1
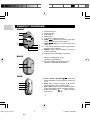
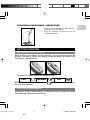
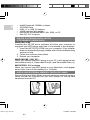
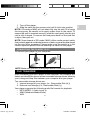
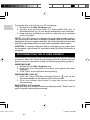
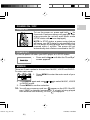
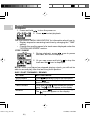
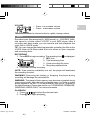
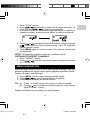
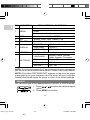
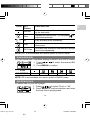
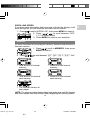
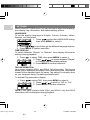
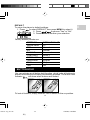
Model: MP 130
User Manual
03(QJ&RYHU5
1
7/5/04, 4:41 PM
EN
DIGITAL MP3 PLAYER (MP130)
USER MANUAL
CONTENTS
Introduction ................................................................................. 1
Product Overview ....................................................................... 2
Getting Started ............................................................................ 3
Installing the Batteries ............................................................ 3
System Requirements ............................................................ 3
Driver Software Installation .................................................... 4
Installing External Memory Cards .......................................... 4
Connecting the Player to PC .................................................. 5
File Transfer ................................................................................. 5
Disconnecting the Player from PC ............................................ 6
Power On / Off ............................................................................. 7
Power On ............................................................................... 7
Power Off ............................................................................... 7
Modes ........................................................................................... 7
Music ...................................................................................... 8
Voice ...................................................................................... 9
Radio .................................................................................... 10
Menu Navigation ....................................................................... 11
Repeat .................................................................................. 12
Equalizer (EQ) ...................................................................... 13
Deleting Files ....................................................................... 13
Display Settings ................................................................... 14
Memory ................................................................................ 15
Settings ................................................................................ 16
Button Hold ............................................................................... 17
Upgrading Firmware (Windows Users Only) .......................... 18
Formatting the Player (Windows Users Only) ........................ 19
Copyright ................................................................................... 19
Safety and Care ......................................................................... 20
03(QJFRQWHQWV5
1
7/5/04, 4:41 PM
EN
Troubleshooting ........................................................................ 21
Hardware .............................................................................. 21
Software ............................................................................... 22
Caution ....................................................................................... 22
Technical Specifications .......................................................... 22
About Oregon Scientific ........................................................... 23
FCC Statement .......................................................................... 24
03(QJFRQWHQWV5
2
7/5/04, 4:41 PM
EN
INTRODUCTION
Congratulations on your selection of the MP130. This full-featured MP3
Music Player offers a variety of features including multi-format support,
FM radio and voice recorder capabilities. Your player combines various
playback and audio enhancing features into a portable design that
you comfortably wear around your neck.
MAIN FEATURES
• Current support for MP3, WMA, and WAV audio file formats
• Multi-format support for mass data storage
• Voice record
• FM radio with option to save up to 30 preset channels
• Built-in 128MB / 256 / 512MB flash memory (Please refer to
indication on the packing)
• Support for Secure Digital and Multi-Media external memory
cards (SD / MMC support)
• 5 preset equalizer settings
• Upgradeable firmware for future audio format support
• Multilanguage menu support
• ID3 Tag information display
• USB 2.0 for fast file transfer (USB flash drive)
ACCESSORIES
• CD-ROM
• Neck strap with stereo earphones
• USB cable
• Carrying pouch
• 1 x AAA alkaline battery
1
03(QJ523
1
ඣϳ
7/12/04, 4:44 PM
EN
PRODUCT OVERVIEW
FRONT
1.
2.
3.
4.
5.
6.
Neck strap loop.
Earphone jack.
LCD display.
Microphone.
+: Increase playback volume.
PREV
: Review the current or previous
song / back to the previous option.
7. NEXT
: Skip to the next track or next
7
option.
8
8. –: Decrease playback volume / go back to
9
previous menu settings.
10
9. MENU: Enter menu settings / press to
confirm selection.
10. USB port: For USB cable connection.
1
2
3
4
5
6
BACK
1. Battery compartment cover:
Detach to install battery.
2. SD card / MMC compartment cover:
Detach to install SD card / MMC.
1
2
SIDE
1. PLAY / STOP / ON/OFF
: Start and
pause playback / stop playback / power on
or off.
2. REC: Start / stop recording / A-B section
repeat / directly enter VOICE mode.
3. RPT / EQ: Press to select repeat options /
Press and hold to select equalizer options.
4. Button hold switch
: Locks / unlocks
all buttons.
1
2
3
4
2
03(QJ523
2
ඣϳ
7/12/04, 4:44 PM
1. Loop the strap around the MP3 player's
loophole and secure tightly.
2. Plug the earphone connector into its
corresponding jack.
GETTING STARTED
INSTALLING THE BATTERIES
Before using your player for the first time, you should first install the
battery. Be sure to check the polarity when inserting the battery into
the battery compartment.
The battery status indicators are as follows:
Low
Medium
NOTE: When the battery icon shows
as soon as possible.
Full
, replace with a new battery
SYSTEM REQUIREMENTS
Before you begin, please check to make sure your computer meets
the following system requirements:
3
03(QJ523
3
ඣϳ
7/12/04, 4:44 PM
EN
ATTACHING EARPHONES / NECKSTRAP
EN
•
•
•
•
•
•
Intel® Pentium® 133MHz or faster
CD-ROM Drive
USB 1.1 or USB 2.0 support
10MB free hard disk space
Microsoft® Windows® 98SE, Me, 2000, or XP
Mac OS 10.2 or above
DRIVER SOFTWARE INSTALLATION
(FOR WIN98SE USERS ONLY)
WINDOWS 98SE
Installing the MP130 driver software will allow your computer to
recognize your MP3 player each time it is connected to the computer.
1. Insert the MP130 CD-ROM into your computer. If the installer
does not automatically begin, please refer to the troubleshooting
section for help.
2. Follow the onscreen instructions.
3. Restart your computer.
WINDOWS ME, 2000, XP
When you connect your MP3 player to your PC, it will appear as two
removable drives (i.e., Removable Disk (H:) and Removable Disk (I:)).
MACINTOSH 10.2 or above
When you connect your MP3 player to your Macintosh, it will appear
as two drive icons on the desktop (i.e., Untitled).
INSTALLING EXTERNAL MEMORY CARDS (SD / MMC)
Secure Digital and Multi-Media memory cards are external memory
cards that can be inserted into your MP3 player for storing data
transferred from the PC.
4
03(QJ523
4
ඣϳ
7/12/04, 4:44 PM
NOTE: SD cards or MMC will not insert fully into the slot if it is facing
the wrong way. Be careful not to apply undue force to the cards. To
ensure the card is inserted securely, push the card gently into the slot
until a click is heard. To remove the card press down on the card first
to eject, then pull out.
NOTE: Some brands of SD cards / MMC utilize a write-protect switch
that protects against accidental erasure of data or prevents data stored
on the card from accessed. Please make sure the switch is in the
unlock/unprotect position before inserting the card into the player.
CONNECTING THE PLAYER TO PC
To connect your player to your computer:
NOTE Make sure you turn off the player before connecting to the PC.
FILE TRANSFER
After connecting your MP3 player to the computer, the computer will
detect and identify the device as two removable storage drives, allowing
you to drag and drop files between your computer and your player.
Two removable storage drives are:
1. Internal storage of your player (i.e., Removable Disk (H:))
2. External card storage (i.e., Removable Disk (I:))
Your player supports the following audio file formats for playback:
• MP3 (MPEG-1, Audio Layer 3)
• WMA (Windows Media Audio)
• WAV
5
03(QJ523
5
ඣϳ
7/12/04, 4:44 PM
EN
1. Turn off the player.
2. Slide the card into the memory slot until it clicks into position.
EN
To transfer files to and from your PC and player:
1. Double click the My Computer icon.
2. Double click the drive letter (i.e. Removable Disk (H:) or
Removable Disk (I:)) of your player assigned by the computer.
3. Drag and drop the file(s) you wish to copy from your computer
onto your player.
NOTE: Your MP3 player is equipped for mass data storage support.
This means that it can also be used as a portable hard drive to store and
transport all forms of computer data files. You will not be able to view or play
any of the stored data unless it is one of the supported audio formats.
CAUTION: To prevent data loss before unplugging your player from
the computer, wait at least 15 seconds to make sure the file transfer is
complete.
DISCONNECTING THE PLAYER FROM PC
Disconnecting the player while transferring data may corrupt the data
or result in data loss. Follow the procedures below to disconnect the
player from your computer running the following operating systems.
WINDOWS 98SE
1. Double click the My Computer icon.
2. Right click the removable drive letter your player has been
assigned.
3. Click "Eject" from list before disconnecting.
WINDOWS ME, 2000, XP
1. Click the "Stop USB Mass Storage Device"
icon on the
Windows taskbar at the bottom right of the monitor.
2. Click your player drive letter to stop the device before
disconnecting.
MACINTOSH 10.2 or above
Drag and drop the "Untitled" icons from desktop to the "Trash" icon for
eject the player before disconnecting.
6
03(QJ523
6
ඣϳ
7/12/04, 4:44 PM
EN
POWER ON / OFF
POWER ON
To turn the power on, press and hold
for
2 seconds. A welcome screen will greet you. After
a few seconds the unit will enter Music mode
(STOP status with icon displayed).
NOTE: In STOP status, a power saving feature
will cause your MP3 player to automatically shut
off if no audio is being played and no keys are
pressed within 1 minute. The power will not
automatically shut off when connected to the PC.
POWER OFF
To turn the power off when your MP3 player is in STOP status:
•
Press and hold
screen appears.
until after the "Good Bye"
MODES
There are 3 main modes to choose from: MUSIC, VOICE and RADIO.
To enter each mode:
1. Press MENU to enter the main mode of your
choice.
2. Press MENU again and use
or
or RADIO mode.
3. Press MENU to confirm selection.
to select MUSIC, VOICE
appear on the LCD if the SD
TIP: You will see a memory card icon
card / MMC is detected successfully. If a track is being played
from external card memory, an icon is displayed.
7
03(QJ523
7
ඣϳ
7/12/04, 4:44 PM
EN
MUSIC
PLAYBACK
1. Press and hold
to turn the power on.
2. Press
to start playback.
TIP: See section "MENU NAVIGATION" for information about how to:
• Display elapsed or remaining track time by changing the "TIME"
setting.
• Change the scrolling speed of a track name displayed under the
"SCROLLING SPEED" section.
STOP / PAUSE
1. During playback, press
once to pause
the track; the icon is displayed.
to stop the
2. Or you can press and hold
track and the icon is displayed.
NOTE: When your player has stopped playing a track, you will not be
able to resume play from the last song track position.
SKIP / FAST FORWARD / REWIND
ACTION
Skip forward
BUTTON PRESS
Press
repeatedly to skip to the next tracks.
repeatedly to skip back to
Press
previous tracks.
Skip backwards
Fast Forward
Press and hold
to fast-forward the current
song. The
icon will appear on the display.
Rewind
Press and hold
to rewind the current song.
The
icon will appear on the display.
8
03(QJ523
8
ඣϳ
7/12/04, 4:44 PM
EN
VOLUME
• Press + to increase volume
• Press - to decrease volume
TIP: Press and hold a volume button to rapidly change values.
VOICE
Recorded voice files are saved in .WAV format (i.e., VOICE001.WAV)
and saved in a folder called "VOICE" in your MP3 player. After a
recording has been made, you can retrieve and then playback the
voice files in VOICE mode.
TIP: You can change the default names after uploading the files to the
VOICE folder of the Removable Disk icon shown on your computer
and renaming them.
RECORDING
1. Press REC to begin recording. The recording icon is displayed.
1
1. REC icon
2. Total remaining time
2
4
3. Voice recording file name
3
4. Recording elapsed time
2. Press REC to stop recording.
NOTE: If the memory availability runs out, the player will deactivate
the recording function.
WARNING: Removing the battery or dropping the player during
recording will damage the recorded file.
WARNING: The player's flash memory may become corrupted during
voice record mode, when the unit is powering down, or if there is undue
shock applied to the unit. To fix the problem if this occurs, upgrade to
the latest firmware. Please see section on "UPGRADING FIRMWARE:
WINDOWS USERS ONLY" for more information.
PLAYBACK
1. Press
2. Press
or
to select the desired track.
to begin playback.
9
03(QJ523
9
ඣϳ
7/12/04, 4:44 PM
EN
1
1. Playback icon
2. File number
4
3. Voice file name
3
4. Playback elapsed time
until the
3. Press again to pause playback. Press and hold
icon is displayed to stop playback.
2
PLAYBACK TRACK SECTIONS (A-B REPEAT)
1. While playing a track, press REC once to
mark the start of the section you wish to
repeat. The icon
is displayed.
2. Press REC again to mark the end of the section. Your marked
section is now ready to play repeatedly and the icon
will
appear on the display.
3. Press REC again to resume normal play.
RADIO (FM 87.5MHZ~108MHZ)
While in RADIO mode, you can listen to the radio channels you preset
into the device.
Press
to switch between "SCAN" and "PRESET" mode.
"SCAN" mode
"PRESET" mode
TIP: During the first time you access the RADIO mode, the player will
do a one-time auto-select of radio channels and save them in sequential
order. While auto saving channels, the buttons are locked.
SCAN / PRESET CHANNELS
You can either scan for radio stations automatically or manually. When
scanning for a station automatically, you player will automatically scan
frequencies and stop scanning when a signal strong enough to listen
to is detected.
10
03(QJ523
10
ඣϳ
7/12/04, 4:44 PM
4. Press
or
repeatedly to select a desired channel or press
to exit current screen without saving. Up to 30 channels
can be preset / saved.
5. Press MENU again to confirm preset. The channel number will
be displayed.
NOTE: FM scanning reception may vary in different areas.
LISTENING TO PRESET CHANNELS
1. Enter "PRESET" status.
2. Press
or
to move to the next or previous preset channels
(01 / 30~30 / 30).
MENU NAVIGATION
Once you have chosen which of the 3 main modes to access, you can
access and adjust the various menu options (Repeat, Equalizer, Delete,
Display, Memory, and Settings):
1. Press MENU until the menu settings screen shows.
2. Press
or
to scroll through the list of options.
3. Press MENU to select the desired option.
TIP: A)
B)
Press - to revert back to the screen you last accessed.
Press
once or press and hold-to return to current mode
(Music / Radio / Voice).
Please read below for a summary of menu options.
11
03(QJ523
11
ඣϳ
7/12/04, 4:44 PM
EN
1. Enter "SCAN" status.
2. Press
or
repeatedly to search for a station manually, or
press and hold
or
to search automatically.
3. If a radio station is being searched and stops to identify a
channel to preset, press and hold MENU to save the channel.
EN
NO. MAIN MENU
MENU OPTIONS / SUBMENUS
Music
1
MODE
Radio
Voice
Normal, One, All, Ran, RPT Ran
2
RPT
3
EQ
Normal, Rock, Jazz, Classic, Pop
4
DELETE
One / All
BACKLIT
Off, 3sec, 7sec, 15sec
5
DISPLAY
CONTRAST
00 to 10
SCROLL SP
Off, 1, 2, 3, 4
6
MEMORY
Total, Free, Firmware version
English, French, German,
LANGUAGE
Italian, Spanish, Portuguese
7
SETTINGS
TIME
Elapse / Remain
TAG
Off / On
DEFAULT
No / Yes
NOTE: If no key is pressed for 5 seconds during menu navigation,
you will return to the current mode (Music / Radio / Voice) last viewed.
NOTE: A file called "SETTINGS.DAT" appears on the drive the player
is assigned to on your computer; this file stores all menu settings.
Deleting this file will cause the player to return to its default settings.
REPEAT
You can select one of five repeat patterns in MUSIC or VOICE modes:
1. Press
or
to select the desired repeat
option.
2. Press MENU to confirm.
12
03(QJ523
12
ඣϳ
7/12/04, 4:44 PM
RPT
Pattern
DESCRIPTION
EN
ICON
All tracks are played once from the first track
to the last track.
Repeats the current track. You can press
to
skip to the next track.
Normal
One
All
Play all tracks once repeatedly.
Ran
All tracks are randomly selected and played
back once.
RPT Ran
All tracks are randomly selected then played
back once repeatedly.
NOTE: RPT is not available as a menu option in RADIO mode.
EQUALIZER (EQ)
You can choose from 5 equalizer settings in MUSIC and VOICE modes:
1. Press
or
to select the desired EQ
setting.
2. Press MENU to confirm.
ICON
EQ SETTING
Normal
Rock
Jazz
Classic
Pop
NOTE: EQ is not available as a menu option in RADIO mode.
DELETING FILES
To delete files on your MP3 player:
1. Press
or
to select "One" or "All".
2. Press MENU to confirm selection and stop
the track that is playing back.
13
03(QJ523
13
ඣϳ
7/12/04, 4:44 PM
EN
DELETE ONE
1. Press
or
to choose a track for deletion.
2. Press MENU to delete the track. "File deleted" and the free
memory will be displayed to confirm that the file has been erased.
DELETE ALL
1. If you selected the delete "All" option from the menu and you
pressed MENU to confirm, "Files deleted" will be displayed to
confirm the deletion.
NOTE: Please be careful when deleting files; once erased they cannot
be retrieved.
DISPLAY SETTINGS
While in the DISPLAY menu, you can choose to adjust the backlight,
contrast, or scrolling speed options.
BACKLIGHT
With the backlight feature activated, the display will light up each time
a button is pressed. You can also set how long you want the backlight
to stay on for.
1. Press
to select the BACKLIT, then press MENU to select it.
2. Press
or
to scroll between OFF, 3sec, 7sec, 15sec second
durations.
3. Press MENU to confirm your selection.
CONTRAST
To increase contrast settings so you can read the display more clearly
in bright lighting conditions:
1. Press
to select CONTRAST, then press MENU to select it.
2. Press
or
to choose contrast settings
between 00-10.
3. Press MENU to confirm your selection.
14
03(QJ523
14
ඣϳ
7/12/04, 4:44 PM
MEMORY
To check the status of your player's memory, external card memory or
firmware version:
1. Press
to scroll to MEMORY, then press
MENU to select it.
2. Press
or
to scroll between "[I] T.", "[I] F.", "[C] T.", "[C] F.", "Ver".
• Total amount of internal
memory.
• Amount of free internal
memory .
• Total amount of external
card memory.
• Amount of free external
card memory.
• The firmware version of
your player.
NOTE: The memory status display takes both audio and multi-file formats
and some system files into account when displaying the memory status.
15
03(QJ523
15
ඣϳ
7/12/04, 4:44 PM
EN
SCROLLING SPEED
If you have track information that is too long to fit into the display, it will
scroll through so you can read the text that is left off screen.
1. Press
to select SCROLL SP, then press MENU to select it.
2. Press
or
to scroll between "OFF,
1, 2, 3, 4" speed levels.
3. Press MENU to confirm your selection.
EN
SETTINGS
While in the SETTINGS menu, you can choose to adjust the language,
time display, tag information, and default setting options.
LANGUAGE
To set the display language in English, French, German, Italian,
Spanish, or Portuguese:
1. Press
to select the LANGUAGE setting,
then press MENU to select it.
2. Press
or
to scroll through the different language options.
3. Press MENU to confirm selection.
TIME DISPLAY
To switch between "Elapse" or "Remain" time display information
settings during playback:
1. Press
to select TIME, then press MENU to select it.
2. Press
or
to choose between "Elapse"
or "Remain" play time display settings.
3. Press MENU to confirm selection.
TAG INFORMATION
Your player supports ID3v1 and ID3v2 Tag information. This format
allows you to represent information such as the song title, artist name
instead of the standard track file name. Tag editing is normally done
on your computer using Tag editing software tools.
To activate Tag information display:
1. Press
to select TAG, then press MENU to select it.
2. Press
or
to scroll to "Off" or "On".
3. Press MENU to confirm selection.
NOTE: If the track contains both ID3v1 and ID3v2, only the ID3v2
information will be displayed during playback.
16
03(QJ523
16
ඣϳ
7/12/04, 4:44 PM
Factory default presets are:
SETTINGS
DEFAULT VALUE
Volume Level
RPT
EQ
BACKLIT
CONTRAST
SCROLL SP
LANGUAGE
TIME
TAG
15
Normal
Normal
3 seconds
Level 3
Level 2
English
Elapse
On
BUTTON HOLD
You can activate an all button hold function, which locks all buttons to
prevent the buttons from being accidentally pressed. The button hold
indicator
will show when buttons are locked.
To lock all buttons, simply slide the HOLD switch to the on position.
17
03(QJ523
17
ඣϳ
7/12/04, 4:44 PM
EN
DEFAULT
To return the player to default settings:
1. Press
to select DEFAULT, then press MENU to select it.
2. Press
or
to choose "Yes" or "No".
3. Press MENU to confirm your selection.
EN
UPGRADING FIRMWARE (WINDOWS USERS ONLY)
Upgrading your MP130 MP3 player with the latest firmware ensures
the device provides optimal playback performance:
1. Go to the Oregon Scientific website (www.oregonscientific.com)
to download the MP130 firmware update (.zip file).
2. Unzip the file into the directory recommended by Windows and
install the software by double-clicking "setup.exe".
NOTE: If this is not the first time you are performing a firmware
upgrade, please uninstall the old version before installing the new
firmware update.
NOTE: The firmware upgrade and formatting of the player through
the Macintosh computer is not supported. However, the Macintosh
can recognize the player every time it is connected.
3. After the firmware has been installed, restart your computer.
4. After the PC has finished booting up, connect your MP3
player to the PC via the USB cable.
5. R u n t h e s o f t w a r e b y g o i n g t o S t a r t > P r o g r a m s >
Oregon Scientific MP130>Firmware Upgrade.
6. The current and updated firmware
version is displayed in a window.
Click the Start button to begin the
firmware upgrade process.
7. If a window pops up with the prompt, "Application has detected
that firmware download will result in formatting the data area.
Formatting data area will erase the media contents," cancel
the upgrade process and back up the data stored on player
onto your computer first. Then restart the process again.
18
03(QJ523
18
ඣϳ
7/12/04, 4:44 PM
EN
8. Or, you are given the option to format your
MP3 player before the firmware upgrade.
Check the Format Data Area box and
then click the Start button. All data stored
in the MP3 player is erased and the
firmware upgrade process begins.
9. Click the Close button to close the software once the process
is completed.
10.Unplug the MP3 player from the computer.
FORMATTING YOUR PLAYER (WINDOWS USERS ONLY)
All stored information will be lost and your settings will return to default
values.
1. In Windows Explorer, select the drive letter of your player
assigned by the computer.
2. Ensure you have selected the right drive (i.e. Removable
Disk). Right-click your mouse button and select the FORMAT
option.
3. If there is an option to select File System, please select FAT
format.
NOTE: The formatting player option is not supported on Macintosh
systems.
COPYRIGHT
Voices or sounds recorded cannot be used in ways that infringe copyright
laws. Note that some restrictions apply to the recording of performances,
entertainments and exhibits, even when intended purely for personal use.
Users are also asked to note that the transfer of memory containing
data or MP3 files protected under copyright laws are only permissible
within the restrictions imposed.
19
03(QJ523
19
ඣϳ
7/12/04, 4:44 PM
EN
SAFETY AND CARE
This product is designed to give you years of service if handled properly.
Observe the following guidelines:
• Clean the unit with a damp cloth and mild detergent.
• Do not drop the unit or placing it in a high-traffic location.
• Never immerse the unit in liquid. This can cause electrical shock
and damage the unit.
• Do not subject the main unit to extreme force, shock, or
fluctuations in humidity.
• Do not tamper with the internal components.
• Do not scratch the LCD display.
• Do not make any changes or modifications to this product.
Unauthorized changes may void your right to use the product
and invalidate the warranty.
• The technical specifications for this product and the contents of
the user guide are subject to change without notice.
• Images not drawn to scale.
• Keep your player away from any strong magnetic fields. Exposure to
magnetic fields may cause the memory to get erased or even damaged.
• Keep your player away from excessive dust / sand, moisture,
rain, direct sunlight or heat.
• Do not use excessive force when handling the player.
• Keep your player in a dry, well-ventilated place to prevent it from
molding.
• Never use headphones / earphones while driving, cycling, or
operating any motorized vehicles.
• Listening to music at high volume for long periods of time may
damage your hearing. Keep the volume at a moderate level.
• Do not set headphone / earphone volume to high while using
pedestrian crossings or walking.
• Remove the battery if the player is not to be used for a long time.
• Remove dead battery immediately to avoid damage from corrosion.
20
03(QJ523
20
ඣϳ
7/12/04, 4:44 PM
EN
TROUBLESHOOTING
HARDWARE
Music skips tracks.
The music file may be corrupt or an unsupported format. First check
to make sure it is a supported format. If the format is correct, delete
the file and transfer the music from your PC to player again.
The player will not start or shuts off soon after it starts.
Check the battery polarity to make sure the battery is correctly inserted.
If the battery level indicator shows low battery, replace with a new
battery as soon possible.
The buttons do not work.
The button hold feature may be on. See section "Button Hold" for
more information.
The player is not functioning normally.
The player may need to be reset. Take out and reinsert the batteries,
then turn on the player. You may also format the player from your
computer and upgrade the firmware. Please see section "UPGRADING
FIRMWARE" for information.
The flash memory appears to be corrupted.
Upgrade to the latest firmware to optimise the player's performance.
Remember to check the Format Data Area box during the upgrade
process. Please see section on "UPGRADING FIRMWARE:
WINDOWS USERS ONLY" for more information.
Nothing can be saved in the Secure Digital or Multi-Media memory
card. The player cannot recognise the card memory.
Ensure the card is inserted into the memory slot properly and that it
has extra memory space available for storage. Push the card to eject
and reinsert it if necessary. Please see section "INSTALLING
EXTERNAL MEMORY CARDS (SD / MMC)" for more information.
No sound is coming out of the headphones.
Check to make sure they are plugged in correctly and the volume is
turned up.
21
03(QJ523
21
ඣϳ
7/12/04, 4:44 PM
EN
Your computer does not locate your player.
Check to make sure the USB cable is connected properly. If you are
using Win98SE, make sure you have installed the driver software.
Cannot store any more files on the player.
The memory may be full. Delete files to make some room.
SOFTWARE
The MP130 software does not automatically begin when you insert
the CD.
You may need to start the installation process manually.
1. Double click the My Computer icon on the Windows desktop.
2. Double Click the drive that contains the CD-ROM.
3. Follow the on screen instructions to complete the installation
process.
CAUTION
In case of electrostatic discharge, the product may not function properly
and will require a manual reset. After resetting the unit, data stored
will remain intact; if a message was being recorded, it will be lost.
TECHNICAL SPECIFICATIONS
Built-in flash memory:
Dimensions:
Weight:
LCD dimension:
Backlight:
Record time:
FM radio frequency:
Radio preset channels:
Volume level:
128MB / 256MB / 512MB (Please
refer to indication on the packing)
65mm (L) x 41mm (W) x 24mm (T) /
27mm (T) max.
34 grams (without battery)
20mm (L) x 10mm (W), 96 x 48 pixels
EL backlight (Blue)
Approx. 8 hours (128MB)
Approx. 16 hours (256MB)
Approx. 32 hours (512MB)
87.5~108MHz
30
0-30
22
03(QJ523
22
ඣϳ
7/12/04, 4:44 PM
MP3 to PC connection:
Supported playback formats:
Player firmware:
max. 20mW
20Hz~20000Hz
90dB
1 x AAA alkaline battery
Approx. 15 hours continuous
playback (at room temperature,
default volume)
USB 1.1 or USB 2.0 (Hi-speed or
Full speed)
MP3 (up to 320kbps)
WMA (up to 192kHz)
WAV
Upgradeable via
www.oregonscientific.com
*Data is measured with included battery. Various factors can affect
battery life, such as temperature, battery type or battery capacity.
NOTE: Design and specifications are subject to change without notice.
ABOUT OREGON SCIENTIFIC
Visit our website (www.oregonscientific.com) to learn more about
Oregon Scientific products such as digital cameras; MP3 players;
children's electronic learning products and games; projection clocks;
health and fitness gear; weather stations; and digital and conference
phones. The website also includes contact information for our customer
care department in case you need to reach us, as well as frequently
asked questions and customer downloads.
We hope you will find all the information you need on our website, however
if you'd like to contact the Oregon Scientific Customer Care department
directly, please visit www2.oregonscientific.com/service/support or call
949-608-2848 in the US. For international enquiries, please visit
www2.oregonscientific.com/about/international/default.asp.
23
03(QJ523
23
ඣϳ
7/12/04, 4:44 PM
EN
Earphone Out:
Frequency Range:
Signal to Noise Ratio:
Battery:
Battery Life*:
EN
FCC STATEMENT
This device complies with Part 15 of the FCC Rules. Operation is
subject to the following two conditions:(1) This device may not cause
harmful interference, and (2) This device must accept any interference
received, including interference that may cause undesired operation.
This equipment has been tested and found to comply with the limits
for a Class B digital device, pursuant to Part 15 of the FCC Rules.
These limits are designed to provide reasonable protection against
harmful interference in a residential installation. This equipment
generates, uses and can radiate radio frequency energy and, if not
installed and used in accordance with the instructions, may cause
harmful interference to radio communications.
However, there is no guarantee that interference will not occur in a
particular installation. If this equipment does cause harmful interference
to radio or television reception, which can be determined by turning
the equipment off and on, the user is encouraged to try to correct the
interference by one or more of the following measures:
•
•
•
•
Reorient or relocate the receiving antenna.
Increase the separation between the equipment and receiver.
Connect the equipment into an outlet on a circuit different from
that to which the receiver is connected.
Consult the dealer or an experienced radio / TV technician for help.
CAUTION: Modification-The FCC requires the user to be notified that
any changes or modifications made to this device that are not expressly
approved by Oregon Scientific, Inc. may void the user 's authority to
operate the equipment.
Interface cable-Use the shielded cable sold or provided by
Oregon Scientific, Inc. for your equipment. Using other interface cable
may exceed the limits of Class B Part 15 of the FCC rules.
24
03(QJ523
24
ඣϳ
7/12/04, 4:44 PM
Oregon Scientific
MP 130
Tested To Comply
With FCC Standards
FOR HOME OR OFFICE USE
25
03(QJ523
25
ඣϳ
7/12/04, 4:44 PM
EN
Legal Company Name: Oregon Scientific, Inc.
Address: 19861 SW 95th Place, Tualatin, Oregon 97062, USA
Phone, Fax: (1) 800-853-8883, (1) 503-684-8883
© 2004 Oregon Scientific. All rights reserved.
086-003399-051
03(QJ%DFN5
1
7/5/04, 4:40 PM