1
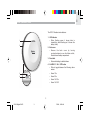
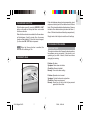
Wake-up Vibration Alarm
Model : VR101
User Manual
VR101 English Cover R8 OP
1
7/15/04, 10:05 AM
EC-Declaration of Conformity ................................. 9
Introduction .............................................................. 2
Key Features ............................................................ 2
Front (and Back) View ........................................... 3
Installing the Batteries ........................................... 4
Safety and Care Instructions .................................. 5
Safety Precautions ................................................. 5
Caring for your Product .......................................... 5
Getting Started ......................................................... 5
Unpacking the Product .......................................... 5
Batteries ................................................................. 5
Battery Detection ................................................... 6
The Vibration Wake-up Device ................................ 6
The Alarm Function ................................................. 6
Basic Functions ..................................................... 6
Displaying the Alarm Time ..................................... 6
The Snooze Function ............................................... 7
The Reset Hole ......................................................... 7
Troubleshooting Guide ............................................ 7
Basic Functions ..................................................... 7
Specifications ........................................................... 8
Warnings ................................................................... 8
1
VR101 English R8 OP
1
7/15/04, 10:05 AM
EN
About Oregon Scientific .......................................... 9
CONTENTS
EN
INTRODUCTION
KEY FEATURES
Thank you for selecting the Oregon Scientific TM
Wake-up Vibration Alarm (VR101) as your product of
choice. This device is designed to give you many years
of reliable service.
The vibration device is a wireless wake-up vibrating
device with an 8-minute snooze function.
This vibration device can work with the following
Oregon Scientific clocks:
• RM818P
• RM998P
• RMR939P
NOTE Keep this manual handy as you use your new
product. It contains practical step-by-step instructions,
safety and care information, technical specifications
and warnings you should know. Read the manual
thoroughly, and keep it in a safe place in case you need
to refer to it.
2
VR101 English R8 OP
2
7/15/04, 10:05 AM
EN
FRONT (AND BACK) VIEW
The VR101 Vibration device features:
1. LED Indicator
• When flashing green it shows data is
transmitting; when flashing red it shows the
battery is low).
1
2
2. Back cover
• Remove the back cover by turning
counterclockwise to see the Alarm switch,
Reset hole and battery compartment.
3. Reset hole
• Returns all settings to default values.
4. ALARM 1 / 2 / ALL / OFF button
• Slide to toggle between the following alarm
modes:
• Alarm 1 On
3
• Alarm 2 On
4
• Alarm 1 & 2 On
• Alarm 1 & 2 Off
3
VR101 English R8 OP
3
7/15/04, 10:05 AM
EN
INSTALLING THE BATTERIES
• Battery compartment
• To remove the back cover, turn counter-clockwise.
• The unit uses 2 AA / UM-3 1.5V batteries for power.
4
VR101 English R8 OP
4
7/15/04, 10:05 AM
GETTING STARTED
SAFETY PRECAUTIONS
UNPACKING THE PRODUCT
Please observe the following safety precautions when
setting up and using this product.
When you unpack your clock, make sure to keep all the
packing materials in a safe place, in case you need to
later transport or return it for servicing.
• Heat sources-Keep the product away from
heat sources, such as radiators, stoves,
heaters, and other heat-generating products.
The following items should be included in this package:
• Water and moisture-Do not use the product
in or near water or in high moisture areas, such
as a bathroom.
• Batteries
• Vibrating device
• User manual
CARING FOR YOUR PRODUCT
BATTERIES
To ensure you receive the maximum benefit from using
this product, please observe the following guidelines:
NOTE Please note that the batteries will be packed
separately and not installed in the unit.
• Cleaning-Use a damp cloth. Do not use liquid
cleaning agents, benzene, thinner, or aerosols.
• Ventilation-The vents and other openings are
designed for ventilation, and should not be
blocked or covered.
To load the batteries:
• Blocking the vents can cause the product to
overheat, and can damage the unit.
2. Install the batteries by matching the correct
polarity. Always use the correct battery type
(2 UM - 3 AA - sized 1.5V batteries).
1. Rotate off the battery cover by turning it counterclockwise.
• Repair-Do not attempt to repair the product
or modify the circuitry by yourself. Contact the
retailer or a qualified repairman if the product
requires servicing. Only use replacement parts
that are recommended by the manufacturer.
3. Replace the battery cover by rotating it in reverse
direction (clockwise).
WARNING Reversing the polarity may damage the
product.
• Do not scratch hard objects against the LCD
display as this may cause damage.
5
VR101 English R8 OP
5
7/15/04, 10:05 AM
EN
SAFETY & CARE INSTRUCTIONS
EN
NOTE Replace the batteries whenever the LED
indicator turns to a red color as this color shows that the
batteries are low. Replace all the batteries at the same
time - it is dangerous to mix old and new batteries.
NOTE The vibrating device is powered by two
"AA" 1.5V alkaline batteries, which are included. It is also
compatible with rechargeable batteries (not included).
Contact your local waste disposal authority for
instructions on how to dispose of used batteries. Used
batteries can be harmful to the environment, and should
not be thrown out with household trash.
THE ALARM FUNCTION
BASIC FUNCTIONS
To have the vibration alarm function, remember to
activate the vibration alarm in the main unit, and to match
the settings in the vibration device.
BATTERY DETECTION
If the battery voltage level is low, the LED indicator on
the vibrating device will be flashing in red.
When the alarm in the vibration device goes off, you
can turn the vibration off by pressing any button on the
main unit.
THE VIBRATION WAKE-UP DEVICE
NOTE The alarm will automatically stop vibrating after
1.5 minutes.
The vibrating wake-up device receives a signal from the
main unit and performs a wake-up function by vibrating.
It is designed to go under your pillow.
DISPLAYING THE ALARM TIME
By default, the main unit's LCD screen displays the
current date and month.
The device has a range of roughly 15 meters and has
an LED meter to show data transmission and battery
level.
To display the alarm time to set the alarm time and to
activate the alarm, please consult the user manual
included with the Oregon Scientific main unit.
The switch within the vibrating device can adjust to
alarm 1 or alarm 2, or both. Simply select the alarm time
when you want the device to wake you up.
6
VR101 English R8 OP
6
7/15/04, 10:05 AM
While the alarm goes off, press the SNOOZE / LIGHT
button on the main unit to stop the Alarm and enable
the Snooze function.
When the Snooze function is enabled, the Snooze alarm
will last between 8 and 9 minutes. Also, the snooze
function will be disabled if 1) the clock time is changed;
2) or the alarm ON / OFF button is pressed.
Simply insert a blunt stylus to reset the unit's settings.
TROUBLESHOOTING GUIDE
NOTE When the Snooze function is enabled, the
Bell Icon will be flashing at 1Hz.
BASIC FUNCTIONS
THE RESET HOLE
This section includes a list of frequently asked questions
for problems you may encounter. If your device is not
operating as you think it should, check here before
arranging for servicing.
Problem: No alarm.
Symptom: Alarm does not vibrate.
Check this: Alarm is disabled.
Remedy: Turn on the alarm setting.
Problem: Operation is not normal.
Symptom: Certain functions do not perform.
Check this: Device requires reset.
Remedy: Reset the unit with a blunt stylus pressed
against the Reset Hole.
7
VR101 English R8 OP
7
7/15/04, 10:05 AM
EN
If the clock behaves strangely or stops responding, insert
and press a blunt stylus into the vibration device's Reset
Hole. (This is located inside the vibration device. Remove
the back of the vibration device just above the Alarm 1,
Alarm 2, All switch and above the battery compartment).
THE SNOOZE FUNCTION
EN
• Take precautions when handling all battery types.
They can cause injuries, burns, or property
damage as a result of contact with conducting
materials, heat, corrosive materials or explosives.
Remove the batteries before storing the product
for long periods of time.
SPECIFICATIONS
Dimensions (diameter x height): 90 x 21mm
(3.54 x 0.83 inches).
Weight: 80g (0.18 lbs) without batteries.
Alarm Duration: 1.5 minutes.
Power supply: 2 x UM-3 / AA 1.5V batteries
(compatible with rechargeable batteries not included).
Operation temperature: -5ºC to +50ºC (23ºF to122ºF).
RF Frequency: 433 MHz.
Transmission Range: up to 15 meters in open areas.
• The product is a precision instrument. Never
attempt to take this device apart. There is a
serious danger of powerful electric shocks.
• Do not immerse the device in water.
• Do not, under any circumstances, touch the
exposed electronic circuitry of the device as
there is a danger of electric shock should it
become exposed.
WARNINGS
• Do not use or store the device, including the
remote sensor, in locations that may adversely
affect the product such as rain, snow, desert,
and magnetic fields.
To ensure you use your product correctly and safely,
read these warnings and the entire user manual before
using the product.
The warnings given here provide important safety
information and should be observed at all times.
WARNINGS
• Do not attempt to repair the product yourself.
Contact the retailer or our customer service
department if it requires servicing.
8
VR101 English R8 OP
8
7/15/04, 10:05 AM
Visit our website (www.oregonscientific.com) to learn
more about Oregon Scientific products such as digital
cameras; MP3 players; children's electronic learning
products and games; projection clocks; health and
fitness gear; weather stations; and digital and conference
phones. The website also includes contact information
for our customer care department in case you need to
reach us, as well as frequently asked questions and
customer downloads.
Efficient use of radio frequency spectrum
(Article 3.2 of the R&TTE Directive)
Applied Standards
ETSI EN 300 220-3 (Ver1.1.1) : 2000-09
Additional information:
The product herewith complies with the requirements of
the Low Voltage Directive 73 / 23 / EC, the EMC Directive
89 / 336 / EC and carries the CE marking accordingly.
We hope you will find all the information you need
on our website, however if you'd like to contact the
Oregon Scientific Customer Care department directly,
please visit www2.oregonscientific.com/service/support
or call 949-608-2848 in the US. For international
enquiries, please visit www2.oregonscientific.com/
about/international/default.asp.
Carmelo Cubito
Agrate Brianza (MI) / Italy January 2004
Manufacturer’s EU R&TTE Representative
EC-DECLARATION OF CONFORMITY
This product contains the approved transmitter module that
complies with the essential requirements of Article 3 of the
R&TTE 1999 / 5 / EC Directive, if used as intended and the
following standards have been applied:
COUNTRIES RTTE APPROVAL COMPLIED
All EC countries, Switzerland CH
and Norway N
Safety of information technology equipment
(Article 3.1.a of the R&TTE Directive)
Applied Standard
EN 60950 : 2000
9
VR101 English R8 OP
9
7/15/04, 10:05 AM
EN
Electromagnetic compatibility
(Article 3.1.b of the R&TTE Directive)
Applied Standards
ETSI EN 301 489-1-3 (Ver.1.4.1) : 2002-08
ABOUT OREGON SCIENTIFIC
© 2004 Oregon Scientific. All rights Reserved.
P/N.: 086-003516-012
VR101 English Back R8 OP
1
7/15/04, 10:05 AM