1
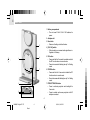
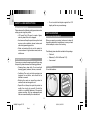
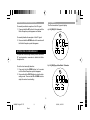
Cool RF Projection Clock
with Animated Projection
Model : RM818P
User Manual
RM818P English Cover R7 OP
1
7/15/04, 10:16 AM
The Snooze Function ............................................. 15
Introduction .............................................................. 2
The Projector Function .......................................... 16
Key Features ............................................................ 2
Activating the Projector ........................................ 16
Front View .............................................................. 3
Animation Speed Setting ..................................... 16
Back View .............................................................. 4
Animation on / off Setting ..................................... 17
LCD Display Symbols ............................................ 5
The Vibrating Wake-up Device (Optional) ............ 17
Safety and Care Instructions .................................. 6
The Backlight ......................................................... 18
Safety Precautions ................................................. 6
The Reset Hole ....................................................... 18
Caring for your Product .......................................... 6
Default Settings ................................................... 18
Getting Started ......................................................... 6
Troubleshooting Guide .......................................... 18
Unpacking the Product .......................................... 6
Basic Functions ................................................... 18
Batteries ................................................................. 6
Specifications ......................................................... 19
Adaptor .................................................................. 7
Warnings ................................................................. 20
Radio Reception ....................................................... 8
About Oregon Scientific ........................................ 20
Radio Reception Description ................................. 8
EC-Declaration of Conformity ............................... 21
Enabling / Disabling Radio Reception ................... 9
Setting the Clock Manually ..................................... 9
Clock Mode ............................................................ 9
Clock Setting Mode ............................................. 10
Selecting a Language .......................................... 12
The Alarm Function ............................................... 13
Basic Functions ................................................... 14
Displaying the Alarm Time ................................... 14
Setting the Alarm Time ......................................... 14
RM818P English R7 OP
1
Black
1
9/10/04, 3:20 PM
EN
Activating / Deactivating the Alarm ...................... 15
USER MANUAL CONTENTS
EN
INTRODUCTION
KEY FEATURES
Thank you for selecting the Oregon ScientificTM RM818P
Cool RF Projection Clock with Animated Projection as
your product of choice.
The desktop dual-band radio-controlled clock with
animated time projection function features:
1. Radio-controlled clock function.
2. Time, alarm status and animation projection on your
wall or ceiling.
This device is designed to give you many years of reliable
service, including the following conveniences:
3. Auto-calendar from 2000 to 2099 in DM or MD
format.
• Radio-controlled calendar clock*
• Daily dual alarm with 8-minute Snooze
4. Days of the week in 5 languages (English, German,
French, Italian and Spanish).
• Vibrating wake-up device (Optional)
5. Daily dual alarm with 8-minute Snooze function.
6. Backlight.
*Automatically synchronizes the current time and date
when it is brought within range of the radio signal DCF77
generated from Frankfurt, Germany for Central Europe
or MSF60 generated from Rugby, England.
7. Projection image reverse switch for 180 degrees
(upside down).
8. Optional feature for wireless wake-up vibrating
device.
NOTE Keep this manual handy as you use your new
product. It contains practical step-by-step instructions,
safety and care information, technical specifications and
warnings you should know. Read the manual thoroughly,
and keep it in a safe place in case you need to refer to it.
2
RM818P English R7 OP
2
Black
9/10/04, 3:20 PM
EN
FRONT VIEW
The Cool RF Projection Clock with Animated Projection
features:
1
1. Projection Unit
• The projector can swivel 180 degrees back and
to the front.
2. Main LCD Display
4
• Displays current time, date and RF signal
reception indicator.
3. SNOOZE / LIGHT button
• Press to activate projection and backlight for
5 seconds.
5
2
4. ALARM button
• Press to toggle between Alarm 1, Alarm 2 and
Calendar mode.
6
5.
ON / OFF button
• Press to activate / deactivate the alarm function.
6. CLOCK button
• Press to toggle among Clock Seconds / Calendar,
Clock Day-of-the-Week / Calendar, Clock-zone
Offset / Calendar.
3
3
RM818P English R7 OP
3
Black
9/10/04, 3:20 PM
EN
BACK VIEW
1. Battery compartment
• The unit uses 2 AAA / UM-4 1.5V batteries for
power.
2. Adaptor slot
3. Reset hole
• Returns all settings to default values.
5
4. [EU / UK] switch
• Slide to select your nearest radio signal base i.e.
England or Germany.
5. UP button
6
1
• Press and hold for 2 seconds to enable and start
the RF function when in normal mode.
• Press to increase the flashing item by 1 in Setting
mode.
7
6. DOWN button
• Press and hold for 2 seconds to disable the RF
function when in normal mode.
• Press to decrease the flashing item by 1 in Setting
mode.
2
7. PROJECTION ON button
• Press to activate projection and backlight for
5 seconds.
3
4
• Press to enable continuous projection with AC
adaptor connected.
4
RM818P English R7 OP
4
Black
9/10/04, 3:20 PM
EN
LCD DISPLAY SYMBOLS
1
1. Radio Reception Signal-Indicates the condition
of radio reception.
2. Clock Time
6
3. Alarm
2
4. Alarm Time
5. Animation speed-Can select fast or slow.
7
6. Low Battery-Appears when power is low.
7. Time Zone indicator
3
8
4
8. Alarm-on-Appears when alarm is activated.
5
5
RM818P English R7 OP
5
Black
9/10/04, 3:20 PM
EN
• Do not scratch hard objects against the LCD
display as this may cause damage.
SAFETY & CARE INSTRUCTIONS
SAFETY PRECAUTIONS
Please observe the following safety precautions when
setting up and using this product.
GETTING STARTED
• LCD panel-The LCD panel is made of glass,
and may break if the unit is dropped.
UNPACKING THE PRODUCT
• Heat sources-Keep the product away from heat
sources, such as radiators, stoves, heaters, and
other heat-generating products.
When you unpack your product, make sure to keep all
the packing materials in a safe place, in case you need
to later transport or return it for servicing.
• Water and moisture-Do not use the product in
or near water or in high moisture areas, such as
a bathroom.
The following items should be included in this package:
• Clock unit
• Batteries (2 x UM-4 AAA-sized 1.5V)
CARING FOR YOUR PRODUCT
• User manual
To ensure you receive the maximum benefit from using
this product, please observe the following guidelines:
BATTERIES
• Cleaning-Use a damp cloth. Do not use liquid
cleaning agents, benzene, thinner, or aerosols.
To load the batteries:
• Ventilation-The vents and other openings are
designed for ventilation, and should not be
blocked or covered.
• Blocking the vents can cause the product to
overheat, and can damage the unit.
• Repair-Do not attempt to repair the product or
modify the circuitry by yourself. Contact the
retailer or a qualified repairman if the product
requires servicing. Only use replacement parts
that are recommended by the manufacturer.
6
RM818P English R7 OP
6
Black
9/10/04, 3:20 PM
EN
1. Locate the battery compartment.
ADAPTOR
2. Install the batteries by matching the correct
polarity. Always use the correct battery type
(2 x UM-4 AAA-sized 1.5V batteries).
By plugging in the adaptor, the projector will project the
time on the wall / ceiling continuously.
WARNING Reversing the polarity may damage the
product.
NOTE Replace the batteries whenever the low battery
icon is shown
, the display is dim, or the display
does not illuminate when the power is on. Replace all
the batteries at the same time-it is dangerous to mix old
and new batteries.
7
RM818P English R7 OP
7
Black
9/10/04, 3:20 PM
EN
RADIO RECEPTION
This product is designed to synchronize its calendar
clock automatically once it is brought within range of
the radio signal.
NOTE When the unit is receiving the signal, the Radio
Reception symbol with start to blink. Generally, complete
reception takes around 2 to 10 minutes, depending on
the strength of the signal.
To select the most suitable radio signal for your location,
slide the [EU / UK] switch to the appropriate setting.
Press [RESET] whenever you have changed the
selected setting.
Even though there are areas that may have more
difficulty in receiving a signal, the Radio-controlled / RF
clock contains accurate quartz movement and will retain
precise timing if the signal is missed on a rare occasion.
RADIO RECEPTION DESCRIPTION
STRONG SIGNAL WEAK SIGNAL
NOTE Reception can be affected by a number of
factors. For best reception, place the device away from
metal objects and electrical appliances. Other causes
for signal interference include electrical transmission
tower, steel reinforced construction, and metal siding.
Reception is ideal when placed near a window.
NO SIGNAL
Strong reception of radio clock signal.
Weak reception of radio clock signal.
No reception of the radio clock signal.
8
RM818P English R7 OP
8
Black
9/10/04, 3:20 PM
EN
ENABLING / DISABLING RECEPTION
CLOCK MODE
To manually enable the reception of the RF signal:
The Clock mode has 3 types of display:
1. Press and hold the UP button for 2 seconds until the
Radio Reception symbol appears and flashes.
a) HH_MM_SS / Calendar
To manually disable the reception of the RF signal:
2. Press and hold the DOWN button for 2 seconds until
the Radio Reception symbol disappears.
SETTING THE CLOCK MANUALLY
To adjust the clock settings manually without automatic
RF synchronization, remember to disable the Radio
Reception first.
b) HH_MM_Day-of-the-Week / Calendar
To set the clock manually therefore:
1. Press and hold the DOWN button for 2 seconds
until the Radio Reception symbol disappears.
2. Press and hold the CLOCK button to enter the clocksetting mode. Then use the UP or DOWN button to
adjust the value of each setting.
9
RM818P English R7 OP
9
Black
9/10/04, 3:20 PM
EN
c) HH-MM-ZONE OFFSET / Calendar
HOUR-SETTING MODE
3. Press the CLOCK button once more to set the
minutes. (Use the UP and DOWN buttons to adjust
the minutes).
NOTE Press the CLOCK button to toggle between the
three modes.
MINUTE-SETTING MODE
CLOCK SETTING MODE
To set the time:
1. Press and hold the CLOCK button for more than
2 seconds.
2. Press the CLOCK button two more times. (Use the
UP and DOWN buttons to adjust the hour).
10
RM818P English R7 OP
10
Black
9/10/04, 3:20 PM
3. Use the UP and DOWN buttons to select the time
format (whether 12-hour to 24-hour format).
To select the time zone:
4. Press the ALARM button to exit the set mode.
1. Press and hold the CLOCK button for 2 seconds.
The time-zone offset hour digits will blink. Use
the UP and DOWN buttons to select your time zone
(e.g. +1, the time displayed will be the RF clock
time plus 1 hour).
TIME FORMAT SETTING MODE
2. Press the ALARM button to exit the set mode.
TIME ZONE SETTING MODE
To set the current date:
1. Press and hold the CLOCK button for 2 seconds.
2. Press CLOCK four more times.
3. Use the Up and Down buttons to select the year.
4. Press the CLOCK button to set the date format by
using the UP and DOWN buttons.
5. Press the CLOCK button to set month using the
UP and DOWN buttons.
To select time format:
1. Press and hold the CLOCK button for 2 seconds.
2. Press the CLOCK button once again.
11
RM818P English R7 OP
11
Black
6. Press CLOCK again to set the date, and then press
ALARM button to exit the set mode.
9/10/04, 3:20 PM
EN
4. Press the ALARM button to exit the set mode.
EN
DATE FORMAT SETTING MODE
YEAR-SETTING MODE
MONTH SETTING MODE
NOTE The order of the flashing items is: time zone
offset, 12 / 24hr format, hour, minute, year, DM<MD,
month, day, language, exit clock setting mode.
SELECTING A LANGUAGE
The main unit can display the weekday in five different
selectable languages: English, German, French, Italian
and Spanish.
To choose a language:
1. Press and hold the CLOCK button for 2 seconds.
2. Press CLOCK eight times.
3. Use the UP and DOWN buttons to select the
language.
12
RM818P English R7 OP
12
Black
9/10/04, 3:20 PM
THE ALARM FUNCTION
LANGUAGE SETTING MODE
NOTE Press the ALARM button or the PROJECTION
ON button to exit the Clock Setting mode. Any changed
item will be effective afterward.
13
RM818P English R7 OP
13
Black
9/10/04, 3:20 PM
EN
4. Press the CLOCK button once more to exit the set
mode.
EN
BASIC FUNCTIONS
When the alarm sounds:
• The backlight will go on for 5 seconds;
• The projection will go on for 5 seconds;
• And if you have a vibration device, it will vibrate
for 1.5 minutes.
To turn off the alarm sound:
• Press any button.
NOTE If you do not press any button, the alarm will
automatically stop ringing after 2 minutes.
NOTE The three squiggly lines indicate "on" for the
optional vibrating wake up device.
DISPLAYING THE ALARM TIME
SETTING THE ALARM TIME
By default, the unit's LCD screen displays the current
date and month.
Press and hold the Alarm button for 2 seconds to enter
the Alarm Setting mode.
To display the alarm time instead:
To adjust the alarm time, make sure that the alarm time
is currently displayed on the LCD screen. (To do this,
press the ALARM button).
1. Press the ALARM button.
DIFFERENT ALARM MODES
To set the alarm time:
1. Press and hold the ALARM button for 2 seconds.
2. Adjust the hour of the alarm time by using the UP
and DOWN buttons.
14
RM818P English R7 OP
14
Black
9/10/04, 3:21 PM
NOTE You will see the bell icon appear beside the
date on the lower half of the LCD display. The first bell
will turn on the alarm for Alarm #1. If you press the
ON / OFF button a second time, you will activate the
second alarm as well (as shown by the appearance of
the second bell icon beside the date but below the bell
icon for the first alarm).
4. Press the ALARM button when done.
5. Select the alarm types (sound only; vibration alarm
only or both) by using the UP and DOWN buttons.
6. Press the ALARM button when done.
The alarm time should now be displayed.
THE SNOOZE FUNCTION
While the alarm is ringing, press the SNOOZE / LIGHT
button to stop the Alarm sound and enable the Snooze
function.
When the Snooze function is enabled, the Snooze alarm
will last between 8 and 9 minutes. Also, the snooze
function will be disabled if 1) the clock time is changed;
ON / OFF button is pressed.
2) or the
ACTIVATING / DEACTIVATING THE ALARM
To set the alarm on:
1. Press the
ON / OFF button.
NOTE When the Snooze function is enabled, the Bell
Icon will be flashing.
15
RM818P English R7 OP
15
Black
9/10/04, 3:21 PM
EN
3. Adjust the minute of the alarm time by using the
UP and DOWN buttons.
EN
NOTE If the AC / DC adaptor is plugged, press the
PROJECTOR ON and the projector will stay
continuously on. Press the PROJECTOR ON button
again to deactivate the continuous projection-on function.
THE PROJECTOR FUNCTION
ACTIVATING THE PROJECTOR
ANIMATION SPEED SETTING
To enter to the projector setting mode:
1. Press the PROJECTOR ON button for 2 seconds.
2. Use the UP and DOWN buttons to select either fast
or slow animation.
3. Press the PROJECTION ON button to confirm.
To turn on the projector:
1. Press the SNOOZE button to activate the projector
for 5 seconds.
NOTE The order of the Flashing items is speed
high / slow, alarm animation on / off, exit project setting
mode.
16
RM818P English R7 OP
16
Black
9/10/04, 3:21 PM
To flip the projected time upside down:
To set the animation on:
1. Press the SNOOZE / LIGHT button.
1. Press and hold the PROJECTION ON button for
2 seconds.
2. While the projector is on, press the SNOOZE / LIGHT
button again to flip the time.
2. Select the animation speed by using the UP and
DOWN buttons.
3. To flip again, press the SNOOZE / LIGHT button
again, etc.
3. Press the PROJECTION ON button
4. Use the UP and DOWN buttons to select "on" or
"off."
THE VIBRATING DEVICE (OPTIONAL)
5. Press the PROJECTION ON button to confirm.
The vibrating wake-up device receives a signal from the
main unit and performs a wake-up function by vibrating.
It is designed to go under your pillow. You can purchase
the device separately.
The device has a range of roughly 15 meters and has
an LED meter to show data transmission and battery
level.
The light on the vibration device will flash in red when
the battery is low, and the light will flash in green when
the battery power is full.
The switch within the vibrating device can adjust to
alarm 1 or alarm 2, or both. Simply select the alarm time
when you want the device to wake you up.
NOTE The animation feature will move the image of
the time, alarm on/off status and alarm time in a
cascading and random motion, which is pleasant to the
eye.
17
RM818P English R7 OP
17
Black
9/10/04, 3:21 PM
EN
ANIMATION ON / OFF SETTING
EN
• The battery status is displayed.
NOTE The vibrating device is powered by two "AA"
1.5V alkaline batteries (included). It is also compatible
with rechargeable batteries (not included).
• The projector is disabled.
THE BACKLIGHT
The user can press the SNOOZE / LIGHT button at the
base of the unit to enable the backlight function and the
backlight will be turned on and last for 5 seconds.
THE RESET HOLE
If the clock behaves strangely or stops responding, insert
and press a blunt stylus into the clock's Reset Hole. (This
is located on the back of the clock. Simply insert a blunt
stylus to reset the unit's settings).
NOTE The clock will then be reset to its original factory
setting as seen above.
DEFAULT SETTINGS
All segments of the LCD will be turned on for 3 seconds
and a beep sound will be given out. Then it will start RF
reception.
TROUBLESHOOTING GUIDE
BASIC FUNCTIONS
This section includes a list of frequently asked questions
for problems you may encounter. If your device is not
operating as you think it should, check here before
arranging for servicing.
• The Clock Setting are: PM12:00, 1st January,
2004, RF enabled, English.
• The Clock and alarm displays in 24 / 12 hour
mode depending on the selection of radio signal
(EU / UK).
• Both the bell alarm and the vibration alarm of
Alarm 1 and Alarm 2 are disabled.
18
RM818P English R7 OP
18
Black
9/10/04, 3:21 PM
Check this: Alarm is disabled.
Remedy: Turn on the alarm setting.
Symptom: The RF signal cannot be received.
Check this: Obstacles (either electromagnetic
interference or objects) are barring the
signal from reaching the main unit.
Problem: Operation is not normal.
Remedy: Move the unit away from any sources of
interference, including other electronic
devices.
Check this: Device requires reset.
Symptom: Certain functions do not perform.
Remedy: Reset the unit with a blunt stylus pressed
against the Reset Hole.
Problem: Low-battery signal is not displayed on the
LCD screen.
SPECIFICATIONS
Symptom: Batteries of the unit are low.
Width x Height x Depth: 44 x 141 x 88mm
Check this: Check LCD display of the unit.
Weight: 146g (without batteries)
Remedy: Install new batteries into the unit.
RF FREQUENCY
SYSTEM
Problem: Clock time is not correctly set.
DCF77 (EU) OR
MSF60 (UK)
Symptom: No radio signal reception.
Display:
Check this: Electromagnetic interference or objects are
barring reception. Orientation or placement
of main unit is not optimum for receiving
the RF signal.
HOUR FORMAT
Remedy: Place the main unit far away from PCs,
phones, and other electronic equipment.
Date format User-selectable: DD-MM or MM-DD
Problem: No alarm.
Clock accuracy: +/-0.5 second per day (when RF is
disabled)
Symptom: Alarm does not sound.
RM818P English R7 OP
Day-of-week display: In English, French, German,
Spanish, and Italian
19
19
Black
12HR AM / PM
(MSF FORMAT) 24HR
(DCF FORMAT)
9/10/04, 3:21 PM
EN
Problem: Radio antenna is not displayed on the
LCD screen.
EN
Operation temperature: -5 °C to +50 °C
• Do not, under any circumstances, touch the
exposed electronic circuitry of the device as there
is a danger of electric shock should it become
exposed.
WARNINGS
• Take special care when handling a damaged
LCD display, as the liquid crystals can be harmful
to your health.
Alarm Duration: 2 minute
Power supply: 2 x UM-4 / AAA 1.5V batteries
• Do not use or store the device, including the
remote sensor, in locations that may adversely
affect the product such as rain, snow, desert, and
magnetic fields.
To ensure you use your product correctly and safely,
read these warnings and the entire user manual before
using the product.
The warnings given here provide important safety
information and should be observed at all times.
ABOUT OREGON SCIENTIFIC
Visit our website (www.oregonscientific.com) to learn more
about Oregon Scientific products such as digital cameras;
MP3 players; children's electronic learning products and
games; projection clocks; health and fitness gear; weather
stations; and digital and conference phones. The website
also includes contact information for our customer care
department in case you need to reach us, as well as
frequently asked questions and customer downloads.
WARNINGS
• Do not attempt to repair the product yourself.
Contact the retailer or our customer service
department if it requires servicing.
• Take precautions when handling all battery types.
They can cause injuries, burns, or property
damage as a result of contact with conducting
materials, heat, corrosive materials or explosives.
Remove the batteries before storing the product
for long periods of time.
We hope you will find all the information you need
on our website, however if you'd like to contact the
Oregon Scientific Customer Care department directly,
please visit www2.oregonscientific.com/service/support
or call 949-608-2848 in the US. For international
enquiries, please visit www2.oregonscientific.com/about/
international/default.asp.
• The product is a precision instrument. Never
attempt to take this device apart. There is a
serious danger of powerful electric shocks.
• Do not immerse the device in water.
20
RM818P English R7 OP
20
Black
9/10/04, 3:21 PM
EN
Additional information:
EC-DECLARATION OF CONFORMITY
The product herewith complies with the requirements of
the Low Voltage Directive 73 / 23 / EC, the EMC Directive
89 / 336 / EC and carries the CE marking accordingly.
This product complies with the essential requirements
of Article 3 of the R&TTE 1999 / 5 / EC Directive, if used
as intended and the following standards have been
applied:
Safety of information technology equipment
(Article 3.1.a of the R&TTE Directive)
Applied Standard
EN 60950 : 2000
Carmelo Cubito
Agrate Brianza (MI) / Italy January 2004
Manufacturer’s EU R&TTE Representative
Electromagnetic compatibility
(Article 3.1.b of the R&TTE Directive)
Applied Standards
ETSI EN 301 489-1-3 (Ver.1.4.1) : 2002-08
COUNTRIES RTTE APPROVAL COMPLIED
All EC countries, Switzerland CH
and Norway
21
RM818P English R7 OP
21
Black
9/10/04, 3:21 PM
N
© 2004 Oregon Scientific. All rights Reserved.
P/N.: 086-003536-018
RM818P English Back R7 OP
1
7/15/04, 10:16 AM