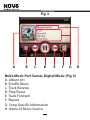
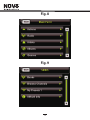
1
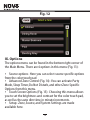
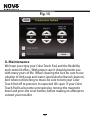
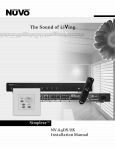
NV-CTP36 Color Touch Screen
User Guide
FCC Radio Frequency Interference Warning
This equipment has been tested and found to comply with the limits for a Class B digital
device, pursuant to Part 15 of the FCC Rules. These limits are designed to provide reasonable
protection against harmful interference in a residential installation. This equipment generates,
uses, and can radiate radio frequency energy and, if not installed and used in accordance
with the instructions, it may cause harmful interference to radio communications. However,
there is no guarantee that interference will not occur in a particular installation. If this equipment
does cause harmful interference to radio or television reception, which can be determined by
turning the equipment off and on, the user is encouraged to try to correct the interference by
one or more of the following measures:
- Reorient or relocate the receiving antenna.
- Increase the separation between the equipment and receiver.
- Connect the equipment into an outlet on a circuit different from that to which the receiver
is connected.
- Consult the dealer or an experienced radio/TV technician for assistance.
This device complies with Part 15 of the FCC Rules. Operation is subject to the following two
conditions: (1) This device may not cause harmful interference, and (2) this device must accept
any interference received, including interference that may cause undesired operation.
EN55022 Class-B
EN55024
IC Statement
This Class B digital apparatus complies with Canadian ICES-003.
3
IMPORTANTES INSTRUCTIONS DE SECURITE
FRENCH
1.
Danger
L‘exposition a des niveaux eleves de bruit peut provoquer une perte
permanente de l’audition, Chaque organisme humain reagit
differemment quant a la perte de l’audition, mais quasiment tout le
monde subit une diminution de I’acuite auditive lors d’une exposition
suffisamment longue au bruit intense. Les autorites competentes en
reglementation de bruit ont defini les expositions tolerees aux niveaux
de bruits:
DURE EN HEURES PAR JOUR
8 6 4 3 2 1
INIVEAU SONORE CONTINU EN dB
90 93 95 97 100 103
2.
3.
4.
5.
6.
7.
Selon les autorites, toute exposition dans les limites citees ci-dessus,
peuvent provoquer certaines pertes d’audition. Des bouchons ou
protections dans l’appareil auditif ou sur l’oreille doivent etre portes lors
de l’utilisation de ce systeme d’amplification afin de prevenir le risque
de perte permanente de l’audition, Dans le cas d’expositions
superieures aux limites precitees il est recommande, afin de se
premunir contre les expositions aux pressions acoustiquese I evees
potentielIement dangeure u ses, aux personnes exposees aux
equipements capables de delivrer de telles puissances, tels ce
systeme d’amplification en fonctionnement, de proteger l’appareil
auditif.
8.
9.
10.
11.
12.
13
CE SYMBOLE A POUR BUT D'AVERTIR L'UTILISATEUR DE LA PRESENCE
DE VOLTAGE DANGEREUX NON-ISOLE A L'INTERIEUR DE CE PRODUIT
QUI PEUT ETRE DE PUISSANCE SUFFISAMMENT IMPORTANTE POUR
PROVOQUER UN CHOC ELECTRIQUE AUX PERSONNES.
14.
CE SYMBOLE A POUR BUT D'AVERTIR L'UTILISATEUR DE LA PRESENCE
D'INSTRUCTIONS D'UTILISATION ET DE MAINTENANCE DANS LES
DOCUMENTS FOURNIS AVEC CE PRODUIT.
15.
AFIN DE REDUIRE LES RISQUÉ D'INCENDIE ET DE DECHARGE
ELECTRIQUE, NE PAS EXPOSER CET APPAREIL A LA PLUIE OU A
L'HUMIDITE.
16.
4
de ventilation. Ne pas pl avec attention toutes les
recommandations et précautions d'emploi avant d'utiliser ceLire
produit.
Toutes les recommandations et précautions d'emploi doivent
être conservées afin de pouvoir s'y reporter si nécessaire.
Lire et comprendre tous les avertissements énumérés dans les
précautions d'emploi.
Suivre toutes les précautions d'emploi pour utiliser ce produit.
Ce produit ne doit pas être utilisé près d'eau, comme par
exemple baignoires, éviers, piscine, sous-sol humides ... Etc.
Utiliser exclusivement un chiffon sec pour nettoyer ce produit.
Ne bloquér aucune ouverture acer le produit tout contre un mur
ou dans une enceinte fernée, cela gênerait le flux d'air
nécessaire au refroidissement.
Ne pas placer le produit près de toute source de chaeur telle
que radiateurs, arrivées d'air chaud, fourneaux ou autres
appareils générant de la chaleur (incluant les amplificateurs
producteurs de chaleur) .
Ne pas négliger la sécurité que procure un branchement
polarisé ou avec raccordement à la terre, Un branchement
polarisé comprend deux fiches dont l'une est plus large que
l'autre. Un branchement à la terre comprend deux fiches plus
une troisième reliée à la terre. Si la fiche secteur fournie ne
s'insert pas dans votre prise de courant. consulter un
'électricien afin de remplacer votre prise obsolète.
Protéger le cordon d'alimentation de tout écrasement ou
pincement, particulièrement au niveau des fiches, des
réceptacles utilisés et à l'endroit de sortie de l'appareil. Ne pas
casser la fiche de terre du cordon d'alimentation.
Utiliser uniquement les accessoires spécifiés par le
constructeur.
Utiliser uniquement avec le chariot de transport, le support, le
trépied, la console ou la table spécifiés par le constructeur ou
vendus avec l'appareil. Lors de l'utilisation d'un chariot, bouger
avec précaution l'ensemble chariotlappareil afin d'éviter les
dommages d'un renversement.
Débrancher cet appareil lors d'orages ou s'il n'est pas utilisé
pendant une longue période.
Des précautions doivent être prises afin qu'aucun objet ne
tombe et qu'aucun liquide ne se répande à l'intérieur de
l'appareil par les orifics de ventilation ou n'importe quelle autre
ouverture.
Pour toutes interventions techniques s'adresser à un
technicien qualifié.L'intervention technique est nécessaire
lorsque l'appareil a été endommagé de n'importe quelle façon,
comme par exemple si le cordon secteur ou sa fiche sont
détériorés,si du liquide a coulé ou si des objets sont tombés à
l'intérieur de l'apparei1,si l'appareil a été exposé à la pluie ou à
l'humidité, s'il ne fonctionne pas normalement ou s'il est tombé.
ATTENTI0N:Pour réduire le risque d'incendie ou de choc
electrique ne pas exposer l'appareil à la pluie ou à l'humidité.
Table of Contents
I.Overview..................................................................................Page 6
II. Color Touch Pad Buttons......................................................Page 6
III. The Now Playing Screen......................................................Page 7
IV. Main Menu............................................................................Page 12
V. Music Menu............................................................................Page 13
VI. Favorites................................................................................Page 16
VII. Sources.................................................................................Page 17
VIII. Zones...................................................................................Page 17
IX. Options..................................................................................Page 18
X. Maintenance................................. ........................................ Page 20
5
I. Overview
The NV-CTP36 Color Touch Pad is a full color, 3.6” touch screen
LCD display. This display will show full metadata from NuVo
sources like the NuVo dock for iPod, T2 series of tuners, and M3
Music servers. Album Art is also displayed on the Now Playing
Screen when used in conjunction with the Music Port Server.
The Color Touch Pad can also be used as a whole house
controller, giving you access to all the zones in your home.
Here you can turn zones on and off and change audio sources
playing in zones.
II. Color Touch Pad Buttons
There are 4 hard buttons (Fig. 1) below the Screen on the Color
Touch Pad. The diagram on the right corresponds with the
descriptions below.
A- Power button. Press this button once to turn off the music
in the zone. Press and hold it for 3 or more seconds and it will
power off all of your zones.
B- Home button. Press this button to view the Menu.
C- Volume Down- Press once to decrease volume one
increment. Press and hold to decrease volume faster
D- Volume Up- Press once to increase volume one increment.
Press and hold to increase volume faster.
6
Fig. 1
A
B
C
D
III. The Now Playing Screen (Fig. 1)
The Now Playing Screen displays source specific
information relevant to the source chosen in the
Color Touch Pad zone. On this screen you will also
find buttons used to control the audio source. The
following pages will review the different screens you
may see, dependent on the audio sources that were
installed in your NuVo system.
7
Fig. 2
A
B
C
D
E
F
G
H
NuVo dock for iPod (Fig. 2)
A- Album Art (Not Displayed on iPod dock sources)
B- Shuffle Music
C- Track Reverse
D- Play/Pause
E- Track Forward
F- Repeat
G- Song Specific Information
H- Name of iPod on NuVo dock for iPod
8
Fig. 3
A
B
C
D
E
F
G
NuVo Music Port Server, Digital Music (Fig. 3)
A- Album Art
B- Shuffle Music
C- Track Reverse
D- Play/Pause
E- Track Forward
F- Repeat
G- Song Specific Information
H- Name of Music Source
9
H
Fig. 4
A
B
C
D
E
F
NuVo Music Port Server, Pandora (Fig. 4)
A- Album Art
B- Press if you dislike a song played by Pandora
C- Play/Pause
D- Press if you like a song played by Pandora
E- Track Forward (Limit of 6 per hour)
F- Song Specific Information
G- Name of Music Source
10
G
Fig. 5
A
B
C
D
E F
G
NuVo Radio Tuner (Fig. 5)
A- Album Art (Not displayed on NuVo Tuner Sources)
B- Radio Presets
C- Channel frequency up and down
D- Band- Press to cycle between AM/FM/and
Satellite Radio (if applicable)
E- Radio Signal Strength
F- RDS Data- Song specific information (dependent
on radio station broadcasting this data)
G- Name of Music Source
11
IV. Main Menu Screen
To get to the Menu (Fig. 6) press the home button on the
control pad, or press album art when viewing the Now Playing
Screen. The main menu will have up to five selections to
choose from.
?
Music- Pressing this icon will show you all of the available
music options to choose from in relation to your chosen
source.
?
Favorites- You have the option to save playlists and radio
presets as ‘Favorites”. This is a global preset that will appear on
the screen regardless of source selected.
?
Sources- This is where you can view all of the sources
available and make a selection from the list.
?
Zones- See other zones when you press this button. Turn
other zones on or off from the Color Touch Pad, and change the
music source played in other zones.
?
Now Playing- This icon will take you to the Now Playing
screen, where you can view information on the artist you are
listening to, or channel information from the tuner.
An options button in the bottom right corner of the screen
makes available screen adjustments like brightness and
contrast, as well as advanced system settings.
12
Fig. 6
V. Music Menu
The music menu will display all available music options for the
source you have selected. These will vary by NuVo Source, and
are detailed below.
?
NuVo M3 Music Server, NuVo dock for iPod- you can browse
and select your digital music stored on these sources by Artist,
Album, Song, Genre, and Playlist when listening to the NuVo
Music Server or iPod dock (Fig. 7).
?
NuVo Music Port Server- With this source you can choose
your digital music files by Artist, Album, Song, Genre, and
playlist. Internet Radio Channels are also available under this
menu (Fig. 8).
13
?
NuVo T2 Tuners- When listening to a NuVo tuner, you can
press Music to change bands and select channels by presets
(Fig. 9).
?
Non-NuVo Sources- You can control non-NuVo sources
from the Color Touch Pad. IR functions will be mapped to a
track forward, reverse, and play/pause button to allow for basic
control of these sources.
Additionally there is an IR receiver placed in between the
Home and Volume Down buttons. You may aim your remote
control at the Color Touch Pad to allow for full product control.
Fig. 7
14
Fig. 8
Fig. 9
15
VI. FavoritesNuvo provides the option of saving tuner presets as Favorites,
as well as playlists from music servers and iPod docks. A
Favorite is a global preset, so no matter what audio source you
are listening to, these will always appear in the Favorites menu
(Fig. 10).
For example, If you are listening to a song on your iPod, and
you select a Satellite Radio Channel previously saved as a
Favorite, the music in that zone will automatically switch the
source from the iPod to the Tuner, and select that specific
preset channel.
Fig. 10
16
VII. Sources
This menu (Fig. 11) displays all audio sources connected to
your NuVo system. It is here that you can change the source
playing in the specific zone, by selecting from the available
options.
Fig. 11
VIII. Zones
The zones menu (Fig. 12) allows you to control other zones
from the convienent location of the Color Touch Pad. For
example, you may turn the outdoor zone on/off, change the
music source being played in a the kitchen, or turn the volume
in the kid’s room down.
17
Fig. 12
IX. Options
The options menu can be found in the bottom right corner of
the Main Menu. There are 4 options in this menu (Fig. 13)?
Source options- Here you can select source specific options
from the color touch pad
?
Advanced Zone Control (Fig. 14)- You can activate Party
Mode, Sleep Timer, Do Not Disturb, and other Zone Specific
Options from this menu.
?
Touch Screen Options (Fig. 15)- Choosing this menu allows
you to set the brightness and contrast for the color touch pad,
as well as the auto dim time, in minute increments.
?
Setup- Zone, Source, and System Settings are made
available here.
18
Fig. 13
Fig. 14
19
Fig. 15
X. Maintenance
We hope you enjoy your Color Touch Pad, and the flexibility
and control it offers. With proper care it should provide you
with many years of life. When cleaning the face be sure to use
solution of dish soap and water (avoid alcohol based cleaners).
And when not listening to music be sure to turn your Color
Touch Pad off to preserve its expected life span. If your Color
Touch Pad has become unresponsive, remove the magnetic
bezel and press the reset button, before making an attempt to
contact your installer.
20
NuVo Technologies LLC Hebron, KY USA
www.nuvotechnologies.com
CTPUG0948