1
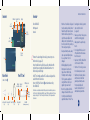
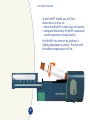
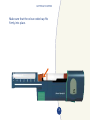
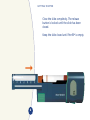
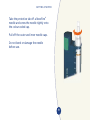
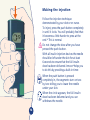
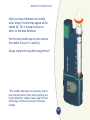
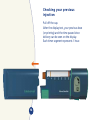
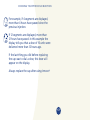
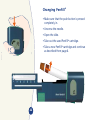
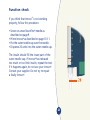
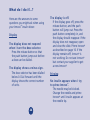
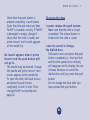
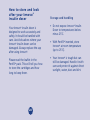
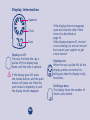
0088
Innovo®
Instruction Manual
Novo Nordisk A/S
2880 Bagsvaerd, Denmark
8-4249-00-004-1
4. proof 02-11-07
Innovo® Eng. Neutral
© 2001 Novo Nordisk A/S
Revision date: October 2002
Order no. 510620
Making insulin
easy to live with
Notex Tryk & Design
Read this carefully before
you use Innovo®
Look at the diagram inside this
cover for the names of the
different parts of Innovo®.
You can unfold the diagram to
help you while you follow the
instructions.
Innovo ®
Window
LOT
number
Residual
scale
Slide
Display
Novo Nordisk A/S
Push
button
2880 Bagsvaerd
Denmark
Dose
selector
Release
button
æ If Innovo® has been dropped or knocked, you must carry out a
Cap
NovoFine ®
Penfill ® 3 ml
6 mm or 8 mm w
Rubber Coloured
membrane band
White bar code
band
Rubber
stopper
(plunger)
Outer needle
cap
Inner needle
cap
Needle Protective
tab
Colour-coded
cap
IMPORTANT INFORMATION
Innovo ®
Glass ball
(for insulin suspensions only)
function check (see page 23).
Innovo® insulin doser should only be used in combination with
products that are compatible therewith and allow Innovo® to
function safely and effectively.
Penfill® 3 ml cartridges and NovoFine® needles are designed to be
used with Innovo® insulin doser.
Innovo®, Penfill®, NovoFine® and w are trademarks owned by
Novo Nordisk A/S.
The CE-mark on a medical device indicates that the product conforms with the provisions in
the EC Directive for Medical Devices 93/42/EEC. Innovo® fullfils the specification limits for dose
accuracy according to ISO 11608-1 Pen-Injectors for Medical use, Part 1: Requirements and
test methods.
• Your Innovo® insulin doser is designed
to work accurately and safely. Innovo®
has built-in safety features to ensure
that the insulin dose injected is the
dose that has been dialled. In the
unlikely event of a malfunction your
Innovo® doser will lock to prevent you
from receiving a wrong dose.
• As a precautionary measure, always
carry a spare insulin delivery device
in case your Innovo® is lost or
damaged.
• A flashing display tells you that
battery power is low. Be sure to
replace Innovo® within 30 days.
The battery cannot be changed.
This is to guarantee quality and
safety at all times. Contact your
supplier to get a new Innovo®.
• Innovo® is tough but could still be
damaged. So handle it with care, do
not drop it and avoid knocking it
against hard surfaces. If Innovo® has
•
•
•
•
•
•
been dropped or knocked, you must
carry out a function check
(see page 23).
Never use your Innovo® unless you are
sure that it is working properly.
Always replace the cap after using
Innovo®.
Do not play with the dose selector
or the push button as this can cause
Innovo® to wear out.
Keep Innovo®, Penfill® and NovoFine®
out of the reach of children.
Your Innovo® is for use by you alone.
Do not allow anyone else to use it.
Health care professionals, relatives
and other carers should follow
general precautionary measures
for removal and disposal of
needles to eliminate the risk of
unintended needle penetration.
33
Innovo ®
Window
LOT
number
Residual
scale
Slide
Display
Novo Nordisk A/S
Push
button
2880 Bagsvaerd
Denmark
Dose
selector
Release
button
æ If Innovo® has been dropped or knocked, you must carry out a
Cap
NovoFine ®
Penfill ® 3 ml
6 mm or 8 mm w
Rubber Coloured
membrane band
White bar code
band
Rubber
stopper
(plunger)
Outer needle
cap
Inner needle
cap
Needle Protective
tab
Colour-coded
cap
IMPORTANT INFORMATION
Innovo ®
Glass ball
(for insulin suspensions only)
function check (see page 23).
Innovo® insulin doser should only be used in combination with
products that are compatible therewith and allow Innovo® to
function safely and effectively.
Penfill® 3 ml cartridges and NovoFine® needles are designed to be
used with Innovo® insulin doser.
Innovo®, Penfill®, NovoFine® and w are trademarks owned by
Novo Nordisk A/S.
The CE-mark on a medical device indicates that the product conforms with the provisions in
the EC Directive for Medical Devices 93/42/EEC. Innovo® fullfils the specification limits for dose
accuracy according to ISO 11608-1 Pen-Injectors for Medical use, Part 1: Requirements and
test methods.
• Your Innovo® insulin doser is designed
to work accurately and safely. Innovo®
has built-in safety features to ensure
that the insulin dose injected is the
dose that has been dialled. In the
unlikely event of a malfunction your
Innovo® doser will lock to prevent you
from receiving a wrong dose.
• As a precautionary measure, always
carry a spare insulin delivery device
in case your Innovo® is lost or
damaged.
• A flashing display tells you that
battery power is low. Be sure to
replace Innovo® within 30 days.
The battery cannot be changed.
This is to guarantee quality and
safety at all times. Contact your
supplier to get a new Innovo®.
• Innovo® is tough but could still be
damaged. So handle it with care, do
not drop it and avoid knocking it
against hard surfaces. If Innovo® has
•
•
•
•
•
•
been dropped or knocked, you must
carry out a function check
(see page 23).
Never use your Innovo® unless you are
sure that it is working properly.
Always replace the cap after using
Innovo®.
Do not play with the dose selector
or the push button as this can cause
Innovo® to wear out.
Keep Innovo®, Penfill® and NovoFine®
out of the reach of children.
Your Innovo® is for use by you alone.
Do not allow anyone else to use it.
Health care professionals, relatives
and other carers should follow
general precautionary measures
for removal and disposal of
needles to eliminate the risk of
unintended needle penetration.
33
Contents
Page 2
Getting started
4
10
12
14
16
18
20
22
23
24
28
30
æ
32
Introduction
Priming Innovo ®
Choosing your dose
Making the injection
Checking your previous injection
Subsequent injections
What to do when Penfill ® is nearly empty
Changing Penfill ®
Function check
What do I do if...?
How to store and look after your Innovo ® insulin doser
Display information
Important information
Introduction
Thank you for choosing Innovo®, the
insulin doser designed to make insulin
therapy easier to live with.
This manual contains instructions for
using, storing, and cleaning your
Innovo®. Here are some of the unique
features Innovo® has to offer:
Easy to carry. Innovo® is short and
compact, making it easy to carry in
your pocket or purse.
Easy to inject. Innovo is designed to
fit perfectly in your hand, and is ideal
for making quick and discreet
injections.
®
2
Easy to read. The display on
Innovo® is large and clear, making it
easy to read the dose of insulin
dialled and delivered.
Easy to remember. Innovo® has a
built-in memory function, displaying
your previous dose of insulin and
the time passed since your last
delivery.
Easy to dial. Innovo® is accurate to
use, and can easily be dialled to
deliver doses from 1 to 70 units,
in steps of 1 unit.
INTRODUCTION
Easy to change dose. The insulin
dose can easily be changed without
wasting insulin simply by dialling up
or down.
Easy to change Penfill®. Innovo® is
specially designed for the easy
changing of Penfill® 3 ml cartridges
and NovoFine® needles with a length
of up to 8 mm. (Be sure to look for
the s on the NovoFine® packaging
when selecting needles).
(including priming). After this time,
the display flashes to tell you that
Innovo® will expire.
Be sure to replace Innovo® within
30 days. The battery cannot be
changed. This is to guarantee
quality and safety at all times.
Thank you for choosing Innovo®.
It is important that you follow the
instructions carefully to make
insulin therapy as easy to live with
as possible.
Easy reminders. Innovo® has a
battery that lasts for about 5 years
from manufacturing date when used
at a rate of four daily injections
3
Getting started
Pull off the cap. Put the cap to one side and
keep it. You will need to replace the cap
after your injection.
The very first time the cap is pulled off, the
display stays blank until the slide is opened.
4
GETTING STARTED
Make sure that the push button is pressed
completely in. Otherwise the slide will be
locked.
Open the slide in the direction of the arrow
shown below.
The display now shows 0.
5
GETTING STARTED
In the Penfill® leaflet you will find
instructions on how to:
• check that Penfill® is intact (e.g. no fissures).
• resuspend the insulin, if Penfill® contains an
insulin suspension (cloudy insulin).
Put Penfill® into Innovo® by pushing it
slightly backwards as shown. The end with
the rubber stopper goes in first.
6
GETTING STARTED
Make sure that the colour-coded cap fits
firmly into place.
7
GETTING STARTED
Close the slide completely. The release
button is locked until the slide has been
closed.
Keep the slide closed until Penfill® is empty.
8
GETTING STARTED
Take the protective tab off a NovoFine®
needle and screw the needle tightly onto
the colour-coded cap.
Pull off the outer and inner needle caps.
Do not bend or damage the needle
before use.
9
Priming Innovo ®
æ Always prime your Innovo
to ensure the
insulin flow:
• before each injection
• after changing Penfill®
• after changing the needle
• after opening and closing the slide.
®
It is important that insulin appears at the
tip of the needle before you make your
injection. Otherwise you will not receive
the full insulin dose.
How to prime your Innovo®
• Make sure that a needle is mounted, the
push button is pressed completely in, and
the slide is closed. If the slide is not closed,
the release button will be locked.
• Press the release button a.
You will see that the push button jumps
out.
A
10
PRIMING INNOVO ®
• Dial 1 unit b.
When inserting a new Penfill®, start with
8 units.
After opening and closing the slide you
will need to dial a larger number of units,
depending on the amount of insulin left
in Penfill®.
• Hold Innovo® with the needle upwards
and tap the slide gently with your finger
a few times c.
• Press the push button completely in until
it locks d.
• A drop of insulin should appear at the
needle tip.
• If not, repeat the procedure dialling
1 unit until a drop of insulin appears.
B
C
D
11
Choosing your dose
æ
Make sure that a needle is mounted and that
the push button is pressed completely in.
Press the release button a and the push
button will jump out. The display will show 0.
Dial the number of units you need by turning
the dose selector at a steady speed b. In this
example a dose of 10 units has been dialled.
The number of units you have dialled is shown
in the display. You cannot use the clicks as you
dial to determine the dose.
B
12
A
CHOOSING YOUR DOSE
Changing a dose
If you accidentally dial a larger dose than
you need, dial back to the correct number
of units. The dose dialled can be changed
until you press the push button.
Cancelling a dose
If you want to cancel a chosen dose, dial
back to zero and press the push button
completely in. Your last delivered dose
(or priming) and the time passed since its
delivery will reappear on the display.
13
Making the injection
Follow the injection technique
demonstrated by your doctor or nurse.
To inject, press the push button completely
in until it locks. You will probably feel that
it becomes a little harder to press at the
end.* This is normal.
æ Do not change the dose after you have
pressed the push button.
With all insulin injection devices the needle
should be left under the skin for at least
6 seconds to ensure that the full insulin
dose has been delivered. Innovo® helps you
to do this by providing a built-in timer.
When the push button is pressed
completely in, the segments turn on two
by two telling you to leave the needle
under your skin.
When the circle appears, the full insulin
dose has been delivered and you can
withdraw the needle.
14
MAKING THE INJECTION
After you have withdrawn the needle,
a few drops of insulin may appear at the
needle tip. This is normal and has no
effect on the dose delivered.
Put the outer needle cap on and unscrew
the needle. Discard it carefully.
Always replace the cap after using Innovo®.
*Thin needles reduce pain, but you may need to
press the push button firmly when injecting your
insulin. NovoFine® needles, made using thin-wall
technology, minimise the amount of pressure
needed.
15
Checking your previous
injection
Pull off the cap.
After the display test, your previous dose
(or priming) and the time passed since
delivery can be seen on the display.
Each timer segment represents 1 hour.
16
CHECKING YOUR PREVIOUS INJECTION
For example, if 4 segments are displayed,
more than 4 hours have passed since the
previous injection.
If 12 segments are displayed, more than
12 hours have passed. In this example the
display tells you that a dose of 10 units were
delivered more than 12 hours ago.
If the last thing you did before replacing
the cap was to dial a dose, this dose will
appear on the display.
Always replace the cap after using Innovo®.
17
Subsequent injections
Pull off the cap.
When the cap is pulled off, all the display
symbols are turned on telling you that the
display is fully functioning.
Your previous dose (or priming) and the
time passed since delivery then appear on
the display.
18
SUBSEQUENT INJECTIONS
Check that Innovo® contains the type
of insulin you want to inject.
If Penfill® contains a soluble insulin, follow
the instructions from page 9 in this manual.
If Innovo® contains an insulin suspension
(cloudy insulin), you must resuspend the
insulin as described in the Penfill® leaflet.
Then carry on as shown from page 9
and inject shortly after resuspending
the insulin suspension.
19
What to do when Penfill ® is
nearly empty
Do not try to inject an insulin suspension
(cloudy insulin) if the rubber stopper is below
the arrow marks on the slide as shown in the
picture. The glass ball must have adequate
space to resuspend the insulin.
æ
Innovo® will not let you dial a larger
dose than that remaining in Penfill®.
Do not force the dose selector to turn;
instead change Penfill®.
If you need more insulin than the amount in
the cartridge, you can either:
• change Penfill® and inject the whole dose
at once,
or
• inject the remaining insulin and insert
a new Penfill® cartridge for the rest of
your dose.
20
WHAT TO DO WHEN PENFILL ® IS...
Change Penfill® as described on page 22.
Then prime Innovo® as described on
page 10 -11.
Dial the remaining number of units to
complete your dose.
Inject, making sure that you have now
injected your full dose.
If you have changed Penfill® so your total
dose was divided into two doses, note that
Innovo® will only remember the second of
the two doses given.
21
Changing Penfill ®
• Make sure that the push button is pressed
completely in.
• Unscrew the needle.
• Open the slide.
• Take out the used Penfill® cartridge.
• Take a new Penfill® cartridge and continue
as described from page 6.
22
Function check
If you think that Innovo® is not working
properly, follow this procedure.
• Screw on a new NovoFine® needle as
described on page 9.
• Prime Innovo® as described on page 10-11.
• Put the outer needle cap over the needle.
• Dispense 20 units into the outer needle cap.
The insulin should fill the lower part of the
outer needle cap. If Innovo® has released
too much or too little insulin, repeat the test.
If it happens again, do not use your Innovo®.
Contact your supplier. Do not try to repair
a faulty Innovo®.
23
What do I do if...?
Here are the answers to some
questions you might ask when using
your Innovo® insulin doser.
Display
The display does not respond
when I turn the dose selector.
Press the release button so that
the push button jumps out before
a dose can be dialled.
The display shows a minus sign.
The dose selector has been dialled
below 0. Dial forward until the
display shows the correct number
of units.
24
The display is off.
If the display goes off, press the
release button, and the push
button will jump out. Press the
push button completely in, and
the display should reappear. If the
display does not reappear, open
and close the slide. Prime Innovo®
as described on page 10. If the
display remains off, Innovo® is
not working. Do not use Innovo®
but contact your supplier to get
a new Innovo®.
Priming
No insulin appears when I try
to prime Innovo ® .
The needle may be blocked.
Change the needle and prime
Innovo® until insulin appears at
the needle tip.
WHAT DO I DO IF...?
Check that the push button is
pressed completely in and locked.
Open the slide and make sure that
Penfill® is inserted correctly. If Penfill®
is damaged or empty, change it.
Check that the slide is closed, and
prime Innovo® until insulin appears
at the needle tip.
No insulin appears when I prime
Innovo ® and the push button will
not go in.
The needle may be blocked. Change
the needle and prime Innovo® until
insulin appears at the needle tip.
To open the slide, dial back to zero
and press the push button
completely in until it locks. Then
change Penfill® as described on
page 22.
Choosing the dose
I cannot release the push button.
Make sure that the slide is closed
completely. The release button is
locked until the slide is closed.
I want to cancel or change
the dialled dose.
Dial back to zero and press the push
button completely in. Your last dose
and the time passed since delivery
will reappear on the display. You can
increase, decrease or cancel the
dialled dose until you press the push
button.
Do not change the dose after you
have pressed the push button.
25
WHAT DO I DO IF...?
Insulin is delivered when I
turn the dose selector.
You have dialled the maximum
dose of 70 units and then carried
on dialling. If you need to inject
a dose of insulin larger than
70 units, you must divide the
dose into amounts equal to or
less than 70 units.
Injection
The push button blocks during
the injection.
Do not try to force the push
button in.
The needle may be blocked.
Change the needle and
prime Innovo® as described
on page 10.
26
Check if Penfill® is damaged. Dial
back to zero and press the push
button completely in until it locks.
Then open the slide and change
Penfill® as described on page 22.
Prime Innovo® until insulin appears
at the needle tip.
Please observe that part of the
insulin dose may have been injected.
If the push button still cannot be
pressed completely in, contact your
supplier.
WHAT DO I DO IF...?
Changing Penfill ®
Function check
I cannot open the slide.
Put on a new needle. Press the
push button completely in until
it locks. Remove the needle and
open the slide. If the slide still
cannot be opened, contact your
supplier.
Do not try to force the slide
open.
I do not think that my Innovo ®
is working properly.
Carry out the function check
described on page 23. Make
sure that the lower part of the
outer needle cap is filled with
20 units of insulin.
Never use your Innovo® unless
you are sure that it is working
properly.
27
How to store and look
after your Innovo ®
insulin doser
Your Innovo® insulin doser is
designed to work accurately and
safely. It should be handled with
care. Avoid situations where your
Innovo® insulin doser can be
damaged. Always replace the cap
after using Innovo®.
Please read the leaflet in the
Penfill® pack. This will tell you how
to store the cartridges and how
long to keep them.
28
Storage and handling
• Do not expose Innovo® Insulin
Doser to temperatures below
minus 25°C.
• With Penfill® inserted, store
Innovo® at room temperature
(up to 25°C).
• Your Innovo® is tough but can
still be damaged. Handle it with
care and protect it against direct
sunlight, water, dust and dirt.
HOW TO STORE AND LOOK AFTER YOUR...
Cleaning
Remember
• Clean off dirt and dust with
a dry, soft brush.
• Do not try to repair a faulty
Innovo®.
• You can clean your Innovo® by
wiping it with cotton wool
moistened with ethyl or isopropyl
alcohol.
• Innovo® must only be used
according to the instructions in
this manual. The manufacturer will
not be held responsible for any
equipment problems if you have
not followed these instructions.
• Do not soak Innovo® in alcohol,
wash it or lubricate it. This may
damage the mechanism.
• If you find that Innovo® is faulty,
Novo Nordisk will replace it if:
- you return Innovo® to your supplier
within 1 year of receiving it
- you enclose any documents you
were given when you received
Innovo®
- Novo Nordisk can inspect Innovo®
and confirm that it is faulty.
29
Display Information
Segment
Circle
Dose
Display is off
The very first time the cap is
pulled off, the display stays
blank until the slide is opened.
æ If the display goes off, press
the release button, and the push
button will jump out. Press the
push button completely in, and
the display should reappear.
30
If the display does not reappear,
open and close the slide. Prime
Innovo® as described on
page 10.
If the display remains off, Innovo®
is not working. Do not use Innovo®
but contact your supplier to get
a new Innovo®.
Display test
When the cap is pulled off, all the
display symbols are turned on,
telling you that the display is fully
functional.
Dialling a dose
The display shows the number of
insulin units dialled.
After delivery
The display shows the number
of insulin units delivered.
The circle confirms that the
delivery has been completed.
Previous injection
The display shows the number
of insulin units delivered. The
segments indicate the time
passed since delivery. One
segment represents 1 hour. In
this example more than 4 hours
have passed since Innovo®
delivered the previous dose.
Flashing display
A flashing display indicates
that the battery power is low.
Be sure to replace your Innovo®
within 30 days. The battery
cannot be changed. Contact
your supplier to get a new
Innovo®.
Minus sign
A minus sign on the display
tells you that the dose selector
has been dialled below 0.
Dial forward until the display
shows the number of units
required.
31
8-4249-00-004-1
During delivery
The segments turning on two by
two tell you to leave the needle
under the skin during injection.
æ Important information
• Always prime your Innovo®
(as described on page 10 -11)
to ensure the insulin flow:
• before each injection
• after changing Penfill®
• after changing the needle
• after opening and closing the slide
• With a Penfill® in Innovo®, never
press the push button unless
a needle is mounted.
• Always make sure that the push
button is pressed completely in
and locks.
The display confirms completed
delivery when the segments turn on
two by two and then the circle
appears.
• Do not change the dose after you
have pressed the push button.
• On the Penfill® label there is a
coloured band that is unique to the
different types of insulin. When
32
•
•
•
•
Penfill® is inserted into Innovo®, the
coloured band is visible through the
slide. Before each injection make sure
that you are using the right type of
insulin.
If you are treated with more than
one type of insulin in Penfill® 3 ml
cartridges, you should use two
devices, one for each type of insulin.
Do not use the residual scale to
measure the amount of insulin to be
injected.
Take the needle off Innovo®
immediately after each injection.
If you do not remove it, temperature
changes may cause liquid to leak
out of the needle. With an insulin
suspension (cloudy insulin), this may
change the concentration of the insulin.
Do not initiate injection of an insulin
suspension (cloudy insulin) if the rubber
stopper is below the arrow marks on
the slide.
Innovo ®
Window
LOT
number
Residual
scale
Slide
Display
Novo Nordisk A/S
Push
button
2880 Bagsvaerd
Denmark
Dose
selector
Release
button
æ If Innovo® has been dropped or knocked, you must carry out a
Cap
NovoFine ®
Penfill ® 3 ml
6 mm or 8 mm w
Rubber Coloured
membrane band
White bar code
band
Rubber
stopper
(plunger)
Outer needle
cap
Inner needle
cap
Needle Protective
tab
Colour-coded
cap
IMPORTANT INFORMATION
Innovo ®
Glass ball
(for insulin suspensions only)
function check (see page 23).
Innovo® insulin doser should only be used in combination with
products that are compatible therewith and allow Innovo® to
function safely and effectively.
Penfill® 3 ml cartridges and NovoFine® needles are designed to be
used with Innovo® insulin doser.
Innovo®, Penfill®, NovoFine® and w are trademarks owned by
Novo Nordisk A/S.
The CE-mark on a medical device indicates that the product conforms with the provisions in
the EC Directive for Medical Devices 93/42/EEC. Innovo® fullfils the specification limits for dose
accuracy according to ISO 11608-1 Pen-Injectors for Medical use, Part 1: Requirements and
test methods.
• Your Innovo® insulin doser is designed
to work accurately and safely. Innovo®
has built-in safety features to ensure
that the insulin dose injected is the
dose that has been dialled. In the
unlikely event of a malfunction your
Innovo® doser will lock to prevent you
from receiving a wrong dose.
• As a precautionary measure, always
carry a spare insulin delivery device
in case your Innovo® is lost or
damaged.
• A flashing display tells you that
battery power is low. Be sure to
replace Innovo® within 30 days.
The battery cannot be changed.
This is to guarantee quality and
safety at all times. Contact your
supplier to get a new Innovo®.
• Innovo® is tough but could still be
damaged. So handle it with care, do
not drop it and avoid knocking it
against hard surfaces. If Innovo® has
•
•
•
•
•
•
been dropped or knocked, you must
carry out a function check
(see page 23).
Never use your Innovo® unless you are
sure that it is working properly.
Always replace the cap after using
Innovo®.
Do not play with the dose selector
or the push button as this can cause
Innovo® to wear out.
Keep Innovo®, Penfill® and NovoFine®
out of the reach of children.
Your Innovo® is for use by you alone.
Do not allow anyone else to use it.
Health care professionals, relatives
and other carers should follow
general precautionary measures
for removal and disposal of
needles to eliminate the risk of
unintended needle penetration.
33
0088
Innovo®
Instruction Manual
Novo Nordisk A/S
2880 Bagsvaerd, Denmark
8-4249-00-004-1
4. proof 02-11-07
Innovo® Eng. Neutral
© 2001 Novo Nordisk A/S
Revision date: October 2002
Order no. 510620
Making insulin
easy to live with
Notex Tryk & Design
Read this carefully before
you use Innovo®
Look at the diagram inside this
cover for the names of the
different parts of Innovo®.
You can unfold the diagram to
help you while you follow the
instructions.