1
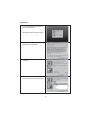
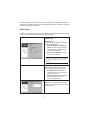
User's Guide
Wireless RF Keyboard & Mouse
AKM9600/8
PREFACE
R & TTE Compliance Statement
This equipment complies with all the requirements of the DIRECTIVE 1999/5/EC OF
THE EUROPEAN PARLIAMENT AND THE COUNCIL OF 9 March 1999 on radio
equipment and telecommunication terminal equipment and the mutual recognition of
their conformity (R & TTE).
Safety
This equipment is designed with the utmost care for the safety of those who install and
use it.However, special attention must be paid to the dangers of electric shock and
static electricity when working with electrical equipment.All guidelines of this manual
and of the computer manufacturer must therefore be allowed at all times to ensure the
safe use of the equipment.
EU Countries Intended for Use
The ETSI version of this device is intended for home and office use in Austria, Belgium,
Denmark, Finland, France, Germany, Greece, Ireland, Italy, Luxembourg, The
Netherlands, Portugal, Spain, Sweden, and United Kingdom.
EU Countries Not Intended for Use
None
Federal Communications Commission Radio(FCC) Statement
This equipment has been tested and found to comply with the limits for a Class B digital device,
pursuant to Part 15 of the FCC Rules. These limits are designed to provide reasonable
protection against harmful interference in a residential installation.This equipment generates,
uses, and can radiate radio frequency energy and if not installed and used in accordance with
the instruction manual may cause harmful interference to radio communications.However,
there's no guarantee that interference will not occur in a particular installation. If this equipment
does cause harmful interference to radio or television reception, which can be determined
by turning the equipment off and on, the user is encouraged to try to correct the interference
by one or more of the following measures:
Reorient or relocate the receiving antenna
Increase the separation between the equipment and receiver.
Connect the equipment into an outlet on a circuit
different form that to which the receiver is connected.
Consult the dealer or an experienced radio TV technician for help.
Table of Contents
INTRODUCTION
PACKAGE CONTENTS
1
SYSTEM REQUIREMENTS
2
FEATURES
2
MAINBOARD AND MOUSE COMPONENTS
WIRELESS RF KEYBOARD
2
WIRELESS RF MOUSE
3
RF RECEIVER
4
INSERTING BATTERIES
MOUSE
4
KEYBOARD
5
SETTING UP YOUR KEYBOARD & MOUSE
INSTALLING THE SOFTWARE
7
MOUSE
7
KEYBOARD
9
USING THE SOFTWARE
10
IWARE MOUSE
11
MULTIMEDIA KEYBOARD
13
TROUBLESHOOTING
15
A WORD ABOUT ERGONOMICS
16
Introduction
Congratulations on your purchase of the
wireless RF Keyboard & Mouse, which
combines an innovative ergonomic design
with all the features and convenience of
wireless technology:
The wireless RF Keyboard has advanced
multimedia features that enable you to
play audio CDs, VCDS,DVDs, and MPEG
files. You can use the keyboard hot keys
to raise, lower and mute audio.
RF Receiver
Other hot keys let you open your
default Web browser and refresh
Web pages, browse forward and
Wireless RF Keyboard
backwards,open a search page,
Wireless RF Mouse
and send e-mail, the Windows
calculator and entering power savings mode.There are also extra 3 hotkeys for being
auto-defined your desirous window.
The bundled software further enhances your keyboard by supplying an onscreen
display(OSD) and onscreen menus to control audio and Web functions.
The Wireless RF Mouse has a scroll wheel/middle button that can be assigned
various functions such as Web page or word processing software scrolling,or
launching applications such as Windows Explorer.
Package Contents
After you have unpacked the Wireless RF Keyboard & Mouse, check the contents to
make sure the following items are included.
One Wireless RF Mouse
One Wireless RF Keyboard
One RF receiver
Two AAA batteries (for the mouse)
Two AA batteries (for the keyboard)
One CD combined driver with this quick guide together
1
If any of the above items are missing or appear damaged, contact your dealer
immediately. Do not throw the shipping carton away in case you need ship your
Wireless RF Keyboard & Mouse.
System Requirements
To use the mouse software and the hot keys on your multimedia keyboard, you need
the following:
Windows XP/ME/2000/98/95/NT 4.0 or later
PS/2 mouse and keyboard ports
Sound Blaster compatible sound card (for CD/VCD/DVD, and MPEG operation)
CD-ROM drive (for software installation and CD/VCD operation)
DVD-ROM drive (for DVD operation)
Features
Wireless radio frequency (RF) technology
Scroll wheel mouse enables scrolling in Web pages and text editors
Onscreen display (OSD) provides status information
Keyboard multimedia and web hot keys provide convenient access to often
used commands
Plug and Play compliant
Compatible with Windows XP/ME/2000/98/95/NT4.0
Mainboard and Mouse Components
Wireless RF Keyboard
The following illustration shows the wireless RF Keyboard and hot keys:
2
Button
WWW
Function
Button
Suspend: enters the
computer into power saving
mode
World Wide Web: opens
your default Web browser
Volume Up: increases
audio volume
E-mail: launches the default
e-mail application
Previous Track: searches
forwards through tracks
on a CD/DVD/VCD
P1: define user's desired
window ,system taciturnity
is WORD.
P2:define user's desired
window, system taciturnity
is EXCEL.
P3: define user's desired
window, system taciturnity
is CALENDAR.
Volume Down: decreases
audio volume
My Favorite: opens the IE
favorites folder, or the
Netscape bookmarks folder
Search: opens a search
window in Netscape or
Windows IE
Mute: turns off the audio
output
Stop: stops playing a
CD/DVD/VCD
=
Function
Calculator: open the
Calculator window
Play/Pause:plays or
pauses a CD/DVD/VCD
My Computer: open the
My Computer window
Next Track: searches
backward through tracks on
a CD/DVD/VCD
Wireless RF Mouse
The following illustration shows the RF mouse components:
Left button
Scroll wheel/middle button
Right button
3
RF Receiver
The following illustration shows the RF receiver components:
PS/2 keyboard
connector(purple)
PS/2 mouse
connector (green)
Mouse/keyboard
connect button
Caps Lock indicator
Inserting Batteries
The keyboard and mouse both require batteries to operate. The mouse uses two AAA
batteries and the keyboard uses two AA batteries. Refer to the following instructions
and illustrations for inserting the batteries:
Mouse
1.Turn the mouse over.
2. Open the battery compartment. Press
the edge( A ) with your thumb and pull
up ( B ).
B
A
3.Insert two AAA batteries into the
compartment. Ensure that you orient
the batteries according to the polarity
markings inside the battery
compartment.
+
-
+
4.Replace the battery compartment
cover. Insert the tab into the slot
( A ) and flip the cover into place ( B ).
A
Slot
Tab
4
B
Keyboard
1.Turn the keyboard over.
2.Open the battery compartment. Slide
the cover in the direction of the arrows.
3.Insert two AA batteries into the
compartment. Ensure that you orient
the batteries according to the
polarity markings inside the battery
compartment.
4.Replace the battery compartment
cover.
Setting up Your Keyboard and Mouse
Your R F keyboard and mouse connect to the PS/2 keyboard and mouse ports on
your computer.
Note! Insert the keyboard and mouse batteries before setting
up the keyboard and mouse. Refer to the previous section.
Refer to the following instructions and illustrations to connect the keyboard and
mouse to your PC:
1.Turn off your computer.
2.Plug the purple PS/2 connector on
the R F receiver cable into the PS/2
keyboard port on your computer.
3.Plug the green PS/2 connector on
the RF receiver cable into the PS/2
mouse port on your computer.
5
4.Place the RF receiver in a good
location.
Place the receiver at least
8 inches (20 cm) from
electrical devices such
as the computer or monitor.
5.Place the keyboard and the mouse
in the proper location for your
computer.
8 in (20 cm)
Note! Refer to the section on
ergonomics later in the quick
guide for more information on
setting up your workstation.
6.Turn on the computer.
7.Press the Receiver connect button a
(don't hold it down), then press the
Mouse connect switch within 3
seconds. Mouse ID will link in
success.Repeat to press the
Receiver connect button, then press
the Keyboard Connect switch withon
3 seconds,keyboard ID will link in
success.
A
B
Connect
switches
Receiver
connect button
C
Ensure that the mouse and keyboard are working. If they do not respond,pls.move the
mouse or press keystrokes. If not working yet,pls. keep intermission for 15 seconds
at least,then repeat Step 7 to ensure that a connection has been made.For any further
solution, pls.take refer to the Troubleshooting section at the end of this guide.
6
Installing the Software
The RF mouse and multimedia keyboard come with software to enhance their functions.
The software is located on the bundled CD.
Note! Connect your Wireless RF Keyboard & Mouse before
installing the software. Refer to the previous section.
Insert the software CD into the CD-ROM drive. The auto-installation screen appears.
A menu provides you with the option of installing the mouse and keyboard.
Follow these instructions to install the keyboard and mouse sofware:
Mouse
1.From the software CD installation
menu, click install Mouse. The iWare
mouse installation program starts.
Click Next .
2.Select "3 Button Wheel Mouse,"
and click Next .
3.Select "PS2 PORT"and click Next .
7
4.Click Next to accept the default
directory or browse to the desired
directory
5.Click Next TO ACCEPT
THE DEFAULT FOLDER OR TYPE
A new folder name.
6.Click Next to start copying files to
your computer.
7.Click Finish to complete the
installation.
When the computer has restarted, an
iWare mouse icon apperars in the
taskbar.
iware mouse
icon
8
Keyboard
1.From the software CD install menu,
click Install Keyboard.
The Mediakey Setup Wizard begins.
2.Read the Software License
Agreement and click Yes .
3.Click Next to continue the setup
program.
4.Click Next to accept the default
location or browse to a new location.
9
5.click Next to accept the default folder
or type a new folder name.
The setup program copies files to
the computer.
6.Click Finish and reset computer .
When the setup program has finished
installing the multimedia software, a
MediaKey icon appears in the taskbar.
Mediakey
icon
Using the Software
After your computer restarts, the iWare Mouse icon and the Multimedia Keyboard icon
appear at the lower right side of your screen in the taskbar:
iware mouse
icon
Muiltimedia
keyboard
10
The following sections briefly describe the iWare Mouse and Multimedia keyboard
software, For detailed information on the Multimedia Keyboard software, refer to the
Multimedia Keyboard online help.
IWare Mouse
Double-click the iWare Mouse icon in the taskbar to open the iWare Mouse Setting
screen, The following table describes the iWare Settings:
Wheel Tab
Wheel mode
These two items define the operation
of the scrolling wheel:
System default(Intelli-Mouse)
mode: this option sets the wheel
scrolling function as Microsoft's
Intelli-Mouse standard.
Enhance scroll mode: enables
enhanced scroll mode.
Note! Experiment with these two
modes; after some practice, choose
the mode to best suit your work
habits.
Wheel Speed
These items enable you to set how
fast the page scrolls in the screen:
Scroll #lines per scroll unit:
sets the number of text lines that
the page will scroll.
Scroll one page per scroll unit:
sets the screen to scroll one
complete page at a time.
Button Tab
Enables you to set the middle button
function. Choose the function from the
drop-down list.
11
About Tab
Provides the iWare software version.
Refer to this screen when updating the
most recent version.
3.2
Multimedia Keyboard
Double-click the Multimedia Keyboard icon in the taskbar to open the Multimedia
Keyboard utility:
The following table briefly describes the button functions:
Web Browser and File Functions
WWW Home: click this button to launch the default Internet browser
application and go to the default home page.
E-mail:click this button to launch the default mail application.
Calculator:click this button to open and close the windows calculator.
12
My Computer: click this button to open a My Computer
Screen saver: Click this button to launch the default screen saver.
File Explorer: click this button to open a file explorer window.
Help:click this button to launch the Multimedia Keyboard help file.
Minimize:click this button to send the Multimedia Keyboard windows
to the task bar.
Close:click this button to close the Multimedia Keyboard.
Multimedia Key Functions
CD Stop: click this button to stop playing a CD/DVD/VCD.
PLAY/PAUSE:click this button to play or pause a CD/DVD/VCD.
Eject: click this button to eject a CD/DVD/VCD.
Rewind: click this button to search backward through a CD/DVD/VCD.
Record: click this button to launch the Microsoft Recorder.
13
Pre Track: click this button to go to the previous track on a
CD/DVD/VCD.
NEXT Track : click this button to go to the next track on a
CD/DVD/VCD
Mute: click this button to turn off the audio.
Playlist:click this button to manage your playlists.
Volume Up/Down:click these buttons to raise and lower the volume.
Self-define P1.P2.P3 hot keys' Function
Double-click the media key icon in the taskbar,then click "Options" term,the
below functions can be defined:
1.Function setting:
System tacitly window for P1:Word,P2:Excel;P3:calendar.
Other Reset functions and execution procedures can be self-defined as will.
2.Internet Setting:
Corresponding execution Procedure with WWW and MAIL hot keys can be
self-defined.
3.Display Setting:
The Status and delay time of On-Screen keyboard can be defined.
.
Note! When the play button
is clicked, the application automatically
detects the type of media in the CD-ROM drive(AVI,MPEG,MOV, or audio)
and begins playing the media.If an audio or video CD is not detected, a dialog
box opens to help you select the file to play.
If two CD-ROM drives are installed on the computer, the default drive is
selected.
14
Troubleshooting
Wireless RF keyboard & Mouse not detected
If the keyboard and mouse don't respond to activity, follow these steps:
1. Ensure that the receiver cable is properly connected to the PS/2 mouse and
keyboard ports(refer to setting up your Keyboard and Mouse on page 7),
Ensure that the purple connector is connected to the keyboard port, and the
green connector is connected to the mouse port.
2.Ensure that the batteries have been installed correctly(refer to Inserting
Batteries page 5).
3.Ensure that there are no IRQ or I/O address conflicts.Refer to your operating
system user's manual for information on resolving IRQ and I/O address
conflicts.
4.Ensure that you have established a connection between the R F receiver and
the keyboard/mouse(refer to Setting up Your Keyboard and Mouse on page 7)
.
Wireless R F Keyboard & Mouse don't work after changing batteries
If the keyboard and mouse don't respond to activity after replacing the batteries,
follow these steps:
1.Ensure that the batteries have been installed correctly(refer to Inserting
Batteries page 5).
2.Ensure that the batteries are not discharged.
3.Ensure that you have established a connection between the R F receiver and
the keyboard/mouse(refer to Setting up Your Keyboard and Mouse on page 7).
Cursor doesn't move properly on the screen
If the cursor doesn't move or the motion is erratic,follow these steps:
1.Ensure that you have established a connection between the R F receiver and
the keyboard/mouse (refer to Setting up Your Keyboard and Mouse on page 7).
2.Change the position of the RF receiver.There should be a distance of at least 8
inches (20 cm) between the receiver and any electrical appliance (such as
speakers, monitor,or computer).
3.Ensure that the mouse batteries are not discharged.If they are discharged,pls.
replace them (refer to Inserting Betteries page 5).
4. Clean the mouse ball and rollers.
a.Remove the retainer-ring onthe bottom of the mouse (press in the
direction of the arrow on the retainer-ring cover).
b.Remove the ball from the compartment.
c.Wipe the ball with a clean,lint-free cloth.
d.Blow into the ball compartment to dislodge dust and lint.
e.If the rollers inside the ball compatrment have dirt on them,clean the
rollers using a cotton swab moistened with isopropyl rubbing alcohol.
f.Replace the ball and retainer-ring.
15
After pressing the sleep button,the computer doesn't wake up
After pressing the sleep button to place the computer into suspend mode,the
computer doesn't wake up after pressing another key (other than the sleep button).
There may be a problem with power management.Some systems are unable to wake
up after being placed into suspend mode.
Follow these steps to fix this problem:
1.Refer to your computer hardware documentation regarding power-manage
ment operation.
2.Ensure that the power-management settings for your operating system are
correct,as described in Windows Help.
A Word about Ergonomics
Ergonomics is the study of how people with their different physical characteristics and
ways of functioning relate to their working environment (the furnishings and machines
they use).The goal of Ergonomics is to incorporate comfort,efficiency,and safety into
the design of keyboards,computer desks,chairs,and other items in an effort to prevent
physical discomfort and health problems in the working environment.
If your budget permits,buy ergonomically designed furniture such as chairs,shelves,
and desks that fit your physical characteristics and work methods.
You can create an ergonomically improved workstation without spending much money.
Following are a few tips to help you work effectively without a lot of physical discomfort:
Keep your forearms,wrists,and hands in a relaxed position,with your elbows at
your side.
Position the keyboard and mouse so that you do not have to reach for them.
Don't strike the keys too hard;type with a soft touch.
Keep your thighs parallel to the floor and your feet flat on the floor or on a
footrest.
Use a chair that provides good back support.
Try to place the monitor so that there is a little glare from the sun on the monitor.
Walk around the room every hour.
Every half-hour look away from the computer screen for a few minutes.
Vary your tasks throughout the day.
Avoid resting your wrists on sharp edges.
16