1
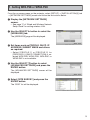
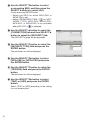
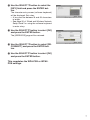
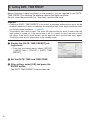
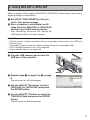
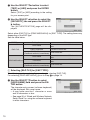
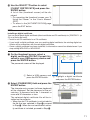
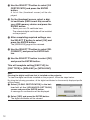
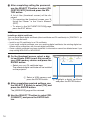
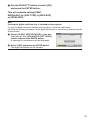
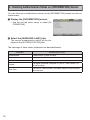
LCD Projector
NP3250/NP2250/
NP1250/NP3250W
WPA Setting Guide
Supported
Authentication
Method
WPA-PSK
WPA-EAP
WPA2-PSK
WPA2-EAP
Sec
urity
Network
WPA
Security
Se
cu
T
S SHI
LEF
LEN
FT
RIG
HT
WN
DO
UP
SELE
CT
3D
REFO
RM
AUTO
ADJU
ST
SOU
RCE
AN
/ST
ON
USB
D
BY
WIRELESS
WIRELESS
LAM
STAT P
POW US
ER
rity
Contents
Introduction........................................................................................................ 3
1. Setting WPA-PSK or WPA2-PSK..................................................................... 5
2. Setting DATE, TIME PRESET........................................................................... 8
3. Setting WPA-EAP or WPA2-EAP..................................................................... 9
4. Checking Authentication Status on [INFORMATION] Screen......................... 16
NOTES
(1) The contents of this guide may not be reprinted in part or whole without permission.
(2) The contents of this guide are subject to change without notice.
(3) Great care has been taken in the preparation of this guide; however, should you
notice any questionable points, errors or omissions, please contact us.
(4) Notwithstanding article (3), NEC will not be responsible for any claims on loss of
profit or other matters deemed to result from using the Projector.
© NEC Display Solutions, Ltd. 2009
1st edition April 2009
Reproduction, modification, and other uses are prohibited without the permission of NEC Display Solutions, Ltd.
Introduction
Thank you for purchasing the LCD Projector NP3250/NP2250/NP1250/NP3250W.
This guide explains how to set the enhanced wireless LAN security (authentication
method) on the projector as shown on the table below.
Set the projector according to the security environment of your network.
Authentication
method
Wireless LAN
Encryption
type
WPA-PSK,
WPA2-PSK
(→ Page 5)
TKIP
AES
WPA-EAP,
WPA2-EAP
(→ Page 9)
TKIP
AES
EAP type
–
EAP-TLS
PEAPMSCHAPv2
Digital certificate
Not used
Format of
certificate
–
Client certificate PKCS#12
CA Certificate
DER
CA Certificate
DER
Important:
• Please note that instructions and explanation on security functions on the above table is
not included in the supplied “User’s Manual” or within the “Wired and Wireless Network
Setup Guide”.
• When you set WPA-EAP or WPA2-EAP, be sure to set [DATE, TIME PRESET] before
installing digital certificates. (→ page 8)
If setting of [DATE, TIME PRESET] is not correct, a message “authentication error” will be
displayed.
• To install digital certificates on the projector, use a USB memory device in the market.
Continued on next page
Other Notes
• Contact your network administrator for information about access point and settings
for authentication server (authentication method, encryption type, EAP type, and
digital certificates).
• For using the on-screen menu on the projector, see the “User’s Manual” (PDF) on
the supplied CD-ROM.
• See the supplied “Wired and Wireless Network Setup Guide” for instructions on setting IP address, subnet mask, SSID, and WEP on the projector.
• WPA-PSK, WPA-EAP, WPA2-PSK and WPA2-EAP are available only when [INFRASTRUCTURE] is selected in [NETWORK TYPE] of the [CONNECTION] page. They
are not available when [AD HOC] is selected.
• WPA-PSK stands for “Wi-Fi Protected Access-Pre-Shared Key”, TKIP for “Temporal
Key Integrity Protocol”, AES for “Advanced Encryption Standard”, EAP for “Extensible
Authentication Protocol”, TLS for “Transport Layer Security”, PEAP for “Protected
Extensible Authentication Protocol”, MSCHAPv2 for “Microsoft Challenge Handshake Authentication Protocol version 2”, DER for “Distinguished Encoding Rules”,
PKCS for “Public-Key Cryptography Standards”.
1. Setting WPA-PSK or WPA2-PSK
From the on-screen menu on the projector, select [SETUP] → [INSTALLATION(2)] tab
→ [NETWORK SETTINGS] screen and follow the instructions below.
➊ Display the [NETWORK SETTINGS]
screen.
• See page 17 of “Wired and Wireless Network
Setup Guide” for setting wireless LAN.
➋ Use the SELECT ▶ button to select the
[WIRELESS] tab.
The [WIRELESS] page will be displayed.
➌ Set items such as PROFILE, DHCP, IP
ADDRESS, SUBNET MASK and others
as required.
• Select [PROFILE 1] or [PROFILE 2] for
[PROFILES]. If [EASY CONNECTION] is selected, WPA-PSK, WPA2-PSK, WPA-EAP, or
WPA2-EAP is not available.
➍ Use the SELECT ▼ button to select
[ADVANCED SETTINGS] and press the
ENTER button.
The [ADVANCED SETTINGS] screen will be
displayed.
➎ Select [SITE SURVEY] and press the
ENTER button.
The “SSID” list will be displayed.
➏ Use the SELECT ▼▲ button to select
a connecting SSID, and then press the
SELECT ▶ button to select [OK].
Finally press the ENTER button.
• Select the SSID for which WPA-PSK or
WPA2-PSK is set.
• Select [INFRASTRUCTURE ( )] for [NETWORK TYPE]. WPA-PSK, WPA2-PSK,
WPA-EAP, or WPA2-EAP is not available
when [AD HOC (
)] is selected.
➐ Use the SELECT ▲ button to select the
[CONNECTION] tab and then SELECT ▶
button to select the [SECURITY] tab.
The [SECURITY] page will be displayed.
➑ Use the SELECT ▼ button to select the
[SECURITY TYPE] field and press the
ENTER button.
The pull-down list will be displayed.
➒ Use the SELECT ▼▲ button to select
[WPA-PSK] or [WPA2-PSK] and press
the ENTER button.
❿ Use the SELECT ▼ button to select the
[TKIP/AES] field and press the ENTER
button.
The pull-down list will be displayed.
⓫ Use the SELECT ▼▲ button to select
[TKIP] or [AES] and press the ENTER
button.
Select [TKIP] or [AES] according to the setting
for your access point.
⓬ Use the SELECT ▼ button to select the
[KEY] field and press the ENTER button.
The character entry screen (software keyboard)
will be displayed. Set a key.
• A key must be between 8 and 63 characters
in length.
• See page 26 of “Wired and Wireless Network
Setup Guide” for using the software keyboard
to enter a key.
⓭ Use the SELECT ▼ button to select [OK]
and press the ENTER button.
The [WIRELESS] page will be returned.
⓮ Use the SELECT ▼ button to select [RECONNECT] and press the ENTER button.
⓯ Use the SELECT ▼ button to select [OK]
and press the ENTER button.
This completes the WPA-PSK or WPA2PSK settings.
2. Setting DATE, TIME PRESET
Before installing a digital certificate on the projector, you are required to set [DATE,
TIME PRESET] for checking the expiration date of the digital certificate.
Set the current date and time (i.e., local time), and the time zone.
Important:
• If setting of [DATE, TIME PRESET] is not correct, a message “authentication error” will be
displayed because of failure of checking the expiration date of the digital certificate when
you install a digital certificate. (→ page 16)
• The projector has a built-in clock. The clock will keep working for about 2 weeks after the
main power is turned off. If the main power is off for 2 weeks or more, the built-in clock
will cease. If the built-in clock ceases, set the date and time, and the time zone again.
The built-in clock will not cease while in the standby mode.
❶ Display the [DATE, TIME PRESET] setting screen.
• From the on-screen menu, select [SETUP]
→ [BASIC] tab → [TOOLS] → [DATE, TIME
PRESET].
❷ Set the DATE, TIME and TIME ZONE.
❸ After setting, select [OK] and press the
ENTER button.
The DATE, TIME PRESET time has been set.
3. Setting WPA-EAP or WPA2-EAP
Select a wireless LAN compliant WPA-EAP or WPA2-EAP authentication and install a
digital certificate on the projector.
❶ Set [DATE, TIME PRESET] on the projector. (See previous page)
❷ Use a computer to save digital certificates (files) for WPA-EAP or WPA2-EAP
setting to your USB memory device.
After completing saving the file, remove the
USB memory device from the computer.
Important:
IFT
SSHH
NNSS
LLEE
FFTT
LLEE
• The file formats of digital certificate that are supported by the projector are DER and
PKCS#12 only.
• The projector cannot handle any digital certificate whose file size exceeds 8 KB.
• CRL (Certificate Relocation List) is not supported.
• Client certificate chain is not supported.
HT
RIG
WNN
DOOW
UP
SELE
CT
❸ Plug the USB memory device into the
USB port of the projector.
3D
REF
OR
M
AU
TO
AD
JU
ST
SO
UR
CE
N
O
US
B
LA
ST MP
AT
WER US
D
N
TA
/S
BY
PO
WIRELESS
WIRELESS
USB port
❹ Repeat steps ❶ on page 5 to ❽ on page
6.
The pull-down list will be displayed.
❺ Use the SELECT ▼▲ button to select
[WPA-EAP] or [WPA2-EAP] and press
the ENTER button.
❻ Use the SELECT ▼ button to select the
[TKIP/AES] field and press the ENTER
button.
The pull-down list will be displayed.
❼ Use the SELECT ▼▲ button to select
[TKIP] or [AES] and press the ENTER
button.
Select [TKIP] or [AES] according to the setting
for your access point.
❽ Use the SELECT ▲ button to select the
[SECURITY] tab and press the SELECT
▶ button.
The [AUTHENTICATION] page will be displayed.
Select either [EAP-TLS] or [PEAP-MSCHAPv2] for [EAP TYPE]. The setting items vary
depending on the EAP type.
See the table below.
EAP Type
Setting Item
User Name
Note
1 character or more and 32 characters or
less
PKCS#12 format file
Client Certificate
CA Certificate
DER format file
(Certificate authority’s certificate)
1 character or more and 32 characters or
User Name
less
1 character or more and 32 characters or
Password
PEAP-MSCHAPv2
less
CA Certificate
DER format file
(Certificate authority’s certificate)
EAP-TLS
① Selecting [EAP-TLS] for [EAP TYPE]:
The following section explains the operation for selecting [EAP-TLS].
For selecting [PEAP-MSCHAPv2], go on to Step ➒ on page 13.
❾ Use the SELECT ▼ button to select
[USER NAME] field and press the ENTER button.
The character entry screen (software keyboard)
will be displayed. Set a user name.
• A user name must be 1 character or more
and 32 characters or less.
• See page 26 of “Wired and Wireless Network
Setup Guide” for using the software keyboard
to enter characters.
10
❿ Use the SELECT ▼ button to select
[CLIENT CERTIFICATE] and press the
ENTER button.
A list of files (thumbnail screen) will be displayed.
• For operating the thumbnail screen, see “5.
Using the Viewer” in the “User’s Manual”
(PDF).
• To return to the [AUTHENTICATION] page,
press the EXIT button.
NOTE:
Installing a digital certificate
You can install each digital certificate (client certificate and CA certificate) for [PROFILE 1 (or
2)] on a file-by-file basis.
• Install a root CA certificate for a CA certificate.
• If you install a digital certificate over your existing digital certificate, the existing digital certificate will be overwritten with the new digital certificate.
• Once a digital certificate has been installed, its information cannot be deleted even if you
stop setting WPA-EAP or WPA2-EAP.
⓫ On the thumbnail screen, select a
digital certificate (PKCS#12 format file)
saved in your USB memory device and
press the ENTER button.
The password screen will be displayed.
① Select a USB memory and
press the ENTER button.
② Highlight a digital certificate
and press the ENTER button.
⓬ Select [PASSWORD] field and press the
ENTER button.
The character entry screen (software keyboard)
will be displayed. Set the password of the private key. A password must be 1 character or
more and 32 characters or less.
The selected digital certificate file will be installed on the projector.
• When the root CA certificate is not included in
the file that was selected in Step ⓫, proceed
to Step ⓭. When the root certification authority certificate is included, proceed to Step ⓯.
11
⓭ Use the SELECT ▼ button to select [CA
CERTIFICATE] and press the ENTER
button.
A list of files (thumbnail screen) will be displayed.
⓮ On the thumbnail screen, select a digital certificate (DER format file) saved in
your USB memory device and press the
ENTER button.
• Select your root CA certificate here.
The selected digital certificate will be installed
on the projector.
⓯ After completing required settings, use
the SELECT ▼ button to select [OK] and
press the ENTER button.
The [WIRELESS] page will be returned.
⓰ Use the SELECT ▼ button to select [RECONNECT] and press the ENTER button.
⓱ Use the SELECT ▼ button to select [OK]
and press the ENTER button.
This will complete setting [EAP-TLS] for
[EAP TYPE] in [WPA-EAP] or [WPA2-EAP].
HINT:
Clearing the digital certificate that is installed on the projector
To clear the digital certificate installed on the projector, follow the steps below.
By doing the following procedure, all the digital certificates for the currently displayed profile
will be cleared.
❶ Select [CLEAR CERTIFICATES] in the bottom left of the [ADVANCED SETTINGS]
screen and press the ENTER button.
A message for confirmation will be displayed.
❷ Select [YES] and press the ENTER button.
The digital certificates will be cleared.
12
HINT:
• The PKCS#12 format digital certificate including a CA certificate will be installed as a root
CA certificate.
② Selecting [PEAP-MSCHAPv2] for [EAP TYPE]:
❾ From the [AUTHENTICATION] page, use
the SELECT ▼ button to select [EAP
TYPE] field and press the ENTER button.
The pull-down list will be displayed.
❿ Use the SELECT ▼▲ button to select
[PEAP-MSCHAPv2] and press the ENTER button.
⓫ Use the SELECT ▼ button to select
[USER NAME] field and press the ENTER button.
The character entry screen (software keyboard)
will be displayed. Set a user name.
• A user name must be 32 characters or less.
• See page 26 of “Wired and Wireless Network
Setup Guide” for using the software keyboard
to enter characters.
⓬ After completing setting a user name,
use the SELECT ▼ button to select the
[PASSWORD] field and press the ENTER button.
The character entry screen (software keyboard)
will be displayed. Set a password.
• A password must be 32 characters or less.
13
⓭ After completing setting the password,
use the SELECT ▼ button to select [CA
CERTIFICATE] field and press the ENTER button.
A list of files (thumbnail screen) will be displayed.
• For operating the thumbnail screen, see “5.
Using the Viewer” in the “User’s Manual”
(PDF).
• To return to the [AUTHENTICATION] page,
press the EXIT button.
NOTE:
Installing a digital certificate
You can install each digital certificate (client certificate and CA certificate) for [PROFILE 1 (or
2)] on a file-by-file basis.
• Install a root CA certificate for a CA certificate.
• If you install a digital certificate over your existing digital certificate, the existing digital certificate will be overwritten with the new digital certificate.
• Once a digital certificate has been installed, its information cannot be deleted even if you
stop setting WPA-EAP or WPA2-EAP.
⓮ On the thumbnail screen, select a digital certificate (DER format file) saved in
your USB memory device and press the
ENTER button.
• Select your root CA certificate here.
The selected digital certificate will be installed
on the projector.
① Select a USB memory and
press the ENTER button.
⓯ After completing required settings, use
the SELECT ▼ button to select [OK] and
press the ENTER button.
The [WIRELESS] page will be returned.
⓰ Use the SELECT ▼ button to select [RECONNECT] and press the ENTER button.
14
② Highlight a digital certificate
and press the ENTER button.
⓱ Use the SELECT ▼ button to select [OK]
and press the ENTER button.
This will complete setting [PEAPMSCHAPv2] for [EAP TYPE] in [WPA-EAP]
or [WPA2-EAP].
HINT:
Clearing the digital certificate that is installed on the projector
To clear the digital certificate installed on the projector, follow the steps below.
By doing the following procedure, all the digital certificates for the currently displayed profile
will be cleared.
❶ Select [CLEAR CERTIFICATES] in the bottom left of the [ADVANCED SETTINGS]
screen and press the ENTER button.
A message for confirmation will be displayed.
❷ Select [YES] and press the ENTER button.
The digital certificates will be cleared.
15
4. Checking Authentication Status on [INFORMATION] Screen
You can check your authentication status on the [INFORMATION] screen from the onscreen menu.
❶ Display the [INFORMATION] screen.
• Use the first tab (main menu) to select [INFORMATION].
❷ Select the [WIRELESS LAN(1)] tab.
The current authentication status will be displayed in the [AUTHENTICATION] field.
The meanings of these status statements are described below.
Statement
16
Authentication status
Authenticated
Authentication is done correctly.
Failure
Authentication failed.
Authenticating…
Authentication is in process.
Expired
The digital certificate is expired. Or [DATE, TIME PRESET] is
not set correctly.
Time Error
The [DATE, TIME PRESET] has been cleared. Set the correct
date and time.