1
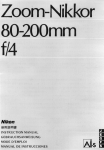
Zoom-Nikkor
25-50mm
iA
Nikon
INSTRUCTION MANUAL
GEBRAUCHSANWEISUNG
MODE D'EMPLOI
MANUAL DE INSTRUCCIONES
\M
e*H
a^mxmsm
English
Depth-of-field scale Deutch
Scharfentiefeskala
Francais
-4M
-25 H
-Page 8
- Page 25
-Seite 12
-Seite 25
-Page 16
Echelle de profondeur de champ- -Page 25
Espanol
Escala de profundidad de camp—
Pagina 20
Pagina 25
[MB
[MB
IS.fiffiK',«';»«
2SWBB
3 « B I « *
4*^8®
57 a - - 7J-> > ?''J >;T
6».«!gK§ffl
8EEilK*'-f K
MtttttMtA
107 J--f > y - r t « 5 K f f l R U Hffl
MSfl«FffliSt**-f K(SB Effl)
I2,«U1S
l3Hfflttillt#-f K
l±t'»(C
C c 7 ) l ^ > X ( i , - =1 > F ^ " 7 > hc7)^rTc7>^i>-5^-T-'-f lzffll.'-£-£*><T-£*TTL
rathittiaui-TMjsaiijtA'iTAtr.
*fcAi3j*(iii»F«a»<HiE,Mt) <r>-h*
I* > * « * ( * , IOWII1S-C-. «»L'>**<7>i»Sf£iB«L->X*<n«»A-'bBltS,
»8<K"«T* l * T » / < - f » * * M » * ' 7 - f F X - i l / > X T - r . « * . COTJgit
ffi««A'ibfl|!>ffll*T-*<—#T-*'<-TS5^Xt
LT«Sat¥*m*'j:6'r. —
* - « > ? £ t " > hfth-B-It.SIJ-jm'J > ^ X i T - 5 2 r F K ^ i t T - « a « » l i g ) l l a 0 . 6
m * T - » I S T - * ! T . T > 7 f j i > f » < *«12"«>T-.--y 3—)H80«"F2.8,r-y 3
— JL-300i""iF4.5U>X'c75 7-f JL-# — * £ S B T * * T „
L'>*«-S»»lt*|Sl(JE5B»-ib*T)~.Ji»-U £ * * < L T j t * 5 4 T 1 1 .
I t .
X*S»tr/5lR]~HI L I T .
~>±»
c m u > x s - A i 7 j i t m * ^ 7*f-"Y i ; » ' J - 7 I t * < • * « . TJ.* 7 * ? Y conattia
Kl^/<-AIiEH.-f3tjB(;*4; £ &«M5LTA-'b«5';oltT < t ' J l ' . * / c . St*
4
tvt-t-fc-tt
B
L.-tKf> K r * * 3 - * * T . r o t s i e i t ' t e v h ^ h - t t B T ' S i f * ' . M u f t i :
fc 511 £'(**<*#< , » ¥ » J « { , S < 4 5 B t ^ d t f T ( I'') S T . MMIUM
T*i < C i * - T # 5OTT-, 77-f > 5 ' - i « ) » t l ' J t 7 7 » « i ' r f f l l S 6 C *
crou>xt77-f>y-x?g-i-i:ro«*#*5-tijrawrr.
"———___ *»<>-* A/L B c D E Gl Q2 S3 G4
HI H2 H3 H4 J K/P M R
F3
0 S
0
0
a 0
F 2
a 0
o
o
0 0
0
• ?U^>-^<-#-TC-200*»l*L/;a*
A/L B c 0 E SI G2 G3 G4 HI H2 H3 H4 J K/P M R T
F3
F2
• 0
•o
• •
• •
o
©
••
•
f U 3 > ' < - # — TO-U, TC-300ti«mtH*£-tiA.„
0: S i f T .
O : « » » > — • « , # * * i : < < K*l S T ^ i l f S
*f,
|;**«1T.
• *i7>*<7>ttii»e-h-e-Tii. 7-r Jl'2»ritjf(ASA/IS0)&
5
X-Vs?
—C
* i a * » u i t , * . s ! E « t a « i i . 25"m*-ib5ommjiT-5 <rBfOTBa*<MEn?nx
-a*
A'<feU %*•&*<& <J J T r n T c i t K fc';H>„
»¥*;»*
» * # * * « . * * 5*?-< mjsuiZsA*? > z w L W o y 7 <>•?•—fax-mi
Lir„itz.m*AB^m-3Xiz#<r>^mi*ai,z ttfTJ *T»
r«lc7)35m««»i;[B]m_ha*-&h-&. J]mi ,5mm tz^, *-r»l<»4>*«tii;
0)lBf:t-5f:.SfflBIII. m . B I H
(«3.5ft) *-^j?33m (HfilOft)
SWKSttiB
D
25mm, 35mm. 50mm(7) 3 T m * . S ! g | | ( i ; ti l - T « # ? < . i B f l « R « L X *> U » T .
* ^
fc«»!g(i«-*mt
6
#m*A!g«ticcEUf:»?fafiiS TtJtsstt-TMKL »-r. 4>
M M IS m
m * p a tt
Hi
A
*.«S6KBSS
l :4
lolflltt
80*40' -47" 50
25, 28, 35. 40, 50
°°~0.6m,2ft.H#K)
X - t ^ ?' B < s j t ( a n s « 73-3o')
« >J a t
K 'I * *
•;« *
*
St
4-22,
SfdittU
-Zi
yr-Off- i * i * » f B « ' j
i a t e
>FV9> h
72mm(p = 0.75mm)
v
*
-5 ^
h
*
*
75mm(»*a)XII2™(*«>
<a*
v
I- * ¥ B A - & U >• X * J * t T-
104mm
«600g
T^-izV'l-
•
•CHE9BB
7 2 m m j t i i : i A < ^ 5 t U > X + +• t f
7—
B.itfcLF-1
V 7 h -T — ^ No.62
M— K * — X C L - I 5 S
72mm ^
KHK-7(*'.it**)
<JU?-
f U- 3 > / * — 9 — TC-200
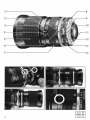
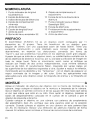
NOMENCLATURE
1
2
3
4
5
6
7
8
Focal Length/Aperture Index
Distance Scale
Distance Scale Index Line
Infrared Compensation Scale
Focusing Ring
Focal Length Scale
Zooming Ring
EE Servo Coupling Post
9 Meter Coupling Shoe
10 Aperture-Direct-Readout Scale
11 Aperture Indexing Post for Nikon
SB-E Speedlight
12 Aperture Scale
13 Meter Coupling Ridge
14 Aperture Ring
FOREWORD
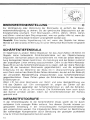
This 25-50mm f/4 lens is a retro-focus zoom lens featuring 11 elements in
10 groups. It offers the benefits of a wide-angle 25mm lens with continuous
zooming up to 50mm. It is well constructed and designed to correct all aberrations, especially barrel distortion which is a common problem in wide-angle
zoom lenses. Although a zoom lens, its optical performance will challenge that
of fixed focal length lenses for sharpness and image clarity throughout its
entire focal range. Both zooming and focusing are accomplished through two
independent rings—minimum focusing distance is 0.6m, Multilayer Nikon
Integrated Coating on all air-exposed lens surfaces helps reduce reflection,
thus minimizing flare and ghost to insure greater image contrast and color
rendition. Among the applications best suited for this lens are press photography and general subject shots.
MOUNTING
A
Position the lens in the camera's bayonet mount, aligning the aperture index of
the lens with the mounting index of the camera. Twist the lens counterclockwise
until it clicks into place. To remove, depress the lens release button on the
camera body and twist the tens clockwise.
When mounting the lens on the camera with a meter coupling lever (Al type),
make sure that the camera's meter coupling lever is correctly positioned; when
mounting on a camera without this lever (non-AI type), "manual" maximum
aperture indexing is required. In both cases, refer to the camera's instruction
manual.
FOCUSING
B
To focus, rotate the focusing ring until the image in the viewfinder appears
sharp and crisp. Once your subject is in focus, you are then ready to zoom. The
subject will remain in focus throughout the entire zoom range. For pinpoint
focusing, use the maximum focal length and then reduce the focal length for the
desired picture composition.
You can prefocus the lens by using the distance scale markings which are
engraved, both in meters and feet, on the focusing ring. Turn the focusing ring
until the black dot is opposite the number which corresponds with your estimated or measured camera-to-subject distance.
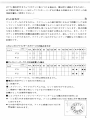
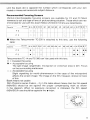
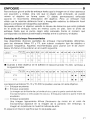
Recommended Focusing Screens
Various interchangeable focusing screens are available for F2 and F3 Nikon
cameras to suit any type of (ens or picture-taking situation. Those which are recommended for use with this Zoom-Nikkor 25-50mm f/4 lens are listed below.
< W i
J i e r ^ n A L B C D E Gl
F3
0 0
F 2
0
G2 G3 G4 HI
H2 H3|H4 J K P M R T
s
O
a 0
a
o 0
o
,5,
• When the Teleconverter TC-200 is attached to this iens, use the following
table:
C«mora
—•
F3
F2
____
A/L B
•
•
c
D E Gl
0
a
a
0
G2 G3 G4 HI
H2 H3
m
J K/P M R T
• •
• •
••
'
Teleconverters TC-14 and TC-300 can't be used with this lens.
© = Excellent focusing
<§) = Acceptable focusing
The split-image rangefinder, microprism or cross-hair area is dim. Focus
on the surrounding matte area.
O = Acceptable focusing
Slight vignetting (or moire phenomenon in the case of the microprism)
affects the screen image. The image on the film, however, shows no trace
of this.
Blank means not usable.
With Photomic-series finders, - V j in the table above means that the film speed
(ASA/ISO) should be set against the proper compensating mark as shown
in the diagram. When no exposure correction is indicated, the film speed
(ASA/ISO) in use should be opposite the • index.
ZOOMING
C
To zoom in or out, simply turn the zoom ring until the desired composition is
tramed on the focusing screen. The ring has a four-position scale showing which
of five focat lengths—25mm, 28mm, 35mm, 40mm and 50mm—is in use in case
you want to preset the lens to any of these focal lengths.
Caution: Slight vignetting will occur when you shoot with the lens at a small
aperture, at its closest focusing distance and at a wide angle focal length.
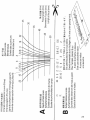
DEPTH-OF-FIELD SCALE
Unlike other Nikkor lenses, the Zoom-Nikkor 25-50mm f/4 has no color-coded
depth-of-field indicators engraved on the lens barrel. However, you can still
determine the depth of field by using the scales provided with this pamphlet.
To use, first cut out the scales along the lines indicated. Then, place the subject-distance scale (B) over the depth-of-field scale (A) with the top edge of ihe
(B) scale lined up with the focal length in use and the focused distance aligned
with the (A) scale's central indicator line. Now read off the numbers (on the B
scale) which appear opposite the pair of depth-of-field lines (on the A scale)
corresponding to the aperture in use; these numbers express the depth of
field lor the settings in use.
For example, if the lens is prefocused at 1.5m (5 ft) with the focal length set at
35mm and the aperture at f/16, the numbers on the distance scale opposite
the depth-of-field lines for the f/16 setting show that the depth of field extends
from 1m (3.511) to 3m (10 It). You can also observe the depth o1 lield through the
viewfinder by pressing the depth-of-field preview button on the camera.
INFRARED PHOTOGRAPHY
D
The plane of sharpest focus for infrared light is slightly more distant than
its counterpart for visible light as seen through the camera viewfinder. Thus,
for the sharpest focus in infrared photography, adjustments must be made.
The scales provided can be used for determining the amount of adjustment via
the dotted infrared compensation line included.
In the same manner as described in the "depth-of-field scale" section, match
the prefocused subject distance (using the B scale) with the focal length and
aperture scale central indicator line (on the A scale). The distance from the
central indicator line to the dotted compensation line represents the amount of
adjustment required. Now, turn the lens' focusing ring counterclockwise
until the prefocused distance is shifted as prescribed on the scales.
10
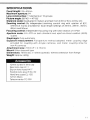
SPECIFICATIONS
Focal length: 25^50mm
Maximum aperture: f/4
Lens construction: 11 elements in 10 groups
Picture angle: 80°40' ^47°50'
Distance scale: Graduated in meters and feet from 0.6m (2 ft) to infinity («)
Zooming control: By independent zooming control ring with rotation of 83°;
reference marks provided for focal length settings of 25mm, 28mm, 35mm,
40mm and 50mm
Focusing control: Independent focusing ring with total rotation of 73*30'
Aperture scale: t/4<M/22 on both standard and apeiture-direct-readout (ADR)
scales
Diaphragm: Fully automatic
Exposure measurement: Full-aperture method adopted; meter coupling ridge
provided for coupling with Al-type cameras, and meter coupling shoe for
non-AI cameras
Attachment size: 72mm (P = 0.75mm)
Mount: Nikon bayonet type
Dimensions: 75mm dia. x 112mm (overall); 104mm extension from flange
Weight: Approx.600g
Accessories
72mm screw-in lens cap
Rear lens cap LF-1
Slip-on lens hood HK-7
Flexible lens pouch No. 62
Hard lens case CL-15S
72mm filters
TeleconverterTC-200
NOMENKLATUR
1
2
3
4
5
6
7
8
Brennweiterv/Blendenindexpunkt
Distanzskalen
Distanzindexlinie
Skala fur Infrarot-Kompensation
Einstellring
Brennweitenskala
Zoomring
KupplungsstiftfurAutomatische
Blendensteuerung
9 Blendenmitnehmer
10 BlendenskalafurSucherDirektablesung
11 Anschlagfur Blendenkupplung
mit dem Blitzgerat Nikon SB-E
12 Blendenskala
13 Steuerkurve
14 Blendenring
VORWORT
Dieses Zoom-Nikkor 25—50mm f/4 Objektiv ist ein aus 11 Elemenien in 10
Gruppen bestenendes Zoom-Objektiv in Retrofokus-Bauweise. Es verbindet die
Vorteile eines 25mm Weitwinkel-Objektivs mit kontinuierltcher Brennweitenverariderung bis zu 50mm. Es ist sorgfaltig konstruiert und fur die Korrektur aller
Aberrationen, besonders der in alien Zoom-Objektiven auftretenden falMbrmigen
Verzeichnung, ausgelegt. Seine optische Leistungsfahigkeit in Bezug auf Scharfe
und Bildqualitat steht der von Objektiven mit fester Brennweite nicht nach,
obwohl es ein Zoom-Objektiv ist. Die Einstellung der Bildscharfe und der Brennweite erfolgt mit zwei getrennten Ringen, wobei der Mindestabstand vom
Objekt 60cm ist. Alle der Luft ausgesetzten Oberflachen sind mit dem Nikon
integrierten Uberzug mehrschichtig vergutet, um Ruckspiegelung des Lichts
zu verringern und dadurch Blendungen und Geisterbilder auf ein MindestmarJ
zuruckzufuhren und scharfere Bildkontraste und bessere Farbenwiedergabe zu
erreichen. Dies Objektiv ist besonders gut fur Reportagefotografie und allgemeine Aufnahmen geeignet.
EINSETZEN DES OBJEKTIVS
A
Den Blendenindexpunkt des Objektivs auf die AnschluB-markierung der Kamera
ausrichten, Dann das Objektiv in den BajonettanschluB der Kamera einsetzen.
Das Objektiv im Gegenuhrzeigersinn drehen, bis es mit einem Klick fest
einrastet. Zum abnehmen des Objektivs ist der Sperrknopf am Kameragehause
zu drucken und das Objektiv im Uhrzeigersinn zu drehen.
Beim Einsetzen des Objektivs in eine Kamera mit einem MeGwerk-Kupplungshebel (Al Typ) ist sorgfaltig darauf zu achten, daft dieser Hebel sich in der
n'chtigen Stellung befindet; beim Einsetzen in etne Kamera ohne diesen Hebel
(d.h. nicht vom Al Typ) muli die "manuelle" Einstellung der groBten Blende
vorgenommen werden. In beiden Fallen bitten wir die Gebrauchsanweisung
der Kamera zu beachten.
SCHARFEINSTELLUNG
B
Zur Scharfeinstellung ist der Einstellring zu drehen, bis das Bild scharf und klar
im Sucher erscheint. Eine einmal vorgenommene Scharfeinstellung bleibt
12
uber den gesamten Brennweitenbereich erhalten. Fur besonders scharfe
Einstellung ist bei der groftten Brennweite einzustellen, und die Brennweite dann
bis zur Erreichung des gewunschten Bildausschnittes zu verkurzen. Eine
Voreinstellung kann mit der in Meter und Fu6 auf dem Einstellring eingravierten
Entfernungsskala vorgenommen werden. Hierzu wird der Einstellring gedreht,
bis der schwarze Punkt sich geneniiber der Zahl befindet, die der geschatzten
oder gemessenen Entfernung der Kamera vom Objekt entspricht.
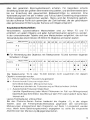
Empfohlene Mattscheiben
Verschiedene, auswechselbare Mattscheiben sind zur Nikon F2 und F3
erhaltlich, urn jedem Objektiv und jeder Aufnahmesituation gerecht zu werden.
In der untenstehenden Tabelle sind jene Mattscheiben aufgefuhrt, die sich bei
Verwendung des Zoom-Nikkor 25-50mm f/4 Objektivs am besten eignen.
~
—^JAattscheibe A / L
B
c
D E
Gl
G2 G3 G4
HI
H2 H3 H4 J
K/P M R T
FS
0 a
0
O
0 0
©
F 2
© o
©
-2;
0 ©
6
S
• Fur Verwendung des Objektivs mit Telekonverter TC-200 kommen folgende
Scheiben in Frage:
———_
F3
F2
Mattscheibe
A/L
•
•
B C D E
©
0
g
©
Gl
G2 G3 G4
HI
H2 H3 H4 J
K/P M R T
• •
• •
••
•
Die Telekonverter TC-14 oder TC-300 konnen nicht zusammen mit diesem
Objekt i w e rwendet werden.
Q = Hervorragend zur Fokussierung geeignet
® = Ausreichende Fokussiermbglichkeit
Schnittbild-lndikator. Mikroprismen bzw.
Fadenkreuz dunkeln ab. Fokussierung auf Mattscheiben-Umfeld.
O as Ausreichende Fokussiermdglichkeit
Leichte Vignettierung (oder Moire Phanomen im Fall von Mikroprismen)
beeinfluBt das Schirmbild. Das Bild auf dem Film weist jedoch keine Spur
hiervon auf.
Leeres Feldbedeutet unbrauchbar.
Bei den Photomic-Serien Sucher bedeutet die Angabe -V 2 in der obigen
Tabelle, dass die Filmempfindlichkeitsskala gegenuber den betreffenden
Markierungen entsprechend dem Diagramm auf Seite 14 eingestellt werden
miss. Wenn keine Belichtungskorrektur angegeben ist, sollte die eingestellte
ASA/ISO-Zahl der Markierung • gegenuberstehen.
13
BRENNWEITENEINSTELLUNG
C
Zur VerlSngerung Oder Verkurzung der Brennweite ist einfach der Brennweiteneinstellungsring zu drehen, bis der gewunschte Bildausschnit! auf der
Einstellscheibe erscheint. Fiinf Brennweiten—25mm, 28mm, 35mm, 40mm
und 50mm—sind auf dem Ring eingraviert, was von grofter Hilfe ist, wenn die
Brennweite auf eine dieser Grdssen voreingestellt werden soil.
VorsichV. Eine leichte VigneUierung trttt aut, wenn das Objektiv bei kleiner
Blende auf die kurzeste Entfernung mit einer Weitwtnkel-Brennweite eingestellt
ist.
SCHARFENTIEFENSKALA
lm Gegensatz zu andern Nikkor-Objektiven hat das Zoom-Nikkor 25-50mm f/4
Objektiv keine farbkodierte Scharfentiefenskafa auf der Objektiv-fassung
eingraviert. Sie konnen jedocn die Scharfentiefe mit Hiife der dieser Beschretbung beiliegenden Skalen bestimmen. Zur benutzung sind die Skalen zunachst
den angezeigten Linien entlang auszuschneiden, Dann ist die Motiv-AbstandsSkala <B) so auf die SchSrfentiefenskala (A) zu legen, daft der obere Rand der
Skala (B) der benutzten Brennweite gegenubersteht, und die eingestellte
Entfernung mit der Mittenlinie der Skala (A) in Obereinstimmung gebracht
wird. Dann sind auf der Skala (B) die Zahlen abzulesen, die den auf der Skala (A)
der verwandten Blendendffnung entsprechenden zwei Scharfentiefenlinien
gegenuberstehen, Diese Zahlen geben die Scharfentiefe fur die benutzten
Einstellungen an.
Wenn z.B. bei einer Brennweite von 35mm und einer Blendendffnung von
f/16 das Objektiv auf 1,5m voreingestellt ist, zeigen die Zahlen auf der
Entfernungsskala gegeniiber den Scharfentiefenlinien an, dafJ die Scharfentiefe sich von 1m bis zu 3m erstreckt. Die SchSrfentiefe kann auch durch
den Sucher ermittelt werden, indem der Scharfentiefenknopf der Kamera
gedriickt wird.
INFRAROTFOTOGRAFIE
D
In der Infrarolfotografie ist die Scharfenebene etwas weiter als fur durch
sichtbares Licht erzeugte Bilder entfernt. Aus diesem Grunde mussen zur
genauesten Einstellung in der Infrarotfotografie Kompensationseinstellungen vorgenommen werden. Die mitgelieferten Skalen konnen zur Bestimmung
der notwendigen Kompensation durch Benutzung der gezeigten punktierten
Linie fur Infrarot-Kompensation benutzt werden.
14
Wie fttr die Scharfentiefenskala beschrieben, 1st die voreingestellte Entfernung
zum Objekt (auf der B Skala) mit der Brennweite und der Blendenoffnung
auf der Markierungslinie in der Mitte (auf der A Skala) in Ubereinstimmung zu
bringen. Der Abstand der Markierungslinie in der Mitte zur punktierten Linie stellt
die notwendige Kompensation dar. Der Einstellring des Objektivs ist dann
entgegen dem Uhrzeigersinn zu dreheh, bis die voreingestellte Distanz
entsprechend der Skala geandert ist.
TECHNISCHE DATEN
Brennweite: 25 ~ 50mm
Max. Blendenoffnung: 1/4
Optlsche Konstruktion; 11 Elemente in 10 Gruppen
Bitdwinkel: 80 o 40'~47 o 50•
Entfernungsskala: Kalibriert in Meter und FuR von 0,6m bis Unendlich (°°)
Zoom regie r Zoomring mit unabhSngiger steuerung, Drehwinkel 83°, Indexmarken fOr 25mm, 28mm, 35mm, 40mm und 50mm
Fokussieren: Unabhangig beweglicher Einstellring mit einem Gesamtdrehwinkel
von 73° 30'
Blendenskala: f/4 ~ f/22 fur normale wie auch Direktablesung (ADR) Skalen
Blendenart: Vollautomatisch
Belichtungszeitmessung: Bei voll geoffneter Blende; Verbindungsvorrichtung
zum Kuppeln mit Al-Typ Kameras, und Verbindungsschuh fur andere Typen
von Kameras
Frontgewinde: 72mm (P = 0,75mm)
Fassung: Nikon Bajonettfassung
Abmessungen: 75mm+ * 112mm (Gesamtlange); 104mm Lange vom Flansch
Gewicht:Ca.600g
Einschraubbarer Frontdeckel 72mm
Hinterer Objektivdeckel LF-1
Aufsteckbare Sonnenblende HK-7
ObjektivbeutelNr.62
Objektivk6cherCL-l5S
Filter 72mm
Telekonverter TO200
15
NOMENCLATURE
1
2
3
4
5
6
7
8
Repere de focale/ouverture
Echelle des distances
Repere des distances
Echelle de compensation
infrarouge
Bague de mise au point
Echelle des focales
Bague de zooming
Index de servocommande
diaphragme
9 Fourchette de couplage du
posemetre
10 Lecture directedu diaphragme
11 Coupleurdel'ouverturepour
flash SB-E Nikon
12 Echelle des ouvertures
13 Index de couplage photom§trique
14 Bague de diaphragme
AVANT-PROPOS
Cet objectif de 25 ~ 50mm f/4 est un zoom de type retrofoyer se composant
de 11 lentilles groupees en 10 groupes. S'il possede tous les aspects pratiques qui caracterisent un grand angle de 25mm, il permet egalement un
zooming continu jusqu'a 50mm. Grace a sa construction et a sa conception
particulieres, les aberrations telles que la distorsion due au tube de I'objectif, un probleme commun a tous les zooms grand angle, ont ete corrig6es.
Les performances de ce zoom sont similaires a celles d'objectifs a focale
fixe en ce qui concerne clarte" et definition, et ce, sur toute sa gamme de
focales. Le zooming et la mise au point s'effectuent s^parement a I'aide de
bagues individuelles. La distance minimum de mise au point est de 0,6m.
Les surfaces de lentilles exposees a I'air ben^ficient du traitement integre
Nikon multi-couches, qui permet de reduire la reflexion tout en minimisant
les taches ou les images parasites dues a une reflexion. Le contraste et
le rendu des couleurs en sont sensiblement ameliores. Cet objectif convient
non seulement a la photographie de reporlage, mais egalement a la photographie generate.
MONTAGE
A
Alignez le repere d'ouverture avec le repere de fixation de I'appareil, engagez
I'objectif dans la monture baionette puis tournez celui-ci dans le sens horaire
inverse jusqu'a son complet verrouillage. Pour le retirer, appuyez sur le bouton
de deverrouillage de I'objectif et tournez I'objectif dans le sens des aiguilles
d'unemontre.
Lorsque vous montez I'objectif sur un boftier dote d'un levier de couplage
diaphragme/posemetre (Al), assurez-vous que ce dernier est correctement
positionne. Si au contraire vous fixez cet objectif sur un boftier ne beneficiant pas de ce systeme de couplage (de type autre que Al), le couplage doit
obligatoirement etre effectue" a la main. Dans le premier comme dans le second
cas, referez-vous au mode d'emploi du boitier.
16
MISE AU POINT
B
Pour mettre au point, tournez la bague de mise au point de I'objectif
jusqu'a ce que I'image apparaisse nette et piquee. Une fois la mise au point
faite sur votre sujet, celle-ci est conservee iors de changements de focale.
Pour effectuer une mise au point precise, reglez votre zoom sur la focale
maximum et reduisez ensuite ceHe-ci pour vous arreter sur le cadrage qui
convient a votre photographie.
Vous pouvez egalement effectuer une mise au point prealable a I'aide de
I'echelle des distances gravees en metres et en feet sur la bague de mise au
point. Tournez la bague de mise au point jusqu'a ce que le point noir se
trouve en face du nombre correspondant a la distance appareil-sujet telle
qu'elle aura ete mesuree ou estimee.
Verres de visee recommand6s
Differents verres de visee interchangeables peuvent etre monies sur les
boitiers Nikon F2 ou F3, qui permettent de faire face a toutes les conditions de
prise de vues. Certains d'entre eux sont plus speciaiement recommandes
avec le Zoom-Nikkor 25-50mm f/4, comme il apparaft ci-dessous.
isr—-—*^
A/L B
F3
© e
'3
O
8 0
©©
F 2
Co;
0)
0
o
0 0
0
c
D E Gl
G2 G3 G4 HI
H2 H3 H4 J K/P M R T
• Lorsque Ton adapte le teleconvertisseur TC-200 sur cet objectif, se
referer a la table suivante:
ac
~~~"—•—-__
Verre
Boitier
—•—___^
A/L
F3
•
F2
» 0
o
°'
0
0
Gl
G2 G3 G4 HI
H2 H3 H4 J K/P M R T
• '
• •
*•
•
Les teleconvertisseurs TC-14 ou TC-300 ne peuvent etre utilises avec cet
objectif.
© = Mise au point excellente
® = Mise au point acceptable
La zone du stigmometre du verre de visee. du microprisme ou de reticule est floue. Faire la mise au point sur la zone depolie.
O = Mise au point acceptable
Un leger vignettage (ou phenomene de moire avec un micro-prisme)
se produit sur I'image de visee. Ceci n'affecte pas la photographie
• elle-meme.
Les cases en blanc signifient inutilisables.
17
Pour les viseurs Photomic, -V 2 dans le tableau a la page precedente indique que
la sensibilite ASA/ISO du film doit etre amenee en regard du repere de compensation tel que montre. Lorsque aucune correction n'est exigee, positionnez
la sensibilite ASA/ISO du film en regard de ['indication • . —
r
1
2
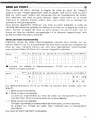
ZOOMING
La focaie se modifie en tournant la bague de zooming jusqu'a ce que le
cadrage desire soit obtenu. Cette bague est pourvue d'une echelle des focales
a cinq positions (25, 28, 35, 40 et 50mm) vous permettant de preselectionner
I'unedeces focales.
Remarque: Un leger effet de lucarne est susceptible de se produire lorsqu'on
utilise une petite ouverture a la distance de mise au point la plus courte et a une
focaie grand angle.
ECHELLE DE PROFONDEUR DE CHAMP
A I'encontre d'autres objectifs Nikkor, le Zoom-Nikkor 25-50mm f/4 ne possede
pas d'indicateurs de profondeur de champ colores sur son barillet. II vous
est toutefois possible de determiner la profondeur de champ en utilisant
les echelles figurant dans cette brochure. Les decouper tout d'abord comme
indique sur la figure. Puis, placer I'echelle des distances (B) sur I'echelle de
profondeur de champ (A) et aligner le bord superieur de I'echelle (B) avec la
focaie utilisee. La distance sur laquelle la mise au point a ete faite doit etre
alignee sur la ligne centrale de reperes de I'echelle (A). II ne vous reste plus
qu'a lire les chiffres (sur I'echelle B) apparaissant en regard des deux
lignes de profondeur de champ (echelie A) qui correspondent a I'ouverture
choisie. Ces chiffres donnent la profondeur de champ pour I'ouverture choisie.
Si par exemple la mise au point est faite sur l,5m (5 feet), que la focaie
choisie soit de 35mm et I'ouverture de f/16, les chiffres sur I'echelle des
distances en regard des lignes correspondant a I'ouverture de f/16 indiquent
que la profondeur de champ s'etend de 1m (3,5 feet) a 3m (10 feet). II est
egalement possible d'evaluer visuellement la profondeur de champ en se
servant du bouton de contrdle prevu a cet effet sur le bottier.
PHOTOGRAPHIE EN INFRAROUGE
D
Le plan de nettete maximale en lumiere infrarouge est situe legerement en
deca du plan de focalisation en lumiere visible. II est done necessaire
d'effectuer des corrections pour obtenir une mise au point parfaite en photographie infrarouge. Se servir des echelles figurant dans cette brochure
18
pour determiner les corrections a apporter aux reglages grace a la ligne de
compensation infrarougeen pointilles.
Proceder de la meme maniere que pout I'utilisation des echelles de protorv
deur de champ. Amener le repere de la distance preselectionnee (echelle
B) sur la ligne repere de focale et d'ouverture (echelle A). La distance
separant cette ligne repere et la ligne en pointilles represents la correction
a apporter. Tourner la bague de mise au point de I'objectif dans le sens
contraire des aiguilles d'une montre jusqu'a ce que la distance de mise au
point pre-selectionnee soit modifiee comme indique par les echelles.
CARACTERISTIQUES TECHNIQUES
Longueur focale: 25 ~ 50mm
Ouverture max): 1/4
Construction optique: 11 lentilles en 10 groupes
Champ angulaire: 80M0' ~ 47c50'
Echelle des distances: Graduee en metres et en feet, de 0,6m (2 feet) a
I'infini
Utilisation du zoom: Bague de zooming independante tournant sur un angle
de 83°; reperes de reference pour longueurs focales de 25, 28, 35, 40 et
50mm
Mise au point: Bague de mise au point independante tournant sur un angle
de-73°30'
Echelle des ouvertures: Graduee de f/4 a f/22 sur les echelles standard
et de lecture directe de I'ouverture (ADR)
Diaphragme: Entierement automatique
Mesure de I'exposition: A pleine ouverture; index de couplage photometrique interne pour boftiers Al ou fourchette de couplage photometrique pour boftiers autres que boitiers Al
Porte-accessoire: D'un diametre de 72mm (P = 0,75mm)
Monture: De type Nikon a baionnette
Dimensions: 75mm+ x 112mm longueur hors tout; 104mm extension de
I'embase
Poids: Env. 600g
Accessoires
Bouchon avant d'objectif vissant 72mm
Bouchon arriere d'objectif LF-1
Parasoleil a encliquetage HK-7
Etui rigideCL-15S
Pochette souple N° 62
Filtres 72mm
Teleconvertisseur TC-200
19
NOMENCLATURA
1 Puntoindicadordelongitud
focal/abertura
2 Escaladedistancias
3 Indice de escala de distancias
4 Escala de compensacidn
infrarroja
5 Anillodeenfoque
6 Escala delongitud focal
7 Anillodezoom
8 Borne del servo acoplador EE
9 Zapata deacoplamientoal
exposimetro
10 Escalade lecturadirectade la
abertura
11 Pivote indicador para el Nikon
Speedlight SB-E
12 Escala de aberturas
13 Protuberancia de acoplamiento
al exposimetro
14 Anillode aberturas
PREFACIO
El Zoom-Nikkor 25-50mm f/4 es un objetivo zoom compuesto por 11
elementos en 10 grupos. Tiene los beneficios de un objetivo gran
angular de 25mm, con una capacidad zoom de hasta 50mm. Tiene una
excelente construccion y esta disenado para corregir toda clase de
aberraciones, en especial las distorciones convexas (en forma de
"barril"), que son problemas frecuentes en los objelivos zoom gran angular.
A pesar de que se trata de un objetivo zoom, su calidad optica compite con la
de los objetivos de distancia focal fija, por su claridad y precision de imagen en
todo su rango focal. Tanto el movimiento zoom como el enfoque se
realizan por medio de dos anillos independientes, cuya minima distancia
focal es de 0,6m. El recubrimiento Nikon, integrada por varias capas, en
las superficies de los objetivos expuestas al aire, ayudan a reducir la reflexion,
minimizando asi los destellos y los "fantasmas" con el objeto de asegurar un
mayor contraste de la imagen y del color. Entre las aplicaciones mas
adecuadas para esle objetivo estan la lotograiia de prensa y la lotograiia en
general.
MONTAJE
A
Ali'nee el indicador de abertura del objetivo con la marca de montaje de la
camara; luego coloque el objetivo en la montura a bayoneta de la camara.
Gire el objetivo en sentido contrario al de las agujas del reloj hasta que sienta
el die que indica que esta en su sitio. Para quitar el objetivo, presione el
boton de desprendimiento colocado en el cuerpo de la camara y gire el
objetivo de izquierda a derecha.
Cuando coloque el objetivo en una camara con palanca de acoplamiento
del exposimetro (tipo Al), verifique que esta palanca est6 en la posicion
correcta. Cuando coloque el objetivo en una camara sin esta palanca (tipo
sin Al), es necesario realizar una seleccion de abertura maxima de forma
manual. En ambos casos remftase al manual de instrucciones de la camara.
20
ENFOQUE-
B
Para enfocar gire el anillo de enfoque hasta que la imagen en el visor aparezca
con precision y nitidez. Una vez que el objeto este enfocado, se puede
mover el objetivo en forma zoom. El objeto permanecera enfocado
durante el movimiento telescbpico del objetivo. Para un enfoque mas
nitido use la maxima distancia focal y enseguida reduzca ta distancia focal
segun la composicion fotografica que desee.
Se puede enfocar el objetivo usando la escala de distancia que esta grabada
en el anillo de enfoque, tanto en metres como en pies. Gire el aniilo de
enfoque hasta que el punto negro este" colocado frente al numero que
corresponda a la distancia estimada o medida entre la camara y el objeto.
Pantallas de Enfoque Recomendadas
Hay disponibles diversos pantallas de enfoque intercambiables diferentes,
para las camaras Nikon F2 y F3, que cubren cualquier tipo de objetivo o
situacion fotografica. Aquellas recomendadas para usarse con el de ZoomNikkor 25-50mm f/4 se indican en el cuadro siguiente.
Pantalla
A
/ L B C D E Gl
G2 G3 G4 I HI
H2 H3 H4 J K/P^M R T
I Cuando a este objetivo se le adhiere el teleconvertidor TC-200, remitase a
la siguiente tabla:
P^»* A/L B C D E Gl G2 G3 G4 HI H2 H3 H4 J K/P M R T
F2
•
•
Los teleconvertidores TC-14 y TC-300 no pueden usarse con este objetivo.
0 = Enfoque excelente
® = Enfoque aceptable
La imagen es brillante de un borde al otro, pero la parte central del visor
microprismatico o reticulado es oscura Enfoquese sobre la parte mate de
alrededor.
0 = Enfoque aceptable
Una imagen ligeramente difusa (fenomeno de moire en el caso de
microprisma) aparece en la imagen de la pantalla. Sin embargo, la
imagen en la pelicula no muestra indicios de esto.
El espacio en bianco significa que no se puede usar.
Con visores de la serie Photomic, - V , en la labia en la pagina anterior significa
que e) indice de rapidez (ASA/ISO) de la peli'cula debera quedar frente a la debida
marca de compensacidn como muestra el diagrama. Cuando no se indique
correccidn en la exposicidn, el fndice de rapidez (ASA/ISO) de la peli'cula
en uso debera quedar frente al indice rojo T •
MOVIMIENTO DEL ZOOM Para usar el objetivo zoom simplemenle gi're el aniilo zoom hasta que
encuentre la posicibn deseada en la pantalla de enfoque. El aniilo tiene
una escala de 5 posiciones de distancia focal, 25mm, 28mm, 35mm, 40mm y
50mm, las cuales se pueden usar para colocar el objetivo de antemano en
cualquiera de estas distancias focales.
Advertencia: Ocurriran ligeras reducciones de la iluminacion en los bordes de
las fotografias cuando utiliza el objetivo con aberturas pequenas, a la menor
distancia focal o a una distancia focal gran angular.
ESCALA DE PROFUNDIDAD DE CAMPO
A diferencia de otros objetivos Nikkor, el objetivo Zoom-Nikkor 25-50mm
f/4, no tiene grabado un indicador numerico de colores para la profundidad
de campo en el cuerpo del objetivo. Sin embargo, se puede determinar
la profundidad de campo usando las escalas proporcionadas en este folteto.
Para usarlas, primero recorte las escalas siguiendo las lineas indicadas.
Enseguida coloque la escala de objeto-distancia (B) sobre la escala de profundidad de campo (A) con el borde superior de la escala (B) alineado con la
distancia focal usada, y la distancia focal aiineada con la linea indicadora
central de la escala (A). Despues tome los numeros (escala B) que aparecen
frente al par de lineas de profundidad de campo (en la escala A) y que
corresponden a la abertura usada; estos numeros expresan la profundidad de
campo de las selecciones usadas.
Por ejemplo, si el objetivo esta enfocado de antemano en 1,5m (5 pies) con
una distancia focal de 35mm y una abertura de 1/16, los numeros en la escala
de distancia opuestos a las lineas de profundidad de campo para la seleccibn
f/16, indican que la profundidad de campo va desde 1 metro (3,5 pies) hasta
3 metros (10 pies). Tambien puede observar la profundidad de campo a
traves del visoroprimiendo previamente el boton de profondidad de campo de
la camara.
FOTOGRAFIAINFRARROJA
D
El piano para un entoque preciso para luz infrarroja es ligeramente mas
22
distante que su contraparte de luz visible, tal y como se ve a traves del visor
de la camara. Debido a esto, es necesario hacer un ajuste para obtener
un enfoque precise en fotograffa infrarroja. Se pueden usar las escalas
proporcionadas para determinar el grado de ajuste por medio de las li'neas
punteadas de compensacidn infrarroja incluidas.
De la misma forma en que se describe en la seccion "Escala de la profundidad de campo'', alinee la distancia del objeto previamente enfocado
(usando la escala B) con la linea de la distancia focal y dei indicador
central de la escala de abertura {en la escala A). La distancia desde la
linea indicadora central hasta la lines punteada de compensacidn representa el
grado de ajuste necesario. Enseguida gire el anillo de enfoque del objetivo
de derecha a izquierda, hasta que la distancia previamente enfocada se
modifique, tal y como esta indicado en las escalas.
ESPECIFICACIONES
Distancia focal: 25 ~ 50mm
Abertura maxima: f/4
Estructura del objetivo: 11 elementos en 10 grupos
Angulo lotografico: 80°40'^47°50
Escala de distancias: Graduada en metros y en pies desde 0,6m (2 pies)
hasta infinito
Control zoom: Anillo de zoom independiente con rotacibn de 83°; marcas
de referenda para establecer distancias focales de 25mm, 28mm, 35mm,
40mm y 50mm
Control de enfoque: Anillo de enfoque independiente con rotacion total
de73°30'
Escala de abertura: f/4M/22, tanto en la escala normal como en la de lectura
directa de ta abertura (ADR)
Tamano de accesorios: 72mm (P = 0,75mm)
Diaf ragma: Totalmente automatico
Medicidn de la exposicion: Se ha adoptado el me^todo de abertura total;
con reborde de acoplamiento al exposi'metro para adaptarse a las camaras
tipo Al y con zapata de acoplamiento al exposi'metro para camaras tipo
sin AJ
Medida de accesorios: 72mm (P =
Accesorios
0,75mm)
Montura: A bayonets Nikon
Tapa frontal de rosea de 72mm
Dimensiones: 75mm4> * 112mm
Tapa trasera LF-1
longitud (total); 104mm de exParasol de insercion HK-7
tension desde de el borde
EstucheftexibleN°62
Peso:Aprox. 600g
EstucheduroCL-15S
Filtros de 72mm
Telecorwertidor TC-200
23
24
(Nikon)
NIPPON KOGAKU K.K.
No reproduction in any form of this booklet, in
whole or in part (except for brief quotation in
critical articles or reviews), may be made without
written authorization f r o m the publishers.
Printed in Japan ( 8 2 . 3 A O i & - 2 N