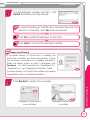
1
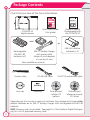
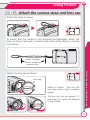
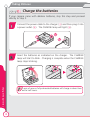
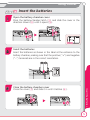
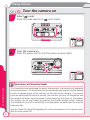
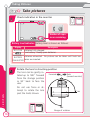
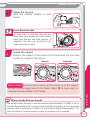
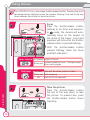
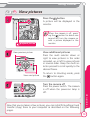
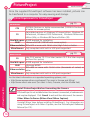
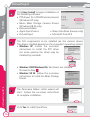
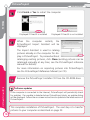
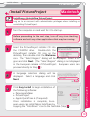
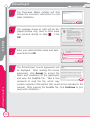
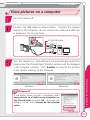
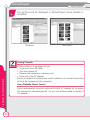
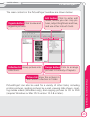
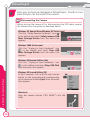
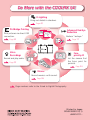
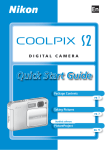
En
D I G I TA L C A M E R A
Quick Start Guide
Package Contents
pg. 2
Taking Pictures
pg. 3
Bundled software
PictureProject
pg. 14
Package Contents
Check that you have all the items listed below.
En
En
The Nikon Guide to Digital Photography
with the
D I G I TA L C A M E R A
DIGITAL CAMERA
Quick Start Guide
Quick Start Guide
(this guide)
COOLPIX S4
digital camera
and
Rechargeable
EN-MH1-B2
batteries (× 2)
Guide to Digital
Photography with
the COOLPIX S4
or
LR6 (AA) alkaline
batteries (× 2)
MH-71 battery charger
with power cable
(shape of cord depends
on country of use)
(also available as options)
Camera strap
UC-E6 USB cable
EG-CP14 audio/video cable
Warranty
Lens cap
Warranty
PictureProject
installer CD
(yellow)
PictureProject
reference manual
CD (silver)
Depending on the country or region of purchase, the package will include either
alkaline batteries or an MH-71 battery charger with rechargeable EN-MH1-B2
batteries.
NOTE: Memory card not provided. See page 81 of the Guide to Digital Photography for a list of approved memory cards.
2
Taking Pictures
Attach the camera strap and lens cap
Attach the strap as shown.
To ensure that the camera is not dropped and damaged, attach the
strap as shown and wear it around your neck while using or carrying
the camera.
Adjust to length
shown if wearing
around neck.
Attach the camera strap and lens cap
Attach the lens cap as shown.
Lens cap
Attach as shown. Cap will click
into place when hinge is correctly
seated.
The lens cap can be opened (�)
and closed (�) while still attached
to the camera.
1
2
3
Taking Pictures
Charge the batteries
If your camera came with alkaline batteries, skip this step and proceed
directly to Step 3.
1
Connect the power cable to the charger (�) and then plug it into
a power outlet (�). The CHARGE lamp will light (�).
3
1
2
2
Insert the batteries as indicated on the charger. The CHARGE
lamp will start to blink. Charging is complete when the CHARGE
lamp stops blinking.
Charge the batteries
A pair of new or fully exhausted batteries will charge in about two
and a half hours.
4
Taking Pictures
Insert the batteries
1
Open the battery-chamber cover
Press the battery-chamber latch (�) and slide the cover in the
direction shown (�) until it opens (�).
1
3
2
Insert the batteries
Insert the batteries as shown in the label at the entrance to the
battery chamber, making sure that the positive (“+”) and negative
(“–”) terminals are in the correct orientation.
3
Close the battery-chamber cover
Close the cover (�) and slide it in until it latches (�).
Insert the batteries
2
1
2
5
Taking Pictures
Turn the camera on
1
Select
mode
Slide the mode selector to
2
Turn the camera on
Press the power switch until the power-on lamp lights.
(auto mode).
Auto Power off (Stand-by Mode)
Turn the camera on
If no operations are performed for about five seconds, the monitor will gradually
dim to save power. Full brightness can be restored by pressing the shutter-release
button or operating any of the controls on the back of the camera. If no operations are performed for about a minute, the monitor will turn off altogether and
the camera will enter stand-by mode, further reducing the drain on the battery.
The display can be reactivated by pressing the shutter-release button halfway.
The camera will turn off automatically if no operations are performed for another
three minutes.
See the Guide to Digital Photography for more information on the options available for auto power off.
6
Taking Pictures
Choose a language and set the clock
The first time the camera is turned on, a language-selection dialog will
be displayed in the monitor. Follow the steps below to choose a language and set the time and date.
Use the multi selector to navigate the menus.
Move cursor up
Press left, right,
up, or down
Press center ( )
to make selection
Display sub-menu, move
cursor right, or make
selection
Cancel and return
to previous menu,
or move cursor left
Move cursor down
1
2
DATE
Set time and date?
Cancel
Confirm
Highlight language.
3
DATE
Confirm
Confirmation dialog displayed.
4
Set time and date?
Choose a language and set the clock
No
Yes
TIME ZONE
London, Casablanca
DaylightSaving
No
Yes
Confirm
Highlight Yes.
Confirm
TIME ZONE menu displayed. *
* To turn daylight saving time on or off, press multi selector down to highlight
DaylightSaving and press center of multi selector. When DaylightSaving is
checked, time will automatically be advanced one hour. To return to Step 4, press
multi selector up to highlight current time zone.
7
Taking Pictures
5
HOME TIME ZONE
6
London, Casablanca
Back
Confirm
Madrid, Paris, Berlin
Back
Confirm
Display map of world time zones.
7
DATE
D
M
Y
Select home time zone.
8
01 . 01 . 2005
00
:
M
:
M
Y
:
00
Edit Day (order of Day, Month, and
Year may differ in some areas).
Y
10
01 . 10 . 2005
00
D
01 . 01 . 2005
00
DATE
D
DATE
00
Display DATE menu.
9
HOME TIME ZONE
DATE
D
M
Y
01 . 10 . 2005
00
15
:
10
Choose a language and set the clock
Confirm
Select Month. Repeat 8 – 9 to edit
Month, Year, hour, and minute.
11
DATE
D
M
Y
Highlight D M Y.
12
01 . 10 . 2005
15
:
10
Confirm
Choose order in which Day, Month,
and Year will be displayed.
8
AUTO
Exit to shooting mode.
9
Taking Pictures
Choose the battery type
This step is only required with alkaline batteries. If your camera came
with EN-MH1-B2 NiMH batteries, skip this step and proceed directly to
“Take pictures”.
1
SHOOTING MENU 1/2
SET-UP
Image mode
White balance
Exp. +/Continuous
Exit
Confirm
Help
2
Highlight SET-UP.
Display shooting menu.
3
SET-UP
Shooting
g menu
Welcome screen
Date
Brightness
Date imprint
Exit
Confirm
1/4
4
Help
Display setup menu.
5
Alkaline
COOLPIX(NiMH)
Lithium
6
Confirm
Help
Alkaline
COOLPIX(NiMH)
Lithium
Confirm
Highlight Alkaline.
3/4
Help
Select and return to setup menu.
Choose the battery type
SET-UP
Interface
AF assist
Reset all
Battery type
Menus
Exit
Confirm
3/4
BATTERY TYPE
Exit
Display options.
7
SET-UP
Interface
AF assist
Reset all
Battery type
Menus
Exit
Confirm
Highlight Battery type.
BATTERY TYPE
Exit
SHOOTING MENU 1/2
SET-UP
Image mode
White balance
Exp. +/Continuous
Exit
Confirm
Help
8
AUTO
9
Exit to shooting mode.
Replacing the Batteries
After inserting new batteries, check that the correct type is selected in the Battery type menu as described on page 80 of the Guide to Digital Photography.
9
Taking Pictures
Take pictures
1
Check indicators in the monitor
AUTO
AUTO
Number of exposures remaining
Battery level indicator: Battery level is shown as follows:
Display
Description
NO ICON Batteries fully charged.
Low battery. Ready spare batteries.
WARNING!!
Batteries exhausted. No pictures can be taken until fresh batBATTERY
teries are inserted.
EXHAUSTED
2
Rotate the lens to shooting position
The lens can be gently roForward
tated up to 180 ° forward
from the storage position
or 90 ° back to face the
user.
0°
Back
(toward monitor)
Take pictures
Do not use force or attempt to rotate the lens
past the limits shown.
90°
180°
Range of rotation
10
Taking Pictures
Ready the camera
Hold the camera steadily in both
hands.
3
Don’t Block the Shot
Important
4
To avoid dark or partially obscured pictures, keep your fingers and other objects
away from the lens and flash window. If
attached, the lens cap should be fully
open as shown at right.
Frame the subject
Position the subject in the center of the frame and use the zoom
control to compose the picture.
Zoom in
Zoom out
Zoom control: Press the zoom control to T to zoom in on the subject
so that it fills a larger area of the frame. Select W to zoom out, increasing the area visible in the frame.
Take pictures
Where Are My Pictures Stored?
The camera stores pictures in internal memory (approximately 13.5 MB) or on removable Secure Digital (SD) memory cards (available separately; a list of approved
memory cards is provided on page 81 of the Guide to Digital Photography). Pictures are stored in internal memory when no memory card is inserted.
11
Taking Pictures
The COOLPIX S4 has a two-stage shutter-release button. Pressing the shutter-release button halfway focuses the camera. Pressing it the rest of the way
down releases the shutter to record a picture.
Focus
Press the shutter-release button
halfway to set focus and exposure.
In
mode, the camera will automatically focus on the subject at
the center of the frame. Focus and
exposure will lock while the shutterrelease button is pressed halfway.
5
With the shutter-release button
pressed halfway, check the focus
and flash indicators:
AUTO
Focus indicator On (green) Subject in focus.
Camera unable to focus. Change compoBlinks red
sition and try again.
Flash lamp
6
AUTO
On (red) Flash will fire when picture is taken.
Blinks red Flash charging.
Off
Flash off or not required.
Take the picture
Press the shutter-release button
the rest of the way down to take
the picture. To prevent blur, press
the shutter-release button down
smoothly.
10
Take pictures
12
AUTO
AUTO
10
Taking Pictures
View pictures
Press the
button
A picture will be displayed in the
monitor.
1
(playback) button
2
View previous picture
View next picture
3
When the camera is off, pressing the
button for about one
second will turn the camera on
with a picture displayed in the
monitor.
View additional pictures
Press the multi selector down or
right to view pictures in the order
recorded, up or left to view pictures
in reverse order. Keep the multi selector pressed to scroll quickly to the
desired frame.
To return to shooting mode, press
button again.
the
Turn the camera off
Press the power switch. The camera
is off when the power-on lamp is
off.
View pictures
Now that you’ve taken a few pictures, you can install PictureProject and
transfer (copy) them to your computer as described on the following
pages.
13
PictureProject
Bundled software
Once the supplied PictureProject software has been installed, pictures can
be transferred to a computer for easy viewing and storage.
System Requirements for PictureProject
Windows
pg. 15
300 MHz Pentium or better recommended (550 MHz Pentium III
or better for muvee option)
Preinstalled versions of Windows XP Home Edition, Windows XP
OS
Professional, Windows 2000 Professional, Windows Millennium
Edition (Me), or Windows 98 Second Edition (SE)
Hard disk space 60 MB required for installation
RAM
Minimum 64 MB (128 MB with muvee option)
Video resolution 800 × 600 or more with 16-bit color (High Color) or better
Miscellaneous Only computers with built-in USB ports supported
CPU
Macintosh
pg. 19
Mac OS X version 10.1.5 or later (version 10.2.8 or later required
for Burn Disc option)
Hard disk space 60 MB required for installation
RAM
Minimum 64 MB
800 × 600 or more with 16-bit color (thousands of colors) or
Video resolution
better
Miscellaneous Only computers with built-in USB ports supported
OS
For the latest information on supported operating systems, visit:
• http://www.europe-nikon.com/support (for users in Europe and Africa)
• http://www.nikon-asia.com/ (for users in Asia, Oceania, and the Middle East)
Install PictureProject
Install PictureProject Before Connecting the Camera
Important
If PictureProject is not installed when the camera is connected, a hardware wizard may be displayed. Click Cancel to exit and then disconnect the camera.
Other Nikon Software (Nikon View / Nikon Capture)
Uninstall Nikon View before installing PictureProject. For information on
using PictureProject with Nikon Capture, see the PictureProject Reference
Manual (on CD).
14
Bundled software
Install PictureProject
PictureProject
Windows
Windows
Windows XP / Windows 2000
1
Log on to an account with administrator privileges when installing or
uninstalling PictureProject under Windows XP Home Edition, Windows XP
Professional, or Windows 2000 Professional.
Windows
Important
Turn the computer on and wait for Windows to start up.
Before proceeding to the next step, turn off any virus-checking
software and exit any other applications that may be running.
2
Insert the PictureProject installer CD into
the CD-ROM drive. The Install Center
program will launch automatically and a
“Select Region” dialog will be displayed.
Select a region and click Next. (The “Select Region” dialog is not
displayed in the European release of PictureProject. European users can proceed directly to Step 3 .)
3
A language selection dialog will be
displayed. Select a language and click
Next.
Install PictureProject
If the “Select Region” or “Select Language” Dialog Is Not Displayed
Open the “My Computer” window by selecting My Computer from the Start
menu (Windows XP Home Edition / Windows XP Professional) or by double-clicking the My Computer icon on the desktop (other versions of Windows) and then
double-click the CD (PictureProject) icon.
15
PictureProject
Bundled software
Click Easy Install to begin installation of
the following software:
• PTP drivers for COOLPIX-series cameras
(Windows XP only)
• Nikon Mass Storage Camera Drivers
(Windows 98 SE only)
• Panorama Maker
• Apple QuickTime 6
• Nikon FotoShare (Europe only)
• PictureProject
• Microsoft DirectX 9
5
The first components to be installed are the camera drivers.
The drivers installed depend on the computer’s operating system:
• Windows XP: Follow the on-screen
instructions to install the PTP driver
(on some systems the driver may be
installed by a wizard).
Windows
4
• Windows 2000 /Windows Me: No drivers are installed.
Proceed to Step 6 .
• Windows 98 SE: Follow the on-screen
instructions to install the Mass Storage
Drivers.
Install PictureProject
16
6
The Panorama Maker install wizard will
start. Follow the on-screen instructions
to complete installation.
7
Click Yes to install QuickTime.
Bundled software
The Nikon FotoShare setup program will
start (Europe only). Follow the on-screen
instructions to complete installation.
9
The PictureProject setup program will now
start. After reading the license agreement,
click Yes to accept the agreement and
proceed with installation.
10
Click Next to install PictureProject to
the location shown under “Destination
Folder,” or click Browse… to choose a
different folder. Complete the following
steps:
Windows
8
PictureProject
1 Click Yes when prompted to create a new folder.
2 To create a shortcut to PictureProject on the desktop, click
Yes when prompted.
3 Click Finish to exit the PictureProject installer.
Install PictureProject
11
Panorama Maker and muvee options require DirectX version 9 or later. If an earlier
version is installed, the dialog shown at
right will be displayed. Follow the onscreen instructions to install DirectX 9.
17
PictureProject
12
Bundled software
Click Finish or Yes to restart the computer.
Windows
Displayed if DirectX is installed
13
Displayed if DirectX is not installed
When the computer restarts, the
PictureProject Import Assistant will be
displayed.
The Import Assistant is used to catalog
pictures already on the computer for display in PictureProject. To proceed without
cataloging existing pictures, click Close (existing pictures can be
cataloged manually at any time; see the PictureProject reference
manual for details).
For more information on importing pictures into PictureProject,
see the PictureProject Reference Manual (on CD).
14
Remove the PictureProject installer CD from the CD-ROM drive.
Install PictureProject
Software updates
If the computer is connected to the Internet, PictureProject will periodically check
for updates. If an update is detected when PictureProject starts, an update dialog
will be displayed. Follow the on-screen instructions to update to the latest version of
PictureProject.
This completes installation of PictureProject. The next step is to transfer
pictures to your computer as described on page 23.
18
Bundled software
Install PictureProject
PictureProject
Windows
Macintosh
Installing or Uninstalling PictureProject
Important
1
Log on to an account with administrator privileges when installing or
uninstalling PictureProject.
Turn the computer on and wait for it to start up.
Before proceeding to the next step, turn off any virus-checking
software and exit any other applications that may be running.
3
A language selection dialog will be
displayed. Select a language and click
Next.
4
Click Easy Install to begin installation of
the following software:
• Panorama Maker
• PictureProject
• Apple QuickTime 6 (if required)
Once installation is complete, European users can install Nikon FotoShare by
copying the “FotoShare” icon to the hard disk (Step 12 ).
Install PictureProject
Insert the PictureProject installer CD into
the CD-ROM drive. Double-click the
PictureProject installer CD icon on the
desktop, then double-click the Welcome
icon. The “Select Region” dialog will be displayed. Select a region and click Next. (The “Select Region” dialog is not displayed
in the European release of PictureProject. European users can
proceed directly to Step 3 .)
Macintosh
2
19
PictureProject
Macintosh
Install PictureProject
20
Bundled software
5
The Panorama Maker installer will start.
Follow the on-screen instructions to complete installation.
6
The message shown at right will be displayed (Europe only; users in other areas
can proceed directly to Step 7 ). Click
OK.
7
Enter your administrator name and password and click OK.
8
The PictureProject license agreement will
be displayed. After reading the license
agreement, click Accept to accept the
terms and conditions of the agreement
and view the ReadMe file. Take a few
moments to read this file, which may
contain important information that could not be included in this
manual. After viewing the ReadMe file, click Continue to proceed with installation.
Bundled software
9
PictureProject
The PictureProject installer will start. Click
Install and follow the steps below:
To have PictureProject Transfer start automatically when the
camera is connected, click Yes when prompted.
2
Click Yes to add PictureProject to the Dock.
3
Click Quit to exit the PictureProject installer.
Macintosh
1
Apple QuickTime 6
If an earlier version of QuickTime is installed, the
QuickTime 6 installer will start automatically. Follow
the on-screen instructions to complete installation.
When the dialog shown at right is displayed, click
Continue. Do not complete the “Registered To,”
“Organization,” and “Registration Number” fields.
On some systems, the QuickTime installer may require
considerable time to complete installation.
10
Click Restart to restart the computer.
Install PictureProject
Displayed if QuickTime 6
is not installed
Displayed if QuickTime 6
is installed
21
PictureProject
11
Bundled software
When the computer restarts, log
in to the “Admin” account. The
PictureProject Import Assistant will
be displayed.
The Import Assistant is used to catalog pictures already on the computer for display in PictureProject. To
proceed without cataloging existing
pictures, click Close (existing pictures can be cataloged manually
at any time; see the PictureProject reference manual for details).
Macintosh
For more information on importing pictures into PictureProject,
see the PictureProject Reference Manual (on CD).
12
After exiting the Import Assistant, open the “FotoShare” folder
on the PictureProject installer CD and install Nikon FotoShare by
dragging the Nikon FotoShare icon to the “Applications” folder
on the hard disk (note that FotoShare is included only with the
European release of PictureProject). When copying is complete,
remove the PictureProject installer CD from the CD-ROM drive.
Software updates
If the computer is connected to the Internet, PictureProject will periodically check
for updates. If an update is detected when PictureProject starts, an update dialog
will be displayed. Follow the on-screen instructions to update to the latest version of
PictureProject.
Install PictureProject
This completes installation of PictureProject. The next step is to transfer
pictures to your computer as described on the following page.
22
Bundled software
PictureProject
View pictures on a computer
1
Turn the camera off.
2
Connect the USB cable as shown below. Connect the camera
directly to the computer; do not connect the cable via a USB hub
or keyboard. Do not use force.
UC-E6 USB cable
3
Turn the camera on. PictureProject will automatically detect the
camera and the PictureProject Transfer window will be displayed
in the computer monitor. Click Transfer to copy all the pictures
in the camera memory to the computer.
View pictures on a computer
Windows
Macintosh
Windows XP
If the dialog shown at right is displayed, select
Copy pictures to a folder on my computer using PictureProject and click OK. To bypass this
dialog in future, check Always do the selected
action.
23
PictureProject
4
Bundled software
The pictures will be displayed in PictureProject when transfer is
complete.
Windows
Macintosh
During Transfer
Important
View pictures on a computer
While transfer is in progress, do not:
• Disconnect the USB cable
• Turn the camera off
• Remove the batteries or memory card
• Disconnect the AC adapter
Failure to observe this precaution could interfere with normal functioning
of both the camera and the computer.
Use a Reliable Power Source
Nikon recommends using the optional EH-62B AC adapter kit to power
the camera for extended periods. Do not use another make or model of
AC adapter.
24
Bundled software
PictureProject
The main controls in the PictureProject window are shown below:
Organize button: Click to view and
organize pictures.
Edit button: Click to enter edit
mode, where you can crop pictures, adjust brightness and hue,
and use other retouch tools.
Collection list: Group pictures into
collections.
Design button: Click to arrange
pictures in a variety of layouts.
View pictures on a computer
Picture list: View the pictures in
the current collection or folder.
PictureProject can also be used for a variety of other tasks, including
printing pictures, sending pictures by e-mail, viewing slide shows, creating muvee videos (Windows only), and copying pictures to CD or DVD
(requires Windows or Mac OS X version 10.2.8 or later).
25
PictureProject
5
Bundled software
Once your pictures are displayed in PictureProject, transfer is complete and you can disconnect the camera.
Disconnecting the Camera
Before turning the camera off or disconnecting the USB cable, remove
the camera from the system as described below.
Windows XP Home Edition /Windows XP Professional
Click the “Safely Remove Hardware” icon ( )
in the taskbar and select Safely remove USB
Mass Storage Device from the menu that
appears.
Windows 2000 Professional
Click the “Unplug or Eject Hardware” icon
( ) in the taskbar and select Stop USB
Mass Storage Device from the menu that
appears.
Windows Millennium Edition (Me)
Click the “Unplug or Eject Hardware” icon
( ) in the taskbar and select Stop USB Disk
from the menu that appears.
View pictures on a computer
Windows 98 Second Edition (SE)
In My Computer, click with the right mouse
button on the removable disk corresponding
to the camera and select Eject from the menu
that appears.
Macintosh
Drag the camera volume (“NO NAME”) into the
Trash.
26
Bundled software
PictureProject
You have now taken pictures and copied them to your computer. This
completes the COOLPIX S4 Quick Start Guide. To make the most of all
the features of your Nikon digital camera, be sure to read the Guide to
Digital Photography.
Viewing the PictureProject Reference Manual
The PictureProject manual may be found on the PictureProject reference manual CD.
Insert the PictureProject reference manual CD in a CD-ROM drive.
2
Double-click the CD icon.
• Windows: Open “My Computer” and double-click the CD
(Nikon) icon.
• Macintosh: Double-click the CD (Nikon) icon on the desktop.
3
Double-click the INDEX or INDEX.pdf icon to display a languageselection screen. Clicking a language displays an index of the
documentation available for PictureProject; click a title to view.
View pictures on a computer
1
27
Do More with the COOLPIX S4!
D-Lighting
Bring out details in shadows.
Page 43
PictBridge Printing
Advanced Red-Eye
Reduction
Print pictures via direct USB
connection.
Page 52
Reduce “red-eye.”
Page 17
Voice
Recordings
Facepriority AF
Let the camera find
the focus point for
portraits.
Record and play audio.
Page 33
Page 24
Movies
Record movies—with sound.
Page 36
Page numbers refer to the Guide to Digital Photography.
Printed in Japan
SB5G01000101(11)
6MA12211--