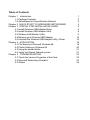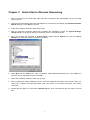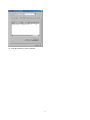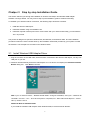
1
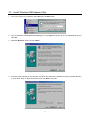
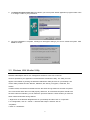
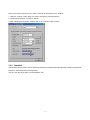
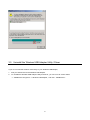
Wireless USB Adapter
Version: 2.02 --- - September 2001
Copyright Statement
No part of this publication may be reproduced, stored in a retrieval system, or transmitted in any form or by
any means, whether electronic, mechanical, photocopying, recording or otherwise without the prior writing of
the publisher.
Windows 95/98 and Windows 2000 are trademarks of Microsoft Corp.
Pentium is trademark of Intel.
All copyright is reserved.
Radio Channel Selection Table
Channel_ID U.S.A.
1
2
3
4
5
6
7
8
9
10
11
12
13
14
×
×
×
×
×
×
×
×
×
×
×
-
Regulatory domains
Most of
Canada
Spain
Europe
×
×
×
×
×
×
×
×
×
×
×
×
×
×
×
×
×
×
×
×
×
×
×
×
×
×
-
France
Japan
×
×
×
×
-
×
×
×
×
×
×
×
×
×
×
×
×
×
×
Table of Contents
Chapter 1 Introduction
1-1 Package Contents
1-2 Advantages for Using Wireless Network
Chapter 2 QUICK START TO WIRELESSS NETWORKING
Chapter 3 STEP BY STEP INSTALLATION GUIDE
3-1 Install Wireless USB Adapter Driver
3-2 Install Wireless USB Adapter Utility
3-3 Wireless LAN Monitor Utility
3-4 Remove your Wireless USB Adapter
3-5 Uninstall the Wireless USB Adapter Utility / Driver
Chapter 4 APPLICATION
4-1 File Sharing in Microsoft Windows 98.
4-2 Printer Sharing in Windows 98
4-3 Using the shared folder
4-4 Using the Shared Network printer
Chapter 5 TROUBLESHOOTING
5-1 Check the Various Properties of the Card
5-2 Microsoft Networking Checklist
5-3 Others
1
2
2
3
5
5
8
9
15
16
18
18
20
21
21
22
22
23
24
Chapter 1
Introduction
USB (Universal Serial Bus) provides a high-speed link for external devices to connect to a PC, and it has
better Plug-and-Play support. Therefore, network adapters based on USB are easier to use than traditional
PCI or PCMCIA adapters. With a wireless (IEEE 802.11b/Bluetooth) USB adapter, a desktop or laptop
computer can communicate with another computer in a wireless way. Besides, through a wireless access
point or a wireless Internet router, the computer can access resources on an Ethernet LAN or on the Internet.
Easy-to-use utilities are bundled with Wireless USB adapter for configuration, monitoring, and diagnosis
purposes. After install Wireless USB Adapter, you can:
a. Share your Internet access by using just one connection
b. Share printers and other peripheral devices
c. Share data and image files between networked PCs
d. Play multi-player games
Wireless USB Adapter can wirelessly transmit and receive data, minimizing the need for wired connections, at a speed of
up to eleven megabit per second. With Wireless USB Adapter you can locate your PC wherever you want without wires
and cables.
Wireless USB Adapter provides LAN users with an access to real-time information anywhere in their organization. The
mobility provides productivity and service, which are not available under wired networks. The Wireless USB Adapter
configuration is easy to change from peer-to-peer networks, suitable for a small number of users, to full infrastructure
networks of thousands of users that allow roaming around a broad area. Please read this manual to get familiar with the
Wireless USB Adapter. This manual contains detailed instructions in operation of this product. Please keep this manual
for future reference.
1
1.1 Package Contents
The Wireless USB Adapter kit includes the following items:
a.
Wireless USB Adapter
b.
USB Cable
c.
The CD including:
1. Wireless USB Adapter Utility & Driver software
2. User’s Manual (this document)
d.
Quick Installation Guide
1.2 Advantages for Using Wireless Network
Advantages for Using a Wireless Network:
♦
Hard to wire areas: Wireless USB Adapter provides access to network services in areas otherwise hard
or expensive to wire, such as historic buildings with asbestos and classrooms.
♦
Flexible workgroups: Lower total cost of ownership for workspaces that are frequently reconfigured.
♦
Networked conference rooms: user can access the network as they move from meeting to meeting,
getting up to date access to information and the ability to communicate decision while ‘on the go’
♦
Ad hoc networking: on site consultants and small workgroups increase productivity with quick network
setup and collaboration software
♦
Branch office networking: provides an easy to install, use and maintain network for a remote or sales
office
♦
Campus-wide network mobility: roaming capabilities allow enterprise to set up easy to
use wireless networks that cover the entire campus transparently
2
Chapter 2
Quick Start to Wireless Networking
1.
Plug the connector of the USB cable, which has been connected to the USB adapter, into any free USB
port on your PC.
2.
Windows will automatically detect the USB Adapter as a new device and display the Add New Hardware
Wizard dialog box. Click Next to continue.
3.
Follow the installation wizard to setup step by step.
4.
After the Add New Hardware Wizard has completed the installation process, the System Settings
Change dialog box will appear asking to restart the system. Click Yes to restart.
5.
Once your system has restarted, in Control Panel, double-click the System icon, click the Device
Manager tab. Operation System will detect new device.
6.
Select Run from the Start menu. Type “E:\Wireless USB Adapter\ Utility\Setup.exe” in the Open box
(where E: is your CD-ROM drive) and click OK.
7.
Follow the installation wizard to setup step by step.
8.
After completing the Utility installation process, check the toolbar at the bottom of the screen. There is a
small icon to indicate the connection status. Red color means no connection and green color means
connected.
9.
Double-click the Utility icon, and click the Site Survey tab. Then choose the AP that you want to connect
with.
3
10. Click IE Explorer to surf the Internet.
4
Chatper 3
Step by step Installation Guide
This section will lead you through the installation of Wireless USB Adapter and Wireless USB Adapter
software in through details. You may wish to skip to quick installation guide to wireless networking.
To establish your wireless network connection, the following steps should be executed.
1.
Install the Wireless USB Adapter.
2.
Install the software using the installation CD.
3.
Install the required network protocols to communicate with your network. Most likely, you will need the
TCP / IP protocol.
The product is designed to operate in Windows 98, Windows Me, and Windows 2000. And the installation
procedure is about the same. Please follow up the installation wizard that provided by your system to install
the software. The example here is based on the Windows 98SE.
3.1 Install Wireless USB Adapter Driver
1. Plug the connector of the USB cable, which has been connected to the Wireless USB Adapter, into any free
USB port on your PC.
2. Windows will automatically detect the USB Adapter as a new device and display the Add New Hardware
Wizard dialog box. Click Next to continue.
Note: If you’re asked to insert a “ Windows 98 CD-ROM “ during the installation, insert your “ Windows 98
CD-ROM “ and click “ Yes “. Once the setup task is completed, the “ Microsoft Internet Explorer “ should
start up. Please close it.
Additional Note for Windows 2000
If you install the Wireless USB Adapter under Windows 2000, it will be a little bit different
5
from Windows 98 or Me. A message will be prompted as follows, click “Yes” to complete the USB
adapter setup.
3. The following dialog box asks how would you like to install the driver. Select the Search for the best
driver…option and click Next.
4. Place the Wireless USB Adapter CD-ROM into the CD-ROM drive. Select the “Specify a location” check
box and type the following path: E:\Wireless USB Adapter\ Driver (substitute the letter of your CD drive for
E if needed). Click Next to continue.
6
5. The Add New Hardware Wizard finds the correct driver, click Next to proceed.
6. After the Add New Hardware Wizard has completed the installation process, click Finish. The System
Settings Change dialog box will appear asking to restart the system. Click Yes to restart.
7
3.2 Install Wireless USB Adapter Utility
1.
Once your system has restarted, select Run from the Start menu.
2.
Type “E:\Wireless USB Adapter\Utility\Setup.exe” in the Open box (where E: is your CD-ROM drive) and
click OK.
3.
Read the Welcome screen and click Next.
4.
The next screen will tell you the directory into which the utility will be installed. Accept the default directory
or if you wish, enter an alternate location, then click Next to proceed.
8
5.
The Select Program Folder dialog box allows you to accept the default application program folder name
or to assign a name of your preference.
6.
Once the installation is complete, a dialog box will appear asking if you want to restart the system. Click
Finish to accept.
3.3 Wireless LAN Monitor Utility
Wireless USB Adapter has its own management software. Users can control all
functions provided by the application named Wireless LAN Monitor Utility. The Utility icon will
appear in the taskbar by clicking the Wireless LAN Monitor Utility shortcut on your desktop. The
monitor Utility includes six tabs: Monitor, Statistics, Site Survey, Encryption, Advanced, and
Version.
In AdHoc mode, the Channel and SSID must be the same among stations so that the computers
can communicate within the local LAN properly. Moreover, all connected computers should have
the same netid and subnetid, you can follow the procedure below to check whether you have the
same netid and subnetid among stations:
1. Right-click on the Network Neighborhood on your desktop and then click on “Properties”.
2. In Configuration, click on “TCP/IP -> Wireless USB Adapter” and then click on
“Properties”.
3. Click on “IP Address”.
9
4. Click on “Specify an IP Address” and make sure having the same netid and subnetid of all the
connected computers.
3.3.1 Setting
l Operating Mode:
If you want to connect with Access Point, please set the mode as” Infrastructure”. If you have more
stations and just want to set them as local network, please set the Mode as ” Ad Hoc”.
l Channel:
It shows radio channel numbers that used for networking. The Channel number must be the same
among stations, so that computers can communicate within the local LAN. It can be changed only
under the Ad Hoc Mode. If the Mode is Infrastructure, this parameter will not be active.
l SSID:
SSID is the group name that will be shared by every member of your wireless network .You will only
be able to connect with an Access Point (AP), which has the same SSID. Note that the SSID will be
case sensitive. Please note that when you are in the Ad-hoc mode, the SSID must be the same
among stations so that computers can communicate within the local LAN properly.
l Tx Rate:
You can choose one of the transmission rates as follows, 1Mbps, 2Mbps, 5.5Mbps, 11Mbps, and
Fully Auto.
l Power Save Mode:
You can set this mode as Power Save to set your USB adapter as power saving mode.
l MAC Address:
It shows the MAC address of your Wireless USB Adapter device, and the parameter can’t be changed.
l Other information:
The Signal Strength and Link Quality will be shown in the screen below under the Status of your
USB adapter,
l Status:
The Status will show the “OK” if you select “Ad Hoc mode” in the Operating Mode. Besides, the
Status will show BSSID of AP that you associated if you select the “Infrastructure “ in the “Operating
Mode”.
10
There are three processes once you want to change the parameter in the “Setting”:
1. Click the “Change” button first if you want to change any of the parameter.
2. Choose the parameter you wish to change.
3. After changing the parameter, please click on the “Submit” button to finish.
3.3.2 Statistics
The following screen shows various statistics including the Data Packets, Management Packets and Rejected
Packets in transmitting and receiving status.
You can click the Clear button to reset Statistics Tab.
11
3.3.3 Site Survey
The screen shows all the messages of Access Point around your Wireless USB Adapter device. The
messages of Access Point include BSSID, SSID, Signal, the Channel used by AP, and enabled the
Encryption AP or not.
You can click the Rescan button to find the new AP.
You can double-click the BSSID to choose the AP that you want to connect with.
12
3.3.4 Encryption
You may desire an additional measure of security in your wireless network, which can be achieved
by using the Encryption function.
WEP Key to use:
You can choose one of the four Keys you typed (Key1~Key4) as the WEP Key.
WEP Mode:
If you set the Mode to Optional, your device can communicate with the stations with disabled WEP. Otherwise,
if you set Mode to Mandatory, then your device cannot communicate with the stations with disabled WEP.
Authentication Type:
Open System Authentication algorithm is mostly used. In Shard Key Authentication algorithm, you must have
WEP on, the algorithm should be different, and some steps use packets with encryption by transferring a
challenge text. In order to choose which authentication algorithm will be used, you must know which one the
AP supports first. Most APs only support Open System.
! Caution: WEP Key needs to be the same for all IEEE802.11b stations.
Follow the steps below to set your WEP:
(1) Select the Encryption type: 64bit or 128bit.
(2) Type WEP Key: If you select 64bit, you must type 10 values in the following range (0~F) from Key1 to Key
4 space. Besides, if you select 128 bit, you must type 26 values (0~F) in each WEP Key from Key 1 to
Key 4. Please note that all the WEP Keys (key1~key4) have to be filled.
(3) Select WEP Key: Select one of WEP Key from Key1 to Key4 for using.
(4) Choose the WEP Mode: Mandatory for communicating with all stations having WEP enabled or Optional
for WEP disabled.
(5) Select the Authentication Type: Open System or Shared Key.
(6) After all the settings are completed, click on Submit button to save the setting.
13
3.3.5 Advanced
The screen shows the advanced setting of the Wireless LAN Monitor Utility, and it includes Preamble Type,
Fragmentation Threshold, and RTS / CTS Threshold. We suggest to use the default settings: Preamble Type:
Long.
Click on Submit button to save all the settings.
14
3.3.6 Version
The screen shows the version of Driver, Firmware, and Application for Wireless USB Adapter Utility / Driver.
3.4 Remove your Wireless USB Adapter
If you do not need the wireless connectivity of your Wireless USB Adapter, you can unplug
your USB adapter directly, and follow the procedures mentioned below to remove the PC
Card from its slot.
! Caution:
When removing the Wireless USB Adapter, you will lose your connection to the network. Make sure you have
closed all files and network applications (such as e-mail) prior to removing the USB device,
Additional Note for Windows 2000
If you directly remove your USB device in Windows 2000, a message of unsafe remove device will be
prompted as follows. Please click OK.
15
3.5 Uninstall the Wireless USB Adapter Utility / Driver
If you do not need the wireless connectivity of your Wireless USB Adapter,
1.
First you should remove the Wireless USB Adapter.
2.
To uninstall the Wireless USB Adapter Utility and Driver, you can move to Control Panel
---> Add/Remove Programs---> Wireless USB Adapter , and click “ Add/Remove“.
16
3.
You will be asked if you want to uninstall the Wireless USB Adapter Utility and all of its components. Click
“ Yes “ to uninstall or click “ No “ to exit.
4.
Now the un-installation is completed. Please click “ OK“.
17
Chapter 4
Application
To enable the sharing of the Internet access, you should set your Wireless USB Adapter mode as “ Infrastructure “ and
connect to the access point. When the procedure is completed, an Access Point will appear on the Wireless LAN
Neighborhood of Wireless USB Adapter Utility. Double-click it to enter the Network Neighborhood folder. This folder
contains the links to all the com puters in your workgroup on the entire network.
4.1 File Sharing in Microsoft Windows 98
Wireless USB Adapter allows the sharing of files between computers that are logged onto the same wireless
network. Let’s assume that you want your folder “ My Documents “ to be shared with other computers and the
wireless network:
1.
First, locate the folder “ My Documents “ and right click it.
2.
Select “ Sharing “ from the available options.
3.
Select “ Shared As “ to open your folder for file sharing. You can also select and define the level of access
you want for your folder.
18
If “ Read-Only “ is selected, the other users in the wireless network can only copy files from your folder.
Copying files into your folder is not allowed. If “ Full “ is selected, the other users in the wireless network have
full access into your folder. They can copy to and from your folder as well as modify files. You can also set the
option to “ Depends on Password “ wherein the user in the wireless network can access to your folder through
a set password.) The set password will determine if the user can only read your folder or has full access to
your folder.
4.
Click “ Apply “ or “ OK “ to activate the options that you have set. Now you can see the folder “ My
Documents “ with a little hand under it. The folder is now open for file sharing.
Sharing files in the 802.11b wireless network will be like sharing files on a wired LAN.
19
4.2 Printer Sharing in Windows 98
In order to the printer can be shared across the network, it has to be set as the network printer.
Follow the instructions below to set a printer as a network printer:
1. Click the “ Start “ button, point to the “ Settings “, and then click “ Printers “.
2. In the Printers window, click the printer you want to share.
3.Click “ Sharing… “ on the “ File “ menu.
4. Click the Sharing tab, then click “ Shared As “, and if necessary, enter a password.
20
4.3 Using the shared folder
1.
Double-click the “ Network Neighborhood “ icon, and then double-click the computer where the shared
folder is located.
2.
Double-click the folder you want to connect to.
3.
You may want to assign a drive letter for shared folder that you connect to.
4.
In the “ Network Neighborhood “, double-click the computer where the shared folder is located.
5.
Click the folder you want to connect, and click “ File “ menu, and then click “ Map Network Drive “.
6.
Select an available drive, and then click “OK”.
Note: If a password is required, the Windows will prompt you. Then you need to enter the password that had
been assigned to this shared folder.
4.4 Using the Shared Network printer
1.
In the “ Network Neighborhood “, locate and double-click the computer where the printer you want to use
is located.
2.
Double-click the printer icon in the window.
3.
To set up the printer, follow the instructions on the screen.
Note:
1.
After you have set up a network printer, you can use it as if it were attached to your computer.
2.
If a password is required, the Windows will prompt you, and you need to enter the password that had
been assigned to this shared printer. Whenever printing a document through the network, be sure to
select the printer that is set as the network printer.
21
Chapter 5
Troubleshooting
If you encounter some problems installing the Wireless USB Adapter or you want to confirm
whether your card is installed properly or not, refer to the procedure below after you have
installed the card.
5.1 Check the Various Properties of the Card
To verify if the driver has been set in your computer properly, you can follow the procedures below.
Right -click “ My Computer “ and then select “ Properties “, then you will enter your system properties. Select
the Device Manager and click the Network Adapter. You will find the Wireless USB Adapter if it is installed
successfully.
If there is Question-mark (?) or Exclamation-mark (!) in yellow on your Wireless USB Adapter in previous picture
(PC Card Properties & System Properties), please make sure you have inserted the right PC Card, the proper
driver and utility have been installed as well. If you are not sure, follow the procedure below to reinstall
(update) the driver.
a. Enter “System Properties” and click “Device Manager” on upper menu.
b. Click “Network Adapter” and choose Wireless USB Adapter
c. Select “Driver” on the upper menu of Wireless USB Adapter properties, and then click on “ Update Driver”
button.
d. Follow the Update Device Driver Wizard to complete the driver installation.
22
5.2 Microsoft Networking Checklist
In order to the Wireless USB Adapter can run properly, some network items must be presented
in the Microsoft “ Network Neighborhood “ setup. To check and activate the network setup,
right-click the “Network Neighborhood“ and select “Properties”. The following items should be
presented in the network setup:
1. Wireless USB Adapter
2. IPX / SPX-compatible Protocol -> Wireless USB Adapter
3. NetBEUI -> Wireless USB Adapter
4. TCP / IP -> Wireless USB Adapter
5. File and printer sharing for Microsoft Networks.
6. Client for Microsoft Networks
If any of these items are missing, please follow the instructions below to install them properly:
Set up the Network Protocols:
Click “ Add “ and select “ Protocol “ on Network “ Configuration “.
Click “ Add “ and then choose the network protocol. Select Microsoft as the manufacturer and
“ NetBEUI “, “ TCP/IP “, and “ IPX/SPX-compatible “ for the network protocols. Then click “OK“.
Now your network protocol should be set. Please check if your network needs any special
requirements to operate in your office environment.
23
Network Service for Microsoft Networking:
Click “ Add “ and select “ Service “.
Select “ Microsoft “ as the manufacturer and choose “ File and printer sharing for Microsoft
Networks “ for network service;
Click “ OK “ to set the network service.
5.3 Others
Additional Note for Windows 98 earlier edition
If your system is running Windows 98 first edition, you may use one of the following ways to make
Wireless LAN Monitor Utility work properly.
1. Copy and replace the file MFC42.dll from c:\windows\system of Windows 98SE to the same
directory of your Windows 98 first edition.
2. Upgrade your system and IE from Microsoft web site.
24