1
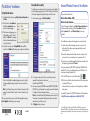
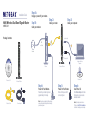
Installation Guide
N600 Wireless Dual Band Gigabit Router
WNDR37AV
Step 1A:
Unplug or power off your modem.
Step 1B:
Step 2:
Step 3:
Cable your router.
Cable your computer.
Cable your modem.
Package Contents:
(not included)
DSL
or Cable
Internet
Power on/off
Laptop or Desktop
Computer
Modem
Wireless-N Router
N600 Wireless Dual Band Router
WNDR37AV
N600 Wireless Dual Band Router
WNDR37AV
Resource CD
Ethernet Cable
Resource CD
Wireless-N Router
Power Adapter
Step 4:
Step 5:
Step 6:
Power On Your Modem.
Power On Your Router.
Insert Your CD.
Wait until your modem cycles on
(approximately 2 minutes).
Wait until the power LED
turns solid green.
Click Router Setup and follow
the steps to set up a secure
wireless network.
Note: If you have a modem with a battery-backup,
remove and re-insert the battery before connecting
your modem to power.
Note: If your laptop does not have a
CD drive, see “No CD Drive” Installation
on the back to complete your router setup.
“No CD Drive” Installation
Set up Internet access
1. In the address field of your browser, type http://www.routerlogin.net and
click Enter.
Set up wireless security
Connect Wireless Devices to Your Router
You should set up a secure wireless network. Once your router security is established,
your wireless laptops, gaming devices (such as Wii or Play station 3 with wireless),
or other wireless equipment can safely and securely connect to the Internet.
Enter your wireless information here:
1. From the main menu page, select Wireless Settings.*
2. Enter the router User Name admin and
default Password password to open
your router’s main settings page.
Wireless Network Name (SSID) ________________________________
Wireless Security Passphrase __________________________________
If you don’t remember your Passphrase, type http://www.routerlogin.net into
your browser and log in by entering your User Name admin and Password
(default is password). Then, select Wireless Settings to retrieve your
Passphrase.
3. When the main settings page opens, you
will be asked if you want to “Check for
Update.” Click Cancel. You can always
check for new firmware later after you are
connected to the Internet.
You can add wireless computers and other equipment to your wireless network:
1. Open the wireless software that manages your wireless connections on the
wireless device (iPhone, laptop computer, gaming device) that you want to
connect to your router.
4. Select the first menu item on the left: Setup Wizard. Make sure Yes is
selected. Then click Next and follow the prompts to complete the Setup Wizard.
2. The wireless software will scan for all wireless networks in your area. Look for
your network—the one you named when you set up your router. Select it.
3. If you set up security, you will be prompted for a Passphrase or network key. Enter
the Passphrase you selected and click Connect.
*Your router menu may display different or additional features not shown in this image.
When the Setup Wizard has completed detecting your connection, the Basic
Settings page displays showing your settings. You are now connected to the
Internet.
Note: If your ISP requires that you enter a User Name or Password, you will be
prompted to enter this information. If you do not have this information, contact
your ISP.
After connecting to the Internet, you can check for firmware updates by selecting
Router Upgrade and following the on-screen prompts.
2. First, name your wireless network. Choose a name that is easy for you to
remember. You might want to write it down here: ___________________________
(the default name is NETGEAR).
3. Select your security method. NETGEAR recommends WPA-PSK (TKIP) +WPA2PSK (AES). Then, enter a Passphrase. In the example, we entered HomeNetwork.
You might want to write your Passphrase down here:________________________.
Note: Both your Network Name (SSID) and Passphrase are case sensitive. Your
Network name, Security method and Passphrase must be the same on all the
wireless devices connected to your router.
If your wireless device supports WPS (WiFi Protected Setup)—NETGEAR calls this
method Push 'N' Connect—you might be prompted to press a WPS button on the
router instead of entering a Passphrase. Then:
1. Press the WPS button on the router. It will look similar to
or
.
2. Within 2 minutes, follow the wireless software instructions on the wireless device
to complete the WPS process.
The device will then be connected to your router. Repeat this process to add other
wireless devices.
For complete DoC please visit the NETGEAR EU Declarations of Conformity website
at: http://kb.netgear.com/app/answers/detail/a_id/11621/.
4. Click Apply and close your browser.
July 2010
© 2010 by NETGEAR, Inc. All rights reserved. NETGEAR and the NETGEAR logo are registered
trademarks of NETGEAR, Inc. in the United States and/or other countries. Other brand and product names
are trademarks or registered trademarks of their respective holders. Information is subject to change without
notice.