1
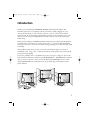
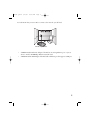
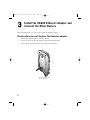
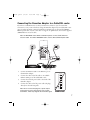
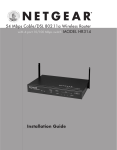
XE602 Qcard
5/7/02
10:23 AM
Page 1
Powerline Ethernet Adapter
MODEL XE602
Installation Guide
XE602 Qcard
5/7/02
10:23 AM
Page 2
Technical Support
YOU MUST REGISTER TO OBTAIN TECHNICAL SUPPORT. PLEASE RETAIN
PROOF OF PURCHASE AND THE WARRANTY INFORMATION.
To register your product, get product support or obtain product information and product
documentation, go to http://www.NETGEAR.com/register.
You’ll find technical support information at http://www.NETGEAR.com/ through the
Customer Service area. If you want to contact technical support by telephone, see the support
information card for the correct telephone number for your country.
2002 by NETGEAR, Inc. All rights reserved.
©
NETGEAR and Auto Uplink are trademarks or registered trademarks of NETGEAR, Inc. in the United States and/or
other countries.
Other brand and product names are trademarks or registered trademarks of their respective holders.
Information is subject to change without notice.
XE602 Qcard
5/7/02
10:23 AM
Page 3
Introduction
Thank you for purchasing the NETGEAR® XE602 Powerline Ethernet Adapter. This
Powerline adapter lets you completely network your home by simply plugging into your
existing electrical wiring, so your network connection is as close as your nearest 110-volt
electrical outlet. Now your high-speed cable/DSL connection can be available in every room.
And you can also extend an existing Ethernet network to PCs in other rooms without any
added wiring.
Robust and rate-adaptive, the XE602 minimizes interference from other household appliances.
Go ahead and use your hair dryer, vacuum cleaner or TV – your network will automatically
find the best data rate so that you can continue surfing, playing games or telecommuting, safely
and reliably.
This installation guide shows you how to connect your Powerline adapter to your PC or
Cable/DSL router. Setup is easy – follow the instructions in this guide and your network will
be up and running quickly.
If you have problems, there is a troubleshooting section on page 14 to help you. You can also
find all the latest information online from www.NETGEAR.com. NETGEAR offers technical
support 24 hours a day and 7 days a week on the Web (www.NETGEAR.com), by e-mail
([email protected]) and by phone (see the provided support information card for
phone numbers).
Kids' Room
Kitchen
Home Office
PC
Cable/DSL
Modem
Internet
Radio
Powerline Adapter XE602
PC
Powerline
Adapter
XE602
Powerline Adapter XE602
Router
1
XE602 Qcard
5/7/02
10:23 AM
Page 4
Installation Overview
Estimated setup time is 10 to 20 minutes for each PC.
1.
Unpack the box and verify the contents.
2.
Connect the Ethernet port to any Ethernet device such as a PC or Cable/DSL router.
3.
Connect the power cord.
4.
Set the encryption password (optional).
2
XE602 Qcard
1
5/7/02
10:23 AM
Page 5
Unpack the Box
When you open the box, verify that you have received everything.
The package includes:
•
XE602 Powerline Ethernet Adapter
•
Resource CD
•
10-ft Ethernet Patch Cable (BLUE)
•
10-ft Ethernet Crossover Cable (GRAY)
•
6-ft power cord
•
Vertical Stand
•
Wall-mounting screws
•
XE602 Installation Guide (this document)
•
Warranty and registration card
•
Support information card
If you don’t have everything listed above, see the support information card for contact
information. If the support information card is missing, you can get contact information at
www.NETGEAR.com in the Customer Service area.
Powerline Ethernet Adapter
XE602
Ethernet Cables
Stand
Powerline Ethernet Adapter XE602
Resource CD, installation guide,
support information card
& warranty/registration card
110v cord
3
XE602 Qcard
2
5/7/02
10:23 AM
Page 6
Prepare to Install the Powerline
Ethernet Adapter
The NETGEAR Powerline Ethernet adapter enables you to set up a home network using your
existing electrical outlets. Computers in different rooms can share the Internet connection as
well as files and printers using the Electrical wiring that’s already in your house. There is no
need for unsightly Ethernet cabling or any rewiring.
You will need one of NETGEAR’s Powerline adapters in each room that you want part of the
home network. The XE602 Powerline Ethernet adapter can easily connect to any device with
a 10BaseT or a 10/100 Mbps Ethernet port.
In order to share your Cable or DSL connection among PCs in different rooms, you will need
the following:
Home Office
PC
Cable/DSL
Modem
Powerline
Adapter
XE602
Router
•
Cable or DSL Modem
•
Cable/DSL Gateway Router (such as the NETGEAR RP614 or XR814)
•
A XE602 Powerline Ethernet Adapter connected to the Router (unless you are using the
NETGEAR XR814 Powerline Cable/DSL router)
4
XE602 Qcard
5/7/02
10:23 AM
Page 7
For each Room that you want a PC to connect to the network, you will need:
Kids' Room
PC
Powerline Adapter XE602
•
A XE602 Powerline Ethernet Adapter, if the PC has an existing Ethernet port or you are
about to install a 10/100 Mbps Ethernet Network Card.
•
A XA601 Powerline USB Adapter, if the PC lacks an Ethernet port but supports a USB port.
5
XE602 Qcard
3
5/7/02
10:23 AM
Page 8
Install the XE602 Ethernet Adapter and
Connect the Other Devices
After unpacking the box, you are ready to install the Powerline adapter.
Decide where you wish to place the Powerline adapter.
•
It can be placed horizontally on a desk or tabletop.
•
It can be mounted on the wall using the enclosed wall mounting kit.
•
It can be placed in the vertical stand, in order to save desk space.
Powerline Adapter XE602
on Vertical Stand
6
XE602 Qcard
5/7/02
10:23 AM
Page 9
Connecting the Powerline Adapter to a Cable/DSL router
If you have a Cable/DSL router to share your Internet connection, you can extend that
connection to every room in the house using the Powerline adapter. If your Cable/DSL router
supports either automatic or manual (push button) uplink ports, use the standard (BLUE)
Ethernet patch cable. If your router does not support an uplink feature, then use the supplied
(GRAY) Ethernet crossover cable.
Note: for NETGEAR routers RT311 and RT314 please use the (GRAY) Ethernet
crossover cable. For all other NETGEAR routers, use the (BLUE) Ethernet patch cable.
Cable/DSL
Modem
Power Adapter XE602
LAN
Ports
WAN
Port
1.
Connect the Ethernet Cable to the Ethernet port of
the Powerline Adapter.
2.
Connect the other end of the cable to an available
Ethernet LAN port of the Cable/DSL router.
3.
Connect the enclosed power cable to the back of the
Powerline adapter.
4.
Connect the other end of the power cable (the plug)
directly into the wall receptacle.
Router
OFF
ON
Note: Do not connect the plug into a power strip or
surge protectors since these devices may contain
circuit filters, which may degrade the Powerline signal.
WARNING!
7
XE602 Qcard
5/7/02
10:23 AM
Page 10
Connecting the Powerline Adapter to a PC
Power Adapter XE602
1.
Connect the enclosed standard (BLUE) Ethernet Cable to the Ethernet port of the
Powerline Adapter.
2.
Connect the other end of the cable to the Ethernet port of the PC.
3.
Connect the enclosed power cable to the back of the Powerline adapter.
4.
Connect the other end of the power cable (the plug) directly into the wall receptacle.
Note: Do not connect the plug into a power strip or surge protectors since these
devices may contain circuit filters, which may degrade the Powerline signal.
OFF
ON
8
WARNING!
XE602 Qcard
5/7/02
10:23 AM
Page 11
Check the Setup
The Power light should light up.
The Ethernet Link LED icon should light up as long as the device on the other end of the
Cable (router or PC) is ON.
The Powerline LED icon should be ON indicating that the system has been initialized.
Power LED
Powerline LED
Ethernet LED
Powerline Adapter XE602
Note: If a light isn’t lit when it should be, go to the Troubleshooting section.
9
XE602 Qcard
4
5/7/02
10:23 AM
Page 12
Setting Up Your Encryption Software
(optional)
The NETGEAR Powerline products provide the option to set your own unique encryption key.
The encryption key is used to protect unauthorized access to you network over the powerline
network. This is accomplished by using the NETGEAR Encryption utility supplied on the
Resource CD. The utility will generate a new key once you define a network password. Each
powerline device must be set with exactly the same key; otherwise they will be unable to
communicate with one another.
Note: Once you begin to change the key for each device, portions of your network
may become disabled until all of the devices have been set with the new encryption
key.
1.
Install the software on the PC connected to the XE602 Powerline Ethernet Adapter.
a. For a Powerline adapter connected to Cable/DSL router, install the software on a PC
connected to one of the adjacent LAN ports of the router.
2.
Insert the CD into the CD-ROM drive
3.
Double-Click on the Setup.exe on the root directory of the CD
4.
Once the following screen appears, click "Next" and follow the instructions on the setup
screens, until you reach the screen shown in step 5.
10
XE602 Qcard
5/7/02
10:23 AM
Page 13
5.
Once all of the appropriate files have been copied to your hard drive, the following dialog
box will appear. Click "Finish".
6.
In order to complete the installation, you will be asked to restart your computer. Close all
other applications and then click “Yes” to restart the computer.
7.
Once the computer restarts, double click on the "Encryption Utility" icon on the
Windows desktop.
11
XE602 Qcard
5/7/02
10:23 AM
Page 14
8.
Once the following screen appears, click "Next"
9.
Enter a new password between 4-24 characters in length. Record the password on the
following line, since you will need to program each Powerline device with it.
Note: The password is case sensitive and must be copied exactly.
New Password: __________________________
Once you have entered the new password, click on "Next".
12
XE602 Qcard
5/7/02
10:24 AM
Page 15
10. Once the following dialog box appears, click on “Next” to begin reprogramming the
XE602 with the new encryption password.
11. Click on “Next” again and the following dialog box will appear. Click “Finish” and then
repeat these steps for all remaining NETGEAR Powerline devices.
13
XE602 Qcard
5/7/02
10:24 AM
Page 16
Troubleshooting
Problem
Ethernet Link LED is
OFF or intermittent
Power Line LED is
not ON
14
Cause
Solution
•
Make sure the power cord is properly
connected at both ends.
•
Make sure that the cable plug is
properly inserted and locked into the
port at both the hub and the device.
•
Make sure all cabling is Category 5 and
meets the requirements for 10 Mbps
operation.
•
Check Link LEDs on attached Ethernet
devices or the network adapter cards.
•
If you are having trouble connecting
the XE602 to an Ethernet Hub or
switch; connect it to the port that
supports an uplink and press the uplink
button.
Normal/Uplink
push button is
in the wrong
position
•
Check the Normal/Uplink push button
on the front panel of the hub, switch or
router.
Incorrect Cable
used to connect
to the router
•
Exchange the supplied Ethernet patch
cable with the Ethernet crossover cable.
System not
Initializing
•
Recheck your connections and the
Power LED is ON.
Port connection
is not
functioning
XE602 Qcard
5/7/02
10:24 AM
Page 17
Technical Specifications
Network Ports
One 10 Base-T Ethernet port
One 14 Mbps PowerLine Ethernet port
Network Interface
RJ-45 (10 Base-T Ethernet),
Electrical Plug (PowerLine Ethernet)
Performance Standards
10 Mbps 10BASE-T
Ethernet Standards Compliance
IEEE 802.3 10BASE-T Ethernet
Power Line Networking Standards Compatible with HomePlug 1.0 standard
Modulation Schemes
OFDM Symbol Modulation
DQPSK, DBPSK, ROBO Carrier Modulation
CSMA/CA
Frequency Band
4.3 MHz – 20.9 MHz
Additional Protocols
Forward Error Correction (FEC)
Automatic Channel Adaption
Status LEDs:
Unit
Ethernet
Power Line
Unit: Power
Link/Activity
System Initialized
Power Supply
85-135 V @ 60 Hz, Internal
Dimensions
W-175 mm (6.9")
D-115 mm (4.53")
H-25 mm (1")
Weight
0.4 kg (0.87 lb)
Environmental Specifications
Operating temperature: 0º C to 40ºC (32 to 104°F)
Operating relative humidity: 10% to 90%
noncondensing
Electromagnetic Emissions
FCC Part 15 Class B
Warranty
2 years
15
XE602 Qcard
5/7/02
10:24 AM
Page 18
Voluntary Control Council for Interference (VCCI) Statement
This equipment is in the second category (information equipment to be used in residential areas) and conforms to the
standards set by the Voluntary Control Council for Interference by Data Processing Equipment and Electronic Office
Machines that are aimed at preventing radio interference in residential areas.
EN 55 022 Declaration of Conformance
This is to certify that the NETGEAR Model XE602 Powerline Ethernet Adapter is shielded against the generation of radio
interference in accordance with the application of Council Directive 89/336/EEC, Article 4a. Conformity is declared by the
application of EN 55 022 Class B (CISPR 22).
Federal Communications Commission (FCC) Compliance Notice: Radio Frequency Notice
This equipment has been tested and found to comply with the limits for a Class B digital device, pursuant to part 15 of the
FCC Rules. These limits are designed to provide reasonable protection against harmful interference in a residential
installation. This equipment generates, uses, and can radiate radio frequency energy and, if not installed and used in
accordance with the instructions, may cause harmful interference to radio communications. However, there is no guarantee
that interference will not occur in a particular installation. If this equipment does cause harmful interference to radio or
television reception, which can be determined by turning the equipment off and on, the user is encouraged to try to correct
the interference by one or more of the following measures:
• Reorient or relocate the receiving antenna.
• Increase the separation between the equipment and receiver.
• Connect the equipment into an outlet on a circuit different from that to which the receiver is connected.
• Consult the dealer or an experienced radio/TV technician for help.
Canadian Department of Communications Radio Interference Regulations
This digital apparatus (NETGEAR Model XE602 Powerline Ethernet Adapter) does not exceed the Class B limits for radionoise emissions from digital apparatus as set out in the Radio Interference Regulations of the Canadian Department of
Communications.
Règlement sur le brouillage radioélectrique du ministère des Communications
Cet appareil numérique (NETGEAR Model XE602 Powerline Ethernet Adapter) respecte les limites de bruits
radioélectriques visant les appareils numériques de classe B prescrites dans le Règlement sur le brouillage radioélectrique du
ministère des Communications du Canada.
Statement of Conditions
In the interest of improving internal design, operational function, and/or reliability, NETGEAR reserves the right to make
changes to the products described in this document without notice.
NETGEAR does not assume any liability that may occur due to the use or application of the product(s) or circuit layout(s)
described herein.
Certificate of the Manufacturer/Importer
It is hereby certified that the NETGEAR Model XE602 Powerline Ethernet Adapter has been suppressed in accordance
with the conditions set out in the BMPT-AmtsblVfg 243/1991 and Vfg 46/1992. The operation of some equipment (for
example, test transmitters) in accordance with the regulations may, however, be subject to certain restrictions. Please refer to
the notes in the operating instructions.
Federal Office for Telecommunications Approvals has been notified of the placing of this equipment on the market and has
been granted the right to test the series for compliance with the regulations.
Bestätigung des Herstellers/Importeurs
Es wird hiermit bestätigt, daß das Model XE602 Powerline Ethernet Adapter gemäß der im BMPT-AmtsblVfg 243/1991
und Vfg 46/1992 aufgeführten Bestimmungen entstört ist. Das vorschriftsmäßige Betreiben einiger Geräte (z.B. Testsender)
kann jedoch gewissen Beschränkungen unterliegen. Lesen Sie dazu bitte die Anmerkungen in der Betriebsanleitung.
Das Bundesamt für Zulassungen in der Telekommunikation wurde davon unterrichtet, daß dieses Gerät auf den Markt
gebracht wurde und es ist berechtigt, die Serie auf die Erfüllung der Vorschriften hin zu überprüfen.
April 2002
*M1-XE602NA-0*
M 1 - X E 6 0 2 N A - 0