1
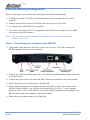
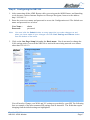
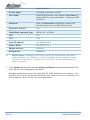
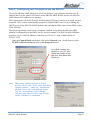
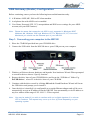
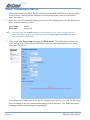
Contents
Introduction .................................................................................................................... 3
Which configuration is best? ...........................................................................
Package Contents ...........................................................................................
Factory Defaults ...............................................................................................
Do I need a Micro filter? ...................................................................................
3
4
4
5
Ethernet Gateway Configuration ................................................................................... 6
Step 1: Connecting your computer to the NB1300 ......................................... 6
Step 2: Configuring the NB1300 ..................................................................... 7
Step 3: Configuring your Computer to use the NB1300 ................................ 9
Ethernet Modem (Bridge) Configuration ..................................................................... 10
Step 1: Connecting your computer to the NB1300 ....................................... 10
Step 2: Configuring the NB1300 .................................................................... 11
Step 3: Configuring your Computer/Router to use the NB1300 .................. 12
USB Gateway (Router) Configuration ......................................................................... 13
Step 1: Connecting your computer to the NB1300 ....................................... 13
Step 2: Configuring the NB1300 ................................................................... 14
Step 3: Configuring your Computer to use the NB1300 .............................. 15
Trouble Shooting ......................................................................................................... 16
Resetting the NB1300 ADSL Modem ............................................................ 16
Registering your NetComm Product ........................................................................... 16
Contact Information .......................................................................................
Trademarks and Notices ...............................................................................
Warranty Registration Form ..........................................................................
Product Warranty ............................................................................................
Limitations of Warranty ..................................................................................
www.netcomm.com.au
Page 2
16
16
17
19
19
Rev. 2 - YML643
NB1300 ADSL Modem
Introduction
This guide is supplied to help you connect your NB1300 ADSL Modem quickly to your
network or Windows computer.
If the NB1300 has already been used, we strongly recommend you reset and flush all settings of
the unit via the USB cable by pressing and holding the RESET button on the rear of the modem
for 10 seconds. Wait for the RDY light to begin pulsing before continuing.
Note:
Please be aware that connection via USB is only supported in Windows 98SE,
Windows Me, Windows 2000 and Windows XP. For Windows 95, NT, Linux and
Macintosh you should use the Ethernet port of your NB1300.
Which configuration is best?
Your NB1300 ADSL Modem can be connected and configured in various ways, below is a
description of the most common modes of operation.
Ethernet Gateway (Router) - This is when the NB1300 is connected to your network switch
or hub and shares the Internet connection to all computers on the network. The NB1300 will log
on to your ISP on behalf of your computers and it will shield your computers from direct
Internet attack by using Network address Translation (NAT).
Ethernet Modem (Bridge) - This is when you plug the modem directly into the Ethernet port
of just one computer or another router (via a cross over Ethernet cable) you then must run
Internet connection software (often supplied by your ISP) on the computer or second router to
establish a connection to the Internet. This method means that the computer or router connected
to the Ethernet port of the NB1300 is exposed to the Internet and is given a public IP address.
USB Gateway (Router) - If you do not have an Ethernet port on your computer you can use
your USB port like an Ethernet port to connect to the NB1300. This "simulated" Ethernet port
is only for connecting to the NB1300 and is only available for Windows 98SE, Windows 2000
and Windows XP. The NB1300 will log on to your ISP on behalf of your computer and it will
shield your computer from Internet attack by using NAT. Note that the USB cable is not
supplied with the NB1300.
If you wish to configure the NB1300 in a different way to the examples above you should
consult a Network Specialist for more information.
Note:
We recommend you change your Router’s password from the factory default
before connecting it to a network or the Internet. Refer to the “Admin Password”
section in the “Security” Menu.
This unit should only be connected to the Telecommunications Network through a
line cord which meets the requirements of ACA TS008.
Rev. 2 - YML643
NB1300 ADSL Modem
www.netcomm.com.au
Page 3
Package Contents
The following items should be contained in your NB1300 ADSL Modem Package:
■ Quick Start Guide
■ ADSL Modem (NB1300)
■ Power adaptor (12V AC / 1Amp)
■ Telephone line cable (RJ11)
■ Crossover network cable (RJ45)
■ NetComm Communications CD-ROM (CRS767)
■ USB Cable
Factory Defaults
The following table lists the Factory Defaults of your NB1300 ADSL Modem:
Field
Setting Details
LAN IP address:
192.168.1.1
LAN Subnet Mask:
255.255.255.0
DHCP Server:
Enabled (pool 192.168.1.100 - 192.168.1.149)
User Name:
admin
Password:
password
Main Function:
Router (Bridge Disabled)
WAN connection type:
PPPoE LLC
VPI:
8
VCI:
35
Note:
These defaults may change with firmware updates and factory changes please
consult the NetComm website to check for the latest defaults.
www.netcomm.com.au
Page 4
Rev. 2 - YML643
NB1300 ADSL Modem
Do I need a Micro filter?
Micro filters are used to prevent common telephone equipment, such as phones, answering
machines and fax machines, from interfering with your ADSL service. If your ADSL enabled
phone line is being used with any other equipment other than your ADSL Modem then you will
need to use one Micro filter for each phone device.
Splitters may be installed when your ADSL line is installed or when your current phone line is
upgraded to ADSL. If your telephone line is already split you will not need to use a Microfilter
- check with your ADSL service provider if you are unsure.
Each micro filter is connected in-line with your telephone or fax machine so that all signals pass
through it. Telephones and/or facsimiles in other rooms that are using the same extension will
also require Microfilters. The following diagram gives an example of connecting your ADSL
Modem/Router using a Microfilter.
A suitable Microfilter can be purchased from NetComm or your Service Provider, if required.
Rev. 2 - YML643
NB1300 ADSL Modem
www.netcomm.com.au
Page 5
Ethernet Gateway Configuration
Before continuing, ensure you have the following items and information ready:
■ A Windows 98, ME, NT, 2000 or XP client machine with a Network Interface Card
installed.
■ Either a Network Hub and two UTP cables OR one Crossover UTP cable.
■ A telephone line with ADSL service enabled.
■ User Name, Password, VPI, VCI, encapsulation and DNS server settings for your ADSL
account (ask your ISP if unsure) .
Note:
The following procedure presumes your NB1300 is set to a factory default IP
address 192.168.1.1.
Step 1: Connecting your computer to the NB1300
■ Using either a hub and two UTP cables, or just one crossover UTP cable, connect the
NB1300 Modem Router to your computer.
■ Connect one end of the ADSL phone line to the NB1300 ADSL Modem and the other end
to the wall socket.
■ Connect the power pack to the NB1300 ADSL Modem and switch on the power switch.
■ Ensure that there is a LAN link light on the NB1300.
■ Ensure that the computer you intend to use has an IP address in the same subnet as the
NB1300 ADSL Modem. (e.g. the NB1300’s default IP is 192.168.1.1 - your computer
should be on 192.168.1.100 or similar.) If you have DHCP enabled on your computer, the
NB1300 will assign your computer a suitable IP address.
■ Ensure that your computer has a LAN link light.
www.netcomm.com.au
Page 6
Rev. 2 - YML643
NB1300 ADSL Modem
Step 2: Configuring the NB1300
1. After connecting all the ADSL Router cables, powering on the ADSL Router, and launching
a web browser, such as Internet Explorer or Netscape Navigator, browse to the address
http://192.168.1.1.
2. Enter the correct user name and password to access the Configuration tool. The default user
name and password are as below.
User Name :
Password :
Note:
admin
password
You must click the Submit button on every page that you make changes on and
when you have made all your changes click the Save Setting and Reboot button
from the bottom of the menu.
3. Click on the One Page Setup link under the Basic menu. You do not need to change the
LAN settings unless you need the NB1300 to work with an existing network on a subnet
other than 192.168.1.x.
You will need to Change your WAN and VC settings as provided by your ISP. The following
lists an example of the most common ISP settings used in Australia. The fields that require
changing from the default settings are highlighted.
Rev. 2 - YML643
NB1300 ADSL Modem
www.netcomm.com.au
Page 7
❖
Field
Setting Details
Service name:
Any name to describe your ISP
User Name:
Your ISP will provide a case sensitive User Name in a
format similar to your email address. Contact your ISP
for details
Password:
Enter your Password as supplied by your Service
Provider (characters are usually all lower case)
Disconnect timeout:
0❖
Mode/Wan Connection Type:
PPPoE LLC or PPPoA
VPI:
8❖
VCI:
35 ❖
Static IP Address:
192.168.241.101 ❖
Subnet Mask:
255.255.255.0 ❖
Default Gateway:
0.0.0.0 ❖
Bridge mode:
Disabled ❖
Default Setting. Although in most cases you will not be required to alter these
default settings for your NB1300, your ISP may identify specific settings to enable
connection to their service. Please refer to your ISP or Network Administrator for
further information.
4. Click Submit and then click the Save Setting and Reboot button from the bottom of the
menu. Wait for the configuration to complete.
Standard configuration of your NetComm NB1300 ADSL Modem is now complete. You
should be able to access the Internet through the unit, when it is set to be your gateway on
your computer/s. Refer to Step 3 for more information.
www.netcomm.com.au
Page 8
Rev. 2 - YML643
NB1300 ADSL Modem
Step 3: Configuring your Computer to use the NB1300
To use the NB1300 ADSL Modem to access the Internet, your computer must have an IP
Address that is in the same LAN subnet as the NB1300 ADSL Router and use the NB1300
ADSL Router’s IP address as its gateway.
Most applications call for the Primary and Secondary DNS server entries to be made on each
computer. These can be automatically assigned by another DHCP server or by enabling the
DHCP server on the NB1300 ADSL Modem, and entering the DNS values in the DNS section
of the NB1300.
The following example shows how a computer could be set up when the NB1300 ADSL
Modem is configured with no DHCP service for this example. The NB1300 ADSL Modem
would be set to a LAN IP Address (Gateway) of 192.168.1.1 with a Subnet Mask of
255.255.255.0
Open the Control Panel and double click on the Network icon. Scroll down to select
TCP/IP-> Ethernet Card and click on the Properties button.
Your DNS numbers are
specific to your ISP and
should be notified along
with your User Name and
Password.
Note:
When using Internet Explorer as a web
browser, click on the “Tools” menu and select
“Internet Options”. Select the “Connections”
tab and click on the “LAN Settings” button.
Tick the “Automatically detect settings”
checkbox and make sure the “Use a Proxy
server” checkbox is unchecked.
Rev. 2 - YML643
NB1300 ADSL Modem
www.netcomm.com.au
Page 9
Ethernet Modem (Bridge) Configuration
Before continuing, ensure you have the following items and information ready:
■ A computer with a Network Interface Card installed or a router (such as the NetComm
NB3100).
■ A Crossover UTP cable.
■ A telephone line with ADSL service enabled.
■ User Name, Password, VPI, VCI, encapsulation and DNS server settings for your ADSL
account (ask your ISP if unsure). These are not needed for the NB1300, but are required for
the computer or router that it will be connected to.
Note:
The following procedure presumes your NB1300 is set to a factory default IP
address 192.168.1.1.
Step 1: Connecting your computer to the NB1300
■ Using a Crossover network cable, connect the Ethernet port of the NB1300 into the Ethernet
port of the computer you wish to use to configure the unit.
■ Connect the power and switch the NB1300 on.
■ Ensure the LAN link on the NB1300 is active.
■ Configure your Computer to use any IP address in the range of 192.168.1.2 to
192.168.1.254.
Note:
When the NB1300 is used in Bridge mode it is a fairly passive device and most
Internet configuration required (such as User Name, Password, etc.) is done on the
computer or another router.
www.netcomm.com.au
Page 10
Rev. 2 - YML643
NB1300 ADSL Modem
Step 2: Configuring the NB1300
1. After connecting all the ADSL Router cables, powering on the ADSL Router, and launching
a web browser, such as Internet Explorer or Netscape Navigator, browse to the address
http://192.168.1.1.
2. Enter the correct user name and password to access the Configuration tool. The default user
name and password are as below.
User Name :
Password :
Note:
admin
password
You must click the Submit button on every page that you make changes on and
when you have made all your changes click the Save Setting and Reboot button
from the bottom of the menu.
3. Click on the One Page Setup link under the Basic menu.
You will need to Change your WAN and VC settings as provided by your ISP. The following
lists an example of the most common ISP settings used in Australia. The fields that require
changing from the default settings are highlighted.
Rev. 2 - YML643
NB1300 ADSL Modem
www.netcomm.com.au
Page 11
Field
Setting Details
Service name:
Blank ❖
User Name:
Blank ❖
Password:
Blank ❖
Disconnect timeout:
0❖
Mode/Wan Connection Type:
1483 Bridged IP LLC
VPI:
8❖
VCI:
35 ❖
Static IP Address:
192.168.241.101 ❖
Subnet Mask:
255.255.255.0 ❖
Default Gateway:
0.0.0.0 ❖
Bridge mode:
Enabled
❖
Default Setting. Although in most cases you will not be required to alter these
default settings for your NB1300, your ISP may identify specific settings to enable
connection to their service. Please refer to your ISP or Network Administrator for
further information.
4. Click Submit and then click the Save Setting and Reboot button from the bottom of the
menu. Wait for the configuration to complete.
Step 3: Configuring your Computer/Router to use the NB1300
ISP Software Method
Install software on your computer (usually provided by your ISP) and enter a User Name and
Password. This software usually adds a PPP service to your computer.
Please refer to your ISP for more information on how to configure your software to work with
the NB1300 ADSL Modem when used as a bridge.
Second Router Method
If you are using a second router in conjunction with the NB1300 as a Bridge, you should unplug
the NB1300 from the computer and plug the NB1300 into the secondary router. Consult the
second router’s documentation for information on how to configure your user name and
password.
Note:
Depending on the second router, you may need to use a “straight through” UTP
cable instead of a “crossover” UTP cable to join the NB1300 to the WAN port of the
other router.
www.netcomm.com.au
Page 12
Rev. 2 - YML643
NB1300 ADSL Modem
USB Gateway (Router) Configuration
Before continuing, ensure you have the following items and information ready:
■ A Windows 98SE, ME, 2000 or XP client machine.
■ A telephone line with ADSL service enabled.
■ User Name, Password, VPI, VCI, encapsulation and DNS server settings for your ADSL
account (ask your ISP if unsure).
Note:
Please be aware that connection via USB is only supported in Windows 98SE,
Windows Me, Windows 2000 and Windows XP. For Windows 95, NT, Linux and
Macintosh you should use the Ethernet port of your NB1300.
Step 1: Connecting your computer to the NB1300
1. Place the CD-ROM provided into your CD-ROM drive.
2. Connect the USB cable from the NB1300 into a spare USB port on your computer.
3. Windows will detect the new hardware and launch a New hardware Wizard. When prompted
to search for drivers choose “Specify location”.
4. Browse the drive letter of your CD-ROM drive and locate the “USB driver” folder. E.g.
D:\USB driver\ where D: is the drive letter of your CD-ROM.
5. Continue with the driver search by clicking OK and the Found Hardware Wizard will locate
the USB driver and prompt you to install it.
6. Once the driver is installed, it is configurable as a regular Ethernet adapter and will be set to
automatically accept an IP address from the NB1300. You can manually set its IP address to
any free address in the range of 192.168.1.2 –254 as required.
Note:
You may be asked if you wish to continue with out a digital signature if so choose
YES to continue. This request may occur up to four (4) times depending on your
operating system.
Rev. 2 - YML643
NB1300 ADSL Modem
www.netcomm.com.au
Page 13
Step 2: Configuring the NB1300
1. After connecting all the ADSL Router cables, powering on the ADSL Router, and launching
a web browser, such as Internet Explorer or Netscape Navigator, browse to the address
http://192.168.1.1.
2. Enter the correct user name and password to access the Configuration tool. The default user
name and password are as below.
User Name :
Password :
Note:
admin
password
You must click the Submit button on every page that you make changes on and
when you have made all your changes click the Save Setting and Reboot button
from the bottom of the menu.
3. Click on the One Page Setup link under the Basic menu. You do not need to change the
LAN settings unless you need the NB1300 to work with an existing network on a subnet
other than 192.168.1.x.
You will need to Change your WAN and VC settings as provided by your ISP. The following
lists an example of the most common ISP settings used in Australia. The fields that require
changing from the default settings are highlighted.
www.netcomm.com.au
Page 14
Rev. 2 - YML643
NB1300 ADSL Modem
❖
Field
Setting Details
Service name:
Any name to describe your ISP.
User Name:
Your ISP will provide a case sensitive User Name in a
format similar to your email address. Contact your ISP
for details.
Password:
Enter your Password as supplied by your Service
Provider (characters are usually all lower case).
Disconnect timeout:
0❖
Mode/Wan Connection Type:
PPPoE LLC or PPPoA
VPI:
8❖
VCI:
35 ❖
Static IP Address:
192.168.241.101❖
Subnet Mask:
255.255.255.0❖
Default Gateway:
0.0.0.0 ❖
Bridge mode:
Disabled ❖
Default Setting. Although in most cases you will not be required to alter these
default settings for your NB1300, your ISP may identify specific settings to enable
connection to their service. Please refer to your ISP or Network Administrator for
further information.
4. Click Submit and then click the Save Setting and Reboot button from the bottom of the
menu. Wait for the configuration to complete.
Step 3: Configuring your Computer to use the NB1300
Most applications call for the Primary and Secondary DNS server entries to be made on each
computer. These can be automatically assigned by another DHCP server or by enabling the
DHCP server on the NB1300 ADSL Modem, and entering the DNS values in the DNS section
of the NB1300.
Rev. 2 - YML643
NB1300 ADSL Modem
www.netcomm.com.au
Page 15
Trouble Shooting
Resetting the NB1300 ADSL Modem
When the Ethernet cable cannot be used due to an unknown or inaccessible IP address, you will
need to reset the NB1300 ADSL Modem to its factory defaults. To reset the ADSL Modem to
its factory defaults, use a ballpoint pen to press and hold the RESET button for 10 seconds.
Wait 30 seconds for the NB1300 ADSL Modem to reboot. The NB1300 ADSL Modem will
now have the default settings, including its default IP address of 192.168.1.1 and default
passwords
Registering your NetComm Product
To ensure that the conditions of your warranty are complied with, please go to the NetComm
web site for quick and easy registration of your product at
www.netcomm.com.au
Alternatively, you can use a copy of the Warranty Registration Form on the following page and
mail it to NetComm Limited, PO Box 1200, Lane Cove NSW 2066.
Contact Information
If you have any technical difficulties with your product, please do not hesitate to contact
NetComm’s Customer Support Department.
Email:
[email protected]
Fax:
(02) 9424-2010
Web:
www.netcomm.com.au
Trademarks and Notices
NetComm™ is a trademark of NetComm Limited. Windows® is a registered trademark of
Microsoft Corporation. Other brand and product names are trademarks or registered trademarks
of their respective holders. Information is subject to change without notice. All rights reserved.
Please note that the images used in this document may vary slightly from those of the actual
product. Specifications are accurate at the time of the preparation of this document but are
subject to change without notice.
www.netcomm.com.au
Page 16
Rev. 2 - YML643
NB1300 ADSL Modem
Cut along the line
Warranty Registration Form
Date of Purchase
….......…………...........……….................................
Name
….......…………...........……….................................
Company
….......…………...........……….................................
Address
….......…………...........……….................................
…………………….........……...........
Tel No (
) ..............……….….
E-mail
Post Code
Fax No (
)
.....………....……….
....………...……….
….......…………...........……….................................
The following information is vital for your warranty
Please make sure it’s correct and complete.
Serial No
….......…………...........……….................................
Model
….......…………...........……….................................
!
Make sure
you fill this
section in!
Product Type:
PC Card
External
Internal
Other
I intend to use this device at:
Home
School/College/University
Business
Government Office
Dealer’s Name
….......…………...........……….................................
Dealer’s Address
….......…………...........……….................................
…………………….........……...........
Tel No (
) ..............……….….
Post Code
Fax No (
)
.....………....……….
....………...……….
How did you find out about our products?
…………………….............................………………………………………....…………
…………………….............................………………………………………....…………
Product Warranty
The warranty is granted on the following conditions:
1. This warranty extends to the original purchaser (you) and is not transferable;
2. This warranty shall not apply to software programs, batteries, power supplies, cables or
other accessories supplied in or with the product;
3. The customer complies with all of the terms of any relevant agreement with NetComm and
any other reasonable requirements of NetComm including producing such evidence of
purchase as NetComm may require;
4. The cost of transporting product to and from NetComm’s nominated premises is your
responsibility; and,
5. NetComm does not have any liability or responsibility under this warranty where any cost,
loss, injury or damage of any kind, whether direct, indirect, consequential, incidental or
otherwise arises out of events beyond NetComm’s reasonable control. This includes but is
not limited to: acts of God, war, riot, embargoes, acts of civil or military authorities, fire,
floods, electricity outages, lightning, power surges, or shortages of materials or labour.
6. The customer is responsible for the security of their computer and network at all times.
Security features may be disabled within the factory default settings. NetComm recommends
that you enable these features to enhance your security.
The warranty is automatically voided if:
1. You, or someone else, use the product, or attempts to use it, other than as specified by
NetComm;
2. The fault or defect in your product is the result of a voltage surge subjected to the product
either by the way of power supply or communication line, whether caused by thunderstorm
activity or any other cause(s);
3. The fault is the result of accidental damage or damage in transit, including but not limited to
liquid spillage;
4. Your product has been used for any purposes other than that for which it is sold, or in any
way other than in strict accordance with the user manual supplied;
5. Your product has been repaired or modified or attempted to be repaired or modified, other
than by a qualified person at a service centre authorised by NetComm; and,
6. The serial number has been defaced or altered in any way or if the serial number plate has
been removed.
Limitations of Warranty
The Trade Practices Act 1974 and corresponding State and Territory Fair Trading Acts or
legalisation of another Government (“the relevant acts”) in certain circumstances imply
mandatory conditions and warranties which cannot be excluded. This warranty is in addition to
and not in replacement for such conditions and warranties.
To the extent permitted by the Relevant Acts, in relation to your product and any other materials
provided with the product (“the Goods”) the liability of NetComm under the Relevant Acts is
limited to, at the option of NetComm to:
■ Replacement of the Goods; or
■ Repair of the Goods; or
■ Payment of the cost of replacing the Goods; or
■ Payment of the cost of having the Goods repaired.
All NetComm ACN 002 490 486 products have a standard 12 months warranty from date of
purchase. However some products have an extended warranty option (refer to packaging). To
be eligible for the extended warranty you must supply the requested warranty information to
NetComm within 30 days of the original purchase by registering on-line via the NetComm web
site at www.netcomm.com.au.
NetComm reserves the right to request proof of purchase upon any warranty claim.
Rev. 2 - YML643
NB1300 ADSL Modem
www.netcomm.com.au
Page 19