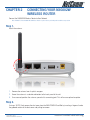
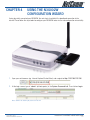
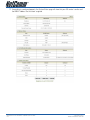
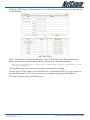
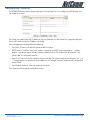
1
User Guide N3G002W 3G Wireless Router Contents Chapter 1 - Overview.....................................................................................................................................4 N3G002W Features...................................................................................................................................5 Package Contents.....................................................................................................................................6 Minimum System Requirements.................................................................................................................6 LED Indicator............................................................................................................................................7 Back Panel Port.........................................................................................................................................7 Restoring Factory Defaults.........................................................................................................................8 Default Settings.........................................................................................................................................8 Chapter 2 - Connecting your N3G002W Wireless Router...............................................................................9 Chapter 3 - Setting up your Computer.........................................................................................................12 Chapter 4 - Using the Web Configuration Wizard .......................................................................................15 Chapter 5 - Advanced Setup........................................................................................................................21 Basic Setting...........................................................................................................................................22 Basic Setting > Primary Setup...........................................................................................................23 Basic Setting > DHCP Server.............................................................................................................29 Basic Setting > Wireless...................................................................................................................30 Basic Setting > Change Password.....................................................................................................34 Forwarding Rules....................................................................................................................................35 Forwarding Rules > Virtual Server......................................................................................................36 Forwarding Rules > Special AP..........................................................................................................37 Forwarding Rules > Miscellaneous....................................................................................................38 Security Setting.......................................................................................................................................39 Security Settings > Packet Filters......................................................................................................40 Security Settings > Domain Filters.....................................................................................................42 Security Settings > URL Blocking.......................................................................................................43 Security Settings > MAC Control........................................................................................................44 Security Setting > Miscellaneous.......................................................................................................45 Advanced Setting....................................................................................................................................46 Advanced Settings > System Log......................................................................................................47 Advanced Settings > Dynamic DNS...................................................................................................48 Advanced Settings > QoS.................................................................................................................49 Advanced Settings > SNMP..............................................................................................................50 Advanced Settings > Routing............................................................................................................51 Advanced Settings > System Time.....................................................................................................52 Advanced Settings > Scheduling.......................................................................................................53 Advanced Settings > Performance.....................................................................................................54 N3G002W 3G Wireless Router User Guide YML894 Rev1 www.netcomm.com.au Tool Box..................................................................................................................................................55 Tool Box > System Info.....................................................................................................................56 Tool Box > Restore Setting................................................................................................................56 Tool Box > Firmware Upgrade............................................................................................................57 Tool Box > Backup Settings...............................................................................................................57 Tool Box > Reset to Default...............................................................................................................57 Tool Box > Reboot............................................................................................................................57 Tool Box > Miscellaneous..................................................................................................................57 Chapter 6 - Troubleshooting........................................................................................................................58 Appendix A – Establishing your wireless connection..................................................................................61 Windows XP service pack 2.....................................................................................................................61 Mac OSX 10.4........................................................................................................................................63 Windows Vista.........................................................................................................................................65 Appendix B – How to configure WEP/WPA-PSK Wireless Security..............................................................68 Appendix C – Legal and Regulatory Information.........................................................................................70 YML894 Rev1������������������������������������� N3G002W 3G Wireless Router User Guide www.netcomm.com.au Chapter 1 Overview NetComm N3G002W 3G Wireless Router is a high-performance router that supports wireless networking for home, office or public space usage. The NetComm N3G002W 3G Wireless Router supports the use of a 16-bit and 32-bit Type II PC Card, either WCDMS, EV-DO and Even HSDPA which enable you to distribute your 3G Broadband service among multiple computers. It also has a WAN uplink port to connect the N3G002W to an ADSL/Cable modem or existing gateway router. The inclusion of a Wireless Access Point feature will enable you to connect your computer or laptop wirelessly to the internet via the router. Security is a key issue with Broadband users and NetComm’s N3G002W 3G Wireless Router does not leave you exposed. Employing the latest Active Firewall technology, the N3G002W blocks every unauthorized packet of data that comes in ensuring your defenses are rock-solid against hackers, unauthorized entries and probes. What’s more, the N3G002W 3G Wireless Router is equipped with a VPN pass-through feature allowing you to use a standard VPN client for Point-to-Point communication even while your firewall is active. The N3G002W Port Forwarding and UPnP function have made it easier for today’s Internet users to configure and setup the myriad of Network Port Rules needed by Internet applications such as On-Line Gaming, PeerTo-Peer file sharing and Messenger services to operate N3G002W 3G Wireless Router User Guide YML894 Rev1 www.netcomm.com.au N3G002W Features 3G Access 1*PC card Type II Slot supports both 16-bit and 32-bit bus rate. Standards IEEE 802.11b/g IEEE 802.3 IEEE 802.3u Firewall IP Filtering NAT (Network Address Translation) with VPN Pass through MAC Filtering Supported WAN type Static IP, Dynamic IP, PPPoE, 3G Connection Scheme Connect-on-demand, Auto-Disconnect NAT function Class C ;One-to-Many; Max 253 Users; Virtual Server; DMZ Host VPN PPTP, L2TP and IPSec Pass Through Configuration and Management Web-Based and SNMP DHCP Server and Client Working Environment Temperature: 0~40oC, Humidity 10%~90% non-condensing OS supported Windows 95/98/ME/NT/2000/XP; Linux Power Switching 5V 3.0A Ports 1 WAN port, 1 LAN port (2xRJ45, 10/100 Base T), 1 USB Port DC Power Port Wireless Standard IEEE 802.11b\g Turbo Data Rate 54, 48, 36, 24, 18, 12, 9, and 6 Mbps per channel, Auto Fall-Back Frequency 2.4 – 2.462 GHz, CCK / OFDM modulation Range Coverage Tx/Rx power 18dbm/Per Cell indoors approx. 35-100 meters; outdoors up to 100-300 meters # of Channels 1-11 for N. America (FCC);1-11 for Canada (DOC) 1-13 Europe/Australia (Except Spain and France) (ETSI) 1-14 Japan (TELEC); Security 64-bit and 128-bit WEP Encryption; WPA Encryption, WPA2 Encryption Antenna Detachable Antenna 1.8dBI YML894 Rev1������������������������������������� N3G002W 3G Wireless Router User Guide www.netcomm.com.au Package Contents Your N3G002W Wireless Router Package contains the following items: • N3G002W Wireless Router • Quick Installation Guide • User Guide on CD • RJ-45 Straight-through Ethernet Cable • Cradle Set • 5V, 3.0A Power Supply Unit. If any of the above items are damaged or missing, please contact your dealer immediately. Minimum System Requirements Before continuing with the installation of your N3G002W Wireless Router, please confirm that you comply with the minimum system requirements. • A compatible 16-bit or 32-bit PCMCIA 3G modem card with service for 3G Broadband access if you want to use 3G Broadband service. Note: Subject to term and condition from your 3G Broadband Internet Service. • Computer with Windows, Macintosh, or Linux-based operating systems with a working Ethernet adapter with TCP/IP Protocol installed. • Internet Explorer version 6.0 or Netscape Navigator version 7.0 and above. Wireless Computer System Requirements • Computer with a working 802.11b, or 802.11g wireless adapter N3G002W 3G Wireless Router User Guide YML894 Rev1 www.netcomm.com.au LED Indicators Label Status Indicates 3G Flashing Flashes when unit is ready Off Power is off Flashing Flashes when data is being sent and received on the LAN connection On Indicates a link to your LAN or Network card is active Off Indicates no link to LAN Flashing Flashes when data is being sent and received on the WAN connection On Indicates that the upstream link to your Modem or router via the WAN port is active Off Indicates no link to WAN Flashing Indicates that the Wireless link is enabled Off Indicates that the Wireless link is disabled LAN WAN WIFI Back Panel Ports Antenna To connect to the supplied detachable antenna WAN 10/100 Base T Ethernet port (RJ-45) uplink port to connect to a modem or router LAN 10/100 Base T Ethernet port (RJ-45) to connect to Ethernet network card or Ethernet Hub/Switch Reset To reset your Wireless Router to factory default settings (All customized settings that you have saved will be lost!) Power Connect to the Power Adapter that comes with your package YML894 Rev1������������������������������������� N3G002W 3G Wireless Router User Guide www.netcomm.com.au Restoring Factory Defaults This feature will reset the Router to its factory default configuration. Occasions may present themselves where you need to restore the factory default settings on your router. Typical situations are: • You have lost your password and unable to login to the router; • You have purchased the router from someone else and need to reconfigure the device. • You are asked to perform a factory reset by a member of the excellent NetComm Support Staff. In order to restore your router to its factory default settings, please follow these steps: • Ensure that the router is powered on (for at least 20 seconds). • Use a paper clip or a pencil tip to depress the reset button for ten seconds and release. At this point, the reset is in progress. Do not power off the unit at this point. • After the router reboots, the default settings are now restored. This entire process takes several minutes to complete. • Once you have reset the router to its default settings you will be able to access the device’s web configuration using http://192.168.123.254 with password “admin”. Default Settings LAN (Management) Static IP Address: 192.168.123.254 Subnet Mask: 255.255.255.0 Default Gateway: blank WAN (Internet) WAN mode: DHCP Wireless SSID: default Channel: 11 Security: none Modem Access Username: admin Password: admin N3G002W 3G Wireless Router User Guide YML894 Rev1 www.netcomm.com.au Chapter 2 Connecting your N3G002W Wireless Router Connect the N3G002W Wireless Router to Your Network Note: DO NOT connect N3G002W 3G Wireless Router to power before performing the installation steps below. Step 1. Attach the antenna. 1. Remove the antenna from its plastic wrapper. 2. Screw the antenna in a clockwise direction to the back panel of the unit. 3. Once secured, position the antenna upward at its connecting joint. This will ensure optimal reception. Step 2. If using a 3G PC Card, remove the dust cover from the WAN PCMCIA Card Slot by inserting a fingernail under the grooved section of the dust cover and pulling to remove. YML894 Rev1������������������������������������� N3G002W 3G Wireless Router User Guide www.netcomm.com.au Step 3. Insert your wireless Type II 3G card (either 16-bit or 32-bit ) into the WAN PCMCIA Card Slot or plug the USB 3G modem to the USB port. Note: The N3G002W 3G Wireless Router is designed to work with either UMTS, EV-DO or HSDPA 3G cards that can be used as modems (support tethered data). Please refer to your service provider for detailed feature information. Step 4. Insert the Ethernet cable into LAN Port on the back panel of the N3G002W 3G Wireless Router, and an available Ethernet port on the network adapter in the computer you will use to configure the unit. Note: The N3G002W 3G Wireless Router LAN Port is “Auto-MDI/MDIX.” This provides Ethernet cable LAN Port access. N3G002W 3G Wireless Router User Guide 10 YML894 Rev1 www.netcomm.com.au Step 5. 1. Connect the power adapter to the port on the back panel of your N3G002W 3G Wireless Router. 2. Then plug the other end of the power adapter into a wall outlet or power strip. a. The 3G LED will turn ON to indicate that the unit is powered on. b. Other LEDs will flash ON and OFF as the N3G002W 3G Wireless Router performs initialization and Internet connection processes. This will take a few minutes. c. When complete, the following LEDs will illuminate green: 3G, LAN, and WiFi. Note: Please refer to the user guide for explination of the use of the WAN Port YML894 Rev1������������������������������������� N3G002W 3G Wireless Router User Guide www.netcomm.com.au 11 Chapter 3 Setting up your Computer Having physically connected your N3G002W, the next step is to configure the router to establish a broadband connection. Depending on your computers current settings you may first need to reconfigure the TCP/IP (Network Settings) to access your 3G Wireless Router. Follow the instructions for your operating system. Windows® XP PCs 1. In the Windows task bar, click the Start button, and then click Control Panel. 2. Click on Network & Internet Connections icon. (Category mode only). 3. Click the Network Connections icon. 4. In the LAN or High-Speed Internet window, right-click on the icon corresponding to your network interface card (NIC) and select Properties. (Often, this icon is labeled Local Area Connection). 5. The Local Area Connection dialog box displays with a list of currently installed network items. Ensure that the check box to the left of the item labeled Internet Protocol (TCP/IP) is checked. Select Internet Protocol TCP/IP and click on Properties. 6. In the Internet Protocol (TCP/IP) Properties dialog box, click the radio button labeled Obtain an IP address automatically. Also click the radio button labeled Obtain DNS server address automatically. 7. Click OK twice to confirm your changes, and close the Control Panel. Windows 2000 PCs First, check for the IP protocol and, if necessary, install it: 1. In the Windows task bar, click the Start button, point to Settings, and then click Control Panel. 2. Double-click the Network and Dial-up Connections icon. 3. In the Network and Dial-up Connections window, right-click the Local Area Connection icon, and then select Properties. 4. In the Local Area Connection Properties dialog box, select Internet Protocol (TCP/IP), and then click Properties 5. In the Internet Protocol (TCP/IP) Properties dialog box, click the radio button labeled Obtain an IP address automatically. Also click the radio button labeled Obtain DNS server address automatically. 6. Click OK twice to confirm and save your changes, and then close the Control Panel. N3G002W 3G Wireless Router User Guide 12 YML894 Rev1 www.netcomm.com.au Windows Me PCs 1. In the Windows task bar, click the Start button, point to Settings, and then click Control Panel. 2. Click on View All Control Panel Options. 3. Double-click the Network icon. 4. The Network Properties dialog box displays with a list of currently installed network components. If the list includes Internet Protocol (TCP/IP), then the protocol has already been enabled. Skip to step 10. 5. If Internet Protocol (TCP/IP) does not display as an installed component, click Add… 6. In the Select Network Component Type dialog box, select Protocol, and then click Add… 7. Select Microsoft in the Manufacturers box. 8. Select Internet Protocol (TCP/IP) in the Network Protocols list, and then click OK. You may be prompted to install files from your Windows ME installation CD or other media. Follow the instructions to install the files. If prompted, click OK to restart your computer with the new settings. Next, configure the PC to accept IP information assigned by the modem: 9. Follow steps 1 - 3 above. 10. In the Network Properties dialog box, select TCP/IP, and then click Properties. If you have multiple TCP/IP listings, select the listing associated with your network card or adapter. 11. In the TCP/IP Settings dialog box, click the radio button labeled Obtain an IP address automatically. 12. Click OK twice to confirm and save your changes, and then close the Control Panel. Windows 95, 98 PCs First, check for the IP protocol and, if necessary, install it: 1. In the Windows task bar, click the Start button, point to Settings, and then click Control Panel. 2. Double-click the Network icon. 3. The Network dialog box displays with a list of currently installed network components. If the list includes TCP/IP, and then the protocol has already been enabled. Skip to step 9. 4. If TCP/IP does not display as an installed component, click Add… The Select Network Component Type dialog box displays. 5. Select Protocol, and then click Add… The Select Network Protocol dialog box displays. 6. Click on Microsoft in the Manufacturers list box, and then click TCP/IP in the Network Protocols list box. 7. Click OK to return to the Network dialog box, and then click OK again. You may be prompted to install files from your Windows 95/98 installation CD.Follow the instructions to install the files. 8. Click OK to restart the PC and complete the TCP/IP installation. Next, configure the PCs to accept IP information assigned by the Modem: 9. Follow steps 1 - 3 above. 10. Select the network component labeled TCP/IP, and then click Properties. If you have multiple TCP/IP listings, select the listing associated with your network card or adapter. 11. In the TCP/IP Properties dialog box, click the IP Address tab. YML894 Rev1������������������������������������� N3G002W 3G Wireless Router User Guide www.netcomm.com.au 13 12. Click the radio button labeled Obtain an IP address automatically. 13. Click OK twice to confirm and save your changes. You will be prompted to restart Windows. 14. Click Yes. Windows Vista 1. In the Windows task bar, click on Start and then click Control Panel. 2. Click on Network and Sharing Center. 3. Click on Manage Network Connection on the left menu. 4. Right click on Local Area Connection and click on Properties 5. The Local Area Connection dialog box will display a list of currently installed network items. Ensure that the check box to the left of the item labeled Internet Protocol Version 4 (TCP/IPv4) is checked. Select Internet Protocol Version 4 (TCP/IPv4) and click on Properties. 6. In the Internet Protocol Version 4 (TCP/IPv4) properties dialog box, click the radio button labeled Obtain an IP address automatically. Also click the radio button labeled Obtain DNS server address automatically. 7. Click OK twice to confirm your changes and close the Control Panel. Mac OSX 10.4 1. Click the Apple icon and choose System Preferences. 2. Click on Network icon. 3. Set Location to Automatic and Show to Built In Ethernet. 4. Click on TCP/IP tab. 5. In the Configure option, choose Use DHCP with automatic address. 6. Click on Apply Now. N3G002W 3G Wireless Router User Guide 14 YML894 Rev1 www.netcomm.com.au Chapter 4 Using the N3G002W configuration Wizard Having physically connected your N3G002W, the next step is to establish the broadband connection to the internet. Please follow the steps below to configure your N3G002W router via the web configuration wizard utility. 1. Open your web browser (e.g. Internet Explorer/Firefox/Safari) and navigate to http://192.168.123.254/ 2. At the login screen, type in “admin” (without quotes) in the System Password field. Then click on Login. Notes: admin is the default login password for the unit. YML894 Rev1������������������������������������� N3G002W 3G Wireless Router User Guide www.netcomm.com.au 15 3. Click on Wizard and then on Enter. 4. This page shows you the steps needed to configure your N3G002W unit. Click Next to continue. 5. This page allows you to change the web configuration login password. To change the password, enter the old password (default is “admin”) and enter the new password. You also need to enter the new password in the Reconfirm field. Then click Next. Or click Next without entering any details to keep the default password. Note: if you change the password, please make sure that you use the new password the next time you log into the web configuration. N3G002W 3G Wireless Router User Guide 16 YML894 Rev1 www.netcomm.com.au 6. Select the type of WAN connection that you want to use and click on Next. Notes: To use a 3G card, please choose “3G card”. For iBurst PCMCIA card, choose iBurst card. For connection to an existing modem/ router choose “WAN Ethernet port”, please refer to the user guide for more details. 7. After choosing 3G, you need to enter the information below, this will have been provided to you by your 3G broadband service provider. Click Next once you finished. Notes: This example shows Bigpond Next G connection settings. Note that you do not have to change the LAN IP address. APN (Access Point Name) for various providers ISP APN Username/Password required Telstra telstra.internet NO Bigpond telstra.bigpond YES Three 3netaccess NO Vodafone vfinternet.au NO Optus internet NO YML894 Rev1������������������������������������� N3G002W 3G Wireless Router User Guide www.netcomm.com.au 17 8. This page allows you to disable the wireless functionality, change the wireless network name (SSID) and change the wireless channel. Click Next once you finished. 9. It is strongly recommended that you now set up simple wireless security such as WEP 64bit or WPA (if your wireless client supports WPA). In order to secure your network. Select your required wireless security and click on Next. Notes: Please refer to the user guide for more information regarding wireless security and how to utilize wireless security on your network. This example shows WEP 64 bit encryption with key “1234567890” N3G002W 3G Wireless Router User Guide 18 YML894 Rev1 www.netcomm.com.au 10. Please review the settings and click on Apply Settings to save them. You can also click Back if there is a error. Notes: To let the wizard run a network testing please tick on Do you want to proceed the network testing? 11. After several minutes the N3G002W will save all the settings and the wizard is complete. Click Finish to go back to the Status page and the unit will now use the new settings. YML894 Rev1������������������������������������� N3G002W 3G Wireless Router User Guide www.netcomm.com.au 19 12. If everything is configured properly, the System Status page will show that your 3G service is online and the WAN IP address that has been assigned. N3G002W 3G Wireless Router User Guide 20 YML894 Rev1 www.netcomm.com.au Chapter 5 Advanced Setup To access the Advanced Setup option of your N3G002W, you need to access the unit’s web configuration outline on page 15 and click on Advanced Setup menu at the top of the page. For first time installation, you will be presented with the following page. Choose Advanced Setup and click Enter to access the Advanced Setup page. After that, click on any of the top menu to access the respective settings pages. YML894 Rev1������������������������������������� N3G002W 3G Wireless Router User Guide www.netcomm.com.au 21 Basic Setting The Basic Setting page allows you to configure a number of basic settings on the unit. This section deals with these features. Click on any of the menu on the left to configure the respective setting page. N3G002W 3G Wireless Router User Guide 22 YML894 Rev1 www.netcomm.com.au Basic Setting > Primary Setup This Page allows you to change the LAN (Local Area Network) settings on your N3G002W wireless router and the WAN (Wide Area Network) connection. Note: This example shows WAN connection for Telstra Next G connection. 1. LAN IP Address: the local IP address of this device. 2. LAN Netmask: the Netmask of the local IP address 3. WAN’s MAC Address: The WAN’s MAC of this device. If you want to clone the MAC address from your computer network card, just click the Clone MAC and click Save. 4. WAN Type: WAN connection type of your ISP. Each WAN type will give you the option to enter the required information. You can select one of the following options. a. Static IP Address. For connection with static IP address. b. Dynamic IP Address. For connection with dynamic IP address. Mostly used when the N3G002W unit is in use in conjunction with another modem/router. c. Dynamic IP Address with Road Runner Session Management. When using the N3G002W with Telstra Bigpond Cable service. d. PPP over Ethernet. For connection with PPPoE service. Mostly used when the N3G002W unit is YML894 Rev1������������������������������������� N3G002W 3G Wireless Router User Guide www.netcomm.com.au 23 connected to a Bridge ADSL modem. e. Unnumbered PPPoE. For connection with unnumbered PPPoE service. f. Unnumbered PPPoE + NAPT. For connection with unnumbered PPPoE service with NAPT enabled. g. MultiSession PPPoE. For ISP with multi session PPPoE. h. L2TP. For connection with L2TP service. i. PPTP. For connection with PPTP service. j. 3G. For connection with 3G service. Notes: All of the connection types above are used in conjunction with a modem or another router connected to the WAN port except for 3G which needs a 3G PC Card installed. Static IP Address, Dynamic IP address, Dynamic IP Address with Road Runner Session Management and PPP over Ethernet has an Enable Backup option to set it as the primary connection and the 3G card as the backup connection. Static IP Address If your WAN connection uses a static IP address, please select Static IP Address and fill in the required information in the fields provided. • WAN IP Address. Type in the IP address assigned by your Internet Service Provider. • Subnet Mask. Type in the Subnetmask assigned by your Internet Service Provider. • WAN Gateway. Type in the WAN Gateway assigned by your Internet Service Provider. • WAN MTU. Leave as default unless instructed by your Internet Service Provider. • Primary DNS/Secondary DNS. Type in the DNS address assigned by your Internet Service Provider. • NAT Disable. Tick Enable to disable NAT. • Auto-backup. Tick Enable to make the 3G connection a backup connection. Dynamic IP Address This connection will get the IP address from the internet service provider. Choose this connection if you are connecting the router to an Optus Cable Modem service. Leave everything as default unless instructed by your Internet Service Provider and tick Enable Auto-backup to enable the 3G auto back up function. N3G002W 3G Wireless Router User Guide 24 YML894 Rev1 www.netcomm.com.au Dynamic IP Address with Road Runner Session Management This connection will get the IP address from the internet service provider. Choose this connection if you are connecting the router to a Telstra Bigpond Cable modem. • Account. Type in your Account username. • Password. Type in your account password. • Login Server (Optional). Type in the login server of the Roadrunner service. • Auto Backup. Tick Enable to make the 3G connection as a backup connection. PPP over Ethernet Most ADSL service will use PPP over Ethernet protocol. Use this if you connect the router to a bridge ADSL modem. • PPPoE Account/ PPPoE Password. Type in your account username and password. • MTU. Leave as default unless instructed by your Internet Service Provider. • Primary DNS/Secondary DNS. Primary DNS/Secondary DNS. Type in the DNS address assigned by your Internet Service Provider. Optional. • Maximum Idle Time. Enter the number of second you want to have elapsed without any activity before your Internet connection terminates automatically. Set to 0 to disable. • Auto-reconnect- Tick to enable auto reconnect function. • PPPoE Service Name (Optional). Type in the PPPoE service name assigned by your Internet Service Provider. • Assigned IP Address (Optional). Type in the IP address assigned by your Internet Service Provider. • Auto Backup. Tick Enable to make the 3G connection a backup connection. YML894 Rev1������������������������������������� N3G002W 3G Wireless Router User Guide www.netcomm.com.au 25 L2TP For internet services using L2TP. • My Tunnel Name. Type in the Tunnel Name assigned by your Internet Service Provider. • Server IP address. Type in the server IP address assigned by your Internet Service Provider. • My IP Address. Tick Get IP from theDHCP Server if your service uses a DHCP server. Or tick on Use Static IP and type in the IP address assign by your Internet Service Provider. • L2TP Account / L2TP Password. Type in the username and password assigned by your provider. • Maximum Idle Time. Enter the number of seconds you want to have elapsed without any activity before your Internet connection terminates automatically. Set to 0 to disable. • Connect mode selection. Tick on Always-on for an always on connection. N3G002W 3G Wireless Router User Guide 26 YML894 Rev1 www.netcomm.com.au PPTP For internet service using PPTP. • My Tunnel Name. Type in the Tunnel Name assigned by your Internet Service Provider. • Server IP address. Type in the server IP address assigned by your Internet Service Provider. • My IP Address. Tick Get IP from the DHCP Server if your service uses a DHCP server. Or tick on Use Static IP and type in the IP address assigned by your Internet Service Provider. • PPTP Account / PPTP Password. Type in the username and password assigned by your provider. • Maximum Idle Time. Enter the number of seconds you want to have elapsed without any activity before your Internet connection terminates automatically. Set to 0 to disable. • Connect mode selection. Tick on Always-on for an always on connection. 3G For 3G service, you need to enter the following information, please refer to your 3G service provider for detailed information. • APN- Enter the APN for your PC card. • Pin Code- Enter the Pin Code for your SIM card • Dial-Number- This field should not be altered except when required by your service provider. • User Name- Enter your 3G username. • Password- Enter your 3G password. • Maximum Idle Time- Enter the number of seconds you want to have elapsed without any activity before your Internet connection terminates automatically. Set to 0 to disable. • Auto-reconnect- Tick to enable auto reconnect function. Caution for 3G WAN connection: The 3G connection fields may not be necessary for your connection. The information on this page will only be used when your service provider requires you to enter a User Name and Password to connect to the 3G network. Click Save to save the settings or Undo to cancel. YML894 Rev1������������������������������������� N3G002W 3G Wireless Router User Guide www.netcomm.com.au 27 iBurst For iBurst services using the PCMCIA card, choose iBurst and enter the following information • Username / Password. Type in your account username and password. • WAN MTU. Leave as default unless instructed by your Internet Service Provider. • Primary DNS/Secondary DNS (Optional). Primary DNS/Secondary DNS. Type in the DNS address assigned by your Internet Service Provider. • Maximum Idle Time. Enter the number of seconds you want to have elapsed without any activity before your Internet connection terminates automatically. Set to 0 to disable. • Auto-reconnect. Tick to enable auto reconnect function. • Service Name (Optional). Type in the service name assigned by your provider. • Assigned IP Address (Optional). Type in the IP address assigned by your provider. N3G002W 3G Wireless Router User Guide 28 YML894 Rev1 www.netcomm.com.au Basic Setting > DHCP Server This page allows you to configure the DHCP Server on the unit. For more settings click on More. 1. DHCP Server: Please leave this set to Enable unless you have another DHCP server on the same network. 2. Lease Time: DHCP lease time to the DHCP client. 3. IP Pool Starting/Ending Address: You must specify the starting / ending address of the IP address pool. Please leave as default unless necessary. 4. Domain: Optional. 5. Primary DNS/Secondary DNS: Optional, This feature allows you to manually assign a DNS Servers 6. Primary WINS/Secondary WINS: Optional, This feature allows you to manually assign a WINS Servers 7. Gateway: Optional. The IP Address of an alternate Gateway. This function enables you to assign another gateway to your PC from the DHCP server. Click Save to save the settings or Undo to cancel. You can also check the DHCP client list by pressing the Client List button. Fixed Mapping button will bring you to the Security Setting > MAC Control page. YML894 Rev1������������������������������������� N3G002W 3G Wireless Router User Guide www.netcomm.com.au 29 Basic Setting > Wireless This page allows you to configure the wireless feature of the unit such as SSID and security. 1. Wireless - Enable by default. Changing this option to Disable will turn off the wireless feature on the unit and you will not be able to connect wirelessly. 2. WMM Capable- Choose Enable or Disable WMM function. WMM stands for Wi-Fi Multimedia, this provides features that improve the user experience for audio, video and voice applications over Wi-Fi networks. 3. SSID- Service Set Identifier (SSID) is the name designated for the wireless network of the unit. The default SSID is default. This SSID can be easily changed to rename the wireless network. (Note: SSID names may contain up to 32 ASCII characters) 4. Channel- can be from 1 to 13 and 11 is the default channel. Devices on the network that want to connect to the unit must use the same channel. (Note: Most wireless adapters will automatically scan and match the wireless channel). Changing this option might improve the wireless signal quality. However, please only use channel 1 to 11 as certain wireless adapter does not work on channel 12 and 13. 5. Auto Select Channel – Choose Enable to let the router decides the best channel to use. Disable to choose manually. N3G002W 3G Wireless Router User Guide 30 YML894 Rev1 www.netcomm.com.au 6. Security- You may choose from the following option, No Encryption, WEP.802.1x, WPA-PSK, WPA, WPA2PSK, or WPA2. By default the N3G002W uses No Encryption (as shown in the screen above). Other option that you can use are explained as follow: a) WEP (Wired Equivalent Privacy). Enabling this security will protect your data while it is transferred from the computer to the N3G002W router. Select the WEP Encryption (64bit or 128bit) and enter the WEP key in Key 1 field. Please note that WEP Encryption key can only use numbers from 0 to 9 and letters from A to F. 64 bit encryption needs 10 digits key and 128 bit encryption needs 26 digits key. b) 802.1X: In order to use 802.1X security, you need to have a RADIUS server on your network that will act as the authentication server. Please type in the details for your RADIUS server in the fields required. YML894 Rev1������������������������������������� N3G002W 3G Wireless Router User Guide www.netcomm.com.au 31 c) WPA-PSK/WPA2-PSK : A newer type of security is WPA-PSK-TKIP and WPA-PSK2-ADE. This type of security gives a more secure network compare to WEP. Use TKIP Encryption Type for WPA-PSK and AES for WPA2-PSK. After that, please enter the key in the Passphrase field. The key needs to be more then 8 characters and less then 63 characters and it can be any combination of letters and numbers. Please note that the configuration for WPA-PSK and WPA2-PSK is identical d) WPA/WPA2 : Similar to 802.1X security but with TKIP or AES Encryption. You need to have a RADIUS server on the network to perform user authentication. Please type in the details for your RADIUS server in the fields required. Notes: After configuring wireless security, you also need to configure your wireless adapter to use the same security settings before you can connect wirelessly. Not all wireless adapter supports WPA-PSK/WPA2-PSK/WPA/WPA2 security, please refer to your wireless adapter user guide for more details. It is strongly recommended to set up a simple wireless security such as WEP 64bit or WPA (when the wireless client supports WPA) in order to secure your network. Click Save to save the settings and Undo to cancel. N3G002W 3G Wireless Router User Guide 32 YML894 Rev1 www.netcomm.com.au To Configure WDS (Wireless Distribution System) click on WDS Setting button and you will be presented with the following page. WDS is used to wirelessly connect multiple Access Points (in WDS mode), and in doing so extends the wireless infrastructure to locations where cabling is not possible or inefficient to implement. Notes: Be sure you understand the purpose of WDS mode before continuing with the configuration, and be aware that not all Access Points can be use in WDS mode. To enable WDS please make sure to tick the Enable tick box for Wireless Bridging. And then type in the MAC address of the remote WDS unit in the Remote AP MAC list. Or you can copy the one from the Scanned AP’s MAC list. This router can accommodate up to 6 remote MAC addresses. Click Save to save the settings and Undo to cancel. YML894 Rev1������������������������������������� N3G002W 3G Wireless Router User Guide www.netcomm.com.au 33 Basic Setting > Change Password On this page you can change the N3G002W web configuration password. Please type in your old password (factory default password is admin) and type in the new password. You also need to type in the new password in the Reconfirm field. Note: if you change the password, please make sure that you use the new password the next time you log into the web configuration. Click Save to save the settings and Undo to cancel. N3G002W 3G Wireless Router User Guide 34 YML894 Rev1 www.netcomm.com.au Forwarding Rules The Forwarding Rules page allows you to configure the port forwarding management on the unit. Click on any of the menu on the left to access the respective setting page. Forwarding rules are a necessary feature as by default NAT (Network Address Translation) will automatically block incoming traffic from the Internet to the LAN if a specific port mapping does not exists in the NAT translation table. Because of this, the NAT provides a level of protection for computers that are connected to your LAN. However, this also creates a connectivity problem when you want to make LAN resources available to Internet clients, which you may want to do to play network games or host network applications. There are three ways to work around NAT and to enable certain LAN resources available from the Internet; Port Forwarding (in Virtual Server page), Port Triggering (in Special AP page) and DMZ Host (in Miscellaneous page). YML894 Rev1������������������������������������� N3G002W 3G Wireless Router User Guide www.netcomm.com.au 35 Forwarding Rules > Virtual Server A virtual server is defined as a Service Port, and all requests to this port will be redirected to the computer specified by the Server IP. Virtual Server can also work with Scheduling Rules, and give user more flexibility on Access control. For detail instructions on scheduling rules, please refer to Advanced Setting > Scheduling. For example, if you have an FTP server (default port is port 21) at 192.168.123.1, a Web server (default port is port 80) at 192.168.123.2, and a VPN server (default port is port 1723) at 192.168.123.6, then you need to specify the following virtual server mapping table: Service Port Server IP Enable 21 192.168.123.1 Ticked 80 192.168.123.2 Ticked 192.168.123.6 Ticked 1723 Note: At any given time, only one IP address can be bind to a particular Service Port. Click Save to save the settings and Undo to cancel. N3G002W 3G Wireless Router User Guide 36 YML894 Rev1 www.netcomm.com.au Forwarding Rules > Special AP Some applications like On-line games, Video conferencing and Internet telephony require multiple connections to the internet. Because of that, these applications cannot work with a pure NAT router such as the N3G002W. The Special Applications feature allows some of these applications to work with this router. If this fails to make the application working, try to set up that computer as the DMZ host instead. Please refer to Forwarding Rules > Miscellaneous section. The fields are explained as follow: 1. Trigger: the outbound port number that will be triggered by the application.. 2. Incoming Ports: when the trigger packet is detected, the inbound packets sent to the specified port numbers will be allowed to pass through the firewall. The N3G002W also provides predefined settings for some popular application. To use the predefined settings, select your application from the Popular application list, select an unused ID from the list and then click Copy to. After that the predefined settings will be added to the list. Click Save to save the settings and Undo to cancel. YML894 Rev1������������������������������������� N3G002W 3G Wireless Router User Guide www.netcomm.com.au 37 Forwarding Rules > Miscellaneous DMZ (Demilitarized Zone) Host is a computer without the protection of firewall. It allows that particular computer to be exposed to unrestricted 2-way communication to the internet. It is mostly used for Internet games, Video conferencing, Internet telephony and other special applications. To enable DMZ, enter the IP address of the PC and tick on Enable. Note: This feature should be used only when necessary. Click Save to save the settings and Undo to cancel. N3G002W 3G Wireless Router User Guide 38 YML894 Rev1 www.netcomm.com.au Security Setting The Security Setting page allows you to configure the security management on the unit such as Packet filters and MAC Control. Click on any of the menu on the left to access the respective setting page. YML894 Rev1������������������������������������� N3G002W 3G Wireless Router User Guide www.netcomm.com.au 39 Security Setting > Packet Filters Packet Filter enables you to control what packets are allowed to pass through the router. There are two type of packet filter, Outbound Packet Filter which applies to all outbound packets and Inbound Packet Filter which only applies to packets that destined to Virtual Server or DMZ host only. To enable an Outbound Filter, please make sure to tick the Enable tick box on the top of the page. There are two type of filtering policies: 1. Allow all to data traffic to pass except those match the specified rules. 2. Deny all to data traffic to pass except those match the specified rules. For each direction, you can specify up to 48 rules. And for each rule you need to define the following: • Source IP address • Source port • Destination IP address • Destination port • Protocol: TCP or UDP or both. • Use Schedule Rule# For source or destination IP address, you can define a single IP address (192.168.123.1) or a range of IP addresses (192.168.123.100-192.168.123.200). Empty fields imply all IP addresses. For source or destination port, you can also define a single port (80) or a range of ports (1000-1999). And you need to add prefix “T” or “U” to specify TCP or UDP protocol e.g. T80, U53, U2000-2999. No prefix indicates both TCP and UDP are defined. An empty implies all port addresses. Packet Filter also works with Scheduling Rules, and gives user more flexibility on Access control. For detail instruction regarding scheduling rule, please refer to Advanced Setting > Scheduling. Click Save to save the settings and Undo to cancel. N3G002W 3G Wireless Router User Guide 40 YML894 Rev1 www.netcomm.com.au Inbound Filter: To access the Inbound Packet Filter page, click on Inbound Filter on the bottom of the Outbound Filter page. All the settings on this page are similar to the one for the Outbound Filter. Click Save to save the settings and Undo to cancel. YML894 Rev1������������������������������������� N3G002W 3G Wireless Router User Guide www.netcomm.com.au 41 Security Setting > Domain Filters Domain Filters enable you to prevent users from accessing specific domain addresses. To enable the Domain Filter please make sure to tick the Enable tick box on the top of the page. Log DNS Query. Please tick the Enable tick box if you want to log the action when someone accesses the specific URLs. Privilege Host/Netmask. To set a group of computer that has privilege to access the internet without any restriction. To set a Domain Filter, you need to specify the following: • Domain Suffix. Please type the suffix of the URL that needs to be restricted. For example, “.com”, “xxx. com”. • Action. The router action that you want when someone is accessing a URL that met the domain suffix. Tick on Drop to block the access and/or tick on Log to log this access. • Enable. Tick to enable the rule. Click Save to save the settings and Undo to cancel. N3G002W 3G Wireless Router User Guide 42 YML894 Rev1 www.netcomm.com.au Security Setting > URL Blocking URL Blocking will block LAN computers from connecting to a pre-defined website. The major difference between Domain Filter and URL Blocking is that Domain Filter require users to input a suffix (e.g. xxx.com, yyy. net) while URL Blocking only requires user to input a keyword. To enable URL Blocking please make sure to tick on Enable tick box on the top of the page. To set a URL Blocking rule, you need to specify the following: • URL. If any part of the Website’s URL matches the pre-defined word then the connection will be blocked. For example, you can use pre-defined word “sex” to block all websites if their URLs contain the predefined word “sex”. • Enable. Tick to enable the rule. Click Save to save the settings and Undo to cancel. YML894 Rev1������������������������������������� N3G002W 3G Wireless Router User Guide www.netcomm.com.au 43 Security Setting > MAC Control MAC Control allows you to assign different access rights for different users and to assign a specific IP address to a certain MAC address. To enable MAC Address Control please make sure to tick the Enable tick box on the top of the page. Two types of control are available: • Connection control. Check Connection Control to control which clients (wired and wireless) can connect to the unit. If a client is denied to connect to this device, it means the client can not access to the Internet either. Choose allow or deny to allow or deny clients with MAC addresses that are not in the list to connect to this device. • Association control. Check Association Control to control which wireless client can associate with the unit. If a client is denied to associate with the unit, it means the client can not send or receive any data via this device. Choose allow or deny to allow or deny the clients with MAC addresses that are not in the list to associate to the wireless LAN Click Next Page or Previous Page to see the entire list. Click Save to save the settings and Undo to cancel. N3G002W 3G Wireless Router User Guide 44 YML894 Rev1 www.netcomm.com.au Security Setting > Miscellaneous This page allows you to change various miscellaneous security settings on the unit. These settings are: 1. Remote Administrator Host/Port. By default, only users on the LAN side can browse the unit web configuration page to perform administration task. Enabling this feature will allow you to connect to the web configuration from the internet. If the specified Host address is 0.0.0.0, any computer on the internet can connect to the unit web configuration page. For better security, you can specify just one IP address or even use subnet mask bits “/nn” notation to specified a group of trusted IP addresses for example, “10.1.2.0/24”. Note: When Remote Administration is enabled, the web server port will be shifted to 80. However, you can also change web server port. 2. Administrator Time-out. The amount of time with no activity before the unit logout automatically, you may set it to zero to disable this feature. 3. Discard PING from WAN side. When enabled, any host on the WAN port can not ping the unit. 4. Disable UPNP: When enable, the UPnP feature will be disabled. Some users will want to disable UPnP for security reasons. Click Save to save the settings and Undo to cancel. YML894 Rev1������������������������������������� N3G002W 3G Wireless Router User Guide www.netcomm.com.au 45 Advanced Setting The Advanced Setting page allows you to configure the advanced settings on the unit such as System log, Dynamic DNS and SNMP. Click on any of the menu on the left to configure the access the respective setting page. N3G002W 3G Wireless Router User Guide 46 YML894 Rev1 www.netcomm.com.au Advanced Setting > System Log The N3G002W Wireless router supports two types of System log. One is via syslog (using UDP packet) and the second is via email. For syslog, you need to enter the IP address of the host computer that will receive the syslog message and tick on the Enable tick box for IP Address for Syslog. For email logging you need to define the following: • Email Alert. Tick on the Enable tick box to enable this feature. • SMTP Server IP and Port. Enter the IP address and port of the SMTP server separated by “:” (without quotes). If you do not specify the port number, the default value (25) will be used. For example, “mail. yoururl.com” or “mail.yoururl.com:26”. • Send E-mail alert to. Enter the recipients for the email logs. To assign more than one recipient, use “;” or “,” (without quotes) to separate the email addresses. For example, [email protected]; recipient2@ yoururl2.com. • Email Subject (Optional). Enter the subject for the email. Click Save to save the settings and Undo to cancel. YML894 Rev1������������������������������������� N3G002W 3G Wireless Router User Guide www.netcomm.com.au 47 Advanced Setting > Dynamic DNS The Dynamic DNS feature enables users to have a static domain name for their internet connection even when their internet connection IP address is dynamic. By mapping the host name to the current public IP address of the router, users who want to connect to the router or any services behind the router from the internet can just use the Dynamic DNS hostname instead of the IP Address which might change every time the router connects to the Internet. Before you can use Dynamic DNS service, you need to register an account on one of the many supported Dynamic DNS provider such as DynDNS.org, TZO.com and dhs.org. After registering the account, the Dynamic DNS provider will provide you with the following details: • Host Name • Username/Email • Password/Key. To enable the Dynamic DNS feature on the unit, click the Enable check box, choose the respective Provider and enter the details from your provider. Click Save to save the settings and Undo to cancel. N3G002W 3G Wireless Router User Guide 48 YML894 Rev1 www.netcomm.com.au Advanced Setting > QoS To Enable QoS make sure the Enable Tick Box on the top of the page is ticked. Upstream bandwidth Total bandwidth of outgoing traffic. Downstream bandwidth Total bandwidth of incoming traffic. QoS Priority The QoS Packet Filter classifies data packets to three kinds of data flows (High,Normal,Low). The ratio of bandwidth division of each data flow is 6:3:1 Enable Make sure you tick the Enable tick box so that the QoS Filter is active. You can specify 8 QoS rules to control data flows through the Router. Local IP: IP address of LAN host Local Port: TCP or UDP port Remote IP: IP address of WAN host Remote Port: TCP or UDP port Click Save to save or Undo to cancel. YML894 Rev1������������������������������������� N3G002W 3G Wireless Router User Guide www.netcomm.com.au 49 Advanced Setting > SNMP SNMP (Simple Network Management Protocol) is a protocol designed to give user the capability to remotely manage a computer or network device by polling and setting terminal values and monitoring network events. To Enable SNMP, you need to set the following: • Enable SNMP. Check either Local or Remote or both to enable the function. If Local is ticked, the unit will respond to request from LAN and if Remote is ticked, the unit will respond to request from WAN. • Get Community. Set the community for GetRequest. This will act as a password. • Set Community. Set the community for SetRequest. This will act as a password. • IP 1,IP 2,IP 3,IP 4. Input the IP addresses of your management PCs. The unit will send SNMP Trap message only to the IP address listed. • SNMP Version. Select the SNMP version of your SNMP Management software. Click Save to save the settings and Undo to cancel. N3G002W 3G Wireless Router User Guide 50 YML894 Rev1 www.netcomm.com.au Advanced Setting > Routing When you have more than one router or subnet on your network, you need to enable routing function to allow different subnets to communicate with each other. There are two types of routing feature on the N3G002W Wireless Router, Dynamic routing and Static routing. Dynamic Routing use RIP protocol to allow the N3G002W to adapt to changes in the network. RIP enables the device to determine the best route for each packet based on the “hop count” or number of hops between Source and Destination. Tick on Enable tick box to enable Dynamic Routing. Please select RIPv2 only if you have different subnet in your network. Otherwise, please select RIPv1 if you need this protocol. Static Routing allows computers that are connected to the N3G002W to communicate with computers on another LAN segment which are connected to the N3G002W via another router. You can specify up to eight routing rules. To set a rule, you need to specify the following: • IP address • Subnet mask • Gateway • Hop, number of hop. • And tick on Enable for each rule. Click Save to save the settings and Undo to cancel. YML894 Rev1������������������������������������� N3G002W 3G Wireless Router User Guide www.netcomm.com.au51 Advanced Setting > System Time This page allows you to change the System time setting on the N3G002W Wireless Router. There are three ways to set up the System Time on the unit. 1. Get Date and Time by NTP Protocol. Select if you want to get the date and time from an NTP server. You also need to choose the Time Server and the Time Zone. Click on Sync Now! to sync the time with the Time Server. 2. Set Date and Time using PC’s Date and Time. Select if you want to set the unit time using your computer date and time. 3. Set Date and Time manually. Select to set the date and time manually. After that, you also need to set the Daylight Saving setting. Select either Enable or Disable and define the Start and End date for the daylight saving period. Click Save to save the settings and Undo to cancel. N3G002W 3G Wireless Router User Guide 52 YML894 Rev1 www.netcomm.com.au Advanced Setting > Scheduling This feature allows you to define a time schedule for Virtual Server and Packet Filter rules on the unit. To enable Scheduling please make sure to tick the Enable tick box at the top and click on Save. After that, create a new rule by pressing the Add New Rule button. Enter the Rule name and set the Start Time and End Time for each day. And then click Save to save the new rule. Once defined, you can use it for Virtual Server and Packet Filter by entering the rule number in Schedule Rule# Click Save to save the settings and Undo to cancel. YML894 Rev1������������������������������������� N3G002W 3G Wireless Router User Guide www.netcomm.com.au53 Advanced Setting > Performance This page give you option to change the wireless advance settings. 1. Beacon Interval. Beacons are packets sent by the unit to synchronize to wireless clients. The default value is set to 100 milliseconds and the acceptable value is 1 to 1000. 2. DTIM interval. The default value is set to 3 and the acceptable value is 1 to 65535. A DTIM is a countdown informing clients of the next window for listening to broadcast and multicast messages. When the unit has buffered broadcast or multicast messages for associated clients, it sends the next DTIM with a DTIM Interval value. AP clients hear the beacons and awaken to receive the broadcast and multicast messages. 3. Wireless mode. Select wireless connection mode for wireless connection. G mode will only allows connection from wireless clients with 802.11g connection. Please use mixed mode unless you want to prevent older wireless (802.11b) adapter to connect. 4. TX Rates. Default rate is Auto and operates at 54Mbps data rate when possible but drop to lower rates when necessary, dependent on signal strength and the capacity of the wireless client station. 5. SSID Broadcast. Choose enable or disable the wireless SSID broadcast. By turning off the broadcast of the SSID, it is possible to make your wireless network nearly invisible. 6. Speed Enhanced Mode. This is Tx Brust function in only available for Ralink wireless solution. 7. Antenna Transmit Power: Default is 100% 17dbM. You can either increase or decreases the antenna transmit power. Click Save to save the settings and Undo to cancel. N3G002W 3G Wireless Router User Guide 54 YML894 Rev1 www.netcomm.com.au Tool Box The Tool Box page consists of various tools for the unit. Click on any of the menu on the left to access the respective page. YML894 Rev1������������������������������������� N3G002W 3G Wireless Router User Guide www.netcomm.com.au55 Tool Box > System Info From this page you can view the System log and the Routing Table of the unit. Tool Box > Restore Setting To restore the configuration from a file, browse the configuration file and then click the Restore button. Notes: Please disable any anti virus or firewall program before doing restoring the settings. N3G002W 3G Wireless Router User Guide 56 YML894 Rev1 www.netcomm.com.au Tool Box > Firmware Upgrade To update your N3G002W firmware, browse the update image file or configuration file and then click the Upgrade button. Notes: Please disable any anti virus or firewall program before doing the firmware upgrade. Tool Box > Backup Setting To back up your settings to a file, click the Backup Setting button and save it as a bin file. When you want to restore those settings, please click Firmware Upgrade button and use the bin file. Tool Box > Reset to Default To reset the unit back to factory default settings, click on the Reset to Default button and click OK. Please wait for a few minutes as the unit will reboot after resetting the configuration. Tool Box > Reboot To reboot the unit manually, click the Reboot button and click OK. Tool Box > Miscellaneous Wake-on-LAN is a technology that allows you to power up a network device remotely. In order to use this feature, the network device must be Wake-on-LAN enabled and you need to know the MAC address of the device. By entering the network device MAC address and click on Wake Up, the router will send a wake-up frame to the network device immediately. Notes: This feature only works for local computer connected to the router. YML894 Rev1������������������������������������� N3G002W 3G Wireless Router User Guide www.netcomm.com.au57 Troubleshooting This section provides an overview of common issues, and possible solutions for the installation and operation of the N3G002W Wireless Router. 1. Unable to access the Web Configuration when I use my computer to configure the router. Note: It is recommended that you use an Ethernet connection to configure the N3G002W. Ensure that the LAN light on the N3G002W Wireless router is ON. If the light is NOT ON, check to see if the cable for the Ethernet connection is securely connected. Note: Ensure that the IP Address of the computer is in the same range and subnet as the N3G002W Wireless Router. The default IP Address of the N3G002Wireless Router is 192.168.123.254. All the computers on the local area network must have a unique IP Address within the same range (e.g., 192.168.123.x). All computers must also have the same subnet mask (e.g., 255.255.255.0). Do a Ping test to make sure that the N3G002W Wireless Router is responding. • Click on Start > Run • Type in CMD and press Enter. • Type “ping 192.168.123.254” (without quotes). A successful ping will shows four replies. Note: If you have changed the default IP Address, ensure you ping the correct IP Address assigned to the N3G002Wireless Router. 2. Why my wireless client can NOT access the Internet? When the N3G002W Wireless Router unit is configured to use Wireless encryption (WEP, WPA/WPA2 or any encryption), you need to ensure that your wireless adapter settings matches the router settings. Please refer to your wireless adapter manual for additional information. Ensure that the wireless client is associated and joined with the correct Access Point. To check this connection (Windows XP), follow the steps below: • Click on Start > Control Panel > Network Connection • Right Click on Wireless Network connection • Select View Available Wireless Networks. The Connect to Wireless Network screen appears. Ensure you have selected the correct wireless network. Ensure the IP Address assigned to the wireless adapter is within the same subnet as the Access Point and gateway. The N3G002W Wireless Router has a default IP Address of 192.168.123.254. Wireless adapters must have an IP Address in the same range (e.g., 192.168.123.x). Although the subnet mask must be the same for all the computers on the network, no two devices may have the same IP Address. Therefore, each device must have a unique IP Address. To check the IP Address assigned to the wireless adapter, follow the steps below: • Click on Start > Run • Type in CMD and press Enter. • Type in “ipconfig /all” and press Enter • Type in “ping 192.168.123.254” to check if you can access the N3G002W Note: If you have changed the default IP Address, ensure you ping the correct IP Address assigned to the N3G002Wireless Router. N3G002W 3G Wireless Router User Guide 58 YML894 Rev1 www.netcomm.com.au 3. Why does my wireless connection keep dropping? Please try the following steps to improve the wireless signal quality. • Antenna Orientation. – Try different antenna orientations for the N3G002W Wireless Router. – Try to keep the antenna at least 6 inches away from the wall or other objects. • Try changing the channel on the N3G002W Wireless Router to a different channel to avoid interference. Please refer to Basic > Wireless section on page 27 • Keep your product away (at least 3-6 feet) from electrical devices that generate RF noise, like microwaves, monitors, electric motors, etc. 4. Can not establish a wireless connection? Note: An Ethernet connection is required to troubleshoot the N3G002W Wireless Router.. When the N3G002W Wireless Router unit is configured to use Wireless encryption (WEP, WPA/WPA2 or any encryption), you need to ensure that your wireless adapter settings matches. Please refer to your wireless adapter manual for additional information. • Move the N3G002W Wireless Router and the wireless client into the same room, and then test the wireless connection. • Try to disable all security settings such as WEP, and MAC Address Control. • Turn off the N3G002W and the client. And then turn the N3G002W back on again, and then turn on the client. • Ensure that all devices are set to Infrastructure mode. • Ensure that the LED indicators are indicating normal activity. If not, ensure that the AC power and Ethernet cables are firmly connected. • Ensure that the IP Address, subnet mask, gateway and DNS settings are correctly entered on the computer. • If you are using 2.4GHz cordless phones, X-10 equipment, or other home security systems, ceiling fans, or lights, your wireless connection may degrade dramatically, or drop altogether. • To avoid interference, you can change the wireless Channel on the N3G002W Wireless Router. • Keep your product at least 3-6 feet away from electrical devices that generate RF noise. Examples include: microwaves, monitors, electric motors, and so forth. 5. I do not remember my encryption key. What should I do? If you forgot your encryption key, the Wireless card will not be able to establish a connection to the N3G002W Wireless Router. To reset the encryption key(s), login to the N3G002Wireless Router web configuration using an Ethernet connection. (Please refer to Basic > Wireless on page 27, for additional information). YML894 Rev1������������������������������������� N3G002W 3G Wireless Router User Guide www.netcomm.com.au59 6. How do I reset my N3G002W Wireless Router to its factory default settings? To hard-reset the N3G002W Wireless Router its factory default settings, follow the steps listed below: • Ensure that the router is powered on (for at least 20 seconds). • Use a paper clip or a pencil tip to depress the reset button for ten seconds and release. At this point, the reset is in progress. Do not power off the unit at this point. • After the router reboots, the default settings are now restored. This entire process takes several minutes to complete. • Once you have reset the router to its default settings you will be able to access the device’s web configuration using http://192.168.123.254 with password “admin”. 7. What is VPN? • VPN stands for “Virtual Private Networking.” VPN creates a “tunnel” through an existing Internet connection using PPTP (Point-to-Point Tunneling Protocol) or IPSec (IP Security) protocols with various encryption schemes including Microsoft Challenge Handshake Authentication Protocol (MS-CHAP). • This feature allows you to use your existing Internet connection to connect to a remote site with added security. 8. What can I do if my Ethernet cable does not work properly? • First, ensure that there is a solid cable connection between the Ethernet port on the N3G002W Wireless Router, and your NIC (Network Interface Card). • Second, ensure that the settings on your NIC adapter are “Enabled,” and set to accept an IP address from the DHCP (Please refer to Computer Hardware Configuration on page 9 for additional information). • If all settings appear to be correct, ensure that you are not using a crossover Ethernet cable. Although the N3G002W Wireless Router is MDI/MDIX compatible, not all NIC are. Therefore, it is recommended that you use a straight through Ethernet cable when possible. N3G002W 3G Wireless Router User Guide 60 YML894 Rev1 www.netcomm.com.au Appendix A Establishing your wireless connection The following examples use “wireless” as the SSID and 64bit WEP with “a1b2c3d4e5” as the encryption key. Windows XP service pack 2 Follow these steps: 1. Open Network Connections (Start -> Control Panel -> Network Connections): 2. Right-click on your Wireless Network Connection and select View Available Wireless Networks: 3. Select the wireless network you want to connect to and click Connect: YML894 Rev1������������������������������������� N3G002W 3G Wireless Router User Guide www.netcomm.com.au61 4. Enter the network key (“a1b2b3d4e5”) and click Connect: 5. The connection will show Connected. N3G002W 3G Wireless Router User Guide 62 YML894 Rev1 www.netcomm.com.au Mac OSX 10.4 Follow these steps: 1. Click on the Airport icon on the top right menu. 2. Click on the network name that you want to connect. This example uses “wireless” as the network name. YML894 Rev1������������������������������������� N3G002W 3G Wireless Router User Guide www.netcomm.com.au63 3. On the new window, tick on Show Password and type in the network key in the Password field. This example uses “a1b2c3d4e5” as the key. After that, click on OK. 4. To check the connection, click on the Airport icon and there should be a tick on the wireless name. N3G002W 3G Wireless Router User Guide 64 YML894 Rev1 www.netcomm.com.au Windows Vista Follow these steps: 1. Open Network and Sharing Center (Start > Control Panel > Network and Sharing center). 2. Click on “Connect to a network”. 3. Choose “Connect to the Internet” and click on “Next”. YML894 Rev1������������������������������������� N3G002W 3G Wireless Router User Guide www.netcomm.com.au65 4. Choose “Wireless”. 5. Click on the wireless network name. In this example, the wireless network name is “wireless” and click “Connect”. 6. Tick on “Display Characters” and type in the network key. This example uses “a1b2c3d4e5” as key. Click “Next” after that. N3G002W 3G Wireless Router User Guide 66 YML894 Rev1 www.netcomm.com.au 7. Select the appropriate location. This will affect the firewall settings on the computer. 8. Tick on both “Save this network” and “Start this connection automatically” and click on “Next”. 9. Now the connection is ready. Notes: For other operating system such as Windows 98SE, Windows ME and Windows 2000 or if you use the wireless adaptor utility to configure your wireless connection, please consult the wireless adapter documentation for additional information. YML894 Rev1������������������������������������� N3G002W 3G Wireless Router User Guide www.netcomm.com.au67 Appendix B How to configure WEP/WPA-PSK Wireless Security 1. Open your web browser (i.e. Internet Explorer or Firefox) and navigate to http://192.168.123.254/. 2. At the login screen, type in admin in the System Password field. Then click on Login. 3. Click on Basic Setting and then click on Wireless. 4. After that you will be presented with the wireless setting page. On this page you can configure the wireless security. N3G002W 3G Wireless Router User Guide 68 YML894 Rev1 www.netcomm.com.au 5. To use WEP, please configure the following: • Change Security to WEP • Change WEP Encryption to 64bit or 128bit (This example uses 64bit) Notes: 64 bit needs 10 digits key and 128 bit needs 26 digits key. • Type in the key in Key 1 field (This example uses “a1b2c3d4e5” key) Notes: WEP key can only use numbers from 0 to 9 and letters from A to F. • Click on Save to save the settings 6. To use WPA, please configure the following: • Change Security to WPA-PSK • Change Encryption Type to TKIP • Enter the WPA key in the Passphrase field. Notes: The key needs to be more then 8 characters and less then 63 characters and it can be any combination of letters and numbers. • Click Save to save the settings Notes: Wireless client network cards must be WPA-compliant to connect to a WPA enable network, if in doubt check the wireless client network card documentation, or use WEP security. Notes: After changing the security settings, you might need to remove the current wireless settings on the computer and reconfigure the wireless computer according to the new settings. YML894 Rev1������������������������������������� N3G002W 3G Wireless Router User Guide www.netcomm.com.au69 Appendix C Legal & Regulatory Information This manual is copyright. Apart from any fair dealing for the purposes of private study, research, criticism or review, as permitted under the Copyright Act, no part may be reproduced, stored in a retrieval system or transmitted in any form, by any means, be it electronic, mechanical, recording or otherwise, without the prior written permission of NetComm Limited. NetComm Limited accepts no liability or responsibility, for consequences arising from the use of this product. NetComm Limited reserves the right to change the specifications and operating details of this product without notice. NetComm is a registered trademark of NetComm Limited. All other trademarks are acknowledged the property of their respective owners. Customer Information ACA (Australian Communications Authority) requires you to be aware of the following information and warnings: (1) This unit shall be connected to the Telecommunication Network through a line cord which meets the requirements of the ACA TS008 Standard. (2) This equipment has been tested and found to comply with the Standards for C-Tick and or A-Tick as set by the ACA . These standards are designed to provide reasonable protection against harmful interference in a residential installation. This equipment generates, uses, and can radiate radio noise and, if not installed and used in accordance with the instructions detailed within this manual, may cause interference to radio communications. However, there is no guarantee that interference will not occur with the installation of this product in your home or office. If this equipment does cause some degree of interference to radio or television reception, which can be determined by turning the equipment off and on, we encourage the user to try to correct the interference by one or more of the following measures: • Change the direction or relocate the receiving antenna. • Increase the separation between this equipment and the receiver. • Connect the equipment to an alternate power outlet on a different power circuit from that to which the receiver/TV is connected. • Consult an experienced radio/TV technician for help. (3) The power supply that is provided with this unit is only intended for use with this product. Do not use this power supply with any other product or do not use any other power supply that is not approved for use with this product by NetComm. Failure to do so may cause damage to this product, fire or result in personal injury. N3G002W 3G Wireless Router User Guide 70 YML894 Rev1 www.netcomm.com.au Product Warranty The warranty is granted on the following conditions: 1. This warranty extends to the original purchaser (you) and is not transferable; 2. This warranty shall not apply to software programs, batteries, power supplies, cables or other accessories supplied in or with the product; 3. The customer complies with all of the terms of any relevant agreement with NetComm and any other reasonable requirements of NetComm including producing such evidence of purchase as NetComm may require; 4. The cost of transporting product to and from NetComm’s nominated premises is your responsibility; and, 5. NetComm does not have any liability or responsibility under this warranty where any cost, loss, injury or damage of any kind, whether direct, indirect, consequential, incidental or otherwise arises out of events beyond NetComm’s reasonable control. This includes but is not limited to: acts of God, war, riot, embargoes, acts of civil or military authorities, fire, floods, electricity outages, lightning, power surges, or shortages of materials or labour. 6. The customer is responsible for the security of their computer and network at all times. Security features may be disabled within the factory default settings. NetComm recommends that you enable these features to enhance your security. The warranty is automatically voided if: 1. You, or someone else, use the product, or attempts to use it, other than as specified by NetComm; 2. The fault or defect in your product is the result of a voltage surge subjected to the product either by the way of power supply or communication line, whether caused by thunderstorm activity or any other cause(s); 3. The fault is the result of accidental damage or damage in transit, including but not limited to liquid spillage; 4. Your product has been used for any purposes other than that for which it is sold, or in any way other than in strict accordance with the user manual supplied; 5. Your product has been repaired or modified or attempted to be repaired or modified, other than by a qualified person at a service centre authorised by NetComm; and, 6. The serial number has been defaced or altered in any way or if the serial number plate has been removed. Limitations of Warranty The Trade Practices Act 1974 and corresponding State and Territory Fair Trading Acts or legalisation of another Government (“the relevant acts”) in certain circumstances imply mandatory conditions and warranties which cannot be excluded. This warranty is in addition to and not in replacement for such conditions and warranties. To the extent permitted by the Relevant Acts, in relation to your product and any other materials provided with the product (“the Goods”) the liability of NetComm under the Relevant Acts is limited at the option of NetComm to: • Replacement of the Goods; or • Repair of the Goods; or • Payment of the cost of replacing the Goods; or • Payment of the cost of having the Goods repaired. All NetComm ACN 002 490 486 products have a standard 12 months warranty from date of purchase. However some products have an extended warranty option (refer to packaging). To be eligible for the extended warranty you must supply the requested warranty information to NetComm within 30 days of the original purchase by registering on-line via the NetComm web site at www.netcomm.com.au YML894 Rev1������������������������������������� N3G002W 3G Wireless Router User Guide www.netcomm.com.au71 Product Warranty NetComm products have a standard 12 months warranty from date of purchase. However some products have an extended warranty option, via registering your product online at the NetComm website www.netcomm.com.au. Refer to the User Guide for complete product warranty conditions, limitations of warranty and other legal and regulatory information. Contact Information If you have any technical difficulties with your product, please do not hesitate to contact NetComm’s Customer Support Department. Email: [email protected] www.netcomm.com.au Note: NetComm Technical Support for this product only covers the basic installation and features outlined in the Quick Start Guide. For further information regarding the advanced features of this product, please refer to the configuring sections in the User Guide or contact a Network Specialist. NetComm Limited ABN 85 002 490 486 PO Box 1200, Lane Cove NSW 2066 Australia E – [email protected] W – www.netcomm.com.au N3G002W 3G Wireless Router User Guide 72 YML894 Rev1 www.netcomm.com.au