1
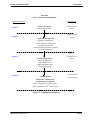
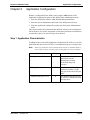
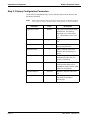
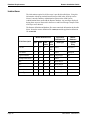
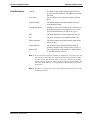
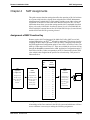
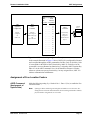
ROAMER
AN
OPEN APPLICATION INTERFACE (OAI)
INSTALLATION GUIDE
NEC America, Inc.
NDA-30016-003
Revision 1.0
February, 1997
Stock # 241735
LIABILITY DISCLAIMER
NEC America reserves the right to change the specifications, functions,
or features in this document at any time without notice. NEC America
has prepared this document for use by its employees and customers. The
information contained herein is the property of NEC America and shall
not be reproduced without prior written approval from NEC America.
Copyright 1996
NEC America, Inc.
Roamer Installation Guide
CONTENTS
TABLE OF CONTENTS
Page
Chapter 1 - Introduction . . . . . . . . . . . . . . . . . . . . . . . . . . . . . . . . . . . . . . . . . . . . . . . . . . 1
Chapter 2 - Application Configuration . . . . . . . . . . . . . . . . . . . . . . . . . . . . . . . . . . . . . . . 5
Step 1: Application Characteristics . . . . . . . . . . . . . . . . . . . . . . . . . . . . . . . . . . . . . . . . . . . . . . . . .
Step 2: Primary Configuration Parameters . . . . . . . . . . . . . . . . . . . . . . . . . . . . . . . . . . . . . . . . . . .
Step 3: OAI Facilities . . . . . . . . . . . . . . . . . . . . . . . . . . . . . . . . . . . . . . . . . . . . . . . . . . . . . . . . . . .
Step 4: Secondary OAI Configuration Parameters . . . . . . . . . . . . . . . . . . . . . . . . . . . . . . . . . . . . .
Step 5: User-Defined Parameters. . . . . . . . . . . . . . . . . . . . . . . . . . . . . . . . . . . . . . . . . . . . . . . . . .
5
6
7
8
9
Chapter 3 - Database Requirements . . . . . . . . . . . . . . . . . . . . . . . . . . . . . . . . . . . . . . . 11
Instructions . . . . . . . . . . . . . . . . . . . . . . . . . . . . . . . . . . . . . . . . . . . . . . . . . . . . . . . . . . . . . . . . . . 12
Field Definitions . . . . . . . . . . . . . . . . . . . . . . . . . . . . . . . . . . . . . . . . . . . . . . . . . . . . . . . . . . . . . 13
Chapter 4 - MAT Assignments . . . . . . . . . . . . . . . . . . . . . . . . . . . . . . . . . . . . . . . . . . . . 15
Assignment of MSF Function Key. . . . . . . . . . . . . . . . . . . . . . . . . . . . . . . . . . . . . . . . . . . . . . . . .
AOKC Command: (Assignment of OAI Key Codes) . . . . . . . . . . . . . . . . . . . . . . . . . . . . . . . . . . .
AKY1 Command: (Assignment of Dterm Function Key) . . . . . . . . . . . . . . . . . . . . . . . . . . . . . . . .
Assignment of Free Location Feature. . . . . . . . . . . . . . . . . . . . . . . . . . . . . . . . . . . . . . . . . . . . . .
ASYD Command: (Assignment of System Data) . . . . . . . . . . . . . . . . . . . . . . . . . . . . . . . . . . . .
Assignment of Numbering Plan to Support Free Location Feature . . . . . . . . . . . . . . . . . . . . . . .
ANPD Command: (Assignment of Numbering Plan Data) . . . . . . . . . . . . . . . . . . . . . . . . . . . . .
ASPA Command: (Assignment of Special Access Code) . . . . . . . . . . . . . . . . . . . . . . . . . . . . .
ASDT Command: (Assignment of Station Data) . . . . . . . . . . . . . . . . . . . . . . . . . . . . . . . . . . . .
NDA-30016 Revision 3.0
15
16
16
17
17
18
18
18
18
Page i
CONTENTS
Roamer Installation Guide
This Page Left Blank.
Page ii
NDA-30016 Revision 3.0
Roamer Installation Guide
FIGURES
LIST OF FIGURES
Figure
Title
1-1
4-1
4-2
Installation Requirements . . . . . . . . . . . . . . . . . . . . . . . . . . . . . . . . . . . . . . . . . . . . . . . 3
OAI Function Key Assignment . . . . . . . . . . . . . . . . . . . . . . . . . . . . . . . . . . . . . . . . . . 15
OAI Function Key Assignment Example . . . . . . . . . . . . . . . . . . . . . . . . . . . . . . . . . . . 17
NDA-30016 Revision 3.0
Page
Page iii
FIGURES
Roamer Installation Guide
This Page Left Blank.
Page iv
NDA-30016 Revision 3.0
Roamer Installation Guide
Chapter 1
Introduction
Introduction
This guide provides specific field entries that need to be made in the process of
installing and configuring Roamer. In addition to this guide, use the following
manuals for this installation:
• Applications Manager (APM) Installation Manual – Contains step-by-step
instructions for installing the software from the release media.
• Applications Manager (APM) Operations Manual – Explains how applications
like Roamer are configured in the APM environment, using the entries and
values provided in this guide.
• NEAX2400 System Manuals – Give very detailed explanations about the
assignments that need to be made through the Maintenance Administration
Terminal (MAT) commands on the NEAX2400.
The installation and set up of Roamer involves the following processes. Each of
these topics is covered in more detail in the remaining chapters of this book:
• Software Installation – Roamer software must first be loaded from the release
media. Log in to the APM Platform Management Menu, select the Installation
of Applications/Packages option, and follow the instructions provided in the
APM Installation Manual to complete this part of the installation.
• Application Configuration – Roamer is internally supported by the APM and
must be configured in the APM environment. Chapter 2 of this guide provides
the information that must be entered into this APM configuration file. Use the
instructions provided in the APM Operations Manual to make the entries
provided in this section.
• Database Requirements – Roamer requires two application databases, one of
which is constructed and maintained through the APM Database
Administration option. The process begins with the creation of a master
definition file and its related master database. An application definition file is
constructed which enables the processing of the master files into an application
database. Chapter 3 of this guide defines the information which must be
included in these definition and database files. Use the instructions provided in
the APM Operations Manual to make the entries contained in this section.
• Mat Assignments – Several data settings must be assigned at the NEAX
Maintenance Administration Terminal (MAT) before Roamer will function.
Chapter 4 of this guide specifies the necessary commands and the values at
which they are to be set. Use the instructions provided in the NEAX2400 IMS
System Manuals to make the entries contained in this section.
NDA-30016
Revision 3.0
Page 1
Introduction
Roamer Installation Guide
A Note About the Logical and Physical Numbers Used By Roamer:
Roamer uses logical and physical numbers to move users from one phone to
another. A physical number (e.g., 4502) is the actual extension associated to a
Dterm or station through the NEAX2400 MAT. A logical number (e.g., 202) is an
arbitrary number that is associated to a telephone user and that is controlled by the
Open Application Interface (OAI). Physical numbers are not moved. Logical
numbers move with the user. Thus, when a user indicates a move, Roamer finds the
user’s logical number and reassigns it to the physical number of the new telephone.
During installation, a logical number and a home physical number are assigned to
each user in the Roamer database. Assignments are made at the NEAX2400 MAT
which associates those physical numbers to specific Dterms.
These two sets of numbers can be the same or different. If they are different and
OAI processing is interrupted, Roamer may lose access to the physical numbers
since OAI relocates users by their logical numbers. If the two numbering systems
are the same and OAI processing is interrupted, all users can be restored to their
physical home phone numbers by disabling the Free Location Feature through the
NEAX2400 MAT.
The installation process, including its presentation in this manual and reference to
other manuals that you need to complete installation, is illustrated in Figure 1-1 on
page 3:
Page 2
NDA-30016 Revision 3.0
Roamer Installation Guide
Introduction
ROAMER
INSTALLATION REQUIREMENTS
Instructions in:
Discussed in chapter:
Chapter 1
Software Installation
Software Release Media
APM Installation
Manual
APM Operations
Manual
Chapter 2
Application Configuration
Application Characteristics
Primary Parameter Configuration
OAI Facilities (Optional)
OAI Configuration Parameters (Optional)
User-Defined Parameters
Chapter 3
Database Requirements
Master Definition File
Master Database File
Application Definition File
Application Database
Chapter 4
NEAX2400 IMS
Maintenance Administration
Terminal (MAT) Assignments
AOKC (Assignment of OAI Key Codes)
APM Operations
Manual
NEAX2400 IMS
System Manuals
AKY1 (Assignment of Dterm Function Key)
Figure 1-1 Installation Requirements
NDA-30016 Revision 3.0
Page 3
Introduction
Roamer Installation Guide
This Page Left Blank.
Page 4
NDA-30016 Revision 3.0
Roamer Installation Guide
Chapter 2
Application Configuration
Application Configuration
Roamer is configured into the APM system using the Add function of the
Application Configuration option on the APM System Administration menu:
1. Enter the APM option from the APM Platform Management Menu.
2. Enter the System Administrator password at the APM password screen.
3. Enter the Application Configuration option from the System Administration
menu.
This section contains the information that should be entered to the configuration
file for Roamer. For specific instructions on what these parameters mean and how
to make these entries, use the APM Operations Manual.
Step 1: Application Characteristics
In adding Roamer to the APM Application Configuration file, define it as an OAI
application that does not need a CRT or a communication queue, as shown below.
Note:
Entries for parameters that are marked with an asterisk (*) should be made exactly as they are shown. All other entries in this guide serve only as examples.
Parameter
NDA-30016
Revision 3.0
Entry
Description
OAI Application (Y,N)
Y
Y(es). Roamer is an OAI
application because it
communicates with the
NEAX2400 using OAI
processes.
CRT Application (Y,N)
N
(No). Roamer does not require a
terminal screen that is of the
same type as the one used by the
APM.
Communication Queue (Y/N)
N
(No). Roamer does not need an
IPC queue to communicate with
other processes.
Page 5
Application Configuration
Roamer Installation Guide
Step 2: Primary Configuration Parameters
On the APM Configuration Entry screen, make the entries shown below to the
parameters indicated.
Note:
Entries for parameters that are marked with an asterisk (*) should be made exactly as they are shown. All other entries in this guide serve only as examples.
Parameter
Application Name
Executable Filename*
Group*
Description
Roamer
The name to be displayed in the
APM menus. This name is
displayed as it is entered here
(i.e., capital letters, lower case,
etc.).
/oai/app/freeloc
The path name of the executable
file.
(no entry)
(Roamer is not a member of a
group of applications.)
Response Mode
I
This is a default value since
Roamer does not belong to a
group.
Initialization Batch
N
Roamer is not to be initialized
automatically when the OAI
system is initialized.
Termination Mode*
M
Roamer is to receive a termination
message rather than a kill or
termination signal from the APM,
when it is to terminate.
Standard Output*
Number of Restarts
Page 6
Entry
/dev/null
0
Roamer’s output is sent to this
file.
Roamer may not be restarted by
the APM if it terminates
erroneously.
NDA-30016 Revision 3.0
Roamer Installation Guide
Application Configuration
Step 3: OAI Facilities
According to instructions in the APM Operations Manual, designate the following
NEAX2400 facilities for Roamer using the Facilities command on the
Configuration Entry screen:
FLF
MRFI
NTF
TCFI
Note:
NDA-30016 Revision 3.0
Free Location
Mode Release (I)
Number Transfer
Terminal Control (I)
MRFR
MSF
TCFD
Mode Release (R)
OAI Mode Set
Terminal Control (D)
The same MSF identification number (i.e., from 128 to 192) that is selected in the
APM during Step 3 must be assigned to Roamer at the NEAX MAT. For more information, see Chapter 4, “MAT Assignments” on page 15.
Page 7
Application Configuration
Roamer Installation Guide
Step 4: Secondary OAI Configuration Parameters
Using the OAI-Conf command on the APM Configuration Entry screen, make the
entry shown for each of the following parameters required by Roamer. Use the
instructions provided for this option in the APM Operations Manual:
Parameter
Entry
Description
/oai/db/cur/
roamerdb
The path name of the database
containing user information. The
database filename roamerdb,
shown here with its path, should
be used as the name of the
corresponding Application
Definition File. For more
information see Chapter 3,
“Database Requirements” on
page 11.
Timeout Value #1
60
The number of seconds Roamer
waits for user numeric input
before it releases the Dterm.
Timeout Value #2
20
The number of seconds Roamer
waits for input of processing
symbols such as # before it
releases the Dterm.
Tenant Number
1
This configuration applies to
tenant No. 1.
Database Name #1*
Source Link Name
OAI1X25
The port on the source side of the
communication link. Entry
should correspond to a Link
Name in the APM System
Configuration file.
Destination Link Name
PBX1X25
The port on the destination side of
the communication link.
10
The number of seconds Roamer
waits before trying to re-establish
an association with the NEAX
that has been released.
Association Recovery
Page 8
NDA-30016 Revision 3.0
Roamer Installation Guide
Application Configuration
Step 5: User-Defined Parameters
Make the following additional parameter entries through the UserDefined
command on the APM Configuration Entry screen:
Parameter
Entry
Description
User Defined #1
3
The number of the Roamer Dterm
function key LED. This number
must correspond to the function
key assigned to Roamer at the
NEAX MAT. For more
information, see Chapter 4, “MAT
Assignments” on page 15.
User Defined #2
0
The default Route Restriction
Class value.
User Defined #3
Y
Y(es), implement the Name
Display feature; N (o), do not
implement the Name Display
feature and only display phone
numbers.
User Defined #4
R
The way the privilege level is
determined when there is more
than one user assigned to a Dterm,
using the following characters:
• H = Highest Priority level
among assigned users.
• L = Lowest priority level
among assigned users.
• R = Most recently added user
privilege level.
User Defined #5
Y
Y(es). Roamer is to reset all
logical numbers to their home
numbers at the designated Reset
Time
N(o). Roamer is not to reset the
logical numbers daily. (See User
Defined #6.)
User Defined #6
NDA-30016 Revision 3.0
3:00
The Reset Time on a 24-hour
clock at which all logical numbers
are reset daily to their home
numbers. This entry is valid only
if User Defined #5 is set to Y(es).
Page 9
Application Configuration
Roamer Installation Guide
Parameter
Entry
Description
User Defined #7
0
The number of 30-minute
intervals that the backup file will
remain valid after a power failure.
The largest allowable value is 48
(24 hours). A longer delay must
be indicated with the value 0
(always valid).
User Defined #8*
/oai/app/data/
roamerbu
The name of the backup file that
reflects the current status of
assignments. This file preserves
the current status of the Roamer
system in the event of a power
failure. If no backup is desired,
leave this field blank.
User Defined #9
16
The length of the User Name field
in the Roamer database.
This completes the configuration of Roamer in the APM. Now go to Chapter 3,
“Database Requirements” on page 11 to create its database support.
Page 10
NDA-30016 Revision 3.0
Roamer Installation Guide
Chapter 3
Database Requirements
Database Requirements
Roamer uses the following two databases, only the first of which is created through
the APM:
• The Roamer Database
This database contains default assignment information. Each user ID is
associated to telephone numbers and privileges, a tenant, and a reset option.
This database is created through the APM and is configured as /oai/db/cur/
roamerdb.
• The Backup Database
This database reflects the current status of Roamer activity and is created and
maintained by Roamer. It is configured in the APM as /oai/app/data/roamerbu.
The Roamer database is created through the Database Administration option on the
APM System Administration Menu and involves the following four-step process:
Step 1 - Create
Master Definition File
Step 2 - Build
Master Database File
Step 3 - Create
Application Definition File
Step 4 - Process
Application Database
1. Create a Master Definition File: This step involves creating the master definition file that defines the fields in the master database file.
2. Build a Master Database File: This step involves entering data that was defined in the master definition file, in Step 1, into the master database fields.
3. Create an Application Definition File: In this step, a definition file is created
for the Roamer database. This file defines the formats by which data from the
corresponding master file is to be converted to meet the needs of Roamer.
4. Process the Application Database: In this step, the Process and Install Application Databases options on the APM Database Administration menu create the
file that will be used by Roamer. When the Process option is activated, data is
drawn from the master database and converted to the formats specified in the
corresponding application definition file. The Install option is then activated to
enable Roamer to copy its database into a working file.
NDA-30016
Revision 3.0
Page 11
Database Requirements
Roamer Installation Guide
Instructions
The information required in all four steps is provided in table below. Using this
information with the procedural instructions provided in the APM Operations
Manual, enter the Database Administration option on the APM System
Administration Menu, and build the Roamer database. Any messages displayed
during these steps are discussed in the Process and Error Messages chapter of the
APM Operations Manual.
The Roamer definition and database files must contain the information in the table
below. Name the master definition file roamer_m and the application definition
file roamerdb.
Master Definition File
Field Description
Page 12
Type
Size
Application
Definition File
Master
Database
Data Type
Typical
Entry
Min.
Value
Max.
Value
0
99999 ASCII
9999
598241297
ASCII
Thompson
User ID
N
10
User Name
A
16
Logical Number
N
5
Exempt from Reset? A
2
RSC
N
2
0
SFC
N
2
Physical Number
N
Tenant Number
Phone Type
0
99999 Long Integer
201
ASCII
n
15
Short Integer
1
0
15
Short Integer
2
5
0
99999 Long Integer
3200
N
3
0
255
Short Integer
1
N
2
0
10
Short Integer
10
NDA-30016 Revision 3.0
Roamer Installation Guide
Field Definitions
Database Requirements
User ID
A unique 10-digit number that describes each user
(e.g. social security number). The database is sorted by
this field.
User Name
The 16-character user name that is displayed on the
Dterm.
Logical Number
The station number associated with the user name
under Roamer control.
Exempt from Reset?
Whether or not (Yes or No) this user is to be reset to a
home phone when all system phones are reset. (See
User-Defined Parameters #5 and #6 on page 9.)
RSC
The Route Restriction Class assignment of the user.
SFC
The Service Feature Class assignment of the user.
Physical Number
The station number associated with the phone under
NEAX control.
Tenant Number
The number of the tenant to which this physical
number is assigned. (See Tenant Number on page 8.)
Phone Type
The equipment type of this phone. To indicate a Dterm
V, this field must be set to 10.
Note 1: To enter an unassigned physical number into the database, list it under a User ID
that is not associated with a user name and leave the Logical Number, Exempt
from Reset?, RSC, and SFC fields blank. A user can be entered to the database
without a phone assignment by leaving the Physical Number, Tenant Number, and
Phone Type fields blank (e.g., security staff who are mobile and not assigned to a
home phone).
Note 2: Remember to complete Step 4, Process the Application Database, after entering
the information above.
NDA-30016 Revision 3.0
Page 13
Database Requirements
Roamer Installation Guide
This Page Left Blank.
Page 14
NDA-30016 Revision 3.0
Roamer Installation Guide
Chapter 4
MAT Assignments
MAT Assignments
This guide assumes that data settings that affect the operation of all OAI software
on a system-wide basis have already been assigned on the NEAX Maintenance
Administration Terminal (MAT). Such settings include system index values and
assignment of Interface I/O Port Data in the Interface Processor (IP). For more
information about these system data settings and the MAT commands described
below, refer to the OAI Module Installation Manual for the NEAX2400 IMS, the
NEAX2400 IMS Command Manual, the NEAX2400 IMS Job Specification Manual,
and the NEAX2400 IMS Programming Manual.
Assignment of MSF Function Key
Roamer requires MAT assignment of the Mode Set Facility (MSF) to an OAIassigned function key on all Dterms affected by application. This process involves
assigning the MSF and its Operation Code (Op-Code), configured for Roamer in
the APM Application Configuration option, to one of the 14 OAI Key Codes. (The
MSF Op-Codes range from 128 to 191. These are available for on-screen viewing
through the Providers command in the APM Application Configuration option.)
Each of the OAI Key Codes corresponds to an AKY1 Function Key Index (FKI)
value which is then assigned to the specific Dterm function key. This process is
illustrated below:
PBX Correspondence of
AOKC
AKY1
OAI
Function
Key Codes
APM
Application
Configuration
MAT
AOKC
Command
Designation of
Facility (Type)
and its Op-Code
for Use by
Roamer
Assignment of
an OAI Key Code
(between 1 and 14)
to the Same
Facility Type
and Op-Code
Key Indices
1
< . . . .>
34
2
3
< . . . .>
< . . . .>
35
36
4
< . . . .>
37
5
< . . . .>
38
6
< . . . .>
39
7
< . . . .>
40
8
< . . . .>
41
9
< . . . .>
42
10
< . . . .>
43
11
< . . . .>
44
12
< . . . .>
45
13
< . . . .>
46
14
< . . . .>
47
MAT
AKY1
Command
Assignment of
Corresponding
MAT Function
Key Index to a
.....
.....
...
...
specific Dterm
Function Key
Figure 4-1 OAI Function Key Assignment
A knowledge of the Dterm stations in the NEAX system and which ones will have
access to Roamer is necessary to making the following assignments:
NDA-30016 Revision 3.0
Page 15
MAT Assignments
Roamer Installation Guide
AOKC Command: (Assignment of OAI Key Codes)
This command is used to associate the MSF facility and its operation code that was
configured in the APM for Roamer to one of the 14 OAI Key Codes in the MAT.
1. Select an unused OAI Key Code from 1 to 14. To determine what Key Codes
are available for assignment, use the LOKC command to list the AOKC Key
Codes that are already assigned.
2. Enter MSF as the facility to be assigned to the selected Key Code, using the values on the screen.
3. Enter the same Op-Code that was configured for Roamer in the APM. If necessary, retrieve it using the Providers command on the APM Configuration Entry
screen.
AKY1 Command: (Assignment of Dterm Function Key)
This command is used to assign key data on the Dterms that are to have access to
Roamer.
MAT Function Key Indexes #34 to #47 have been designated for use in the OAI
system and correspond to the 14 OAI Key Codes as illustrated on the previous
page. The AKY1 command is used to assign a Dterm function key to the specific
MAT Function Key Index that, in turn, corresponds to the previously assigned OAI
Key Code. This command must be used to assign the function key on each Dterm
that is to be set up with access to Roamer.
1. Enter the same tenant number that is configured for Roamer in the APM Application Configuration option (i.e., Tenant Number on page 8).
2. Enter the station number of the Dterm on which the function key is being assigned.
3. Enter to the Dterm function key field the MAT Function Key Index that corresponds to the previously assigned OAI Key Code.
Page 16
NDA-30016 Revision 3.0
Roamer Installation Guide
MAT Assignments
PBX Correspondence of
AOKC
AKY1
OAI
Function
Key Codes
APM
Application
Configuration
Roamer
configured
for
MSF #129
MAT
AOKC
Command
OAI Key
code #10 given
MSF facility type
and
Op-Code #129
Key Indices
1
2
< . . . .>
< . . . .>
34
35
3
< . . . .>
36
4
< . . . .>
37
5
< . . . .>
38
6
< . . . .>
39
7
< . . . .>
40
8
< . . . .>
41
9
< . . . .>
42
10
< . . . .>
43
11
< . . . .>
44
12
< . . . .>
45
13
< . . . .>
46
14
< . . . .>
47
MAT
AKY1
Command
Function Key
Index #43
assigned to
Function
Key #3
.....
.....
...
...
Dterm Function
Key #3
Figure 4-2 OAI Function Key Assignment Example
In the example illustrated in Figure 4-2 above, MSF #129 is configured for Roamer
and is assigned through the AOKC command to OAI Key Code 10. OAI Key Code
10 corresponds in the PBX to MAT Function Key Index 43. Each Dterm in the
system that is to access Roamer has function key 3 assigned to MAT Function Key
Index 43 via the AKYI command. Now, for the duration of Roamer’s lifetime,
whenever a phone user presses function key 3 on any assigned Dterm, MSF 129
initiates communication with Roamer.
Assignment of Free Location Feature
ASYD Command:
(Assignment of
System Data)
NDA-30016 Revision 3.0
Make the following setting: Sys 1 Index 4 bit 4 – Enter 1 (Yes) to enable the Free
Location Feature.
Note:
If OAI goes down and the logical and physical number sets are the same, disabling this Free Location Feature disables all relocated logical numbers and only
physical number assignments are accessible.
Page 17
MAT Assignments
Roamer Installation Guide
Assignment of Numbering Plan to Support Free Location Feature
ANPD Command:
(Assignment of
Numbering Plan
Data)
This command is used to assign the actual first digit and the total number of digits
for the set of physical numbers and again for the logical numbers. For instance, if
the physical numbers are to be four digits long and lie in the range between 3000
to 3999, the first digit is 3 and the total number of digits is 4. The logical numbers
can be the same first digit and total number of digits. Remember, use the same
tenant number that was configured for Roamer.
ASPA Command:
(Assignment of
Special Access
Code)
This command is then used to associate the first digit, assigned through ANPD,
with a kind of service. In ASPA, assign the logical and physical number(s) from
ANPD to STN – Station Number Level. Use the tenant number configured for
Roamer and the same connection status index that was used in ANPD.
ASDT Command:
(Assignment of
Station Data)
Finally, this command is used to associate each physical (station) number from
ANPD to the actual Dterm, or station, Line Equipment Number (LENS) and
telephone class. Again, use the same tenant number.
Note:
Now that MAT assignments for logical and physical numbers are complete and
correspond to the Roamer database, when a telephone user enters a logical number, the NEAX performs the following processes:
a. It reads the first digit and the total number of digits according to the ANPD
assignment.
b. It finds that the first digit is assigned to station service through the ASPA.
c. It checks to see if the Free Location Feature (FLF) is enabled.
d. If FLF is enabled, from its database Roamer provides the physical number
associated to that logical number.
e. Then the NEAX reads the ASDT to find out what actual Dterm is associated to
that physical number and makes the change in assignment.
Roamer is installed and ready to be initialized. Enter the APM Operations Menu
and initialize Roamer through the Non-CRT Application Control option according
to instructions provided in the APM Operations Manual.
Page 18
NDA-30016 Revision 3.0