1
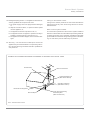
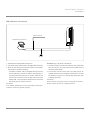
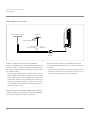
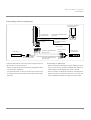
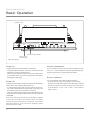
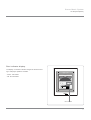
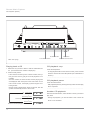
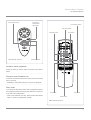
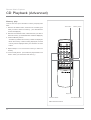
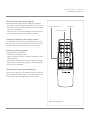
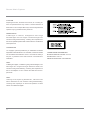
Stereo Music System
R
Stereo Music System
Owner’s Manual
1
Stereo Music System
WARNING
This equipment has been tested and found to comply with the
TO REDUCE THE RISK OF FIRE OR ELECTRIC
limits for a Class B digital device, pursuant to part 15 of the
SHOCK, DO NOT EXPOSE THIS APPLIANCE TO
RAIN OR MOISTURE.
FCC Rules. These limits are designed to provide reasonable
protection against harmful interference in a residential installation. This equipment generates, uses and can radiate radio
CAUTION
frequency energy and, if not installed and used in accordance
RISK OF ELECTRIC SHOCK.
DO NOT OPEN!
with the instructions, may cause harmful interference to radio
communications. However, there is no guarantee that interference will not occur in a particular installation. If this equipment
CAUTION
does cause harmful interference to radio or television recep-
TO REDUCE THE RISK OF ELECTRIC SHOCK, DO
tion, which can be determined by turning the equipment off
NOT REMOVE COVER (OR BACK). NO USER-SER-
and on, the user is encouraged to try to correct the interfer-
VICEABLE PARTS INSIDE. REFER SERVICING TO
ence by one or more of the following measures:
QUALIFIED SERVICE PERSONNEL.
- Reorient or relocate the receiving antenna.
- Increase the separation between the equipment and receiver.
The lightning flash with arrowhead symbol, within
an equilateral triangle, is intended to alert the user
to the presence of uninsulated “dangerous voltage”
within the product’s enclosure; that may be of sufficient mag-
- Connect the equipment into an outlet on a circuit different
from that to which the receiver is connected.
- Consult the dealer or an experienced radio/TV technician
for help.
nitude to constitute a risk of electric shock to persons.
WARNING
The exclamation point within an equilateral triangle
The Federal Communications Commission does not allow any
is intended to alert the user to the presence of im-
modifications or changes to the unit EXCEPT as that specified
portant operating and maintenance (servicing) in-
by Nakamichi in this manual. Failure to comply with this gov-
structions in the literature accompanying the appliance.
ernment regulation could void your authority to operate the
equipment.
This digital apparatus does not exceed the CLASS B limits for
radio noise emissions from digital apparatus set out in the Radio
Interference Regulations of the Canadian Department of Communications.
Please record the serial number in the space provided below
and retain this number. The serial number is located on the
rear panel of the unit.
Model Number : SoundSpace 5
Serial Number :
2
Stereo Music System
Important Notice
Contents
This is applicable to sales outside the European Community.
Safety Instructions .............................................................. 4
Usage Precautions ............................................................. 6
We thank you for your purchase of this Nakamichi product and
External View ...................................................................... 8
trust that it will provide you with many years of trouble-free
Installation ........................................................................... 9
performance. Should you be using your Nakamichi product in
Connections ........................................................................ 10
a country other than the one in which it was originally pur-
Basic Operation .................................................................. 14
chased, we ask you note the following:
CD Playback (Basic) ........................................................... 16
CD Playback (Advanced) ................................................... 20
1) The appointed Nakamichi distributor for any given country
FM/AM Broadcast Reception ............................................. 24
is responsible for warranty servicing only on units distrib-
Other Functions .................................................................. 26
uted by or through it in that country in accordance with its
Troubleshooting .................................................................. 30
applicable warranty.
Specifications ...................................................................... 32
2) Should a Nakamichi product require servicing in a country
other than the one in which it was originally purchased, the
end user may seek to have repairs performed by the nearest Nakamichi distributor, subject to that distributor's local
servicing policies, but all costs of repair (parts, labor, transportation) must be born by the owner of the Nakamichi product.
Thank you again for your purchase.
Nakamichi Corporation
Tokyo, Japan
3
Stereo Music System
Safety Instructions
The following safety instructions have been included in com-
10. Heat – The appliance should be situated away from heat
pliance with safety standard regulations. Please read them
sources such as radiators, heat registers, stoves, or other
carefully.
appliance (including amplifier) which produce heat.
1. Read Instructions – All the safety and operating instructions
should be read before the appliance is operated.
11. Power Sources – The appliance should be connected to a
power supply only of the type described in the operating
instructions or as marked on the appliance.
2. Retain Instructions – The safety and operating instructions
should be retained for future reference.
12. Grounding or Polarization – Precautions should be taken
so that the grounding or polarization means of an appli-
3. Heed Warnings – Adhere to all warnings on the appliance
ance is not defeated.
and in the operating instructions.
13. Power-Cord Protection – Power-supply cords should be
4. Follow Instructions – All operating and use instructions should
be followed.
routed so that they are not likely to be walked on or pinched
by items placed upon or against them, paying particular
attention to cords at plugs, convenience receptacles, and
5. Water and Moisture – The appliance should not be used
the point where they exit from the appliance.
near water - for example, near a bathtub, washbowl, kitchen
sink, laundry tub, in a wet basement, or near a swimming
pool, etc.
6. Carts and Stands – The appliance should be used only with
a cart or stand that is recommended by the manufacturer.
14. Cleaning – The appliance should be cleaned only as recommended away from power lines.
15. Power-Lines – An outdoor antenna should be located away
from power lines.
7. An appliance and cart combination
16. Outdoor Antenna Grounding – If an outside antenna is con-
should be moved with care. Quick stops,
nected to the receiver, be sure the antenna system is
excessive force, and uneven surfaces
grounded so as to provide some protection against volt-
may cause the appliance and cart com-
age surges and built-up static charges. Article 810 of the
bination to overturn.
National Electrical Code, ANSI/NFPA 70, provides information with regard to proper grounding of the mast and
8. Wall or Ceiling Mounting – The appliance should be mounted
supporting structure, grounding of the lead-in wire to an
to a wall or ceiling only as recommended by the manufac-
antenna-discharge unit, size of grounding conductors, lo-
turer.
cation of antenna-discharge unit, connection to grounding
electrodes, and requirements for the grounding electrode.
9. Ventilation – The appliance should be situated so that its
See the next page.
location or position does not interfere with its proper ventilation. For example, the appliance should not be situated
17. Nonuse Periods – The power Cord of the appliance should
on a bed, sofa, rug or similar surface that may block the
be unplugged from the outlet when left unused for a long
ventilation openings; or placed in a built-in installation, such
period of time.
as a bookcase or cabinet that may impede the flow of air
through the ventilation openings.
18. Object and Liquid Entry – Care should be taken so that
objects do not fall and liquids are not spilled into the enclosure through openings.
4
Stereo Music System
Safety Instructions
19. Damage Requiring Service – The appliance should be ser-
Caring for the Exterior Panels
viced by qualified service personnel when:
Caring for the exterior panels of the unit should be limited to
A. The power-supply cord or the plug has been damaged;
wiping with a soft dry cloth. Avoid using solvents or alcohol-
or,
based cleaners.
B. Objects have been fallen, or liquid has been spilled
into the appliance; or,
Note to CATV system installer
C. The appliance has been exposed to rain; or,
This reminder is provided to call the CATV system installer's
D. The appliance does not appear to operate normally or
attention to Article 820-40 of the NEC that provides guidelines
exhibits a marked change in performance; or,
E. The appliance has been dropped, or the enclosure damaged.
for proper grounding and, in particular, specifies that the cable
ground shall be connected to the grounding system of the building, as close to the point of cable entry as practical.
20. Servicing – The user should not attempt to service the
appliance beyond that described in the operating instruction. All other servicing should be referred to qualified service personnel.
EXAMPLE OF ANTENNA GROUNDING ACCORDING TO NATIONAL ELECTRICAL CODE
Ground Clamp
Antenna Lead In Wire
Antenna Discharge Unit
(NEC Section 810-20)
Grounding Conductors
(NEC Section 810-21)
Electric Service Equipment
Ground Clamps
Power Service Grounding
Electrode System
(NEC Art 250 Part H)
NEC – National Electrical Code
5
Stereo Music System
Usage Precautions
About the batteries
About Remote Control
- Do not charge the batteries. Attempting to charge regular
Do not expose the remote control to direct sunlight or high
(non-rechargeable) batteries may cause fluid leakage or
temperatures. Failure to observe this precaution may cause
cause the batteries to explode, involving the risk of fire and
deformation of the case.
injury.
...............................................................................................
- When inserting the batteries in the remote control, pay
attention to proper +/- polarity as indicated in the battery compartment. Inserting batteries with wrong polarity
may cause fluid leakage or cause the batteries to explode,
involving the risk of fire, injury, or contamination.
- Do not use batteries other than indicated in this manual.
Cleaning
Clean the unit only by wiping it with a soft cloth. Never use
any solvents, cleaning alcohol or chemical cleaners, since
these may damage the finish and labelling, and lead to discoloration and deformation.
...............................................................................................
Do not use a mixture of old and new batteries. Failure to
observe this precaution may cause fluid leakage or cause
Packing material
the batteries to explode, involving the risk of fire, injury, or
We recommend that you retain the shipping carton and pack-
contamination.
ing material of the unit, since these will be useful for renewed
- Do not expose batteries to heat or try to dismantle them.
transport.
Do not throw batteries into fire or water. Failure to ob-
...............................................................................................
serve this precaution may cause fluid leakage or cause the
Transportation
batteries to explode, involving the risk of fire, injury, or contamination.
- Remove the batteries when not using the unit for a long
Before moving or transporting the unit, be sure to remove all
CDs to prevent the possibility of damage.
...............................................................................................
time. Failure to observe this precaution may cause fluid leakage or cause the batteries to explode, involving the risk of
Other precautions
fire, injury, or contamination. If fluid leakage has occurred,
- Do not place an amplifier, television, or other heavy object
carefully wipe all fluid off the battery compartment and in-
on the unit. Otherwise deformation and breakdown may oc-
sert new batteries. If battery fluid has come into contact with
cur.
skin, immediately wash thoroughly with water.
- Protect the unit from shocks and vibration. Shocks or strong
vibrations during CD playback may cause damage to the
discs.
- To avoid the possibility of hum interference, this unit should
not be placed in close vicinity to other components.
- A sudden increase in the ambient temperature can cause
moisture to condense on the optical lens of the laser pickup,
making correct playback impossible. Condensation can be
removed by turning on the power to the unit and letting it
warm up for about 30 minutes to 1 hour.
6
Stereo Music System
Usage Precautions
On CDs
Inserting the batteries
Be sure to observe the following points concerning CD use in
order to avoid CD damage, jams, sound skipping, and break-
Removing the battery compartment cover (Main remote control)
down.
-
Do not insert the 8-cm (3-inch) CDs (CD
Singles).
-
Do not insert discs which are not
round, such as novelty discs with octagonal or heart shape.
-
Do not use any commercially available
CD accessories (such as adapters for
3-inch CDs, disc stabilizers, disc protectors, cleaning discs etc.).
- Use only discs with a
Removing the battery compartment cover (Sub remote control)
mark or similar, which indi-
cates compliance with official Compact Disc standards.
- Some CDs may have a certain amount of flash (flaky
plastic deposit resulting from the grinding process) near
the center hole or the outer circumference. Remove any
such remnants before using the disc, otherwise it may
not be possible to eject the CD properly, or skipping
may occur.
- CDs bearing labels or stickers with excess glue around
the edges or CDs with glue residue from removed adhesive tape, stickers or similar may give problem during eject or cause other damage.
- Recordable CDs (CD-R) recorded on certain recorders
cannot be played back with this unit.
1. Remove the cover of the battery compartment on the rear
of the remote control.
2. Insert the supplied two IEC R03 (size AAA) batteries into
the compartment, with the polarity as shown.
3. Close the cover of the battery compartment.
7
Stereo Music System
External View
3 Disc MusicBank System
Standby
Sleep
AMFM
Disc
Disc 3
Preset
Random
Track
Vol.
Speaker Unit (Front)
ST
Memory
Remaining Time
Disc 2
Disc 1
Repeat
Memory No.
Loud.
Main Unit (Front)
Speaker Unit (Front)
(With speaker grill removed)
Power
Sleep
Illumi.
Tape
Aux
CD
Tuner
Preset
Tune
AM
FM/Mono
P.Scan
Disc 1
Disc 2
Disc 3
Random
Repeat
D.Scan
M.Clear
Call
Time
Memory
Disc
Mute
Volume
Select
Loud
Remote Control Unit
Subwoofer
Output
L
Digital Output
Speaker
(Impedance 4Ω)
R
Power Input
Main Remote Control
Source
Speaker Unit (Rear)
Main Unit (Rear)
Volume
Power
Off
Mono
Select
Loud.
P.Scan
FM/AM
D
PS
Stop
Track/ Tune
D
PS
Mute
Sleep
Sub Remote Control
8
Stereo Music System
Installation
Decide the installation locations for the main unit and the left
and right speaker units before making the connections. Place
each unit on furniture or the like or hang it from the wall.
...............................................................................................
Installing on wall
You can use the main unit and speaker units fastened to a wall
with the accessory screws. (When fastening to a concrete
wall or other non-wooden wall, please use any commonly avail-
Changing the speaker grill
able screw designed for the specific wall material.)
In addition to the standard speaker grills (gray), the speakers
CAUTION
for this system come with navy blue/green grills. The speaker
When using the main unit and speaker units fastened to a
grill is removed by just pulling it forward, so use the grill that
wall, check that the units are close enough to each other
best matches the atmosphere of the installation location.
for connection before installing them to the wall.
...............................................................................................
1. Use a drill or the like to drill 3-3.5φ diameter holes (two for
Using placed on furniture
1. Paste two each of the accessory rubber feet on the bottom
of the main unit, left speaker, and right speaker (total six
each unit) on the installation surface.
2. Screw the accessory tapping screws for wall installation into
the wall.
3. Hang the main unit and speaker units with their rear instal-
rubber feet).
2. Pull out the main unit and speaker unit rear stays all the
way out and install each unit tilted.
CAUTION
When using this system placed on some furniture, always
lation holes hanging on the screws you installed into the
wall.
Tapping screw for wall
installation
Wall
install with the stays pulled all the way out. If you install
these units with the stay not pulled out or only pulled out
part way, they may fall over.
Hole
(3-3.5φ)
Installation screws
Stay
Aux
Tape
L
L
R
Subwoofer
Output
R
Input
Rec
L
Play
Digital Output
Speaker
(Impedance 4Ω)
Power Input
R
Rubber feet
Aux
Tape
L
L
R
R
Input
Rec
Play
9
Stereo Music System
Connections
Notes
System Connections
- Be sure to disconnect the power cords for this system and all
1. Connect the cables from the rear of the speaker units to the
other audio equipments from the AC outlets before making
left and right Speaker terminals on the rear of the main unit.
connections.
2. Connect the 5-pin connector for the power supply unit to
- Never insert shorting pins, pin cords, or the like on unused
the Power Input terminal of the main unit.
terminals. The system may cease to put out sound or shorts
3. Connect the AM antenna and FM antenna. (Page 11-12.)
could cause breakdown.
4. Connect the source equipment. (Page 13.)
- The white terminal on this system is the left channel audio
5. When all the equipment has been connected, connect the
terminal and the red terminal is the right channel audio ter-
power cable to the power supply unit and plug the power
minal.
cable into a receptacle.
Speaker Unit (R)
Speaker Unit (L)
SoundSpace 5
SoundSpace 5
Speaker
Speaker
R
L
Main Unit
To Power Input terminal
To Speaker L terminal
Subwoofer
Output
L
Digital Output
Speaker
(Impedance 4Ω)
Power Input
R
To Speaker R terminal
To AC outlet
Power Supply Cable
Power Supply Unit
10
Stereo Music System
Connections
AM antenna connection
AM wire antenna
Supplied AM loop antenna
FM
Antenna
75Ω
Unbal.
AM Antenna
GND
Loop
Ground
1. Assemble the supplied AM loop antenna.
Establishing a ground connection
2. Connect the loop antenna lead to the AM Antenna terminal.
1. Provide a single-conductor wire (ordinary vinyl-coated lead
3. Move the loop antenna around and install it in the location
wire) and connect one end of the wire to the AM antenna
with optimum reception sensitivity.
terminal marked "GND".
- If reception condition with the supplied AM loop antenna
2. Connect the other end of the wire to an earth ground, for
are not satisfactory, extend an antenna wire (ordinary vi-
example more than 50 cm length of exposed wire or a metal
nyl-coated lead wire) about 4 to 5 meters outdoors and
bar buried in the ground, or a water pipe (lead pipe) with
connect the end of the wire to the AM antenna terminal
complete grounding.
marked “AM”. The loop antenna should remain connected
CAUTION
also when using an outdoor antenna.
Never connect the ground wire to a gas pipe to avoid ex-
CAUTION
plosion hazard in case of a lightning strike.
If an outdoor AM antenna is used, grounding must be provided for protection against lightning.
11
Stereo Music System
Connections
FM antenna connection
Supplied dipole antenna
FM antenna
Orient towards transmitter
FM
Antenna
75Ω
Unbal.
300-ohm
twin-lead cable
AM Antenna
GND
Loop
75-ohm
coaxial cable
Supplied
antenna
adapter
Areas in close proximity to strong stations
Areas with many noise or interference sources
Extend the supplied 300-ohm twin-lead folded dipole and fix it
Use shielded coaxial cable (5C-2V or 3C-2V) for the antenna
to a wall or similar, in a position that yields best reception (high-
connection.
est number of signal strength indicators light up when receiving a desired station).
- Note that gain and directivity of the dipole antenna are low.
Often multipath (reflections of broadcast signals by nearby
buildings etc.) will occur, which degrades sound quality. Also,
heavy traffic, railroads, or high-voltage power lines in the
vicinity of the reception location may cause noise interference. Installation of a 3-element outdoor FM antenna is recommended in such cases.
...............................................................................................
Fringe areas in considerable distance from stations,
or urban areas with numerous high-rise buildings
Use an outdoor FM antenna with 5 to 8 elements.
12
- A long antenna cable introduces signal loss and is prone to
externally induced noise. For optimum performance, you
should keep the connection as short as possible.
Stereo Music System
Connections
Connecting source equipment
Commonly available
active subwoofer
To Subwoofer
Output terminal
Aux
Tape
L
L
R
To Digital Output
terminal
R
Input
Rec
Commonly available RCA pin
plug cable
Commonly available
optical digital connection cable
Play
To MD player optical
input terminal
Commonly available RCA
pin plug cable
Audio device
Commonly available
RCA pin plug cable
Commonly available RCA
pin plug cable
To Line Output
terminal
MD player or
cassette deck
To Line Input
terminal
There are terminals for connecting source equipment on the
Connecting an MD player
right and the rear of the main unit.
- When connecting an MD player that has digital input termi-
- Always unplug all power cords from the receptacles before
connecting any equipment.
nals, you can use any commonly available optic digital connection cable to record digitally from a CD to an MD.
- The white terminals on this unit are the left channel audio
- When connecting an MD player whose line input/output ter-
terminals and the red terminals are the right channel audio
minals are stereo mini-jacks to the main unit, use any com-
terminals.
monly available RCA/stereo mini-plug conversion cable.
13
Stereo Music System
Basic Operation
Headphone jack
Disc
Source
/Power
Volume
Select
FM/AM
Track
/Seek
1
2
Preset
3
Memory
Phones
Volume Adjustment button
Power button/
Source selector
Main Unit (Top)
Power on
Volume adjustment
Pressing the Power button switches on the power.
- Pressing the Source selector on the main remote control will
activate the unit in the desired source.
- When you press the Band selector the power is switched on
in tuner mode; when you press the Play button, the power is
switched on in CD mode.
...............................................................................................
You can adjust the volume with the Volume Adjustment but-
Power off
Pressing the Power button on the main remote control switches
off the power. The Standby indicator lights up.
- To switch off the power with the main unit/sub remote control, press and hold down the Power button on the main unit/
sub remote control (for at least about 1 second).
- When you switch the power back on again after switching it off,
the power comes on with the same source as when it went off.
CAUTION
Even when the power is switched off, power is supplied
to some of the circuits in this system. When you will be
leaving the system unused for a long time, for example
when going away on a trip, be sure to unplug the power
plug from the AC outlet.
14
tons (∧/∨). You can adjust the volume at high speed by pressing and holding down a Volume Adjustment button.
...............................................................................................
Source selection
You can select the source with the Source selector.
- The main remote control can select the source directly.
- For the main unit and sub remote control, each time you press
the Source selector, the system switches to the next source
in the sequence: Tuner → CD → Tape → AUX (external
input) → Tuner....
Stereo Music System
Basic Operation
Power button/
Source selector
Power button
Volume Adjustment button
Source selector
Play button
Volume
Source
Power
Off
Select
Loud.
P.Scan
FM/AM
Mono
D
PS
Stop
Track/ Tune
Power
D
Sleep
Illumi.
CD
Tape
Aux
FM/Mono
AM
P.Scan
Disc 1
Disc 2
Disc 3
Random
Repeat
D.Scan
M.Clear
Call
PS
Tuner
Mute
Tune
Preset
Sleep
Band selector
Play button
Time
Memory
Disc
Sub Remote Control
Mute
Select
Volume
Loud
Using headphones
Remote Control Unit
Connect the headphones to the headphone jack on the main
unit.
CAUTION
When using headphones, be careful not to raise the volume too high. Listening for prolonged periods at volumes
so high that they irritate the ears can harm your hearing.
Band selector
Volume Adjustment button
Main Remote Control
15
Stereo Music System
CD Playback (Basic)
Dust cover/Disc slot
Disc
Source
/Power
Volume
Select
FM/AM
Track
/Seek
1
2
Preset
3
Memory
Phones
Power button
CD Select button
Eject button
Main Unit (Top)
Loading the CD
Ejecting a CD
Before loading the CD, press the Power button to switch on
Before ejecting a CD, press the Power button to switch the
the power.
power on. If you were playing back a CD, stop playback be-
1. Press the CD Select button and select the disc number in
which you wish to load the CD. (You cannot select a disc
number in which no CD is loaded for CD playback. Stop
playback before selecting a disc number.)
2. Press the Eject button to open the Dust cover.
CAUTION
Do not open the Dust cover by hand.
3. Gently place the disc in the Disc slot with the label side of
the CD facing you. (The CD is automatically taken in, the
Dust cover closes, and the Disc indicator lights.)
fore ejecting the CD.
1. Press the CD Select button, then select the number of the
disc that you wish to take out.
2. When you press the Eject button, the Dust cover opens
and the CD is ejected.
3. Remove the CD.
4. Repeat Steps 1-3.
5. When you finish removing CDs, press the Eject button. (The
Dust cover closes.)
CAUTION
CAUTION
- Do not insert the 8-cm (3-inch) CDs (CD Singles).
Do not close the Dust cover by hand.
- Do not insert discs which are not round, such as novelty
discs with octagonal or heart shape.
- Do not use any commercially available CD accessories
(such as adapters for 3-inch CDs, disc stabilizers, disc
protectors, cleaning discs etc.).
16
Stereo Music System
CD Playback (Basic)
Disc indicator display
The display on the Disc indicator changes as follows according to CD player operation and state.
- Green: CD loaded
3 Disc MusicBank System
- Off: No CD loaded
Standby
Sleep
AMFM
Disc
Disc 3
Preset
Random
Track
ST
Memory
Remaining Time
Vol.
Disc 2
Disc 1
Repeat
Memory No.
Loud.
Disc Indicator
17
Stereo Music System
CD Playback (Basic)
Disc
Source
/Power
Select
Volume
FM/AM
Track
/Seek
1
2
Preset
3
Memory
Phones
CD Select button
Track Search button
Main Unit (Top)
Stop button
Play button/Pause button
Playing back a CD
CD playback stop
1. Select the CD you wish to listen to with the CD Select but-
Press the Stop button.
ton. (The selected disc number is displayed.)
- To stop playback with the sub remote control, press and hold
2. Press the Play button.
down the sub remote control Stop button (for at least about 1
- If the contents of memory have not been erased, the system goes into memory play and normal playback is not
possible.
- The disc number, the track number, and the playing time
second.)
...............................................................................................
CD playback pause
are displayed. With each push of the Time button on the
main remote control, the display cycles through the fol-
- With playback paused, pressing the Play button resumes play
lowing modes.
- Service mode is displayed for about 10 seconds, then the
Another CD playback
Time mode
Elapsed time for current track
Disc
Track
Time
Disc
Track
Remaining Time
↓
- During CD playback, you cannot select a disc number for
which no CD is loaded.
↓
Service mode
Number of tracks/total playing time for current CD
With the CD Select button, select the disc number you want to
play back.
Remaining mode
Remaining time on current CD
where it paused.
...............................................................................................
system automatically returns to time mode.
18
Press the Pause button.
Disc
Track
Stereo Music System
CD Playback (Basic)
Track Search button
Play button/
Pause button/
Stop button
Track Search button
Disc Scan button
Source
Volume
Power
Off
Time button
Loud.
P.Scan
FM/AM
Mono
CD Select button
Select
D
PS
Stop
Track/ Tune
Power
D
Sleep
Illumi.
Tape
Aux
PS
Tuner
CD
Mute
Preset
Tune
Sleep
FM/Mono
AM
P.Scan
Disc 1
Disc 2
Disc 3
Random
Repeat
D.Scan
M.Clear
Call
Time
Memory
Disc
Sub Remote Control
CD Select button
Mute
Select
Volume
Loud
Another track playback
Remote Control Unit
Select the track you want to listen to with the Track Search
button.
...............................................................................................
Reverse cue/Forward cue
Press the Track Search button and hold it down (for at least
about 1 second).
- Release the Track Search button to resume the playback.
...............................................................................................
Disc scan
If you press the Disc Scan button with CD playback stopped,
the first approximately 8 seconds of the first track on each CD
in the main unit is played back.
Stop button
Play button
- When you find the disc you want, press the Disc Scan button
again. That disc is played back normally.
Pause button
Main Remote Control
19
Stereo Music System
CD Playback (Advanced)
Memory play
This unit can store up to 50 tracks in memory and play them
back.
Time button
Memory button
1. With the CD Select button, select the CD containing the
track you wish to store into memory. (The selected disc
number is displayed.)
2. With the Track Search button, select the track you want to
store into memory. (The selected track number is displayed.)
3. Press the Memory button.
- The Memory indicator and memory number are displayed.
- When the memory number is being displayed, the total
Power
memory time is displayed while you hold down the Time
Sleep
Illumi.
CD
Tape
Aux
FM/Mono
AM
P.Scan
Disc 1
Disc 2
Disc 3
Random
Repeat
D.Scan
M.Clear
Call
Tuner
button.
Tune
4. Repeat Steps 1-3 to store all the tracks you want into
memory.
5. Press the Play button. (The tracks are played back in the
order in which you stored them into memory.)
Preset
Time
Memory
Disc
Mute
Select
Volume
Loud
Remote Control Unit
Play button
CD Select button
Main Remote Control
20
Track Search button
Stereo Music System
CD Playback (Advanced)
Check the contents of the program
With CD playback stopped, press the Memory Call button.
- Each time you press the Memory Call button, you can check
Memory Clear button
Time button
the memory number, memory disc number, and memory track
on the main unit display.
Memory Call button
- When the memory number is displayed, the total time until
then is displayed while the Time button is held down.
...............................................................................................
Change the contents of the memory number
Press the Memory Call button and display the memory number you wish to correct, then store the correct track into that
Power
memory location according to Steps 1-3 for memory play.
Tuner
...............................................................................................
Clear the memory program
CD
Sleep
Illumi.
Tape
Aux
Preset
Tune
FM/Mono
AM
P.Scan
Disc 1
Disc 2
Disc 3
- The Memory indicator goes out.
Random
Repeat
D.Scan
- When you take out a CD, the contents of memory are auto-
M.Clear
Call
Press the Memory Clear button.
matically erased.
Time
Memory
Disc
- If the contents of memory have not been erased, normal playback (Page 18), random play (Page 22), and all repeat play
Mute
Select
(Page 23) are not possible.
...............................................................................................
Volume
Loud
Remote Control Unit
Checking the memory remaining time
During memory play, you can display the memory remaining
time by pressing the Time button. To end this display, press
the Time button until the display returns to time mode.
Main Remote Control
21
Stereo Music System
CD Playback (Advanced)
Random play
You can play back all tracks on all inserted CDs in random order.
1. Press the Stop button.
Random button
2. Press the Random button.
- The Random indicator lights up on the display and random play starts.
- Random play is not possible if the contents of memory
have not been erased.
- To stop random play, press the Stop button or switch the
source.
...............................................................................................
Power
Skip to the next track
Tuner
If you press the Random button during random play, the rest
of the current track is skipped over, the next track is selected
randomly, and random play continues.
CD
Sleep
Illumi.
Tape
Aux
Preset
Tune
FM/Mono
AM
P.Scan
Disc 1
Disc 2
Disc 3
Random
Repeat
D.Scan
M.Clear
Call
...............................................................................................
To cancel random play
Press the Stop button.
Time
Memory
Disc
- The Random indicator on the display goes out.
Mute
Select
Volume
Loud
Remote Control Unit
Stop button
Main Remote Control
22
Stereo Music System
CD Playback (Advanced)
Track repeat play
The current track is played over and over.
1. Start normal playback (Page 18), memory play (Page 20),
Repeat button
or random play (Page 22).
2. Press the Repeat button.
- The Repeat indicator on the display lights up, the Track
indicator flashes, and the current track is played back over
and over.
3. To end repeat play, press the Repeat button.
- The Repeat indicator on the display goes out and the Track
indicator returns from flashing to being lit.
...............................................................................................
Power
Tuner
All repeat play
All the CDs loaded in this unit are played back over and over
CD
Tune
Sleep
Illumi.
Tape
Aux
Preset
FM/Mono
AM
P.Scan
Disc 1
Disc 2
Disc 3
Random
Repeat
D.Scan
M.Clear
Call
in order of disc number and track number.
1. Start normal playback (Page 18).
Time
2. Press and hold down the Repeat button (for at least about
Memory
1 second).
Disc
- The Repeat indicator lights up on the display and all repeat play starts.
3. To end all repeat play, press and hold down the Repeat
Mute
Select
button (for at least about 1 second).
- The Repeat indicator on the display goes out.
Volume
Loud
Remote Control Unit
...............................................................................................
Memory repeat play
The tracks already stored into memory are played back repeatedly.
1. Start memory play (Page 20).
2. Press and hold down the Repeat button (for at least about
1 second).
- The Repeat indicator on the display lights up and memory
repeat play starts.
3. To end memory repeat play, press and hold down the Repeat button (for at least about 1 second.)
- The Repeat indicator on the display goes out.
Stop button
Main Remote Control
23
Stereo Music System
FM/AM Broadcast Reception
Disc
Source
/Power
Volume
Select
FM/AM
Track
/Seek
1
2
Preset
3
Memory
Phones
Band selector
Main Unit (Top)
Preset Station button
Auto Tuning button/Manual Tuning button
Automatic tuning
Preset Memory
1. With the Band selector, select the desired frequency band.
1. Use manual or automatic tuning to tune in the station you
2. Press and hold down the Auto Tuning button (for at least
about 1 second) to start automatic tuning.
3. To continue automatic tuning, again press and hold down
2. When you press the Memory button on the main unit, the
Memory indicator flashes. While the Memory indicator is
the Auto Tuning button (for at least about 1 second.)
flashing (about 5 seconds), select the desired preset num-
- When receiving a stereo broadcast, the ST indicator is
ber (1-5) with the preset station button (∧/∨).
displayed on the display.
- Use manual tuning for stations that cannot be received
with automatic tuning.
...............................................................................................
Manual tuning
1. Select the desired frequency band with the Band selector.
2. Use the Manual Tuning buttons to tune in the frequency of
the station you wish to listen to.
24
wish to preset.
3. Press the Memory button on the main unit again.
- The Memory indicator on the display stops flashing and
stays lit for a while. When it goes out, the memory process is complete.
...............................................................................................
Memory tuning
Select a preset station with the Preset Station buttons (∧/∨).
Stereo Music System
FM/AM Broadcast Reception
Band selector/
Mono button
Preset Scan button
Preset Station button
Band selector
Auto Tuning button/
Manual Tuning button
Source
Volume
Power
Off
Loud.
P.Scan
FM/AM
Mono
Select
D
PS
Stop
Track/ Tune
D
PS
Power
Sleep
Illumi.
Tape
Aux
Mute
Tuner
CD
Sleep
Tune
Auto Tuning button/
Manual Tuning button
Preset Station button
Preset
FM/Mono
AM
P.Scan
Disc 1
Disc 2
Disc 3
Random
Repeat
D.Scan
M.Clear
Call
Time
Memory
Sub Remote Control
Disc
Mute
Select
Preset scan
1. With the Band selector, select the desired frequency band
Volume
Loud
Remote Control Unit
(FM1, FM2, FM3, FM4, AM1, AM2).
2. Press the Preset Scan button.
- All the stations stored in memory for the selected frequency
band (FM or AM) are received for about 5 seconds each.
3. When you find the station you want, press the Preset Scan
button again.
- The preset scan stops and the selected station is received.
...............................................................................................
Stereo/mono switching
If the amount of noise in an FM broadcast you are listening to
becomes bothersome, press and hold down the Mono button
(for at least about 1 second) to put the unit into mono mode.
- The ST indicator on the display goes out and the audio
Mono button
Preset Scan button
switches to mono, which reduces the amount of noise received.
- To end mono mode, again press and hold down the Mono
Main Remote Control
button (for at least about 1 second). Mono mode is also ended
when you change the frequency or switch off the power.
25
Stereo Music System
Other Functions
Disc
Source
/Power
Volume
Select
FM/AM
Track
/Seek
1
2
Preset
3
Memory
Phones
Sound Tuning Mode selector/Loudness button
Volume Adjustment button
Main Unit (Top)
Tone/balance adjustment
Audio mute
Press the Sound Tuning Mode selector to display BAS (bass),
Pressing the Mute button instantaneously lowers the volume.
MID (mid range), TRE (treble), or BAL (balance) on the dis-
- To end the muting, press the Mute button again.
play.
...............................................................................................
- Pressing the Volume Adjustment button (∧) raises the level
for the bass when BAS is displayed, for the mid range when
MID is displayed, and for the high range when TRE is displayed. When BAL is displayed, pressing the (∧) button
emphasizes the right side.
- Pressing the Volume Adjustment button (∨) lowers the level
for the bass when BAS is displayed, for the mid range when
MID is displayed, and for the high range when TRE is displayed. When BAL is displayed, pressing the (∨) button
emphasizes the left side.
26
Loudness compensation
When you press and hold down the Loudness button (for at
least about 1 second), the Loud. indicator is displayed on the
main unit display and the bass and treble, which tend to be
impaired at low volumes, are emphasized.
- To end loudness, again press and hold down the Loudness
button (for at least about 1 second).
Stereo Music System
Other Functions
Volume Adjustment button
Sound Tuning Mode
selector/
Loudness button
Aux button
Source
Volume
Power
Off
Loud.
P.Scan
FM/AM
Mono
Select
D
PS
Stop
Track/ Tune
Power
D
Sleep
Illumi.
Tape
Aux
PS
Tuner
CD
Mute
Tune
Preset
Sleep
Sub Remote Control
FM/Mono
AM
P.Scan
Disc 1
Disc 2
Disc 3
Random
Repeat
D.Scan
M.Clear
Call
Time
Memory
Disc
Mute button
Mute
Select
Volume
Loud
Changing the Source Display
Remote Control Unit
You can change the display for AUX mode or tape mode to
match the external input source. (The factory settings for these
displays are “AUX” and “TAPE”.)
1. Press the AUX button (Tape button).
2. With “AUX” (“TAPE”) displayed on the display, press and
hold down the AUX button (Tape button) (for at least about
one second).
3. While the “AUX” (“TAPE”) display is flashing, pressing the
AUX button (Tape button) changes the display through the
sequence: “TV” → “VIDEO” → “AUX” → “TV” .... (“MD” →
“TAPE” → “MD” → ....).
4. While the desired source name is being displayed, press
Sound Tuning Mode selector/
Loudness button
and hold down the AUX button (Tape button) (for at least 1
second). This changes the source display setting.
Mute button
Volume Adjustment button
Main Remote Control
27
Stereo Music System
Other Functions
Display section
3 Disc MusicBank System
Standby
Sleep
AMFM
Disc
Disc 3
Preset
Random
Track
ST
Memory
Remaining Time
Vol.
Disc 2
Disc 1
Repeat
Memory No.
Loud.
Main Unit (Front)
Sleep function
Audio timer
Each time you press the Sleep button, the time until the unit
You can use any commercially available audio timer to switch
automatically goes on standby is changed to the next step in
on the power at the set time.
the sequence 10 minutes/20 minutes/30 minutes/60 minutes/
1. Select the source. (When selecting CD, put the CD player
90 minutes/120 minutes/end sleep mode.
on playback or pause.)
- To end sleep mode, press the Sleep button again.
2. Adjust the volume and tone.
- When setting sleep with the sub remote control, press and
3. With the audio timer, set the time at which the power will
hold down the Sleep button (for at least about 1 second).
come on.
You can change the setting time by repeatedly pressing the
- If the audio timer is set with CD playback stopped, the
Sleep button after the time is displayed. To end sleep mode,
power comes on with the unit in CD mode, but the CD is
press and hold down the Sleep button (for at least about 1
not played back. Be sure to set the audio timer with CD
second).
player on playback or pause.
28
Stereo Music System
Other Functions
Sleep button
Illumination button
Sleep button
Source
Volume
Power
Off
Loud.
P.Scan
FM/AM
Mono
Select
D
PS
Stop
Track/ Tune
Power
D
Sleep
Illumi.
Tape
Aux
PS
Tuner
CD
Mute
Tune
Preset
Sleep
FM/Mono
AM
P.Scan
Disc 1
Disc 2
Disc 3
Random
Repeat
D.Scan
M.Clear
Call
Time
Memory
Disc
Sub Remote Control
Mute
Select
Volume
Loud
Selecting the Illumination Color
Remote Control Unit
Each time you press the Illumination button, the illumination
color for the window sections of the main unit toggles between
green and blue.
- You can put out the window section illumination by pressing
the Illumination button and holding it down (for at least 1 second). To light up the illumination again, press and hold down
the illumination button again (for at least 1 second).
- The factory setting is blue illumination.
Main Remote Control
29
Stereo Music System
Troubleshooting
Some apparent malfunctions may be remedied by simple checks as described below. If the problem persists, please contact your
dealer or an authorized Nakamichi service center.
No power.
After insertion, a disc is ejected again.
- Verify that the plug of the power cord is plugged properly into
- The disc was inserted upside down. Insert the disc with the
the AC outlet.
label facing up.
................................................................................................
................................................................................................
No sound.
Disc playback is not possible, sound is unstable, or
- Verify that all connections are established properly.
skipping occurs.
- Verify that volume level is set to a suitable position.
- If the disc is dirty, clean it.
- Verify that mute function is disabled.
- If the disc is scratched, use another disc.
- Verify that speakers are connected properly.
- Turn off the CD player and other components, and check all
- The protection circuitry may have been activated. Stop playback of the program source and wait a while until the amplifier automatically resets itself.
................................................................................................
connections.
- Moisture may have condensed on the pickup lens. Turn the
unit on and let the unit warm up for about 30 minutes to one
hour.
Some channels are interchanged.
...............................................................................................
No sound in some channels.
Memory play is not possible.
- Verify that audio equipment connections are established prop-
- The contents of the memory may have been lost. Repeat the
erly.
- Verify that balance is set correctly.
................................................................................................
Hum is heard.
- Verify that all connections are established properly.
30
memory programming procedure.
Stereo Music System
Troubleshooting
FM broadcast is supposed to be in stereo, but sound
Remote control cannot be operated.
is monaural.
- Verify that power is supplied to the unit.
- Verify that antenna is connected properly.
- Verify that batteries are inserted properly.
- Press and hold down the Mono button (for at least 1 second)
- Replace both batteries with fresh ones.
to end mono mode.
................................................................................................
FM or AM broadcasts cannot be received.
- Adjust position and/or orientation of antenna.
- Verify that antenna is connected properly.
- Point remote control at sensor when operating.
- Remove any obstacles between remote control and the main
unit.
- Do not operate remote control units of other equipment at
the same time.
................................................................................................
................................................................................................
FM or AM broadcast reception is noisy.
“E-MECHA” indication appears.
- Adjust position and/or orientation of antenna.
- Turn the unit off and then on again.
- Increase distance between this unit and other electrical equipment.
31
Stereo Music System
Specifications
[Main unit]
Control Amplifier Section
FM Tuner Section
Inputs ......................................... 2 (Tape, Aux)
- All RF levels in microvolts given re 75-ohm antenna input.
Outputs ...................................... 1 channel (Subwoofer)
- Modulation: Mono 100 %, Stereo Pilot: 10 %, Stereo Audio Signal:
Recording Outputs .................... 1 (Tape)
Input Sensitivity / Impedance ........... 250 mV / 33 kohm
Rated Output Level / Impedance
90 %
Frequency Range
U.S.A./Canada ....................... 76.0 - 90.0 MHz in 100-kHz steps
Line Output ............................ 500 mV / 1 kohm
Recording Output .................. 250 mV / 1 kohm
Headphone Output ................ 40mW / 40ohm
Total Harmonic Distortion .......... Less than 0.04 % (20 - 20,000 Hz)
Other Area ............................. 87.5 - 108.0 MHz in 50-kHz steps
IHF Usable Sensitivity ............... 14 dBf / 2.7 µV (Mono, IHF)
50-dB Quieting Sensitivity ......... 22 dBf / 6.9 µV (Mono)
Signal-to-Noise Ratio ................ Mono : Better than 72 dB at 65 dBf
Frequency Response ................ 10 - 50,000 Hz +0, -3 dB
Stereo : Better than 68 dB at 65 dBf
Signal-to-Noise Ratio ..................... Better than 80 dB (A-WTD, input shorted)
Frequency Response ................ 30 - 15,000 Hz +1, -3 dB
Channel Separation ....................... Better than 55 dB (1 kHz, input shorted)
Total Harmonic Distortion .......... Mono : Less than 0.4 % (1 kHz)
Tone Controls
Stereo : Less than 0.6 % (1 kHz)
Bass ....................................... 20 Hz ±10 dB
Stereo Separation ..................... Better than 30 dB (1 kHz)
Mid ......................................... 1 kHz ±10 dB
Treble ..................................... 20 kHz ±10 dB
Loudness ................................... 100 Hz +7 dB, 10 kHz +5 dB
CD Player Section
System ....................................... Compact Disc digital audio
Signal Readout .......................... Optical (semiconductor laser)
Power Amplifier Section
Error Correction ......................... CIRC principle
Continuous Sine Wave Power Output
Number of channels .................. 2 channels, stereo
............................................... 15 W X 2 (1 kHz, 1 % THD)
Maximum Power output ............ 18 W X 2
Total Harmonic Distortion .......... Less than 0.1 % (1 W )
D/A Converter type .................... 20-bit Dual D/A Converters
with 8-times oversampling digital filter
Sampling Frequency ................. 44.1kHz
Quantization .............................. 16-bit linear
Disc Rotational Velocity ............. Approx. 200 to 500 rpm
AM Tuner Section
(constant linear velocity)
(Modulation: 400 Hz, 30 %)
Wow-and-Flutter ........................ Below measurement limit
Frequency Range
U.S.A./Canada ....................... 522 - 1,629 kHz in 9-kHz steps
Other Area ............................. 530 - 1,710 kHz in 10-kHz steps
or 531 - 1,602 kHz in 9 - kHz steps
Sensitivity .................................. 55 dBµ/m
Frequency Response ................ 5 - 20,000 Hz ±0.5 dB
Total Harmonic Distortion .......... 0.005 % or less (1 kHz, 0 dB)
Signal-to-Noise Ratio ................ Better than 95 dB (IHF A-WTD)
Dynamic Range ......................... Better than 95 dB
Signal-to-Noise Ratio ................ Better than 50 dB at 90 dBµ/m
Channel Separation ................... Better than 90 dB
Total Harmonic Distortion .......... Less than1 % at 90 dBµ/m
Optical Digital Output ................ 660 nm, –18 dBm
32
Stereo Music System
Specifications
[Speaker Unit]
[General]
Enclosure ................................... 2-way bass reflex type
Power Source ............................ AC 100 V, 50/60 Hz
Speaker Unit
AC 110 - 120 V or AC 220 - 240 V,
Midrange/Woofer ................... 10 cm (1 - 15/16 inches) round cone X 2
Tweeter .................................. 2.5 cm (1 inch) semi dome
Impedance ................................. 4 ohms
Rated Power Handling .............. 10 W
50/60 Hz (According to country of sale)
Power Consumption .................. 95 W max.
Dimensions*
Main Unit ................................ 220 (W) X 270 (H) X 94 (D) mm
Maximum Power Handling ........ 20 W
8 - 11/16 (W) X 10 - 5/8 (H) X 3 - 11/16 (D) inches
Speaker Unit .......................... 220 (W) X 270 (H) X 95 (D) mm
8 - 11/16 (W) X 10 - 5/8 (H) X 3 - 3/4 (D) inches
[Remote Control Unit]
Power Supply Unit ................. 100 (W) X 88 (H) X160 (D) mm
3 - 15/16 (W) X 3 - 7/16 (H) X 6 - 5/16 (D) inches
Principle ..................................... Infrared pulse system
Power Supply ............................ DC 3 V (1.5 V X 2)
Dimensions*
Mass
Main Unit ................................ Approx. 3.0 kg, 6 lbs. 10 oz.
Speaker Unit .......................... Approx. 1.8 kg, 3 lbs. 15 oz.
Main Remote Control ............ 55 (W) X 19 (H) X 182 (D) mm
2 - 3/16 (W) X 3/4 (H) X 7 - 3/16 (D) inches
Power Supply Unit ................. Approx. 2.1 kg, 4 lbs. 10 oz.
Supplied Accessories ................ Power supply cable X 1
Sub Remote Control .............. 49 (W) X 26 (H) X 110 (D) mm
AM loop antenna X 1
1- 15/16 (W) X 1 (H) X 4 - 5/16 (D) inches
Dipole antenna X 1
Mass
Antenna adapter X 1
Main Remote Control ............ Approx. 100 g / 4 oz. (including batteries)
IEC R03 (size AAA) battery X 4
Sub Remote Control .............. Approx. 60 g / 2 oz. (including batteries)
Rubber feet X 6
Tapping screw (M5.5x16) X 6
Speaker grill (navy blue) X 2
Speaker grill (green) X 2
* Dimensions do not include protruding parts. Height is the panel height.
- Specifications and design are subject to change for further improvement without notice.
- MusicBank is a registered trademark of Nakamichi Corporation.
33
Stereo Music System
CAUTION
Adjusting the knobs, switches and controls, etc. or taking actions not specified herein may result in a harmful emission of
laser beams. This Compact Disc Player must be adjusted and
repaired only by qualified service personnel.
OBSERVERA!
Inställningar av rattarna, omkopplarna eller övriga
kontrollknappar som inte anges i bruksanvisningen kan
resultera i farlig laserustrålning. Justering eller reparation av
denna kompaktskivspelare skall endast utföras av kvalificerad
servicepersonal.
HUOMAUTUS
Jos nuppeja, kytkimiä ja säätimiä ym. säädetään tai laitetta
käytetään toisella tavalla kuin on selostettu, tuloksena saattaa
LASER DIODE PROPERTIES
olla vaarallista lasersäteiden vuotoa. CD-soittimen säätö ja
MAXIMUM RADIANT POWER: 0.5 mW
korjaus on jätettävä aina asiantuntevan huoltoteknikon
WAVELENGTH: 790 nm
tehtäväksi.
EMISSION DURATION: CONTINUOUS
OBS!
Indstilling af knapper, cmskiftere og øvrige kontrolknapper, som
ikke følger den i brugsanvisningen beskrevne måde, kan
resultere i farlig laserudstråling. Justering eller reparation af
denne CD-afspiller må kun udføres af kvalificeret servicepersonale.
OBS!
Justering av ratt, brytere og kontroller etc., eller annet som
ikke er beskrevet her, kan resultere i farlig laserbestråling.
Justering eller reparasjon av denne CD-spilleren må bare
utføres av kvalifiserte fagfolk.
34
Stereo Music System
The label is attached to the Compact Disc Player on the locaCLASS 1 LASER PRODUCT
tion specified in the illustration. For your own protection, you
LUOKAN 1 LASERLAITE
KLASS 1 LASERAPPARAT
are strongly advised to follow the directions on the label, when
handling laser radiation-emitting equipment. The label indicates
that the equipment contains laser radiation-emitting components.
Följande etikett är klistrad på det ställe på denna
kompaktskivspelare som är angivet på illustrationen. För din
egen säkerhet skall du noggrant följa anvisningarna angivna
på etikettern vid hantering av de laserutstrålande
komponenterna. Denna etikett visar att apparaten innehåller
laserutstrålande komponenter.
CLASS 1 LASER PRODUCT
LUOKAN 1 LASERLAITE
CD-soittimeen on kiinnitetty tarra kuvassa näkyvään paikkaan.
KLASS 1 LASERAPPARAT
Oman turvallisuutesi vuoksi on tärkeää noudattaa tarkasti
Subwoofer
Output
tarrassa olevia ohjeita, kun käytät lasersäteitä lähettäviä
L
Digital Output
Speaker
(Impedance 4Ω)
laitteita. Tarra osoittaa, että laite sisältää lasersäteitä lähettäviä
Power Input
R
osia.
Mærkaten er anbragt på CD-afspilleren, som vist på
illustrationen. For din egen sikkerheds skyld bør du nøje følge
anvisningerne på mærkatern, når du bruger laserudstrålende
u d s t y r. M æ r k a t e n v i s e r, a t a p p a r a t e t i n d e h o l d e r
laserudstrålende komponenter.
Etiketten er klistret på det stedet som er spesifisert i
illustrasjoenen. For din egen sikkerhets skyld må du følge
anvisningene som er oppgitt på etiketten når du behandler
laserstråleproduserende komponentene. Etiketten indikerer at
kompenentet inndeholder laserstråleproduserende
komponenter.
35
Stereo Music System
Nakamichi Corporation
1-153 Suzukicho, Kodaira, Tokyo 187-8501, Japan
Phone: 81(42)346-3103 Fax: 81(42)344-0802
Nakamichi America
955 Francisco St., Torrance, CA 90502
Phone: 1(310)538-8150 Fax: 1(310)324-7614
Nakamichi Canada
276 S.W. Marine Drive, Vancouver, B.C. V5X 2R4, Canada
Phone: 1(604)324-7535 Fax: 1(604)324-7919
Nakamichi Asia
8/F The Grande Bldg., 398 Kwun Tong Rd., Kowloon, Hong Kong
Phone: 852(2357)6690 Fax: 852(2357)6697
Nakamichi Europe
Berkshire House, 56, Herschel Street, Slough, Berkshire SL1 1PY, England
Phone: 44(1753)577 345 Fax: 44(1753)550 211
Web Site
http://www.nakamichi.com
©
36Nakamichi Corp. 1999
0D07251A