1
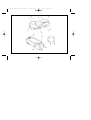
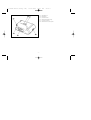
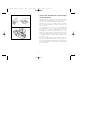
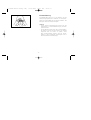
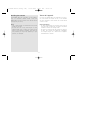
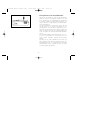
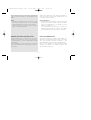
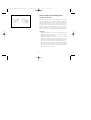
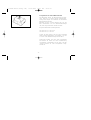
• 22899 Minox (Anltg. MX)
01.03.2000
13:57 Uhr
Seite 1
Änderungen in Konstruktion und Ausführung vorbehalten
Design subject to alterations without notice
Sous réserve de modifications
MINOX GmbH
Walter-Zapp-Str. 4
D-35578 Wetzlar
Tel. +49(0)64 41-9 17-0
Internet: http://www.minox.com · eMail: [email protected]
960 331 BX/1/00/ L
• 22899 Minox (Anltg. MX)
01.03.2000
13:57 Uhr
Seite 2
Anleitung
Instructions
Notice d’utilisation
MINOX MX
01.03.2000
13:57 Uhr
Seite 3
v
v
• 22899 Minox (Anltg. MX)
01.03.2000
13:57 Uhr
)
xp
(e
MINOX
15 0
3 6
3
x
• 22899 Minox (Anltg. MX)
Seite 4
• 22899 Minox (Anltg. MX)
01.03.2000
Bedienungselemente
Operating controls
Composition de l'appareil
13:57 Uhr
11.
12.
13.
14.
15.
16.
17.
18.
19.
10.
11.
12.
13.
14.
15.
16.
Seite 5
Filmtransportrad
Auslöser
Bildzählwerk
Entfernungseinstellungshebel
Entfernungsskala
Objektivabdeckung
Sucher
Objektiv
Öse für Handschlaufe
Sucherfenster
Blitzanschluß
Blitzkontakt
Filmlängenindex
Filmfachabdeckung
Leuchtrahmen
Nahbereichmarkierung
• 22899 Minox (Anltg. MX)
11. Film transportation lever
12. Shutter release button
13. Frame Counter
14. Distance adjustment lever
15. Distance scale
16. Lens cover
17. Viewfinder
18. Lens
19. Eyelet for hand strap
10. Viewfinder
11. Flash connection
12. Flash contact
13. Film length index
14. Film chamber cover
15. Bright light frame
16. Close-up mark
01.03.2000
13:57 Uhr
11.
12.
13.
14.
15.
16.
17.
18.
18.
10.
11.
12.
13.
14.
15.
16.
–1–
Seite 6
Levier pour transporter le film
Déclencheur
Compteur d'images
Levier pour régler la distance
Echelle des distances
Volet de protection
Viseur
Objectif
Oeillet pour le cordon
Fenêtre du viseur
Connexion du flash
Contact du flash
Index de la longueur du film
Couvercle du logement du film
Cadre lumineux
Marque des distances proches
• 22899 Minox (Anltg. MX)
01.03.2000
13:57 Uhr
23.
24.
25.
26.
27.
28.
–2–
Seite 7
Blitzbereich
Meßzelle
Kontaktstifte
Bereitschaftsanzeige
Power-Schalter
Batteriefach, Blitzgerät
• 22899 Minox (Anltg. MX)
23. Flash range
24. Meter cell
25. Contact pins
26. Ready symbol
27. Power switch
28. Battery chamber, flash
01.03.2000
13:57 Uhr
23.
24.
25.
26.
27.
28.
–3–
Seite 8
Portée du flash
Cellule résistance photo CDS
Broches de contact
Symbole de chargement
Bouton power
Compartiment pour pile, flash
• 22899 Minox (Anltg. MX)
Inhaltsverzeichnis
Table of contents
Table des matières
01.03.2000
13:57 Uhr
Seite 9
Bedienungselemente . . . . . . . . . . . . . . . . . . . . . . . .U4
Einleitung . . . . . . . . . . . . . . . . . . . . . . . . . . . . . . . . . .6
Öffnen der Filmkammer und
Einlegen der Filmkassette . . . . . . . . . . . . . . . . . . . . . .8
Kamerahaltung . . . . . . . . . . . . . . . . . . . . . . . . . . . . .12
Fotografieren mit der MINOX MX . . . . . . . . . . . . . . .14
Inbetriebnahme des Blitzgerätes . . . . . . . . . . . . . . . .18
Einlegen der Batterie . . . . . . . . . . . . . . . . . . . . . . .18
Blitzlichtaufnahmen . . . . . . . . . . . . . . . . . . . . . . . .20
Fotografieren mit dem MINOX MX Blitz . . . . . . . . .22
Herausnehmen der Filmkassette . . . . . . . . . . . . . . .24
Zubehör . . . . . . . . . . . . . . . . . . . . . . . . . . . . . . . . . .28
Filme 8x11 . . . . . . . . . . . . . . . . . . . . . . . . . . . . . . . .28
Pflege und sachgemäßer Umgang mit Ihrer
neuen Kamera bzw. Ihrem neuen Blitzgerät . . . . . . .32
Kundendienst . . . . . . . . . . . . . . . . . . . . . . . . . . . . . .36
Technische Daten MINOX MX . . . . . . . . . . . . . . . . . .38
Technische Daten MINOX MX Blitzgerät . . . . . . . . . .38
–4–
• 22899 Minox (Anltg. MX)
01.03.2000
Operating controls . . . . . . . . . . . . . . . . . . . . . . . . . .1
Introduction . . . . . . . . . . . . . . . . . . . . . . . . . . . . . . .7
Opening the film compartment
and setting the frame counter . . . . . . . . . . . . . . . . .9
Holding the camera . . . . . . . . . . . . . . . . . . . . . . . .13
Taking photos with the MINOX MX . . . . . . . . . . . .15
Preparing the flash unit . . . . . . . . . . . . . . . . . . . . .19
Inserting the battery . . . . . . . . . . . . . . . . . . . . . .19
Flash shots . . . . . . . . . . . . . . . . . . . . . . . . . . . . .21
Shooting photos with the MINOX MX flash . . . . .23
Removing the film cartridge . . . . . . . . . . . . . . . .25
Accessories . . . . . . . . . . . . . . . . . . . . . . . . . . . . . .29
Films 8x11 . . . . . . . . . . . . . . . . . . . . . . . . . . . . . . .29
Care and correct handling of your new camera . . .32
Customer service . . . . . . . . . . . . . . . . . . . . . . . . . .37
Technical Data MINOX MX . . . . . . . . . . . . . . . . . . .39
Technical Data Flash unit . . . . . . . . . . . . . . . . . . . .39
13:57 Uhr
Seite 10
Composition de l’appareil . . . . . . . . . . . . . . . . . . . . . .1
Introduction . . . . . . . . . . . . . . . . . . . . . . . . . . . . . . . .7
Ouverture du logement du film et
mise en place du film . . . . . . . . . . . . . . . . . . . . . . . . .9
Tenue de l’appareil . . . . . . . . . . . . . . . . . . . . . . . . . .13
Pour photographier avec le MINOX MX . . . . . . . . . .15
Mise en service du flash . . . . . . . . . . . . . . . . . . . . . .19
Installation de la pile . . . . . . . . . . . . . . . . . . . . . . .19
Pour photographier avec le flash . . . . . . . . . . . . . .21
Faire des photos avec le flash MINOX MX . . . . . . .23
Extraction du conteneur de film . . . . . . . . . . . . . . .25
Accessoires . . . . . . . . . . . . . . . . . . . . . . . . . . . . . . . .29
Films de format 8x11 . . . . . . . . . . . . . . . . . . . . . . . .29
Conseils pour l’entretien de votre nouvel
appareil photo et du flash . . . . . . . . . . . . . . . . . . . . .33
Service-Après-Vente . . . . . . . . . . . . . . . . . . . . . . . . .37
Fiche Technique du MINOX MX . . . . . . . . . . . . . . . .40
Fiche Technique du flash . . . . . . . . . . . . . . . . . . . . . .40
–5–
• 22899 Minox (Anltg. MX)
Einleitung
Introduction
Introduction
01.03.2000
13:57 Uhr
Seite 11
Zum Kauf Ihrer neuen MINOX MX möchten wir Sie
ganz herzlich beglückwünschen. Auch diese Kamera steht in der großen Tradition des Hauses MINOX
und verbindet Kompaktheit mit bester Qualität und
herausragendem Design.
Die MINOX MX kann zu Ihrem ständigen Begleiter
werden, um Ihre schönsten Erinnerungen festzuhalten.
Um die Möglichkeiten der 8x11 mm Fotografie in
vollem Umfang nutzen zu können, lesen Sie diese
Anleitung bitte sorgfältig durch.
–6–
• 22899 Minox (Anltg. MX)
01.03.2000
May we first congratulate you on the purchase of
your new MINOX MX. This camera carries on
with the long tradition of the house of MINOX,
combining top quality and compact features with
outstanding design. The MINOX MX can go with
you everywhere, ready to capture your most precious moments.
To get the most out of 8x11 photography, please
read these instructions carefully.
13:57 Uhr
Seite 12
Nous vous remercions et vous félicitons pour l'achat de votre nouveau MINOX MX. A l'instar des autres produits MINOX, cet appareil est aussi détenteur des valeurs traditionnelles MINOX: la compacité alliée à une qualité de haut niveau, sous un
superbe design. Pratique et discret, il pourra vous
accompagner partout pour mémoriser vos plus
beaux souvenirs.
Pour une exploitation optimale des possibilités
offertes par la photographie en format 8x11 mm,
veuillez lire attentivement ce mode d'emploi.
–7–
• 22899 Minox (Anltg. MX)
01.03.2000
13:57 Uhr
Seite 13
Öffnen der Filmkammer und Einlegen
der Filmkassette
Schieben Sie mit Ihrem Finger die geriffelte Oberfläche der Filmfachabdeckung (14) nach außen und
öffnen Sie so die Filmkammer Ihrer MINOX MX.
Nachdem Sie den Film eingelegt haben, schieben
Sie die Filmfachabdeckung wieder zurück bis sie
fest einrastet.
Der Bildzähler (3) stellt sich nun automatisch auf
die Startposition "S". Drehen Sie den Filmtransporthebel (1) zweimal nacheinander bis zum
Anschlag und lösen Sie jeweils einmal aus. Durch
diese zwei "Leertransporte" wird das bereits vorbelichtete Filmstück weiter transportiert und der Film
in Aufnahmestellung gebracht. Der Bildzähler zeigt
nun eine "1" an.
Mit dem Filmlängenindex (13) stellen Sie die Anzahl der auf dem Film befindlichen Aufnahmen ein.
Auch nach längerem Nichtgebrauch der Kamera ist
somit noch ersichtlich, welcher Film in Ihrer MINOX
MX eingelegt ist.
–8–
• 22899 Minox (Anltg. MX)
01.03.2000
13:57 Uhr
Seite 14
Opening the film compartment and
setting the frame counter
Ouverture du logement du film et
mise en place du film
Push the ribbed surface of the film chamber
cover (14) outwards to open the film compartment of your MINOX MX. Make sure to close the
film chamber cover after inserting the film. The
frame counter (3) turns automatically to the starting position "S". Turn the film transportation
lever fully and do this twice. This blank frame
advance action moves on the already exposed
piece of film and brings the film into shooting
position. Now the frame counter shows the number "1".
With the film length index (13) you adjust the
number of exposures of the film. With this index
you are always informed about the film length
inserted in your MINOX MX.
Pour ouvrir le logement du film pousser avec les
doigts la surface du couvercle du logement de film
(14). Après l'installation du film refermer le couvercle jusqu'à ce qu'il endiquet ferme. Le compteur
d'images (3) se met automatiquement sur la position "S". Tournez le levier pour transporter le film
(1) deux fois jusqu'au point de butée et appuyer
chaque fois sur le déclencheur. Ces deux transports
à vide avancent la portion du film déjà exposée et
le mettent en position pour la prochaine prise de
vue. Le compteur de vues indique alors le nombre
"1".
Avec l’index de la longueur du film (13) vous marquez le numéro d’expositions du film. Par cela vous
êtes toujours informé quel film vous avez installé
dans votre MINOX MX.
–9–
• 22899 Minox (Anltg. MX)
01.03.2000
13:57 Uhr
Seite 15
Hinweise:
– Für die MINOX MX brauchen Sie MINOX 8 x
11 mm Filmkassetten (Negativformat 8 x11 mm).
Bestellnummern der verschiedenen MINOX Filme
entnehmen Sie bitte der Zubehörauflistung.
– Achten Sie vor dem Einlegen der Filmkassette
darauf, daß Sie das Bildzählwerk richtig eingestellt haben. Nur so ist sichergestellt, daß Sie
Ihren Film bis zur letzten Aufnahme nutzen können.
– Wechseln Sie die Filme möglichst immer im Dunkeln/Schatten und nie unter direkter Lichteinwirkung.
– Es ist ratsam, die Filmkassette umgehend zur
Entwicklung zu geben. Hierzu bewahren Sie den
belichteten Film bitte in der lichtdichten Filmschachtel auf.
– 10 –
• 22899 Minox (Anltg. MX)
01.03.2000
Note:
– The MINOX MX takes MINOX 8x11 mm film
cartridges (negative format 8x11 mm). For
order numbers of the various MINOX films,
refer to the accessories list.
– Make sure the frame counter is correctly set
prior to inserting the film cartridge
– Load and unload the film in subdued light and
never in direct light.
– We advise you to have the film processed as
soon as possible. Keep the exposed film in the
light-proof film box prior to processing.
13:57 Uhr
Seite 16
Recommandation:
– Pour le MINOX MX utiliser les conteneurs de
films MINOX 8 x 11 mm (Format de négatif: 8 x
11 mm). Les références des films MINOX disponibles figurent sur la liste des accessoires.
– Avant de déposer le conteneur de film dans son
logement, s'assurer que le compteur d'images
est adéquatement programmé.
– Si possible ne procéder aux changements de
films qu'à l'ombre ou dans la pénombre.
Jamais en pleine lumière.
– Il est conseillé de faire rapidement développer
tout film exposé et, de le conserver dans son
emballage d'origine, étanche à la lumière.
– 11 –
• 22899 Minox (Anltg. MX)
01.03.2000
13:57 Uhr
Seite 17
Kamerahaltung
Die MINOX MX wiegt nur ca. 55 Gramm. Um die
Verwacklungsgefahr beim Auslösen zu minimieren,
halten Sie Ihre MINOX MX mit beiden Händen. Die
Ellbogen sollten am Körper anliegen.
Hinweis:
– Schon geringe Verwacklungen können bei den
Aufnahmen zu einer Beeinträchtigung der Bildqualität führen.
– Da das Objektiv über einen sehr großen Bildwinkel verfügt, achten Sie bitte darauf, die Kamera
möglichst weit von hinten zu greifen. Somit
kann ausgeschlossen werden, daß z.B. Fingerkuppen in Ihre Aufnahmen hereinragen und so
Ihre Aufnahmen beeinträchtigen.
– 12 –
• 22899 Minox (Anltg. MX)
01.03.2000
13:57 Uhr
Seite 18
Holding the camera
Tenue de l'appareil
The MINOX MX has a weight of only approx.
55 g. To minimize camera shake, hold your
MINOX MX with both hands. Your elbows should
rest against your body.
Le poids du MINOX MX est seulement 55 g environ. Pour éviter tout risque de flou, il est conseillé
de tenir l'appareil à deux mains les coudes serrés
contre le corps.
Note:
– Just a small shake can deteriorate the picture
quality of the shot.
– As the lens has a very wide angle of view,
always make sure to keep your hands as far
back on the camera as possible. This rules out
the possibility of finger tips appearing in your
pictures, for example.
Recommandations:
– Un léger tremblement au moment de la prise de
vue peut déjà occasionner une perte de qualité
notable au niveau de l'image finale.
– En raison du grand angle de champ de l'objectif
du MX, pour éviter une apparition indésirable
sur l'image (doigts, etc..) veiller à tenir l'appareil
suffisamment à l'arrière.
– 13 –
• 22899 Minox (Anltg. MX)
01.03.2000
13:57 Uhr
Seite 19
Fotografieren mit der MINOX MX
Öffnen Sie die Kamera in dem Sie die Objektivabdeckung (6) bis zum Anschlag aufziehen. Um bei
Ihren Aufnahmen die bestmöglichsten Ergebnisse
zu erzielen, greifen Sie die Kamera möglichst von
hinten. Dadurch ist gewährleistet, daß das Objektiv
nicht verdeckt wird.
Um den Bildausschnitt festzulegen, halten Sie den
Sucher dicht vor Ihr Auge und wählen Sie im
Leuchtrahmen den relevanten Bildausschnitt aus.
Schätzen Sie den Abstand zum Objekt, stellen Sie
dann die Entfernung auf der Entfernungsskala (5)
durch Schieben des Entfernungseinstellungshebels
(4) ein.
Die Entfernungsskala zeigt Entfernungen von 1 m,
2 m, 4 m und unendlich an. Sie können auch zwischen diesen Angaben liegende Entfernungen
wählen.
Drücken Sie nun den Auslöseknopf und üben mit
dem Daumen einen leichten Gegendruck auf das
Kameragehäuse aus. So vermeiden Sie eventuelle
Verwacklungen. Beim Auslösen können Sie dann
ein leises Klicken vernehmen.
– 14 –
• 22899 Minox (Anltg. MX)
01.03.2000
13:57 Uhr
Seite 20
Taking photos with the MINOX MX
Pour photographier avec le MINOX MX
To open the camera pull the lens cover (6) out as
far as it will go. For best results, hold the camera
with your hands as far back as possible. This
makes sure that the lens is not obstructed in any
way. For picture composition, hold the viewfinder
close in front of your eye and frame the subject
in the bright light frame. Tax the distance to the
object, adjust the distance on the distance scale
(5) by pushing the distance adjust lever. The
distance scale shows distances of 1 m, 2 m, 4 m,
and infinity. Distances between these marks can
also be chosen. Press the shutter release button
and slightly press with your thumb against the
camera base. This helps to avoid any shake.
Pour ouvrir l'appareil ouvrir le volet de protection
jusqu'au point de butée. Pour éviter le risque d'obstruer l'objectif tenir l'appareil bien à l'arrière.
Avec le viseur tout près de l'oeil, cadrer dans la
limite du repère lumineux puis, au moment choisi,
presser sur le déclencheur. Evaluer la distance jusqu'à l'objet, ajuster la distance sur l'échelle (5) en
poussant le levier (4). L'échelle montre des
distances de 1 m, 2 m, 4 m et l'infini. Les distances
entre les indications sont également possible.
En même temps, pour éliminer tout risque de flou,
exercer une légère contre pression du pouce sur le
boîtier.
– 15 –
• 22899 Minox (Anltg. MX)
01.03.2000
13:57 Uhr
Seite 21
Drehen Sie nach dem Auslösen den Filmtransportrad (1) bis zum Anschlag. Die Kamera ist nun wieder aufnahmebereit.
Hinweis:
– Damit Sie nicht versehentlich den Auslöseknopf
bei verschlossenen Frontkappe betätigen und
dadurch eine Aufnahme verlieren, transportieren
Sie den Film bitte erst vor jeder Aufnahme weiter.
– Befreien Sie die Objektivoberfläche von Zeit zu
Zeit von Fingerabdrücken oder Staub.
MINOX MX Graufilter
Unter besonders extremen Lichtverhältnissen, wie
z. B. bei starker Sonneneinstrahlung am Strand
oder im Schnee, ist es empfehlenswert, den
MINOX MX Graufilter zu verwenden.
Hierzu stecken Sie den Filter vor die Frontlinse der
Kamera. Das einfallende Licht wird nun um den
Faktor 4 reduziert.
– 16 –
• 22899 Minox (Anltg. MX)
01.03.2000
13:57 Uhr
Seite 22
After exposure push turn the film transportation
lever (1) as far as it will go. The camera is now
ready.
Après avoir déclenché, pour réarmer l'appareil, il
suffit de tourner le levier pour transporter le film
(1) jusqu'au point de butée.
Note:
– Transport the film only after every shot so that
the shutter release button is not activated
inadvertently when the front cover is closed.
– Clean the surface of the lens every now and
again to remove fingerprints.
Recommandations:
– Transporter le film seulement avant chaque prise
de vue pour éviter le risque d'activer le déclencheur par inadvertance et de perdre de cette
manière une prise de vue.
– Il es recommandé de nettoyer de temps en
temps la partie frontale de l'objectif pour éliminer d'éventuelles traces de doigts ou souillures.
MINOX MX Neutral density filter
Filtre gris MINOX MX
Under extreme light conditions, such as bright
sunlight on the beach or in snow, for instance, it
is recommended to use the MINOX MX neutral
density filter.
For this purpose you just fit the filter on the front
lens of the camera. The incoming light is now cut
by 4 stops.
Dans des conditions de lumière particulières, par
exemple sous éclairage solaire intense, à la plage,
avec des paysages enneigés ensoleillés, il est
recommandable d’utiliser le filtre gris MINOX MX.
Dans ce cas, emboîtez le filtre devant la lentille
frontale de l’appareil. La lumière incidente sera
alors réduite au facteur 4x.
– 17 –
• 22899 Minox (Anltg. MX)
01.03.2000
13:57 Uhr
Seite 23
Inbetriebnahme des Blitzgerätes
Einlegen der Batterie
Drücken Sie bitte mit Ihrem Zeigefinger so gegen
das Batteriefach, daß Sie durch Ziehen in Pfeilrichtung das Batteriefach öffnen. Beim Einlegen der
Batterie achten Sie bitte auf die korrekte Ausrichtung des Plus- und Minuspols. Nun können Sie den
Deckel wieder schließen, indem Sie den Batteriedeckel wieder auf das Batteriefach schieben. Verwenden Sie eine 3 Volt Batterie des Typs CR 123 A.
Hinweise:
– Minustemperaturen können die Batterieleistung
beeinträchtigen. Bitte schützen Sie Ihr Blitzgerät
deshalb vor extremer Kälte.
– Erschöpfte Batterien dürfen niemals ins Feuer
geworfen werden! Auch kurzgeschlossene, geöffnete und erhitzte Batterien stellen eine Gefahr
dar und können Personenschäden verursachen.
– Batterien sind kein Spielzeug und sollten deshalb
für Kinder unzugänglich aufbewahrt werden.
Wird eine Batterie verschluckt, suchen Sie bitte
unverzüglich einen Arzt auf!
– 18 –
• 22899 Minox (Anltg. MX)
01.03.2000
13:57 Uhr
Seite 24
Preparing the flash unit
Mise en service du flash
Inserting the battery
Installation de la pile
Press your forefinger against the battery compartment and pull in the direction of the arrow to
open the battery compartment. When inserting
the battery make sure that the + and - poles are
the right way round. Now close the compartment
again by sliding the cover back onto the battery
compartment. Use a 3-Volt battery of the type
CR 123 A.
Pour ouvrir le logement de la pile du flash, presser
de l'index sur son couvercle dans le sens indiqué
par la flèche. Important: Disposer la pile en faisant
coïncider ses pôles (+) et (-) avec les symboles similaires indiqués sur l'unité. Refermer en faisant glisser le couvercle. Modèle de pile à utiliser pour ce
flash: Pile de 3 volts de type CR 123 A.
Notes:
– Minus temperatures can impair the battery performance. Therefore always protect your flash
against very low temperatures.
– Never throw used batteries into a fire! Also
short-circuited, opened and heated batteries
are a hazard and a health risk.
– Batteries are not toys! Keep them out of the
reach of children. Should a child swallow a
battery, consult a doctor immediately!
Recommandations:
– Comme les températures basses peuvent affaiblir
la performance des piles, il est conseillé de
protéger votre flash du grand froid.
– Ne jamais jeter au feu de piles usées ! Même
celles qui sont court-circuitées, fracturées ou calcinées peuvent toujours être nocives.
– Une pile n'est pas un jouet et devrait toujours
être tenue hors de portée des enfants.
En cas d'ingestion, il faut immédiatement consulter un médecin.
– 19 –
• 22899 Minox (Anltg. MX)
01.03.2000
13:57 Uhr
Seite 25
Blitzlichtaufnahmen
Um den Blitz an der Kamera zu befestigen,
stecken Sie bitte die drei hellen Kontaktstifte des
Blitzgerätes in die drei Öffnungen an der rechten
Seite der Kamera. Drücken Sie dann die zwei
Tasten am Blitzgerät zusammen und drücken das
Blitzgerät fest an die Kamera, so daß die Haken
hörbar einrasten.
Betätigen Sie nun den "Power"-Schalter (27) und
warten bis die Bereitschaftsanzeige erloschen ist.
Sollte diese Anzeige 15 s nach Betätigen des
"Power"-Schalters nicht geleuchtet haben, setzten
Sie bitte eine neue Batterie ein.
Um den Blitz wieder abzunehmen, drücken Sie
bitte die Entriegelungstaste am Blitzgerät gleichzeitig herunter.
Hinweis:
– Um eine optimale Belichtung zu gewährleisten,
sollte sich das Blitzgerät bei Hochformat-Aufnahmen stets oben befinden.
– 20 –
• 22899 Minox (Anltg. MX)
01.03.2000
13:57 Uhr
Seite 26
Flash shots
Pour photographier avec le flash
To fasten the flash on the camera push the three
bright contact pins of the flash unit into the
three openings on the right-hand side of the
camera. Depress the two buttons on the flash
simultaneously and press the flash right up to the
camera to make the black hooks engage with a
click.
Montage du flash sur l'appareil: Introduire les trois
broches de contact du flash dans les trois ouvertures
situées à l'extrémité de l'appareil, à droite. Presser
ensuite en même temps sur les deux touches de
blocage du flash et appuyer ce dernier contre
l'appareil photo jusqu'à ce que les deux crochets
noirs s'enclenchent distinctement.
Actuate the power switch (27) on the back of
your flash unit and wait until the flash ready symbol turns off. Should this symbol not light up within 15 s, the battery has to be changed.
Activer maintenant le flash en dirigeant son
POWER-commutateur et attendre jusqu'à ce que le
témoin de confirmation s'éteind. Si le témoin ne
luit pas 15 s après avoir activé le commutateur
renouveler le pile.
Pour retirer le flash presser en même temps vers le
bas sur les touches de l'unité flash.
Press the buttons on the flash unit simultaneously
to remove the flash again.
Note:
– For optimal exposure, the flash should always
be at the top when taking upright shots.
Recommandation:
– Pour obtenir un éclairage optimal lors de prises
de vue en hauteur, l'unité flash doit toujours
être située en haut de l'appareil.
– 21 –
• 22899 Minox (Anltg. MX)
01.03.2000
13:57 Uhr
Seite 27
Fotografieren mit dem MINOX MX Blitz
Das Blitzgerät steuert die Blitzreichweite automatisch. Das Foto ist immer optimal ausgeleuchtet,
solange das Objekt sich innerhalb der maximalen
Blitzreichweite befindet.
Betätigen Sie den "Power"-Schalter (28), um den
Blitz anzuschalten. Die rote Bereitschaftsanzeige
(26) wird einige Sekunden danach leuchten.
Mögliche Reichweiten (Farbnegativfilm)
ISO 100 von 0,1 m bis 1,6 m
ISO 400 von 0,1 m bis 3 m
Achten Sie bitte darauf, daß Sie nicht außerhalb
dieses Entfernungsbereichs fotografieren, da dies
zu Unter- oder Überbelichtungen führen kann.
Dieser Blitz schaltet sich nach dem Fotografieren
automatisch ab. Sollten Sie ohne Unterbrechung
fotografieren, vergewissern Sie sich bitte, daß der
"Power"-Schalter vor dem Fotografieren eingeschaltet ist.
– 22 –
• 22899 Minox (Anltg. MX)
01.03.2000
13:57 Uhr
Seite 28
Shooting photos with the MINOX MX flash
Faire des photos avec le flash MINOX MX
The flash has an automatic distance recognition.
For optimal exposure the object should always be
in the maximal possible distance.
Actuate the power switch (27) to switch on the
flash. The red ready symbol will light for several
seconds.
Le flash possède une reconnaissance des distances
automatique. Pour obtenir un éclairage optimal,
l'objet doit toujours être dans la distance maximale. Activer maintenant le flash en dirigeant son
POWER commutateur. Le témoin de confirmation
luit quelques secondes d'après.
Possible distances
Les distances possibles:
ISO 100 from 0.1 m to 1.6m
ISO 400 from 0.1 m to 3 m
ISO 100 de 0,1 m à 1,6 m
ISO 400 de 0,1 m à 3 m
Make sure to not take photos outside of this
distance, as this may lead to under- or over-exposure.
S'assurer de ne pas photographier dehors de cette
distance car cela mène à sous- ou sur-exposition.
The flash turns / switches of automatically. When
taking photos continuously make sure that the
power switch is turned on.
Ce flash s'arrête automatiquement. Si photographier sans interruption, s'assurer que le POWER
commutateur est enclenché.
– 23 –
• 22899 Minox (Anltg. MX)
01.03.2000
13:57 Uhr
Seite 29
Herausnehmen der Filmkassette
Wenn Sie die auf dem Film angegebene Zahl der
Aufnahmen erreicht haben, schließen Sie bitte die
Objektivabdeckung.
Drücken Sie nun den Auslöser und transportieren
den Film ein weiteres Mal. Wiederholen Sie diesen
Vorgang noch ein zweites Mal, so daß Sie insgesamt noch zwei "Leeraufnahmen" gemacht haben.
Um den belichteten Film zu entnehmen, öffnen Sie
bitte den Filmfachdeckel. Durch ein leichtes Kippen, können Sie nun den Film der Kamera entnehmen.
– 24 –
• 22899 Minox (Anltg. MX)
01.03.2000
13:57 Uhr
Seite 30
Removing the film cartridge
Extraction du conteneur de film
When reached the number of photos indicated
on the film, close the lens cover. Press the release
button and advance once more. Repeat this
action once again, so that you have taken two
blank photos.
Après être arrivé au nombre des prises de vues
indiqué sur le film fermer le volet de protection.
Déclencher et faire avancer le film encore une fois.
Faire avancer le film encore une fois pour qu'avoir
fair deux prises de vues á vide.
Remove the exposed film by opening the film
box. By slightly tilting the camera you can now
remove the film cartridge.
Pour extraire le film exposé, ouvrir le couverte du
logement du film. Retourner ensuite l'appareil pour
récupérer le conteneur.
– 25 –
• 22899 Minox (Anltg. MX)
01.03.2000
13:57 Uhr
Seite 31
Hinweis:
– Es ist ratsam, die Filmkassette umgehend zur
Entwicklung zu geben. Hierzu bewahren Sie den
belichteten Film bitte in der lichtdichten Filmschachtel auf.
– Bringen Sie den belichteten Film zu Ihrem
MINOX Spezialisten in Ihrer Nähe oder schicken
Sie ihn direkt zu unserem Fachlabor:
MINOX Fachlabor
Herrn Carsten Chadt
Postfach 12 01 41
D - 57022 Siegen
Tel + 49- (0)2 71-6 60 97-47
Fax+ 49- (0)2 71-6 60 97-48
– 26 –
• 22899 Minox (Anltg. MX)
01.03.2000
Note:
– We advise you to have the film processed as
soon as possible. Keep the exposed film in the
light-proof film box prior to processing.
– Give the exposed film to your nearest MINOX
specialist or send it directly to our laboratory:
13:57 Uhr
Seite 32
Recommandation:
– Il est conseillé de faire rapidement développer
tout film exposé et, de le conserver dans son
emballage d'origine, étanche à la lumière.
– Donner le film exposé au MINOX spécialiste ou
envoyer le film exposé directement au laboratoire MINOX:
MINOX Fachlabor
Herrn Carsten Chadt
Postfach 12 01 41
D - 57022 Siegen/Germany
MINOX Fachlabor
Carsten Chadt
Postfach 12 01 41
D - 57022 Siegen/Allemagne
Tel + 49- (0)2 71-6 60 97-47
Fax + 49- (0)2 71-6 60 97-48
Tel + 49- (0)2 71-6 60 97-47
Fax + 49- (0)2 71-6 60 97-48
– 27 –
• 22899 Minox (Anltg. MX)
01.03.2000
MINOX Labore weltwelt
MINOX laboratories world-wide
Laboratoires MINOX dans tout le monde
Australia
Austria
Accurate Instrument Services
Shop 13 Highpoint Plaza
Ashgrove, Queensland 4060
Tel. +61 (0) 7 366 44 95
Fax +61 (0) 7 366 59 82
Color-Drack Ges. m.b.H.
Max Bader Platz 4
A-5620 Schwarzach
Tel. +43 (0) 6415 74 95
Fax +43 (0) 6415 62 45
13:57 Uhr
Czech Republic
Foto-Video Milan Skoda
Vodickova 36
11000 Praha 1
Tel. + 42 (0) 2 24 23 22 46
Fax + 42 (0) 2 24 21 71 29
Finland
Etri Oy
Heinolan vanhatie 25
FIN-15101 Lahti
Tel. +358 (0) 3 811 811
Fax +358 (0) 3 811 311
Germany
MINOX - EU Laborservice
Postfach 12 01 41
D-57020 Siegen / Germany
Tel. +49 (0) 271 660 97 47
Fax +49 (0) 271 660 97 48
Bilderland Ges.m.b.H.
Babenbergerstraße 88
A-8021 Graz
Tel. +43 (0) 316 91 45 00
Fax +43 (0) 316 91 45 00 35
Belgium
Avuchrome Finishing NV/SA
Ringlaan 14 A
B-9400 Ninove
Tel. +32 (0) 54 33 55 68
Seite 33
PAARZ MINOX Speziallabor
Postfach 30 29
D-37020 Göttingen
Tel. +49 (0) 551 210 77
Fax +49 (0) 551 233 80
Italy
CEWE Color Belgium SA/NV
Chaussée de Wavre 1212
B-1160 Bruxelles
Tel. +32 (0) 2 660 19 64
Foto Tecnica Due Elle
Via Chiossetto 16
I-20122 Milano
Tel. / Fax +39 (0) 278 17 68
Foto Laboratorio Studio 4
Via Pacchiotti 79
I-10146 TORINO
Tel. / Fax +39 (0) 107 790 341
For Black and White:
De la Fontaine
Chaussée de Waterloo 594
1060 Bruxelles
Tel. +32 (0) 2 345 63 38
– 28 –
• 22899 Minox (Anltg. MX)
01.03.2000
Japan
Lemon Co. Ltd.
4-3-13 Ginza
Chuo-Ku 3 app.
Tokyo
Tel. +81 (0) 3 3567 4583
Fax +81 (0) 3 3567 5550
Luxemburg
Photostudio-Photolab, Rol Schleich
16 route d'arlon
L-8210 Manier
Tel. +352 (0) 31 91 51
Fax +352 (0) 31 91 52
13:57 Uhr
Switzerland
HTC Photography
P.O. Box 69233
Glendene, Auckland / New Zealand
Tel. +64 (0) 9 837 09 59
Netherlands
Zwart Wit Fotografica Hommers
Axelsestraat 1
4543 CD Zaamslag
Tel. +31 (0) 115 43 22 84Jautze Vaklab
Van Gijnstraat 27
Rijswijk
Tel. +31 (0) 70 31 92 121
Norway
Foto Knudsen
N-5020 Bergen
Tel.: +47 -(0) 55 15 30 00
Fax: +47 -(0) 55 15 30 01
Pro Ciné
Colorlabor AG
Postfach
CH-8820 Wädenswil
Tel. +41 (0) 1 783 71 11
Fax +41 (0) 1 780 69 41
MLS Fotolabor
Claragraben 14
CH-4005 Basel
Tel. +41 (0) 61 681 52 95
Colorphot
Rolf Wälchli AG
Postfach
CH-3002 Bern
Tel. +41 (0) 31 331 01 33
Fax +41 (0) 31 331 17 70
Etablissements Lecuit Carlo
Rue des Joncs
L-1818 Howald
Tel. +352 (0) 49 56 07
Fax +352 (0) 49 21 99
New Zealand
Seite 34
Singapore
Cherry Colour Lab. Pte. Ltd.
No. 1 Scotts Road
#03-16
Shaw Centre
Singapore 228 208
Tel. +65 (0) 23 54 189
United Kingdom Leica Camera Ltd.
Davy Avenue - Knowhill
Milton Keynes, MK5 8LB
Tel. +44 (0) 1 908 66 66 63
Fax +44 (0) 1 908 67 13 16
USA
– 29 –
MINOX Processing Laboratories
250, Meacham Avenue
Elmont, New York 11003
Tel. +001 (0) 516 437 57 50
Fax +001 (0) 516 775 89 24
• 22899 Minox (Anltg. MX)
01.03.2000
13:57 Uhr
Seite 35
Zubehör
Kombi-Etui (für Kamera und Blitzgerät)
Graufilter (im Lieferumfang enthalten)
69 260
––––––
Filme 8x11
Schwarzweißfilme 36 Aufnahmen
Minopan 25 ISO 25/15°
Minopan 100 ISO 100/21°
Minopan 400 ISO 400/27°
69 000
69 002
69 004
Schwarzweißfilme 15 Aufnahmen
Minopan 25 ISO 25/15°
Minopan 100 ISO 100/21°
Minopan 400 ISO 400/27°
69 001
69 003
69 005
Farbnegativfilme 36 Aufnahmen
Minocolor 25 ISO 25/15°
Minocolor 100 ISO 100/21°
Minocolor 400 ISO 400/27°
69 058
69 052
69 055
Farbnegativfilme 30 Aufnahmen
Minocolor 100 PRO 100/21° *
69 060
– 30 –
• 22899 Minox (Anltg. MX)
01.03.2000
Accessories
Combi case
Grey filter
13:57 Uhr
Seite 36
Accessoires :
69 260
part of scope of delivery
Etui combi
Filtre gris
69 260
livré de série avec l'appareil
Films 8x11
Films de format 8 x 11
Black and white films with 36 exposures
Minopan 25 ISO 25/15°
69 000
Minopan 100 ISO 100/21°
69 002
Minopan 400 ISO 400/27°
69 004
Films noir et blanc (36 prises de vue)
Minopan 25 ISO/15°
Minopan 100 ISO/21°
Minopan 400 ISO/27°
69 000
69 002
69 004
Black and white films with 15 exposures
Minopan 25 ISO 25/15°
69 001
Minopan 100 ISO 100/21°
69 003
Minopan 400 ISO 400/27°
69 005
Films noir et blanc (15 prises de vue)
Minopan 25 ISO/15°
Minopan 100 ISO/21°
Minopan 400 ISO/27°
69 001
69 003
69 005
Color negative films with 36 exposures
Minocolor 25 ISO 25/15°
69 058
Minocolor 100 ISO 100/21°
69 052
Minocolor 400 ISO 400/27°
69 055
Films négatifs couleurs (36 prises de vue)
Minocolor 25 ISO/15°
69 058
Minocolor 100 ISO/21°
69 052
Minocolor 400 ISO/27°
69 055
Color negative films with 30 exposures
Minocolor 100 PRO 100/21°*
69 060
Films négatifs couleurs (30 prises de vue)
Minocolor 100 PRO 21° *
69 060
– 31 –
• 22899 Minox (Anltg. MX)
01.03.2000
13:57 Uhr
Seite 37
Farbnegativfilme 15 Aufnahmen
Minocolor 100 ISO 100/21°
Minocolor 100 PRO 100/21° *
Minocolor 400 ISO 400/27°
Farbdiafilme 36 Aufnahmen
Minochrome 50 E ISO 50/18°
inkl. Entwicklung, ohne Rahmung
Minochrome 50 ER ISO 50/18°
inkl. Entwicklung, mit Rahmung
69 053
69 059
69 054
69 050
69 051
* = mit Filmemulsion des Advanced Photo System
Hinweis:
– Die beste Bildqualität erzielen Sie mit dem neuen
Minocolor 100 PRO Film. Mit seiner Emulsion
des Advanced Photo System garantiert er
wesentlich höheres Auflösungsvermögen, gesteigerte Kontraste und außergewöhnliche Brillianz.
– 32 –
• 22899 Minox (Anltg. MX)
01.03.2000
13:57 Uhr
Seite 38
Color negative films with 15 exposures
Minocolor 25 ISO 25/21°
69 053
Minocolor 100 PRO 100/21° *
69 059
Minocolor 400 ISO 400/27°
69 054
Films négatifs couleurs (15 prises de vue)
Minocolor 100 ISO/ 21°
69 053
Minocolor 100 PRO/21° *
69 059
Minocolor 400 ISO/ 27°
69 054
Color transparency films with 36 exposures
Minochrome 50 E ISO 50/18° includes
processing, without framing
69 050
Minochrome 50 ER ISO 50/18° includes
processing, with framing
69 051
Films pour diapositives couleurs (36 prises de vue)
Minochrome 50 E ISO 50/18°
Développement inclus, SANS cadre
69 050
Minochrome 50 ER ISO 50/18°
Développement inclus, AVEC cadre
69 051
* = with film emulsion of Advanced Photo System
* = Avec émulsion des films APS (Advanced Photo System)
Note:
– The best picture quality is obtained with the
new Minocolor 100 PRO film. With its emulsion of the Advanced Photo System it warrants
a greatly increased resolving power, improved
contrast and an outstanding brilliance.
Recommandation:
– La meilleure qualité d'image est obtenue avec
l'utilisation du nouveau film Minocolor 100 PRO.
Son excellente émulsion APS (Advanced Photo
System) garantit un notable accroissement du
pouvoir de résolution, du contraste et de la brillance.
– 33 –
• 22899 Minox (Anltg. MX)
01.03.2000
13:57 Uhr
Seite 39
Pflege und sachgemäßer Umgang mit
Ihrer neuen Kamera bzw. Ihrem neuen
Blitzgerät
Den Kamera- bzw. Blitzgerätkörper und die Objektivoberfläche sollten Sie keinesfalls mit scharfen
Reinigern (Lösungsmittel) säubern. Verwenden Sie
lediglich ein trockenes und sauberes Baumwolltuch.
Bei hartnäckigeren Flecken kann die betroffene
Oberfläche kurz angehaucht und sofort trockengerieben werden.
Spritzwasser sollten Sie ebenso durch ein trockenes
Baumwolltuch entfernen. Wasserschäden können
hohe Reparaturkosten verursachen oder zum Totalschaden der Kamera/des Blitzgerätes führen.
Vermeiden Sie eine abrupte Änderung der Umgebungstemperatur. Durch starke Temperaturschwankungen kann es zu Kondensatbildung im Inneren
der Kamera/des Blitzgerätes kommen.
Darüber hinaus sollten Sie die Kamera/das Blitzgerät vor Staub, Sand und sonstigen Verunreinigungen schützen.
Bei Funktionsstörungen der Kamera/des Blitzgerätes sollten Sie auf jeden Fall von einem Aufschrauben oder gewaltsamen Aufbrechen des Kamerakörpers absehen.
– 34 –
• 22899 Minox (Anltg. MX)
01.03.2000
13:57 Uhr
Seite 40
Care and correct handling of your
new camera
Conseils pour l'entretien de votre nouvel appareil photo et du flash
Never clean the camera body and the lens surface with strong cleaning agents (solvents).
Just use a dry, clean cotton cloth. Stubborn
marks can be breathed on and then quickly rubbed clean.
Splash water should also be rubbed off with a
dry cotton cloth. Damage through water can
result in expensive repair work or even completely destroy the camera.
Avoid sudden changes in ambient temperature.
Abrupt temperature fluctuations can cause the
formation of condensation inside the camera.
You should also protect the camera against dust,
sand and other forms of contamination.
Should the camera not be functioning properly,
never unscrew the camera body or try to force it
open.
To prevent damage to the retina of the eye,
never look through the viewfinder into an extremely strong source of light (the sun, for example). Optical systems can cause irreversible damage to the eye in combination with an extreme
intensity of light.
Ne jamais nettoyer cet appareil et son objectif avec
un produit à action forte (détergents, etc.). En
règle générale, n'utiliser qu'un chiffon de coton sec
et propre. Pour éliminer les tâches opiniâtres, souffler brièvement sur l'endroit et sécher en frottant
doucement.
De même, éclaboussures et embruns devraient
immédiatement être séchés avec un chiffon sec en
coton. Les dégât causés par l'eau peuvent être à
l'origine de réparations coûteuses ou d'une mise
hors service irrémédiable de l'appareil.
Dans la mesure du possible, il est préférable d'éviter à l'appareil tout changement brutal de
température. De genre de variations peuvent en
effet provoquer une condensation à l'intérieur de
l'appareil.
L'appareil doit être tenu à l'écart de la poussière,
du sable et d'autres sources potentielles d'impuretés. En cas de difficultés de fonctionnement, ne
jamais dévisser l'appareil ou tenter de l'ouvrir par la
force.
Pour éviter le risque d'un endommagement éventuel de la rétine de l'oeil, ne jamais regarder une
forte source lumineuse au travers du viseur (notam– 35 –
• 22899 Minox (Anltg. MX)
01.03.2000
13:57 Uhr
Seite 41
Um eine Schädigung der Netzhaut auszuschließen,
blicken Sie keinesfalls durch den Sucher in starke
Lichtquellen (z.B. die Sonne). Optische Systeme
können in Verbindung mit hoher Lichtintensität zu
irreversiblen Augenschäden führen.
Achtung
Für Funktionsstörungen, die sich aus einer unsachgemäßen Handhabung der MINOX MX/ des Blitzgerätes ergeben, übernimmt die MINOX GmbH keine
Haftung.
– 36 –
• 22899 Minox (Anltg. MX)
01.03.2000
Important
MINOX GmbH shall not assume liability for any
malfunctions caused by incorrect handling of the
MINOX MX.
13:57 Uhr
Seite 42
ment le soleil). Interposé à une source
de lumière de forte intensité, tout système optique
peut provoquer des dommages irréversibles aux
yeux.
Important
La Société MINOX GmbH n'accepte aucune responsabilité pour les défauts de fonctionnement
ayant pour origine une manipulation fautive du
MINOX MX.
– 37 –
• 22899 Minox (Anltg. MX)
01.03.2000
13:57 Uhr
Seite 43
Kundendienst
In Schadensfällen oder für Wartungsarbeiten wenden Sie sich bitte an den MINOX Kundendienst:
MINOX GmbH
Walter-Zapp-Str. 4
D-35578 Wetzlar
Tel. +49(0)6441-917-680
Fax +49 (0)6441-917-681
Internet: http://www.minox.com
eMail: [email protected]
Im Ausland stehen Ihnen unsere Landesvertretungen oder unsere autorisierten Reparaturwerkstätten
zur Verfügung. Die entsprechenden Adressen entnehmen Sie bitte der beiliegenden Garantiekarte.
– 38 –
• 22899 Minox (Anltg. MX)
01.03.2000
13:57 Uhr
Seite 44
Customer service
Service-Après-Vente:
If the camera is damaged or for maintenance,
please contact the MINOX Customer Service:
Pour toute prestation SAV, merci de prendre
contact avec le Service-Après-Vente MINOX:
MINOX GmbH
Walter-Zapp-Str. 4
D-35578 Wetzlar/Germany
Tel. +49(0)6441-917-680
Fax +49 (0)6441-917-681
Internet: http://www.minox.com
eMail: [email protected]
In countries other than Germany, please contact
the agencies or authorized repair workshops in
your country. For full addresses please refer to
the enclosed guarantee card.
MINOX GmbH
Walter-Zapp-Strasse, 4
D-35578 Wetzlar/Allemagne
Tel. +49 (0)6441-917 680
Fax +49 (0)6441-917-681
Internet: http://www.minox.com
E-Mail: [email protected]
En dehors de l'Allemagne, prendre contact avec
nos représentations locales ou les ateliers de réparation MINOX agréés. Voir la liste d'adresses sur la
carte de garantie ci-jointe.
– 39 –
• 22899 Minox (Anltg. MX)
01.03.2000
13:57 Uhr
Seite 45
Technische Daten MINOX MX
Kamera-Typ
Filmformat
Objektiv
Fokussierung
Verschlußzeit
Sucher
Bildzähler
Blitzanschluß
Abmessungen
Gewicht
Kleinstbildkamera
8x11 mm
Objektiv 1:4,8/15 mm (3 Elemente in 2 Gruppen)
Entfernungseinstellung 1 m, 2 m, 4m bis unendl.
1/125 s
Leuchtrahmensucher (mit Nahbereichsmarkierung 30 cm)
automatisch, stellt sich automatisch auf 0 zurück
Anschluß für MINOX Spezialblitzgerät
84 (Breite) x 21 (Höhe) x 34 (Tiefe) mm
55g (ohne Film)
Zubehör
Graufilter
Kombi-Etui
Best.-Nr.
(im Lieferumfang enthalten)
69 260
Daten MINOX MX Blitzgerät
Blitzgerät
Leitzahl
Abmessungen
Automatikblitz, automatische Abschaltung
9 (ISO 100)
61 (Breite) x 20 (Höhe) x 42 (Tiefe) mm
Gewicht
38 g (ohne Batterie)
– 40 –
• 22899 Minox (Anltg. MX)
01.03.2000
13:57 Uhr
Seite 46
Technical Data MINOX MX
Type of camera
Film format
Lens
Focusing
Shutter
Viewfinder
Frame counter
Flash connection
Dimensions
Weight
Subminiature camera
8x11 mm
Lens 1:4.8/15 mm (3 elements in 2 groups)
1 m, 2 m, 4 m to infinity
1/125 s
Bright-line viewfinder
automatic, is automatically set to 0
Connection for MINOX MX flash
84 (width) x 21 (height) x 34 (depth) m
55 g (without film)
Accessories
grey filter
Combi case
Order no.
part of scope delivery
69 260
Technical Data Flash unit
Type of flash
Guide number
Dimensions
automatic flash, turns off automatically
9 (ISO 100/21°)
61 (width) x 20 (height) x 42 (depth) mm
Weight
38 g (without batteries)
– 41 –
• 22899 Minox (Anltg. MX)
01.03.2000
13:57 Uhr
Seite 47
Fiche Technique du MINOX MX
Type d'appareil
Format du film
Objectif
Réglage des distances
Obturateur
Viseur
Compteur de vues
Connexion flash
Dimensions
Poids
Appareil de format miniature
8 x 11 mm
Objectif 1: 4,8/15 mm (3 élements en 2 parties)
de 1 m, 2 m, 4m à l’infini
1/125 s
A cadre lumineux
Se met automatiquement à 0
Connexion pour flash MINOX MX
84 mm (largeur) x 21 mm (hauteur) x 34 mm (épaisseur)
55 g. (sans film)
Accessoires
Filtre gris
Etui combi
Numéro de code
livré de série avec l'appareil
69 260
Fiche Technique du flash
Flash
Nombre-Guide
Dimensions (Lo. x La. x Ep.)
Flash automatique, déconnexion automatique
9 (ISO 100)
61 mm x 20 mm x 42 mm
Poids
38 g. (sans pile)
– 42 –