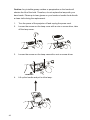
1
INTRODUCTION
Good tools are essential for creating successful presentation. This projector allows
you to project XGA full-color images and video onto a large screen from 30" ~
350” either for presentation or home entertainment. They are compatible to three
video sources. For example, the projectors can be connected simultaneously to
one PC or one Mac that have D-SUB interfaces; to any video equipment that has
common video source; or to an audio source.
Crisp, clear images of this projector is displayed in XGA compatible full color
(16,670,000 color) at a resolution of 1024 x 768 pixels. You will be impressed
during a presentation that the projector produces such bright images for you to
take notes easily though you have enough light. To enjoy audio display, the built-in
2W+2W speakers of the projector creates rich and powerful sound. An external
speaker can also be connected when further amplification is required.
You may also utilize a remote control of this projector not only to select different
image sources but also OSD menus and adjust their values as required.
Additionally, the remote control a wireless mouse. The remote mouse assists you
to control mouse operations on the computer screen during presentations.
This projector also features a wisdom-type chip that fully support images of the
computer output at VGA, SVGA, XGA and SXGA with an extraordinary crisp, clear
display. Without a doubt, the projector supports the IBM-compatible PCs and
Notebook Computer, Apple Macintosh and Apple PowerBook. The video sources
can be NTSC, PAL or SECAM format as well the interfaces can be RCA jacks, SVideo jack and Component Video jacks.
1
Safety Instructions
Three symbols as below shown will be used throughout the manual to remind you
when to operate or repair this projector:
Attention: Extra tips or useful indications
Caution: Steps against damages to your equipment
Warning: Steps to avoid personal injury
The following are Safety Instructions that should be followed strictly when setting
up and utilizing the projector:
1.
Read these instructions.
2.
Keep these instructions.
3.
Heed all warnings.
4.
Follow all instructions.
5.
Do not place your projector onto an unsteady trolley, stand or table.
6.
Do not operate your projector nearby a water or heat source.
7.
Only apply accessories or attachments as recommended by this manual.
8.
Use the exact type of power as labeled on the projector. If you are not sure
of the type, you may confirm it from your dealer or local electric company.
9.
Plug in properly the three-pin earthen plug into an earthen socket. If you
have a two-pin earthen plug, contact your dealer or electrical technician for a
replacement. Do not touch the plug with wet hands.
10. Failure to take the following precautions may result in sparks or fire:
Ensure the plug is free of dust before inserting it into a socket.
Insert the plug into the socket securely.
2
11. Never overload wall sockets, extension sockets and multi-way plug boards or
this may result in sparks or fire.
12. Make sure that the projector is placed properly so that no one will step on the
power cord or its relative cables because this may damage or cause fraying
to the lead or the plug.
13. Turn the power of the projector off and unplug its power cable from the wall
socket before cleaning. Use a damp cloth and avoid using liquid or aerosol
cleaners.
14. Make sure not to block the openings or slots on the projector. These
openings are for ventilation which keeps the machine from overheating. Do
not place the projector on your sofa, carpet, any soft material, or in a closet
that does not provide ventilation.
15. Make sure no items or no liquid is squeezed into or spilled into the housing
slots.
16. Except as specially instructed in this manual, never try to do any service by
yourself. Opening the cover of the projector for doing some repairs is
dangerous, especially, when handling the high voltage parts inside the
machine. Be sure to have qualified service personnel for carrying out the
service maintenance.
17. Unplug the power cord of the projector from the wall socket during a
thunderstorm or when the projector will not be operated for a long period of
time. Do not place the projector and the remote control on any heat-emitting
equipment or in a hot space (e.g.: in a motionless car).
18. Under the following conditions, unplug the projector from the wall socket and
refer the problems to qualified service personnel.
If the power cable or plug is damaged or frays,
If the liquid spills into or if it has been exposed to the rain,
If the projector is not able to work although you have followed the set
up instructions, or if the performance of the projector has a noticeable
3
change and needs repaired,
If the projector has been dropped or the cabinet has been damaged.
Where To Get Help
We provide authorized distributors, dealers and service centers to provide
maintenance to the projectors. Please contact authorized representatives in your
locality for information pertaining to your product and after-sale services.
When you need more information on this product, contact the appropriate
distributors or dealers that you bought this machine from or contact the service
center.
4
Transporting Your Projector
Please follow strictly the following steps when transporting the projector because it
contains many components that are made of glass and precision technology:
When transporting to a service center:
Use the original packing.
If you did not keep the original carton, use the equivalent and put
enough cushion inside for protection.
When transporting for business use:
Put it in the original carrying case or bag, then pack it in a secure box
with cushioning.
We shall not be liable for any damages occurred during the
transportation.
When carrying by hands:
Use a hard carrying case or a soft carrying bag for protection.
Remote Control Information
You may control this projector through the infrared receiver (IR) located at the front
of the projector. However, the projector may not response to the commands of the
remote control if
The surrounding light is too bright,
Certain types of the fluorescent lighting are used,
The IR receiver is shined on with a bright light,
Equipment that emits infrared energy such as a radiation heater in the
room.
The above mention conditions occur frequently for most infrared controlled
equipment.
Try the following solutions:
Replace new batteries. The batteries may be low on power.
Partly turn off some light source and remove the projector from direct
sunlight.
Close the window or remove the projector from direct sunlight.
Switch off other equipment that emits infrared energy.
5
Even if any one of the above conditions happens, you can always control the
projector via keys on the control panels of the projector.
Warning:
The laser pointer feature in the remote control will emit high energy. Do not look
into it directly or the red beam will injure your eyes seriously. Do not let children
play with the remote control.
Remote Control Briefing Functions
The briefing functions offered by remote control are as follow:
Press the FREEZE key on the remote control to still the image that is
being displayed, and OSD menu will display the icon of FREEZE.
Press the DIGITAL ZOOM key on the remote control to enlarge a certain
part of the displayed image form the Computer input or the Video input.
Adjust the four direction keys on the remote control or on the operational
panel allows you to adjust the position of the displayed image, OSD
menu will display the icon of DIGITAL ZOOM.
Note: If you want to enlarge this displayed image and still the image that is being
displayed at the same time, just press the DIGITAL ZOOM key and the FREEZE
key next. If you press the FREEZE key and the DIGITAL ZOOM key next, the first
function of DIGITAL ZOOM will be relieved by FREEZE.
Press the BLANK key on the remote control to start the blank function
and OSD menu will display the letters of BLANK.
When press FREEZE, DIGITAL ZOOM and BLANK key next, the three
functions will execute at the same time. You must press key reversely to
relieve functions.
Note: FREEZE, DIGITAL ZOOM and BLANK will execute at the same time in the
Computer input, but not in the Video input.
When you use the MUTE button on the operation panel of the projector
and the FREEZE key on the remote control, the OSD menu will display
Mute icon and FREEZE at the same time.
6
INSTALLATION
This section depicts details on unpacking and setting up the projector as well on
connecting your projector with other equipment.
7
Unpacking The Projector
Check immediately that your have the following accessories after unpacking your
projector:
One Projector
One Lens Cover
One Users’ Manual
One Remote Control
Two AA type batteries
One Power Cord
One Computer Cable
One Control Cable
One Audio Cable
One RCA Video signal Cable (Yellow)
One RCA Audio signal Cable (Red, White)
S-Video signal Cable
USB Cable
The above mention items may not be required for your particular computer
system.
Warning:
Do not expose to children the plastic bags, accessories, and any optional items for
the projector. A plastic bag may cause suffocation to a child if placed accidentally
over the head.
Save all the packaging material of the projector in a safe suitable place in case
you need to transport the projector in the future. You should always transport the
projector with its original packaging or equivalent.
The following items are the accessories of this projector:
Mac Adapter
Mac Monitor Adapter
Mac Mouse Cable
Component Video Cable
8
Setting Up The Projector
1.
Place the projector on a sturdy, flat surface within 1.8 meters of a computer
or video source (e.g. video tape deck, camcorder, digital camera, or laser
disk player).
2.
Place the projector at a qualified distance from the screen so as to project
the desired screen size. Refer to the following chart for suitable distances to
keep.
3.
Adjust the projector so as
to parallel the lens at right
SCREEN
SIZE
angles to the screen. If
the projector is not angled
correctly, the screen
image will be crooked.
4.
Connect one end of the
power cable bundled with
300”
200”
100”
80”
60”
40”
30”
HORIZONTAL DISTANCE
BETWEEN THE PROJECTOR
AND THE SCREEN
The Shortest
The Longest
Distance
Distance
12.5m
16.5m
8.5m
12.0m
4.5m
6.0m
3.5m
4.5m
2.5m
3.0m
1.5m
2.0m
1.5m
this projector to its power connector. Connect the other end to a grounded
electrical socket.
Warning:
Never look into the lens of the projector and never let children look into the
lens of the projector.
5.
To insert the batteries in the remote control device, slide off the battery
compartment cover as shown below.
6.
Install two AA type batteries bundle with your packing as the diagram shows.
9
Ensure the polarities of the batteries are placed in the correct positions.
7.
Slide back the batteries' compartment cover.
Please pay attention when replacing batteries:
Do not mix used and new batteries.
Do not recharge used batteries or expose them to fire or water.
Replace new batteries as soon as possible after the old batteries have
run out of power. You may use a soft cloth to remove any acid if the
batteries leaked. Clean your hands immediately if the fluid gets onto
your hands.
If you do not intend to operate the projector for a long period of time, take
out the batteries.
10
Connecting To A Computer
This projector can be connected to a computer with the following video signals:
VGA, SVGA, XGA and SXGA.
Computers that are compatible with this projector is as below:
IBM desktop PC or compatible.
IBM notebook or compatible.
Apple Macintosh desktop computer, including the following:
Macintosh Quadra®, Macintosh Centris®, and Power Macintosh®.
Any Apple PowerBook with video-out capability, including the following
series: 160, 165, 180 and 500 series PowerBook.
HDTV signal in ATSC broadcast system. (U.S.A., Canada, S. Korea, Taiwan,
Argentina)
Connecting To A Desktop Computer
Before connecting this projector to a desktop computer, make sure that both
machines have the power shut off.
1.
Remove the computer monitor cable from the computer.
11
2.
Connect either end of the Computer Cable to the Computer In port of the
projector. Then, connect the other end of the Computer Cable to the Monitor
Out port.
3.
If necessary, connect the computer monitor cable to the Computer Out port
of the projector.
If the functions of the wireless mouse on the Remote Control need to be operated,
please make the following connections to each signal cable according to the steps
numbered 4 ~ 6 below:
4.
Connect the Control Cable to the Control port of the projector.
5.
Remove the computer mouse cable.
6.
Connect the PS/2 Mouse connector of the Control Cable to the PS/2 port of
the computer.
You may connect your computer to the USB interface of the projector so to enable
the function of the wireless mouse on the remote control. Please follow the step
numbered 7 for connection.
7.
Connect one end of the USB Cable to the USB port of the projector, and
connect the other end of the USB Cable to the USB port of your computer.
8.
Tighten all connector screws to ensure secure connections.
9.
For DVI, insert one end of the DVI Cable into the DVI jack of the projector.
Insert the other end of the DVI Cable into the video-out jack on the DVI
source.
12
DVI Cable
DVI Source
DVI
Data Projector
Connecting To A Notebook
Before connecting this projector to a notebook, make sure that both machines
have the power shut off.
1.
Connect either end of the Computer Cable to the Computer In port of the
projector, then connect the other end of the Computer Cable to the Monitor
Out port of the notebook.
If the functions of the wireless mouse on the Remote Control need to be operated,
please make the connections to each signal cable according to the steps
numbered 2~ 3 below:
2.
Connect the Control Cable to the Control port of the projector.
3.
Connect the PS/2 Mouse connector of the Control Cable to the PS/2 mouse
port of the notebook.
You may connect your computer to the USB interface of the projector so to enable
the function of the wireless mouse on the remote control. Please follow the step
numbered 4 for connection.
13
4.
Connect one end of the USB Cable to the USB port of the projector, and
connect the other end of the USB Cable to the USB port of your computer.
5.
Tighten all connector screws to ensure secure connections.
Connecting To A Macintosh Desktop Computer
Before connecting this projector to a Macintosh desktop computer, make sure that
both machines have the power shut off.
1.
Remove the Mac monitor cable from the Mac.
2.
Set the DIP switches of the Mac Adapter in accordance with the desired
resolutions (i.e. 19” mode).
3.
Then, connect the Computer Cable to one end of the Mac Adapter.
4.
Tighten all connector screws to ensure secure connections.
5.
Connect the other end of the Mac Adapter to the Mac.
6.
Connect the other end of the Computer Cable to the Computer In port of the
projector.
7.
If necessary, connect the Mac monitor to the Computer Out port of the
projector.
If the functions of the wireless mouse on the Remote Control need to be operated,
please make the connections to each signal cable according to the steps
numbered 8 ~ 10 below:
8.
14
Connect the Control Cable to the Control port of the projector.
9.
Remove the mouse cable from the Mac Mouse port, and connect the Mac
Mouse Cable to the Mac Mouse port.
10. Connect the other end of the Mac Mouse Cable to the PS/2 mouse
connector of the Control Cable.
You may connect your computer to the USB interface of the projector so to enable
the function of the wireless mouse on the remote control. Please follow the step
numbered 11 for connection.
11. Connect one end of the USB Cable to the USB port of the projector, and
connect the other end of the USB Cable to the USB port of your computer.
12. Tighten all connector screws to ensure secure connections.
Connecting To A Macintosh PowerBook
Before connecting this projector to a Macintosh PowerBook, make sure that both
machines have the power shut off.
1.
Set the DIP switches of the Mac adapter in accordance with the desired
resolutions (i.e. 19” mode)
2.
Connect one end of the Mac Adapter to the PowerBook Monitor Out port.
3.
Tighten all connector screws to ensure secure connections.
4.
Connect the other end of the Mac Adapter to the Computer Cable.
5.
Connect the other end of the Computer Cable to the Computer In port of the
15
projector.
If the functions of the wireless mouse on the Remote Control need to be operated,
please make the connections to each signal cable according to the steps
numbered 6 ~ 8 below:
6.
Connect the Control Cable to the Control port of the projector.
7.
Connect the Mac Mouse Cable to the PS/2 Mouse connector of the Control
Cable.
8.
Connect the other end of the Mac Mouse Cable to the mouse port of the
PowerBook.
You may connect your computer to the USB interface of the projector so to enable
the function of the wireless mouse on the remote control. Please follow the step
numbered 9 for connection.
9.
Connect one end of the USB Cable to the USB port of the projector, and
connect the other end of the USB Cable to the USB port of your computer.
10. Tighten all connector screws to ensure secure connections.
Connecting To A Set-top Box
Before connecting the projector to a Set-top Box, make sure that the power of
16
both machines have been shut off.
1.
Connect either end of the Computer Cable to the Computer In port of the
projector. Then, connect the other end of the Computer Cable to the Monitor
Out port of the Set-top Box.
Note: This projector is compatible with ATSC broadcast system. (U.S.A., Canada,
S. Korea, Taiwan, Argentina)
Note: The ATSC broadcast system uses AC-3 sound decoding mode. For the best
audio quality, we do no suggest you connecting the audio signal with the projector.
Please read the manual of your Set-top Box to connect to an external speaker.
Note: When connecting to a HDTV Set-top Box, this projector is compatible with
RGBHV connector (same with VGA D-Sub connector).
Connecting To A Video Source
The following procedures can be used to make connections to a video tape deck,
camcorder, laser disc player or any other compatible video image source of the
projector. The projector can receive composite video signals, S-Video signals and
Component Video signals. If the video source has a RCA video jack, it receives
composite video signals. If the video source has an S-Video jack, it receives S-
17
Video signals. If the video source has a Component Video jack, it can be
connected to transmit video signals to the projector.
Note: The projector is not compatible with a cable TV-style F connector.
A connection can be made to all Component Video, S-Video and composite video
sources at the same time. To select a signal source, you may use the Video key
on the remote control or the Source key on the projector for your selection.
Cables can be connected to the Component Video, S-Video and the Composite
Video connectors at the same time. Press the above said Video key or the Source
key for the selection of an input signal. The selections in order are the following:
First, the Component Video signal, then the S-Video signal, and the Composite
Video signal is the next.
The projector supports NTSC, PAL and SECAM video formats. By default, it
automatically detects and identifies the video format.
The steps of connecting the projector to the video source
1.
2.
Shut off the projector and its video source if they are on.
To receive composite video signal, connect the yellow RCA plug at one end
of the RCA Cable (Video) to the Video In jack of the projector. Connect the
other yellow RCA plug to the video-out jack on the video source. (Connect
the red and white RCA Cable (Audio) plugs, which carry audio signals, to the
projector and any video player according to the aforesaid method. If the red
and white RCA Cable (Audio) plugs are not connected, the projector will only
show images. No sound will be heard.)
18
3.
For S-Video, insert one end of the S-Video Cable into the S-Video jack of the
projector. Insert the other end of the S-Video Cable into the video-out jack on
the S-Video source. (An adapter is needed if the S-Video source has a larger
S terminal.)
4.
When you apply the Component Video jacks as a transmission interface,
have the three Component Video Cables (Green, Blue, Red) of a video
source connect to the three Component Video ports (Green, Blue, Red) on
the projector by matching their colors accurately.
19
Connecting To An Audio Source
The projector has two types of inputs for audio: one single-jack inputs for a
computer and a two-jack input for the video audio. The video audio source input
has an L jack that controls the left speaker and an R jack that controls the right
speaker. If a video audio source is connected with only one plug, connect it to the
L Audio In jack.
Connection of an audio cable from a computer source
1.
Shut off the projector and computer source if they are on.
2.
Connect one end of the Audio Cable to the Audio In jack on the projector.
3.
Connect the other end of the Audio Cable to the Audio Output jack on the
computer audio source.
20
Connection of an audio cable from a video audio source
1.
Shut off the projector and video source if they are on.
2.
Connect one end of the RCA Cable (Audio) to the Audio In jacks on the
projector. Insert the white plug into the L Audio In jack and the red plug into
the R Audio In jack.
3.
Connect the other end of the RCA Cable (Audio) to the Audio Output jacks
on the video audio source. Connect the white plug to the left channel and the
red plug to the right channel.
21
Connecting To An External Speaker
Though the internal speakers of the projector are enough for most small size or
medium-size rooms, an external speaker can be connected to achieve the best
results for large room presentations.
The Steps of connecting the projector to an External Speaker:
1.
2.
Check to ensure that both the projector and all sources are turned off.
Connect the 3.5 mm stereo mini-plug of the Audio Cable to the Audio Out
jack of the projector.
3.
Connect the other end of the Audio Cable to the external speaker. Be sure to
connect the white RCA plug to the left channel, the red RCA plug to the right
channel.
Speaker or PA
L
R
AUDIO
Data Projec tor
Audio Cable
22
HOW TO OPERATE
THIS PROJECTOR
This chapter provides the following information about using your projector.
Turning equipment on and off
How to adjust the projected image
How to operate this projector
Examine the Projector Status
23
Turning The Equipment On And Off
Turn on the projector and any video players in the following sequence:
1.
2.
Video Signal Source equipment
Audio Signal Source equipment (If it is different with a computer or video
signal source)
3.
Projector
4.
External Speaker
5.
Computer
Remove the lens cover before the projector is turned on. When the power source
is connected, the Power Led Indicator will first blink for a few seconds and will be
fully lit when the connection of the power source is completed. If the computer and
the Video Signal Source are connected, an image depicting a computer or a Video
Signal Source will be displayed. It will take at least 30 seconds to display a regular
image after the power has been connected.
Warning:
When the lamp is turned on, never let yourself or let children look into the lens of
the projector. The bright light emitted from the lamp into the lens of the projector
will seriously damage the eyes.
Attention:
Remove the lens cover before the projector is turned on as the strong light emitted
from the lamp will damage the lens cover permanently.
To turn the projector and its accessory equipment off, please operate the above
steps in reverse order.
Attention:
When the power source is disconnected, the built-in fan will continue to operate in
order to cool down the projector, and the Power Led indicator will turn orange and
blink for two minutes. When the projector -has cooled down, Power Led indicator
will remain lit in green. If the projector is turned on during Power Led indicator is
blinking in orange, the projector will not be able to display images.
Attention:
24
Due to the design of the projector, the projector will not turn on immediately when
the Projection Lamp Led Indicator turns green and blinks. Please wait for a
moment until the lamp is ready.
25
How To Adjust The Projected Image
The Focus and Zoom Functions
When an image is displayed on the screen, first examine whether the image is
focused, and whether it is located on the screen accurately.
To focus the display image, you may adjust
the Focus Ring by turning left or right. The
Focus Ring is fixed on the outer rim of the
projector lens.
To enlarge of minimize the screen size,
adjust the Zoom Ring by turning left or right
so to project the desired screen size. The
Zoom Ring is designed on the inner rim of the projection lens.
To Fix the Position of the Image Projected on the Screen
To adjust the position of the image that is projected on the screen, adjust the two
stands at the bottom of the projector.
26
The Auto Key
If the image projected is from the computer, project it on the screen and then
press the AUTO key to automatically adjust the set up of this projector with the
computer signal.
Press the AUTO key when the image is displayed in a WINDOWS-like
screen of a computer. Sometimes a certain computer input signal may not be
able to match the functions set up by the AUTO key, then the OSD Menu
must be utilized for further adjustments.
The Resize key
The RESIZE key enables one to choose the resolution of image input by any
computer video signal.
When the image size of a computer is not over XGA (1024 x 768 pixels) for
its resolution, you may choose either the central-image-projection display
(Windows display) or the whole-image-projection display (Resize Display) for
your image display mode.
If the resolution of the image display is beyond the XGA resolution (1024 x
768 pixels), you may choose to display a certain part of the image projected
(Windows Display) or to display the whole part of the image projected
(Resize Display).
Note: The RESIZE key is not suitable to be used for the adjustment of a XGA
(1024 x 768 pixels) image.
27
How To Operate This Projector
Generally, the remote control will be used to control the projector. The keys on the
remote control have the following functions:
To turn the power on or off
To switch between the video signal sources
To enter the OSD Menu to select the adjustment functions such as the
Computer Video, Video Signal Image, Volume, and other settings
To resize the image display
To tune the Volume and select the Mute adjustment
To adjust the Brightness
To adjust the Contrast
To freeze the image
To select the blank function
Please always have your remote control aimed at the remote control sensors that
are designed respectively at the front and at the back part of the projector. Use the
remote control within a distance of 7 meters from the projector.
Besides the remote control, the function keys on the operation panel of the
projector are able to be used for operation. The function keys are as below:
To turn the Power on or off
To enter the OSD Menu to select the adjustment functions such as the
Computer Video, Video Signal Image, Volume, and other settings
To tune the Volume and select the Mute adjustment
To switch between the video signal sources
To adjust the Keystone
To adjust the Brightness
To adjust the Blank
28
B lank
Source
The Buttons on the Operation Panel of the Projector & Their Functions
Buttons Functions
POWER
MENU
AUTO
ENTER
SOURCE
BLANK
KEYSTONE+/-
Turns the projector on or off.
Enter or exit the OSD Menu.
Adjusts automatically the video signal received from the computer in
order to have the best effects for the display.
When you enter the OSD Menu, the Enter key is used as a
confirmation key.
Switches between the video signal sources (Computer In, Video
Signal).
Select Blank function
Modifies the shape of projected image if it is a little trapeziumlike.
29
The Buttons on the Remote Control & Their Functions
Buttons
POWER
MENU
SOURCE
AUTO
RESIZE
FREEZE
DIGITAL ZOOM
VOLUME (+ –)
BLANK
BRIGHTNESS (+ –)
CONTRAST (+ –)
DIRECTION KEY
CLICK 1
CLICK 2
Functions
Turn the projector on or off.
Enter or exit the OSD Menu.
Switches between the video signal sources (Computer In, Video
Signal)..
Adjusts automatically the video signal received from the computer in
order to have the best effects for the display.
Switches between the display mode and to return to the original size
of a display mode.
Suitable for the VGA, XGA & SXGA input.
To still the images displayed
Adjusts the size of an image by digital.
Tunes the Volume louder or softer.
Select Blank function
Adjusts the brightness of the image displayed
Adjusts the contrast of the image displayed
Moves the mouse cursor when the remote mouse device is
accurately set up.
Functions as a selector when entering into the OSD Menu.
Functions as the left button of a computer mouse.
Functions as the Enter key for confirmation when entering into
the OSD Menu.
Functions as the right button of a computer mouse.
Functions as the Enter key for confirmation when entering into
the OSD Menu.
Note: The ZOOM & FOCUS functions are not suitable to this model.
30
Examine The Projector Status
The projector is designed with Power Led Indicator and a Lamp Led Indicator.
Both indicators enable an immediate inspection of the status of the projector.
Attention:
When both the indicators blink or remain lit, it means that the projector has a
serious problem(s). If so, please follow the instructions on page 45 in this manual
for necessary solutions.
Power Led Indicator
Color
Status
Green
Remains Lit
Red
Remains Lit
Red
Blinks
Lamp Led Indicator
Color
Status
Indication Led remains off
Green
Remains Lit
Green
Blinks
Orange/Red Blinks
Alternately
Orange
Blinks
Red
Remains Lit
Red
Blinks
Meaning
The projector system is operating normally.
The projector is over heated, and the Power is off.
The projector has an internal problem(s).
Meaning
The lamp is turned off.
The lamp is turned on.
The projector is warming up.
The life of the lamp will soon end, please prepare a
replacement.
The projector is cooling down.
The life of the lamp has ended, please replace with
a new lamp now.
There is a problem with the lamp or power supply
of the projector.
31
USING THE OSD MENU
The functions offered by the OSD menu of this projector are as follows:
Adjusts the input signal of the projected image in its brightness,
black level, contrast, position and the interface of the remote-control
mouse.
Adjusts the input signal of the projected image in its phase &
tracking (Image), sharpness, saturation, hue and Flash Tone(Video).
Adjusts the volume and to select the type of input signal.
Selects the projection mode in front, ceiling, rear and ceiling & rear
projection; to select the language, the content of the input signal and
the consumed lamp life (Information).
Revise and save the settings of OSD menu.
Keystone correction (Keystone)
32
How To Access The OSD Menu
Press the MENU key (on the top control panel of the projector or the
remote control) and the main menu window will be displayed at the
left top of the projected image. Press the MENU key again (on the
top control panel of the projector or the remote control) to close the
main menu window and cease OSD setting.
The icon you select on the OSD menu will be marked in blue.
How To Change OSD Settings
You may use the DIRECTION key on the remote control to choose
the setting of the item you want to revise. Then, press the CLICK 1
or CLICK 2 for confirmation and the submenu will show up for further
setting.
To go back to the upper-level menu, you need to press the MENU
key on the remote control or that on the top control panel.
To show the OSD box or to conceal it, you need to go back to the
home menu and press the MENU key on the remote control or that
on the top control panel.
OSD Menu
You may revise the defaults of computer signals under OSD menu.
Operation method: Under OSD menu, utilize the TRACKING+or
TRACKING- key select the icon which default needs to be revised.
Press the CLICK 1 or CLICK 2 key on the remote control or the ENTER
key on the control panel. Then you can revise the settings. After that,
press the CLICK 1 or CLICK 2 key on the remote control for confirmation
and the MENU key to go back to OSD menu.
Brightness
Adjusts the setting of brightness will make the whole projected image
brighter or darker. The image will be brighter by increasing the value of
Brightness and darker by decreasing the value.
33
Black Level
Adjusts the scale of the black color in the projected image. The higher the
value of Black Level is and the darker the image will be.
Contrast
Adjusts the contrast between the bright and gloomy regions in the
projected image. If the value of Contrast is higher, the bright regions will
be brighter and the gloomy regions will be darker. If the value is lower,
then the contrast between bright and gloomy regions will be not that
obvious.
Position
After entering the “Position” icon under OSD menu, you will see the “HPosition” and “V-Position” bars in the “Position” box. You may revise the
setting by using the direction key on the remote control and have the
image projected onto proper position.
When entering the “H-Position” bar, you may make the horizontal
movement for the projected image.
When entering the “V-Position” bar, you may make the vertical
movement for the projected image.
Image
Select image bar to adjust the synchronization and tracking of the analog
signal from computer. Clicking into the “Image” icon under OSD menu,
and select the “Synchronization” or “Tracking” bars in the “Image” box.
You may make adjustments by revising the settings of Synchronization
and Tracking respectively.
If there is still some noise on the image after utilizing Auto Config. to
adjust the settings of Synchronization and Tracking, you may click
into “Synchronization” to diminish it.
If the image remains blurred or presents vertical lines on it, you may
click into “Tracking” to adjust for a pure image.
34
Auto Configuration
Entering the “Auto Config.” icon under OSD menu, the projector will automatically
select the frequency and image position for the analog signal.
Information
Entering the “Information” icon under OSD menu, it will present the state of the
image: current resolution (1024*768 or 720*240), Hf (horizontal scanning
frequency) & Vf (vertical scanning frequency) and lamp age (the consumed hours).
Miscellaneous
Entering the “Miscellaneous” icon under OSD menu, you can restore the revised
settings to the defaults. You may also make adjustments for OSD Timeout, OSD
Position, Dithering, Native Mode and Auto Color.
In the Miscellaneous box, there are “Factory Reset”, “OSD Timeout”, “OSD
Position”, “Dithering”, “Native Mode”, ”Color Temperature” and “Auto Color” bars.
Select the “Factory Reset” bar, all the settings you have revised will be
restored to the defaults which are set up before shipment of the projector.
Select the “OSD Timeout” bar, the duration of OSD box displayed on the
image can be adjusted from 5 seconds to 60 seconds; i.e. the time of OSD
box displayed on the image will last for min. 5 seconds to max. 60 seconds.
(The duration will be extended by 5 seconds.)
Select the “OSD Position” bar, you may adjust the position of the OSD box
on the image.
Select the “Native Mode” bar, the projector won’t compress or increase the
pixels but present the image in the original resolution of the input signals.
For example, when the input signal is in 800*600 pixels and entering “Native
Mode”, the image will remain in 800*600 resolution, not 1024*768
resolution. (Note: The resolution of this projector is 1024*768 pixels, XGA.)
Select the ”Color Temperature” bar to adjust the whiteness of a displayed
image. When “Color Temperature” bar move to left, the color of displayed
image will become bluer. When “Color Temperature” bar move to right, the
color of displayed image will become reder.
Select the ”Lamp Life Rest” bar select “Yes” when a new lamp is replaced to
reset the counter of the lamp life back to the beginning. This setting is to
make sure that the projector records a proper update of the life of the newly
35
installed lamp.
Select the “Auto Color” bar and the projector will do the adjustment
automatically.
Select the “Screen Aspect” bar to select “16:9” or “4:3” screen ratio.
Input Select
Selects the type of input signals. Entering “Input Select”, you may see the
“Computer”, “DVI”, “Video”, “S-Video” and “YCbCr” bars.
Select the “Computer” bar and the projector will process and display images
deriving from the computer input (Computer In, D-sub 15 pins).
Select the “DVI” bar and the projector will process and display images
deriving from the DVI (Digital Visual Interface) input.
Select the “Video” bar and the projector will process and display images
deriving from the A/V input.
Select the “S-Video” bar and the projector will process and display images
deriving from the S-Video input.
Select the “YCbCr” bar the projector will process and display images
deriving from the component video input.
Video
Adjusts the hue and the saturation of projected images. In the “Video” box, you
may see the “Sharpness”, “Saturation”, ”Hue” and “Flash Tone” bars.
.
Select the “Sharpness” bar to adjust the sharpness of a displayed image.
Select the “Saturation” bar and the saturation will be darker or lighter by
increasing or decreasing its value.
Select the “Hue” bar and you may adjust the color phase of the projected
image.
Select the “Flash Tone” bar and The adjustment on “Flesh Tone” can be
made according to users’ visual preference.
Save
Save all the revised settings under OSD menu.
36
Keystone
Modifies the shape of projected image if it is a little trapezium-like.
Volume
Selects the volume, which can adjust the volume of the audio output from the
speakers. When entering the “Volume” icon, you will see the “Volume” and “Mute”
in the box.
Volume item can adjust the volume of the audio output from the speakers.
Mute item can mute the volume of the audio output from the speakers.
Projection Mode
Selects the projection mode, which can be front, ceiling, rear and ceiling & rear
projection. When entering the “Projection Mode” icon, you will see the “Front”,
“Ceiling”, “Rear” and “Ceiling+Rear” bars in the box.
Front projection is the common mode and set up as the default before
shipment of the projector.
The image is displayed upside down when you enter “Ceiling” and have it
on. You need to select ceiling projection mode when the projector is fixed
onto the ceiling.
The both sides of the image are displayed contrarily when you enter ”Rear”
and have it on. You need to select rear projection mode when using a
certain transparent screen and appreciating the image on the opposite of
the projector.
The image is displayed upside down and both sides of the image are shown
contrarily when you enter “Ceiling+Rear” and have it on. You need to select
ceiling & rear projection mode when the projector is fixed onto the ceiling,
projecting to a certain transparent screen and you appreciate the image on
the opposite of the projector.
Notice: If you want to change the mode to front projection from ceiling, rear or
ceiling+rear projection, just enter “Front” and have it on.
Mouse
To perform the mouse function with the remote control, you need to enter the
37
“Mouse” icon for the interface of mouse device. In the “Mouse” box, you will see
the “PS2”, “USB” and “MAC” bars.
When the interface of mouse device is PS2, then just select “PS2”.
When the interface of mouse device is USB, then just select “USB”.
If it is the MAC mouse, the Control Cable (for PS2) needs to connect with a
MAC Mouse Cable and then select “MAC”.
Language
The whole OSD menu can be in complicated Chinese, simplified Chinese and
English versions. You may enter the “Language” icon under OSD menu to select
the proper language.
Attention: To turn off the projector, ensure to follow steps described in “How to
operate this projector”. Before it’s power is off, the projector will save the
adjustment value of each function offered by the OSD menu automatically. For
instance, adjustment value of the “Brightness” or “Black Level” function which
derives from the computer input will be saved automatically before the projector is
powered off.
38
MAINTENANCE
This projector only needs simple maintenance.
1.
Keep the lens clean so that the shadow of dust or stains will not appear on
the screen.
2.
Clean the air filter located at the bottom of the projector. If the air filter is
blocked by dust, this will cause bad ventilation. Thus, the life of the projector
will be shortening, and malfunctions will occur due to overheating.
Attention: When cleaning any section of the projector, the power should be
turned off, and the power cord should be unplugged.
Warning: Never open or try to open any covers of the projector except the cover
of the lamp, filter, and lens. When the projector is operated, it emits high voltage of
electricity and heat. Improper operation will cause you severe injury. Except what
is specifically indicated in this manual, never try to do any other maintenance. You
should have qualified service personnel conduct any service maintenance.
39
Cleaning the Lens
Any dirt or stains on the lens surface should be cleaned off immediately with
a piece of soft, dry cloth not made of cotton or velvet material. You may also
clean the projector by wiping gently the lens surface with a soft cloth
moisten with a mixture of water and a neutral detergent.
Cleaning the Projector Case
Unplug the power cord of the projector before cleaning the projector case.
Then, wipe away any dirt or stains with a soft, non-cotton or non-velvet
cloth. If the dirt or stains are not able to be removed, use a cloth moisten
with a mixture of water and a neutral detergent. Do not use any alcohol,
benzene, thinners, or any other chemical detergents. They will cause
damage or overheating to the projector.
Cleaning the Air Filter
The air filter located at the bottom of the projector should be cleaned once
every 100 working days. Without regular cleaning, the projector will be
blocked by dust, and it will cause the projector to overheat due to poor
ventilation.
The Steps of Cleaning the Air Filter
1.
2.
Turn off the power and unplug the power cord.
Stand the projector up with the handle at the top so that easy access
can be made to the air filter.
3.
Take off the filter cover.
4.
A small size vacuum cleaner for computer or office use can be used for
cleaning the filter, or a piece of dry, non-cotton or non-velvet cloth can
be used in the cleaning process.
Attention: If the clogged dirt is difficult to clean away or if the filter is
old, a replacement of a new filter is required. Please contact the
dealer of this projector for this part.
5.
After the filter is cleaned, put it back to the original place, and put the
filter cover on properly making sure the screws are secured.
40
6.
The cleaning process is finished at this moment. Please follow the
proper operations indicated in this manual when using this projector.
Replacing The Projector Lamp
A new lamp should be replaced according to the following conditions:
Replace the lamp when the image displayed by this projector seems
too dark or too dim.
When the Red and Orange Indicator LED of this projector blinks
alternately, this indicates that the lamp life is going to end soon.
When the Red Indicator LED of this projector is lit, it means the lamp
life of this projector has been exhausted.
Please contact the dealer of this projector for purchasing a new lamp.
The Steps of Replacing a Lamp
Warning: Have the lamp cool down before replacing it, or the hot lamp will
burn you severely.
41
Caution: Any invisible greasy residue or perspiration on the hands will
shorten the life of the bulb. Therefore, do not replace the lamp with your
bare hands. Please put clean gloves on your hands or handle the bulb with
a clean cloth during the replacement.
1.
2.
Turn the power of the projector off and unplug the power cord.
Loosen the screws on the lamp cover with a coin or screw driver, take
off the lamp cover.
42
3.
Loosen the screws on the lamp case with a coin or screw driver.
4.
Lift up the handle and pull out the lamp.
5.
Loosen the screws used to position the electricity outlet on the lamp
with a coin or a screw driver.
6.
Gently insert the new lamp and tighten the screws you loosed in step5.
7.
Tighten the lamp case you took off in step 3.
8.
Position the lamp cover you took off in step 2.
9.
Check again whether all the screws have been tighten. This completes
the process of the lamp replacement.
43
TROUBLESHOOTING
The following paragraphs depict problems indicate by the Led Indicator and
provide information on troubleshooting.
General problems with the projector: Read carefully this section when the
projector is not working or when you need to find out what does this Led
Indicator indicate.
Problems with the image displayed: Read carefully this section when the
projector is not able to project images or when the image displayed is of poor
quality.
Attention: When any problem occurs, after checking and reading carefully the
related section in this manual, you may follow the steps depicted in the manual for
troubleshooting. If suggested methods and steps are not able to solve the
problem, please contact the dealer of this projector.
44
Problem With The Projector
If a problem occurs with the projector, check first the Indicators on it. Each
Led Indicator represents the following messages:
Power Led Indicator
Color
Status
Green
Remains Lit
Red
Remains Lit
Red
Blinks
Lamp Led Indicator
Color
Status
Indication Led remains off
Green
Remains Lit
Green
Blinks
Orange/Red Blinks
Alternately
Orange
Blinks
Red
Remains Lit
Red
Blinks
Meaning
The projector system is operating normally.
The projector is over heated, and the Power is off.
The projector has an internal problem(s).
Meaning
The lamp is turned off.
The lamp is turned on.
The projector is warming up.
The life of the lamp will soon end, please prepare
a replacement.
The projector is cooling down.
The life of the lamp has ended, please replace
with a new lamp now.
There is a problem with the lamp or power supply
of the projector.
The following are solutions to some common problems:
When the Power Led Indicator does not light up:
Check whether the power cord is securely connected with the
projector and the electricity socket, or check whether the lamp cover is
positioned and tightened correctly.
When the Projector Lamp does not light up:
The lamp is burned out; please replace it with a new lamp.
The Power Indicator remains red:
The lamp is turned off automatically due to overheating of the
projector. Wait until the lamp is cooled down before turning the
lamp on.
Check the air vents at the back and at the bottom of the
projector. If the filters are clogged from dust, clean the filters as
45
shown in the steps on page 42.
If the projector remains overheated after the filters have been
cleaned, please contact the dealer of this projector to request
service for checking the cooling fan and the internal circuitry.
The Power Indicator is blinking red:
There is a problem with the internal circuitry. Please contact the dealer
of this projector for service.
The Lamp Led Indicator remains red: The life of the lamp has ended,
please replace with a new lamp now.
The Lamp Led Indicator is blinking red: There is a problem with the
lamp or the power supply of the projector. Please contact the dealer of
this projector for service.
Attention: Never try to do any maintenance on the projector that is not
indicated in this manual.
Problems With The Image Or Sound
The following are solutions to problems with the image or sound:
No image appears on the screen:
Check to ensure that the Power Led Indicator and the Lamp Led
Indicator are both green, and that the lens cover is removed from
the lamp of the projector.
Check to ensure that the video source is correctly selected. You
may press the SOURCE button on the Remote Control or on the
operation panel of the projector to select the video source.
Check the type of video output signal your computer is
producing. The video signal from your company may be out of
the response range of the image source.
46
The words ‘No Signal’ appear on the screen:
Check to ensure whether the video signal source is connected to
the projector.
Check whether this video signal source is outputting a signal.
If the projector does not receive any video input signal in 30
minutes, the projector will automatically turn the power off.
The following are solutions when a partial image or the entire
image is blurred or does not focus correctly:
Try to adjust the focus.
Check to ensure that the distance between the projector and the
screen is within a proper range of distance.
To obtain the best effect, adjust the projector so as to parallel the
lens at right angles to the screen. Additionally, the screen itself
should have a level surface.
Try adjusting the Brightness and the Contrast settings available
on the Computer menu and the Video menu, or you may also
adjust the Synchronization and the Tracking settings by adding
Check the lens for dirt or dust. Use the procedure depicted on
page 40 for details on cleaning the lens.
Abnormal Image Coloring
Abnormal image coloring occurs when the color balance is not set up
properly. You may adjust the color according to the following steps:
If a computer image is being displayed, you may adjust the RGB
settings on the COMPUTER menu.
If a video image is being displayed, you may adjust the color
intensity and tint settings on the VIDEO menu.
47
No Sound
Check whether the audio output is in the Mute status. Press the
MUTE button on the operation panel.
Check to ensure that the volume is not turned all the way down.
Check to ensure that the RCA Cable (Audio) is connected
securely to the Audio source and the projector.
Check to ensure that a wrong source has not been selected. If
so, press the SOURCE button on the operation panel or on the
remote control for a right selection.
Unstable Image Displayed by VHS (Video Player)
This is normal due to the input signal from VHS is unstable.
Users are suggested to use S-video or component input instead,
if possible. Check to ensure that an extra length S-video cable is
not being used.
No response with remote control
Check if the battery runs out of power, or replace with new
batteries.
When taking remote control, please be noted if the button on remote control is
pressed. Which can result in continuous release of power and cause great power
consumption.
48
TECHNICAL
SPECIFICATIONS
49
General
Display Type
Size of liquid Crystal panels
Resolution
Image size
Projection distance
Remote control range
Maximum volume
Liquid Crystal Panel
Thin Film Transistor (TFT)
22.9 mm (0.9 inches)
1024 (horizontal) X 768 (vertical) pixels
30 inches~350 inches
1.5 meter~15 meter
7 meter (23 feet )
2 + 2 W stereo
Optical
Aspect ratio
Zoom ratio
4 X 3 (horizontal X vertical)
1:1.3
Projector lamp
Type
Power
50
SHP
200 W
Mechanical (with lens and feet)
Height
Width
Depth
Weight
8.5cm
31.5 cm
24.5 cm
4.0 kg
Electrical
Voltage
Rated frequency
Power consumption
100 V ~ 240 V, AC
50/ 60 Hz
300 W
Environmental
Temperature
Humidity
Operation: 5 ~ 40℃ (41~104℉)
Storage: -40 ~ 65℃ (14 ~ 140℉)
Operation: 20 ~ 80% RH, non-condensing
Storage: 10 ~ 90% RH, non-condensing
51
Supported Monitor Displays
This projector displays images at an XGA resolution (1024 X 768 pixels). To
display a higher resolution (SXGA) at 1280 X 1024 pixels, the projector will
compress the image to 1024 X 768 pixels.
The table below lists the display formats supported by the projector:
Format
PC 98 60
VGA 60
VESA 72/75/85
SVGA 56/60/72/75/85
XGA 60/70/75/85
SXGA 70/75/85
SXGA 60
SXGA 60/75
UXGA 60
MAC 13”
MAC 16”
MAC 19”
MAC 21”
TV (NTSC)
TV (PAL﹐SECAM)
Pixels
640×400
640×480
640×480
800×600
1024×768
1152×864
1280×960
1280×1024
1600×1200
640×480
832×624
1024×768
1152×870
640×480
768×576
Resize Display Window Display
1024×768
1024×768
1024×768
1024×768
1024×768
1024×768
1024×768
1024×768
1024×768
1024×768
1024×768
1024×768
1024×768
1024×768
1024×768
640×400
640×480
640×480
800×600
1024×768
1152×864
1280×960
1280×1024
1600×1200
640×480
832×624
1024×768
1024×768
1024×768
1024×768
The frequencies of some computers may cause the image to be displayed
incorrectly.
52
Support Modes
The following table lists the display modes supported by this projector
Format
PC/AT NECPC400
VGA 60
DOS/V VESA 72
VESA 75
VESA 85
SVGA 56
SVGA 60
SVGA72
SVGA75
SVGA 85
XGA 60
XGA 70
XGA 75
XGA 85
SXGA 70
SXGA 75
SXGA 60
SXGA 75
Mac
MAC 13”
MAC 16”
MAC 19”
MAC 19”
MAC 21”
Video NTSC
PAL
SECAM
Hor Pix
(Pixels)
640
640
640
640
640
800
800
800
800
800
1024
1024
1024
1024
1152
1152
1280
1280
640
832
1024
1024
1152
640
Ver Pix
(Lines)
400
480
480
480
480
600
600
600
600
600
768
768
768
768
864
864
1024
1024
480
624
768
768
870
480
H Freq.
V Freq.
[K Hz ]
[ Hz ]
24.832
56.416
31.469
59.941
37.861
72.809
37.500
75.000
43.269
85.008
31.156
56.250
37.879
60.317
48.077
72.188
46.875
75.000
53.674
85.061
48.363
60.004
56.476
70.069
60,023
75.029
68.678
84.997
63.851
70.012
67.500
75.000
63.981
60.020
79.977
75.025
35.000
66.667
49.107
75.087
60.241
74.927
48.193
59.278
68.682
75.062
Subcarrier frequency
Pix CLK
[ MHz ]
21.050
25.175
31.500
31.500
36.000
36.000
40.000
50.000
49.500
56.250
65.000
75.000
78.750
94.500
94.499
108.000
108.000
135.001
30.240
55.000
80.000
64.000
100.001
3.58
768
576
Subcarrier frequency
4.43
Only the pixels and the modes listed above can be used for the projector
53
Computer In and Monitor Connector Pin Assignments
The connectors of the Computer In are video RGB 15-pin micro D-type
connectors. The pin assignments for both connectors are as below:
Input Pin
1
2
3
4
5
6
7
8
9
10
11
12
13
14
15
Signal
Red Signal Input
Green Signal Input
Blue Signal Input
No function
GND
Red GND
Green GND
Blue GND
No function
Sync GND
No function
SDA
Horizontal Sync input
Vertical sync input
SCL
Some older graphic subsystems and boards may cause problems when they
are used together with DDC monitors.
Avoid compatibility claims for these systems and boards.
Clearly label monitors that are only suitable for DDC compatible graphic
subsystems and boards.
54