1
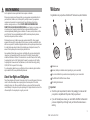
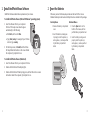
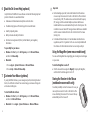
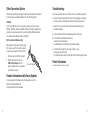
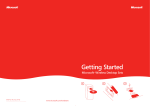
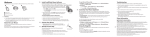
M
M
Getting Started
Microsoft Wireless Mouse Products
®
1
0505 Part No. X11-27312
www.microsoft.com/hardware
2
3
HEALTH WARNING
Use of a keyboard or mouse may be linked to serious injuries or disorders.
When using a computer, as with many activities, you may experience occasional discomfort in
your hands, arms, shoulders, neck, or other parts of your body. However, if you experience
symptoms such as persistent or recurring discomfort, pain, throbbing, aching, tingling,
numbness, burning sensation, or stiffness, DO NOT IGNORE THESE WARNING SIGNS.
PROMPTLY SEE A QUALIFIED HEALTH PROFESSIONAL, even if symptoms occur when you are
not working at your computer. Symptoms like these can be associated with painful and
sometimes permanently disabling injuries or disorders of the nerves, muscles, tendons, or other
parts of the body. These musculoskeletal disorders (MSDs) include carpal tunnel syndrome,
tendonitis, tenosynovitis, and other conditions.
While researchers are not yet able to answer many questions about MSDs, there is general
agreement that many factors may be linked to their occurrence, including: overall health, stress
and how one copes with it, medical and physical conditions, and how a person positions and uses
his or her body during work and other activities (including use of a keyboard or mouse). The
amount of time a person performs an activity may also be a factor.
Some guidelines that may help you work more comfortably with your computer and possibly
reduce your risk of experiencing an MSD can be found in the “Healthy Computing Guide”
installed with this device’s software. If this device did not come with software, see the “Healthy
Computing Guide” section of the “Getting Started” manual. You can also access the “Healthy
Computing Guide” at www.microsoft.com/hardware or (in the United States only) by calling
1 (800) 360-7561 to request a CD at no charge.
If you have questions about how your own lifestyle, activities, or medical or physical condition
may be related to MSDs, see a qualified health professional.
About Your Rights and Obligations
The software included with this product is licensed, not sold. You must either agree to the license
contract in the software Setup screen or promptly return the entire product for a refund,
excluding the return costs. After you install the software, you may consult the license and the
Limited Warranty for the product at any time by looking in the “Legal Information” section of the
software Help files. You may also print a copy for your records.
Welcome
Congratulations on your purchase of a Microsoft® wireless mouse, which includes:
1
2
4
5
3
1
Wireless mouse
2
Receiver (desktop or notebook version, depending on your mouse model)
3
One or more batteries for your wireless mouse, depending on your mouse model
4
CD with Microsoft IntelliPoint mouse software
5
This Getting Started manual
Important
● Check the system requirements (located on the packaging) to make sure that
your system is compatible with the product that you purchased.
● If you don’t already have a mouse, you can install the IntelliPoint software after
you have completed Steps 2 through 5 and your Microsoft wireless mouse is
working.
1
0505 Part No. X11-27312
1
Install IntelliPoint Mouse Software
2
IntelliPoint software enables the unique features of your mouse.
To install IntelliPoint software (Microsoft Windows operating system)
®
1 Insert the software CD into your computer’s
CD drive. If the Setup screen doesn’t appear
automatically, do the following:
● Click Start, and then click Run.
● Type [drive]:setup. For example, if your CD drive
is drive E, type e:setup
2 On the Setup screen, click Install, and then follow
the Setup Wizard instructions on the screen. Restart
the computer, if prompted to do so.
Insert the Batteries
Whenever you insert batteries, always make sure that each of them is new.
Alkaline batteries provide maximum battery life and are included in the package.
Desktop Mouse
1 Remove the battery compartment
cover.
2 Insert the batteries, making sure
to properly orient the positive (+)
and negative (–) ends as specified
by the battery compartment
labels.
Notebook Mouse
1 Press the Open button on the
bottom of the mouse, and then
pull the battery compartment out.
2 Insert the battery, making sure to
properly orient the positive (+)
and negative (–) ends as specified
by the battery compartment
labels.
To install IntelliPoint software (Macintosh)
1 Insert the software CD into your computer’s CD drive.
2 Double-click the Microsoft-Desktop.dmg file.
3 Double-click the Microsoft Desktop.mpkg icon, and then follow the on-screen
instructions. Restart the computer, if prompted to do so.
2
3
3
Position the Wireless Mouse and Receiver
For optimum performance, position the receiver away from any items that might
cause interference, such as computer monitors, large metal objects (including
metal furniture), desktop fans, or fluorescent lights. Make sure that the distance
between the mouse and receiver is within the wireless range specified on the
packaging.
5
Test the Mouse
Try using the mouse. If it doesn’t work as expected, make sure that you completed
the following procedures as specified earlier in these instructions:
● The battery or batteries are new and inserted correctly.
● The receiver is properly connected to the computer.
● The receiver and mouse are properly positioned within their wireless range and
there are no nearby items that might cause interference.
If the mouse is still not working, try changing the wireless connection channel.
Changing the channel is useful if your mouse is experiencing interference.
To change the wireless connection channel
● Press the Connect button on the bottom of the wireless mouse.
If changing the channel doesn’t solve the problem, you may need to reconnect
the mouse to the receiver.
Desktop mouse positioning
4
Notebook mouse positioning
Connect the Receiver to the Computer
To reconnect the mouse to the receiver
1 Make sure that the mouse and receiver are positioned as specified earlier in
this manual.
2 Press the button on the receiver, and then immediately press the Connect
button on the bottom of the mouse. Using the tip of a pen may make it easier
to press smaller buttons.
● Turn on your computer, and then plug the rectangular USB
connector into your computer’s rectangular USB port.
Note If you don’t have an available USB port, see “Other
Connection Options” later in this manual.
USB Connector
4
5
6
Read the On-Screen Help (optional)
Help for Microsoft IntelliPoint mouse software contains the following important
product information in a searchable format:
● Hardware and software feature descriptions and instructions
● Troubleshooting topics and Product Support Services information
● Healthy Computing Guide
● Battery removal and safety information
● End-User License Agreement (EULA), Limited Warranty, and regulatory
information
To open Help for your mouse
● Windows: Click Start, point to All Programs, point to Microsoft Mouse,
and then click Mouse Help.
● Macintosh:
7
Important
● Before boarding any aircraft, remove the batteries from the wireless
mouse or snap the receiver into its slot on the bottom of the notebook
mouse (turning it off). The wireless mouse can transmit radio frequency
(RF) energy, much like a cellular telephone, whenever batteries are
installed and the mouse is activated either by touch or button press. The
notebook mouse can transmit RF energy whenever batteries are installed
and the receiver is detached from its slot on the bottom of the mouse
(turning it on).
● For detailed information about U.S. and Canadian radio interference
regulations, search for “regulations” in the on-screen Help installed with
the software. For information about how to access Help, see Step 6.
Using the Magnifier (some mouse models only)
You can use the Magnifier like a magnifying glass to enlarge text and images
on your screen.
1 Choose Apple > System Preferences > Microsoft Mouse.
To turn the Magnifier on and off
2 Choose Help > Microsoft Mouse Help.
● Click the mouse button assigned to Magnify to display the Magnifier,
and then click the button again to turn it off.
Customize Your Mouse (optional)
By using IntelliPoint software, you can reassign any button, including the wheel
button, to a different command. You can also change your mouse settings, such
as the wheel scrolling rate.
To start IntelliPoint software
● Windows: Click Start, point to All Programs, point to Microsoft Mouse,
and then click Microsoft Mouse.
Storing the Receiver in the Mouse
(notebook mouse models only)
For added portability or when the mouse isn’t in use, you
can snap the receiver into its slot on the bottom of the
mouse. Attaching the receiver to the mouse in this way
automatically turns the mouse off.
● Macintosh: Choose Apple > System Preferences > Microsoft Mouse.
6
7
Other Connection Options
Troubleshooting
USB provides simpler plug-and-play connectivity and enhanced performance.
If you don’t have any available USB ports, try the following options:
If you have a question about your wireless mouse, try the following options:
USB hub
If all of your USB ports are in use, consider purchasing a 4-port or 8-port
USB hub. USB hubs, which are available at office and computer supply stores,
provide an inexpensive solution for connecting multiple USB devices when
your computer has a limited number of USB ports.
PS/2 connection (Windows only)
Although we recommend connecting using
USB, you can use a PS/2 connection option
if your product supports PS/2 connectivity.
● View the on-screen Help, which contains product information and
troubleshooting tips.
● Look in the Readme file for late-breaking product information.
● Go to the Microsoft Hardware Web site at
www.microsoft.com/hardware
for additional product information and software updates.
● See the Product Support Services topics in Help, or go to
http://support.microsoft.com
for information about how to contact Microsoft Product Support Services.
1 Shut down and turn off the computer.
2 Plug the USB connector into the
USB-to-PS/2 adapter, and then
plug the adapter into your computer’s
round PS/2 mouse port.
● Check the system requirements (located on the packaging) to make sure
that your system is compatible with the product that you purchased.
USB-to-PS/2 adapter
Patent Information
For patent information, see on-screen Help.
Product Information and Software Updates
For general product information and software updates, go to the
Microsoft Hardware Web site at
http://www.microsoft.com/hardware
8
9
Important Battery Information
Caution Use and replace only with AA (LR6) Alkaline, Zinc-Carbon, or Zinc-Chloride
Batteries.
General Precautions
● Keep batteries out of reach of children.
● Insert the batteries in the proper direction as indicated by the positive (+) and negative
(-) markings on the battery and battery compartment.
● Do not mix old and new batteries or batteries of different types (for example, carbon
and alkaline batteries).
● Always remove old, weak, or worn-out batteries promptly and recycle or dispose of
them in accordance with Local and National Disposal Regulations.
● If a battery leaks, remove all batteries and recycle or dispose of them in accordance with
the battery manufacturer’s instructions and Local and National Disposal Regulations.
Before inserting new batteries, thoroughly clean the battery compartment with a damp
paper towel, or follow the battery manufacturer’s recommendations for cleanup. If fluid
from the battery comes into contact with skin or clothes, flush skin with water
immediately.
● Remove the batteries if your device is to be stored for an extended period of time
without being used.
Special Precautions
The precautions below are to prevent the sudden release of electrolytes, which these
prohibited actions can cause:
● Do not install the batteries incorrectly. Carefully observe the positive (+) and negative (-)
markings on the battery for proper installation.
● Do not open, puncture, or mutilate the batteries.
● Do not heat batteries.
● Do not use a fire to dispose of batteries.
Released battery electrolyte is corrosive, can cause damage to the eyes and skin, and may
be toxic if swallowed.
10
Regulatory Information
Tested to comply with FCC (U.S. Federal Communications Commission) Standards. For home
or office use. Not intended for use in machinery, medical or industrial applications. Any
changes or modifications not expressly approved by Microsoft could void the user’s
authority to operate this device.
This product is for use with NRTL Listed (UL, CSA, ETL, etc.), and/or IEC/EN 60950 compliant
(CE marked) Information Technology equipment. No serviceable parts included.
This device is rated as a commercial product for operation at +41ºF (+5ºC) to +95ºF
(+35ºC).
Note: For detailed information on U.S. and Canadian radio interference regulations, search
for “regulations” in the on-screen Help files installed with the accompanying software.
This Class B digital apparatus complies with Part 15 of the U.S. Federal Communications
Commission (FCC) rules, Canadian ICES-003 and RSS-210. Operation is subject to the
following two conditions: (1) this device may not cause interference, and (2) this device
must accept any interference received, including interference that may cause undesired
operation.
Cet appareil numérique de la classe B est conforme aux normes NMB-003 et CNR-210 du
Canada. Son fonctionnement est assujetti aux deux conditions suivantes : (1) Cet appareil
ne peut pas provoquer d’interférences nuisibles et (2) cet appareil doit accepter toute
interférence reçue, y compris les interférences pouvant entraîner un fonctionnement non
désiré
Microsoft Corporation; One Microsoft Way; Redmond, WA 98052-6399; U.S.A.
United States: (800) 426-9400 Canada: (800) 933-4750
RF Technical Specifications
RF output power: < 54 dBµV/m at 3 m
Keyboard with two channels – RF frequencies: 27.095MHz (channel 1), 27.195MHz (channel 2)
Keyboard with a single channel – RF frequency: 27.195MHz
Mouse with two channels – RF frequencies: 27.045MHz (channel 1), 27.145MHz (channel 2)
Mouse with a single channel – RF frequency: 27.145MHz
11
Information About Devices That Use LEDs
This product has been evaluated to comply with International
Standard IEC 60825-1:1993/A2:2001
This product uses LEDs that are inherently Class 1.
Class 1 LED product
Product Disposal Information
Dispose of this product in accordance with local and national disposal regulations
(if any), including those governing the recovery and recycling of waste electrical
and electronic equipment (WEEE).
Warning
To protect against risk of fire, bodily injury, electric shock or damage to the equipment:
● Do not immerse any part of this product in water or other liquid.
● Do not spray liquid on this product or allow excess liquid to drip inside.
● Do not use this product if it has sustained any type of damage.
● Disconnect this product or remove its batteries before cleaning.
Information in this document, including URL and other Internet Web site references, is subject to
change without notice. Unless otherwise noted, the example companies, organizations, products,
domain names, e-mail addresses, logos, people, places, and events depicted herein are fictitious,
and no association with any real company, organization, product, domain name, e-mail address,
logo, person, place, or event is intended or should be inferred. Complying with all applicable
copyright laws is the responsibility of the user. Without limiting the rights under copyright, no
part of this document may be reproduced, stored in or introduced into a retrieval system, or
transmitted in any form or by any means (electronic, mechanical, photocopying, recording, or
otherwise), or for any purpose, without the express written permission of Microsoft Corporation.
Microsoft may have patents, patent applications, trademarks, copyrights, or other intellectual
property rights covering subject matter in this document. Except as expressly provided in any
written license agreement from Microsoft, the furnishing of this document does not give you any
license to these patents, trademarks, copyrights, or other intellectual property.
Microsoft Corporation grants the purchaser of this product the right to reproduce one (1) copy of
this user manual for each Hardware Device you purchased in the package.
© 2005 Microsoft Corporation. All rights reserved.
Microsoft and Windows are either registered trademarks or trademarks of Microsoft Corporation in
the United States and/or other countries.
All other trademarks are property of their respective owners
12