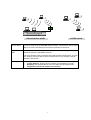
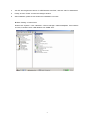
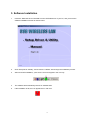
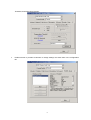
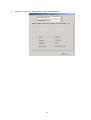
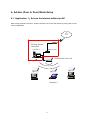
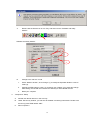
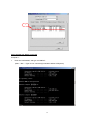
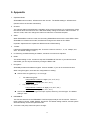
1
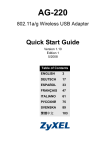
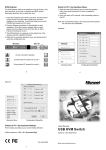
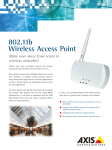
User’s Manual Wireless LAN USB Adapter Model No.: SP907BB Website:http://www.micronet.info Content 1. Introduction.................................................................................................................................... 2 1.1. Package Contents........................................................................................................ 2 1.2. Appearance.................................................................................................................. 2 1.3. System Requirements ................................................................................................. 2 1.4. Environments ............................................................................................................... 2 2. Installation ..................................................................................................................................... 4 3. Software Installation ...................................................................................................................... 6 3.1. 4. 5. Software Utility ............................................................................................................. 7 Ad-Hoc (Peer to Peer) Mode Setup ............................................................................................ 11 4.1. Application 1:Access the Internet without an AP..................................................... 11 4.2. Application 2:Data sharing between computers...................................................... 16 Appendix ..................................................................................................................................... 17 1 1. Introduction Thank you for using Micronet SP907BB. This installation guide will help you install SP907BB and connect to the Internet quick & easy. 1.1. Package Contents 1. Micronet SP907BB Wireless LAN USB Adapter 2. Quick Installation Guide 3. Manual & Driver CD Disc 4. USB cable 1.2. Appearance High performance antenna 90˚ LED Indicator: Green: Connected Blinking: Not connected 1.3. System Requirements 1. Desktop/ Laptop with USB port and CD-ROM driver 2. Operating System: Linux/ Mac OS X/ Windows 98 SE/ME/2000/XP 1.4. Environments There are two application modes for SP907BB, the “Ad-Hoc mode” and the “Infrastructure mode”. (For further explain, please refer to the “WLAN Application Modes” below) Different modes require different settings. Please check the environment first. Infrastructure mode: Via “Access Point” (AP) to connect to the Internet. This mode further gives wireless access to Internet or data sharing under a previously wired environment. Ad-Hoc mode: Connecting to other computer with WLAN card. This mode does not need AP to connect to each other. 2 Ad-Hoc WIRELESS Test o ad L On On Ln i e Batte ry Sm art Repa l ce Boost Batte ry Ba te t ry iMac INFRASTRUCTURE Infrastructure mode Ad-Hoc mode Ad-Hoc Mode Ad-Hoc mode is a Peer-to-Peer mode. Without an AP, computers can also connect to each other by SP907BB. With this mode, computers are able to share data or connect to the Internet if one of them is already connected to. Infrastructure Mode Infrastructure mode including an AP, unlike Ad-Hoc mode, enabling users to best utilizes the frequency bandwidth of the AP. This mode enables users to integrate wired and wireless infrastructures. Through APs, wireless users are able to access wired resources, for example: Internet, database, and printers. Advantages Comparing to Ad-Hoc mode, Infrastructure mode has the following advantages: 9 Longer distance: Through AP, the wireless access distance is longer. 9 Roaming: The wireless devices can move within the AP support area. 9 Integration of wired and wireless environment. 3 2. Installation Note: The screens showed below are from Windows 2000. For other Windows system, the steps are the same, but the screens shown will be a little different. 1. After plugging SP907BB into your PC, it will automatically find and alert a New USB Device. Click “Next” to continue. 2. You’ll see the following screen. Please choose the default item (with “Recommended”) and click “Next”. 3. Please choose “CD ROM”, and insert the “Manual & Driver CD-ROM”, then click “Next”. 4 4. Your PC will recognize the device of “USB Wireless LAN Card”, and click “Next” to install driver. 5. Finally, click the “Finish” to leave this dialogue window. 6. After installation, please check whether the installation is success. ÎStart→Setting→Control Panel Double click “System”→click “Hardware”→Device manager→Network Adapters. If the install is success, it should include “USB Wireless Lan CARD” item. 5 3. Software Installation 1. Insert the “Manual & Driver CD-ROM” into the CD-ROM driver of your PC, and you’ll see the software installation window as shown below. 2. Click “Setup Driver & Utility”, and choose the “default” item through the installation process. 3. After successful installation, you’ll see the new icon appear in the icon tray. 4. The software will automatically search for available APs. 5. If the installation is fail, the icon appeared is in red color. 6 3.1. Software Utility 1. Click the icon and the software utility window shows up. 2. Status window allows you to change Operation Mode, Channel, SSID, Tx Rate, Int Romaing, and Radio. It also shows the connecting signal and quality for you to adjust related infrastructures and configurations. 3. Statistics window: It shows the real time transmitting and receiving status. 4. Site Survey window: Click “Scan” to search all available WLAN devices and their status in 7 current environment. Double click the device you want to connect. 5. Encryption window: SP907BB is able to provide 64/128Bit encryption. 6. Advanced window: It provides you to adjust PREAMBLE, Fragmentation Threshold, RTS/CTS 8 Threshold, and Power Save function. 7. Profiles window: It provides customers to change settings and save them in the configuration file. 9 8. Info window: It shows the latest software version and MAC address. 10 4. Ad-Hoc (Peer to Peer) Mode Setup 4.1. Application 1:Access the Internet without an AP With existing Internet connection, another computer can access the Internet by using Peer to Peer mode of SP907BB. Internet WWW Existing Internet 現有上網環境 connection ADSL/Cable 局端設備 (Adsl / Cable) Ethernet card 1 Computer 1 網路卡一 USB Wireless Lan Card 電腦一 無線網卡 Mac Platform Microsoft Platform Computer 2 11 Linux Platform Setup Steps 1. Check the current environment and install WLAN cards i. Check whether “computer 1” connects to the Internet. ii. Install USB Wireless Lan Card in “computer 1”, and “computer 2”. 2. “Computer 1” Setup i. Click “Start” (1) -> Settings (2) -> Click Network and Dial-up Connections (3) 2 3 1 ii. Under Network and Dial-up Connections, there are two Connection icons; one is the original Ethernet card, another is the new SP907BB. 12 iii. Check the status of the Connection icon. Click the Connection icon, and you can see the device name and status under Network Connections. The name of this WLAN CARD is “USB Wireless LAN Card”, and another one is the original connected device, “Ethernet card 1”. PS: (If you have more than 2 connecting devices, please un-plug the Ethernet line and the disappear Connection icon is the original connected device.) iv. Double click the original connected device, and enter into the following window. Click Properties (1) -> Sharing (2) -> Check “Enable Internet Connection Sharing for this connection” -> OK 2 3 1 v. After finishing, the following window shows up. Please choose “Yes”, and the computer will set your IP address in 192.168.0.1. 13 vi. Double click the WLAN icon in Icon Tray, and enter into the “Software and Utility window”. Software and Utility window: 2 1 3 vii. 3. 4 Change to the “Ad-Hoc” mode 1. Under “Monitor window”, click “Change” (1) to modify the Operation Mode to “Ad-hoc” mode (2). 2. Change the SSID name to “ANY” (3), and then click “Submit” (4) to save this change. After setting, this WLAN card could be the Gateway for other WLAN devices. 3. Reset your computer. “Computer 2” Setup A. Double click the WLAN icon in the Icon tray. B. Under Site survey window, you will see all available connecting instruments. Double click the item (1) with SSID named “ANY”. C. Rest computer 2. 14 1 Check whether the Setup is success Computer 1: 1. Enter into DOS MODE, and type “IPCONFIG”. (Start -> Run -> Type cmd or command) (in Windows 98/me OS System) 15 2. Check whether the IP address is 192.168.0.1, and the Subnet Mask is 255.255.255.0 (as shown above) Computer 2: 1. IP address does not need to setup. The DEFAULT GATEWAY is 192.168.0.1. 2. Please follow the steps of “computer 1” to check whether the IP address is 192.168.0.1 4.2. Application 2:Data sharing between computers When user does not want to have Ethernet line or want to share resources (including data and printers), using WLAN is the lowest cost solution! Computer 2 Computer 1 Computer 1 Setup steps: Check computer 1 & computer 2 already install SP907BB. In computer 1: 1. Double click the WLAN icon in Icon Tray, and enter into the “Software and Utility window”. 2. Under “Monitor window”, click “Change” to modify the Operation Mode to “Ad-hoc” mode. 3. Change the SSID name to “ANY”, and then click “Submit” to save this change. After setting, this SP907BB could be the Gateway for other WLAN devices. Please reset the computer. In computer 2: 1. Double click the WLAN icon in the Icon tray. 2. Under Site survey window, you will see all available connecting instruments. Double click the item with SSID named “ANY”. 3. Reset computer 2. After setting, computers are able to share data and resources with each other. (Data sharing method please refer to related OS system operating manual) Note: If you log in a Domain in computer 1, please DO NOT long in that Domain when using computer 2. However, if you need to use the resources in “computer 1” from “computer 2”, you need to know the password for log in that Domain in “computer 1”. 16 5. Appendix 1. Operation Mode: SP9007BB has two modes, ‘Infrastructure’ and ‘Ad-Hoc’. The default setting is “Infrastructure”. (Please refer to the Product Introduction) 2. Channel: The channel setting should follow the regulation of the local government. For ‘Infrastructure’ mode, the channel does not need to be set. It will automatically change to the same channel as AP’s. In ‘Ad-Hoc’ mode, users can change the channel to match the connected computer. 3. SSID: When SP907BB is in Ad-Hoc mode, all connecting SP907BB should have the same SSID. When SP907BB is in Infrastructure mode, the SSID will change to the same as AP’s SSID. Important: Capital and non-capital are different words in SSID setting. 4. Tx Rate: It determine SP907BB’s transmitting rate. There are 5 rated to choose, 1, 2, 5.5, 11Mbps, and Auto. The default setting is “Auto”. 5. Int. Roaming: Its default setting is ‘Disable’, and does not need to be adjusted. 6. Radio: The default setting is ‘ON’. It means to stop the SP907BB’s RF function. If your WLAN card is embedded, you can stop its function by turning the Radio “ON”. 7. Encryption: SP907BB provides 64/128bits encryption. Choose “disable”, if you do not need this function. When using Encryption, there are two configurations to setting: Choose from encryption key 1~4 to encrypt. 9 For 64bits encryption: Using letters & numbers: 5 digits (“a-z”,”A-Z”,”0-9”) Hexadecimal: 10 digits (“a-f”,”A-F”,”0-9”) 9 For 128bits encryption: Using letters & numbers: 13 digits (“a-z”,”A-Z”,”0-9”) Hexadecimal: 26 digits (“a-f”,”A-F”,”0-9”) Choose the Authentication type from open system, share key, and auto type. The default setting is ‘auto’. 8. PREAMBLE: This function determines the PREAMBLE TYPE that physical layer’s PLCP will use. There are three modes to choose: LONG, SHORT, and AUTO. The default setting is AUTO, and the system will automatically choose the optimized mode. 9. Tx Power Level (mW): Does not open to change. 17 10. Fragmentation Threshold: This configuration determines whether needs to fragment the Frame during transmit. When fragment, if the transmit fell, computer only resent the fail frame instead of the whole file again. When the frequency band used is not clear, i.e. The S/N ratio is low, transmit is easier to fail. Under this situation, fragmentation is a good way to increase efficiency. 11. RTS/CTS: When frame smaller than the RTS Threshold value, the SP907BB will automatically transmit the frame if the channel is available. If the channel is used, SP907BB will follow the 802.11b regulation that would ask the receiving device whether to send the frame. This will take more time for devices to check with each other, but it also prevents the loss of frames. 12. Power Save: Determine whether to use power saving mode. The default setting is ‘Disable’. 18