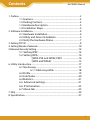
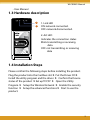
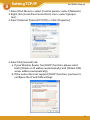
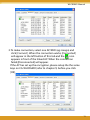
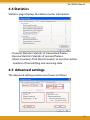
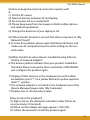
1
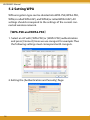
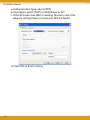
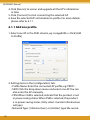
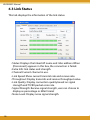
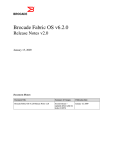
WLCBGMO MISO Wireless Cardbus Adapter User Manual Contents WLCBGMO Manual 1. Preface.............................................................................................................2 1.1 Features....................................................................................2 1.2 Packing Content....................................................................2 1.3 Hardware description..........................................................3 1.4 Installation Steps..................................................................3 2. Software Installation....................................................................................4 2.1 Hardware Installation..........................................................4 2.2 Utility and Driver Installation ..........................................5 2.3 Verify the Hardware Status................................................7 3. Setting TCP/IP..................................................................................................9 4. Setting Wireless Network.........................................................................10 5.Network Security Setting...........................................................................12 5.1 Setting WEP.........................................................................12 5.2 Setting WPA.........................................................................14 《WPA-PSK and WPA2-PSK》...........................14 《WPA and WPA2》..............................................15 6. Utility Introduction....................................................................................17 6.1 Site Survey............................................................................17 6.1.1 Add one profile ...........................................18 6.2 Profile......................................................................................19 6.3 Link Status.............................................................................20 6.4 Statistics.................................................................................21 6.5 Advanced settings............................................................21 6.6 IP Information.....................................................................23 6.7 About tab..............................................................................23 7. FAQ................................................................................................................ 24 8. Specification............................................................................................... 27 1 1 Preface WLCBGMO Manual corega CG-WLCBGMO MISO Wireless Cardbus Adapter, compliance with IEEE802.11b/g standards. Its internal MIMO XR technology can improve transmit frequency and increase signal coverage area six times farther then general 802.11g standard products. Moreover, it supports TX-Burst technology, and can effectivly improve transmit speed. It also spends less power from laptop. In sum, these outstanding features make CG-WLCBGMO a great companion for no Centrino laptop users. 1.1 Features • Compliance with IEEE802.11b/g standard. • Internal MIMO XR technology, improve the wireless coverage area up to 375M. Its coverage area radius is six times farther then general 802.11g standard products.(Environmental factors may adversely affect wireless signal range). • Internal 2 antennas, support TX-Burst technology, effectivly improve transmit speed. • Supports WEP(64/128 bits), WPA, WPA2, and 802.1 network security modes. • Supports roaming function, can automatically search for stronger signal wireless AP. • Laptop friendly cardbus design • Supports power save mode, spending less power. 1.2 Package Content Before installation, please make sure the packing content is completed. If there is something loss please contact your local distributor. - MISO Wireless Cardbus Adapter - CD-ROM 2 WLCBGMO Manual - User Manual 1.3 Hardware description 1 2 1. Link LED ON: network connected. OFF: network disconnected. 2. Act LED Indicates the connection status Blink: transmitting or receiving data OFF: not transmitting or receiving data 1.4 Installation Steps Please confirm the following steps before installing the product. Plug the product into the Cardbus slot Put the Driver CD Install the utility program and the driver Confirm the Device status of the product Set up TCP/IP Open the Utility Program Setup the Wireless Network Enable the security function Setup the advanced functions Start to use the product. 3 2 Software Installation WLCBGMO Manual 2.1 Hardware Installation Please plug corega WLCBGMO into the Cardbus slot of the laptop. After you plug it in, please install the software and driver. When the following pages appear, please click [cancel]. <Windows XP> <Windows 2000> 4 WLCBGMO Manual 2.2 Utility and Driver Installation 1. Put Driver CD into the CD-ROM drive. 2. Please select [English] 3. Click [Install Software] 5 WLCBGMO Manual 4. The [corega Wireless Adapter Setup] page. 5. Click [Continue Anyway]. 6 WLCBGMO Manual 6. Click [Finish] to finish setup. 2.3 Verify the Hardware Status 1. Open [Control Panel]=>Double-click [System]. 2. Select [Hardware] tab=>Click [Device Manager]. 7 WLCBGMO Manual 3. Select and double-click [CG-WLCBGMO]. 4. Verify the device status of CG-WLCBGMO is [This device is working properly]->Click [OK] to close this page. 8 3 Setting TCP/IP WLCBGMO Manual 1. Enter [Start Menu]=>select [Control panel]=>select [Network]. 2. Right-click [Local Area Connections] icon=>select [properties]。 3. Select [Internet Protocol(TCP/IP)]=>Click [Properties]. 4. Select the [General] tab. a. If your Wireless Router has [DHCP] function, please select both [Obtain an IP address automatically] and [Obtain DNS server address automatically]. b. If the router does not support [DHCP] function, you have to configure the IP and DNS settings. 9 4 Setting Wireless Network WLCBGMO Manual User can use corega Wireless Utility to configure wireless network. After finishing configuration, please check if the connection works. Please confirm that user’s computer is in the wireless radio wave range. If the computer is out of the radio range, the setup will not be seccessful. After user installed CG-WLCBGMO and corega Wireless Utility, CG-WLCBGMO will automatically link with the AP/Router. If the connection is successful, the following message will appear . 1. Click the icon in the system tray to open the Utility. If there is no such icon, enter [Start]->click[Program]->select[CGWLCBGMO]->click[corega Wireless Utility] and the icon will appear. 2. The availibale APs are displayed in the [Site Survey] tab. If there is no AP in dialog box, please press [Rescan] . 10 WLCBGMO Manual 3. To make connection, select one AP/SSID (eg:corega) and click [Conncet]. When the connection works, [Connected] will appear in the left button of this tab and the icon appears in front of the linked AP. When the connection failed,[Disconnected] will appear. If the AP has set up the encryption, please setup the the same keys on CG-WLCBGMO (refer to chapter 5) before you click [OK]. 11 5 Network Security Setting WLCBGMO Manual If your AP/Router have setted network security function, your cardbus needs to have the same security setting. The details of network security setting are described below. Please open corega Wireless Utility before you start to setup network security: Double click the icon in the system tray to open the Utility page. If there is no wireless icon, please click [start Menu]->select [Programs]->click [CG-WLCBGMO]->click [corega Wireless Utility], and the wireless icon will appear. 5.1 Setting WEP 1. If your AP has [WEP] authentication(eg:corega ), press [Connect]. 12 WLCBGMO Manual 2. Please follow the instructions: a. [Authentication Type]: indicates the authentication type of the AP/Router. Please confirm the setting of the AP/Router. *[Open]: WEP open system is based on request and grant. It is essentially no authentication. *[Shared]: WEP shared key is based on request, challenge, challenge response, grant/deny. b. Select [WEP] in [Encryption]. c. [Hex]/[ASCII]: It will be auto selected -> Enter AP encryption keys in the box Key1~Key4. d. Select the current AP encryption keys from Key1~Key4. e. Press [OK] to finish setting. 13 WLCBGMO Manual 5.2 Setting WPA WPA encryption type can be divided into WPA-PSK, WPA2-PSK, WPA(or called WPA-EAP), and WPA2(or called WPA2-EAP). All settings should correspond to the settings of the current connected wireless network. 《WPA-PSK and WPA2-PSK》 1. Select an AP with [WPA-PSK] or [WAP2-PSK] authentication and press [Connect]. Here we use corega A for example. Thus the following settings must correspond with corega A. 2. Setting the [Authentication and Security] Page: 14 WLCBGMO Manual a. Authentication Type: Select [WPA-PSK] . b. Encryption: Select [TKIP] or [AES].(Same as AP) c. Enter the password in [WAP Preshared Key] box and click [OK]. 《WPA and WPA2》 1. Select an AP with [WPA] or [WAP2] authentication and press [Connect]. Here we use corega A02 for example. Thus the following settings must correspond with corega A02. 2. Setting the [Authentication and Security] Page: 15 WLCBGMO Manual a. Authentication Type: select [WPA]. b. Encryption: select [TKIP] or [AES](Same as AP) c. If the AP/router has [802.1x Setting] function, click it for advance setting. Please consult your MIS for details. d. Click [OK] to finish setting. 16 6 Utility introduction WLCBGMO Manual Chapter 6 will briefly introduce the sections in the setup utility. 6.1 Site Survey 1. The discription of these sections • SSID : Name of AP (or called ESSID). • BSSID : Mac Address of AP • Signal : Signal strength of AP • Channel : AP used channel • Encryption : what encrypted mechanism does AP used • Authentication : What authentication mechanism does AP used. • Network Type : What Network Type does the AP belong to. Generally it is [infrastruture]. 2. Available WLAN list.The icon means currently connecting. 3. [Connected] means connection ok. [Disconnected] means connection failed. 17 WLCBGMO Manual 4. Click [Rescan] to rescan and upgrade all the AP’s information in time 5. Click [Connect] to start connecting the selected AP. 6. Save the selected AP’s information to profile. For more details, please refer to 6.1.1. 6.1.1 Add one profile 1. Select one AP in the SSID column, eg: corega0205=>Click [Add to Profile] 2. Setting items in the [configuration] tab: • Profile Name: Enter the connected AP profile, eg: PROF1. • SSID: Click the drop-down menu and select one AP. You can also enter the AP manually. • PSM: When CAM is selected, indicats that the product is not in power saving status. When PSM is selected, the product is in power saving status. (Only select it under Infrastructure nettype). • Network Type: [Infrastructure] or [Ad Hoc] type. We recom18 WLCBGMO Manual mend you to select [Infrastructure]. • Transmit power: the amount of power used by a radio transceiver to send the signal out. User can choose power value by sliding the bar. • [RTS Threshold] and [Fragment Threshold] : We recommend you to use the default value. User can adjust threshold numbers by sliding the bars or key in the values directly. 3. Click [OK] and the setted AP will appear in the [Profile] tab. 6.2 Profile • [Add]: Click [Add] to add a new profile. • [Delete]: to delete a profile, select one profile name and click [Delete]. • [Edit]:to edit the setting of a profile, select the profile and click [Edit]. • [Activate]: to activate the selected profile, select the profile and click [Activate]. 19 WLCBGMO Manual 6.3 Link Status This tab displays the information of the link status. • Status: Displays the linked AP name and Mac address. When [Disconnect] appears in this box, the connection is failed. • Extra Info: link status and strength. • Channel:Current channel in use. • Link Speed: Show current transmit rate and receive rate. • Throughout: Display transmits and receive throughput value. • Link Quality: Display connection quality based on signal strength and TX/RX packet error rate. • Signal Strength: Receive signal strength, user can choose to display as percentage or dBm format • Noise Level: Display noise signal strength. 20 WLCBGMO Manual 6.4 Statistics Statistics page displays the detail counter information. • Transmit Statistics: Statistic of transmitted frames . • Receive Statistics: Statistic of received frames. • [Reset Counters]: Click [Reset Counter] to zero the statistic numbers of transmitting and receiving data. 6.5 Advanced settings The advanced setting sections are shown as follows. 21 WLCBGMO Manual • Wireless mode: Select wireless network mode(speed) - 802.11b/g mixed: Automatically detect 11b or 11g - 802.11b only: Frequency only 11b - 802.11g only: Frequency only 11g • 11b/g Protection: In order to keep the connention stable, please select [Auto] to automatically confirm which mode the wireless network is in. • TX Rate: Manually force the Transmit using selected rate. Please accept the default setting. • Tx-Burst: Ralink’s proprietary frame burst mode. When it is checked, transmit throughput will be improved.(Only work when AP support this function. eg: coreag WLBARGMO) - Enable TCP Window Size: Extend the Window size of TCP.(When checked, the recieve speed will improve.) - Fast Roaming at ___ dBm: It will enter romaing mode when dBm reaches a level. • CCX2.0: Open CCX(supports Cisco Compatible Extensions function). Check it when AP supports Cisco. - LEAP turn on CCKM: Open CCKM fuction (Cisco Key Management). - Enable Radio Measurements:Open the function of CCK Monitor AP Channel. - Non-Serving Channel Measurements... : Select and start to moniter if wireless channel is non-serving. • Radio Off: Disable wireless radio wave. • [Apply] : Click this when finish the settings. 22 WLCBGMO Manual 6.6 IP Information The MAC Address and the IP information are displayed in this tab. Click[Release] to release IP address, click [Renew] to renew IP information. 6.7 About The About tab displays the information of the utility version and the driver version. 23 7 FAQ WLCBGMO Manual There are 2 ways for solving your problems if WLCBGMO can’t connect to Internet as below: (1) First, please see following “FAQ” to check your problem. (2) Please go to http://www.corega-asia.com to download the latest driver. (3)Please go to http://www.corega-asia.com, then click “Supports”=>select “Online Customer Support”, => fill in the form, =>click “submit”. We’ll reply you as soon as possible. • Product name: e.g.) WLCBGMO • Firmware version: access the management program to check. • Your ISP service name. • Windows system: e.g.) Windows98/2000/XP and so on. • WEB browser(Version): e.g.) IE5.0/5.5/6.0 and so on. • Network adapter manufacturer and its driver version. • Connection way: fixed IP, dynamic IP or PPPoE dial-up connection. • What are your problem and situation: e.g.) unable to internet. • What is the error message or picture? Q1.What should I do when it’s not able to connect to the Internet? A: Please make sure if the below processes are complete or not. (1) Vertify the product is installed. (2) Vertify the driver and the software are configured. (3) Vertify the network setting is correct. (4) Vertify the security setting is correct. (5) Vertify the ESSID setting of AP router correspond to that of WLCBGMO. (6) Vertify the channel if under Ad-Hoc mode. (7) Vertify the wireless Standard of AP is the same as WLCBGMO. 24 WLCBGMO Manual Q2.How to keep the network connection quality well? A: (1) Put the AP nearer. (2) Remove barriers between AP and laptop. (3) Do not place AP on a metal shelf. (4) Please keep away from microwave, 2.4GHz cordless phone, and medical equipment. (5) Change the direction of your laptop or AP. Q3. What should I do when I can not find other computers in [My Network Places]? A: To solve this problem, please open [My Network Places] and make sure all computers have the same settings in the network name. Q4.What should I do when there is troubleshooting Informationthe of network adapter? A: The below symbols indicates that your product installation has failed. Please remove the driver and utility of WLCBGMO and configure the product again. *Displays [Other devices] in the hardware tree with a black exclamation point “!” on a yellow field and a yellow question mark “?” symbol. *The network adapter is not listed in the hardware tree of the [device Manager] page under [My Computer]. *Displays two or more product name. 【How to solve this problem】: (1) Right-click on the [Network controller] under [Other devices] and select [Uninstall]. (2) When confirm delete message appears,click [OK]. (3) Follow the manual to install the product again. 25 WLCBGMO Manual Q5. What should I do when the network adapter icon appears a [x] symbol in the [Device Manager] page: A: When there is a [x] on the icon, the product is disable. To solve this problem, please follow the instructions below: ■ Windows XP Open [Control Panel]=>Double-click [System]=>Select [Hardware] tab=>Click [Device Manager]=>Right-click [CGWLCBGMO]=>select [enable] Q6. How to get the latest driver and Utility? A: Please go to http://www.corega-asia.com, then click supports=>download =>select “driver” or “Utility”, =>select and click the model which you want to upgrade. 26 8 Secification Compliance Standard LAN Interface Protocol Transmission Method Network Type IEEE802.11, IEEE802.11b, IEEE802.11g Frequency Band/ Channel Transmission Rate IEEE802.11b/g: 2.412GHz~2.472GHz Transmitter Output Power Coverage Area WLCBGMO Manual 32bit CardBus CSMA/CA DS-SS, OFDM Infrastructure/802.11 Ad-Hoc IEEE802.11b: 11/5.5/2/1Mbps IEEE802.11g: 54/48/36/24/18/12/9/6Mbps 18.98dBm@11b, 16.38dBm@11g IEEE802.11b: Indoors 150M, Outdoors 375M(MIMO XR Function Enable Range) IEEE802.11g(@54Mbps): Indoors 30M, Outdoors 40M * Environmental factors may adversely affect wireless signal range Security WEP(64/128 bits), WPA-EAP (802.1x) / WPA2-EAP (802.1x)/WPA-PSK / WPA2-PSK Antenna Type Planar Inverted F Antenna Antenna Gain 3.48dBi Support OS Windows 98SE / ME / 2000 / XP Power Consumption 1.22W Environmental Requirements Operating Temperature: 0˚C~40˚C Humidity: <90% (non-condensing) Storage Temperature: -20˚C~60˚C Humidity: <95% (noncondensing) Physical Specifications Dimension 54(W) x 9(D) x 117(H) mm Weight 50 g (main unit) 27