1
USER GUIDE
VERSION 1.0
Optical ScrollPro Mouse SE
DEAR CUSTOMER:
Congratulations on your decision to purchase the Memorex Optical ScrollPro Mouse SE! Please take time to read the
following instructions carefully. They will help you get full use out of your mouse and keep it working reliably for many
years.
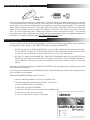
Your Memorex Optical ScrollPro Mouse SE is a USB device that also includes a USB-to-PS/2 adapter for PCs without
a USB port. With its optical design features and 5-button functionality, it combines the latest technology with comfort and style. The use of optics means freedom from regularly cleaning a roller ball and from having to use a mouse
pad, and its 800-dpi precision allows quick, accurate movement. Three of the five buttons are programmable to make
custom navigation through documents and programs quick and easy. Using the supplied software (driver), you can
specify your own scroll and zoom function settings. The fifth button is a scroll wheel that allows you to scroll effortlessly while you're surfing the Internet or working with a text-editing program without resorting to the scrollbar or
arrow keys. The scrolling direction depends on the direction in which the mouse is moved and the way you configure
your mouse buttons. You can also select the usual Window settings such as cursor speed and mouse pointer display
via the CONTROL PANEL and MOUSE PROPERTIES menus. The symmetrical shape makes your mouse perfect for
left-handed people, too. It is IBM compatible and can run on nearly all modern PCs.
GETTING STARTED
Before connecting the optical mouse to your computer, check to be sure your computer has a free USB port
(either USB 1.1 or 2.0) or a PS/2 mouse port. The USB port will be a rectangular socket with a USB logo
next to it; the PS/2 mouse ports are circular sockets and are most often colored a light green. Please
note that USB is only supported properly by Windows 98SE/Me/2000/XP. If your operating system is Windows
95, 98 or NT, you will have to attach the USB-to-PS/2 adapter to the end of the mouse cable to use the mouse
in the PS/2 mouse port. Consult your computer manual or your local computer dealer if the connections are
not immediately obvious to you. Follow the directions below to make the connections to your computer.
CONNECTING
TO THE
USB PORT
You do not need to turn your computer off before connecting the mouse. Insert the plug at the end of the mouse
cable into the USB port without applying force. If the plug does not slide into the port easily, turn the cable end
over and try inserting it again. The plug should slide in easily; please note that it fits only one way. The mouse
will work at this point, but to activate the scroll wheel and the programmable buttons, the supplied software must
be installed. To install the software, follow SOFTWARE INSTALLATION below.
CONNECTING
TO THE
MOUSE PORT
USB to PS/2
Adapter
This connection requires turning your computer off so that the computer recognizes the mouse when it restarts.
Close all programs and turn off the computer. Attach the USB-to-PS/2 adapter to the USB plug at the end of the
mouse cable. If the plug does not slide easily into the adapter, turn the plug over and try again. The plug should
slide in easily; please note that it fits only one way. With the flat edge of the USB-to-PS/2 connector facing the
middle of your computer, connect the green PS/2 adapter into the round PS/2 socket on the rear of your computer. (It is often a light green color). Restart your computer so that it recognizes the mouse. The mouse will
work at this point, but to activate the scroll wheel and the programmable buttons, the supplied software must
be installed. To install the software, follow SOFTWARE INSTALLATION below.
SOFTWARE INSTALLTION
In order to avoid conflicts with previously installed mouse drivers and software, you will first need to delete the
following files by right-clicking on MY COMPUTER and then clicking on PROPERTIES.
• Win 98, Me: select the DEVICE MANAGER tab; look for the MOUSE listing under the devices. Doubleclick on MOUSE, then right-click on the device that is listed. Select REMOVE to delete the driver. If there
is more than one mouse device, remove the drivers for each one in the same manner.
• Win 2000, XP: select the HARDWARE tab. Select DEVICE MANAGER and look for the MOUSE listing.
Double-click on MOUSE, then double-click on the device that is listed. Click the DRIVER tab and then
select UNINSTALL. If there is more than one mouse device, remove the drivers for each one in the same
manner.
Restart your computer by pressing the CONTROL-ALT-DELETE buttons simultaneously. Pressing them a second
time will restart the computer.
Once the previous mouse drivers and software have been deleted and after the computer has sucessfully rebooted, the software can be installed:
Windows 95/98/98SE/Me/2000/XP and NT 3.51/4.0
1. Insert the supplied installation CD into your CD-ROM drive.
2. The software should automatically launch itself. If it does nota. Click the START button on the task bar.
b. Select RUN and click on BROWSER.
c. Select the CD-ROM into which you placed the installation disc.
d. Double-click on the Memorex.exe file.
e. Click on the OK button to launch the program.
3. Follow the on-screen instructions for the installation (be sure to choose the 5-button Mouse selection).
4. After completing the installation, restart your computer.
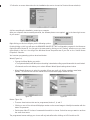
After your computer has successfully rebooted, the software places a new symbol
of your screen
in the lower right corner
Right-clicking on this icon will give you the following options:
Double-clicking on this icon will open the BROWSER MOUSE SETTING configuration program for the Memorex
Optical ScrollPro Mouse SE. You can get to the same area by clicking on the "Setting" selection once you have
right-clicked on the icon. You will get the Windows Mouse Properties area if you click on the "Active Mouse
Properties" Selection.
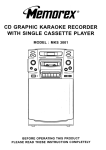
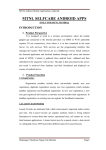
You have two programming options: wheel and button.
Wheel (Figure 1a)
• Choose the Wheel Mode you prefer-o The System default (Intelli-Mouse) mode setting is standard scrolling up and down with the scroll wheel.
o Enhanced scroll mode allows you to select different Wheel Speed settings shown below.
• Wheel Speed allows you to select the number of lines per scroll unit. Higher numbers mean faster
speeds. The second choice shown below will scroll even faster-pages instead of lines.
Figure 1a
Figure 1B
Button (Figure 1b)
• There are three buttons that can be programmed, button 3, 4, and 5.
• Clicking on one of the choices will display a number on the mouse image to identify the number with the
button it represents.
• Each button offers 57 choices of commands from which to choose. Select the ones you want to use from
the scroll down arrow.
The programmed mouse settings you choose will only take effect after clicking on APPLY and then OK.
TECHNICAL SUPPORT
If you have trouble with the installation and the instructions above do not help you to resolve your issue, please
contact Memorex Technical Support at 877-Is it live (toll free) or on-line at www.memorex.com.
When contacting Technical Support, please refer to the MX4600 Memorex Optical ScrollPro Mouse SE.
TECHNICAL
P
RODUCT RS
EGISTRATION
UPPORT
To register your Memorex Optical ScrollPro Mouse SE please visit us on-line at
www.memorex.com
or write to us with your name, address, phone number, model name, model number,
date of purchase and place of purchase at: Memorex Products, Inc., 10100 Pioneer
Blvd., Suite 110, Santa Fe Springs, CA 90670.
TECHNICAL
M
EMOREX PSRODUCT
UPPORT O NE -Y EAR L IMITED WARRANTY
Memorex Products, Inc. ("Memorex") warrants this product, excluding connected equipment, against defects in materials
and workmanship for one year from the date of original purchase. PURCHASER'S REMEDY IS LIMITED TO REPAIR OR
REPLACEMENT OF ANY DEFECTIVE PRODUCT. THIS WARRANTY AND REMEDY IS EXCLUSIVE AND WE SPECIFICALLY DISCLAIM ANY AND ALL OTHER EXPRESS OR IMPLIED WARRANTIES. IN NO EVENT SHALL MEMOREX OR ANY
SUPPLIER OR SELLER BE RESPONSIBLE FOR ANY DIRECT, SPECIAL, INCIDENTAL, CONSEQUENTIAL OR ANY OTHER
DAMAGES OF ANY KIND. For further information regarding warranty service please go to www.memorex.com
TECHNICAL
FCC
NOTICE
SUPPORT
This equipment has been tested and found to comply with the limits for a Class B digital device, pursuant to
Part 15 of the FCC Rules. These limits are designed to provide reasonable protection against harmful interference in a residential installation. This equipment generates, uses and can radiate radio frequency energy and, if
not installed and used in accordance with the instructions may cause harmful interference to radio communications. However, there is no guarantee that interference will not occur in a particular installation. If this equipment does cause harmful interference to radio or television reception, which can be determined by turning the
equipment off and on, the user is encouraged to try to correct the interference by one or more of the following
measures:
•
Reorient or relocate the receiving antenna
•
Increase the separation between the equipment and receiver
•
Connect the equipment into an outlet on a circuit different from that to which the
receiver is connected.
•
Consult the dealer or an experienced radio/TV technician for help.
The Class B digital apparatus meets all requirements of the Canadian Interference-Causing Equipment
Regulation.
Cet appareil numerique de la class B respecte toutes les exigences du Reglement sur le materiel brouilleur du
Canada.
Caution:
Any changes or modifications not expressly approved by the party responsible for compliance could void
the user's authority to operate this equipment. Shielded interface cable, if any, must be used in order to
comply with emission limits.
©2003 Memorex Products, Inc. Santa Fe Springs, CA 90660
5395 6340