1
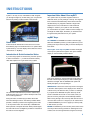
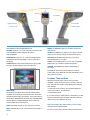
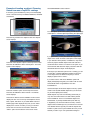
Instruction Manual
mySKY™ PLUS
Your personal guide for sky exploration
INSTRUCTIONS
mySKY is an easy-to-use, multimedia tool that will guide
you through the night sky. It’s like having your own personal
astronomer pointing out the wonders of the universe.
™
Important Note About Your mySKY
Your mySKY uses very sensitive magnetic sensors to
determine where you are pointing it in the sky. The magnetic
lines of force that are detected by these sensors are bent
and distorted by any magnetic materials or large metal
objects such as cars, metal fences or steel reinforced
buildings. In order for your mySKY to work accurately,
you must be about 10 yards or meters from the average car.
The larger the metal object, the farther you should be from
it to get the best performance from your mySKY.
mySKY Keys
Quick Start
Follow the Quick Start Guide on the back cover to insert
the batteries, plug in the earbuds and turn on mySKY. When
mySKY starts up, a screen displays which offers the choice:
“Instructions” or “SkyMap.”
Introduction & Quick Instruction Video
The TRIGGER The TRIGGER is located on the hand grip.
When the TRIGGER is pushed, you tell mySKY that you are
pointing at an object in the sky that you wish to identify and
learn about.
Three Lights on the Top of mySKY: The three small lights
on the top of mySKY are the sights to line up the celestial
object you wish to identify and learn about.
If you are using mySKY for the first time, press the up arrow
to select “Instructions”— you will see a brief introductory
video that explains how to get started using mySKY.
First, line up the light on the front between the two lights on
the back. Then line up the object you wish to identify just
above the front light. Pull the TRIGGER and mySKY will
identify the object you were pointing at.
The instruction video will teach you how to use the keys,
what the trigger is for, how to use the identify function and
how to take a guided tour.
During the video, the three keys just below the screen
have the following functions: The Left Key is BACK. When
pressed, it will take you back to the beginning of the video
or to the previous video. The Center Key is PAUSE/PLAY.
When pressed, it will pause the video. When pressed again,
the video will resume. The Right Key is NEXT. It will advance
the video to the next segment.
ARROW KEYS: Use the four arrow keys shown in the figure
to the left to select options on the display screen. Press one
of the arrow keys to select the item you want. For example,
if you press the UP ARROW, the option at the top of the
screen is selected and so forth. In most cases, when you
press an arrow key, that option is automatically selected.
When moving through a list, use the up and down arrows to
move one item at a time. In a long list you can use the LEFT
or RIGHT ARROW keys to move a page up or down quickly
to find the item you want.
ENTER: The ENTER key is the round key in the center of the
arrow keys. When entering numbers or selecting from a list
of items, first move through the items using the arrow keys.
2
Illuminated Sights
Soft Keys
SD Card Slot
Arrow Keys
Enter
Power ON/OFF
Brightness Control
“Identify” Trigger
Volume Control
Press ENTER to select a highlighted choice.
VOLUME: Press the + or – side of the volume control to get
a comfortable level when using the ear buds or
external speakers.
BRIGHTNESS: Press the + or – side of the brightness key
to brighten or dim both the sights on top of mySKY and
the display.
POWER Button: Press and hold the power to turn mySKY
on. Press and hold it again to turn the mySKY off.
MORE: The MORE key takes you to another screen with
more choices.
OBJECT: The OBJECT key takes you to a series of menus
where you can choose an object to find and learn about.
OPTIONS: The OPTIONS key takes you to a menu of
various settings for your mySKY.
TOURS: The TOURS key takes you to a menu of available
guided tours you can take to explore the night sky.
SKYMAP: The SKYMAP key displays the SkyMap on
the screen.
The labels for the soft keys will change from screen to
screen. Many of the labels are shortcuts that will take you to
other menus or screens.
Location, Time and Date
When the instruction video ends or when you select
“SkyMap”, mySKY needs to know your location, date and
time. The Time and Location screen displays the following
three choices:
Soft Keys
The three keys just below the screen are called soft keys.
The labels on the lower part of the screen show the actions
that will be performed by the soft keys. In the picture above,
the left key is labeled BACK, the center key is labeled MORE
and the right key is labeled SKYMAP. Some of the most
common labels for the soft keys are:
• Accept the current Location, Time and Date displayed.
• Enter new Location, Time and Date
• Demonstration Mode.
If you have used your mySKY before, it remembers your last
location and the internal clock keeps track of the time and
date as long as your batteries are good.
BACK: The BACK key lets you go to the previous screen.
If the current time, date and location is correct, select
the top choice and press ENTER.
NEXT: The NEXT key moves you forward to the next step or
screen.
To enter a new location, time and date, use the arrows to
3
scroll down to the “New Location/Time” line and press
DONE. Next, choose your state or country: Press the UP or
DOWN ARROWS to scroll through the list one line at a time.
Press the right or left arrows to scroll through the list one
page at a time. Once your country or state is highlighted,
press ENTER and the City list displays.
Scroll through the list of cities and choose the city nearest
to your location (the city can be as far away as 100 miles
or 160km). Once your choice is highlighted press ENTER.
Enter the date in the format: mm/dd/20yy. For example, if
you wish to enter March 6, 2008, press the following keys:
0 (zero), ENTER, 3, ENTER (mm)
0, ENTER, 6, ENTER (dd)
0, ENTER, 8, ENTER (20yy)
Press DONE after you have entered the date.
Next enter the time: Enter the hour and minutes, as correct
to the minute as possible, in 12 hour AM/PM format. For
example, if you wish to enter 9:20 p.m. press the
following keys:
0, ENTER, 9, ENTER (hour)
2 ENTER, 0, ENTER (minutes)
0 ENTER, 0, ENTER (seconds)
Identify Mode
mySKY has several modes of operation. The most
important mode is “Identify” – this is the default mode.
mySKY is ready to identify celestial objects, such as
stars, constellations, planets and so forth. The SkyMap
on the screen shows the area of the sky where you are
pointing mySKY. Center an object in the sights and pull the
TRIGGER. mySKY will tell you what the object is.
Important Note: Once you have pressed the TRIGGER, you
no longer need to point mySKY at the object (you can relax
your arm and hold mySKY in a comfortable position to see
the display).
In many cases, an image of the selected object appears on
the screen. Press PLAY (if it is displayed) to see and hear a
multimedia description of the object. Pressing the INFO key
displays text about the object.
Take a Tour
Another mode is “Tour.” When you select the “Tonight’s
Best Tour”, for example, mySKY will guide you to the best
objects in the sky for your time, date and location. When the
first object of the Tour displays, you have several choices.
™
Select PM. If you make a mistake, press the DEL key.
mySKY compensates for Daylight Savings automatically.
When you are finished entering the time, press DONE.
Your location, time and date are now stored in memory
until you change the batteries or they run down. The next
time you turn on mySKY, the Time and Location screen will
display current time and day with your last location as the
first choice. If the information is correct, select the top line
and press DONE.
Select the Demonstration mode if you wish to get
a demonstration of mySKY’s operation during the daytime
or when you are inside.
Sensor Calibration
When mySKY has your time and location, you will be
asked to place mySKY on a stable surface while it adjusts
its sensors. This usually takes about 30 to 45 seconds.
If it takes longer, make sure the mySKY is not setting on
any operating machinery, speaker or other surface that is
moving or vibrating. When the mySKY is done adjusting the
sensors, the sights on the top of the unit will light up and
the screen will display the SkyMap screen. You are now in
the default “Identify” mode and you can immediately begin
identifying night sky objects and use other mySKY features.
If this is an object you wish to learn more about, press the
UP ARROW key for “More”. If you wish to skip this object,
press the NEXT key. If you want to return to the last object,
press the BACK key. If you select “More”, press PLAY for
audio and video presentations or INFO for on-screen text
data about the object. If you wish to skip this object, press
the RIGHT ARROW to choose “Next” and proceed to the
next object on the Tour. If you wish to have mySKY find the
object in the sky for you, press the UP ARROW to
select “GoTo”.
4
How to Locate an Object in the Sky:
When you press “GoTo” on any object screen, the screen
will display a star map and an arrow will appear. Move
mySKY in the direction the arrow is pointing.
The circle will then flash to let you know that you have found
the object and the screen will display the object page.
As you move mySKY closer to the object, the arrow will get
shorter and shorter.
When you get very close to the object, a crosshair will be
displayed at the position of the object on the SkyMap.
Push the soft key labeled PLAY for audio descriptions,
video, and images of the object or INFO for on-screen text
data about the object. To exit a tour: Press the key labeled
END TOUR. If the END TOUR option is not displayed, keep
pressing the BACK key until END TOUR is displayed.
Catalogs of Celestial Objects
Move mySKY slowly to center the crosshair in the circle at
the center of the display.
The sky is full of interesting and mysterious objects, not
just stars and planets. mySKY has a database that contains
over 30,000 celestial objects. Although most of these
objects cannot be seen with the naked eye, mySKY can
still show you where they are and give you images and
information about them. If you select an object from any of
mySKY’s catalogs, mySKY will display a screen like the one
above. If you select “GoTo,” mySKY will display an arrow
on the screen to guide you to the object you have chosen.
mySKY’s catalogs include: stars; double and variable stars;
planets; constellations; galaxies; and nebulas, just to name
a few. These objects are arranged in various catalogs:
Solar System—planets, the Moon, comets, and asteroids
Deep Sky—star clusters, nebulas, galaxies and more
Constellations—all 88 constellations with star maps
Stars—several catalogs of stars
5
Example of locating an object: Choosing
Saturn from one of mySKY’s catalogs
the DOWN ARROW to select “Saturn”.
If necessary, push the BACK key until you see the SkyMap
screen. The three soft keys are labeled OBJECTS, OPTIONS
and TOURS.
For most objects (in this case, Saturn), you will see an image
of the object or a similar object representing the object type.
Press the key just below the “Objects” label. The Objects
screen displays.
Notice the “Solar System” option is at the top of the screen.
Press the UP ARROW to select “Solar System”. The Solar
System screen displays.
If you press PLAY, you may see additional images of the
object on the screen and hear a description of the object
in your earbuds. All the planets, constellations, major stars
and most popular celestial objects have both audio and
visual information. If PLAY is not shown as an option or you
want technical data about the object, press INFO and text
with details about the object will be displayed.
If the object you selected is part of a list or catalog, you can
use the LEFT or RIGHT ARROWS to display the previous
or next object in the list. When the object you want is
displayed, press PLAY or “GoTo.”
If you select “GoTo” with the UP ARROW, mySKY will
display the SkyMap and guide you to Saturn with an arrow
as described earlier. Congratulations! You have
located Saturn!
Notice the “Planets” option is at the top of the screen.
Press the UP ARROW to select “Planets”. The Planets
screen displays.
There are two Planets screens available. The first screen
displays the four most commonly viewed planets: Venus,
Mars, Jupiter, and Saturn. If you select MORE a second
Planets page will be displayed. Any time you see “More”
displayed on a screen, it means you can go to another
screen with more choices or information. Notice the
“Saturn” option is at the bottom of the screen. Press
Use this technique to find other objects in the sky. mySKY
contains over 30,000 celestial objects and you can locate
any of these objects just as easily.
30,000 objects may seem overwhelming at first and you
may never check all of these out. Start with the planets
and constellations. Then move to Messier objects and
Named Stars, or perhaps Variable Stars (stars that vary
in brightness). You will not be able to see many of these
objects without a telescope, but you will become more and
more familiar with the night sky and with the objects that
inhabit it. mySKY can be a personalized astronomy course
that lets you learn at your own speed while having fun.
6
Constellations
If you choose a selection from mySKY’s Constellation list
and then select “Trace,” mySKY will guide you to the major
stars of the chosen constellation, one by one, tracing out its
popular shape on the sky (for example, it will trace out the
“dipper” shape of Ursa Major).
The first star in the constellation will be located when you
select “Trace”. Select “Next” and the second star will be
located. Continue to select “Next” to locate each star in the
constellation.
Other Options
Explore the features of the “Options” menu—you may find
them quite useful while using mySKY. The features include
Night Vision, Connection, Lights, Technical Info
and Auto-Off.
Battery Level
After selecting “Options,” press the DOWN ARROW to
select “Technical Info.” Press the right Soft Key labeled
BATT to select “Battery”. A screen will display showing your
current battery level.
If you notice mySKY acting erratically, it may be time
to change the batteries.
Night Vision Screen Mode
Press the UP ARROW to toggle between Night Vision and
the Full Color Display. When you select Night Vision, the
screen is displayed in red to protect your night vision.
Lights
The Lights menu offers you two submenus: Blink Sights
and Light Balance:
Blink Sights: This option allows you to blink the three sights
on top of mySKY. This will help when you’re lining up with
a celestial object that is dim. Select the Blink Sights option
and then press the LEFT ARROW to enable blinking. Press
the LEFT ARROW again to turn on the lights
without blinking.
Light Balance: Select the Light Balance option and then
press the RIGHT or LEFT ARROW to change the brightness
of the three sights on top of mySKY. Press DONE after you
have set the brightness level. Note that the Brightness key
on the side of mySKY sets the brightness level for both the
sights and the display. The Light Balance option does not
set the brightness level of the display.
Auto Power-Off
mySKY has an auto-power-off control that is set to ON by
default. This control automatically turns off the power if no
movement is detected or no keys are pressed for about 5
7
minutes. This protects your batteries from running down
when you are not using the mySKY. If you wish to change
the auto-off setting, press the Soft Key labeled AUTOOFF. Use the UP and DOWN ARROW keys to select the
mode you want to use. If you turn this feature off, please
remember to turn off the mySKY’s power when you are
finished using it.
Connection
This option allows you to connect the mySKY to a Meade
computerized telescope (cable sold separately). Use the UP
and DOWN ARROWS to toggle between the two selections.
Select DONE after you make your choice. This will allow
you to command your telescope to move to any object
you have selected with mySKY. Your telescope must first
be set up and aligned as usual. Then connect one end of
the cable to mySKY and the other to your telescope. See
the instructions that came in the cable package for details.
When connected, all you need to do is select “Point Scope”
from the Object screen and if the object is above your
horizon, the telescope will move to center the object in the
eyepiece of the telescope.
Updating mySKY software:
1. Install Autostar Suite Astronomer’s Edition software
on your computer. Insert the Autostar Suite DVD into your DVD drive. The installation software should start automatically. Follow the on-screen instructions (be sure your computer has an internet connection).
®
2. Power off mySKY.
3. Remove the SD memory card by moving the rubber
cover on the side of the mySKY and pushing in on the edge of the SD card. The card will pop-out.
4. Insert SD card into a PC SD card reader. If your PC does not have a built-in SD card reader, you will need to obtain
a stand-alone reader (inexpensive and available at most local PC and electronic stores). Connect the SD card reader to a USB port on your computer and insert the
SD card into the card reader.
5. Find the “Update mySKY” icon that was installed on
your computer desktop and double click it. In the
Updater window, click on the drive letter that contains your SD card. Now click on the “Update mySKY SD card” key. The update process will start, the “Update mySKY SD card” key will be grayed out, and the progress bar will begin to fill in. About half way through, you will be
asked to remove the SD card and then re-insert it.
After you have put the SD card back into the reader, click
on OK. Wait until the progress bar is completely filled in
and the “Update mySKY SD card” key is no longer
grayed out before you remove the SD card. Do not
remove the SD card, close the updater program, or
turn off your computer while the SD card is being
updated. In the unlikely event of a computer crash, start this step over.
6. After the software has been updated, reinsert the
SD memory card back into mySKY.
7. Turn on mySKY. That’s it! You now have updated software.
How to Reset mySKY if It Freezes Up
First, press and hold the ON/OFF key.
If that does not work, open the battery compartment and
remove one battery for 15 seconds. Replace the battery.
Press the ON/OFF key again to restart mySKY.
Compatibility:
Microsoft Windows 98se / Me / 2000 / XP/ Vista .
®
®
™
Credits
Meade would like to thank the following people and
institutions for materials used in mySKY.
NASA
NASA/CXC/SAO
STScl
Jack Newton
Jason Ware
Mark Sibole
Steve Hamilton
And many others who have submitted their astrophotos to
Meade over the years.
8
Notes
Notes
MEADE LIMITED WARRANTY
Meade’s mySKY is warranted by Meade Instruments Corporations (“Meade”) to be free of defects in materials and workmanship for a period
of ONE YEAR from the date of original purchase in the U.S.A and Canada. Meade will repair or replace a product, or part thereof, found by Meade
to be defective, provided the defective part is returned to Meade, freight-prepaid, with proof of purchase. This warranty applies to the original
purchaser only and is non-transferable. Meade products purchased outside North America are not included in this warranty, but are covered
under separate warranties issued by Meade international distributors.
RGA Number Required: Prior to the return of any product or part, a Return Goods Authorization (RGA) number must be obtained from Meade by writing,
or calling (800) 626-3233. Each returned part or product must include a written statement detailing the nature of the claimed defect, as well as the
owner’s name, address, and phone number.
This warranty is not valid in cases where the product has been abused or mishandled, where unauthorized repairs have been attempted or performed,
or where depreciation of the product is due to normal wear-and-tear. Meade specifically disclaims special, indirect, or consequential damages or lost
profit which may result from a breach of this warranty. Any implied warranties which cannot be disclaimed are hereby limited to a term of one year
from the date of original retail purchase.
This warranty gives you specific rights. You may have other rights which vary from state to state.
Meade reserves the right to change product specifications or to discontinue products without notice.
© 2008 Meade Instruments Corporation. All rights reserved. Specifications subject to change
without notice. Meade, mySKY, Tonight’s Best, and Autostar are trademarks, or registered trademarks
of Meade Instruments Corporation in the United States and other countries. Microsoft, Windows, and
Vista are trademarks, or registered trademarks of Microsoft Corporation in the United States and/or
other countries. Images depicted on this package may not be representative of the images seen or
captured through this product. 40-08019.
Step
1
Quick Start Guide
%0
For technical support, please call: (800) 626-3233
Install Batteries
,25""%2#/6%2/&&
-(%!$3%4*!#+).3%24
$3%40,5')&53).'
$%2%-/6%2%$#/6%2
Slide door forward
and flip open.
34%0
05,,25""%2#/6%2/&&
&2/-(%!$3%4*!#+).3%24
(%!$3%40,5')&53).'
).3)$%2%-/6%2%$#/6%2
Step
2
Connect Headphones
Open rubber cover.
Plug headphone jack
into headphone port.
34%0
452./."902%33).'0/7%2"544/.
Step
3
Step
4
Power On
Choose Instructions or SkyMap
Choose Instructions
to view introduction
video or SkyMap
to start exploring.
PRESS
Press power button
to power on.
14-4540-20