1
1
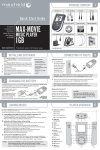
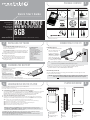
PACKAGE CONTENT
MAX P-X PHOTO 6GB
CARRYING STRAP
RUBBER CASE
POWER ADAPTOR
DRIVER/MANUAL CD-ROM
QUICK START GUIDE
Quick Start Guide
For detailed
instructions and
descriptions
please refer to the
User's Manual
on CD-ROM
www.maxfield.de
MAX P-X PHOTO
1'' Mini-HDD
Quick Start Guide
WMA·MP3·JPG-PLAYER
6GB
USER'S MANUAL
BEDIENUNGSANLEITUNG
MAX P-X PHOTO
DRIVER/TREIBER
FIRMWARE
WMA·MP3·JPG-PLAYER
6GB
MAX
P-X PHOTO
WMA·MP3·JPEG-PLAYER
STEREO EARPHONES
LINE-IN CABLE
USB CABLE
Sennheiser MX 400 Micro Headphones
® Maxfield GmbH · Kaistraße 2 · 40221 Düsseldorf · Germany
Additionally: Guarantee Card
2 INSTALLING SOFTWARE
– Users of Windows Me/2000/XP or Mac OS X do not need
to install any driver, as the operating system automatically recognizes
the player as a "Removable Disk".
– Users of Windows 98/98SE have to install the driver (provided on the
bundled CD) onto the computer before connecting the player to the PC.
1 Inserting the MAX P-X PHOTO installation CD-ROM to the CD-ROM drive
will display an installation screen.
2 Follow the on-screen instructions. –
Choose the options that match the operating system of your PC.
3 If the instructions do not pop up after a few moments, run the
Windows Explorer and double click the CD-ROM drive start the
menu program manually.
NO NEED TO INSTALL DRIVER
FOR WIN ME / 2000 / XP AND MAC OS X
Powered by VARTA
4
CONNECTING TO THE PC
System Requirements
– IBM compatible
– Intel Pentium (or higher)
based with USB port support
– Memory: 64 MB of RAM or above
– OS: Windows 98/98SE/Me/
2000/XP or MAC OS X
– Hard Disk: 100 MB minimum
free space
– USB port
– for using DRM 10:
Windows XP and
Windows Media Player 10
Connecting to the PC
1 Connect the MAX P-X PHOTO via USB
cable to the USB terminal of a PC.
It will turn on automatically.
According to the USB setting
("DRM-Audio" or "USB Disc"),
a respective Removable Disk is
created in "My Computer": HDD
USB Device "Portable Media Player"
(in case Media Player 10 is installed).
USB
port
USB
port
USB
connection cable
Note: Users of Windows 98/98SE have to install the driver (provided on the bundled CD-ROM) onto the
computer before connecting the MAX P-X PHOTO HD-Music-Player to the PC.
3 CHARGING THE BATTERY
The internal Li-Ion battery can be charged
via power adaptor (see figure) .
The charging status is shown by the
power adaptor
battery symbol in the top right corner
of the display.
Make sure that the battery is
fully charged before first use.
Mains supply
DC jack
When charging for the first time the
battery should remain connected to the power supply for 8 hours.
In further charging processes, 1.5 hours will do for charging 80 % of the battery, and 2.5 hours for a full battery charge.
2 Now, you can copy and load files or even complete folders from the hard drive, and paste them into the
Removable Disk, respectively synchronize them with the Windows Media® Player 10.
(For further information see No. 5 "LOADING MUSIC ON THE PLAYER".)
Disconnecting from the PC
If you are using Windows Me/2000/XP, click "Unplug or Remove Hardware" on the bottom right of the monitor
to stop the connection before removing.
CAUTION ! Disconnecting the MAX P-X PHOTO from the PC during file transfer will damage the player.
Please do n o t disconnect the MAX P-X PHOTO before the data transfer is complete.
5 LOADING MUSIC ON THE PLAYER
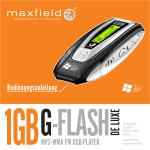
PLAYER OVERVIEW
First connect the MAX P-X PHOTO Player to the PC by using the included USB cable.
The display will display the connection status.
There are two methods to transfer your songs onto your player depending on your preferences and the kind of music codec.
1
1 Loading DRM protected WMA audio tracks with Windows Media® Player 10
For the transfer of WMA-DRM files to the player, the device must be set into "DRM Music" mode via "Setup > USB" before
being connected to the PC. – Start the Windows Media® Player, and select the music library to manage your songs.
In Windows Media® Player 10 choose the function "Sync". For further advice please refer to the Windows
Media® Player FAQs regarding Microsoft® Windows Media® DRM (Digital Rights Management).
9
10 11 12
2 Copying files with Windows Explorer via Drag and Drop
The player can be used as a mobile data storage device. Just use the Copy, Paste, Delete and etc. commands of your
operating system such as Windows or Mac OS X. Before, the player must be set into "USB Disc" mode via "Setup> USB".
Step 1 Select the music you want to download to the player by clicking on the file/folder icon.
(If you want to choose more than one music file/folder, press and hold the Ctrl or Shift key when clicking.)
Step 2 Right-click on the file(s)/folder(s) – a menu appears. Click Copy.
Step 3 Double-click on the Removable Disk to open the drive. The Removable Disk window appears.
Step 4 Right-click on the Removable Disk window and click Paste in the menu.
Step 5 The files/folders are now copied into the player memory.
2
3
4
5
6
Please note: If you want to load WMA-DRM files from music download services to your device, you have to
use the Microsoft® Windows Media® Player 10. – Otherwise, you would lose your acquired rights to play
these songs, and your player would n o t be able to play them.
CAUTION: Disconnecting the MAX P-X PHOTO from the PC during data transfer will damage the player!
Before disconnecting the player, please make sure that the transfer is complete.
If you are using Windows Me, 2000 or XP, please follow the "Safely Remove" instructions to disconnect the player.
Use the "Unplug or Eject hardware" icon located in the toolbar.
7
8
1
2
3
4
MULTIFUNCTION key
MODE|EQ key
HOLD|STOP|EXIT key
VOLUME +/– key
5
6
7
8
Microphone
USB port
DC jack
Reset hole
9
10
11
12
Line-In
Earphones
REC|A-B LOOP key
Display
6
7 STARTING TO PLAY
8
DISPLAY
Disconnect the player from the PC.
Function
· Power On/Off
· Select
Mode / Menu
Key
MULTIFUNCTION
MULTIFUNCTION
Operation
– Press and hold the MULTIFUNCTION key for about two seconds to switch the player on or off.
– Click up/down the screen to choose a mode/menu (selecting status).
The following modes are available: Audio / Photo / Movie / Record / Radio / Setup.
– Confirm/set the desired mode by pressing the MULTIFUNCTION key.
HOLD|STOP|EXIT – Return to previous screen by pressing the HOLD|STOP|EXIT key.
– Exit current option by pressing the HOLD|STOP|EXIT key.
MULTIFUNCTION – In the main menu press the MULTIFUNCTION key to choose Audio, Photo, Movie, or Radio.
· Play Audio /
– In either menu click the MULTIFUNCTION key up/down to choose, where applicable, the
Photo / Movie
desired folder and then the file to be played.
– Play/pause the chosen file by pressing the MULTIFUNCTION key.
– Fast-Forward/Rewind within a music track by pushing and holding the MULTIFUNCTION key
up/down.
– Set radio station (Preset list opens up) by pressing the MULTIFUNCTION key (Radio mode).
· Set FM station
VOLUME +/–
– Increase respectively decrease volume by pressing the VOLUME key (playing status).
· Adjust Volume
REC|A-B LOOP
– Press and hold the REC|A-B LOOP key for about two seconds to record. Recording can be
· Record
and
done in the following modes: Audio / Photo / Movie / Record / Setup.
HOLD|STOP|EXIT You have to preselect recording source "Microphone" or "Line-In" in the Record menu.
– To stop recording, press the HOLD|STOP|EXIT key.
– Press the REC|A-B LOOP key shortly while playing to start/stop A-B Loop.
· Start/stop A-B Loop
MODE|EQ
– Press and hold the MODE|EQ key to enter Audio settings during playback.
· Set Play Mode/
and
– Select and confirm Play Mode and EQ with the MULTIFUNCTION key.
EQ (equalizer)
MULTIFUNCTION – In Radio mode press the MODE|EQ key to turn into either Manual Search, Auto Search,
· Play Radio
or Preset mode.
– In any of these Radio modes – Manual Search or Auto Search or Preset – click the MULTIFUNCTION key up/down to tune into an FM radio station.
– Press MODE|EQ key (Audio/Photo/Record mode) to remove/add tracks from/to playlist.
· Delete/add
– Select and confirm with MULTIFUNCTION key.
playlist content
HOLD|STOP|EXIT – Press shortly the HOLD|STOP|EXIT key to stop audio playback.
· Stop audio play
– Press and keep pressing the HOLD|STOP|EXIT key to activate Hold function (all keys are
· Lock/release keys
locked) and redo to cancel the key lock again.
(hold function)
RESET hole
– To reset the player, push a thin metal pin (e.g. needle or end of paper-clip) into the RESET hole.
· Reset
Playing Status
* Playback Style * Playback Style
Foldername
Playlist
Filename
Artist
Artist
Title
Title
Album
** Play Mode
EQ
Locked Status
Battery Status
** Play Mode
Greatest Hits
Normal
We are the Champions.mp3
Repeat
Queen
Repeat One
We are the champions
Repeat All
Genre
Shuffle
01:30 / 03:15
Folder/File
Playing Progress Bar
Shuffle All
LISTENING TO FM-RADIO 10
In the Main Menu select and enter Radio mode by using the MULTIFUNCTION key.
Automatic tuning
Press the MODE/EQ key to enter 'Auto Search' mode.
Push the MULTIFUNCTION key up or down to run automatic radio scan. When tuned into a station,
the scan stops. Now you have the options to listen, to save the station, or to continue searching.
Manual tuning
Press the MODE/EQ key to enter 'Manual Search' mode.
Push the MULTIFUNCTION key up or down to manually scan the frequency range step by step, until
tuning into a radio station.
9 RECORDING
Save a radio station
You can either record through the built-in microphone or via Line-In from an external device.
. 1 Recording voice
a. Before you start recording, face the built-in
microphone towards the sound source.
b. Press the REC key to start recording.
– Please preselect "Microphone" as
recording source in the Record menu.
– The recorded file will be created under
"Folder/File" in the folder "Record".
c. Pressing the STOP/EXIT key will stop recording
and pressing the REC key again will start a new
recording as a new file.
REC
key
When tuned into a desired station in either 'Auto Search' or 'Manual Search' mode:
Press the MULTIFUNCTION key to enter the list of preset stations.
Push the MULTIFUNCTION key up or down
to select one of the numbers P01 - P30.
Press the MULTIFUNCTION key to set and
save the station with the selected number.
Preset tuning
Press the MODE/EQ key to enter 'Preset' mode.
Push the MULTIFUNCTION key up or down to
tune into a preset radio station. The respective
preset number is indicated.
2 Recording from an external device
a. Connect the Line-In cable to the Line-In terminals
of both the external device and the player.
b. Start playing the external device and press the
REC key to start recording.
– Please preselect "Line In" as
recording source in the Record menu.
– The recorded file will be created under
"Folder/File" in the folder "Record".
c. Pressing the STOP/EXIT key will stop recording and
pressing the REC key again will start a new recording as a new file.
11 MENU SETTINGS
Please refer to manual on CD-ROM for detailed descriptions.
TAKING PRECAUTIONS
!
Taking care of the player
·
·
·
·
·
·
·
·
·
·
·
Keep the product and all its parts and accessories out of the reach of small children.
Do not use or store the player in dusty or dirty environments as this may damage the components.
This product is not waterproof or water resistant. Keep the player away from water.
Keep the player away from heat, humidity, and magnetic interferences.
Do not try to alter or remodel the product as all warranties will otherwise be void.
Normal vibration will not affect the operation of this product, but dropping or excessive shock may cause damage.
Do not leave the unit exposed to direct sunlight for long periods of time, and do not leave it close to a heat source.
Do not clean the player with abrasive chemicals that may harm the surface such as thinners, benzene or alcohol.
Do not apply heavy force to the Display, as it may cause breakage or abnormal display functions.
Do not leave the unit exposed to direct sunlight for a long period of time.
Avoid keeping the unit in places with high humidity, strong magnetic fields, or near high-heat sources.
MENU STRUCTURE
Audio
Photo
Movie
Record
Radio
Setup
Play All
Playlist
Artist
Title
Album
Genre
Folder / File
Play Mode
EQ
License
Show All
Playlist
Folder / File
Show Style
folders and files
Folder/File
Line In
Microphone
tune in
Audio
Photo
Radio
USB
Back Light
Sleep Timer
Language
Setup Reset
Info
Formatting your Player
You can format the internal micro drive of the MAX P-X PHOTO
Player via your PC in USB:"USB" mode with file system FAT 32
(Windows: "My Computer", right mouse-click, "Format" /
Mac: "Disk Utility").
Normal|Repeat One|Repeat|Repeat All|Shuffle|Shuffle All
Normal|DDB|Classic|Rock|Jazz|Pop
WARNING! – Take special care
when formatting because all
data will be erased and cannot be restored.
Upgrading the Firmware
You can upgrade the built-in programs (firmware) if necessary.
Updates on: www.maxfield.de – Support – Downloads – Music-Player 1 GB/above – MAX P-X PHOTO
Show by Keys|Autoshow (5s)|Autoshow (10s)|Autoshow (15s)
Manual Search / Auto Search / Preset
Play Mode Normal|Repeat One|Repeat|Repeat All|Shuffle|Shuffle All
EQ
Normal|DDB|Classic|Rock|Jazz|Pop
Show Style Show by Keys|Autoshow (5s)|Autoshow (10s)|Autoshow (15s)
US|EU|CN
USB Disc|DRM Audio
10 S|20 S|40 S|60 S
Disable|10 Mins|20 Mins|30 Mins|60 Mins
English|Chinese Simp|German
firmware and memory
To download the firmware update provided on our website please do the following:
· Unpack the ZIP file into a folder. (In case you don't use the Windows specific program for unpacking,
please make sure that the directory structure in the ZIP file remains as it is.)
· Save the firmware upgrade file(s) into the SYSTEM directory of the player.
· Disconnect the player from the PC. The Player will update firmware automatically now, maybe afterwards you
have to turn on the player again.
Taking care of your sense of hearing
Please be aware of the fact that using earphones at a high volume for an extended time might cause hearing damage!
Please backup your files!
IMPORTANT! – Maxfield GmbH will not be liable for the loss of data caused by damaged products or
damaged respectively unreadable memories or drives.