1
\-,
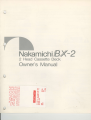
Nakamichi
IBX-2
2 Head CassetteDeck
Owner'sManual
1;riii:i;l
l-! g
< F
f'E
;;iiiii;;i
HgF
;ii;iir;;i Hile
ii;;i5iii Efsgg
z
o
l
i
x +
o
d
o : ;
3.f g.f sFL
9
st
F ' d do t S
Congratulations!
You have chosen a very fine cassette deck.
The NakamichiBX-2 was developedon the basis of this company'sextensive
experiencewith high-gradecassettedecks. While incorporatingmuch of Nakamichi's
superiortechnologyand followingits sound policy,this basic modeldelivershigh
overallcharacteristicsand representsan extraordinaryvalue at a moderateprice.
Pleasetake the time to readthis manualin its entiretyto fully acquaintyourselfwith
this cassette deck.
Thank you.
NakamichiCorporation.
I
A
A
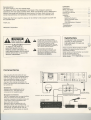
CAUTION-
RISK
O FE L E I T R I T
I
5HIItK. DOTIOTOPEN
TO REDUCETHE RISKOF
ELECTRICSHOCK,DO NOT
REMOVECOVER(OR BACK).NO
PARTSINSIDE.
USER-SERVICEABLE
TO QUALIFIED
REFERSERVICING
SERVICEPERSONNEL.
The lightningflash with arrowhead
symbol,within an equilateraltriangle,is
intendedto alert the user of the oresence
"dangerousvoltage"
of uninsulated
within the product'senclosure;that may
be of sufficientmagnitudeto constitutea
risk of electricshock to oersons.
The exclamationooint within an
equilateraltriangleis intendedto alert
the user of the presence of important
operatingand maintenance(servicing)
instructions,in the literature
accompanying the appliance.
CONTENTS
z
Connections
e
Safety Instructions.. . .
.
Tapes
On Cassette
Controlsand Features
......... ..'
Precautions.
. . . . . . . . . . .. 5
Operation
......... 5
Playback
Matchingthe Deck to
........ 5
V a r i o u sC a s s e t t eT a p e s ..
........ 6
Recording
T i m e rR e c o r d i nogr P l a y b a c k. ... . . . . . . . . . 6
........ 7
Maintenance.
....... 7
T r o u b l e s h o o t i.n. .S. . .
....... I
Specifications.
WARNING
TO PREVENTFIREOR SHOCK
HAZARD,DO NOT EXPOSE
THISAPPLIANCETO RAINOR
MOISTURE.
Pleaserecord the Model Numberand Serial
Numberin the space providedbelow and
retain these numbers.
Model Numberand Serial Numberare located
on the rear panel of the unit.
Model Number:NakamichiBX-2
SeriafNumber:@
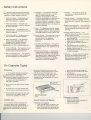
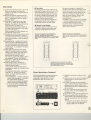
Connections
After consultingthe instructionsfor your
amplifieror receiver,use the shieldedcables
with RCA plugs (providedwith the deck) to
make connectionsas shown in the chart.
Take care not to mix up left and right
channels.While making connections,the
power to the deck and to the amplifiershould
be switched off.
J
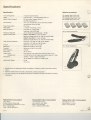
Headphones
Standardstereo headphoneswith an
impedanceof 8- 150 ohms may be
connectedto the headphonejack.
Microphone Connections
The BX-2 possessesonly line input facilities.
When microohonesare to be used for
recording,a separatemicrophonemixer with
a line output must be connectedto this
deck's line input terminals.
Nakamichioffers the ootional MX-100
MicrophoneMixer,which providesthree
inputs for left, right and center blend (L+R)
microphones.To power the MX-1O0,the
separatePS-100 PowerSupply is required.
2
to AC wall outlet or
amplifier's AC outlet
to amplifier's
"Rec Out" terminals (L,
"Tape Play"terminals(L, R)
to amplilier's
SafetyInstructions
r following safety instructions have been
\r6luded in compliance with safety standard
regulations.Please read them carefully.
1. Read Instructions - All the safety and
operating instructions should be read
before the appliance is operated.
2. Retain instructions - The safety and
operating instructions should be retained
lor future reference.
3. Heed Warnings - All warnings on the
appliance and in the operating instructions
should be adhered.
4. Follow lnstructions - All operating and
use instructions should be followed.
5. Water and Moisture - The appliance
should not be used near water - for
. example,near a bathtub,washbowl,
kitchen sink, laundry tub, in a wet
,
or near a swimming pool, etc.
arbasement,
6. Carts and Stands - The appliance should
be used only with a cart or stand that is
recommendedby the manufacturer.
7. Wall or Ceiling Mounting - The appliance
should be mountedto a wall or ceilingonly
as recommendedby the manufacturer.
8. Ventilation- The appliance should be
situated so that its location or position
does not interfere with its proper
ventilation.For example,the appliance
should not be situated on a bed, sofa, rug
or similar surface that may block the
ventilationopenings; or placed in a built-in
installation,such as a bookcase or cabinet
that may impede the flow of air through the
ventilationopenings.
9. Heat - The appliance should be situated
away from heat sources such as radiators,
heat registers,stoves,or other appliances
(includingamplifiers)which produce heat.
1O.PowerSources - The appliance should be
connected to a power supply only of the
type described in the operating
instructionsor as marked on the
appliance.
1 l.Grounding or Polarization- Precautions
should be taken so that the grounding or
polarizationmeans of an appliance is not
defeatdd.
12.Power-Cord Protection - Power-supply
cords should be routed so that they are
not likely to be walked on or pinched by
items placed upon or against them, paying
particular attention to cords at plugs,
conveniencereceptacles,and the point
where they exit from the appliance.
l3.Cleaning- The applianceshould be
cleaned only as recommendedby the
manufacturer.
'1
4.Nonuse Periods - The power cord of the
applianceshould be unplugged from the
outlet when left unused for a long period of
time.
1S.Objectand Liquid Entry - Care should be
taken so that objects do not fall and liquids
are not spilled into the enclosure through
openings.
16.DamageRequiringService- The
appliance should be serviced by qualified
service personnel when:
A. The power-supply cord or the plug has
been damaged; or,
B. Objects have fallen, or liquid has been
spilledinto the appliance;or,
C. The appliance has been exposed to
rain; or,
D. The appliance does not appear to
operate normally or exhibits a marked
change in performance;or,
E. The appliance has been dropped,or the
enclosure damaged
lT.Servicing- The user'shouldnot attempt
to service the appliance beyond that
described in the operating instruction.All
other servicing should be referred to
qualified service personnel.
On CassetteTapes
Precautions
1. C-120 cassettes(playingtime one hour
per side) contain extremelythin tape
which
breaks or snarls easily,is
1,
Vsometimes subject to stretchingand also
is of low sensitivity.Therefore,C-120
cassettes are not recommendedfor
high{idelity recording.
corner as you face the side. Use a small
screwdriver,and push the tab down to break
it off. Do not leavethe brokentab in the
recess. lf you wish at a later date to record
over a side for which the tab has been
removed,cover the tab openingwith a piece
of adhesive tape.
label of the desired side facing you.
Gently push the cassette holder back
into the panel.
For protection of the tape and tape
transport, do not press the eject button
in any mode other than the stop mode.
Break off this tab to
protect Side A or 1
trom accidental erasure
2. Do not pull out the tape from the cassette
housing.
3. Be careful not to turn the cassettereels
with the fingers,causing tape slackening.
4. Store cassette tapes away from heat, high
humidity,dust, and magneticfields such
as caused by speakers, TV sets etc.
Cassette Tabs
You can protect valuablerecordingsfrom
accidentalerasureand re-recordingby
completelyremovingthe appropriatetab on
/ r top edge of the cassette. The tab for
.io" is locatedon the top left-hand
pn
Break off this tab to protect
Side B or 2 from accidental
erasure.
Cassette
Insertion and Removal
(1)lnsertion of a Gassette
1. When the eject button is pushed in the
stop mode,the cassette holder opens.
2. Insert the cassetteinto the holder with
the exposed tape facing down and the
(2)Removal of a Cassette
1. Press the stop switch.
2. When the eject button is pushed,the
cassette holder opens.
3. Removethe cassette.
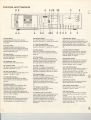
ControlsandFeatures
(1) Eiect Button
By depressingthis button,the cassette
holder is openedfor insertionand removalof
a cassette.
(2) Power Switch
Pressingthis switch activatesthe deck.
Depressingit once more switches the power
off. When the power is switched on, the stop
switch indicator lights up.
(3) Timer Switch
This switch permits unattendedrecordingor
automaticplaybackin conjunctionwith an
odernal audio timer.
(4) Headphone Jack
Accepts standardstereophoneplug.
(5) Cassette Holder
The cover can be easily removedfor routine
cleaningof heads s1s.(*p. 7)
(6) Peak LeYe! Meters
Provideexact indicationof peak levelsin the
rangeof -30 dB to *5 dB.
(7) Dolby NR lndicators
When the Dolby B-Type NR or the Dolby
C-Type NR is used,the respectiveindicator
lights up.
(8) Memory Switch
When this switch is set to "MemoryStop",
the tape is stoppedfrom rewind or
fast-forward at the "0000" tape counter
indication.When the switch is set to
"Memory Play" and the tape is rewoundor
fast-forwarded, playback automatically starts
from the "OOOO"
indicAtion.
(9) Rec Mute Switch
By depressingthis switch during recording,
the input signal can be temporarilycut off.
Duringoperation,the indicatorlights up.
(1O) Rewind Switch
For rapid tape winding in the reverse
direction,press the << section of the switch.
(1 1) Fast-Forward Switch
For rapid tape winding in the forward
direction,press the >> section of the switch.
(1 2) Stop Switch
When the D section is pressed,the tape
motioncomesto a full stop and the indicator
lights up.
(13) Play Switch
Pressthe > section of the switch to start
playback.When the switch is pressedin the
recording-standbymode,recordingstarts.
Duringoperation,the indicatorlights up.
(14) Pause Switch
Pressthe EE section of the switch for
short-terminterruptionof recordingor
playback.The indicatorlights up. To resume
recordingor playback,press the play switch.
(15) Record Switch
Pressthe O section of the switch for
recording.This deck possessesa one-touch
recording-standbyfeature.By simply
pressingthe record switch from the stop
mode,the recording-standbymode is
entered.Duringoperation,the indicatorlights
&
uo.
(16) Output Level Control
Adjuststhe line output level and the
headphoneslisteninglevel.
(17) Master lnput Level Control
Used to adjust the input (record)level for the
left and right channelsimultaneously.
The
level balancebetweenboth channelsin
recordingis adjustedwith the balance
control.The master inout level control can
also be used to fade in or fade out a
recording.
(18) MPX Filter Switch
Used to cut the 19-kHz multiplexcarrier
signal,which could cause misoperationof the
Dolby NR system when recordingfrom FM
stereo broadcasts. When recording from
other sources,this switch should be set to J
off.
(19) Tape Selector Switches
Dependingon the tape used for recording,
the appropriatepositionmust be selected.
Referto "Matchingthe Deck to Various
Cassette Tapes" on page 5.
(2O) Equalizer Switch
Dependingon the tape used for recordingor
playback,the appropriateposition must be
selected.Reler to "Matchingthe Deck to
Various Cassette Tapes" on page 5.
(21) Dolby NR Switches
Used to select the noise reductionsystem,if
desired:either the Dolby B-TypeNR for a
in mid- and high1o-dB improvement
frequencyS/N ratio or the Dolby G-Type NR
for a 20-dB improvement.lf a Dolby NR
system is used,the respectiveDolby NR
il
indicatorlights up.
V
(22) Balance Control
Servesto adjust the level balancebetween
left and right channel in recording.
(23) Gounter Reset Switch
By pressingthis switch, the tape counter
indicationis reset to "0000".
(24) Tape Counter
Can be used to index sectionson the tape
and to check the tape's positionat a given
moment.
Startingfrom the "0000" indication,count is
carried out up to "9999" in the record,
playbackand fastJorward modes ("plus
count") and down to "-999" in the rewind
mode("minuscount").
a
Precautions
1) After the power to the deck is switched
on, the tape control buttons are
Inoperativefor appr.4 seconds,until all
circuits have becomestable.
the timer switch to Off, and the power
switch to On. The button is now operative
and the tape can be removed.
(2) After timer recordingor timer playback is
completed,the eject button may not be
operative.To eject the tape in such a
case, do not press the button forcibly.Set
(3) Voltage Selector
AC voltage is factory-set for the country in
which you purchasedyour BX-2. The voltage
selector permits re-settingof mains voltage
in case the deck is to be used in a different
lPlaybackl
(5) Adjust the desiredvolumewith the output
level control.
(6) When the tape end is reached,the
auto-shutoffmechanismautomatically
stops the tape transport. lf you want to
removethe tape during playback,first
press the E section of the stop switch.
For temporaryinterruptionof playback,
press the EE section of the pause
switch.To resumeplayback,press the
play switch again.
o The logic-controlledtransportof this
deck permitsgoing from any transport
mode into any other (i.e.from play to
rewind,from rewindto fast-forward,
etc.) without using the stop switch.
. During playbackthe peak level meters
display the level recordedon the tape.
Readingsare not affectedby turning
the output level control.
(1) Confirmthat the timer switch is set to Off.
- Switch on the power and insert the
jassette to be played into the cassette
\zholder.
(2) Set the equalizerswitch to the
appropriatepositionfor the tape in use.
(3) lf the tape to be played back was
recorded with Dolby C-Type noise
reduction,press the "C" switch of the
Dolby NR switches.lf the tape was
recorded with Dolby B-Type noise
reduction,press the "B" switch. The
respectiveDolby NR indicatorlights up.
lf the tape to be played back was not
recordedwith Dolby noise reduction,
press the "Off" switch.
(4) Pressthe > section of the play switch.
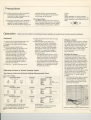
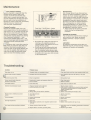
lMatchingthe Deck to VariousGassetteTapesl
Tape Selector Switch and Eq Switch Settings (Recommended Tapes)
:)U120 pS Position
Nakamichi
Nakamichi
TDK
MaxeII
Fuji
AMPEX
Tape
-EEX
IL
SX
IL
zx
I SX,/TO&S Position
Tape Selector Switch
_T,^6
Eq Switch
q6t6^+^r_
Eq(rrsec)
I t A I L
EX
SX
ZX
ape Selector
EX
.
120V
@ m @
220_24OV1
Gheckonce morewhetherall connectionsbetweenamplifierand cassettedeck havebeenproperlyestabtished.
OpefatiOn
I
counlry.
Note:
Safety regulationsin certain countries
prohibitinclusionof a voltageselector.This
feature,therefore,may be absent from your
deck.
_
.uSX
l
-Ezx
This cassettedeck will achievebest
results with NakamichiZX, SX and
a EX trcassette tapes. Thereforethe use of
.lttnese tapes wheneverpossibleis
I
.EL
70
EX
EX II
AD,AD-X
UD, UD-XLI,XL-IS
FR-l
GM-I
I Memory Switch
By setting the memoryswitch to "Memory
Play",playbackautomaticallystarts from
the "00O0" tape counter point when the
tape is rewoundor fast-torwarded.By
setting the switch to "MemoryStop",tape
motionduring rewind or fast-forward
automaticallystops when the "0000"
point is reached.
I Dolby NR System
This deck incorporatesboth the Dolby
B-Type and the Dolby C-Type noise
reductionsystems,which can be freely
selected.The Dolby B-Type NR provides
approximately1OdB of noise reductionin
the high frequencies.The DolbyC-Type
NR achieves a S/N ratio improvementof
appr.2OdB in the range from 2 kHz to 8
kHz,where noise is most readilyaudible.
For playbackof a tape which was
recordedwith Dolby B-TypeNR,the Dolby
NR "B" switch has to be pressed.For
playback of a tape recorded with Dolby
C-Type NR,the "C" switch must be
presseo.
. The Dolby NR system does not reduce
any noise alreadycontainedin the
source signal.You should therefore
use recordingsources which are as
noise-freeas oossible.
Brand Name
Nakamichi
SX
TDK
SA-X
Maxell
UD-XU, XL-[S
FR-ll
Fuji
AMPEX
GM-II
Nakamichi
TDK
ilaxell
Fuji
AMPEX
ZX
MA,MA-R
MX
FR-Metal
MPT
recommended.
lf other tapes are used,it is desirable
to choosetapes from this list.
Ff*ncy
(Hz)
Frequency Responseand Noise Spectrum Analysis
lRecordingl
(1) Confirmthat the timer switch is set to Off.
Switch on the power and insert the
cassetteto be used for recordinginto the
cassette holder.
(2) Set the tape selector switches and the
equalizerswitch accordingto the tape in
use. (* "Matchingthe Deck to Various
Cassette Tapes")
(3) lf the Dolby C-Type NR is to be used,
press the "C" switch of the Dolby NR
switches.lf the Dolby B-Type NR is to be
"8" switch. The
used,press the
respectiveDolby NR indicatorlights up.
lf no Dolby noise reductionis to be used,
press the "Off" switch.
When recordingfrom FM broadcasts,set
the MPX filter switch to On.
(4) Pressingthe counter reset switch to bring
"0000" is
the tape counter indicationto
convenientto easily re-locatethe starting
point of the recordingor use the Memory
Play feature.
(5) By pressingthe O section of the record
switch, the deck automaticallygoes into
the recording-standby(Rec/Pause)mode.
The red O indicatorin the record switch
and the green 0E indicatorin the pause
switch light up.
(6) While watchingthe peak level meters,
adjust the recordinglevel by gradually
sliding up the master input level control
and adjustingthe left/right channel
balancewith the balancecontrol.
For hints on proper level settings,refer to
"Record LevelSetting".
the paragraph
(7) When the > section of the play switch is
pressed,recordingstarts.
(8) When the tape end is reached,the
auto-shutoffmechanismautomatically
stops the tape transport.
lf you want to removethe tape during
recording,first press the tr section of the
stop switch.
For temporaryinterruptionof recording,
press the !! section of the pause
switch. To resume recording,press the
play switch again.
. By pressingthe > section of the play
switch while keepingthe O section of
the record switch depressed,
recordingcan be started immediately
without enteringthe standby mode.
. lf the record switch is pressedafter
the play switch, the recordingmode
cannot be entered.
I Rec Mute
By pressingthe Rec Mute switch during
recording,the tape continuesto run in the
record mode,but the input signal is cut
off and the indicatorlights for as long as
the switch is being kept depressed.This
can be used to insert blank spaces on a
tape, etc. The line output and the
headphoneoutput are not mutedduring
this operation,so that it is possibleto
continuouslymonitorthe input signal.
I Record Level Setting
This deck's LED level metersare free of
"overshoot"problemsand display peak
levelswith a high degreeof accuracy.
(LH)positiontape formulations,
"Chrome"positiontape fotmulations:
Adjustrecordlevelsso thatthe + 3 dB indication
onthe highestsignal
lightsup onlyoccasionally
oeaks.
r_
I
*dB _-.l
P€k
Level
l r
I r_
r- - I
I
r l
_r I
*dB _-l
Peak Level
r_ q
- _t
l
r
! - e- - l
r
r
I
I
l
I
l
Li- -!_i
IJ
_!-.-!LI
"Metal" position tape formulations:
Adjust record levelsso that the + 5 dB indication
lights up only occasionallyon the highestsignal
oeaks.
_
I
I
l
|
t
I
| ' - "- - *; l|
l e
I l-
For good recordings,it is essentialto
maintaina high signal-to-noiseratio. lf the
record level is set too low tape hiss will
impairthe playbacksound quality.On the
other hand,setting the record leveltoo
high will cause distortion.Referto the
chart below as a guidelineto set
recordinglevels.
The Dolby C-Type NR system incorporated
in this deck possessesadvancedcircuitry
to preventdistortioneven at high
saturationlevels.Thereforerecording
levelscan be set in the same wav as
without noise reduction.
l-
I t - ". -- :! |
I:I
rl lr
-r
trlr
^^ I
lt-4-t
l!
^^ I
tr-
l l
lr-
ll !r - . - !I |I
-
n -l
c-
- !-r
I I
- rI
I
I
ll !r - , . -I ! |I
I
I
I
I
-r I
l r - w - r" I
l ! - ^ - !|
lI !r - * -a! II
L
L
l '
d
B
J
I
dB --l
As dilferenttape tormulationshave slightly
different overload (headroom)characteristicq
the requirements may vary to a certain degree
when using ditferenttapes.
[Timer Recording or Playback]
This deck incorporatesa timer-startfeature,
which enablesyou to make unattended
recordingsor start playbackat a preselectedtime with the use of a timer.
(1) Establishconnectionsas shown in the
chart.
(2) Insert the tape to be used for recordingorplaybackand turn on the power to all
components.
(3) For timer recording,set the recording
level to suit the expectedsignal.For timer
playback,set the output control to the
desired level.Check if all componentsare
set up properly.
(4) For timer recording,set this deck's timer
"Rec". For timer playback,set
switch to
"Play".
the switch to
(5) Set the timer to the desiredoperationtime.
(6) At the pre-selectedtime,the timer will
supply power to the components,and the
deck will automaticallystart recordingor
playing.
. Be sure to set the deck's timer switch
to "Off", when the timer recordingor
playbackfeature is not desired.
I
Maintenance
'
d and Transport Cleaning
very importantto regularilyclean the
\/
surfaces of the heads as well as the
capstan,pinchrollerand all other parts
which come in contact with the tape.Tiny
particlessheddedfrom the tape onto these
oarts,as well as dust accumulationsetc.
becomethe cause of drop-outs,and severely
degradefrequencyresponseand
wow-andJlutter characteristics.
Gleaning Procedure
Removethe cassette holder cover. Use
cotton{ipped sticks or the like (availablein
audio stores,etc.) to carefullyand with very
light pressure clean the parts indicatedin
white on the illustration.In cases of severe
contamination,dip the cotton tip in cleaning
fluid. Cleaningis facilitatedif - after
removingthe cassetteholder cover - the
cover is closed again and the pause switch
depressed,thereby raisingthe head
---embly.
b pressure roller is very dirty, press the
lry switch and clean the roller while it is
turning.At this time, be careful that the
cotton tip does not get caught betweenthe
roller and the capstan.After cleaningthe
roller,put the deck into the pause mode
again and clean the revolvingcapstan.
Erase Head
TapeGuide
Rec/PB Head
CaDstan
TapeGuide PressureRoller
Be careful not to apply too much force in
cleaningas the respectiveparts are
critically aligned.Takespecial care not to
damagethe tape guides.
Do not use too much cleaningfluid and
give the cleanedsurfacessome time to
dry off completelybefore playinga tape.
When you have used cotton-tippedsticks,
be careful not to leaveany cotton strands
on the cleanedparts.
Demagnetizing
After a longer period of use,there can be a
build-upof residualmagnetismin heads and
capstan,etc. Such residualmagnetismcan
inducenoiseand impairthe high frequencies
during playback.To preventthis, you should
demagnetizethese parts about once every
50 hours of use with the optional Nakamichi
DM-10 Demagnetizeror another properly
designeddemagnetizer.For details on the
demagnetizingprocedure,please consult the
demagnetizer'sinstructionmanual.
. Always switch off the power to the deck
before startingthe demagnetizing
orocedure.
Gleaning the Faceplate
This unit shouldbe cleanedonly by wipingit
with a soft, dry cloth. Never use alcohol,
solvents,ammoniaor abrasivecleaning
agents.
Lubrication
All importantmovingparts of this deck are
fitted with long-life,oil-less bearings.Periodic
lubricationis thereforenot necessarv.
Troubleshooting
Condition
Probable Cause
Taoe dose not run.
'1.Presseiect button and then close cassetteholderfirmly
qecord mode cannot be enteJed.
2. Cassette tabs have been removed.
2. Placeadhesivetape over tab openingor use new
cassette.
EX cessive playback hiss.
3. Head is magnetized.
3. Demagnetize head.
Uneven sound levels, drop-outs,
excessive wow/flutter.
4. Heads and/or capstan and pressure roller dirty.
5. Faulty cassette.
4. Cleanthese oarts.
5. Reolace cassetle.
Incomplete erasure.
6. Erase head dtry.
6. Clean head and oressureroller
Distorted record/playback sound.
7. Programmaterialitsell is distorted.
8. Recordinglevels are too high.
I
\z
Remedy
'1.
Cassetteholder not comoletelvlocked.
9. Head dirty.
lO. Wrong setting of tape selectorswitches.
7. Check programmaterial.
8. Wide dynamic range permitssome short-termoverload,
but excessiverecordinglevelswill cause distortion.
Adjust recordinglevels.
9. Clean head.
'lO.Select correct setting for the tape in use.
Record mode is entered, but cannot
recoro.
| 1. Input disconnected.
12. Head dirty.
11. Check connections.
12. Clean head.
Cannot playback
13. Outputdisconnected.
14. Headdirty.
13. Check connections.
14. Clean head.
Dull high lrequencies
15. Head dirty.
16. Tape selectorswitches and/or equalizerswitch not set
correclly.
1 5. Clean head.
16. Select correct positions for tape in use.
Hum heard during recordingor playback.
17. Strong inductionfields near deck.
17. Keep deck away from amplifier,transformers,fluorescenl
lamos.etc.
18. Replacesignal cables.
18. Signal cable or connectorgroundinglaulty
Specifications
Specifications
TrackConfiguration..
Heads..
Motors (TapeTransport)
Power Source.
P o w e rC o n s u m p t i o n . . .
Tape Speed.
Wow-and-Flutter.....
FrequencyResponse
Signal-to-Noise
Ratio
Total HarmonicDistortion.
Erasure
Separation
Crosstalk
B i a sF r e q u e n c y . . . . .
Input (Line)
Output(Line).
(Headphones)
Dimensions
A p p r o x i m a tW
e e i g h t.
Optional Accessories
.......4tracks/2-channelstereo
.....2 (eraseheadx 1, record/playback
headx 1)
... . DC servo motor (capstandrive) x 1
DC motor (reel drive) x 1
.. . 1O0,'12O,12O/22O-24O,22O
or 24OYAC; 50/60H2
(Accordingto country of sale)
......23 W max.
1-718 ips. (4.8 cm/sec.) io.S%
. . . . . . . L e s st h a n 0 . 1 ' t %W T D P e a k
ZX Gassette Tape C-60, C-9O
SX Cassette Tape C-60, C-90
EX II Cassette Tape C-60, C-9O
EX Gassette Tape C-60, C-90
Less than 0.06"/0WTD RMS
.......2O HZ-20,OO0
Hz (recordinglevel -2O dB)
....... Dolby C-Type NR on <70ps, ZX tape>
Better than 68dB (400 Hz, 3% THD, IHF A-WTD RMS)
Dolby B-Type NR on (70ps, ZX tape>
DM-1O Head Demagnetizer
Better than 62dB (400 Hz, 3% THD, IHF A-WTD RMS)
. . Less than 1.O%(400 Hz, 0 dB, ZX, EX II tape)
Less than 1.2"/o@OOHz, 0 dB, SX tape)
.. . . . Better than 60 dB (100 Hz, 0 dB)
.. Better than 36 dB (1 kHz, 0 dB)
... Betterthan 60 dB (1 kHz,0 dB)
SP-7 Stereo Headphones
. . . . . . 10 5 k H z
.50 mV 30 kO
....... O.sV(400 Hz,0 dB, outputlevelcontrolat max.)2.2 kO
.. . ... .2.2 mW (400 Hz, O dB, output level control at max.)8 O load
.490(W x 110(H)x 2s0(D)miilimeters
16-15/16(W)x 4-5116(H)x 9-7l8(D)inches
.......5.5 kg
12lb.2 oz
a
a
Specificationsand appearancedesign are subject to changefor further improvementwithout
notice.
Dolby NR under license from Dolby LaboratoriesLicensingCorporation.
The word "DOLBY" and the Double-D-Symbol
are trademarksof Dolby LaboratoriesLicensing
Corporation.
NakamichiCorporation
NakamichiU.SA.Corporatio
n
NakamichiU.SA.Corporation
Tokyo Office
ShinjukuDaiichiSeimeiBldg.
2-7-1 Nishishiniuku,Shiniuku-ku,Tokyo
Phone: (03)342-21461
f elex'. 2324721(NAKAM J)
1101ColoradoAvenue
Santa Monica.Calif. 904O1
Phone: (213)451-5901
Telex : 652429(NAKREISNM )
220 WestburyAvenue
C a r l eP l a c e N
, . Y .1 1 5 1 4
Phone: (516)333-5440
\J
0D041007
G8209308
Printedi n
I
Japan