1
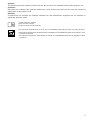
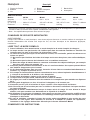
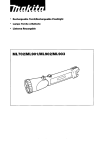
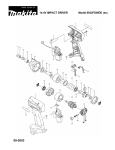
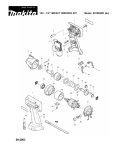
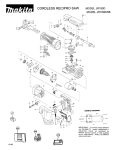
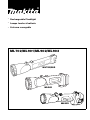
• Rechargeable Flashlight
• Lampe torche à batterie
• Linterna recargable
ML702/ML901/ML902/ML903
ML702/902
ML901
ML903
1
2
1
2
1
2
3
1
2
3
4
8
5
6
7
7
2
8
Symbols
The following show the symbols used for the tool. Be sure that you understand their meaning before use.
Symboles
Nous donnons ci-dessous les symboles utilisés pour l’outil. Assurez-vous que vous en avez bien compris la
signification avant d’utiliser l’outil.
Símbolos
A continuación se muestran los símbolos utilizados con esta herramienta. Asegúrese de que entiende su
significado antes de usarla.
[ Read instruction manual.
[ Lire le mode d’emploi.
[ Lea el manual de instrucciones.
[ Do not touch the bulb which is hot in use or immediately after putting ou light. You may get burnt.
[ Ne touchez pas l’ampoule chaude pendant l’utilisation ou immédiatement après l’avoir éteinte. Vous
pourriez vous brûler.
[ No toque la bombilla que esté caliente de usarla ni inmediatamente después de apagarla. Podría
quemarse.
3
ENGLISH
1
2
3
Explanation of general view
4
5
6
Set plate
Battery cartridge
Screw
Ring
Bulb holder
Reflector
7
8
Shoulder strap
Switch
SPECIFICATIONS
Model
ML702
Bulb ......................... 7.2 V 0.55 A
Dimensions
(L x W x H) ............. 283 x 67 x 71 mm
ML901
9.6 V 0.5 A
ML902
9.6 V 0.5 A
ML903
9.6 V 0.5 A
254 x 67 x 96 mm
325 x 67 x 71 mm
254 x 77 x 98 mm
(11-1/8’’ x 2-5/8’’ x 2-13/16’’) (10’’ x 2-5/8’’ x 3-3/4’’)
Net weight ............... 0.22 kg (0.49 lbs)
0.23 kg (0.51 lbs)
(12-13/16’’ x 2-5/8’’ x 2-13/16’’)(10’’ x 3’’ x 3-7/8’’)
0.25 kg (0.55 lbs)
0.23 kg (0.51 lbs)
• Due to our continuing program of research and development, the specifications herein are subject to change
without notice.
• Note: Specifications may differ from country to country.
IMPORTANT SAFETY INSTRUCTIONS
WARNING:
When using electric tools, basic safety precautions should always be followed to reduce the risk of fire, electric
shock, and personal injury, including the following:
READ ALL INSTRUCTIONS.
1. Read this instruction manual and the charger instruction manual carefully before use.
2. This flashlight is not water-proof. Do not use it in damp or wet locations. Do not expose it to rain or
snow. Do not wash it in water.
3. A short-circuit can cause a large current flow, overheating, possible burns and even a breakdown.
(1) Do not touch the inside of the flashlight head with tweezers, metal tools, etc.
(2) Do not touch the battery terminals with any conductive material.
(3) Avoid storing the battery cartridge in a container with any metal objects such as nails, coins, etc.
4. Never expose the battery cartridge to flames, fire or great heat. Breakage may cause release of
injurious material.
5. If electrolyte gets into your eyes, rinse them out with clear water and seek medical attention right
away. It may result in loss of your eyesight.
6. If operating time has become excessively shorter, stop operating immediately. It may result in a risk
of overheating, possible burns and even an explosion.
7. Be careful not to drop, shake or strike battery.
8. When the tool is not in use, always switch off and remove the battery cartridge from the tool.
9. Do not store the tool and battery cartridge in locations where the temperature may reach or exceed
50°C (122°F).
10. Do not give the tool a shock by dropping, striking, etc.
11. Do not expose the light to eyes continuously. It may hurt them.
12. Do not cover or clog the lit tool with cloth or carton, etc. It may create a risk of fire.
13. Switch off the light immediately when the lamp gets dark in use. If you leave the lamp switched on,
the battery cartridge capacity may decrease.
14. Do not disassemble the charger or battery cartridge; take it to a qualified serviceman when service
or repair is required. Incorrect reassembly may result in a risk of electric shock or fire.
15. If any problem develops, consult your nearest Makita Service Center or dealer. To maintain product
safety and reliability, repairs, maintenance or adjustment should be carried out by Makita
Authorized Service Center.
SAVE THESE INSTRUCTIONS.
4
For USA only
Recycling the Battery
The only way to dispose of a Makita battery is to recycle it. The law
prohibits any other method of disposal.
To recycle the battery:
1. Remove the battery from the tool.
2. a). Take the battery to your nearest Makita Factory Service Center
or
b). Take the battery to your nearest Makita Authorized Service Center or Distributor that has been
designated as a Makita battery recycling location.
• Call your nearest Makita Service Center or Distributor to determine the location that provides Makita
battery recycling. See your local Yellow Pages under ‘‘Tools-Electric’’.
Ni-Cd
OPERATING INSTRUCTIONS
Charging
For ML702 (Fig. 1), ML902 (Fig. 1) and ML901 (Fig. 2)
Charge the battery cartridge with the Makita charger before use. To remove the battery cartridge, pull out the set plate
on the torch/flashlight and grasp both sides of the cartridge while withdrawing it from the torch/flashlight. After charging,
insert the battery cartridge into the torch/flashlight and snap the set plate back into place.
For ML903 (Fig. 3)
Charge the battery cartridge with the Makita charger before use. To remove the battery cartridge, withdraw it from the
torch/flashlight while pressing the buttons on both sides of the cartridge. After charging, insert the battery cartridge into
the torch/flashlight all the way until it locks in place with a little click.
NOTE:
Battery cartridge 9100, 9102, 9100A and 9102A can be used on ML903 if you install the set plate. Install the set plate
on ML903 with the screw provided as shown in Fig. 4.
The following tables indicate the charging time and operating time on a single charge.
ML702
Voltage
7.2 V
Battery cartridge
Operating time
7000
Approx. 140 min.
7002
Approx. 210 min.
7033
Approx. 240 min.
Battery cartridge
Operating time
9100, 9100A, 9120
Approx. 160 min.
Charger
DC7100, DC9710, DC9711,
DC1201, DC1411, DC1439,
DC1470, DC1422, DC1801
DC9711, DC1201, DC1411,
DC1439, DC1422, DC1801
DC9711, DC1411, DC1439,
DC1422, DC1801
ML901/ML903
Voltage
9.6 V
9102, 9102A, 9122
Approx. 230 min.
9133
9134
9135, 9135A
Approx. 260 min.
Approx. 310 min.
Approx. 360 min.
Charger
DC9710, DC9711, DC1201,
DC1411, DC1439, DC1470,
DC1422, DC1801
DC9711, DC1201, DC1411,
DC1439, DC1422, DC1801
DC9711, DC1411, DC1439,
DC1422, DC1801
(Note)
If you use a power checking battery on Model ML901/ML903, the power checking battery will not indicate the remaining
battery capacity properly.
5
ML902
Voltage
Battery cartridge
Operating time
9000
Approx. 160 min.
9002
Approx. 230 min.
9033
Approx. 260 min.
9.6 V
Storing battery cartridge
Always charge the Nickel Metal Hydride battery cartridge
before storing it when you do not use it for more than six
months.
Charger
DC9710, DC9711, DC1201,
DC1411, DC1439, DC1470,
DC1422, DC1801
DC9711, DC1201, DC1411,
DC1439, DC1422, DC1801
DC9711, DC1411, DC1439,
DC1422, DC1801
MAINTENANCE
To maintain product safety and reliability, repairs, maintenance or adjustment should be carried out by a Makita
Authorized Service Center.
Head angle (Fig. 5)
The head angle can be adjusted in four stages. Adjust as
desired.
Replacing bulb (Fig. 6 & 7)
CAUTION:
The bulb is very hot immediately after operation. Wait until
the bulb cools off before attempting to replace it.
First, turn the ring counterclockwise and remove the
reflector. Remove the bulb holder by turning it counterclockwise. Then replace the bulb.
Shoulder strap (Fig. 8)
Install the strap on the tool.
6
ACCESSORIES
CAUTION:
These accessories or attachments are recommended
for use with your Makita tool specified in this manual.
The use of any other accessories or attachments
might present a risk of injury to persons. The accessories or attachments should be used only in the
proper and intended manner.
• Bulb set (2 pcs)
• Shoulder strap
• Set plate (For Model ML903)
FRANÇAIS
1
2
3
Plaque de fixation
Batterie
Vis
Descriptif
4
5
6
Bague
Douille d’ampoule
Réflecteur
7
8
Bandoulière
Interrupteur
SPECIFICATIONS
Modèle
ML702
Ampoule ................ 7,2 V 0,55 A
Dimensions
(L x W x H) ............. 283 x 67 x 71 mm
Poids net ................. 0,22 kg
ML901
9,6 V 0,5 A
ML902
9,6 V 0,5 A
ML903
9,6 V 0,5 A
254 x 67 x 96 mm
0,23 kg
325 x 67 x 71 mm
0,25 kg
254 x 77 x 98 mm
0,23 kg
• Etant donné l’évolution constante de notre programme de recherche et de développement, les spécifications
contenues dans ce manuel sont sujettes à modification sans préavis.
• Note : Les spécifications peuvent varier suivant les pays.
CONSIGNES DE SÉCURITÉ IMPORTANTES
AVERTISSEMENT :
Lorsque vous utilisez un outil électrique, vous devez toujours observer un certain nombre de consignes de
sécurité élémentaires afin d’éviter tout risque de feu, de choc électrique et de blessures physiques,
notamment :
LISEZ TOUT LE MODE D’EMPLOI.
1. Avant l’utilisation, lisez attentivement ce mode d’emploi et le mode d’emploi du chargeur.
2. La lampe torche n’est pas étanche. Ne l’utilisez pas dans des endroits humides ou mouillés. Ne
l’exposez pas à la pluie ni à la neige. Ne la lavez pas à l’eau.
3. Un court-circuit peut provoquer un fort débit de courant, une surchauffe, parfois des blessures et
même une panne.
(1) Ne touchez pas l’intérieur de la tête de la lampe torche avec des pinces, des outils métalliques,
etc.
(2) Ne touchez pas les bornes de la batterie avec un matériau conducteur :
(3) Evitez de ranger la batterie dans un conteneur renfermant des objets métalliques, par exemple
des clous, des pièces de monnaie, etc.
4. N’exposez jamais la batterie aux flammes, au feu ni à une forte chaleur. Une rupture pourrait libérer
des matières dangereuses pour la santé.
5. Si de l’électrolyte pénètre dans vos yeux, rincez-les à l’eau claire et consultez immédiatement un
médecin. Il y a risque de perte de la vue.
6. Si le temps de fonctionnement devient excessivement court, arrêtez l’opération immédiatement. Il
y a risque de surchauffe et de brûlure, voire d’explosion.
7. Prenez garde d’échapper, d’agiter ou de heurter la batterie.
8. Lorsque l’outil n’est pas utilisé, débranchez-le et retirez la batterie.
9. Ne rangez pas l’outil et la batterie dans des endroits où la température peut atteindre ou dépasser
50°C.
10. Prenez garde d’appliquer un choc à l’outil en l’échappant, en le heurtant, etc.
11. N’exposez pas les yeux à la lumière de façon continue. Cela risquerait de les blesser.
12. Ne recouvrez pas ou ne bouchez pas avec un chiffon ou du carton l’outil allumé. Cela peut entraîner
un risque d’incendie.
13. Éteignez la lumière immédiatement lorsque la lampe noircit à l’usage. Si vous laissez la lampe
allumée, cela peut entraîner une diminution de la capacité de la batterie.
14. Ne démontez ni le chargeur ni la batterie ; faites appel aux services d’un technicien qualifié lorsque
l’entretien ou la réparation est nécessaire. Un remontage incorrect peut entraîner un risque de choc
électrique ou d’incendie.
15. En cas de problème, consultez le Centre de service après-vente Makita le plus proche de votre
domicile ou votre agent. Pour maintenir la sécurité et la fiabilité du produit, les réparations,
l’entretien ou les réglages doivent être effectués par le Centre d’Entretien Makita.
CONSERVEZ CES INSTRUCTIONS.
7
MODE D’EMPLOI
Recharge
Modèles ML702 (Fig. 1), ML902 (Fig. 1) et ML901 (Fig. 2)
Avant l’utilisation, rechargez la batterie avec le chargeur Makita. Pour sortir la batterie, sortez la plaque de fixation de
la lampe torche et tenez les deux côtés de la batterie tout en la sortant de la lampe torche. Après la recharge, insérez
la batterie dans la lampe torche et remettez la plaque de fixation en place jusqu’au déclic.
Modèle ML903 (Fig. 3)
Avant l’utilisation, rechargez la batterie avec le chargeur Makita. Pour sortir la batterie, retirez-la de la lampe torche tout
en appuyant sur les boutons des deux côtés de la batterie. Après la recharge, insérez la batterie à fond dans la lampe
torche jusqu’au déclic.
NOTE :
Vous pourrez utiliser le batterie 9100, 9102, 9100A et 9102A avec la ML903 si vous installez la plaque de fixation.
Installez la plaque de fixation sur le ML903 à l’aide de la vis fournie comme indiqué sur la Fig. 4.
Les tableaux suivants indiquent le temps de recharge et la durée de fonctionnement pour une charge.
ML702
Tension
Batterie
Durée de fonctionnement
7000
Environ 140 min.
7002
Environ 210 min.
7033
Environ 240 min.
Batterie
Durée de fonctionnement
9100, 9100A, 9120
Environ 160 min.
9102, 9102A, 9122
Environ 230 min.
9133
9134
9135, 9135A
Environ 260 min.
Environ 310 min.
Environ 360 min.
7,2 V
Chargeur
DC7100, DC9710, DC9711,
DC1201, DC1411, DC1439,
DC1470, DC1422, DC1801
DC9711, DC1201, DC1411,
DC1439, DC1422, DC1801
DC9711, DC1411, DC1439,
DC1422, DC1801
ML901/ML903
Tension
9,6 V
Chargeur
DC9710, DC9711, DC1201,
DC1411, DC1439, DC1470,
DC1422, DC1801
DC9711, DC1201, DC1411,
DC1439, DC1422, DC1801
DC9711, DC1411, DC1439,
DC1422, DC1801
(Note)
Si vous utilisez une batterie ‘‘intelligente’’ avec le modèle ML901/ML903, la rampe de LED n’indiquera pas la capacité
restante de la batterie correctement.
ML902
Tension
9,6 V
Batterie
Durée de fonctionnement
9000
Environ 160 min.
9002
Environ 230 min.
9033
Environ 260 min.
Chargeur
DC9710, DC9711, DC1201,
DC1411, DC1439, DC1470,
DC1422, DC1801
DC9711, DC1201, DC1411,
DC1439, DC1422, DC1801
DC9711, DC1411, DC1439,
DC1422, DC1801
Rangement de la batterie
Remplacement de l’ampoule (Fig. 6 et 7)
Chargez sans faute la batterie Nickel-Métal Hybride avant
de la ranger lorsqu’elle doit rester inutilisée pendant plus
de six mois.
ATTENTION :
L’ampoule est très chaude lorsqu’elle vient de fonctionner. Attendez que l’ampoule ait refroidi avant de procéder
au remplacement.
Angle de tête (Fig. 5)
L’angle de tête possède quatre positions de réglage au
choix. Réglez selon vos préférences.
Tout d’abord, tournez la bague dans le sens inverse des
aiguilles d’une montre et retirez le réflecteur. Retirez la
douille d’ampoule en la tournant dans le sens inverse des
aiguilles d’une montre. Puis, remplacez l’ampoule.
Bandoulière (Fig. 8)
Posez la courroie sur l’outil.
8
ENTRETIEN
Pour maintenir la sécurité et la fiabilité du produit, les
réparations, l’entretien ou les réglages doivent être effectués par le Centre d’Entretien Makita.
ACCESSOIRES
ATTENTION :
Ces accessoires ou ces fixations sont recommandés
pour l’utilisation de l’outil Makita spécifié dans ce
manuel. L’utilisation d’autres accessoires ou fixations
peut présenter un risque de blessures. Les accessoires ou les fixations ne devront être utilisés que dans
le but et de la manière prévus.
• Jeu d’ampoules (2 pièces)
• Bandoulière
• Plaque de fixation (Pour Modèle ML903)
9
ESPAN
x OL
1
2
3
Placa de fijación
Cartucho de baterías
Tornillo
Explicación de los dibujos
4
5
6
Anillo
Portabombilla
Reflector
7
8
Correa de bandolera
Interruptor
ESPECIFICACIONES
Modelo
ML702
Bombilla .................. 7,2 V 0,55 A
Dimensiones
(largo x ancho x alto) ... 283 x 67 x 71 mm
Peso neto ................ 0,22 kg
ML901
9,6 V 0,5 A
ML902
9,6 V 0,5 A
ML903
9,6 V 0,5 A
254 x 67 x 96 mm
0,23 kg
325 x 67 x 71 mm
0,25 kg
254 x 77 x 98 mm
0,23 kg
• Debido a un programa continuo de investigación y desarrollo, las especificaciones aquí dadas están sujetas
a cambios sin previo aviso.
• Nota: Las especificaciones pueden ser diferentes de país a país.
INSTRUCCIONES DE SEGURIDAD IMPORTANTES
ADVERTENCIA:
Cuando utilice herramientas eléctricas deberá seguir siempre las precauciones de seguridad básicas para
reducir el riesgo de incendios, sacudidas eléctricas y lesiones personales, incluyendo lo siguiente:
LEA TODAS LAS INSTRUCCIONES.
1. Lea cuidadosamente este manual de instrucciones y el manual de instrucciones del cargador antes
de utilizar la linterna y el cargador.
2. Esta linterna no es impermeable. No la utilice en lugares hu´medos o mojados. No la exponga a la
lluvia ni a la nieve. No la lave con agua.
3. Un cortocircuito puede causar un flujo grande de corriente, recalentamiento, posibles quemaduras
e incluso una avería.
(1) No toque el interior de la cabeza de la linterna con pinzas, herramientas metálicas, etc.
(2) No toque los bornes de la batería con ningu´n material conductor.
(3) Evite guardar el cartucho de baterías en un recipiente que tenga objetos metálicos tales como
clavos, monedas, etc.
4. Nunca exponga el cartucho de baterías a las llamas, al fuego o a un calor excesivo. Las roturas
pueden causar escapes de materiales nocivos.
5. Si entrase electrolito en sus ojos, aclárelos con agua clara y solicite atención médica enseguida.
Podría acarrearle la pérdida de vista.
6. Si el tiempo de funcionamiento se ha acortado excesivamente, cese la operación inmediatamente.
Podría dar lugar a un recalentamiento, posibles quemaduras, e incluso una explosión.
7. Tenga cuidado de no dejar caer, sacudir ni golpear la batería.
8. Cuando no utilice la herramienta, apáguela y retire el cartucho de batería de ella.
9. No guarde la herramienta ni el cartucho de batería en lugares donde la temperatura pueda alcanzar
o exceder los 50°C.
10. No dé choques a la herramienta dejándola caer o golpeándola, etc.
11. No dirija la luz a los ojos continuamente. Podría dañarlos.
12. No tape ni obstruya la herramienta encendida con un trapo o cartón, etc. Podría crear un riesgo de
incendio.
13. Apague la linterna inmediatamente cuando la bombilla se oscurezca durante el uso. Si la deja
encendida, la capacidad del cartucho de batería podría mermar.
14. No desarme el cargador ni el cartucho de batería; llévelo a personal de servicio cualificado cuando
necesite servicio o reparación. Un montaje incorrecto podría resultar en un riesgo de sacudida
eléctrica o incendio.
15. Si se produce cualquier problema, consulte con su concesionario o Centro de Servicio Makita más
cercano. Para mantener la seguridad y fiabilidad del producto, las reparaciones, el mantenimiento
y los ajustes deberán ser realizados por un Centro de Servicio Autorizado de Makita.
GUARDE ESTAS INSTRUCCIONES.
10
INTRUCCIONES PARA EL FUNCIONAMIENTO
Carga
Para ML702 (Fig. 1), ML902 (Fig. 1) y ML901 (Fig. 2)
Cargue el cartucho de batería con el cargador rápido Makita antes de utilizarlo. Para extraer el cartucho de batería de
la linterna, saque la placa de fijación de la linterna y tire del cartucho sujetándolo por ambos lados. Una vez finalizada
la carga, inserte el cartucho de batería en la linterna y vuelva a poner la placa de fijación en su lugar.
Para ML903 (Fig. 3)
Cargue el cartucho de batería con el cargador rápido Makita antes de utilizarlo. Para extraer el cartucho de batería de
la linterna, presione los botones a ambos lados del cartucho a la vez que tira de él. Una vez finalizada la carga, inserte
el cartucho de batería en la linterna metiéndolo a tope hasta que quede bloqueado produciendo un chasquido.
NOTA:
Si instala la placa de fijación podrá utilizar el cartucho 9100, 9102, 9100A y 9102A con el ML903. Instale la placa en
el ML903 con el tornillo suministrado como se muestra en la Fig. 4.
Las tablas siguientes indican los tiempos de carga y de funcionamiento con una sola carga.
ML702
Voltaje
7,2 V
Cartucho de batería
Tiempo de operación
7000
140 min. aprox.
7002
210 min. aprox.
7033
240 min. aprox.
Cartucho de batería
Tiempo de operación
9100, 9100A, 9120
160 min. aprox.
9102, 9102A, 9122
230 min. aprox.
9133
9134
9135, 9135A
260 min. aprox.
310 min. aprox.
360 min. aprox.
Cargador
DC7100, DC9710, DC9711,
DC1201, DC1411, DC1439,
DC1470, DC1422, DC1801
DC9711, DC1201, DC1411,
DC1439, DC1422, DC1801
DC9711, DC1411, DC1439,
DC1422, DC1801
ML901/ML903
Voltaje
9,6 V
Cargador
DC9710, DC9711, DC1201,
DC1411, DC1439, DC1470,
DC1422, DC1801
DC9711, DC1201, DC1411,
DC1439, DC1422, DC1801
DC9711, DC1411, DC1439,
DC1422, DC1801
(Nota)
Si utiliza una batería de comprobación de energía con el modelo ML901/ML903, la batería de comprobación de energía
no indicará correctamente la capacidad restante de la batería.
ML902
Voltaje
9,6 V
Cartucho de batería
Tiempo de operación
9000
160 min. aprox.
9002
230 min. aprox.
9033
260 min. aprox.
Cargador
DC9710, DC9711, DC1201,
DC1411, DC1439, DC1470,
DC1422, DC1801
DC9711, DC1201, DC1411,
DC1439, DC1422, DC1801
DC9711, DC1411, DC1439,
DC1422, DC1801
Para guardar el cartucho de batería
Reemplazo de la bombilla (Fig. 6 y 7)
Cargue siempre el cartucho de batería de hidruro
metálico de níkel cuando no lo vaya a utilizar durante más
de seis meses.
PRECAUCIÓN:
La bombilla estará muy caliente inmediatamente después
de haber estado funcionando. Espere a que la bombilla
se enfríe antes de intentar reemplazarla.
Ángulo de la cabeza (Fig. 5)
El ángulo de la cabeza puede ajustarse en cuatro pasos.
Ajuste el ángulo deseado.
Primero, gire el anillo hacia la izquierda y quite el
reflector. Quite el portabombilla girándolo hacia la
izquierda. Luego reemplace la bombilla.
Correa de bandolera (Fig. 8)
Instale la correa en la herramienta.
11
MANTENIMIENTO
ACCESORIOS
Para mantener la seguridad y fiabilidad del producto, las
reparaciones, el mantenimiento y los ajustes deberán ser
realizados por un Centro de Servicio Autorizado de
Makita.
PRECAUCIÓN:
Estos accesorios o acoplamientos están recomendados para usar con la herramienta Makita especificada
en este manual. Con el uso de cualquier otro accesorio o acoplamiento se podría correr el riesgo de
producir heridas a personas. Los accesorios o acoplamientos deberán usarse solamente de la manera
apropiada y para la que ha sido designados.
• Conjunto de bombilla (2 piezas)
• Correa de bandolera
• Placa de fijación (Por modelo ML903)