1
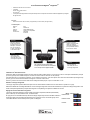
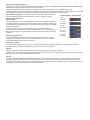
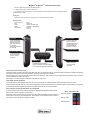
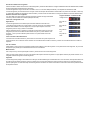
Magellan® ToughCaseTM Instruction Booklet
• Rugged and Waterproof to IPX-7 standards.
• Internal Battery charges your iPhone® or iPod touch®.
• Built-in GPS receiver enhances the GPS reception for your iPhone and enables the iPod touch to use applications that require GPS
signals.
Made for:
iPhone 3GS, iPhone 3G, iPod touch (3rd generation), and iPod touch (2nd generation)
Specifications:
Waterproof:
GPS:
Antenna:
Battery:
Connectivity:
IPX-7
SiRFStar III
Multidirectional Patch
Integrated, non-replaceable
Mini-USB
Headphone
Headphones
USB Connector
Lift the flap to
reveal the 3.5mm
headphone
connector. Note:
headphones with
an inline
microphone, the
Lift the flap to reveal the
USB connector used to
charge the ToughCase
GPS receiver or sync
your iPhone or iPod
touch with iTunes.
Mode
Battery Level
Volume Control
Locking Flap
Lift the locking flap
on both sides to
open the
ToughCase GPS
receiver.
Top button increases
volume, lower button
decreases volume.
Speaker
Microphone
Locking Flap
The speaker and microphone openings
provide access to the speaker and
microphone of the installed iPhone.
Lift the locking flap on
both sides to open the
ToughCase GPS
receiver.
Installing Your iPhone or iPod touch
Lift the locking flaps on both sides of the ToughCase GPS receiver and pivot the lid upwards. The Master Power switch (upper left side) is accessible when the lid is
open. Switch it to ON.
Connect your iPhone to the dock connector. If using an iPod touch, you need to place your iPod touch into the Sleeve (supplied) and then connect the assembly to
the dock connector.
Close the lid and hold the lid shut while snapping the locking flaps until you hear a ‘click’.
Turning the ToughCase GPS Receiver Off
The ToughCase GPS receiver can be turned off to prevent unnecessary battery drain while being stored or during travel.
Release the Locking Flaps and open the ToughCase GPS receiver. Remove your iPhone or iPod touch from the ToughCase GPS receiver. This reveals the Master
Power switch. Slide it to OFF to keep battery charge.
Setting the ToughCase Power Mode
The ToughCase GPS receiver has four power modes available; OFF/ON (described above), idle, battery
only, or battery+GPS.
Pressing the Mode button (on the bottom of the ToughCase GPS receiver) causes the LEDs to display the
current mode the ToughCase GPS receiver is in. To change the mode you need to press the Mode switch
again before the LEDs go out. (When powering on, all lights flash momentarily.)
Mode - LED Indicators
Battery Only
Battery and
GPS
Powering Down
471 El Camino Real
Santa Clara, CA 95050
Charging the ToughCase GPS Receiver
To charge the ToughCase GPS receiver, simply connect the USB cable from the ToughCase to your IBM-compatible or Macintosh computer. Alternatively, you can
charge the ToughCase GPS Receiver with an AC adapter with a USB connector (like the one supplied with your iPhone) or purchase the AC Power Adapter from
MagellanGPS.com.
Note: When the battery in the ToughCase GPS receiver is below 5% charged, there is not enough power in the ToughCase to even power the red battery charge
LED. This LED will remain off even after connecting to a PC or an AC adapter until the ToughCase internal battery is above 5% charge.
ToughCase Battery Life
When your iPhone or iPod touch is installed in the ToughCase GPS receiver and the power mode is set
to Battery only or Battery+GPS, the battery in the ToughCase GPS receiver will charge your iPhone or
iPod touch.
The ToughCase GPS receiver charges when it is connected to a PC with the USB cable (supplied) or a
USB power adapter.
The ToughCase GPS receiver and your iPhone or your iPod touch are both charged when Master Power
switch is on, a USB cable or USB power adapter is connected and the power mode is set to Battery Only
or Battery+GPS.
ToughCase Battery Status. The four LEDs at the bottom of the ToughCase GPS receiver display the
battery charge when the battery button (below the LEDs) is pressed.
Using the ToughCase with Your iPhone
The ToughCase GPS receiver has an earphone opening just above the display lens and a microphone
opening at the bottom. To use your iPhone as a cell phone while it is installed in the ToughCase GPS
receiver, just hold the top of the ToughCase GPS receiver to your ear and speak normally.
Some headsets and headphones have an inline microphone. These can be used with the ToughCase
GPS receiver to listen to the output of your iPhone or iPod touch but cannot be used as the microphone.
You have to use the microphone opening at the bottom of the ToughCase GPS receiver.
Battery Charge - LED Indicators
<10%
Charge
10 - 24%
Charge
25 - 49%
Charge
50 - 74%
Charge
75 - 100%
Charge
Turning your iPhone or iPod touch On
The power buttons for your iPhone or iPod touch are located at the top of the ToughCase GPS receiver in their normal orientation. To power your iPhone, click the
button on the right or click the button on the left to power your iPod touch.
Camera Use
You can use your iPhone to take photos while installed in the ToughCase GPS receiver. There is a clear lens on the back of the ToughCase GPS receiver that
enables your iPhone camera to function as normal.
Maintenance
Use a soft, damp cloth to clean the exterior and display lens of the ToughCase GPS receiver.
Check the seal on the lid of the ToughCase GPS receiver before closing to make sure no foreign objects are caught in the seal that could interfere with the waterproof
integrity of the ToughCase GPS receiver. Check the o-ring that seals the lid to the body of the ToughCase GPS receiver at regular intervals. If it is damaged go to
Support at www.magellangps.com.
Safety
The ToughCase GPS receiver protects your iPhone or iPod touch from water as it is sealed to IPX-7 standards. The temperature inside the ToughCase GPS
receiver can go up to levels that can cause your iPhone or iPod touch to turn off when it is left in direct sunlight for long periods of time. You should avoid leaving the
ToughCase GPS receiver in environments that could raise the internal temperature to unsafe levels such as on the dash or seat of your car where direct sunlight
could raise the internal temperature.
“Made for iPod,” and “Made for iPhone,” mean
that an electronic accessory has been designed
to connect specifically to iPod or iPhone
respectively and has bee certified by the
developer to meet Apple performance
standards. Apple is not responsible for the
operation of this device or its compliance with
safety and regulatory standards.
© 2010 MiTAC International Corporation. The
Magellan logo and Magellan are registered
trademarks of MiTAC International Corporation.
ToughCase is a trademark of MiTAC
International Corporation. All rights reserved.
iPhone and iPod touch are trademarks of Apple,
Inc., registered in the U.S. and other countries.
All other trademarks and registered trademarks
are property of their respective owners.
112-0009-001 A
Livret d’Instruction Magellan® ToughCaseTM
•
Robuste et étanche aux normes IPX-7.
•
La batterie
interne charge votre iPhone®
ou iPod touch®.
•
Le récepteur GPS intégré améliore la réception GPS pour l’iPhone et permet à l’iPod touch d’utiliser des applications qui exigents
des signaux GPS.
Fait pour :
iPhone 3GS, iPhone 3G, iPod touch (3rd generation), and iPod touch (2nd generation)
Caractéristiques :
Etanche :
GPS :
Antenne :
Batterie :
Connectivité :
IPX-7
SiRFStar III
Patch Multidirectionel
Intégré, non-remplacable
Mini-USB
Ecouteurs
Connecteur USB
Ecouteurs
Relevez le rabat pour
révéler le connecteur
d’écouteurs de 3,5 mm.
Remarque : écouteurs
avec un microphone
en ligne, le microphone
ne fonctionnera pas.
Relevez le rabat pour
révéler le connecteur USB
utilisé pour recharger
l’enveloppe ToughCase ou
pour synchroniser l’iPhone/
iPod touch avec iTunes.
Niveau de Batterie
Mode
Contrôle du volume
Rabat de Verrouillage
de Boîtier
Soulevez le rabat
de verrouillage des
deux côtés pour ouvrir
l’enveloppe ToughCase.
Haut-parleur
Microphone
Rabat de Verrouillage
de Boîtier
Soulevez le rabat
de verrouillage des
deux côtés pour ouvrir
l’enveloppe ToughCase.
Les ouvertures de haut-parleur et de
microphone donnent accès au haut-parleur
ou au microphone de l’appareil installé.
Installation de l’iPhone/iPod touch
Soulevez le rabat de verrouillage de boîtier des deux côtés du boîtier et faites pivoter le couvercle vers le haut. L’interrupteur d’alimentation principal
(en haut à gauche) est accessible lorsque le couvercle est ouvert. Faites le commuter sur On (Allumé).
Connectez l’iPhone au connecteur à 30 broches. Si vous utilisez un iPod touch, vous devez placer l’iPod Touch dans l’iPod Sleeve (Enveloppe iPod)
(fournie), puis connectez l’iPod/l’ensemble enveloppe au connecteur à 30 broches.
Fermez le couvercle et enclenchez les rabats de verrouillage de boîtier jusqu’à ce que vous entendiez un “clic”.
Eteindre l’enveloppe ToughCase
L’enveloppe ToughCase peut être désactivée pour éviter de vider la batterie inutilement tout en étant stocké ou pendant un voyage.
Relâchez les Rabats de Verrouillage de Boîtier et ouvrez l’enveloppe ToughCase. Enlevez l’iPhone/iPod touch à partir de l’enveloppe ToughCase. Cela
révèle l’interrupteur d’alimentation principal. Faites-le glisser sur Off (Eteint) pour empêcher la batterie de se vider.
Réglage du mode d’alimentation ToughCase
L’enveloppe ToughCase dispose de quatre modes de puissance disponibles; ON/OFF (allumé/éteint)
(décrit ci-dessus), au ralenti, batterie seule, ou batterie+GPS.
En appuyant sur le commutateur Mode (en bas de l’enveloppe ToughCase) cela cause à la DEL d’afficher le
mode actuel dans lequel l’enveloppe ToughCase est. Pour changer le mode, vous devez appuyer sur le
commutateur Mode à nouveau avant que les voyants ne s’éteignent.
Mode – Indicateurs DEL
Batterie Seule
Batterie et GPS
Eteindre
Autonomie de la Batterie ToughCase
Quand un iPhone ou iPod touch est installé dans l’enveloppe ToughCase et que le mode d’alimentation est réglé à Batterie seule ou Batterie+GPS, la
batterie dans l’enveloppe ToughCase chargera l’iPhone ou l’iPod touch.
L’enveloppe ToughCase se charge quand elle est connectée à un PC avec le câble USB (fourni) ou un adaptateur secteur USB.
L’enveloppe ToughCase et l’iPhone/iPod touch sont tous deux rechargés lorsque le commutateur d’alimentation principal est allumé, qu’un câble USB
ou un adaptateur secteur USB est connecté et que le mode d’alimentation est réglé à Batterie Seule ou Batterie+GPS.
Statut de Batterie ToughCase. Les quatre DEL au bas de l’enveloppe ToughCase affichent la
charge de la batterie lorsque le bouton de la batterie (en dessous de la DEL) est appuyé.
Utilisation de ToughCase avec
l’iPhone d’Apple
L’enveloppe ToughCase a une ouverture d’oreillette juste au-dessus de la lentille d’affichage et
une ouverture microphone en bas. Pour utiliser votre iPhone comme un téléphone cellulaire alors
qu’il est installé dans l’enveloppe ToughCase, il suffit de tenir le haut de l’enveloppe à votre oreille
et de parler normalement.
Certains casques et écouteurs ont un microphone en ligne. Ils peuvent être utilisés avec
l’enveloppe ToughCase pour écouter la sortie de l’iPhone/iPod touch, mais ne peuvent pas être
utiliss comme microphone. Vous devez utiliser l’ouverture du microphone en bas de l’enveloppe
ToughCase.
Allumer l’iPhone/iPod touch
Charge de Batterie – Indicateurs DEL
<10%
de Charge
10 - 24%
de Charge
25 - 49%
de Charge
50 - 74%
de Charge
75 - 100%
de Charge
Les boutons d’alimentation de l’iPhone et de l’iPod touch sont situés en haut de l’enveloppe
ToughCase dans l’orientation normale. Le bouton d’alimentation iPhone est sur la droite et le
bouton d’alimentation de l’iPod touch est sur la gauche.
Utilisation de la Caméra
Vous pouvez utiliser votre iPhone pour prendre des photos une fois installé dans l’enveloppe ToughCase. Il y a une lentille claire au dos de
l’enveloppe ToughCase qui permet à l’appareil photo de l’iPhone de fonctionner normalement.
Entretien
Utilisez un chiffon doux et humide pour nettoyer l’extérieur et la lentille d’affichage de l’enveloppe ToughCase.
Vérifiez le joint sur le couvercle de l’enveloppe ToughCase avant de fermer le couvercle pour vous assurer qu’aucun objet étranger n’est coincé dans
le joint qui pourrait nuire à l’étanchéité de l’enveloppe ToughCase.
Sécurité
L’enveloppe ToughCase protège votre iPhone/iPod touch de l’eau car il est scellé aux normes IPX-7. De ce fait, la température à l’intérieur de
l’enveloppe ToughCase peut aller jusqu’à des niveaux qui peuvent causer à l’iPhone/iPod touch de s’éteindre quand il est laissé en plein soleil
pendant de longues périodes de temps. Vous devriez éviter de laisser l’enveloppe ToughCase sur le tableau de bord ou le siège de votre voiture où
de la lumière du soleil directe pourrait augmenter la température interne.
Magellan® ToughCaseTM Folleto de instrucciones
• Robusto y resistente al agua según los estándares IPX-7.
• La batería interna carga su iPhone® o iPod touch®.
• El receptor GPS incorporado mejora la recepción GPS del iPhone y permite que el iPod touch use aplicaciones que
requieren señales de GPS.
Hecho para:
iPhone 3GS, iPhone 3G, iPod touch (3rd generation), and iPod touch (2nd generation)
Especificaciones:
Resistente al agua:
GPS:
Antena:
Batería:
Conectividad:
IPX-7
SiRFStar III
Receptor multidireccional
Integrada, no reemplazable
Mini USB
Auricular
Auriculares
Conector USB
Levante la solapa para
dejar ver el conector de
auriculares de 3,5 mm.
Nota: en los auriculares
con micrófono
incorporado, el micrófono
no funcionará.
Levante la solapa para
dejar ver el conector
USB utilizado para cargar
la funda ToughCase o
sincronizar el iPhone/
iPod touch con iTunes.
Nivel de batería
Modo
Control de volumen
Solapa de traba de la caja
Levante la solapa de
traba a ambos lados
para abrir la funda
ToughCase.
Altavoz
Micrófono
Las aberturas para altavoz y
micrófono permiten acceder al altavoz
y al micrófono del dispositivo instalado.
Solapa de traba de la caja
Levante la solapa de
traba a ambos lados
para abrir la funda
ToughCase.
Cómo instalar el iPhone/iPod touch
Levante las solapas de traba de la caja a ambos lados de la caja y gire la tapa hacia arriba. Se puede acceder al interruptor de alimentación maestra
(lado superior izquierdo) cuando la tapa está abierta. Colóquelo en la posición de encendido.
Conecte el iPhone al conector de 30 pines. Si está utilizando un iPod touch, debe colocarlo en la funda para iPod (suministrada) y luego conectar el
conjunto iPod/funda al conector de 30 pines.
Cierre la tapa y encaje las solapas de traba de la caja hasta que oiga un ‘clic’.
Cómo apagar la funda ToughCase
La funda ToughCase puede apagarse para evitar un consumo innecesario de la batería mientras está almacenada o durante los viajes.
Suelte las solapas de traba de la caja y abra la funda ToughCase. Retire el iPhone/iPod touch de la funda ToughCase. Esto dejará ver el interruptor
de alimentación maestra. Deslícelo a la posición de apagado para evitar el consumo de la batería.
Cómo configurar el modo de alimentación de la ToughCase
La casa ToughCase tiene cuatro modos de alimentación disponibles; apagado/encendido (descrito
arriba), espera, batería únicamente o batería+GPS.
Al presionar el interruptor de modo (en la parte inferior de la funda ToughCase), los LED muestran el
modo actual en que se encuentra la ToughCase. Para cambiar el modo, debe presionar de nuevo el
interruptor de modo antes de que se apaguen los LED.
Modo – Indicadores LED
Batería únicamente
Batería y GPS
Descargándose
Vida útil de la batería de la ToughCase
Cuando se instala un iPhone o iPod touch en la funda ToughCase y el modo de alimentación se configura en Batería únicamente o Batería+GPS, la batería
de la funda ToughCase cargará el iPhone o iPod touch.
La funda ToughCase se carga cuando está conectada a una PC con el cable USB (suministrado) o un adaptador de alimentación USB.
La funda ToughCase y el iPhone/iPod touch se cargan cuando el interruptor de alimentación maestra está en la posición de encendido, cuando hay
un cable USB o adaptador de alimentación USB conectado y cuando el modo de alimentación se configura en Batería únicamente o Batería+GPS.
Estado de la batería de la ToughCase.
Los cuatro LED de la parte inferior de la funda ToughCase muestran la carga de la batería
cuando se presiona el botón de la batería (debajo de los LED).
Cómo usar la ToughCase con el
Apple iPhone
La funda ToughCase tiene una abertura para auriculares arriba de la lente del visor
y una abertura para micrófono en la parte inferior. Para usar su iPhone como teléfono celular
mientras está instalado en la funda ToughCase, coloque la parte superior de la funda
ToughCase junto a su oreja y hable con normalidad.
Algunos auriculares tienen un micrófono incorporado. Éstos pueden usarse con la funda
ToughCase para escuchar la salida del iPhone/iPod touch pero no puede utilizarse como
micrófono. Tiene que usar la abertura para micrófono en la parte inferior de la funda
ToughCase.
Carga de la batería – Indicadores LED
<Carga del 10%
Carga del 10 24%
Carga del 25 49%
Carga del 50 74%
Carga del 75 100%
Cómo encender el iPhone/iPod touch
Los botones de encendido del iPhone y el iPod touch se encuentran en la parte superior de la
funda ToughCase, en la orientación normal. El botón de encendido del iPhone está a la derecha y el botón de encendido del iPod touch está a la
izquierda.
Uso de la cámara
Puede utilizar su iPhone para tomar fotografías mientras está instalado en la funda ToughCase. En la parte trasera de la ToughCase, hay una lente
transparente que permite que la cámara del iPhone funcione normalmente.
Mantenimiento
Use un trapo suave y húmedo para limpiar el exterior y la lente del visor de la funda ToughCase.
Antes de cerrar la tapa, verifique que en la junta hermética de la tapa de la funda ToughCase no haya objetos extraños que puedan interferir con la
integridad resistente al agua de la funda ToughCase.
Seguridad
La funda ToughCase protege su iPhone/iPod touch del agua, al estar sellada según los estándares IPX-7. Por este motivo, la temperatura interior de
la funda ToughCase puede ascender a niveles que pueden provocar que el iPhone/iPod se apague cuando se deja a la luz solar directa durante
periodos prolongados. Se debe evitar dejar la funda ToughCase en el tablero o el asiento de su automóvil cuando la luz solar directa pueda aumentar
la temperatura interna.