1
Sono 61
User Guide
ProKeys Sono 61 User Guide
Introduction . .
|
1
. . . . . . . . . . . . . . . . . . . . . . . . . . . . . . . . . . . . . . . . . . . . . . . . . . . . . . . . . . . . 3
ProKeys Sono 61 Features . . . . . . . . . . . . . . . . . . . . . . . . . . . . . . . . . . . . . . . . . . . . . . . 4
What’s in the Box?. . . . . . . . . . . . . . . . . . . . . . . . . . . . . . . . . . . . . . . . . . . . . . . . . . . . . . . 4
Keyboard. . . . . . . . . . . . . . . . . . . . . . . . . . . . . . . . . . . . . . . . . . . . . . . . . . . . . . . . . . . . . . . . . . 4
Built-in Audio Interface . . . . . . . . . . . . . . . . . . . . . . . . . . . . . . . . . . . . . . . . . . . . . . . . . . . . . . . . . . . 4
Minimum Requirements. . . . . . . . . . . . . . . . . . . . . . . . . . . . . . . . . . . . . . . . . . . . . . . . . . 5
Standalone Operation. . . . . . . . . . . . . . . . . . . . . . . . . . . . . . . . . . . . . . . . . . . . . . . . . . . . . . . . . . . 5
Bus-Powered Operation. . . . . . . . . . . . . . . . . . . . . . . . . . . . . . . . . . . . . . . . . . . . . . . . . . . . . . . . . . 5
Controls and Connectors . .
. . . . . . . . . . . . . . . . . . . . . . . . . . . . . . . . . . . . . . . . . . . . . . . 6
Top Panel Diagram. . . . . . . . . . . . . . . . . . . . . . . . . . . . . . . . . . . . . . . . . . . . . . . . . . . . . . . . . . . . . 6
Top Panel Descriptions. . . . . . . . . . . . . . . . . . . . . . . . . . . . . . . . . . . . . . . . . . . . . . . . . . . . . . . . . . . 6
Rear Panel Descriptions. . . . . . . . . . . . . . . . . . . . . . . . . . . . . . . . . . . . . . . . . . . . . . . . . . . . . . . . . . 8
Hardware Connections. . . . . . . . . . . . . . . . . . . . . . . . . . . . . . . . . . . . . . . . . . . . . . . . . . . 9
Audio Inputs . . . . . . . . . . . . . . . . . . . . . . . . . . . . . . . . . . . . . . . . . . . . . . . . . . . . . . . . . . . . . . . . 9
Audio Outputs. . . . . . . . . . . . . . . . . . . . . . . . . . . . . . . . . . . . . . . . . . . . . . . . . . . . . . . . . . . . . . . 9
MIDI Connections. . . . . . . . . . . . . . . . . . . . . . . . . . . . . . . . . . . . . . . . . . . . . . . . . . . . . . . . . . . . . 9
Other Connections . . . . . . . . . . . . . . . . . . . . . . . . . . . . . . . . . . . . . . . . . . . . . . . . . . . . . . . . . . . . . 9
Example Operating Scenarios . . . . . . . . . . . . . . . . . . . . . . . . . . . . . . . . . . . . . . . . . . . . . . . . . . . . . . 10
About the audio inputs . . . . . . . . . . . . . . . . . . . . . . . . . . . . . . . . . . . . . . . . . . . . . . . . . . . . . . . . . . 11
ProKeys Sono as a Standalone Instrument . . . . . . . . . . . . . . . . . . . . . . . . . . . . . . . . 12
ProKeys Sono Premium Voice Selection. . . . . . . . . . . . . . . . . . . . . . . . . . . . . . . . . . . . . . . . . . . . . . . . . 12
ProKeys Sono GM sound selection. . . . . . . . . . . . . . . . . . . . . . . . . . . . . . . . . . . . . . . . . . . . . . . . . . . . 12
ProKeys Sono as a Standalone Microphone Preamplifier and Mixer . . . . . . . . . . . . . . . . . . . . . . . . . . . . . . . . . . 13
ProKeys Sono Demos. . . . . . . . . . . . . . . . . . . . . . . . . . . . . . . . . . . . . . . . . . . . . . . . . . . . . . . . . . . 13
Basic ProKeys Sono Setup in Windows . . . . . . . . . . . . . . . . . . . . . . . . . . . . . . . . . . . 14
ProKeys Sono Setup in Mac OS X . . . . . . . . . . . . . . . . . . . . . . . . . . . . . . . . . . . . . . . . 15
Using ProKeys Sono with a Computer . .
. . . . . . . . . . . . . . . . . . . . . . . . . . . . . . . . . . 16
Audio Tracks . . . . . . . . . . . . . . . . . . . . . . . . . . . . . . . . . . . . . . . . . . . . . . . . . . . . . . . . . . . . . . . . 16
MIDI Tracks . . . . . . . . . . . . . . . . . . . . . . . . . . . . . . . . . . . . . . . . . . . . . . . . . . . . . . . . . . . . . . . . 20
ProKeys Sono Audio Setup and Controls. . . . . . . . . . . . . . . . . . . . . . . . . . . . . . . . . . 23
Using the Microphone and Instrument Inputs . . . . . . . . . . . . . . . . . . . . . . . . . . . . . . . . . . . . . . . . . . . . . . 23
Setting Input Gain. . . . . . . . . . . . . . . . . . . . . . . . . . . . . . . . . . . . . . . . . . . . . . . . . . . . . . . . . . . . . 23
Using the Aux Inputs. . . . . . . . . . . . . . . . . . . . . . . . . . . . . . . . . . . . . . . . . . . . . . . . . . . . . . . . . . . . 24
Using Direct Monitoring. . . . . . . . . . . . . . . . . . . . . . . . . . . . . . . . . . . . . . . . . . . . . . . . . . . . . . . . . . 24
The Mono Button . . . . . . . . . . . . . . . . . . . . . . . . . . . . . . . . . . . . . . . . . . . . . . . . . . . . . . . . . . . . . 25
The ProKeys Sono Audio Control Panel (Windows Only). . . . . . . . . . . . . . . . . . . . 26
Latency. . . . . . . . . . . . . . . . . . . . . . . . . . . . . . . . . . . . . . . . . . . . . . . . . . . . . . . . . . . . . . . . . . . 26
About . . . . . . . . . . . . . . . . . . . . . . . . . . . . . . . . . . . . . . . . . . . . . . . . . . . . . . . . . . . . . . . . . . . 26
ProKeys Sono 61 User Guide
Routing MIDI Data to and from your Computer . .
. . . . . . . . . . . . . . . . . . . . . . . . . . 27
Routing MIDI Signals to your Software. . . . . . . . . . . . . . . . . . . . . . . . . . . . . . . . . . . . . . . . . . . . . . . . . . 28
Routing MIDI Signals from your Software. . . . . . . . . . . . . . . . . . . . . . . . . . . . . . . . . . . . . . . . . . . . . . . . 28
Advanced ProKeys Sono Functions in Edit Mode. .
. . . . . . . . . . . . . . . . . . . . . . . . 29
Audio Options in Edit Mode. . . . . . . . . . . . . . . . . . . . . . . . . . . . . . . . . . . . . . . . . . . . . . . . . . . . . . . . 29
Button, Knob, Wheel and Pedal Jack Assignments . . . . . . . . . . . . . . . . . . . . . . . . . . . . . . . . . . . . . . . . . . . 30
ProKeys MIDI Output Settings . . . . . . . . . . . . . . . . . . . . . . . . . . . . . . . . . . . . . . . . . . . . . . . . . . . . . . 35
Sending a Bank Change or Program Change Message. . . . . . . . . . . . . . . . . . . . . . . . . . . . . . . . . . . . . . . . . 37
MIDI Messages In-Depth . . . . . . . . . . . . . . . . . . . . . . . . . . . . . . . . . . . . . . . . . . . . . . . . . 38
Program & Bank Changes. . . . . . . . . . . . . . . . . . . . . . . . . . . . . . . . . . . . . . . . . . . . . . . . . . . . . . . . . 38
NRPN/RPNs . . . . . . . . . . . . . . . . . . . . . . . . . . . . . . . . . . . . . . . . . . . . . . . . . . . . . . . . . . . . . . . 39
Troubleshooting . .
. . . . . . . . . . . . . . . . . . . . . . . . . . . . . . . . . . . . . . . . . . . . . . . . . . . . . . . 40
Appendices - Useful MIDI Data . .
. . . . . . . . . . . . . . . . . . . . . . . . . . . . . . . . . . . . . . . . . 42
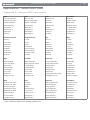
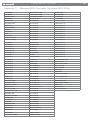
Appendix A - General MIDI Instruments. . . . . . . . . . . . . . . . . . . . . . . . . . . . . . . . . . . . . . . . . . . . . . . . . 42
Appendix B - Channel 10 Drum Map. . . . . . . . . . . . . . . . . . . . . . . . . . . . . . . . . . . . . . . . . . . . . . . . . . . 43
Appendix C - Standard MIDI Controller Numbers (MIDI CCs). . . . . . . . . . . . . . . . . . . . . . . . . . . . . . . . . . . . . 44
Appendix D - Additional RPN Messages. . . . . . . . . . . . . . . . . . . . . . . . . . . . . . . . . . . . . . . . . . . . . . . . . 45
Technical Specifications. . . . . . . . . . . . . . . . . . . . . . . . . . . . . . . . . . . . . . . . . . . . . . . . . . 46
Technical Info. . . . . . . . . . . . . . . . . . . . . . . . . . . . . . . . . . . . . . . . . . . . . . . . . . . . . . . . . . . . 47
Warranty. .
. . . . . . . . . . . . . . . . . . . . . . . . . . . . . . . . . . . . . . . . . . . . . . . . . . . . . . . . . . . . . . 47
ProKeys Sono 61 User Guide
|
3
Introduction
Congratulations on your purchase of M-Audio ProKeys Sono 61. ProKeys Sono 61 is a semi-weighted, velocity sensitive 61-key
digital piano, USB-compatible MIDI controller, and an audio interface in one convenient package. Play the on-board premium
keyboard sounds as a standalone instrument or plug a microphone and guitar into ProKeys Sono and record, edit and produce your
performance via your computer utilizing the included recording software. ProKeys Sono provides everything to instantly transform your
computer into a versatile music studio.
ProKeys Sono functions as a class-compliant device when connected to your computer via USB. This means your computer will
recognize the keyboard without the need to install additional drivers1 and will have immediate access to all audio inputs and outputs as
well as to the built-in MIDI interface. However, as you become more familiar with ProKeys Sono, you may wish to take advantage of
this device’s additional professional features by installing the ProKeys Sono drivers.
Installing the ProKeys Sono drivers in Windows improves audio performance by reducing latency. Latency is the time it takes for MIDI
input (when using software synthesizers) or audio input signal to appear as audio at the ProKeys Sono audio outputs for monitoring.
Windows users will gain additional functionality from installing the ProKeys Sono drivers including: using your new keyboard with more
than one application at the same time (multi-client), the ability to send large SysEx messages, as well as using your ProKeys Sono with
a qualified version of the Pro Tools M-Powered recording software. On a Macintosh, installing the M-Audio drivers enables you to use
your ProKeys Sono with a qualified version of the Pro Tools M-Powered recording software.
Information on Windows driver installation can be found in the printed Quick Start Guide included with your new ProKeys Sono.
Macintosh driver installation instructions are in the “ProKeys Sono 61 Setup in OS X” chapter of this User Guide.
Finally, keep in mind that ProKeys Sono can be used with any third-party music program. Be sure to read your specific application’s
documentation to learn more about how it can best be used with this device.
When using ProKeys Sono as a class-compliant device in Windows (i.e., without installing drivers), the computer will search
for the M-Audio DFU (device firmware upgrade tool) and display a Found New Hardware Wizard. The M-Audio DFU is a
component of ProKeys Sono 61 that is enabled when the M-Audio drivers are installed, but is not necessary for class-compliant
operation. As a result, the Found New Hardware Wizard and can safely be ignored in this scenario. See page 14 to learn more
about this topic.
1
ProKeys Sono 61 User Guide
|
4
ProKeys Sono 61 Features
Keyboard:
Built-in Audio Interface:
61 semi-weighted, velocity sensitive keys
high-quality voices (Grand Piano, Bright Piano, Electric
Piano, Organ, Clavinet)
16-Bit,
44.1 kHz, 2-in, 2-out audio interface
5
XLR
General
Two
rear-panel 1/4” main outputs
Two
front-panel 1/4” headphone outputs
MIDI (GM) sound set with a total of 128 built-in
sounds for playback of MIDI files
On-board reverb and chorus effects
Pitch Bend wheel
Modulation wheel; MIDI re-assignable
Voice Volume knob; MIDI re-assignable
Octave up/down buttons; MIDI re-assignable
Sustain pedal input; MIDI re-assignable
MIDI output jack
40-note maximum polyphony2
Edit mode for advanced functions and programming
microphone input, 1/4” instrument input, and stereo
RCA inputs
Dedicated
Instrument and Microphone gain control knobs
with signal and peak LEDs
Direct
Monitor knob for near-zero latency monitoring
Bus-powered
through USB or DC power for standalone
functionality (DC power adaptor sold separately)
Class-compliant
operation: no driver installation required—
simply connect the keyboard and power on1
2
Stereo premium voices operate at a maximum polyphony of 20 notes.
What’s in the Box?
M-Audio ProKeys Sono 61 keyboard
Printed Quick Start Guide
M-Audio ProKeys Sono Drivers and Documentation CD-ROM
Software Bundle CD-ROM
USB cable
If any of the above listed items are missing, please contact the retailer where you purchased the product.
|
ProKeys Sono 61 User Guide
5
Minimum Requirements
Standalone Operation
Standalone operation refers to using ProKeys Sono without a computer. To do this, an optional 9V,
500mA center-positive power supply or USB-type power supply is required. More information on
available power supplies can be found at www.m-audio.com.
Bus-Powered Operation
In bus-powered mode, ProKeys Sono is connected to a PC or Mac with a USB cable and receives
power through the USB connection. When using ProKeys Sono in this mode, your computer system
must meet the following minimum specifications:
optional USB-type
external power supply
M-Audio ProKeys Sono 61
Windows XP (SP2) 3
Windows Vista 32-bit
Mac OS X 4
• Pentium® III 1GHz or AMD K7
Athlon 1GHz
(CPU may be higher for laptops)
•P
entium® 4 1.6GHz
or AMD Athlon XP 2800+
(CPU may be higher for laptops)
• Macintosh G4 1GHz†
• 512 MB RAM
• 1 GB RAM
• One native USB port
• 128 MB Graphics Card
Home and Professional Edition
only. Windows Media Center Edition
is not currently supported.
• One native USB port
• OS X 10.4.11 with 512 MB RAM
• OS X 10.5.2 with 512 MB RAM
• One native USB port
4
3
4 accelerator cards are not
G
supported.
M-Audio suggests you also check the minimum system requirements for any software applications you plan on using with
your new M-Audio hardware, as they may be greater than the above.
➜ I MPORTANT: Connect your headphones or powered speakers to ProKeys Sono.
Sounds created by ProKeys Sono and from software used with it will play through the
main outputs on ProKeys Sono–not the outputs of your computer’s built-in soundcard.
A Note About System Updates: Please check the M-Audio driver download page at
http://www.m-audio.com/drivers for the availability of an updated driver before you decide
to install operating system updates. Before new M-Audio device drivers are released, they
are tested for use with the operating system versions that are available at that time. When
updates for an operating system are released by Microsoft or Apple, all M-Audio device
drivers have to be re-tested and possibly updated to ensure proper operation. M-Audio
recommends refraining from installing operating system updates until a driver has been
posted to the M-Audio website for that specific operating system.
ProKeys Sono 61 User Guide
|
6
Controls and Connectors
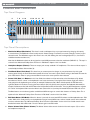
Top Panel Diagram
6
7
8
9 10
11 12
13 14
15
5
4
3
2
1
16
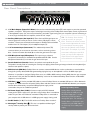
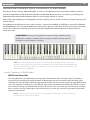
Top Panel Descriptions
1.Modulation Wheel (Modulation): This wheel is used to add expressivity to your performance by changing the intensity
of certain effects. The Modulation wheel usually controls vibrato (change in intonation) or tremolo (change in volume) of your
selected sound. The MIDI data range of this wheel is 0 to 127, with 0 being the note-unchanged position (i.e., the wheel is
rolled downward toward the user).
Note that the Modulation wheel can be assigned to control MIDI parameters other than modulation (MIDI CC 1). This topic is
covered in the “Advanced ProKeys Sono Functions in Edit Mode” chapter of this User Guide.
2.Headphone Outputs (Phones): These two output jacks accept standard 1/4” headphones. The volume of these outputs is
controlled by the Master Volume fader (6).
3.Pitch Bend Wheel (Pitch Bend): This wheel lets you create expressive changes in your performances by raising and
lowering pitch. Rolling the Pitch Bend wheel upward will raise an instrument’s pitch whereas rolling it downward will lower the
pitch. Note that this wheel is spring-mounted and will return to the center position when released.
4. Octave Shift (Data) < > Buttons: In this User Guide, these buttons will be referred to as the Data buttons. By default,
these buttons shift the “center” of the keyboard in one octave increments. Pressing the Data > button (right) will shift the
notes played on the keyboard up one octave (for example, D2 becomes D3). When shifted upward, the LED above the
right Data button will illuminate. Pressing the Data < button (left) will shift the notes played on the keyboard downward (for
example, G4 becomes G3) and the LED above the left Data button LED will illuminate. Pressing both Data buttons together
will “center” the keyboard and restore the default state (Octave shift = 0) and any illuminated Data button LEDs will turn off.
The Data buttons can also be assigned to send different MIDI messages or control other features on ProKeys Sono. This is
explained in the “Advanced ProKeys Sono Functions in Edit Mode” section of this User Guide.
5.Edit Mode Button (Edit Mode): When this button is pressed, the associated LED illuminates and the keyboard enters “Edit
mode.” While in this mode, the keys on the keyboard no longer transmit MIDI notes, and are instead used to select advanced
functions and enter data. The “Advanced ProKeys Sono Functions in Edit Mode” section of this User Guide contains more
detailed information about Edit mode. Press this button again to exit Edit mode.
6.Master Volume Fader (Master Volume): The Master Volume fader controls the level of the main outputs (17) as well as
the headphone outputs (2).
ProKeys Sono 61 User Guide
|
7
7.Microphone Gain Knob (Mic Gain): This knob controls the gain level of the Microphone input. The signal (green) LED
illuminates when signal is present at the microphone input (i.e., incoming audio signal is greater than -20dB). The peak (red)
LED illuminates when incoming audio signal is clipping (distorting) and indicates that the Microphone Gain knob should be
turned down.
8.Instrument Gain Knob (Inst. Gain): This knob controls the gain level of the Instrument input. The signal (green) LED
illuminates when signal is present at the instrument input (i.e., incoming audio signal is greater than -20dB). The peak (red)
LED illuminates when incoming audio signal is clipping (distorting) and indicates that the Instrument Gain knob should be
turned down.
9.Mono Button (Mono): By default, this button affects how incoming signals from the Microphone, Instrument and Auxiliary
inputs are heard through your speakers or headphones. When active, any input signal will be routed to both the left and the
right side of your stereo speakers or headphones in equal amounts, making them appear centered in the stereo field.
Note that by default, the Mono button only affects what you hear. In other words, when recording while the Mono button
is active, the signals from the Microphone, Instrument, and Auxiliary inputs are still sent to your computer in separate left
and right channels, meaning the Microphone will appear on the left channel and Instrument on the right channel within
your recording software (the left and right channels of your Auxiliary inputs will appear in the left and right channels of your
software, respectively).
Also note that the function of the Mono button can be changed to allow incoming signals to be recorded exactly as they are
heard while monitoring. See the “MONO Input Record Key” portion of the “Advanced ProKeys Sono Functions in Edit Mode”
section of this User Guide for information on how to change the operation of this button.
10.Direct Monitor Knob (Direct Monitor): The Direct Monitor knob controls the amount of audio input signal flowing from the
Microphone, Instrument or Auxiliary inputs directly to the 1/4” main outputs. This allows you to monitor your inputs with
near-zero latency.
11.Piano Reset Button (Piano Reset): This button restores basic piano and keyboard controller functions, including resetting
the Modulation wheel, Voice Volume knob, and Sustain Pedal to their default settings. This is useful in situations in which a
user has changed settings of ProKeys Sono and would like to quickly return to the default state (i.e., the Local Mode setting
is set to “On” and the ProKeys Sono Grand Piano sound is loaded). Pressing the Piano Reset button also sends a “MIDI
Panic” sequence of commands (i.e., “All Notes Off” and “Reset All Controllers” MIDI messages) on MIDI channel 1—a useful
feature if you experience “stuck” MIDI notes. For a complete list of MIDI messages that are sent when this button is pressed,
see Appendix E, “Piano Reset Button.”
12.Voice Volume Knob (Voice Vol): This is an assignable controller that, by default, controls the volume of the sounds built
into ProKeys Sono. Details on how to change the function of this knob can be found in the “Knob Assignment” portion of the
“Advanced ProKeys Sono Functions in Edit Mode” section of this User Guide.
13.Reverb On/Off Button (Reverb On/Off): This button engages the internal reverb effect of ProKeys Sono, adding the
effect to the internal keyboard sounds of ProKeys Sono. The reverb depth can be controlled via MIDI CC commands. See
the “Advanced ProKeys Sono Functions in Edit Mode” chapter of this User Guide for more information on this.
14.Chorus On/Off Button (Chorus On/Off): This button engages the internal chorus effect of ProKeys Sono, adding
the effect to the internal sounds of ProKeys Sono. The chorus depth can be controlled via MIDI CC commands. See the
“Advanced ProKeys Sono Functions in Edit Mode” chapter of this User Guide for more information on this.
15. Voice Select Buttons: These buttons let you select which of the five high-quality sounds is played by the ProKeys Sono
keyboard.
16. Keyboard: ProKeys Sono features 61 full-size, semi-weighted, velocity-sensitive keys.
|
ProKeys Sono 61 User Guide
8
Rear Panel Descriptions:
£Ç
£n
£
Óä
Ó£
ÓÓ
ÓÎ
Ó{ Óx
ÓÈ
17.1/4” Main Outputs (Output R—L/Mono): Connect these unbalanced tip-sleeve (TS) main outputs to your mixer, powered
speakers, or amplifier. These jacks output a mixed signal consisting of the ProKeys Sono internal piano sounds, signal from all
of the keyboard’s inputs (mic, instrument, and auxiliary), and audio signal coming from your computer. If you are connecting to
a mono (single channel) device or amplifier, use the left 1/4” output.
TIP: The ProKeys Sono Auxiliary
18.Auxiliary RCA Inputs (Aux Input R—L): These line-level RCA-type inputs can
inputs do not have an input gain
receive signal from a variety of sources such as mixers, CD players, or drum
knob. Therefore, the volume of these
machines. These inputs are mixed into the outputs of ProKeys Sono and will be
inputs must be adjusted at the source
heard on the 1/4” main outputs (17) or headphone outputs (2).
to ensure that the incoming signal
does not clip (distort) at the ProKeys
19.1/4” Instrument Input (Instrument): This unbalanced tip-sleeve (TS)
Sono input. For example, if you have
connector allows you to connect an instrument, such as an electric guitar or
connected a CD player to the RCA
bass. Use the Instrument Gain knob (8) to control the gain level of this input.
inputs, you may need to adjust the
20.XLR Microphone Input (Microphone): This input accepts a dynamic
output volume of the player itself to
microphone connected via a standard three-pin balanced XLR cable. Use the
ensure distortion free recordings.
Microphone Gain knob (7) to control the gain level of this input.
21.Sustain Pedal Jack (Sustain): Connect an optional sustain pedal to this jack.
This pedal is normally used for sustaining the sound you are playing without having to keep your hands on the keyboard (just
like the sustain pedal on a piano).
22.MIDI Out Jack (MIDI Out): ProKeys Sono can connect to external MIDI devices such as synthesizers or sound modules
through this jack. By default, MIDI data generated by playing the keys on the keyboard is sent to this MIDI output jack.
However, it is possible to configure ProKeys Sono to act as a USB to MIDI interface, allowing MIDI data from your computer
to be sent out of this jack. See the “MIDI Out Mode Key” section of the “Advanced ProKeys Sono Functions in Edit Mode”
chapter for more information.
23.USB Port (
): Use the provided USB cable to connect ProKeys Sono to an available USB port on a PC or Macintosh
computer. This USB connection will power ProKeys Sono and allow transfer of audio and MIDI data between your computer
and the device. Alternatively, an optional USB-type power supply can be
Powering ProKeys Sono:
connected to this port for standalone operation.
24.DC Power Supply Port (9V DC): Connect an optional 9V DC >500mA
center-positive power supply to this jack when using ProKeys Sono in standalone
mode. This port does not need to be used when ProKeys Sono is connected to
your computer with a USB cable or if a USB-type power supply is being used.
25. On/Off Switch ( I / O ): This On/Off switch turns ProKeys Sono on and off.
26.Kensington® Security Slot ( ): This slot is compatible with Kensington®
security cables to protect your device from theft.
ProKeys Sono can be powered
through either the USB port or the
DC Power Supply port. It is NOT
necessary to power the device
through both ports. For example, if
ProKeys Sono is connected to your
computer using the USB cable, it is
not necessary to use a DC power
supply.
ProKeys Sono 61 User Guide
|
9
Hardware Connections
Audio Inputs
A dynamic microphone can be connected to the XLR input on the rear panel of the keyboard, while an instrument such as a guitar
or bass can be connected to the 1/4” input jack next to the XLR input. Each of these two inputs has an independent preamp with
its own gain control knob, and signal/clip LEDs. Two RCA Auxiliary inputs are also located on the back panel. Signal from these
inputs is mixed with the Microphone and Instrument inputs before being routed through the USB connection to a connected Mac
or PC.
Audio Outputs
Connect the two 1/4” main outputs on the rear panel to powered monitors, an amplifier, or a mixer. You may also monitor through
headphones by connecting one or two sets of headphones to the 1/4” stereo headphone outputs on the front panel.
MIDI Connections
In addition to the USB MIDI connection between ProKeys Sono and your computer, you can connect the MIDI Out jack of
ProKeys Sono to an external device’s MIDI input. This allows you to control an external synthesizer or sound module by either
using ProKeys Sono as a standalone MIDI controller keyboard or by sending your sequencing application’s MIDI data to the
hardware device through the keyboard (i.e., using ProKeys Sono as a USB to MIDI interface).
Note that the ProKeys Sono “MIDI Out Mode” setting must be configured correctly for your sequencing application’s MIDI output
signals to appear at the MIDI output jack on the back of ProKeys Sono. Please see the section entitled “MIDI Out Mode Key” in
the “ProKeys MIDI Output Settings” chapter to find out more about this setting.
Other Connections
A sustain pedal can be connected to the 1/4” Sustain pedal jack on the back of the keyboard.
|
ProKeys Sono 61 User Guide
10
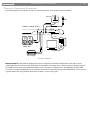
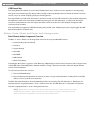
Example Operating Scenarios
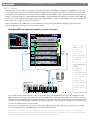
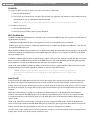
The following diagrams illustrate two scenarios in which ProKeys Sono is connected to external hardware.
'UITAR
-IC
0RO+EYS3ONOBACK
/UTPUT
2
,<-ONO
!UX)NPUT
2
,
)NSTRUMENT -ICROPHONE 3USTAIN -)$)/UT
6$#
53"
0OWERED
-ONITORS
#OMPUTER
#$0LAYER
Example Setup #1
Example Setup #1 shows M-Audio ProKeys Sono with a microphone connected to the Microphone input, and an electric
guitar plugged into the Instrument input. A CD player is connected to the auxiliary inputs. The main outputs of ProKeys Sono are
connected to a monitoring system (powered speakers, in this case) while a computer powers the keyboard through the USB
connection. A sequencing application on the computer handles all incoming and outgoing audio and MIDI data. This is covered
in greater detail in the “Using ProKeys Sono with a Computer” section of this guide.
ProKeys Sono 61 User Guide
|
11
-)$)/UT
0RO+EYS3ONOBACK
/UTPUT
2
,<-ONO
!UX)NPUT
2
,
)NSTRUMENT -ICROPHONE 3USTAIN -)$)/UT
6$#
53"
0OWERED
-ONITORS
#OMPUTER
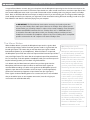
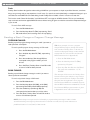
Example Setup #2
Example Setup #2 shows a drum machine plugged into the Aux inputs, and the ProKeys Sono main outputs plugged into a
pair of powered speakers. The ProKeys Sono MIDI Output jack is connected to the MIDI input of the drum machine, while a
sequencing application on a computer handles audio and MIDI data through the USB connection (see “Using ProKeys Sono with
a Computer” to learn more about how your ProKeys Sono and computer exchange audio and MIDI data).
This setup allows you to:
1. Send MIDI information from either the ProKeys Sono keyboard or your computer’s sequencer to the drum machine.
2. Return the audio output of the drum machine into ProKeys Sono, where it can be mixed with the built-in sounds and/or
audio coming from the computer.
3. The mixed output is then sent to powered speakers (or headphones) for monitoring.
About the audio inputs:
Keep in mind that ProKeys Sono features a 2-input, 2-output audio interface. This means that while ProKeys Sono has a variety
of analog inputs on its rear panel (i.e., an XLR microphone input, a 1/4” instrument input, and a pair of RCA Aux inputs), the XLR/
Left Aux and Instrument/Right Aux inputs are merged (or “summed”) together before being sent to the computer. In other words,
if signal is present at all of the inputs when you begin recording, the XLR and Left Aux will appear mixed together in channel one
of your software while the Instrument and Right Aux inputs will appear mixed together as channel two.
Note that by default, the built-in ProKeys Sono sounds are also summed with the microphone, instrument, and auxiliary inputs
and sent to the computer for recording. If you do not wish to send the ProKeys Sono sounds to your music software, this can be
accomplished by toggling the USB Record switch in Edit mode. Additional information on this can be found in the “USB Record
Key” portion of the “Advanced ProKeys Sono Functions in Edit Mode” chapter of this User Guide.
Similarly, while ProKeys Sono features two sets of headphone outputs and 1/4” main outputs, all of these outputs play the same
stereo signal.
ProKeys Sono 61 User Guide
|
12
ProKeys Sono as a Standalone Instrument
Standalone operation refers to using ProKeys Sono without a computer. To do this, an optional USB-type power supply or 9V, 500mA
center-positive power supply (sold separately) is required.
NOTE: While ProKeys Sono can receive power from two different power sources, the device only
requires one power source to operate. In other words, if one type of power supply is connected
(such as a USB-type power adapter), it is not necessary to connect the second type of power supply
(the 9V, 500mA adapter).
ProKeys Sono can function as a standalone instrument, providing five premium voices, and a complete General MIDI (GM) sound
set. In addition to playing the built-in sounds, you can use the keyboard to trigger sounds on synthesizers or sound modules that are
connected to the MIDI Out jack on ProKeys Sono. By default, ProKeys Sono transmits MIDI data on channel one.
You can also use the Mic Gain, Instrument Gain, Direct Monitor and Voice Volume knobs in standalone mode to create a mix of your
keyboard, guitar and vocal performances.
ProKeys Sono Premium Voice Selection
The five premium voices can be accessed via the Voice Select buttons on the top panel. Pressing one of these buttons activates
the corresponding sound.
ProKeys Sono GM sound selection
The ProKeys Sono keyboard has a full General MIDI (GM) sound set with 128 sounds built-in. The built-in GM sounds can be
accessed in two ways:
Method 1: Recall a specific General MIDI instrument in Edit mode
Appendix A lists the built-in General MIDI instruments by their sound numbers. Access a specific instrument by entering its
number in Edit mode:
1.
Press the Edit Mode button.
2.
Press the black key above F5 (F#5), representing “Program.”
3. Enter the desired program number, using the white keys between G4 and B5.
4. Press C6 (Enter) to confirm the selection.
Method 2: Browse General MIDI instruments using the Data buttons
Reassigning the Data buttons to send program change messages will allow you to step through and audition the built-in
General MIDI sounds in consecutive order. To configure the Data < > buttons to send program change messages: 1.
Press the Edit Mode button.
2. Press the black key above F2 (F#2). (ProKeys Sono will automatically exit Edit mode).
3. Press the Data > and < buttons to step forward and backwards through the built-in GM sounds.
To return the Data keys to control the octave shift value:
1.
Press the Edit Mode button.
2.Press the black key above C2 (C#2), representing “Data = Octave.” (ProKeys Sono will automatically exit Edit mode).
For additional information on program changes, see the “Advanced ProKeys Sono Functions in Edit Mode” chapter of this
User Guide.
|
ProKeys Sono 61 User Guide
13
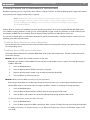
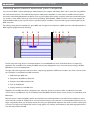
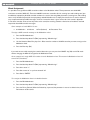
ProKeys Sono as a Standalone Microphone Preamplifier and Mixer
'UITAR
-IC
0RO+EYS3ONOBACK
/UTPUT
2
,<-ONO
!UX)NPUT
2
,
)NSTRUMENT -ICROPHONE 3USTAIN -)$)/UT
6$#
-)$)/UT
0OWERED
-ONITORS
!#
!DAPTER
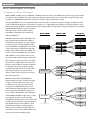
ProKeys Sono can function as the centerpiece of a simple live performance setup.
Connect a Microphone and an Instrument (such as an electric guitar or bass) to
ProKeys Sono and use the Microphone and Instrument gain knobs to set the input
levels. Next, use the Direct Monitor knob to set the overall level of the microphone
and instrument inputs in the mix. Finally, adjust the level of the keyboard’s built-in
sounds by using the Voice Volume knob.
If you connected the line outputs of an external device to the aux inputs of ProKeys
Sono, the volume level of that device may need to be adjusted at the external device
itself.
The mixed signal of Microphone, Instrument, Aux input and built-in sounds will be
available on both headphone outputs and the rear-panel 1/4” outputs.
Tip: Connect the MIDI Out jack
of ProKeys Sono to an external
MIDI synthesizer or sound module.
Connect the Line outputs of the
external device to the Aux inputs
on ProKeys Sono. If you play the
ProKeys Sono keyboard, you will
trigger MIDI sounds on the external
MIDI synthesizer, and can hear them
back through the ProKeys Sono main
outputs.
Use the Master Volume slider to adjust the overall output level.
NOTE: ProKeys Sono is capable of many advanced features which can be accessed via the
ProKeys Sono Edit mode. Many of these features can be useful when ProKeys Sono is operating in
Standalone mode. Additional information concerning these features can be found in the “Advanced
ProKeys Sono Functions in Edit Mode” chapter of this User Guide.
ProKeys Sono Demos
ProKeys Sono has a built-in demo song for each instrument sound. To hear these demos:
1. Press the Edit Mode button.
2. Press one of the Voice Select buttons.
Demo playback can be stopped by pressing the Edit Mode button. While the demo is playing, the LED of the selected voice
will flash. At the completion of the demo, the demo song will repeat.
ProKeys Sono 61 User Guide
|
14
Basic ProKeys Sono Setup in Windows
Information on Windows driver installation can be found in the included printed Quick Start Guide.
Your computer will recognize ProKeys Sono without the need to install the M-Audio driver software. However, M-Audio recommends
installing the device drivers for improved audio performance and to gain access to additional professional features such as:
<
Low latency software monitoring:
Low latency software monitoring allows you to play software synthesizers and monitor audio input through your recording
software with minimal delay between an action (e.g. pressing a key, strumming a chord, or singing a note) and hearing the
resulting sound on your speakers or headphones.
<
Multi-client MIDI operation:
This feature allows you to use ProKeys Sono as a MIDI input and output device with more than one application at the same
time.
<
Support of large System Exclusive (SysEx) transfers:
Transmit large SysEx files (e.g. all parameters of every sound on an external synthesizer, stored within a single file) to
connected Synthesizers or other MIDI devices.
<
Pro Tools M-Powered support:
Use ProKeys Sono as an audio interface with a qualified version of the Pro Tools M-Powered production software.
If you do not require any of the above listed features, you can simply connect ProKeys Sono to your Windows computer and
begin using it without the need to install additional driver software.
Windows XP/Vista users: Important information for class-compliant operation
IMPORTANT:
When using ProKeys Sono class-compliant (i.e., without installing drivers) in Windows, the
computer will search for the M-Audio DFU (device firmware upgrade tool) and display a Found New Hardware
Wizard. The M-Audio DFU is a component of ProKeys Sono 61 that is enabled when the M-Audio drivers are
installed, but is not necessary for class-compliant operation. You have the following options:
A. Cancel the Found New Hardware Wizard and start using ProKeys Sono immediately.
The Found New Hardware Wizard will appear every time your computer detects that the device is
connected (e.g. upon restarting the computer or disconnecting/reconnecting ProKeys Sono).
B.Follow the Found New Hardware Wizard until it gives the option not to be prompted to install this
hardware again.
Windows Vista Users:
• Select “Don’t show this message again for this device” in the first screen that appears.
• Click “Continue” in the confirmation screen that follows.
Windows XP Users:
• In the first screen, select ”No, not this time” and click “Next”
• In the second screen, select “Install the software automatically” and click “Next”
• Finally, make sure the check box labeled “Don’t prompt me again to install this software” is active, then
click Finish.
C. Install the M-Audio drivers as described in the “Driver Installation for ProKeys Sono 61” section of the
Quick Start Guide. After these drivers have been installed, the Found New Hardware Wizard for the
M-Audio DFU will no longer be displayed.
ProKeys Sono 61 User Guide
|
15
ProKeys Sono Setup in Mac OS X
Your computer will recognize ProKeys Sono without the need to install the M-Audio driver software. However, M-Audio drivers need to
be installed if you are planning to use ProKeys Sono with a qualified version of the Pro Tools M-Powered music production software.
➜ I MPORTANT: Disconnect ProKeys Sono from your computer until the appropriate driver
files have been copied to your hard drive. The instructions will indicate when the keyboard
should be connected to your computer.
1.We recommend that you download the most recent drivers by going to the Support > Drivers page at www.m-audio.com.
This ensures that you have the newest drivers available. If you do not have Internet access, insert the M-Audio ProKeys Sono
Drivers and Documentation CD-ROM into your computer to install the drivers that came with the keyboard.
a. If you are installing drivers from the M-Audio ProKeys Sono Drivers and Documentation CD-ROM, a CD-ROM icon will
appear on your desktop once the disc is inserted into your computer. Double-click this icon to view the contents of the
disc. Next, double-click “Open Me.” Finally, select your product from the drop-down menu on the welcome screen and
click “Install.”
b. If you are installing drivers from www.m-audio.com, the downloaded file should automatically mount and display its
contents. If this file does not automatically mount after it has finished downloading, click on the file from the download
stack (Mac OS X 10.5), or double-click the file from the desktop (Mac OS X 10.4) to display its contents. Next, doubleclick the installer application.
2.Follow the driver installer’s on-screen instructions. During Installation, Mac OS X will ask you to enter your user name and
password. Enter this information and click OK to confirm. If you have not configured a password for your computer, leave the
password field blank and click OK. If you are not the computer’s owner, ask the owner or your Administrator for the missing
information.
3. When the installer has completed, click “Restart.” Your computer will reboot automatically.
4. After your computer has finished starting up, connect ProKeys Sono to an available USB port on your computer. The single
USB cable not only powers the keyboard but also transfers MIDI and audio data to and from your computer system.
ProKeys Sono is now ready to use.
ProKeys Sono 61 User Guide
|
16
Using ProKeys Sono with a Computer
ProKeys Sono provides an array of features, and a multitude of possibilities when used in conjunction with recording software on your
computer. As described earlier in this guide, ProKeys Sono combines the functionality of several devices in one single product. These
features can interface with computer software in many different ways. Recording software typically provides different types of tracks,
allowing you to harness the various features of ProKeys Sono.
ProKeys Sono transmits two types of data: Audio and MIDI. Audio is the same type of data that we encounter in our daily lives when
we turn on the radio, or television and hear the resulting sound. Audio is the signal that is sent from microphones and instruments
such as electric guitars and basses to speakers or amplifiers.
On the other hand, the MIDI protocol consists of messages that are used to control synthesizers, sound modules, keyboards, or
“virtual instruments” found within computer software. These MIDI data messages give instructions on how a sound should play. These
instructions dictate parameters such as what note to play, when to play it, how loud to play it, and which sound to use.
The examples on the following pages will examine various recording scenarios by looking at a generic recording/sequencing
application and how it handles audio and MIDI data on separate track types.
Audio Tracks:
Audio tracks allow recording and playback of audio that originates from the Microphone, Instrument or Aux inputs. Audio tracks
within your computer software can also be used to record the built-in voices of ProKeys Sono as audio. Once an audio recording
is made, you can apply effects or edit the recording by cutting or copying parts of the recording. However, the general sound of
the recording is fixed if recorded using audio tracks, and cannot easily be changed.
NOTE: The following examples make use of software-based monitoring. Software monitoring
allows you to hear your signals after they have passed through the recording software. ProKeys
Sono also features a Direct Monitor knob (10) that allows you to listen to input signals directly on
the main outputs, without passing the signals through your audio software. This feature is covered
in the “Using Direct Monitoring” section of the “ProKeys Sono Audio Setup and Controls” chapter.
ProKeys Sono 61 User Guide
|
17
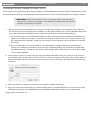
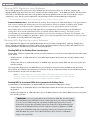
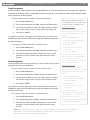
Recording from a Microphone to an Audio Track
12:02:101
Song1
Add A Track
4
6
8
10
12
14
16
18
20
22
24
26
28
30
Audio Out
USB
2
Mic
Audio Out
Instr
USB
Audio Out
Aux
Stereo
Audio Out
Virtual
Inst
MIDI Active
MIDI
Sono 61
Voices
MIDI Active
MIDI
Sono 61
MIDI
Output
MIDI Active
Recording Software
USB
ProKeys Sono 61
USB
Powered
Monitors
Microphone
In this scenario, ProKeys Sono is being used as an audio interface to record a
microphone:
he microphone’s output signal is received at the microphone (XLR) input jack on
T
ProKeys Sono and sent to the computer through the USB connection. Sequencer
software running on the computer can then capture the microphone signal on one of its
mono audio tracks (the track is labeled “Mic” in the illustration above).
This signal can be monitored while recording or played back after it has been recorded.
Monitoring can take place over powered speakers (connected to the 1/4” main
output jacks on the rear panel) or by headphones (connected to either one of the 1/4”
headphone jacks on the front panel).
Keep in mind that—depending on how the Mono button is configured to function—the
microphone input routing can be altered to make the microphone appear on both
channels (one and two) of a stereo track (i.e., “centered” in the stereo field). This
functionality may be helpful in direct monitoring situations where headphones are being
used. To learn more about this, see the section titled “The Mono Button” within the
“ProKeys Sono Audio Setup and Controls” section of this User Guide.
TIP: Signal from the
ProKeys Sono microphone
input is usually available on
input channel one within
your recording software. To
record from a microphone,
this mono audio track must
be configured to receive
signal from audio input
channel one. See your audio
application’s documentation
to learn how to configure an
audio track.
TIP: When recording with a
microphone in your studio,
it is recommended that you
turn off your speakers and
monitor through headphones.
This prevents feedback loops
which may be very loud and
can damage your equipment
or harm your hearing.
ProKeys Sono 61 User Guide
|
18
Recording an Instrument to an Audio Track
12:02:101
Song1
Add A Track
4
6
8
10
12
14
16
18
20
22
24
26
28
30
Mic
Audio Out
Instr
Audio Out
USB
2
Audio Out
Aux
Stereo
USB
Audio Out
Virtual
Inst
MIDI Active
MIDI
Sono 61
Voices
MIDI Active
MIDI
Sono 61
MIDI
Output
MIDI Active
Recording Software
USB
ProKeys Sono 61
USB
Powered
Monitors
Instrument
Like the previous scenario, ProKeys Sono is being used as an audio interface. However, this time
the instrument input is being used to record an electric guitar (or bass) into your computer.
The guitar’s output signal is received at the 1/4” instrument input jack on ProKeys Sono and sent
to the computer through the USB connection. Sequencer software running on the computer can
then capture the guitar’s signal on one of its mono audio tracks (the track is labeled “Instr” in the
illustration above).
This signal can be monitored while recording or played back after it has been recorded. Monitoring
can take place over powered speakers (connected to the 1/4” main output jacks on the rear panel)
or by headphones (connected to either one of the 1/4” headphone jacks on the front panel).
Keep in mind that—depending on how the Mono button is configured to function—the instrument
input routing can be altered to make the instrument appear on both channels (one and two)
of a stereo track (i.e., “centered” in the stereo field). This functionality may be helpful in direct
monitoring situations where headphones are being used. To learn more about this, see the section
titled “The Mono Button” within the “ProKeys Sono Audio Setup and Controls” section of this
User Guide.
TIP: Signal from
the ProKeys Sono
instrument input is
usually available on
input channel two
within your recording
software. To record the
instrument’s output, this
mono audio track must
be configured to receive
signal from audio input
channel two. See your
audio application’s
documentation to learn
how to configure an
audio track.
ProKeys Sono 61 User Guide
|
19
Recording the Aux Inputs to an Audio Track
12:02:101
Song1
Add A Track
2
4
6
8
10
12
14
16
18
20
22
24
26
28
Mic
Audio Out
Instr
Audio Out
Audio Out
Aux
Stereo
USB
30
Audio Out
Virtual
Inst
USB
MIDI Active
MIDI
Sono 61
Voices
MIDI Active
MIDI
Sono 61
MIDI
Output
MIDI Active
Recording Software
USB
Powered
Monitors
RCA
ProKeys Sono 61
Sound Module
or CD Player
USB
Once again, ProKeys Sono is being used as an audio interface. However, in this scenario, the auxiliary input jacks are being
used to record the output of an external device (such as a sound module, CD player, or other line-level device).
The external device’s stereo output is received at the RCA input jacks on ProKeys Sono
and sent to the computer through the USB connection. Sequencer software running on the
computer can then capture the device’s signal on a stereo audio track (labeled “Aux Stereo”
in the illustration above). Signal entering the left Aux input is routed to the left channel
of your software (i.e., channel one) while the right Aux input is routed to the right channel
(channel two) of the recording software.
This stereo signal can be monitored while recording or played back after it has been
recorded. Monitoring can take place over powered speakers (connected to the 1/4” main
output jacks on the rear panel) or by headphones (connected to either one of the 1/4”
headphone jacks on the front panel).
TIP: Signal from the
ProKeys Sono auxiliary inputs
are usually available on input
channels one and two within
your recording software. To
record the external device’s
outputs, a stereo audio
track must be configured to
receive signal from audio
input channels one and two.
See your audio application’s
documentation to learn how
to configure an audio track.
Keep in mind that—depending on how the Mono button is configured to function—the routing
of the auxiliary inputs can be altered to make the left and right channels appear as a mono
sound source that is “centered” in the stereo field. This functionality may be helpful in direct
monitoring situations where headphones are being used. To learn more about this, see the section titled “The Mono Button”
within the “ProKeys Sono Audio Setup and Controls” section of this User Guide.
|
ProKeys Sono 61 User Guide
20
MIDI Tracks:
MIDI tracks allow you to record the notes you play on the ProKeys Sono keyboard as MIDI data. The benefit of using MIDI tracks is that nearly
every aspect of each recorded note can easily be changed. For example, you can change the pitch, duration or even the instrument sound after
a recording has been made. However, you always need to have a MIDI instrument available in order to play back MIDI tracks. ProKeys Sono has
a built-in sound engine that gives you 128 standardized “General MIDI” sounds (including the five ProKeys Sono premium sounds). Additionally,
you can choose to use virtual instrument software within your recording application, or connect an optional MIDI sound module to the MIDI Out
jack on ProKeys Sono to give you even more sound choices.
Below, we will examine various MIDI options you have with ProKeys Sono, by looking at the different track types in a typical recording/
sequencing application, and the options you have with each of them.
Recording MIDI and triggering sounds on a virtual instrument
DW`bcOZ
7\ab`c[S\b
4
6
8
10
12
14
16
18
20
22
24
26
28
30
Mic
Instr
Audio Out
;OZSA]Z]
2
Audio Out
4S[OZS1V]W`
12:02:101
Song1
Add A Track
@SdS`P
1ObVSR`OZ
3QV]
\]\S
Virtual
Inst
Audio Out
MIDI
via
USB
Audio Out
Aux
Stereo
MIDI Active
MIDI
Sono 61
Voices
Audio
via
USB
MIDI Active
MIDI
Sono 61
MIDI
Output
TIP: See your
software’s
documentation
to learn more
about audio/MIDI
routing and virtual
instruments.
MIDI Active
Recording Software
MIDI via USB
Audio via USB
Powered
Monitors
ProKeys Sono 61
NOTE:
For additional
information on
routing MIDI signal
from ProKeys Sono
to your computer
sequencing
software, see the
“Routing MIDI Data
to your Computer”
section of this User
Guide.
In this scenario, the keys, wheels, and other controls of your ProKeys Sono generate MIDI data that is sent to the computer through the
USB connection. The computer’s sequencing software routes this MIDI data to a virtual instrument loaded on one of its tracks. The virtual
instrument receives the MIDI data and then generates audio data (sound) that is then routed to the ProKeys Sono main outputs. Monitoring
can take place over powered speakers (connected to the 1/4” main output jacks on the rear panel) or by headphones (connected to either
one of the 1/4” headphone jacks on the front panel).
Note that it is not necessary to select any of the two ProKeys Sono MIDI output ports5 when working with virtual instruments. Configure
your sequencing application to route MIDI signals to your virtual instrument software.
5 ProKeys Sono will appear as two separate MIDI output ports within your sequencing application: “ProKeys Sono MIDI Out” and
“ProKeys Sono Voices” or, when using the device class-compliant in Windows XP, as “USB Audio Device” and “USB Audio Device [2]”.
See the section titled “Routing MIDI Signals from your Software” for more information.
ProKeys Sono 61 User Guide
|
21
Recording MIDI and triggering the internal sounds of ProKeys Sono
12:02:101
Song1
Add A Track
2
4
6
8
10
12
14
16
18
20
22
24
26
28
30
Mic
Audio Out
Instr
Audio Out
Audio Out
Aux
Stereo
Audio Out
Virtual
Inst
MIDI Active
Sono 61
Voices
MIDI
MIDI
via
USB
MIDI Active
MIDI
Sono 61
MIDI
Output
“ProKeys
Sono
Voices”
port
MIDI Active
Recording Software
MIDI via USB
MIDI via USB
Powered
Monitors
ProKeys Sono 61
Sono 61 Internal
General MIDI
Voices
Note: Most MIDI recording
applications allow incoming
MIDI signals to be recorded and
simultaneously passed through to
externally connected MIDI devices.
If your software is configured to do
this and you are working with the
built-in voices of ProKeys Sono,
sounds will be triggered in real-time
through the recording software.
However, by default ProKeys Sono
also triggers its built-in sounds
directly when playing the keys on
the keyboard. This means that you
may hear every note twice: Once
since the sounds are triggered
locally from the ProKeys Sono
keyboard and a second time
because of MIDI signals returning
to ProKeys Sono from the recording
application.
To prevent notes from being
triggered twice, configure ProKeys
Sono to operate in Local Off mode.
See page 37 for more information
on how to do this.
In this scenario, ProKeys Sono is used to record to a MIDI track within the computer’s sequencing software. The MIDI data is
recorded, simultaneously passed through the software, and routed back to the “ProKeys Sono Voices”6 MIDI output port (this
port connects to the sound engine of ProKeys Sono). Audio is then generated by the built-in sound engine of ProKeys Sono
and sent to powered monitors through the main outputs.
➜ I MPORTANT: Built-in ProKeys Sono sounds can also be recorded as audio to an audio track within your recording
software. By default, sounds generated by the built-in sound engine of ProKeys Sono are merged into audio input
channels one and two, mixing them with input signals from the Microphone, Instrument, and Aux inputs. The mixed
signal can be recorded by your recording software. If you do not wish to send the audio signal created by playing
the built-in ProKeys Sono sounds to your software audio inputs, this can be accomplished by toggling the USB
Record switch in Edit mode. Additional information on this can be found in the “USB Record Key” portion of the
“Advanced ProKeys Sono Functions in Edit Mode” chapter of this User Guide.
6 The order and naming of the MIDI ports may vary slightly depending on your operating system and sequencing
application. If ProKeys Sono is used as a class-compliant device under Windows XP, its output ports will appear as “USB
Audio Device” and “USB Audio Device [2].”
ProKeys Sono 61 User Guide
|
22
Recording MIDI and triggering sounds on an external sound module
12:02:101
Song1
Add A Track
2
4
6
8
10
12
14
16
18
20
22
24
26
28
30
Mic
Audio Out
Instr
Audio Out
Audio Out
Aux
Stereo
Audio Out
Virtual
Inst
MIDI Active
MIDI
Sono 61
Voices
MIDI Active
Sono 61
MIDI
Output
MIDI
MIDI
via
USB
MIDI Active
“ProKeys
Sono
MIDI Out”
port
Recording Software
MIDI via USB
MIDI
RCA
MIDI via USB
Powered
Monitors
ProKeys Sono 61
“MIDI Out”
function
toggled in Edit
mode
Like the previous scenario, ProKeys Sono is used to record to a MIDI track within the computer’s
sequencing software while simultaneously routing this MIDI information back to ProKeys Sono.
However, instead of routing the MIDI signal back to the ProKeys Sono internal sound engine (i.e.,
“the “ProKeys Sono Voices” MIDI port), the MIDI signal is routed to the ProKeys Sono MIDI Out
jack (i.e., to the “ProKeys Sono MIDI Out” 7 port within your software). This results in MIDI data
being sent to an external MIDI sound module.8
The MIDI sound module receives data from the ProKeys Sono MIDI output jack and generates
audio (sound) that is routed back to the RCA inputs of the keyboard. This output of the sound
module can then be monitored through the headphone outputs of ProKeys Sono or via speakers
connected to the 1/4” outputs (as shown above).
TIP: Follow the
method described
in the “Recording
the Aux Inputs to an
Audio Track” section
of this chapter to
record the output of
your external sound
module as audio
within your recording
software.
7
he order and naming of the MIDI output ports may vary slightly depending on your operating system and sequencing
T
application. If ProKeys Sono is used as a class-compliant device under Windows XP, its output ports will appear as “USB
Audio Device” and “USB Audio Device [2].”
8
he ProKeys Sono “MIDI Out Mode” setting must be configured correctly for your sequencing application’s MIDI output to
T
appear at the MIDI output jack on the back of ProKeys Sono. Please see the section entitled “MIDI Out Mode Key” in the
“ProKeys MIDI Output Settings” chapter to find out more about this setting.
|
ProKeys Sono 61 User Guide
23
ProKeys Sono Audio Setup and Controls
Using the Microphone and Instrument Inputs
To record the microphone and instrument inputs of ProKeys Sono into your audio application:
1.Select “ProKeys Sono 61” or “USB Audio Interface 9” as an audio input device within your application’s setup menu.
Please see your audio application’s documentation to learn how to do this.
2.Select “ProKeys Sono 61” or “USB Audio Interface 9” as the audio track’s output within your recording software. Again,
see your audio application’s documentation to learn how to do this.
ProKeys Sono features high-gain, low-noise preamplifiers on its microphone (channel
one) and instrument (channel two) inputs. Channel one features a low-impedance
input with an XLR connector and is designed to receive the output of a dynamic
microphone. Channel two has a 1/4” high-impedance instrument input and is
designed to accept signals from an electric guitar, bass, or other high-impedance
source. You may attach a direct box or passive transformer to the microphone input
(channel 1) if you would like to plug another guitar, bass, or other high-impedance
instrument into the ProKeys Sono Microphone input.
Setting Input Gain
The M-Audio ProKeys Sono Mic input (channel one) and Instrument input (channel
two) each provide up to 35dB of gain. Microphones, electric guitars, and basses
typically emit low “instrument” level signals and require preamplifiers (such as the
ones in ProKeys Sono) to boost the signals before being recorded.
Plug in your microphone or instrument with the gain controls turned down. While
playing your instrument or singing into the microphone at the loudest section of the
song, slowly turn the gain knob clockwise until the red clip LED begins to illuminate.
Then, turn the knob counter-clockwise until the clip indicator no longer illuminates. At
this point, you should be ready to record with the optimum gain setting.
Please keep in mind that the red LED indicates that your input is clipping (distorting)
digitally. This is not the same kind of analog-style distortion found on guitar
amplifiers and stomp boxes. Digital distortion is generally considered to be harsh
and unmusical and it is recommended that you use the signal/peak LEDs to avoid
this type of clipping.
9
Windows XP/Vista Users:
In Windows XP, ProKeys Sono will
appear as “USB Audio Device” if
the optional drivers have not been
installed. If the drivers have been
installed, ProKeys Sono will appear
as “ProKeys Sono 61*”. In Windows
Vista, ProKeys Sono will appear as
“ProKeys Sono 61*” regardless of
whether or not the optional drivers
have been installed.
*Note that the actual ProKeys Sono
name displayed by the computer may
vary slightly.
Tip: As described in the “About the
audio inputs” box in the “Hardware
Connections” chapter earlier in this
User Guide, the XLR/Left Aux inputs
and Instrument/Right Aux inputs are
merged (or “summed”). As a result, if
you are not using one of the inputs,
be sure to turn its gain knob all the
way down (fully counter-clockwise)
since any possible background noise
or unintended signals entering the
unused input during recording may
also be amplified and heard in the
recording.
|
ProKeys Sono 61 User Guide
24
Using the Aux Inputs
M-Audio ProKeys Sono has a pair of line-level inputs labeled “Aux Input.” These
RCA inputs are designed to accept signals from any sound source with line-level
outputs (such as a synthesizer, drum machine, or CD player).
Using music software like Ableton Live Lite, you can record audio into your computer
from any sources with line-level outputs (such as CD players, drum machines, etc.).
➜ IMPORTANT: By default, the Aux inputs and the built-in ProKeys Sono
sounds blend with the Instrument and Microphone inputs before their signals
are sent to a connected computer via USB. If the Aux inputs or any of the
built-in voices are used simultaneously with the Instrument and Microphone
inputs, the resulting recording will be a mix of the various signals. It is not
possible to separate these blended signals after a recording has been made.
If you want to edit or mix the Piano, Microphone, Instrument or Aux inputs
after the recording has been made, then you will need to make a recording of
each of these sound sources one at a time and on separate tracks.
Tip: ProKeys Sono can be configured so that its built-in instrument sounds
are NOT sent to the computer via USB, and therefore will not be recorded
along with signals from the audio input jacks. See the “USB Record Key”
portion of the “Advanced ProKeys Sono Functions in Edit Mode” chapter of
this User Guide for additional information on this.
TIP: You can also use audio
applications such as Ableton Live
Lite to play your MIDI files into your
external synthesizer and record the
output of the synthesizer back into
your computer. This allows you
to apply software “plug-in” effects
to these tracks. To do this, MIDI
sequences must be routed to an
external sound module while the
audio application records the analog
outputs of the external MIDI module
through the ProKeys Sono Aux
inputs. Additional information on this
can be found in the “Recording the
Aux Inputs to an Audio Track” portion
of the “Using ProKeys Sono with
a Computer” chapter of this User
Guide. After recording, you can mix
those tracks with other audio tracks
(such as vocals and guitar) entirely
from within your computer.
Using Direct Monitoring
When a microphone or instrument is plugged into the inputs of ProKeys Sono, its signal needs to be converted to a digital signal,
which then gets sent to the computer via the USB cable. From there, the signal is sent to your music software, processed, and
returned to the ProKeys Sono main outputs. This process usually takes a few fractions of a second to make the round-trip and
that delay is known as “latency.” Latency is not a problem when playing back music, but it can be distracting while recording your
performances. To compensate for this delay, M-Audio ProKeys Sono has a feature called Direct Monitor.
Direct Monitor duplicates your incoming signal and sends one copy of the signal straight to the outputs (the other copy of the
signal is sent to the computer). The signal that is sent directly to the outputs bypasses the computer altogether and has virtually
no latency as a result.
The Direct Monitor knob controls how much of the direct monitor signal is sent straight to the main and headphone outputs. Use
this knob to set the monitoring level of the microphone, instrument, and auxiliary inputs that you are recording relative to the audio
tracks that are playing from your computer.
➜ IMPORTANT: When using Direct Monitor, you will need to disable
“software monitoring” in your audio application. Otherwise, you will “double
monitor” your input signals—once through the Direct Monitor signal path, and
again through your computer software . Disabling software monitoring varies
from application to application, but it is usually done by switching off record
or input monitoring in your software or muting the channels that are record
enabled. See your software’s documentation to learn more.
|
ProKeys Sono 61 User Guide
25
In a typical Direct Monitor scenario, plug your microphone into the Microphone input and guitar into the Instrument input on the
rear panel. Configure a mono track to record from input channel one, and a second mono track to record from input channel two.
Arm (record enable) both mono tracks in your audio software and set their recording levels using the gain controls on ProKeys
Sono. Next, set the Direct Monitor Level and you are ready to record. If you are recording your mic and guitar while listening to
tracks already recorded in your computer, you might want to listen once before starting the actual recording in order to set your
Direct Monitor Level relative to the tracks playing from your computer.
➜ IMPORTANT: The Direct Monitor knob enables monitoring of all audio signals that
enter any of the ProKeys Sono audio inputs. However, the ProKeys Sono outputs must be
selected within your recording software in order to hear sounds created by virtual (computer
software-based) MIDI instruments. Be sure “ProKeys Sono 61” or “USB Audio Device”
is selected as the audio output device within your recording software, and that you have
headphones connected to the headphone outputs on the front of ProKeys Sono or amplified
speakers connected to the 1/4” outputs on the back of ProKeys Sono.
The Mono Button
When the Mono button is pressed, the Microphone input sends its signal to both
the left and right outputs, and the Instrument input also sends its signal to both the
left and right outputs. This means that you will hear these input signals centered
between both speakers (or your headphones). When this button is not pressed,
the Microphone input will be sent to the Left Output and the Instrument input will be
sent to the Right Output. This means that the microphone input will be panned hard
left (i.e., heard only on the left speaker or headphone) while your instrument input will
be panned hard right when you listen back using Direct Monitor.
In its default state, the Mono button only affects how you hear signals from the
Microphone and Instrument inputs, but does not affect how these signals are
recorded. When recording to a stereo track, signal from the Microphone input will
appear as input channel one (referred to as the “left input” in certain applications)
whereas the instrument input appears as input channel two (the “right input”).
These signals can be recorded together on to a stereo track, but it is recommended
that you record the inputs on two separate mono tracks (since this will give you
more control over each individual track).
Tip: ProKeys Sono can be
configured so that signals from the
Microphone and Instrument inputs
are recorded exactly as heard when
monitoring in Mono. Enable the
MONO Input Record function in Edit
mode to use this feature. Once this
setting has been made, the Mono
button will not only affect the way
you hear yourself while recording
(monitoring), but also how the signal
is recorded by your computer. In
this scenario, if the Mono button
is active and you are recording to
a stereo track in your sequencing
software, any mono source (such
as a Microphone or a connected
instrument) will be recorded to both
channels of the stereo track (left
and right). As a result, both, the
microphone and instrument signals
will appear centered between both
speakers – essentially creating a
two-channel mono recording. See
the “Mono Input Record Key” portion
of the “Advanced ProKeys Sono
Functions in Edit Mode” chapter for
additional information on this.
ProKeys Sono 61 User Guide
|
26
The ProKeys Sono Audio Control Panel (Windows Only)
The M-Audio ProKeys Sono Control Panel gives you access to certain audio hardware parameters and status displays. When the
ProKeys Sono drivers are installed, the Control Panel software is also installed onto your system.
The ProKeys Sono Control Panel icon (
) appears in both the system tray (near the clock) and Windows Control Panel.
Double-click the icon to open the ProKeys Sono Control Panel:
Latency
Latency is defined as the time it takes for audio to pass through your computer and appear at the outputs of ProKeys Sono. This
parameter also adjusts the amount of latency when using “virtual instrument” software on your computer. Please see your virtual
instrument software’s documentation to learn more about this.
Smaller buffer sizes result in lower latency, but may not function well with slower computer systems. The Latency slider selects the
buffer size that ProKeys Sono uses to handle digital audio streaming. If you notice significant latency when using ProKeys Sono,
you can experiment with lower settings. If you experience stuttering or crackling in your audio playback, try using a higher latency
setting.
Use the slider to adjust the buffer size to the lowest possible setting that still provides error free recording and playback.
To find your system’s optimum buffer size setting, begin with a high setting and gradually reduce the size until you begin to hear
clicks, pops, or other audible glitches in your audio. Then, raise the buffer size setting until these glitches disappear. You may need
to stop playing audio any time you change this setting and certain applications will require you to re-launch the program before the
new buffer size settings become active.
About
This tab displays the ProKeys Sono Control Panel, firmware, and driver version, and allows you to connect to the M-Audio website
for updates.
|
ProKeys Sono 61 User Guide
27
Routing MIDI Data to and from your Computer
If you are new to MIDI, it may be challenging to understand how your computer and ProKeys Sono “talk” to each other using MIDI as
the communication protocol. The fundamental principle to understand is that MIDI is a control protocol—a MIDI connection allows
instructions to be exchanged between two devices (such as your ProKeys Sono and your computer), rather than actual audio signals
(i.e. sounds). In other words, when a key is pressed on the ProKeys Sono keyboard, a MIDI instruction is sent to your computer (or
hardware MIDI module) to play a specific note at a specified “velocity” (loudness). No actual audio signals are transmitted over the
MIDI connection.
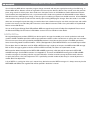
The following image shows an example of a typical MIDI note message as transmitted over a MIDI connection and displayed within a
MIDI sequencing application after recording:
{
Ó
£
Î
Ó £
{
x
Î
The left side of the image shows a visual representation of a recorded MIDI note in the “Piano Roll” editor of a sequencing
application. For many MIDI users, working with MIDI notes that are displayed this way is more intuitive than looking at the bare
MIDI data in list form as explained next.
The right side of the image shows the same note in a sequencing application’s MIDI event list editor, very similar in format to how
this information is transmitted over a MIDI connection.
1. MIDI event type: MIDI note
2. Start point of the MIDI note (Note On)
3. End point of the MIDI note (Note Off)
4. Pitch of the MIDI note
5. Velocity (loudness) of the MIDI note
Regardless of how MIDI information is displayed in your sequencer (visually in a piano roll editor, as traditional score within
musical staff or as a MIDI event list), the recorded or transmitted MIDI information always consists of items 1-5 listed above for all
MIDI notes.
MIDI instructions can be recorded by software and simultaneously routed to destinations that will transform the data into actual
sound: the built-in sounds on ProKeys Sono, a virtual instrument running on the computer, or an external MIDI synthesizer. As you
begin using ProKeys Sono, you will quickly discover that using a computer-based sequencer with virtual instrument software gives
you access to a large array of high-quality sounds, a large graphic user interface, and the ability to edit and change performances
even after they’ve been recorded.
ProKeys Sono 61 User Guide
|
28
Routing MIDI Signals to your Software
Most recording applications require you to select the MIDI input device that you wish to use. To do this, navigate to the
appropriate MIDI setup menu within your music software and select “ProKeys Sono” 10 as the MIDI input device. The exact name
and location of the MIDI setup menu varies among different sequencing applications but it is often found under the “setup” or
“preferences” menu. See your specific application’s documentation to learn more about MIDI input configuration.
10
Note that the actual ProKeys Sono name displayed by the computer may vary slightly.
Attention Windows Users: Under Windows XP, ProKeys Sono will appear as “USB Audio Device” if the optional drivers
have not been installed, and “ProKeys Sono 61” if the optional drivers have been installed. In Windows Vista, ProKeys
Sono will appear as “ProKeys Sono 61” regardless of whether or not the optional drivers have been installed.
Once ProKeys Sono is selected as the MIDI input device, most applications will automatically route MIDI data from
ProKeys Sono to the record-enabled track (unless you explicitly specify a different routing). This means, you can
record-enable your preferred MIDI track, start recording in your sequencer, and play your ProKeys Sono keyboard. Your
performance will be recorded by the application. Refer to your sequencing application’s documentation to learn more about
the specifics of recording MIDI within that program.
Routing MIDI Signals from your Software
Your ProKeys Sono will appear as two separate MIDI output ports in your sequencing application. Selecting “ProKeys Sono
Voices” will send your MIDI data to the ProKeys Sono internal sound engine whereas selecting “ProKeys Sono MIDI Out” will
send that MIDI data to the MIDI output jack on the rear of the keyboard.11
Sending MIDI to the ProKeys Sono sound engine
ProKeys Sono contains a complete GM sound set containing 128 voices, five of which are the ProKeys Sono premium-quality
voices. Select:
• “ ProKeys Sono 61” or “USB audio device” as the MIDI output hardware device within your recording software’s MIDI
setup options.
• “ ProKeys Sono Voices” or “USB audio device” as the MIDI output port of the specific MIDI track you’re using within your
recording software.
This configuration allows you to route MIDI data from your computer to the premium voices and GM sounds on ProKeys
Sono. Consult your software’s documentation for instructions on how to configure the software for use with MIDI instruments
that contain built-in sounds (such as ProKeys Sono).
NOTE: Connect headphones or powered speakers to the ProKeys Sono main outputs. Sounds
created by ProKeys Sono and from software used with it will be available at the main outputs on
ProKeys Sono (not on the outputs of your computer’s built-in soundcard).
Sending MIDI to an external MIDI device connected to ProKeys Sono
If you would like to send MIDI data to an external MIDI device connected to ProKeys Sono: Select:
• “ ProKeys Sono 61” or “USB audio device” as the MIDI output hardware device within your recording software’s MIDI
setup options.
• “ ProKeys Sono MIDI Out” or “USB audio device [2]” as the MIDI output port of the specific MIDI track you’re using within
your recording software.
IMPORTANT: If you are sending data to the “ProKeys Sono MIDI Out” port, the ProKeys
Sono Edit Mode function “MIDI Out” must be configured to allow your sequencer’s MIDI data
to be sent out of the MIDI output jack. By default, the MIDI output jack on the rear of the
keyboard only receives data generated by playing the ProKeys Sono keyboard directly, and
does not receive MIDI data coming from your computer’s sequencing application via USB.
11
The operation of MIDI Out mode can be toggled by following the instructions found in the
“MIDI Out Mode Key” portion of the “Advanced ProKeys Sono Functions in Edit Mode”
chapter of this User Guide.
ProKeys Sono 61 User Guide
|
29
Advanced ProKeys Sono Functions in Edit Mode
The button to the left of the keys, labeled “Edit Mode,” is used to access additional functions of the keyboard. When this button is
pressed, the keyboard enters Edit mode and the LED above the Edit Mode button illuminates. If this button is pressed again, the
keyboard exits Edit mode (the Edit mode button LED turns off) and regular operation is resumed.
When in Edit mode, the black keys on the keyboard are used for selecting functions, while the white keys are used for data entry and
channel selection.
Your keyboard will exit Edit mode as soon as either a function is selected or the CANCEL or ENTER key is pressed. The LED above
the Edit Mode button will turn off and the keyboard can then be used to play notes again. Some functions do not require confirmation
via the Enter or Cancel keys. When these functions are selected, the keyboard will automatically exit Edit mode and return to
Performance mode.
➜ IMPORTANT: Not every music application can process all types of MIDI messages
ProKeys Sono is capable of sending. Please consult your software’s documentation for
information on what messages it can accept.
NOTE: The M-Audio ProKeys Sono Drivers and Documentation CD-ROM contains a document
showing a larger image of the keys and their advanced features in Edit mode called “KeyMap61.pdf.”
We recommend printing this document and keeping it with your ProKeys Sono for fast access to the
advanced features in Edit Mode.
Audio Options in Edit Mode
MONO Input Record Key
This setting determines if the Mono button on the top panel of ProKeys Sono affects how input signals are recorded, or
only how they are heard while monitoring. By default, the Mono button only affects the monitor signal, recordings remain
unaffected. Pressing C#1 in Edit mode and engaging the Mono button will cause all input signals to be merged before being
sent to the computer for recording. As a result, identical signals will be recorded to the left and the right channel of a stereo
track, essentially creating a two-channel Mono recording. This feature is most useful, when only one of the inputs of ProKeys
Sono is used at a time (e.g. the Mic input or the Instrument Input), as it allows you to record a single channel signal to both
channels of a stereo track.
NOTE: If the Mono button on the top panel is disengaged, this option does not have an impact on
the signal path of audio being recorded.
ProKeys Sono 61 User Guide
|
30
USB Record Key
This setting determines whether or not the internal ProKeys Sono voices will be sent to the computer for recording, along
with signals from all audio inputs. By default, audio recordings made using ProKeys Sono will include the internal instrument
sounds, if any of its sounds are playing during the recording process.
Pressing the D#1 key in Edit mode “disconnects” the internal sounds from the USB connection to the computer and prevents
the keyboard’s internal voices from being recorded along with signals from the audio inputs. In other words, the internal
sounds will still be heard out of the main outputs, but these sounds will not be sent to the computer (through the USB
connection) to be recorded.
Pressing the D#1 key toggles the USB Record setting and exits Edit mode. Repeating this process again toggles the USB
Record setting back to its default state.
Button, Knob, Wheel and Pedal Jack Assignments
Data (Octave) button Assignment Overview
The Data “<“ and “>” buttons can be assigned to control one of seven possible MIDI functions:
Octave
(ProKeys Sono 61 Default)
Transpose
Program
Bank
LSB
Bank
MSB
MIDI
Channel
Master
Change
Tune Setting
In the diagram above, there is a group of seven black keys, labeled “Data = Octave, Data = Transpose, Data = Program, Data
= Bank LSB, Data = Bank MSB, Data = Channel and Data = Tuning.” These keys are used to select the desired alternate
function of the Data buttons.
To select alternate Data button functions:
1. Press the Edit Mode button.
2.Press the black key that represents the function you want to assign to the Data buttons. ProKeys Sono will exit Edit
mode as soon as you push one of these keys.
The LEDs above the Data buttons illuminate depending on their current setting. The LED above the “<” Data button will
illuminate when the assigned parameter is set to a value less than zero; the LED above the “>” Data button will illuminate
when the assigned parameter is set to a value greater than zero.
NOTE: Data buttons can control certain functions that cannot be set to values less than zero (such
as MIDI channel selection). When used to control these types of functions, both lights above the
buttons will remain off, regardless of the current setting of that function.
ProKeys Sono 61 User Guide
|
31
Data Button Assignment Options:
1. Octave Shift (Default Data button assignment)
By default, the Data “<” and “>” buttons control octave shift of the ProKeys Sono 61 keyboard. Pressing the Data >
button (right) will shift the notes played on the keyboard up by one octave. Pressing the Data < button (left) will shift the
notes played on the keyboard down by one octave. Pressing both Data buttons together will restore the default octave
(Octave shift = 0).
If you have changed the Data button assignment and would like to re-assign the Data buttons to control octave shift
again:
1. Press the Edit Mode button.
2.Press the black key above C2 (C#2), representing Data = Octave. ProKeys Sono will exit Edit mode as soon as
C#2 has been pressed.
The LEDs above the buttons indicate the direction of the octave shift. An additional method of shifting the ProKeys Sono
octave is described in the “ProKeys MIDI Output Settings” chapter of this User Guide.
2. Transpose
In many cases it is useful to increase or decrease the transmitted pitch by a small number of semitones. For example,
you may be playing a song with a singer and the singer is having trouble hitting the high notes. In this case, you can try
reducing the pitch by one or more semitones. This is achieved using a function called “Transpose.”
To assign the Data “<“ and “>” buttons to transpose:
1. Press the Edit Mode button.
2.Press the black key above D2 (D#2), representing “Data = Transpose.” ProKeys Sono will exit Edit mode as
soon as D#2 has been pressed.
When the Data buttons are assigned to transpose the keyboard, the LEDs above the buttons indicate the direction of
the transposition. To return the keyboard’s transpose shift to zero, press both the Data “<” and “>” buttons at the same
time. An additional method of transposing ProKeys Sono is described in the “ProKeys MIDI Output Settings” chapter of
this User Guide.
3. Channel
MIDI data from the keyboard can be sent on any of 16 MIDI channels. The ProKeys Sono default is to transmit MIDI data
on channel one. However, certain MIDI performance or recording scenarios may require the keyboard to send data on a
different channel.
The Data “<” and “>” buttons can be configured to control the MIDI transmission channel setting. This will allow the
Data “<” and “>” buttons to decrement or increment through the channels. When channel 16 is reached and “>” is
pressed, channel one will be selected.
To assign the Data “<” and “>” buttons to alter the MIDI transmission channel:
1. Press the Edit Mode button.
2.Press the black key above C3 (C#3), representing Data = Channel. ProKeys Sono will exit Edit mode as
soon as C#3 has been pressed.
If the Data “<“ and “>” buttons are assigned to adjust the MIDI channel, the LEDs above the buttons will not change,
since it is not possible to have a channel with a negative value. Pressing both the “<” and “>” buttons together will
recall the default setting, channel one. An additional method of shifting the ProKeys Sono MIDI transmission channel is
described in the “ProKeys MIDI Output Settings” chapter of this User Guide.
ProKeys Sono 61 User Guide
|
32
4. Program Change
Program change MIDI messages can be used to select any of the 128 built-in MIDI instrument sounds on ProKeys
Sono, or to select sounds on external MIDI synthesizers or sound modules connected to the MIDI output jack.
NOTE: When ProKeys Sono is set to Local On, program change messages are always sent to the
MIDI Out jack and the internal sound engine. Program change messages can be sent to just the
MIDI Out jack if the keyboard is set to Local Off. For additional information on Local On and Local
Off modes, see the “Local On/Off Key” section of this chapter.
If the Data “<“ and “>” buttons have been assigned to control the program number, the LEDs above the buttons will not
change, since it is not possible to select a program with a negative value.
To assign the Data “<” and “>” buttons to send program change messages:
1. Press the Edit Mode button.
2. Press the black key above F2 (F#2).
Pressing both the “<” and “>” buttons together will recall Program 0, which selects the first sound patch on any
synthesizer capable of processing MIDI program changes. Program 0 corresponds to the Grand Piano sound on
ProKeys Sono. An additional method of sending Program Change messages is described in the “ProKeys MIDI Output
Settings” chapter of this User Guide.
5. and 6. Bank LSB and Bank MSB
Program changes are the most commonly used messages to change instruments and voices. However, the number of
instruments accessible using only the program change MIDI command is limited to 128 (0-127). Since some devices
have more than 128 voices, they require a method to organize their large number of sounds into banks. Such devices
use Bank LSB (Least Significant Byte) and/or Bank MSB (Most Significant Byte) change messages to select between
groups of sounds (banks). These devices then access the sounds within these banks by using program change
messages. See the “MIDI Messages In-Depth” chapter of this User Guide for additional information. The Data “<” and
“>” buttons can be assigned to send incremental Bank LSB or Bank MSB messages.12
To assign the Data “<” and “>” buttons to send bank change messages:
1. Press the Edit Mode button.
2. Press the black key above G2 (G#2) or A2 (A#2), representing Bank LSB or Bank MSB respectively.
Now the Data “<“ and “>” buttons can be used to send Bank LSB or Bank MSB change messages. As with Program
changes, if the Data “<“ and “>” buttons are selected to vary the Bank LSB or MSB number, the LEDs above the
buttons will not change, since it is not possible to have a Bank with a negative value. Pressing both the “<” and “>”
buttons together will recall Bank 0. Bank 0 is the bank in which the internal ProKeys Sono sounds reside. An additional
method of sending Bank Change messages is described in the “ProKeys MIDI Output Settings” chapter of this User
Guide.
NOTE: Bank change messages must be followed by a program change message in order to recall
a sound. Bank change messages by themselves do not activate a sound, but only locate and access
a predefined location of a set (bank) of 128 sounds.
12
7. Tuning
This key will assign the Data buttons to increment or decrement the Master Tune Setting of ProKeys Sono. The tuning
range is +/- 50 cents. This only affects the internal sound engine. Push and hold the Data < or > button while playing the
keyboard until the desired tuning is found.
To assign the Data buttons to affect the tuning of the built-in ProKeys Sono sounds:
1. Press the Edit Mode button.
2. Press the black key above D3 (D#3), representing “Data = Tuning.”
Now the Data “<“ and “>” buttons can be used to adjust the master tuning of the sounds built into ProKeys Sono.
Pressing both the Data “<” and “>” buttons at the same time restores the tuning offset to zero.
ProKeys Sono 61 User Guide
|
33
Wheel Assignment
It is possible to assign different MIDI controller numbers to the Modulation wheel. These parameters are called MIDI
continuous controllers (MIDI CC). There are 128 MIDI continuous controllers (0-127, counting from and including zero) plus
an additional 4 proprietary M-Audio controller numbers for a total of 132 assignable parameters (counting from and including
zero to 131). Numbers beyond 127 are a proprietary method M-Audio uses to simplify the transmission of certain, otherwise
more complicated multi-part MIDI messages. A full list of controller values is given at the end of this manual in Appendix
C. For these controller values to have any effect on the sound, the receiving software or device has to be able to read and
respond to these MIDI controller messages.
Some examples of useful MIDI CCs are:
01 Modulation 07 Volume 10 Pan (balance) 05 Portamento Time
To assign a MIDI controller message to the Modulation wheel:
1. Press the Edit Mode button.
2. Press the black key above F4 (F#4), representing “Wheel Assign.”
3.Use the Numerical Data Entry keys G4 – B5 to enter the number of the MIDI controller you want to assign to the
Modulation wheel.
4. Press the Enter key (C6).
If you make an error while entering the numerical data value, you can press the CANCEL key (C2) to exit Edit mode
without changing the MIDI CC assigned to the Modulation wheel.
As an example, let’s assign MIDI CC number 10 to the Modulation wheel. This means the Modulation wheel will
control Pan (or balance):
1. Press the Edit Mode button.
2. Press the black key above F4 (F#4), representing “Wheel Assign.”
3. Press A4 to enter “1.”
4. Press G4 to enter “0” so you have entered “10.”
5. Press C6 for “ENTER.”
To re-assign the Modulation wheel to its default function:
1. Press the Edit Mode button.
2. Press the black key above F4 (F#4), representing “Wheel Assign.”
3.Press the F4 key (Default). When the Default key is pressed, the parameter is reset to its default value, and
Performance mode resumes.
|
ProKeys Sono 61 User Guide
34
Pedal Assignment
The Sustain pedal can be assigned to send standard MIDI CCs up to 127 and extended custom messages from 128 to 131.
The default for the Sustain pedal is sending MIDI Controller message 64. Use the G#4 key in Edit mode to change the MIDI
CC assignment for the Sustain Pedal.
To assign a MIDI controller message to the Sustain Pedal jack:
1. Press the Edit Mode button.
2. Press the black key above G4 (G#4), representing “Pedal Assign.”
3.Use the Numerical Data Entry keys G4 – B5 to enter the number of
the controller value you want to assign to the Sustain Pedal Jack.
4. Press C6 for “ENTER.”
If you make an error while entering the numerical data value, you can press the
CANCEL key (C2) to exit Edit mode without changing the MIDI CC assigned to
the Sustain Pedal jack.
To re-assign the Sustain Pedal jack to its default function:
1. Press the Edit Mode button.
2. Press the black key above G4 (G#4), representing “Pedal Assign.”
3.Press the F4 key (Default). When the Default key is pressed, the
parameter is reset to its default value, and Performance mode
resumes.
Knob Assignment
The Voice Volume knob can be assigned to any of 132 controllers (0-131) shown
at the back of this manual in Appendix C.
To assign a MIDI controller message to the Voice Volume knob:
1. Press the Edit Mode button.
2. Press the black key above A4 (A#4), representing “Knob Assign.”
3.Use the Numerical Data Entry keys G4 – B5 to enter the number of
the controller value you want to assign to the Voice Volume knob.
4. Press C6 for “ENTER.”
If you make an error while entering the numerical data value, you can press the
CANCEL key (C2) to exit Edit mode without changing the MIDI CC assigned to
the Voice Volume knob.
To re-assign the Voice Volume knob to its default function:
1. Press the Edit Mode button.
2. Press the black key above A4 (A#4), representing “Knob Assign.”
3.Press the F4 key (Default). When the Default key is pressed, the
parameter is reset to its default value, and Performance mode
resumes.
TIP: Using the Modulation wheel or
Voice Volume knob to set the reverb
or chorus depth on ProKeys Sono
Changing Reverb Depth
The Modulation wheel and/or the Voice
Volume knob can be re-assigned to control the
depth of the built-in ProKeys Sono reverb. To
do this:
1. Press the Edit Mode button.
2. P
ress either the Wheel Assign (F#4) or
Knob Assign (A#4) key.
3. Press B5 to enter “9.”
4. P
ress A4 to enter “1” so you have
entered “91.”
5. Press C6 for “ENTER.”
This setting can be undone by powering the
unit off and back on, or by using the Default
key as described in the next section.
CC 91 is the standard MIDI controller number
for reverb depth (see Appendix C).
Changing Chorus Depth
The Modulation wheel and/or the Voice
Volume knob can be re-assigned to control the
depth of the built-in ProKeys Sono chorus. To
do this:
1. Press the Edit Mode button.
2. P
ress either the Wheel Assign (F#4) or
Knob Assign (A#4) key.
3. Press B5 to enter “9.”
4. P
ress C5 to enter “3” so you have
entered “93.”
5. Press C6 for “ENTER.”
This setting can be undone by powering the
unit off and back on, or by using the Default
key as described in the next section.
CC 93 is the standard MIDI controller number
for chorus depth (see Appendix C).
NOTE: Optional MIDI parameters assigned to the Voice Volume knob, Modulation wheel, or Sustain
Pedal jack are not stored when the keyboard is turned off. These parameters will reset to their
default values each time the keyboard is powered on.
ProKeys Sono 61 User Guide
|
35
Restoring Default Assignments
The Default key is used to selectively reset controller assignments. To reset a specific controller assignment, be sure you
are in Edit mode. Press the key for the parameter you would like to reset (Knob Assign, Pedal Assign, or Wheel Assign), and
then press the Default key (F4). When the Default key is pressed, the parameter is reset to its default value, and Performance
mode resumes.
NOTE: Each time the keyboard is turned off, optional MIDI parameters assigned to specific
hardware controllers will be lost, and the defaults will be restored.
ProKeys MIDI Output Settings
Vel Curve Selection
ProKeys Sono provides three velocity curves to accommodate a variety of playing styles. Three of the keys in Edit mode
are dedicated to the selection of the built-in Low, Mid and Hi velocity curves. The default curve is ‘Mid’ which will always be
selected when ProKeys Sono is powered on.
Pressing one of these keys in Edit mode selects an alternative curve.
Vel Curve=LOW (F#1) makes it easier to play quietly. This curve generates lower velocities than the default curve (MID).
Vel Curve=MID (G#1) is a neutral curve between the low and hi velocity curves.
Vel Curve=HI (A#1) makes it easier to play loudly. This curve generates higher velocities than the default curve (MID).
After one of the Velocity Curve keys is pressed in Edit mode, Performance mode resumes.
OCTAVE:
To change the Octave shift using the Octave “-” and “+” Keys in Edit mode:
1. Press the Edit Mode button.
2.Press the black key above C4 (C#4), representing “Octave -,” to shift the keyboard down by one octave. It is possible
to shift the keyboard down a total of three octaves.
3.Press the black key above D4 (D#4), representing “Octave +,” to shift the keyboard up by one octave. It is possible to
shift the keyboard up a total of four octaves.
4.When you have chosen your octave shift, either press C6 representing “ENTER” or press the Edit Mode button to
exit Edit mode.
TRANSPOSE:
To change the Transposition using the Transpose “-” and “+” Keys in Edit mode:
1. Press the Edit Mode button.
2. Press the black key above C5 (C#5), representing “Transpose -,” to shift the keyboard down by one semitone.
3. Press the black key above D5 (D#5), representing “Transpose +,” to shift the keyboard up by one semitone.
4. Press C6 representing “ENTER,” or press the Edit Mode button to exit Edit mode.
ProKeys Sono 61 User Guide
|
36
CHANNEL:
To change the MIDI transmission channel using the Channel Keys in Edit mode:
1. Press the Edit Mode button.
2.Press one of the 16 Channel keys from D2 to E4, whichever one represents the channel you need. ProKeys Sono will
exit Edit mode as soon as a Channel key has been pressed.
NOTE: In accordance with the General MIDI specification, channel 10 is reserved for drum sounds.
To send data on channel 10:
1. Press the Edit Mode button,
2. Press the F3 key on ProKeys Sono to select channel 10.
MIDI Out Mode Key
The MIDI Out Mode key (G#3) determines what data is sent to the external MIDI Out jack. Pressing this key in Edit mode will
toggle between two options:
1) MIDI generated by playing the keys on the keyboard is sent to the external MIDI output jack (default).
2) MIDI signals from the computer’s sequencing application that are routed to the “ProKeys Sono MIDI Out” 13 port are sent
to the external MIDI output jack.
When the MIDI Out Mode setting has been left in its default setting, MIDI data generated by playing the keys on the keyboard
will be transmitted from the keyboard to the external MIDI output jack and also to your computer via USB. This is the default
setting for ProKeys Sono.
If the MIDI Out Mode setting has been configured to pass signals coming from your computer via USB, the data coming from
the host computer via USB will be sent directly to the MIDI Out jack. In this mode, MIDI data generated by playing the keys
on the keyboard is not sent to the MIDI Output jack, but only to the computer via USB.
In Edit mode, when the MIDI Out Mode key (G#3) is pressed, the function is toggled and Edit mode is exited. Pressing the
Piano Reset button or turning the keyboard off and back on, will restore the default setting.
NOTE: MIDI Out mode only affects signals sent from your computer’s sequencing application to
the “ProKeys Sono MIDI Out” port; this mode does not affect MIDI data sent to the “ProKeys Sono
Voices” port.
13
Local On/Off
The Local On/Off Key (A#3) determines the source of the data stream that is routed to the sounds built into ProKeys Sono.
By default, notes played on the keyboard and notes received via USB from a connected computer are both routed to the
ProKeys internal sound engine. However, pressing this key in Edit mode will set the Local On/Off option to “Off.” This causes
the internal sound engine to no longer directly receive notes from the keyboard, yet still receive MIDI data from a connected
computer.
When the Local On/Off key is toggled, the sounds built into ProKeys Sono will not be played by the piano keyboard.
However, notes played on the keyboard will continue to be sent to the MIDI Out jack as well as to the computer via USB.
In standalone mode, the Local On/Off key allows a remote MIDI device to be controlled without ProKeys Sono playing its
internal sounds.
In Edit mode, when the Local On/Off Key is pressed, the function is toggled and Edit mode is exited. The keyboard then
returns to Performance mode and the Edit Mode LED goes out. At any time, pressing the Piano Reset button will restore this
mode to Local On. Switching the keyboard off and on will also restore this setting back to its default.
Local Off mode is often used to control a software synthesizer running on a connected computer, without layering the built-in
ProKeys Sono sounds on top of the software synthesizer’s tone.
|
ProKeys Sono 61 User Guide
37
Panic
ProKeys Sono has been designed to make working with MIDI on your computer as simple as possible. However, sometimes
things can go wrong and you may experience “stuck” notes (i.e., notes that sustain indefinitely) or unexpected changes in your
sounds due to errant MIDI CC commands being issued. ProKeys Sono includes a “Panic” function to counter this.
This function sends “Reset All Controllers” and “All Notes OFF” messages on all MIDI channels. This lets you immediately
stop stuck notes and remove applied MIDI CC effects without having to figure out what has caused the unexpected changes
in your sound.
To send a Panic MIDI message:
1. Press the Edit Mode button.
2. Press the black key above F3 (F#3), representing “Panic.”
3. Edit mode will exit, and sustaining notes will stop playing.
Sending a Bank Change or Program Change Message
PROGRAM CHANGE:
Sending a specific program change message is useful if you want to
load a particular sound patch.
To send a specific program change message in Edit mode:
1. Press the Edit Mode button.
2.Press the black key above F5 (F#5), representing
“Program.”
3. Press the number keys (G4 through B5) that
correspond to the program number you wish
to load.
4. Press C6 (Enter). ProKeys Sono will exit Edit mode
as soon as a C6 has been pressed.
BANK CHANGE:
Sending a specific bank change message is useful if you want to
select a particular sound bank.
To send a single bank change in Edit mode:
1. Press the Edit Mode button.
2.Press the black key above G5 (G#5), or A5 (A#5),
representing Bank LSB or Bank MSB respectively.
3. Press the number keys (G4 through B5) that
correspond to the bank number you wish to select.
4. Press C6 (Enter). ProKeys Sono will exit Edit mode as
soon as a C6 has been pressed.
TIP: As an example, let’s use a program
change MIDI message to activate the internal
cello sound on ProKeys Sono. To do this we
need to send program change number 42 (this
corresponds to a cello sound in the General
MIDI Instruments list in Appendix A).
1. Press the Edit Mode button.
2. Press the black key above F5 (F#5),
representing “Program.”
3. Press keys D5, then B4, then C6 (Enter).
This enters the combination: “4,” “2,”
“ENTER.”
This message will be sent to the ProKeys Sono
internal sound engine and also to any external
devices connected to the ProKeys Sono MIDI
Out jack. Now the keyboard is set to play the
internal General MIDI cello sound 42 (from the
General MIDI Instruments standard list). The full
list of General MIDI program numbers is given
in Appendix A at the end of this manual.
NOTE: Bank change messages must be followed by a program change message in order to load a
sound. Bank change messages by themselves do not activate a sound, but only locate and access a
predefined location of a set (bank) of 128 sounds.
|
ProKeys Sono 61 User Guide
38
MIDI Messages In-Depth
Program & Bank Changes
When the MIDI standard was first established, it enabled the user to access only 128 different sounds using program change
messages (0-127). As MIDI devices grew to be more sophisticated and contain more sounds, bank change messages were
included in an updated MIDI specification to allow for more than 128 sounds to be accessed.
The language MIDI uses to communicate between musical instruments only allows for program change commands 0-127, for
a total of 128 possible programs (127 programs + program “0” = 128 programs total). Because of inherent limitations of the
MIDI communication protocol, the number of directly accessible programs (using program change messages) cannot easily be
expanded beyond 128. Thus, a system of banks,
with 128 sounds in each, has been created
that enables manufacturers to overcome the
"ANK-3"
"ANK,3"
0ROGRAM
128-sound MIDI limit.
128 banks with 128 sounds in each bank is the
basic principle used to expand the number of
accessible sounds. However, to avoid reaching
the new limit of the resulting 16,384 possible
sounds (128 banks x 128 programs) accessible
using a bank change combined with a program
change, another layer of banks was added. The
result is a system of 128 banks that can contain
128 sub-banks in each of them, which, in turn,
can contain 128 sounds (programs) within them.
Bank change messages are useful when calling
up sounds from a large library that may exist in a
particular sound module or software synthesizer.
For example, devices that are built according
to Roland’s GS specification or Yamaha’s XG
specification require you to specify a bank
change in order to access the extra voices that
these devices provide.
MIDI CC 0 is the bank select MSB (Most
Significant Byte) message. This MIDI message
is 7-bit in size and can be used to select any
of 128 banks. This message can be used in
conjunction with MIDI CC 32 which is bank
select LSB (Least Significant Byte): a separate
7-bit message allowing additional selection of
any of another 128 sub-banks. The combination
of Bank MSB and LSB messages gives a 14-bit
message that can select any of a possible
16,384 banks. Each bank can in turn contain 128
possible sounds selected via a separate program
change MIDI message. This enables a user to
theoretically recall over two million programs
directly, using only MIDI commands. However,
most devices only use a few different banks, and
you can often ignore the LSB message.
0ROGRAM
0ROGRAM
0ROGRAM
"ANK-3"
"ANK,3"
0ROGRAM
"ANK,3"
0ROGRAM
0ROGRAM
0ROGRAM
"ANK,3"
0ROGRAM
"ANK,3"
0ROGRAM
0ROGRAM
0ROGRAM
0ROGRAM
0ROGRAM
0ROGRAM
0ROGRAM
"ANK-3"
"ANK,3"
0ROGRAM
"ANK,3"
0ROGRAM
0ROGRAM
0ROGRAM
"ANK,3"
0ROGRAM
"ANK,3"
0ROGRAM
0ROGRAM
0ROGRAM
0ROGRAM
0ROGRAM
0ROGRAM
0ROGRAM
"ANK-3"
"ANK-3"
"ANK,3"
0ROGRAM
"ANK,3"
0ROGRAM
0ROGRAM
0ROGRAM
"ANK,3"
0ROGRAM
"ANK,3"
0ROGRAM
0ROGRAM
0ROGRAM
0ROGRAM
ProKeys Sono 61 User Guide
|
39
You will find many MIDI devices respond to program change commands and many are organized according to the GM listing. In
General MIDI devices, different sounds are organized in the same way from device to device. Piano sounds are in their particular
place, string sounds are in their place, drum sounds are in their place, and so on. All GM devices (both hardware and software
sound modules) are clearly labeled as such, so you know that their sounds are organized in the General MIDI structure. When a
GM device receives a MIDI program change, it calls up a type of sound that you expect from the GM sound set. All non-GM MIDI
sound modules call up unique sounds from their memory upon receiving MIDI program changes. Since the sounds in a non-GM
device are not arranged in a particular order, you need to take a look at the device itself to see which sound you want and at which
location in the memory it resides. Many VST instruments such as Native Instruments’ FM7 or the synth modules in Propellerhead
Reason are non-GM devices.
You can send Program Change, Bank LSB and Bank MSB messages directly from the ProKeys Sono keyboard. Please consult
the “Advanced ProKeys Sono Functions in Edit Mode“ section of this User Guide for further details.
NRPN/RPNs
Non-registered parameter numbers (NRPN’s) are device-specific messages that enable you to control synthesizers and sound
modules via MIDI. The MIDI specification defines open parameter numbers to allow manufacturers to specify their own controllers.
The more common of these are registered by the MIDI Manufacturer’s Association and are now part of the MIDI specification,
hence the term Registered Parameter Numbers – RPN’s (See Appendix C). Each NRPN/RPN has an associated 2-byte number.
The two bytes allow for 128 values each. (An RPN or NRPN message is made up of two parts: the MSB and the LSB message.
Both of these messages together constitute an RPN or NRPN command.) This allows for 16,384 values in total.
MIDI controllers 98 and 99 represent the NRPN LSB and MSB respectively, while 100 and 101 represent the RPN LSB
and MSB messages (see the MIDI controllers list in Appendix C). To transmit an NRPN/RPN message, these LSB and MSB
controller messages are sent along with their user-specified values. A further controller message and value needs to be sent
to specify the (coarse or fine) value adjustment. This is specified by controller number 6 (data entry) for coarse adjustments or
number 38 for fine adjustments.
A list of NRPN’s is usually given in the user’s manual of any device that receives NRPN messages. It is always necessary that the
NRPN MSB and LSB be sent together. Both will be specified in the device’s manual.
ProKeys Sono 61 User Guide
|
40
Troubleshooting
ProKeys Sono is a high-quality digital piano that has been tested under a wide variety of conditions to ensure trouble-free
performance. In the event that you do experience difficulty with your ProKeys Sono, this section provides tips to help resolve some
basic issues that you may encounter.
Problem: My ProKeys Sono keyboard suddenly stopped working after having performed fine since installation.
Solution: Close any music applications you are using, switch ProKeys Sono off, and restart your computer. Once your
computer has completely restarted, switch ProKeys Sono back on and try again to see if the problem resolves.
Problem: I have connected a sustain pedal to my M-Audio keyboard, but its operation is reversed (i.e., the notes sustain when
the pedal isn’t pressed, but the notes stop sustaining once the pedal is pressed).
Solution: The polarity of the sustain pedal is calculated by the keyboard upon startup. When ProKeys Sono is powering
up, the sustain pedal is assumed to be in the OFF position. It is important that the sustain pedal is not pressed down during
startup, otherwise its operation may be reversed.
If you would like to intentionally reverse the polarity of your sustain pedal (i.e., notes are sustained when the pedal is up; notes
stop sustaining when the pedal is pressed), hold the pedal down while the keyboard is being switched on.
Problem: When playing a virtual instrument loaded in my music software, or when attempting to monitor my microphone or
instrument input, there is a noticeable delay before I hear any sound.
Solution: This delay is known as latency, and it can be adjusted by changing the buffer size setting in your M-Audio Control
Panel. The goal is to set the buffer size as low as possible without experiencing artifacts in the audio. Faster computers
generally allow for smaller buffer size settings, and thus less latency.
When monitoring signals from the Microphone, Instrument or Aux inputs, you can also avoid this problem by using the Direct
Monitor knob instead of monitoring through your music software. See the “Using Direct Monitoring” section in the “ProKeys
Sono Audio Setup and Controls” portion of this User Guide to learn more about direct monitoring.
Problem: I have connected the keyboard to my computer with the USB cable, but I cannot locate the ProKeys Sono USB
keyboard in my software’s MIDI devices dialog box.
Solution 1: ProKeys Sono may not be receiving enough USB bus power to function correctly. Try plugging ProKeys Sono
into a different USB port or a powered USB hub connected to your computer.
Solution 2: In Windows XP, ProKeys Sono will appear as “USB Audio Device” if the optional drivers have not been installed.
Select “USB Audio Device” as your audio and MIDI input and output device.
Problem: I connected ProKeys Sono to my Windows computer and noticed that a question mark appears in the Windows Device
Manager under Other Devices > M-Audio DFU. Does this indicate that there is a problem with ProKeys Sono?
Solution: This behavior is normal and your ProKeys Sono will function normally as a class-compliant device (i.e., without any
drivers). Installing the ProKeys Sono drivers extends the keyboard’s functionality in various ways (i.e., multi-client support,
support for qualified versions of the Pro Tools M-Powered software, and allowing large SysEx transfers) and should resolve
any “DFU” related messages that appear when drivers are not present.
Problem: My synthesizer always recalls the sound next to the program number that I have sent to it from ProKeys Sono. For
example, if I send a program change with the number 40 (Violin), my software loads sound number 41 (Viola).
Solution: Some General MIDI modules count their sound patches from 1 – 128 instead of 0-127. Both methods are
common. As a result, there may be an offset of +/-1 between the program change number sent from the keyboard and the
recalled sound patch on your module.
ProKeys Sono 61 User Guide
|
41
Problem: When I press the keys or use any of the MIDI controls (wheel, knob, data buttons, etc.), no data is being transmitted
from the MIDI output jack.
Solution: This may be the result of the ProKeys Sono MIDI Out mode being set to USB. The MIDI Out jack can be
configured to accept MIDI data from either the ProKeys Sono keyboard or from the computer via the USB connection. If the
MIDI Out mode is set to USB, the controls on the keyboard will not send any data to the MIDI Out jack. See the “ProKeys
MIDI Output Settings” chapter of this User Guide to learn how to toggle MIDI Out mode back to transmit MIDI events
generated by the ProKeys Sono keyboard.
Alternatively, you may simply switch the keyboard off and power it back on. This will restore the default, causing the MIDI
output jack to transmit MIDI events generated by the ProKeys Sono keyboard.
Problem: When using ProKeys Sono with Windows XP or Vista, the computer plays no sound through the ProKeys Sono main
outputs.
Solution: If you have not done so already, try installing the ProKeys Sono drivers to see if this problem resolves. If this does
not resolve the issue:
•Open the Control Panel and double-click the System icon (under Performance and Maintenance if you are in
Category view).
•
•Click the plus sign (“+”) next to Sound, Video and Game Controllers, and locate the ProKeys Sono listing. If you
see a question mark or exclamation point next to it, or if you don’t see it listed, you may need to reinstall the driver
software.
•Make sure your audio software has been configured to use ProKeys Sono. This configuration process varies
from application to application, but it is usually done through a “preferences” or “configuration” menu. See your
application’s documentation to learn more about this.
Select the Hardware tab and click the Device Manager button.
Problem: I cannot hear the internal sounds of ProKeys Sono when using the keyboard with a computer-based sequencer in Local
Off mode.
Solution: This behavior is normal. Local Off mode interrupts the connection between the internal sound engine and the
various MIDI controls (i.e., the keys, wheel, knob, etc.) of ProKeys Sono. If you are using ProKeys Sono with a software
sequencer and would like to play the internal sounds of ProKeys Sono, make sure that the software sequencer’s track that
is recording MIDI data from the keyboard is sending that MIDI data back to the “ProKeys Sono Voices” MIDI output port.
This option of looping MIDI data back to its source is sometimes referred to as “MIDI Monitor” or “pass through” and allows
synthesizers to trigger their own sounds when Local Off mode is engaged. See your software’s documentation for more
information on this.
Problem: My ProKeys Sono MIDI controls (such as Voice Volume knob, data buttons, the Reverb and Chorus on/off buttons,
etc.) stopped working when the keyboard was set to Local Off mode.
Solution: If your ProKeys Sono has been set to “Local Off” mode, the MIDI Controls (piano keys, knobs, buttons, etc.) are
“disconnected” from the internal sound engine and will not directly control the sound engine. In this case, you must make
sure that the MIDI track in your sequencing software is configured to route the MIDI signals from ProKeys Sono back to the
keyboard by activating “ProKeys Sono Voices” as the MIDI output port for the selected MIDI track. Once MIDI data is routed
back to ProKeys Sono this way, the various MIDI controls will continue to work as expected.
Problem:I am unable to view input selection options and route audio from the ProKeys Sono microphone input into
Ableton Live Lite.
Solution: In Ableton Live Lite, click View and make sure that the In/Out option is checked. On an audio track, select “Ext In”
and “1” from the audio input drop down menus. Further information on this can be found in the Ableton Live Lite Help menu.
|
ProKeys Sono 61 User Guide
Appendices - Useful MIDI Data
Appendix A - General MIDI Instruments
Piano
Bass
Reed
Synth Effects
0 Acoustic Grand Piano
32 Acoustic Bass
64 Soprano Sax
96 SFX Rain
1 Bright Acoustic Piano14
33 Electric Fingered Bass
65 Alto Sax
97 SFX Soundtrack
14
2 Electric Grand Piano
34 Electric Picked Bass
66 Tenor Sax
98 SFX Crystal
3 Honky Tonk Piano
35 Fretless Bass
67 Baritone Sax
99 SFX Atmosphere
4 Electric Piano 1 14
36 Slap Bass 1
68 Oboe
100 SFX Brightness
5 Electric Piano 2
37 Slap Bass 2
69 English Horn
101 SFX Goblins
6 Harpsichord
38 Synth Bass 1
70 Bassoon
102 SFX Echoes
7 Clavinet14
39 Synth Bass 2
71 Clarinet
103 SFX Sci- Fi
Chromatic Percussion
Strings/ Orchestra
Pipe
Ethnic
8 Celesta
40 Violin
72 Piccolo
104 Sitar
9 Glockenspiel
41 Viola
73 Flute
105 Banjo
10 Music Box
42 Cello
74 Recorder
106 Shamisen
11 Vibraphone
43 Contrabass
75 Pan Flute
107 Koto
12 Marimba
44 Tremolo Strings
76 Bottle Blow
108 Kalimba
13 Xylophone
45 Pizzicato Strings
77 Shakuhachi
109 Bag Pipe
14 Tubular bells
46 Orchestral Harp
78 Whistle
110 Fiddle
15 Dulcimer
47 Timpani
79 Ocarina
111 Shanai
Ensemble
Synth Lead
Percussive
Organ
16 Drawbar Organ
48 String Ensemble 1
80 Synth Square Wave
112 Tinkle Bell
17 Percussive Organ
49 String Ensemble 2 (Slow)
81 Synth Sawtooth Wave
113 Agogo
14
18 Rock Organ
50 Synth Strings 1
82 Synth Calliope
114 Steel Drums
19 Church Organ
51 Synth Strings 2
83 Synth Chiff
115 Woodblock
20 Reed Organ
52 Choir Aahs
84 Synth Charang
116 Taiko Drum
21 Accordion
53 Voice Oohs
85 Synth Voice
117 Melodic Tom
22 Harmonica
54 Synth Choir
86 Synth Fifths Sawtooth Wave
118 Synth Drum
23 Tango Accordion
55 Orchestral Hit
87 Synth Brass & Lead
119 Reverse Cymbal
Guitar
Brass
Synth Pad
Sound Effects
24 Nylon Acoustic Guitar
56 Trumpet
88 New Age Synth Pad
120 Guitar Fret Noise
25 Steel Acoustic Guitar
57 Trombone
89 Warm Synth Pad
121 Breath Noise
26 Jazz Electric Guitar
58 Tuba
90 Poly Synth Pad
122 Seashore
27 Clean Electric Guitar
59 Muted Trumpet
91 Choir Synth Pad
123 Bird Tweet
28 Muted Electric Guitar
60 French Horn
92 Bowed Synth Pad
124 Telephone Ring
29 Overdrive Guitar
61 Brass Section
93 Metal Synth Pad
125 Helicopter
30 Distorted Guitar
62 Synth Brass 1
94 Halo Synth Pad
126 Applause
31 Guitar Harmonics
63 Synth Brass 2
95 Sweep Synth Pad
127 Gun Shot
14
These sounds are ProKeys Sono premium-quality voices.
42
ProKeys Sono 61 User Guide
Appendix B - Channel 10 Drum Map
Key#
Drum Sound
Key#
Drum Sound
35
Acoustic Bass Drum
59
Ride Cymbal 2
36
Bass Drum 1
60
Hi Bongo
37
Side Stick
61
Low Bongo
38
Acoustic Snare
62
Mute Hi Conga
39
Hand Clap
63
Open Hi Conga
40
Electric Snare
64
Low Conga
41
Low Floor Tom
65
High Timbale
42
Closed Hi-Hat
66
Low Timbale
43
High Floor Tom
67
High Agogo
44
Pedal Hi-Hat
68
Low Agogo
45
Low Tom
69
Cabasa
46
Open Hi-Hat
70
Maracas
47
Low-Mid Tom
71
Short Whistle
48
Hi-Mid Tom
72
Long Whistle
49
Crash Cymbal 1
73
Short Guiro
50
High Tom
74
Long Guiro
51
Ride Cymbal 1
75
Claves
52
Chinese Cymbal
76
Hi Wood Block
53
Ride Bell
77
Low Wood Block
54
Tambourine
78
Mute Cuica
55
Splash Cymbal
79
Open Cuica
56
Cowbell
80
Mute Triangle
57
Crash Cymbal 2
81
Open Triangle
58
Vibraslap
|
43
ProKeys Sono 61 User Guide
Appendix C - Standard MIDI Controller Numbers (MIDI CCs)
00 Bank Select
49 Gen Purpose 2 LSB
98 NRPN LSB
01 Modulation
50 Gen Purpose 3 LSB
99 NRPN MSB
02 Breath Control
51 Gen Purpose 4 LSB
100 RPN LSB
03 Controller 3
52 Controller 52
101 RPN MSB
04 Foot Control
53 Controller 53
102 Controller 102
05 Portamento Time
54 Controller 54
103 Controller 103
06 Data Entry
55 Controller 55
104 Controller 104
07 Channel Volume
56 Controller 56
105 Controller 105
08 Balance
57 Controller 57
106 Controller 106
09 Controller 9
58 Controller 58
107 Controller 107
10 Pan
59 Controller 59
108 Controller 108
11 Expression
60 Controller 60
109 Controller 109
12 Effects Controller 1
61 Controller 61
110 Controller 110
13 Effects Controller 2
62 Controller 62
111 Controller 111
14 Controller 14
63 Controller 63
112 Controller 112
15 Controller 15
64 Sustain Pedal
113 Controller 113
16 Gen Purpose 1
65 Portamento
114 Controller 114
17 Gen Purpose 2
66 Sostenuto
115 Controller 115
18 Gen Purpose 3
67 Soft Pedal
116 Controller 116
19 Gen Purpose 4
68 Legato Pedal
117 Controller 117
20 Controller 20
69 Hold 2
118 Controller 118
21 Controller 21
70 Sound Variation
119 Controller 119
22 Controller 22
71 Resonance
Channel Mode Messages:
23 Controller 23
72 Release Time
120 All Sound off
24 Controller 24
73 Attack Time
121 Reset All Controllers
25 Controller 25
74 Cut-off Frequency
122 Local Control
26 Controller 26
75 Controller 75
123 All Notes Off
27 Controller 27
76 Controller 76
124 Omni Off
28 Controller 28
77 Controller 77
125 Omni On
29 Controller 29
78 Controller 78
126 Mono On (Poly Off)
30 Controller 30
79 Controller 79
127 Poly On (Mono Off)
31 Controller 31
80 Gen Purpose 5
32 Bank Select LSB
81 Gen Purpose 6
Extra RPN Messages:
33 Modulation LSB
82 Gen Purpose 7
128 Pitch Bend sensitivity
34 Breath Control LSB
83 Gen Purpose 8
129 Fine Tune
35 Controller 35
84 Portamento Control
130 Coarse Tune
131 Channel Pressure
36 Foot Control LSB
85 Controller 85
37 Portamento Time LSB
86 Controller 86
38 Data Entry LSB
87 Controller 87
39 Channel Volume LSB
88 Controller 88
40 Balance LSB
89 Controller 89
41 Controller 41
90 Controller 90
42 Pan LSB
91 Reverb Depth
43 Expression LSB
92 Tremelo Depth
44 Controller 44
93 Chorus Depth
45 Controller 45
94 Celeste (De- tune)
46 Controller 46
95 Phaser Depth
47 Controller 47
96 Data Increment
48 Gen Purpose 1 LSB
97 Data Decrement
|
44
ProKeys Sono 61 User Guide
|
45
Appendix D - Additional RPN Messages
You may have noticed that although we have stated there are 128 MIDI controller messages (0 – 127), Appendix C shows 132
assignable controller messages. This is because messages 128 – 131 are a different type of MIDI message, defined in the MIDI
Specification as RPN messages. M-Audio has created four messages that are sent like MIDI CCs, but actually transmit a series of
RPN messages. This makes sending these complex multi-part messages as easy as sending a MIDI CC message. You can assign
these to the controls on your ProKeys Sono keyboard in exactly the same way as any other MIDI controller message. The RPN
messages control the following:
Controller Number
MIDI Message
Use
128
Pitch Bend Sensitivity
Alters the range of a pitch bend message
129
Fine Tune
Adjusts the tuning of your sound module or synthesizer in small steps
130
Coarse Tune
131
Channel Pressure Adjusts the tuning of your sound module or synthesizer in large steps
15
Adds an effect such as vibrato or brightness, depending on the instrument
settings and capabilities
Channel Pressure is not an RPN message. However, it is an additional effect message defined in the General MIDI
specification and this is why we have included it in Appendix D.
15
Appendix E - Piano Reset Button
When the Piano Reset button is pressed, ProKeys Sono performs the following sequence of functions:
1.
MIDI Out mode is set to send MIDI from the keyboard to the computer via USB and to the external MIDI Out jack.
2.
Local mode is set to Local On.
3.
An ‘All Notes Off’ command is sent on MIDI channel 1.
4.
A ‘Reset All Controllers’ command is sent on MIDI channel 1.
5.
The Voice Volume knob is assigned to send MIDI controller 7 (Volume) messages.
6.
The Modulation Wheel is assigned to send MIDI controller 1 (Modulation) messages.
7.
The Sustain Pedal is assigned back to controller 64 (Sustain).
8.
The Global Transmit channel is set to 1.
9.
Transpose and octave shift are both set back to zero.
10. A Program Change = 0 message is sent on MIDI channel 1.
11. Bank Change MSB = 0 and Bank Change LSB = 0 messages are sent on MIDI channel 1.
12. The Reverb Depth is set back to the default value for the Piano Voice.
13. The Chorus Depth is set back to the default value for the Piano Voice.
14. The current status of the Sustain Pedal is sent on MIDI channel 1.
ProKeys Sono 61 User Guide
Technical Specifications
44.1 kHz sampling rate unless otherwise stated
Mic Inputs
Input Impedance
4.4k Ohms
Maximum Input Level at minimum gain
-2.2 dBu (0.6 Vrms), balanced
SNR
-96 dB, A-weighted
Dynamic Range
96 dB, A-weighted
THD+N
0.004 % (-88 dB) @ -1 dBFS, 1 kHz
Frequency Response
20 Hz to 20 kHz, +/- 0.5 dB
Available Pre-amp Gain
41 dB
Instrument Input
Input Impedance
1M Ohm unbalanced
Maximum Input Level at minimum gain
+12 dBV (4 Vrms)
SNR
-94 dB, A-weighted
Dynamic Range
94 dB, A-weighted
THD+N
0.00782 % (-82.1 dB) @ -1 dBFS, 1 kHz
Frequency Response
20 Hz to 20 kHz, +/- 0.6 dB
Available Pre-amp Gain
40 dB
Aux Inputs
Input Impedance
10K Ohm unbalanced
Maximum Input Level
+2 dBV unbalanced
SNR
-96 dB, A-weighted
Dynamic Range
96 dB, A-weighted
THD+N
< 0.005 % (-86 dB) @ -1 dBFS, 1 kHz
Frequency Response
20 Hz to 20 kHz, +/- 0.5 dB
Line Outputs
Output Impedance
240 Ohm unbalanced
Maximum Output Level
+1.8 dBV (1.2 Vrms)
Channel-to-Channel Crosstalk
< -88 dB @ 1 kHz
SNR
-103 dB, A-weighted
Dynamic Range
95 dB, A-weighted
THD+N
0.00391 % (-88.2 dB) @ -1 dBFS, 1 kHz
Frequency Response
20 Hz to 20 kHz, +/- 0.1 dB
Headphone Outputs
Maximum Output
-2 dBV (0.8 Vrms) into 32 ohms @ < 0.05% THD+N
18.2 mW into 32 ohms @ < 0.05% THD+N
Working Range
32 to 600 ohms
Frequency Response
20 Hz to 20 kHz, +/- 1.3 dB
|
46
ProKeys Sono 61 User Guide
|
47
Technical Info
Caution: Electro Static Discharge, Electrical Fast Transient and Conducted RF interference may cause the unit malfunctioning. In such
case, unplug the unit and plug it in again to restore normal operation.
Note: Your M-Audio product has been tested to comply with FCC Standards FOR HOME OR OFFICE USE. Modifications not
authorized by the manufacturer may void users authority to operate this device.
Note: This equipment has been tested and found to comply with the limits for a Class B digital device, pursuant to Part 15 of the
FCC Rules. These limits are designed to provide reasonable protection against harmful interference in a residential installation. This
equipment generates, uses and can radiate radio frequency energy and, if not installed and used in accordance with the instructions,
may cause harmful interference to radio communications. However, there is no guarantee that interference will not occur in a particular
installation. If this equipment does cause harmful interference to radio or television reception, which can be determined by turning the
equipment off and on, the user is encouraged to try to correct the interference by one or more of the following measures:
<
Re-orient or relocate the receiving antenna.
<
Increase the separation between the equipment and receiver.
<
Connect the equipment to an outlet on a circuit different from that to which the receiver is connected.
<
Consult the dealer or an experienced radio/ TV technician for help.
ASIO is a trademark of Steinberg Soft– und Hardware GmbH.
VST is a trademark of Steinberg Soft– und Hardware GmbH
Warranty
Warranty Terms
M-Audio warrants products to be free from defects in materials and workmanship, under normal use and provided that the
product is owned by the original, registered user. Visit www.m-audio.com/warranty for terms and limitations applying to your
specific product.
Warranty Registration
Immediately registering your new M-Audio product entitles you to full warranty coverage and helps M-Audio develop and
manufacture the finest quality products available. Register online at www.m-audio.com/register to receive FREE product
updates and for the chance to win M-Audio giveaways.
WARNING: This product contains chemicals, including lead, known to the State of California to cause cancer, and birth defects
or other reproductive harm. Wash hands after handling.
ProKeys Sono 61
Tested to comply with
FCC standards
FOR HOME OR STUDIO USE
© 2008 Avid Technology, Inc. All rights reserved. Product features, specifications, system requirements and availability are
subject to change without notice. Avid, M-Audio and ProKeys Sono 61 are either trademarks or registered trademarks of Avid
Technology, Inc. All other trademarks contained herein are the property of their respective owners.
M-Audio USA
M-Audio Germany
Technical Support
Technical Support
5795 Martin Rd., Irwindale, CA 91706
Kuhallmand 34, D-74613 Ohringen, Germany
web . . . . . . . . . . . . . . . . . . . . . . www.m-audio.com/tech
email. . . . . . . . . . . . . . . . . . . . . . . [email protected]
tel (pro products). . . . . . . . . . . . . . . . . . . (626) 633-9055
tel . . . . . . . . . . . . . . . . . . . . . . +49 (0)7941 - 9870030
tel (consumer products) . . . . . . . . . . . . . . . (626) 633-9066
tel . . . . . . . . . . . . . . . . . . . . . . +49 (0)7941 - 98 70070
fax (shipping) . . . . . . . . . . . . . . . . . . . . . (626) 633-9032
Sales
Sales
e-mail . . . . . . . . . . . . . . . . . . . . . . . . . [email protected]
e-mail . . . . . . . . . . . . . . . . . . . . . . . [email protected]
tel . . . . . . . . . . . . . . . . . . . . . . . +49 (0)7941 98 7000
tel . . . . . . . . . . . . . . . . . . . . . . . . . . 1(866) 657-6434
fax. . . . . . . . . . . . . . . . . . . . . . . +49 (0)7941 98 70070
fax. . . . . . . . . . . . . . . . . . . . . . . . . . . (626) 633-9070
Web. . . . . . . . . . . . . . . . . . . . . . . . . . . www.m-audio.de
Web. . . . . . . . . . . . . . . . . . . . . . . . . . www.m-audio.com
M-Audio U.K.
Floor 6, Gresham House, 53 Clarendon Road, Watford
WD17 1LA, United Kingdom
Technical Support
e-mail . . . . . . . . . . . . . . . . . . . . . [email protected]
tel (Mac and PC support) . . . . . . . . . . . +44 (0)1753 658630
Sales
M-Audio Canada
1400 St-Jean Baptiste Ave. #150, Quebec City,
Quebec G2E 5B7, Canada
Technical Support
e-mail . . . . . . . . . . . . . . . . . . . [email protected]
tel . . . . . . . . . . . . . . . . . . . . . . . . . . . (418) 872-0444
fax. . . . . . . . . . . . . . . . . . . . . . . . . . . (418) 872-0034
Sales
tel . . . . . . . . . . . . . . . . . . . . . . . . +44 (0)1923 204010
e-mail . . . . . . . . . . . . . . . . . . . . [email protected]
tel . . . . . . . . . . . . . . . . . . . . . . . . +44 (0)1923 204039
tel . . . . . . . . . . . . . . . . . . . . . . . . . . . (866) 872-0444
Web. . . . . . . . . . . . . . . . . . . . . . . . . . www.maudio.co.uk
fax. . . . . . . . . . . . . . . . . . . . . . . . . . . (418) 872-0034
Web. . . . . . . . . . . . . . . . . . . . . . . . . . . www.m-audio.ca
Benelux
Technical Support
Belgium tel . . . . . . . . . . . . . . . . . . . . . +32 22 54 88 93
Holland tel . . . . . . . . . . . . . . . . . . . . . +31 35 625 0097
M-Audio France
Floor 6, Gresham House, 53 Clarendon Road, Watford
WD17 1LA, United Kingdom
Renseignements Commerciaux
tel . . . . . . . . . . . . . . . . . . . . . . . . . . . 0 810 001 105
email. . . . . . . . . . . . . . . . . . . . . . . . . . [email protected]
Assistance Technique
PC. . . . . . . . . . . . . . . . . . . . . . . . . . . 0 820 000 731
M-Audio Japan
エムオーディオ/アビッドテクノロジー株式会社
〒107-0052 東京都港区赤坂 2-11-7 ATT新館ビル4F
Avid Technology K.K. | M-Audio
4F ATT Bldg. 2-11-7 Akasaka, Minato-ku Tokyo 107-0052 Japan
製品をお持ちのお客様|Customer Support & Technical Support
online . . . . . . . . . . . . . . . . . . http://www.m-audio.jp/support
tel . . . . . . . . . . . . . . . . . . . . . . . . . . . . . 03-3505-4034
製品をお持ちでないお客様|Pre Sales
e-mail . . . . . . . . . . . . . . . . . . . . . . . . . [email protected]
tel . . . . . . . . . . . . . . . . . . . . . . . . . . . . . 03-3505-7963
fax . . . . . . . . . . . . . . . . . . . . . . . . . . . . . 03-3505-3417
Web. . . . . . . . . . . . . . . . . . . . . . . . . . . www.m-audio.jp
Mac . . . . . . . . . . . . . . . . . . . . . . . . . . 0 820 391 191
e-mail (PC) . . . . . . . . . . . . . . . . . . . . [email protected]
email (Mac). . . . . . . . . . . . . . . . . . . . . . [email protected]
fax. . . . . . . . . . . . . . . . . . . . . . . . +33 (0)1 72 72 90 52
Web. . . . . . . . . . . . . . . . . . . . . . . . . . www.m-audio.com
080407_PKS61_UG_EN01