1
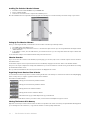
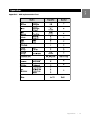
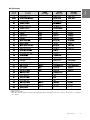
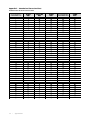
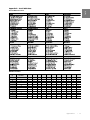
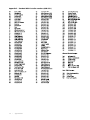
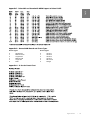
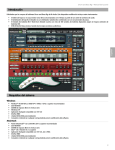
Introduction
In the X-Session Advanced Guide we have made the assumption that you have been through the X-Session Getting Started Guide which should
have been supplied in printed form with your X-Session. If you do not have this guide, please contact your local distributor or download it from
our website www.evolution.co.uk.
The Getting Started Guide should insure that you are now familiar with the basic operation of the X-Session so that we now can focus on more
in-depth features. First however, we need to explain some terminology we use throughout the guide.
Terminology
Edit Mode:
Edit Mode describes the short period after a function button has been pressed during which the parameters of that function can be altered.
The numeric keypad can be used to alter a parameter during this time. No data is sent out of the X-Session when it is in Edit mode except for
program and bank changes. LCD symbols shown in Edit mode will flash to show you that a particular parameter can be edited. If a number is
part entered, and a new controller turned, that number will become the relevant parameter number for the new controller and the 3 second
editing period will re-trigger.
Default mode:
Default Mode describes the state of the X-Session, when no function buttons have been pressed within the last 3 seconds. In Default mode,
the LCD will show the controller symbol, and the 2 digit display will show the last selected controller. The 3 digits display the currently assigned
MIDI CC number.
“On the Fly” Operations
Sending Program Changes On The Fly
You can at any one time send out a program change message to you sound card, sound module, instrument or whatever other device will
receive this standard MIDI message.
The program change will be sent on the global MIDI channel.
1.
2.
Press the PROGRAM button.
Type in the program number you wish to send, using the numerical keypad or the +/- keys.
Example: The LCD display the PROG symbol in the right hand corner Indicating that the PROGRAM button has
been pressed. The program value sent is 00 and its sent on the global MIDI channel 01. You can also program the
assignable buttons to send out fixed program messages to individual MIDI channels.
Global MIDI channel: For more information, please go to page 6.
Sending Bank Changes On The Fly
If your receiving device has more than 128 presets, you may be able to access the additional banks by sending out bank change LSB and MSB
messages.
1.
2.
Press the DATA LSB or DATA MSB button.
Type in the bank number you wish to send, using the numerical keypad on the +/- keys.
Please check the documentation for your receiving device to ensure that it will respond to these messages. For more information about LSB and
MSB, please see the chapter “Program and Bank Changes Explained” on page 9 in this manual.
Sending Snap Shot
Press the +/- buttons together to send a SNAP SHOT of the current X-Session controller assignments and their values. When you
send a snapshot, the LCD will display the SNAPSHOT symbol. The data for an individual controller will be sent on which ever channel
that controller has been assigned to. Snap Shot is one way of synchronizing the receiving device with the X-Session and can be
used as a creative tool, with interesting and surprising results. The data sent when SNAP SHOT is pressed, can be viewed in your
sequencers list editor. Set your sequencer to record and press SNAP SHOT. Then open the list editor and ensure its set to display
controller data.
Muting All Controllers
To Mute all controllers and the cross fader, press the CTRL MUTE buttons. This allows you to alter the position of the controller without affecting the
settings of your software. CTRL MUTE does not affect buttons, and as soon as an assignable button or a function key is pressed, the controllers
are turned back on. Alternatively, you can press the CTRL MUTE buttons again to turn the controllers back on.
Introduction
•
3
English
English
When you first press the CTR MUTE buttons, you will see the LCD display ’OFF’. Changing the position of a controller with controller mute engaged,
the LCD will always display OFF to indicate no data is being sent out by the X-Session. To cancel the controller mute function, simply press a
function key (or keys) or one of the assignable buttons.
This is a very useful feature if you are switching between presets on the X-Session With the controllers out of position. You will be able to move
the controller to a position relative to the software’s controller value, rather than causing the software’s controller value to jump.
You can also use this feature for creative mixing and interesting DJ type control. If for instance you use the X-Session as a conventional volume
mixer, try engaging the controller mute function, change the volume up or down of various channels and press the SNAP SHOT buttons. This
form of mixing is very dynamic and can not be done using a conventional mixer.
About the Cross Fader
The cross Fader can be assigned to two MIDI CC values, by editing F17 and F18. When it is moved, both F17 and F18 will be sent out. F17 will
increment from left to right, while F18 will increment from right to left. So, F17 and F18 work against each other.
As an example, this has been put to practice in the Rebirth preset:
F17 controls the volume of the top drum module, while F18 controls the volume of the bottom drum module. This means you can flick between
the two modules by flicking the fader far left or right, since when F17 is 0, F18 is 127, and when F18 is 0 F17 is 127.
To select F18 for programming, you need to use the CONTROL SELECT Buttons. F17 can be selected for editing by moving the cross fader.
Programming and Editing the X-Session
Introduction To X-Session Programming Options
Each of the X-Session’s 28 controllers can send MIDI CC, RPN/NRPN, GM 1&2 SysEx and even be assigned to individual MIDI channels.
MIDI CC (continuous controller) numbers are part of the standard MIDI specifications and are typically used to control the real-time changing of
parameters in musical equipment.
For a complete list of standard MIDI controller numbers from 0 to 131, please see Appendix E on page 17.
Any of the 28 real-time controllers on the X-Session can be assigned to a MIDI CC number however the 10 assignable buttons have slightly
different options from the cross fader or 16 rotary controllers.
The following 2 charts show all the transmit messages you can program for each of the 18 fader/controllers and 10 assignable MIDI buttons
respectively. We show you this already at this stage, so you can follow the principle of programming the X Session controllers in the following
instructions and examples. Please pay extra attention to the differences between how you program the cross fader or controllers and how you
program the buttons.
4
•
Programming and Editing the X-Session
English
Selecting A Controller For Editing
Before you can assign a MIDI CC to one of the X-Session’s controllers, you will need to select it for editing. There are 2 methods for doing this:
1.
2.
Press CONTROL SELECT. The LCD will display the CONTROLLER symbol. The symbol will be flashing to indicate the controller settings can
be altered. The 3-digit display will show the number of the currently selected controller, proceeded by a ‘C’, or an ‘F’ if the cross fader is
selected.
Type in the number of the controller using the numeric keypad, or the +/ buttons or move the cross fader/rotary controller. Simply moving
a fader/rotary controller will make it the currently selected controller, ready for editing.
To select the second cross fader controller value (F18) please use method 1. It is also not possible to select any of the 10 numerical buttons by
pressing them, since during edit mode, they are used to enter numerical values. To program these buttons, please use the first method.
Assigning MIDI CC’s
Once the controller you want to edit has been selected, you can change the assigned MIDI CC number in the following way:
1.
2.
Press ASSIGN. The LCD will flash the CC symbol. The 3 digit display will indicate the currently assigned MIDI CC number.
Type in a new MIDI CC value using the numeric keypad or ’+’ and ’-’ buttons. The MIDI controller number you select will be assigned to
the currently selected controller, shown by the number on the small, 2-digit display.
Example: After pressing ASSIGN, the display shows the cc symbol and in this case displays that currently the MIDI
CC 07 is assigned to controller number 13.
Assigning An Individual MIDI Channel
1.
2.
3.
Select the controller you want to edit as described earlier.
Press CHANNEL. The LCD will display the CHAN symbol and the 3-digit display will show the current channel assignment of the selected
controller, preceded by a ’c’. The small 2-digit display will show the currently selected controller for assignment.
Type the MIDI channel number (01-16) you want the controller to send to, using the numeric keypad or the +/- keys. If the controller is
assigned to channel 00, it will transmit on the global channel.
Programming and Editing the X-Session
•
5
Changing The Global MIDI Channel
The X-Session’s global MIDI channel affects only the controllers that have the individual MIDI channel assigned to value 00, as described in the
previous section.
Here is how you change the global MIDI channel:
1.
2.
Press GLOBAL CHANNEL (ASSIGN and CHANNEL together). The LCD will display the KEYBOARD and CHAN symbol. The 3-digit display will
show the currently selected global channel, proceeded by a ‘c’.
Type in the MIDI channel number (01-16) using the numeric keypad or the +/- keys.
Example: MIDI channel 01 is assigned as global MIDI channel.
Using a combination of global MIDI channel and individually assigned MIDI channels can be a great way of
navigating through your system. With multitimbral instruments such as Reason, it can be easier to just change the
global MIDI channel on the X-Session in order to jump to the next device, rather than operating the software.
Setting Toggle Values For The Buttons
The 10 assignable buttons can each be assigned to toggle between two values. You may for instance want to send out value 15 when you first
press the button followed by value 74 when you press the button for a second time. This is how you do it:
1.
2.
3.
4.
Press the Function button labelled DATA MSB 2 times.
Type in 15 using the numerical keypad or the +/- keys.
Press the Function button labelled DATA LSB 2 times.
Type in 74 using the numerical keypad or the +/- keys.
If you want the button to send the same value every time you press it, simply type in the same value both times.
RPN/NRPN, GM 1+2 SysEx & Other Messages
As already described, the standard MIDI controller numbers range from 0 to 131. We have extended the list of MIDI CC’s that can be assigned to
the controllers of the X-Session to include RPN/NRPN, MMC and General MIDI 1&2 SysEx messages.
These advanced messages are as easy to program as a regular MIDI CC instruction by entering values 132 to 152 when programming MIDI CC’s.
The charts on page 4 and 5 (or Appendix B) show you what number correspond to each message.
To program the values required for these advanced messages, the X-Session requires you to press the PROGRAM, DATA LSB and DATA MSB
buttons twice respectively. Pressing only once will send the program and bank change instructions “on the fly” as described earlier.
Lets look at a couple of examples to see how this works. Please refer to the chart in Appendix B so you get to grips with the principle:
Assigning MMC Control To A Button
1.
2.
3.
4.
5.
6.
7.
6
Select the button you want to control the MMC message.
Press “ASSIGN” on the X-Session.
Type in “149” using the numerical keypad. This is the number that corresponds to the MMC instruction, as per the chart on
page 4 and 5.
Press “Channel” once.
Type in “127”, using the numerical keypad. This ensures that the message is set to all device ID numbers. For more information about this,
please read “About SysEx Messages & Device ID” on page 7.
Press the “DATA LSB” button twice.
Enter a number from the chart on below to select the MMC message you want:
•
Number
MMC Command
01
02
03
04
05
06
07
08
09
10
11
12
13
STOP
PLAY
DEFERRED PLAY
FAST FORW ARD
REW IND
RECORD ST ROBE
RECORD EXIT
RECORD PAUSE
PAUSE
EJECT
CHASE
COMMAND ERROR RESET
MMC RESET
Programming and Editing the X-Session
Note: For a detailed description of RPN/NRPN data see section RPN/NRPN’s Explained on page 9.
1.
2.
3.
4.
5.
Press Control select, and move the desired controller.
Press control assign twice and while the display is flashing, enter controller 132 for RPN coarse, 133 for RPN fine, 134 for NRPN coarse or
135 for NRPN fine.
Press DATA MSB twice to assign the number for the RPN/NRPN MSB.
Press DATA LSB twice to assign the number for RPN/NRPN LSB.
Press CHANNEL ASSIGN to assign the MIDI channel the message should be sent on.
You will find most data sheets for synths that make use of NRPN’s will give the MSB and LSB values that you should enter into DATA MSB and
DATA LSB banks (also see Appendix F). However, some manuals may only give the hex values. The X-Session requires you to enter the decimal
value. You can easily convert hexadecimal values to decimal using the windows calculator. Simply select Scientific mode, select hex and enter
the hexadecimal value you need to convert. Press the Dec button to convert it to a decimal value. Enter the decimal value into the X-Session.
Alternatively, use the look up table in Appendix C.
The following shows how to set a button to transmit a note on when pressed, and a note off when released.
Assigning A Note To A Button
1. Press SELECT and press the “0” button. The display will show that you have selected controller 19.
2. Press ASSIGN and enter ‘147’ this is the MIDI CC number that corresponds to Note on/off mode, as shown in
Appendix B.
3. Press DATA MSB twice and enter a value of ‘100’. This means when you press the button, a Note on message will
be sent out with a velocity of 100.
4. Press DATA LSB twice, and enter a value of ‘000’. This means when you release the button, a Note off message
will be sent out.
5. Press the PROGRAM button twice and enter ‘064’. This will mean you are sending out MIDI note 64 or E4, each time
you press the button. The MIDI note numbers are given in Appendix D.
This button mode has many uses. You can use this mode to trigger samples, control lighting equipment, play
keyboard notes and much more.
Note: When you press the button in note mode, the LCD display will briefly show the note velocity.
About Sys Ex Messages & Device ID
When transmitting Sys Ex messages, the individual control channel number does not define a transmit channel, but a device ID. This is made
clear since when you press the CHANNEL button, the CC symbol will not be shown and there is no ’c’ in the 3 digit display. Device ID’s range
between 00 – 127. In most cases, you should set the device ID as 127. 127 means the SysEx message will be received by all devices. Please note
that the device ID for a Sys Ex message assigned to a controller can not be changed using the Device ID buttons. These buttons are used for
varying the device ID of the X-Session it self, not just a separate controller.
Non-Volatile Memory
The X-Session uses non-volatile memory so that you can continue where you left off even after powering down and restarting. The current
X-Session controller and channel assignments are stored whether you have stored your setup to a memory locations or not. Also stored is MIDI
Out from USB on/off, Program, DATA LSB and DATA MSB data, global channel setting and last used memory preset.
Programming and Editing the X-Session
•
7
English
Assigning RPN/NRPN To A Controller
Memory Dump
Pressing the MEMORY DUMP buttons will send out a number of Sys Ex data packets that represent the 10 memories you have set up in your
X-Session. This is a useful way of storing or backing up the contents of your memory presets externally.
You can record the complete memory dump in to a standard sequencer. To recall the memory dump back to the X-Session, play the MIDI
track containing the recorded memory dump to the X-Session, making sure that the X-Session drivers are selected as output for that
particular track.
The current controller assignments are not affected by a memory dump, or a memory send to the X-Session. Once a memory dump has been
sent to the X-Session, you will need to recall a preset to access the new memory settings.
Assigning A Device ID To The X-Session
Pressing the “DEV. ID” buttons will allow you to assign a Device ID to the X-Session. The default Device ID is 127, which means when a memory
dump is performed, that dump can be received by any X-Session, regardless of the Device ID setting.
If a device ID is assigned to any number other than 127, the memory dump performed will be specific to X-Session’s with the same device ID. If
the device ID of a X-Session differs from the one recorded with the memory dump, the data will be ignored.
The device ID is a handy way of differentiating between multiple X-Session’s. Otherwise, we recommend you keep the device ID setting as 127.
When you press the Device ID buttons, you will see the small 2-digit display on LCD display ‘id’. The 3-digit display represents the assigned Device
ID. You can enter a new device ID using the numeric keypad, or the ‘+’ and ‘-’ buttons.
For more information on Sys Ex messages and device ID, please go to page 7.
Resetting To The Factory Default Setting
The X-Session comes with 10 useful presets stored in its’ memory (for complete list, see Appendix H). You can reset the X-Session back to the
factory defaults on power-up by holding down the +/- buttons.
Note: Restoring the Factory presets will erase all X-Session setups stored to memory.
MIDI In/Out & MIDI Messages Explained
MIDI In & MIDI Out Signal Flow Diagram
The MIDI IN & MIDI OUT ports have different uses depending on how you intend to connect and power the X-Session. The diagram below shows
the different routing options.
About The MIDI In Port
The MIDI in plug can be used to interface another MIDI device to your PC, via the USB port. Data received from this device will be transmitted via
the X-Session to the PC. This is achieved using a second USB MIDI out. So, when you select the MIDI devices section of your sequencer you will
see two X-Session USB MIDI Ins. The first of these is used to receive the X-Session controller data, the second is used to receive data from the
other device connected to the X-Session’s MIDI IN plug. So, the X-Session is acting as a MIDI-to-USB interface for the other MIDI device.
About The MIDI Out Port
The X-Session can of course also interface with other MIDI devices. By default (I.e. when you switch the unit on), all controller data is sent out via
the MIDI output as well as the USB out.
If you want the MIDI output to act like a traditional USB-to-MIDI interface, just press the two buttons (SELECT and ASSIGN) that activate the MIDI
OUT from USB mode.
If you are using a host application which can pick up multiple input drivers, you will be able to use the X-Session’s MIDI input and the X-Session
surface to record MIDI data and send the whole lot out of the X-Session’s MIDI output.
Important note: The X-Session is not a MIDI THRU device and as such, MIDI data received at the X-Session’s MIDI IN plug can never be sent
directly to the X- Session’s MIDI OUT plug. However, if the X-Session is connected via USB to a computer, data received at the MIDI IN can be
transmitted to the MIDI OUT plug, since the data is sent to the computer, and received back from the computer. MIDI OUT FROM USB mode must
be engaged for this to occur.
8
•
MIDI In/Out & MIDI Messages Explained
The original GM MIDI specification catered for only 128 voices, numbered from 0-127. It is possible to access a different voice by sending a
program change.
In order to expand on the GM set of voices, Bank changes were devised. Each bank contains 128 patches, that can be accessed using a program
change. There are 16,384 banks available, accessible by sending a 14-bit Bank change message. The first 7 bits of this message are sent in a
single byte known as the Bank LSB. The last 7 bits are specified by another byte known as the Bank MSB. The BANK LSB is the most commonly
used This allows for 128 bank changes, and often there is no need to send a Bank MSB.
You will find almost all MIDI devices respond to the program change, but some that do not conform to the GM set of voices use the program
change message for other purposes. Many VST instruments have adopted this approach, allowing you to use a program change to change the
instrument patch. The FM7 by Native Instruments is a good example of this.
Bank changes are more rarely used, although they do exist. Bank changes are useful in manufacturer’s extensions to the MIDI specification, such
as Roland’s GS specification and Yamaha’s XG specification. Both of these require you to specify a Bank change, in order to access the extra
voices and effects that these specifications provide.
Sending Program, Bank LSB and Bank MSB data is made simple using the X-Session. Simply press the PROGRAM, DATA LSB or DATA MSB button
and enter the program or bank change you wish to send.
RPN/NRPN’s Explained
Non-registered parameter numbers (NRPN’s) are device specific messages that enable the control of synths via MIDI. The MIDI specification
defines parameter numbers to allow scope for manufacturers to specify their own controllers. The more common of these have been registered
by the MIDI Manufacturer’s Association and are part of the MIDI specification (hence the term Registered Parameter Numbers – RPN’s). (See
Appendix F).
MIDI controllers 98 and 99 represent the NRPN LSB and MSB respectively, while 100 and 101 represent the RPN LSB and MSB. This can be seen
from the MIDI controllers list in Appendix D. To transmit an NRPN/RPN, these two controller messages are sent along with their user-specified
values. A further controller message and value needs to be sent to specify the (coarse or fine) value adjustment. This is specified by controller
number 6 (Data entry) for coarse adjustments or number 38 for fine adjustments.
A list of NRPN’s will always be given in the User Manual of a device that receives NRPN messages. It is always necessary that the NRPN MSB
and LSB are sent together. Both will be specified in the device’s manual. You may find the manufacturer’s have only specified the numbers in
Hexadecimal format. In this case, use Appendix C to translate the value to Decimal.
The X-Session makes the process of transmitting NRPN’s easy. All you need is to enter the appropriate NRPN LSB by pressing the LSB/DATA button
twice, enter the NRPN MSB by pressing the MSB/DATA button twice, and as you move the X-Session controller, an appropriate NRPN message
will be sent out. Assign NRPN coarse to make big sweeps, or NRPN fine to make slight adjustments.
Sys Ex Explained
System Exclusive (Sys Ex) messages were defined in the MIDI specification to allow individual devices to have individual control via MIDI. The
format of Sys Ex messages allows for virtually any function to be performed via MIDI – so long as the receiving device is able to translate the
message, and act accordingly. This allows devices to send audio sample memory data, memory dumps, controller settings, and much more. It
also allows the controllers of one device to be controlled by another.
It is not possible to program your own specified Sys Ex message into the X-Session. However, there are some useful Sys Ex messages
pre-programmed, that can be accessed by assigning the appropriate MIDI cc to a controller (see Appendix B) It should be noted that a Sys Ex
message is not transmitted on any specified channel. All Sys Ex messages contain a device ID, that is used to single out devices to respond to
the Sys Ex message. All other devices are ignored. If you are using a Sys Ex message on the X-Session the global channel is ignored. When you
press CHANNEL, instead of entering a channel for the controller, you will be enter a device ID instead. This is indicated by the fact that the CC
symbol will not be showing.
Device ID’s run from 00 to 127. 127 is the default device number setting on the X-Session. This setting transmits the Sys Ex message to all
devices.
Although it is not possible to program the controllers of the X-Session with your own Sys Ex messages, there are software applications that can
receive a MIDI input signal and transmit a different, user specified message. You can program your Sys Ex messages into the translator software,
then translate the incoming data from the X-Session to your Sys Ex, depending on the controller you are using.
The Evolution Librarian Software
About The Evolution Librarian Software
The Evolution Librarian Software is a Windows PC librarian program developed for Evolution products. The program not only works with the
MK-425C/449C/461C keyboards but is also compatible with the Evolution X-Session and the Evolution UC-33e USB controllers.
And even better, you can swap patches between Evolution products that are supported by the Librarian so you never have to create the same
patch twice.
The librarian itself, allows you to send and receive the 10 patches to and from the X-Session, load and save memory banks, view how individual
patches have been programmed and drag and drop patches in order to create new combinations in the 10 memory locations.
The Evolution Librarian Software
•
9
English
Program & Bank Changes Explained
Installing The Evolution Librarian Software
1.
2.
3.
Insert the X-Session Installer CD-ROM in to your CD-ROM drive.
Click on “Librarian Installer”
Follow the on-screen instructions to complete the installation process
Once the installation has been completed, launch the program. The following is a screenshot of what you should be seeing on your monitor.
2
1
Setting Up The Librarian Software
Before you start using the Librarian, check that the X-Session has been selected as input and output device.
1.
2.
3.
Select MIDI Setup from the Options menu.
Ensure the USB driver for your Evolution X-Session - is selected in the “Inputs” Column. If you are using native drivers this may be named
“USB Audio Device”.
In the “Outputs” column, select the USB driver for your Evolution X-Session If you are using native drivers this may be named “USB
Audio Device”.
You should now be ready to use the Librarian software with you Evolution X-Session.
Librarian Overview
As you can see from the screenshot of the Librarian (top of this page), you can save, load, receive or send the complete content to and from
either Bank columns.
To transmit the complete content of your Evolution X-Session to the librarian, simply press the “Receive” button on the Librarian software.
This process can only be completed successfully if the USB drivers for your X-Session have been selected correctly, as described in the “Setting
Up The Librarian Software” section.
Once you have Received data from the X-Session, the memories are displayed in the column.
Organizing Presets Received From A Device
You can name the memories as you like. To re-name a memory, double-click on the memory. You can then move memories around by dragging
them to a new position, or using the copy buttons between the two windows.
These buttons are defined below:
Will copy the selected memory in Bank 2 to Bank 1.
Will copy the selected memory in Bank 1 to Bank 2.
Will copy all memories in Bank 2 to Bank 1.
Will copy all the memories in Bank 1 to Bank 2.
Will undo the last copy you made. Only the last copy is remembered.
It’s a good idea to decide which column is your master column, to avoid confusion and maybe loosing hours of work.
Viewing The Contents Of A Memory
Right-click on a memory to view the contents. Please note that it is not possible to the contents of a memory. The Sys Ex librarian will simply allow
you to rearrange the order of memories, or copy memories between one memory dump and another.
10 •
The Evolution Librarian Software
Once you have named all your presets, and organized them in the desired order, click ’save’ to save the content.
Alternatively you can click on the File menu and select save to save the file with the previously assigned file name, or save as to assign the
memory dump a new file name. The shortcut key to save Bank 1 is CTRL+S.
Make sure you give the file a name which allows you to quickly identify your collection of setups.
Loading A Setup
To load a memory setup file back in to the librarian, click on the ’Load’ button and select the required file. The loaded preset setups will appear
in the Bank Window. You can then either send it directly to the Evolution device by clicking send, or edit it.
Alternatively, select Open from the File menu.
The shortcut key for loading is CTRL+O.
Contact
If you have any questions, comments or suggestions about this or any M-Audio product, we invite you to contact us by using the
following information:
M-AUDIO U.S. 5795 Martin Road, Irwindale, CA 91706-6211, U.S.A.
M-AUDIO Deutschland (Germany) Kuhallmand 34, D-74613 Ohringen, Germany
Sales Information: . . . . . . . . . . . . . . . . . . . . . . . . . . . . . . . . . . . . . . . . . . .626-633-9050
Sales Information: . . . . . . . . . . . . . . . . . . . . . . . . . . . . . . . . . . . . . . . . . 49 7941 98 7000
Sales Information (email): . . . . . . . . . . . . . . . . . . . . . . . . . . . . . . . [email protected]
Sales Information (email): . . . . . . . . . . . . . . . . . . . . . . . . . . . . . . . . . [email protected]
Tech Support . . . . . . . . . . . . . . . . . . . . . . . . . . . . . . . (email): [email protected]
Technical Support: . . . . . . . . . . . . . . . . . . . . . . . . . . . . . . . . . . . . . . . . 49 7941 98 70030
Fax: . . . . . . . . . . . . . . . . . . . . . . . . . . . . . . . . . . . . . . . . . . . . . . . . . . . . . . .626-633-9060
Technical Support (email): . . . . . . . . . . . . . . . . . . . . . . . . . . . . . [email protected]
Internet Home Page: . . . . . . . . . . . . . . . . . . . . . . . . . . . . . .http://www.m-audio.com
Fax: . . . . . . . . . . . . . . . . . . . . . . . . . . . . . . . . . . . . . . . . . . . . . . . . . . . . . . 0 7941 98 70070
Internet Home Page: . . . . . . . . . . . . . . . . . . . . . . . . . . . . . . . . http://www.m-audio.de
M-AUDIO U.K. Floor 6, Gresham House, 53 Clarendon Road, Watford WD17 1LA
M-AUDIO Canada 1400 St-Jean Baptiste Ave. #150, Quebec City, QC G2E 5B7, Canada
Tel: 01923 204010 • Fax: 01923 204039
Tel: . . . . . . . . . . . . . . . . . . . . . . . . . . . . . . . . . . . . . . . . . . . . . . . . . . . . . . . . 418-872-0444
Sales Information (phone): . . . . . . . . . . . . . . . . . . . . . . . . . . . . . . . 44 (0) 1442 416590
Fax: . . . . . . . . . . . . . . . . . . . . . . . . . . . . . . . . . . . . . . . . . . . . . . . . . . . . . . . 418-872-0034
Sales Information (fax): . . . . . . . . . . . . . . . . . . . . . . . . . . . . . . . . . .44 (0) 1442 246832
Email: . . . . . . . . . . . . . . . . . . . . . . . . . . . . . . . . . . . . . . [email protected]
Sales Information (email): . . . . . . . . . . . . . . . . . . . . . . . . . . . . . . . [email protected]
Internet Home Page: . . . . . . . . . . . . . . . . . . . . . . . . . . . . . . . . http://www.m-audio.ca
Technical Support (PC): . . . . . . . . . . . . . . . . . . . . . . . . . . . . . . . . . . .44 (0) 1309 671301
Technical Support (Mac): . . . . . . . . . . . . . . . . . . . . . . . . . . . . . . . . . 44 (0) 1765 650072
Technical Support (email): . . . . . . . . . . . . . . . . . . . . . . . . . . [email protected]
Internet Home Page: . . . . . . . . . . . . . . . . . . . . . . . . . . . . . .http://www.maudio.co.uk
M-AUDIO France Floor 6, Gresham House, 53 Clarendon Road, Watford WD17 1LA
M-AUDIO Japan (株式会社エムオーディオジャパン)460-0002 愛知県名古屋市中区丸の内 2-18-10
Tel: 01923 204010 • Fax: 01923 204039
テクニカルサポート : . . . . . . . . . . . . . . . . . . . . . . . . . . . . . . . . .052-218-0859
Informations Commerciales: . . . . . . . . . . . . . . . . . . . . . . . . . . . . . . . . . . . 0810 001 105
テクニカルサポート
(Macintosh): . . . . . . . . . . . . . . . . . . . . . . . . . . . [email protected]
Informations Commerciales (email) . . . . . . . . . . . . . . . . . . . . . . . . . . [email protected]
Assistance Technique(tel) . . . . 0820 000 731 (PC) ou 0820 391 191 (Mac at général)
Assistance Technique(email): . . . . . . . . . [email protected] ou [email protected]
Fax: . . . . . . . . . . . . . . . . . . . . . . . . . . . . . . . . . . . . . . . . . . . . . . . . . . +44 (0) 1442 246 832
Site Internet: . . . . . . . . . . . . . . . . . . . . . . . . . . . . . . . . . . . . . . . . http://www.m-audio.fr
テクニカルサポート
(Windows): . . . . . . . . . . . . . . . . . . . . . . . . . . . . [email protected]
Fax: . . . . . . . . . . . . . . . . . . . . . . . . . . . . . . . . . . . . . . . . . . . .052-218-0875
ホームページ : . . . . . . . . . . . . . . . . . . . . . . . . . . . . http://www.m-audio.co.jp
Contact
•
11
English
Saving A Setup
Trouble-Shooting
My Evolution hardware suddenly stopped working after having performed fine since installation.
< Switch off the unit and leave for 10 seconds. Then restart your computer and try again. If the problem persist you may have to re-install
drivers for the unit.
My drivers are listed in the Device Manager and are said to be working OK, but the keyboard is not recognised in any
software.
< Win2000 and XP have a limitation to how many MIDI device drivers you can have installed at any one time.
There is no indication that you are using the maximum number of drivers—the drivers will install as if there is not a
problem.
< To fix this problem: Go to http://www.evolution.co.uk/support/faq/index.html and locate the above question. You will find a link to an exe
file that will solve this problem for you.
When I move a controller, there is a delay before I hear it affecting the sound.
< This delay is known as latency. Latency with MIDI signals is due to the soft-synth you are using. MIDI data is simply control data. The MIDI
is read by the soft-synth. The soft-synth then completes a large number of complex calculations, in order to produce the sound you hear.
All this takes time. We recommend getting a proper soundcard. You can get a decent one these days for under £30. If you already have
an adequate sound card, try re-installing the latest drivers for the sound card, or try reducing the buffer sizes of the audio drivers. You
can do this in the Sound Studio II and Sound Studio Pro II programs by going to ‘Audio’ – ‘Audio system settings’ where you can reduce
the buffer sizes of the MME or ASIO drives.
I can’t get any sound from my Evolution Software.
< In your software go to Options|Devices. Here you will see a list of MIDI Inputs and MIDI outputs. If you have MIDI inputs available, if no driver
names appear in the Output column, you need to re-install your soundcard or update the soundcard drivers. The output column allows
you to choose which output driver you want for generating the MIDI sounds. Most soundcards will have an option such as “FM synth” or
“SBLive Synth”. Click on these driver names to use the sounds of your soundcard for playback of MIDI data. If you just have a sound chip,
the software synth to select may be like “Microsoft SW synth”. Click on the driver name of your choice.
Rule of Thumb: If you have numerous output drivers enabled (highlighted in blue) and cannot hear any output, de-select all but one of them
and try again. Repeat this process until you hear some sounds.
Technical Info
Modifications not authorized by the manufacturer may void users authority to operate this device.
Note: This equipment has been tested and found to comply with the limits for a Class B digital device, pursuant to Part 15 of the
FCC Rules. These limits are designed to provide reasonable protection against harmful interference in a residential installation.
This equipment generates, uses and can radiate radio frequency energy and, if not installed and used in accordance with the
instructions, may cause harmful interference to radio communications. However, there is no guarantee that interference will not
occur in a particular installation. If this equipment does cause harmful interference to radio or television reception, which can be
determined by turning the equipment off and on, the user is encouraged to try to correct the interference by one or more of the
following measures:
•
•
•
•
Reorient or relocate the receiving antenna.
Increase the separation between the equipment and receiver.
Connect the equipment into an outlet on a circuit different from that to which the receiver is connected.
Consult the dealer or an experienced radio/TV technician for help.
VST is a trademark of Steinberg Soft– und Hardware GmbH
ASIO is a trademark of Steinberg Soft– und Hardware GmbH
DirectX is copyright 2002 Microsoft
Sound Studio II, PictureBoard and Music Teacher are copyright 2003 Evolution Electronics Ltd
All rights reserved
X-Session
ESD and Fast Transient may cause the unit to temporarily malfunction.
Switch off and on again to restore normal operation.
12 •
Trouble-Shooting
Tested to comply with
FCC standards
FOR HOME OR STUDIO USE
English
Appendices
Appendix A - MIDI Implementation Chart
Appendices
•
13
Appendix B - Assignable MIDI CC’s on the X-Session
B1 - The Cross Fader and rotary Controllers:
* Sysex messages
** MMC Sysex messages
*** This value cannot be typed in using the numerical keypad. Type in 144 and then press the ‘+’ button to set this value, or 0 and press
the ‘-’ button.
14 •
Appendices
English
B2-The Buttons:
* Sysex messages
** MMC Sysex messages
*** This value cannot be typed in using the numerical keypad. Type in 144 and then press the ‘+’ button to set this value, or 0 and press
the ‘-’ button.
Appendices
•
15
Appendix C - Hexadecimal Conversion Chart
Hexadecimal to Decimal Conversion Chart
16 •
Appendices
Appendix D - Useful MIDI data
English
General MIDI Instruments
MIDINote
NoteNumbers
Numbers
MIDI
Octave
(n)
Note
Numbers
Cn
C#n
Dn
D#n
En
Fn
F#n
Gn
G#n
An
A#n
-1
0
1
2
3
4
5
6
7
8
9
0
1
2
3
4
5
6
7
8
9
10
11
12
13
14
15
16
17
18
19
20
21
22
23
24
25
26
27
28
29
30
31
32
33
34
35
36
37
38
39
40
41
42
43
44
45
46
47
48
49
50
51
52
53
54
55
56
57
58
59
60
61
62
63
64
65
66
67
68
69
70
71
72
73
74
75
76
77
78
79
80
81
82
83
84
85
86
87
88
89
90
91
92
93
94
95
96
97
98
99
100
101
102
103
104
105
106
107
108
109
110
111
112
113
114
115
116
117
118
119
120
121
122
123
124
125
126
127
Appendices
Bn
•
17
Appendix E - Standard MIDI Controller numbers (MIDI CC’s)
18 •
Appendices
English
Appendix F - Roland GS and Yamaha XG NRPN Support to Roland JV/XP
Appendix G - General MIDI Reverb and Chorus Types
Reverb Types
Chorus Types
0:
1:
2:
3:
4:
8:
0:
1:
2:
3:
4:
5:
Small Room
Medium Room
Large Room
Medium Hall
Large Hall
Plate
Chorus 1
Chorus 2
Chorus 3
Chorus 4
FB Chorus
Flanger
Appendix H - X-Session Preset Chart
Appendices
•
19
Warranty Terms & Registration
Warranty Terms
M-Audio warrants products to be free from defects in materials and workmanship, under normal use and provided that the product is owned by
the original, registered user. Visit www.m-audio.com/warranty for terms and limitations applying to your specific product.
Warranty Registration
Thank you for registering your new M-Audio product. Doing so immediately both entitles you to full warranty coverage and helps M-Audio
develop and manufacture the finest quality products available. Register online at www.m-audio.com/register to receive FREE product updates
and for the chance to win FREE M-Audio gear.
Future Development Of The Librarian
We strongly recommend you register your ownership of the Evolution Librarian if you would like to be kept informed about future development.
As you can see from the version number, the software is at an early version 1.1 stage and we will continue to work on enhancements for
the software.
To register your copy, please visit www.evolution.co.uk/register
20 •
Warranty Terms and Registration
050103_XSession_UG_01