1
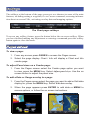
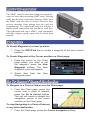
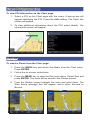
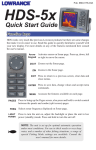
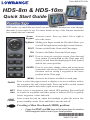
Pub. 988-0176-10A
HDS-8m & HDS-10m
Quick Start Guide
Function keys
HDS works very much like previous Lowrance products but there are some changes
that make it even easier to use. For more details on any of the features mentioned
here consult the user's manual.
Arrow
Keypad
Activates cursor. Press up, down, left or right to
move the cursor.
FlyWheel Sliding your finger around the Flywheel allows you
to scroll through menus and adjust certain features.
ZOUT Zooms out the Radar, Sonar and Chart pages.
ZIN Zooms in the Radar, Sonar and Chart pages.
EXIT Press to return to a previous screen, clear data and
close menus. Pressing Exit on the Chart page will
quickly switch between displaying the boat symbol
and the last cursor position.
ENTER Press to save data, change values and accept menu
commands; also acts as a short cut key for important
functions such as saving a waypoint at the cursor
position on the Chart page.
MENU Accesses the features available on each page.
PAGES
Press to select the page (screen) to display or to access utilities such as
the waypoints list and celestial table. Press and hold to switch control
between the panels and combo (split screen) pages.
WPT
Press to save a waypoint at your current GPS position. Press and hold
to search for waypoints and other points of interest (POI's) or quickly
access waypoints, routes and trails..
LIGHT
Press to turn the unit on, adjust the backlight or place the unit in low
power (standby) mode. Press and hold to turn the unit off.
FIND
POWER
Creating a Man Overboard (MOB) position:
•
Press the ZOUT and ZIN keys at the same time to create a
MOB waypoint with a line to your boat position.
*988-0176-10A*
*988-0176-10A*
Softkeys
The softkeys at the bottom of the page screen act as a shortcut to some of the units
features, including setting a waypoint, Go to Cursor command, accessing information about on screen POIs, activating overlay data and mapping options.
The Chart page softkeys
To access any softkey feature, press the button below the on screen softkey. When
you have finished making any adjustment or entering a command press the softkey
button again to close the menu.
Pages screen
To view a page:
1. From
any screen press PAGES to access the Pages screen.
2. S
elect the page display. Chart / Info will display a Chart and Info
combo page.
To adjust Panel sizes on a Combo page:
1. From the Pages screen select the Combo page option you want
to view, press the MENU key. Select Adjust panel sizes. Use the on
screen button to adjust the panel size.
To add a Data or Gauge overlay to a page:
1. From the Pages screen select the page you want to add or Edit data
display for, press the MENU key. Select Edit data overlay.
2. W
hen the page appears press ENTER to add data or MENU to
access options, or follow the on screen instructions.
MMC / SD card slot
The MMC card slot door has a magnetic latch. Always use care when inserting MMC cards. Forcing
cards into the slot could cause damage. Make sure
the MMC card slot door is always closed to help
prevent moisture from getting into the card slot
compartment. The right hand card slot features a
higher speed connection and should be used first.
The right hand card slot is MMC+ card compatible
offering a higher speed connection for faster data
transfer.
Waypoints
To Create Waypoint at current position:
1. P
ress the WPT/Find key to create a waypoint at the your current
position.
To Create Waypoint at the Cursor position on Chart page:
1. P
lace the cursor on the Chart
page where you want to set
the waypoint, press the New
Waypoint softkey. The New
Waypoint menu will appear.
2. S
elect Save from
Waypoint menu.
the
New
Go To Cursor / Cancel Navigation
To Navigate to a Point of Interest on the Chart page:
1. F
rom the Chart page center the
cursor over a point of interest,
press the Go to Cursor softkey.
The unit will create a straight line
navigation course to the cursor
position on the Chart page.
To stop Navigating to a Point of Interest
or any other destination:
1. From the Chart page, press the Cancel navigation softkey.
Chart POI information
To view POI information on the Chart page:
1. S
elect a POI on the Chart page with the cursor. A pop-up box will
appear identifying the POI. Press the Info softkey. The Chart Info
screen will appear.
2. T
o view additional information about the POI, select Details. The
Information screen will appear.
Routes
To create a Route from the Chart page:
1. P
ress the MENU key and select New Route from the Chart menu.
Press ENTER.
2. Follow the on screen instructions.
3. P
ress the MENU key to open the Edit route menu. Select Save and
press ENTER. The route will be saved to the Routes screen.
4. F
rom the Routes screen highlight the route and select Start. The
Start Route message box will appear, select either Forward or
Reverse.
Sonar : (Available only when connected to a Sonar
or Sonar/GPS unit via Ethernet cord.)
Fish arches
Cursor depth
Information at
cursor's position.
Range scale
Cursor
History bar
Amplitude
scope
NOTE: The unit is set up for optimal automatic operation
under most conditions. For use in thick weeds or very deep
water, and a number of other fishing situations, a range of
special Fishing Mode settings are available. Consult the
user's manual for more details.
To adjust Sensitivity:
1. F
rom the Sonar page press the Sensitivity softkey. The Sensitivity
adjustment softkey will appear on screen. Use the left and right
arrows on the Arrow keypad to make adjustments.
To adjust Colorline:
1. F
rom the Sonar page press the Colorline softkey. The Colorline
adjustment softkey will appear on screen. Use the left and right
arrows on the Arrow keypad to make adjustments.
To mark an Underwater object with a Waypoint:
1. F
rom the Sonar page, press the
Arrow keypad to activate the cursor.
Use the Arrow keypad to center the
cursor over the underwater object,
press ENTER. A waypoint will be
created at the cursor's position on
the Sonar page. The waypoint can
be viewed from either the Waypoints
screen or the Chart page.
To select a Sonar page Palette:
1. F
rom the Sonar page press the MENU key. The Sonar
menu will appear. Select View in the Sonar menu to
open the View submenu.
2. F
rom the View submenu select Palette. The Palette
menu has 12 sonar screen categories, including
Grayscale, Nightview and Iceview.
Sonar page Split screen options
To select a Zoom, Bottom Lock or Flasher
split screen display:
1. From
the Sonar page press the Split/
No Split softkey. The Split screen
options menu will appear. The Split
screen options are: No split, Zoom,
Bottom Lock and Flasher.
To view and control two Frequencies at
once:
1. Press
PAGES to access the Pages
screen. From the Pages screen
Sonar options select + Sonar combo
pages.