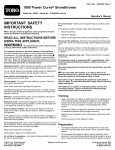
1
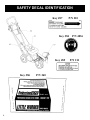
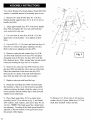
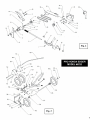
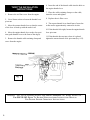
LITTLE WONDER ®
PARTS LIST, OPERATING AND
ASSEMBLY INSTRUCTIONS FOR
PRO HONDA EDGER, MODEL #6232
©2001, LITTLE WONDER ®, Division Schiller-Pfeiffer, Inc.
IMPORTANT SAFETY INSTRUCTIONS
! WARNING ▲
!
▲
To avoid injury when using
your Honda Edger, follow
basic precautions, including the following:
1. READ THESE IMPORTANT SAFETY
INSTRUCTIONS, THE OPERATING INSTRUCTIONS, ASSEMBLY INSTRUCTIONS, USER
MAINTENANCE INSTRUCTIONS, AND THE
HONDA OPERATING AND MAINTENANCE
INSTRUCTIONS CAREFULLY AND COMPLETELY. Be thoroughly familiar with the controls
and the proper use of the equipment. Know how to
stop the unit and disengage the controls quickly.
SAVE MANUALS AND INSTRUCTIONS AND
KEEP IN A SAFE PLACE.
!
▲
DANGER
!
▲
2. ROTATING BLADE
• Keep both hands on handles when blade is rotating.
• Keep feet and hands away from cutting area.
• Do not attempt to remove cut debris or hold
material to be cut when engine is running or when
blade is moving.
• Make sure spark plug wire is disconnected when
clearing jammed material from blade or cutter head.
CAUTION - Blade coasts after machine is turned off.
3. DO NOT USE
! WARNING ! MACHINE ON GRAVELED SURFACES.
Thrown objects can cause serious injuries and/or
property damage.
▲
▲
4. KEEP OPERATING AREA CLEAR - Keep the
area of operation clear of all persons and pets.
5. USE EDGER PROPERLY - Use only for
edging the type of shrub, growth and the like
described in the operating instructions. Do not abuse
machine. Do not use in rain or wet locations.
! Warning:
▲
2
6. DON’T OVERREACH OR STAND ON
UNSTABLE SUPPORT - Keep good footing and
balance at all times.
!
▲
DANGER
!
▲
DANGER
!
▲
7. NEVER DIRECT DISCHARGE OF MATERIAL TOWARD BYSTANDERS OR ALLOW ANYONE NEAR THE AREA OF OPERATION. Use
care in directing discharge to avoid glass enclosures,
automobiles, and the like.
!
▲
8. OBJECTS STRUCK
BY THE BLADE CAN
CAUSE SEVERE INJURIES TO PERSON.
The lawn should always be carefully examined
and cleared of all objects prior to use.
9. STAY ALERT FOR UNEVEN SIDEWALKS,
HOLES IN TERRAIN OR OTHER SIMILAR
CONDITIONS. Always push slowly over rough
ground.
10. NEVER OPERATE MACHINE WITHOUT
GOOD VISIBILITY OR LIGHT.
11. STAY ALERT - Watch what you are doing - use
common sense. Do not operate product when fatigued
or under the influence of alcohol or drugs.
12. DRESS PROPERLY - Wear safety glasses or
goggles. Do not wear loose clothing or jewelry. They
can be caught in moving parts. Use of sturdy gloves
and safety footwear is recommended. Always wear
pants that cover legs.
13. DISCONNECT (UNPLUG) SPARK PLUG
LEAD WIRE:
- When not in use.
- Before servicing, cleaning and the like.
- Before changing blade, belt, etc.
14. MAINTAIN PRODUCT WITH CARE Follow maintenance instructions given in Manuals.
To reduce the risk of fire, do not allow excessive
grass, leaves, or grease to accumulate on the machine.
The engine exhaust from this product contains chemicals known to the
State of California to cause cancer, birth defects or other reproductive harm.
15. STORE MACHINE INDOORS - When not in
use, store indoors in a dry place, locked or otherwise
inaccessible to children.
16. DO NOT ATTEMPT TO REPAIR MACHINE
- Have repairs made by qualified dealer or repairman.
Use only original Little Wonder replacement parts.
17. HANDLE GAS WITH CARE; IT IS HIGHLY
FLAMMABLE.
a) Use a gas container acceptable for the purpose
and do not store gas in the house.
b) Never add gas to a running or hot engine.
c) Fill gas tank outdoors with extreme care. Never
fill gas tank indoors.
d) Replace gas cap securely.
e) If gas is spilled, move Edger and gas container
from area and do not create a source of ignition.
! CAUTION ▲
!
▲
18. To reduce the risk of
fire, replace gasoline cap
securely.
19. START THE ENGINE CAREFULLY. Keep
hands, feet, clothing and the like well away from
blade and moving parts.
20. NEVER ATTEMPT TO MAKE ADJUSTMENTS while the engine is running, except to the
carburetor.
! WARNING ▲
!
▲
21. DO NOT RUN THE
ENGINE INDOORS Exhaust flames are dangerous The engine exhaust
from this product contains chemicals known to the
State of California to cause cancer, birth defects or
other reproductive harm.
24. STOP THE ENGINE WHEN LEAVING THE
MACHINE UNATTENDED.
25. WHEN CLEANING, REPAIRING, OR
INSPECTING, make certain the blade and all moving parts have stopped. Disconnect the spark plug
wire, and keep the wire away from the plug so that
unintentional starting does not occur.
26. NEVER OPERATE THE MACHINE without
guards or other productive devices in place. Before
each use, check all fasteners and safety devices for
proper function.
27. MULTIPLE OPERATORS - Keep a safe
distance between two or more operators when
working together simultaneously.
28. BE SURE MACHINE IS FULLY
ASSEMBLED - Never operate without all guards
and deflectors in place. Ensure that all nuts, bolts,
screws are installed and properly tightened. Check
pulley set screws and all fasteners for tightness and
lubricate cutter head shaft, key, keyway and bushings
with light oil prior to each use.
29. ALWAYS KEEP THE THROTTLE IN THE
“STOP” POSITION WHEN NOT IN USE.
30. LABELS SHOULD BE INSPECTED
BEFORE EACH USE. Replace damaged labels
immediately. See Safety Decal Identification on
page 4.
22. IF BLADE STRIKES A FOREIGN OBJECT,
FOLLOW THESE STEPS:
a) Stop the engine.
b) Disconnect the spark plug lead.
c) Inspect for any damage.
d) Repair any damage before restarting and
operating the machine.
23. DISENGAGE THE BLADE AND/OR STOP
THE ENGINE WHEN THE MACHINE IS
TRANSPORTED OR NOT IN USE.
3
SAFETY DECAL IDENTIFICATION
Key #87
P/N 210
Key #84
Key #85
Key #86
P/N 260
6232
4
P/N 4036
P/N 211
.10
267.10
.17
.17
.10
640 44-0 2
H andle-Su ppo rt, R H
61
64141-2
.10
.10
.10
266.10
.10
4163572
1
H andle-Su ppo rt LH
3/4
8
1
61
41
THROTTLE INSTALLATION
INSTRUCTIONS
1. Remove the air filter cover from the engine.
2. Use a 10mm socket to loosen the throttle lever
pivot nut.
3. Move the remote throttle lever so that the center
of the lever is lined up with the turtle’s tail.
4. Move the engine throttle lever to the slow position (push throttle lever to the front of the edger).
5. Remove the throttle cable retaining clamp and
screw from the engine.
6. Insert the end of the throttle cable into the hole on
the engine throttle lever.
7. Place the cable-retaining clamp over the cable,
insert the screw and tighten.
8. Replace the air filter cover.
9. The remote throttle lever should move from slow
to fast and be approximately centered in its slot.
10. If the throttle feels tight, loosen the engine throttle
lever pivot nut.
11. If the throttle does not stay where it is placed,
tighten the remote throttle lever pivot nut (key # 63).
Fig. 4
WARNING - ALL LITTLE WONDER EDGERS ARE SHIPPED WITHOUT OIL. WHEN FILLING OIL Use SAE 30 Oil. REFER TO ENGINE MANUFACTURES INSTRUCTION MANUAL
FOR PROPER ENGINE OPERATION INSTRUCTIONS
8
OPERATING INSTRUCTIONS
A. BEFORE STARTING
1. Place Edger on level surface; be sure blade
is not obstructed and the area is clear and free of
bystanders. Your Edger is equipped with a Honda
4-cycle engine.
2. Check oil level, and be sure crankcase is filled
with oil.
3. Fill gas tank with fresh gas. Do not mix gas with
oil.
NOTE: Refer to Honda Operating and Maintenance
Instructions for recommended grades of oil and gas.
4 For easier starting, remove belt tension by pulling
up the belt slackener lever (P/N 167-2).
B. STARTING PROCEDURE
1. For easier starting, remove belt tension by pulling
up the belt slackener lever (P/N 167-2).
2. Prior to starting the engine, secure and hold the
edger handle with your left hand.
3. Refer to your Engine Operator/Owner Manual for
Engine Starting Instructions.
4. Once the engine starts, set the throttle control
lever to desired speed.
NOTE: A warm engine requires less choking than a
cold engine.
C. STOP PROCEDURE
1. Pull throttle lever towards you to STOP position.
2. Turn engine switch to OFF position.
! CAUTION ▲
!
▲
D. CAUTION
1. Do not change the
engine governor settings or overspeed the engine.
2. If the product vibrates abnormally, immediately
stop the engine and check for the cause. Vibration is
generally a warning sign of trouble.
3. Stop the engine whenever you leave the operating
position; disconnect the spark plug lead wire before
unclogging the unit, when making a repair, adjust-
ment, inspection or the like.
4. Operate machine from position where guards
block the line of sight to the cutting member.
E. OPERATING
1. Eye protection must be worn at all times. Use
common sense and exercise caution at all times when
operating your Edger.
2. Operate in a safe manner. When edging, the
potential exists for thrown objects which can cause
injury (i.e.) from rocks, cement, pieces of steel, glass,
etc. These obstructions should be avoided at all times.
3. Never leave the machine when the engine is running, particularly on hills where the unit might roll.
4. Setting depth of blade. (1) Place left hand on
upper handle. (2) Grasp lever, P/N 228, with right
hand and pull to the right, which disengages lever
from rachet segment on handle. Move lever forward
or backward along rachet segment and insert key on
lever into notch on rachet at the desired depth.
Moving lever forward decreases depth of cut, moving
lever backward increases depth of cut.
6. Engine speed - The engine speed should be kept
to the minimum consistent with the job at hand.
Speeds higher than necessary will only cause undue
wear and tear. A speed half-way between "fast" and
"slow" is normally adequate. Tougher jobs may
require higher speeds.
7. Little Wonder Edgers provide the finishing touch.
They edge at any angle along flower beds, terraces,
sidewalks and curbs. They trim along buildings,
trees, walks, marker hedges and fences with ease
and reliability.
8. Edging - The blade should be perpendicular to
the ground or sidewalk. The cutting depth should
be sufficient to cut away the root system, usually 1”
to 1 1/2" deep. Along flush sidewalks or driveways,
it is easier to place the wheels on the sidewalk or
driveway rather than the grass. The hardened tool
steel blade, P/N 129, becomes its own guide if it is
permitted to rub against the side or edge of the sidewalk or driveway. Angles other than vertical my be
desirable when edging flower beds, walls, posts, etc.
When edging along a curve, the rear wheels should
be held off the ground so the machine may be maneu9
vered "wheelbarrow fashion."
USER MAINTENANCE
INSTRUCTIONS
1. Keep all nuts, bolts and screws tight.
2. Never store the machine filled with fuel inside a
building or in a confined space where fumes may be
susceptible to sparks or an open flame.
3. Refer to the instructions manual for important
details if the product is to be stored for an extended
period of time.
4. Check the tightness of the blade nut prior to each
use.
5. Prior to each use, lubricate cutter head shaft
(P/N 131), cutter head bracket (P/N l00-C), and key
(P/N 138) at slip rotation points every 8 hours
6. Prior to each use, check to see that set screws on
pulley are tight, and guards are in place.
NOTE: The belt guard is an important safety feature
and is vital to the proper operation of the edger.
7. Grease cutter head every 25 hours. Use Lithium
#0 grease (P/N 4042). Add grease until grease starts
to squeeze through the bearing.
! CAUTION ▲
!
▲
Loose set screws can cause
damage to shaft and pulley.
Improper maintenance will void warranty.
10
WARNING: The engine on your Pro Honda
Edger is not equipped with a spark arrester and
if machine is to be used on any forest-covered,
brush-covered, or grass-covered unimproved
land, before using on such land a spark arrester
must be added to the muffler. The arrester must
be maintained in effective working order by the
operator. In the State of California, the above is
required by law (Section 4442 of the California
Public Resources Code). Other states may have
similar laws. Federal laws apply on federal
lands. See your Authorized Honda Service
Center for spark arrester muffler options.
NOTE: The belt guard is vital to the proper
operation of the edger. The belt guard is not just
a safety feature!
Fig. 5
TROUBLESHOOTING GUIDE
PROBLEM
POSSIBLE CAUSE
CORRECTIVE ACTION
A. Engine will not start
1. Out of gasoline.
2. Spark plug lead wire loose
or disconnected.
3. Defective spark plug.
4. Throttle control lever not
in proper position.
5. Engine flooded or flooding.
6. Stale or contaminated
gasoline.
7. Engine switch off.
8. Oil level low.
1. Fill gasoline tank.
2. Reconnect spark plug lead wire.
1.
2.
3.
4.
1.
2.
3.
4.
B. Loss of power, hard
starting.
Spark plug lead wire loose.
Defective spark plug.
Carburetor out of adjustment.
Air cleaner dirty.
5. Air vents clogged or plugged.
3. Replace spark plug.
4. Move throttle control lever to start position.
5. Start engine with choke fully open.
6 Drain, clean tank and system and refill with
fresh gasoline.
7. Turn engine switch to ON position.
8. Fill crankcase to proper oil level.
Tighten spark plug lead wire.
Replace spark plug.
Properly adjust carburetor.
Clean and service air cleaner. (See the Honda
Operation and Maintenance illustrations.)
5. Clean vent in gasoline tank cap and carburetor.
C. Engine will not idle
properly.
1. Idle speed too slow.
2. Spark plug gap incorrect.
3. Air cleaner dirty.
1. Adjust carburetor idle speed or idle mixture.
2. Set spark plug gap .030 (.76mm) for Honda
engine.
3. Clean and service air cleaner. (See the Honda
Operation and Maintenance illustrations.)
D. Engine runs hot or
overheats.
1. Oil level low.
2. Engine cooling fins or baffles
clogged with dirt and debris.
3. Carburetor out of adjustment.
1. Fill crankcase to proper oil level.
2. Clean and remove obstructions.
1. Parts bent, distorted, worn
out or missing.
1. Inspect control mechanism and repair
or replace damaged, worn out, or missing
components.
E. Control mechanisms
for depth of blade
will not function.
3. Readjust carburetor.
WARNING - ALL LITTLE WONDER EDGERS ARE SHIPPED WITHOUT OIL. WHEN FILLING OIL Use SAE 30 Oil. REFER TO ENGINE MANUFACTURES INSTRUCTION MANUAL
FOR PROPER ENGINE OPERATION INSTRUCTIONS
11
7012/ 4163240s
i
.