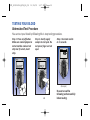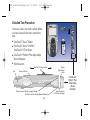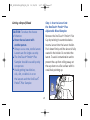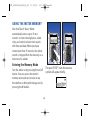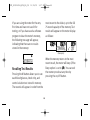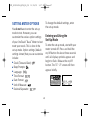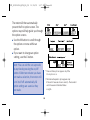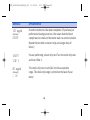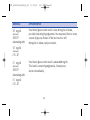
1
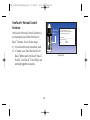
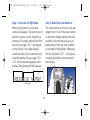
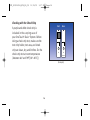
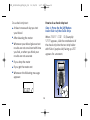
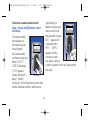
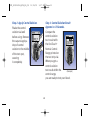
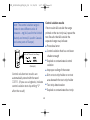
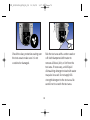
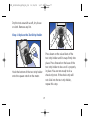
DCO_06331801A_OTB_OB_US
11/25/03
Basic
3:27 PM
Page i
Blood
Glucose
Monitoring
System
Owner's Booklet
Simple
Easy To Handle
Proven Accuracy
DCO_06331801A_OTB_OB_US
11/25/03
3:27 PM
Page ii
DCO_06331801A_OTB_OB_US
11/25/03
3:27 PM
Page iii
The OneTouch® Basic® Blood Glucose Monitoring System
is intended for in vitro diagnostic use for quantitative
determination of glucose in whole blood as an aid in
monitoring effectiveness of diabetes management in the
home and in clinical settings. It is not intended for use in
the diagnosis of diabetes or for neonatal testing
(newborns 0–4 weeks old).
DCO_06331801A_OTB_OB_US
11/25/03
3:27 PM
Page iv
CAUTION: Before using any product to test your blood
glucose (sugar), read all instructions and practice the
test. Do all quality control checks as directed and
consult with a diabetes healthcare professional. These
recommendations apply to all blood glucose monitoring
systems and are supported by the American Association of
Diabetes Educators, the American Diabetes Association,
the U.S. Food and Drug Administration, and the Health
Industry Manufacturers Association.
IMPORTANT: The OneTouch® Basic® System kit contains
many small parts: test strip holder, battery door,
batteries, lancets, control solution vial, etc. Keep the
system kit out of the reach of small children because
these parts may be dangerous if swallowed.
DCO_06331801A_OTB_OB_US
11/25/03
3:27 PM
Page v
TABLE OF CONTENTS
INTRODUCTION . . . . . . . . . . . . . . . . . . . . . . . . . . . . . . . . . . . . . . . . . . . . . . . . . . . . . . . . . . . . . . .1
PRECAUTIONS AND LIMITATIONS . . . . . . . . . . . . . . . . . . . . . . . . . . . . . . . . . . . . . . . . . . . . . . . .2
Infection Control . . . . . . . . . . . . . . . . . . . . . . . . . . . . . . . . . . . . . . . . . . . . . . . . . . . . . . . . . . .3
GETTING STARTED . . . . . . . . . . . . . . . . . . . . . . . . . . . . . . . . . . . . . . . . . . . . . . . . . . . . . . . . . . . . .4
The OneTouch® Basic® Blood Glucose Monitoring System . . . . . . . . . . . . . . . . . . . . . . . . . . .5
OneTouch® Basic® Blood Glucose Meter . . . . . . . . . . . . . . . . . . . . . . . . . . . . . . . . . . . . . . . . .6
OneTouch® Basic®, Profile®, OneTouch® II Test Strips . . . . . . . . . . . . . . . . . . . . . . . . . . . . . . .8
OneTouch® Normal Control Solution . . . . . . . . . . . . . . . . . . . . . . . . . . . . . . . . . . . . . . . . . . .10
BEFORE TESTING . . . . . . . . . . . . . . . . . . . . . . . . . . . . . . . . . . . . . . . . . . . . . . . . . . . . . . . . . . . . .11
Setting Meter Code . . . . . . . . . . . . . . . . . . . . . . . . . . . . . . . . . . . . . . . . . . . . . . . . . . . . . . . .11
Checking the System . . . . . . . . . . . . . . . . . . . . . . . . . . . . . . . . . . . . . . . . . . . . . . . . . . . . . . .13
— Checking with the Check Strip . . . . . . . . . . . . . . . . . . . . . . . . . . . . . . . . . . . . . . . . .14
— Checking with Control Solution . . . . . . . . . . . . . . . . . . . . . . . . . . . . . . . . . . . . . . . .18
www.LifeScan.com
DCO_06331801A_OTB_OB_US
11/25/03
3:27 PM
Page vi
TESTING YOUR BLOOD . . . . . . . . . . . . . . . . . . . . . . . . . . . . . . . . . . . . . . . . . . . . . . . . . . . . . . . .25
Abbreviated Test Procedure . . . . . . . . . . . . . . . . . . . . . . . . . . . . . . . . . . . . . . . . . . . . . . . . . .25
Detailed Test Procedure . . . . . . . . . . . . . . . . . . . . . . . . . . . . . . . . . . . . . . . . . . . . . . . . . . . . .26
— Getting a Drop of Blood . . . . . . . . . . . . . . . . . . . . . . . . . . . . . . . . . . . . . . . . . . . . . .27
— How to Test Your Blood . . . . . . . . . . . . . . . . . . . . . . . . . . . . . . . . . . . . . . . . . . . . . . .33
Special Messages . . . . . . . . . . . . . . . . . . . . . . . . . . . . . . . . . . . . . . . . . . . . . . . . . . . . . . . . .38
Checking the Amount of Blood on the Test Strip . . . . . . . . . . . . . . . . . . . . . . . . . . . . . . . . .39
COMPARING METER AND LABORATORY RESULTS . . . . . . . . . . . . . . . . . . . . . . . . . . . . . . . . . .42
USING THE METER MEMORY . . . . . . . . . . . . . . . . . . . . . . . . . . . . . . . . . . . . . . . . . . . . . . . . . . .45
Entering the Memory Mode . . . . . . . . . . . . . . . . . . . . . . . . . . . . . . . . . . . . . . . . . . . . . . . . . .45
Recalling Test Results . . . . . . . . . . . . . . . . . . . . . . . . . . . . . . . . . . . . . . . . . . . . . . . . . . . . . .46
www.LifeScan.com
DCO_06331801A_OTB_OB_US
11/25/03
3:27 PM
Page vii
SETTING METER OPTIONS . . . . . . . . . . . . . . . . . . . . . . . . . . . . . . . . . . . . . . . . . . . . . . . . . . . . .47
Entering and Using the Set-Up Mode . . . . . . . . . . . . . . . . . . . . . . . . . . . . . . . . . . . . . . . . . .47
Clock (Time and Date) . . . . . . . . . . . . . . . . . . . . . . . . . . . . . . . . . . . . . . . . . . . . . . . . . . . . . .49
— Setting the Time . . . . . . . . . . . . . . . . . . . . . . . . . . . . . . . . . . . . . . . . . . . . . . . . . . . .50
— Setting the Date . . . . . . . . . . . . . . . . . . . . . . . . . . . . . . . . . . . . . . . . . . . . . . . . . . . .51
Beep Prompts . . . . . . . . . . . . . . . . . . . . . . . . . . . . . . . . . . . . . . . . . . . . . . . . . . . . . . . . . . . . .52
Language . . . . . . . . . . . . . . . . . . . . . . . . . . . . . . . . . . . . . . . . . . . . . . . . . . . . . . . . . . . . . . . .53
Time Format . . . . . . . . . . . . . . . . . . . . . . . . . . . . . . . . . . . . . . . . . . . . . . . . . . . . . . . . . . . . . .54
Date Format . . . . . . . . . . . . . . . . . . . . . . . . . . . . . . . . . . . . . . . . . . . . . . . . . . . . . . . . . . . . . .54
Unit of Measure . . . . . . . . . . . . . . . . . . . . . . . . . . . . . . . . . . . . . . . . . . . . . . . . . . . . . . . . . . .55
Decimal Separator . . . . . . . . . . . . . . . . . . . . . . . . . . . . . . . . . . . . . . . . . . . . . . . . . . . . . . . . .55
Exiting the Set-Up Mode . . . . . . . . . . . . . . . . . . . . . . . . . . . . . . . . . . . . . . . . . . . . . . . . . . . .56
SOLVING PROBLEMS . . . . . . . . . . . . . . . . . . . . . . . . . . . . . . . . . . . . . . . . . . . . . . . . . . . . . . . . . .57
Test Procedure Messages . . . . . . . . . . . . . . . . . . . . . . . . . . . . . . . . . . . . . . . . . . . . . . . . . . .57
Error Messages . . . . . . . . . . . . . . . . . . . . . . . . . . . . . . . . . . . . . . . . . . . . . . . . . . . . . . . . . . .62
www.LifeScan.com
DCO_06331801A_OTB_OB_US
11/25/03
3:27 PM
Page viii
TAKING CARE OF YOUR METER . . . . . . . . . . . . . . . . . . . . . . . . . . . . . . . . . . . . . . . . . . . . . . . . . .72
Doing a Daily Check . . . . . . . . . . . . . . . . . . . . . . . . . . . . . . . . . . . . . . . . . . . . . . . . . . . . . . . .73
Cleaning the Meter . . . . . . . . . . . . . . . . . . . . . . . . . . . . . . . . . . . . . . . . . . . . . . . . . . . . . . . . .73
Replacing the Batteries . . . . . . . . . . . . . . . . . . . . . . . . . . . . . . . . . . . . . . . . . . . . . . . . . . . . .78
SPECIFICATIONS . . . . . . . . . . . . . . . . . . . . . . . . . . . . . . . . . . . . . . . . . . . . . . . . . . . . . . . . . . . . .82
GUARANTEE AND WARRANTY . . . . . . . . . . . . . . . . . . . . . . . . . . . . . . . . . . . . . . . . . . . . . . . . . . .83
30-Day Money-Back Guarantee . . . . . . . . . . . . . . . . . . . . . . . . . . . . . . . . . . . . . . . . . . . . . . .83
Three-Year Warranty . . . . . . . . . . . . . . . . . . . . . . . . . . . . . . . . . . . . . . . . . . . . . . . . . . . . . . .83
INDEX . . . . . . . . . . . . . . . . . . . . . . . . . . . . . . . . . . . . . . . . . . . . . . . . . . . . . . . . . . . . . . . . . . . . . .85
www.LifeScan.com
DCO_06331801A_OTB_OB_US
11/25/03
3:27 PM
Page 1
INTRODUCTION
Congratulations! You’ve chosen a very easy-to-use blood glucose monitoring system for
home testing. When used properly, your OneTouch® Basic® System will give you the accurate
test results you need, in just a few simple steps.
Everything you need to know about using the OneTouch® Basic® System is included in this
booklet. A free instructional videotape is also available by calling LifeScan Customer Services
at 1 800 227-8862.
Blood glucose monitoring plays an important role in controlling your diabetes.
The results you get with the OneTouch® Basic® System can help you and your healthcare
professional monitor and adjust your treatment plan (diet, exercise, and medication) to help
you gain better control of your diabetes.
If you have any questions, please call LifeScan Customer Services, or visit www.LifeScan.com.
Thank you for choosing the OneTouch® Basic® Blood Glucose Monitoring System.
P.S. Don’t forget to complete and mail the warranty service card. When we receive your
warranty card, we’ll send you a complimentary gift to show our appreciation. See your
warranty card for details.
1
DCO_06331801A_OTB_OB_US
11/25/03
3:27 PM
Page 2
symptoms without consulting your
healthcare professional.
PRECAUTIONS AND
LIMITATIONS
If your test result is 60 mg/dL or lower,
this indicates low blood glucose
(hypoglycemia). The meter will display
the test result along with the message
danger call.dr. You should
immediately treat hypoglycemia as
recommended by your healthcare
professional.
The following information will be
useful to you and your healthcare
professional when using the OneTouch®
Basic® System to monitor your blood
glucose level.
If you experience symptoms
that are not consistent with your
blood glucose test results AND
you believe you have followed all
instructions described in the owner’s
booklet, contact your healthcare
professional immediately.
If the message hi danger call.dr.
appears on the meter display, this
indicates severe high blood glucose
(hyperglycemia). Contact your
doctor immediately.
Never make significant changes to your
medication program or ignore physical
2
DCO_06331801A_OTB_OB_US
11/25/03
3:27 PM
Page 3
When testing, removal of the test strip
prior to display of the blood glucose
result may give you a false result.
Extremes in hematocrit (the amount of
red blood cells in the blood) can affect
test results. Very high hematocrits
(above 55%) and very low hematocrits
(below 30%) can cause false results.1
Infection Control
Use universal blood precautions. All
patient samples and materials with
which they come in contact are
considered biohazards and should be
handled as if capable of transmitting
infection. Follow proper precautions in
accordance with federal, state, and local
regulations when disposing of all
materials.
Abnormally high levels of Vitamin C or
other reducing substances will cause
false low blood glucose results.2
Normal levels of reducing substances
have little effect on blood glucose
results.
Do not use blood samples with
preservatives that contain fluoride
(gray-top test tubes). You will get false
low results.
3
DCO_06331801A_OTB_OB_US
11/25/03
3:27 PM
Page 4
GETTING STARTED
The OneTouch® Basic® Blood Glucose
Monitoring System consists of three
main products: the OneTouch® Basic®
Blood Glucose Meter, OneTouch®
Basic®, Profile®, OneTouch® II Test
Strips, and OneTouch® Normal Control
Solution. These products have been
designed, tested, and proven to work
together as a system to produce
accurate blood glucose test results. Only
LifeScan manufactures OneTouch®
Basic® System products. Attempting to
substitute other products may affect the
accuracy of your test results and limit the
ability of LifeScan to help you solve
problems that may arise.
4
DCO_06331801A_OTB_OB_US
11/25/03
3:27 PM
The Complete OneTouch® Basic®
Blood Glucose Monitoring
System
■
OneTouch® Basic® Meter
(Batteries installed)
■
Owner’s Booklet
■
Quick Reference Guide
■
Check Strip
■
OneTouch® Normal
Control Solution
■
OneTouch® Penlet® Plus
Adjustable Blood Sampler
■
Lancets
■
Carrying Case
■
Logbook
■
OneTouch® Basic®, Profile®,
OneTouch® II Test Strips
(May be sold separately)
5
Page 5
DCO_06331801A_OTB_OB_US
11/25/03
3:27 PM
Page 6
OneTouch® Basic®
Blood Glucose Meter
Study this diagram
and become familiar
with all the parts of
your OneTouch®
Basic® Meter.
Test Strip
Holder
Battery
Compartment
(on back)
Display
On/Off
Button
M Button
C
C Button
M
Data Port
Test Area
with Protective
Coating
6
DCO_06331801A_OTB_OB_US
11/25/03
3:27 PM
Page 7
C BUTTON. Use the C button to change
the option settings on the OneTouch®
Basic® Meter.
ON/OFF BUTTON. This button
turns the meter on and off.
DISPLAY. The large, easy-to-read display
is where you read the simple messages
that guide you through testing. Your test
results are displayed here.
TEST STRIP HOLDER. The test strip
holder holds a OneTouch® Basic®,
Profile®, OneTouch® II Test Strip in place
when you perform a blood glucose or
control solution test. It must be
removed to clean the meter.
BATTERY COMPARTMENT. Holds two
AAA batteries. The batteries are already
installed in your meter.
TEST AREA. The test area is located
under the test strip holder. There is a
clear, protective coating over the test
area that must be kept clean and
undamaged for accurate results.
M BUTTON. The OneTouch® Basic®
Meter automatically stores your test
results. Use the M button to recall the
information stored in your meter’s
memory and to review your meter’s
option settings.
7
DCO_06331801A_OTB_OB_US
11/25/03
3:27 PM
Page 8
OneTouch® Basic®, Profile®,
OneTouch® II Test Strips
DATA PORT. Allows you to transfer the
information stored in the meter’s
memory to a computer to view,
analyze, and print. Please contact the
LifeScan Data Management
Line at 1 800 382-7226 for more
information about data management
software products.
The OneTouch® Basic® Blood Glucose
Monitoring System measures the
amount of sugar (glucose) in whole
blood. When blood is applied to a
OneTouch® Basic®, Profile®, OneTouch® II
Test Strip, certain compounds on the
test strip react with the blood to form a
blue color. The OneTouch® Basic® Meter
reads the color to determine the blood
glucose level.
Test Strip
Test Spot
8
DCO_06331801A_OTB_OB_US
11/25/03
3:27 PM
Page 9
IMPORTANT TEST STRIP INFORMATION
■
■
■
■
■
■
■
■
■
OneTouch® Basic®, Profile®, OneTouch® II Test Strips can be damaged by heat and
light. Keep them sealed in the original vial. Store the vial in a cool, dry place below
86°F (30°C). Do not refrigerate. Do not place in direct heat or sunlight.
OneTouch® Basic®, Profile®, OneTouch® II Test Strips are intended for use with fresh
whole blood or OneTouch® Normal Control Solution. Do not use them with plasma
or serum samples. Results will not be accurate.
Do not use test strips beyond the expiration date on the vial.
When you open a new vial of test strips, record the discard date on the vial. The
discard date for test strips is four months after first opening the vial.
Do not use test strips that are bent, torn, cut, or changed in any way.
Use each test strip immediately after removing it from the vial; replace the vial cap
and close it tightly.
Never transfer test strips to a new vial or any other container. Always carry test
strips in their original container. Do not carry loose test strips in your meter case.
Do not use bleach (or products containing bleach) near the test strips.
For reliable results, use only OneTouch® Basic®, Profile®, OneTouch® II Test Strips
made by LifeScan.
9
DCO_06331801A_OTB_OB_US
11/25/03
3:27 PM
Page 10
OneTouch® Normal Control
Solution
Expiration
Date
For in vitro diagnostic use only.
Not intended for human consumption.
Discard 90 days after opening.
Normal Control
Solution
®
OneTouch® Normal Control Solution is
an important part of the OneTouch®
Basic® System. Use it in two ways:
1) to practice the test procedure, and
2) to make sure that the OneTouch®
Basic® Meter and OneTouch® Basic®,
Profile®, OneTouch® II Test Strips are
working together properly.
Discard Date:________________________
Unopened exp. date
07/99
Lot No.
VE234
(Example)
10
DCO_06331801A_OTB_OB_US
11/25/03
3:27 PM
Page 11
correctly. You must code the meter
before using it for the first time
and then every time you change
to another vial of OneTouch® Basic®,
Profile®, OneTouch® II Test Strips.
BEFORE TESTING
Note: You do not have to enter the
set-up mode to test. However, the
OneTouch® Basic® Meter has a
number of settings you can change,
including the language, time and
date, display formats, and the unit
of measure. For a description of
these options and how to set them,
see page 47.
CAUTION: If the code number on
the meter display does not match
the code number on the vial of
OneTouch® Basic®, Profile®,
OneTouch® II Test Strips, test results
may be false.
Setting Meter Code
Code the OneTouch® Basic® Meter in
these three easy steps:
Code numbers are used to enable your
meter to provide consistent
measurements. For this reason, it
is important that the code is set
11
DCO_06331801A_OTB_OB_US
11/25/03
3:27 PM
Page 12
Step 1: Press the On/Off Button.
Step 2: Match the Code Numbers.
When turning meter on, all display
symbols will appear. The last test result
will then appear on the display for a
moment. (If using the meter for the first
time, the message code-- will appear
on the display.) If you have already
coded the meter, your current test strip
code followed by the message check
code will momentarily appear on the
display. The following will then appear:
The code number on the test strip vial
ranges from 1 to 16. If the code number
on the meter display matches the code
number on the test strip vial, you can
begin testing. If the two code numbers
do not match, follow Step 3. (When you
first use the meter, code-- will appear,
showing that there is no code stored in
the memory.)
(Example)
M
12
C
DCO_06331801A_OTB_OB_US
11/25/03
3:27 PM
Page 13
Step 3: Code the Meter.
Checking the System
While the meter
displays code--,
or after the word
insert is displayed,
press and release the
C button; the code
number will appear.
Continue pressing
the C button until
the number on the
display matches the code number on the
test strip vial. The code number is now
set for the test strips you are using. The
meter will remember this code number
until you change it. You are now ready to
do a test.
There are two ways to check that your
OneTouch® Basic® System is working
properly. The check strip is used to
check that the meter is operating
properly. OneTouch® Normal Control
Solution is used to check that both the
meter and the test strips are working
together as a system, and that you are
doing the test correctly. It is very
important that you do these simple
checks routinely for accurate results.
M
C
13
DCO_06331801A_OTB_OB_US
11/25/03
3:27 PM
Page 14
Checking with the Check Strip
A purple and white check strip is
included in the carrying case of
your OneTouch® Basic® System. Before
doing a check strip test, make sure the
test strip holder, test area, and check
strip are clean, dry, and lint-free. Do the
check strip test at room temperature
(between 64° and 79°F [18°–26°C] ).
Front
Back
1
2
✔
✔
80403U
(Example)
14
DCO_06331801A_OTB_OB_US
11/25/03
3:27 PM
Do a check strip test:
■
At least once each day you test
your blood
■
After cleaning the meter
■
Whenever your blood glucose test
results are not consistent with how
you feel, or when you think your
results are not accurate
■
If you drop the meter
■
If you get the meter wet
■
Whenever the following message
appears:
Page 15
How to do a check strip test:
Step 1: Press the On/Off Button.
Insert Side 1 of the Check Strip.
When insert code 10 (Example)
strip appears, slide the notched end of
the check strip into the test strip holder
with Side 1 (purple side) facing up. wait
appears for a moment.
M
C
1
✔
15
DCO_06331801A_OTB_OB_US
11/25/03
3:27 PM
Step 2: When apply sample
Appears, Remove the Check Strip from
the Test Strip Holder.
Page 16
Step 3: When insert side 2
Appears, Turn the Check Strip Over
and Slide It Back into the Test Strip
Holder.
Note: This is the only time you
should remove a strip during
a test.
It should go in notched end first, Side 2
(white side) facing up. The meter counts
down from four to zero and then gives
you a check strip result.
Note: Do not apply control
solution to the check strip.
M
M
C
C
2
✔
1
✔
16
DCO_06331801A_OTB_OB_US
11/25/03
3:27 PM
Page 17
CAUTION: If your check strip test
result is out of range, your meter
may not be working properly. Do
not use the meter to test your
blood until you get a check strip
reading that is within the correct
range printed on the back of the
meter. For assistance, call
LifeScan Customer Services at
1 800 227-8862.
(Example)
If these messages appear, repeat the
check strip test. If these messages
appear again, clean your meter and
repeat the test. If you do not obtain an
acceptable (A ok) check strip reading,
redo A will appear each time you turn
on your meter, indicating that your last
check strip test was outside of the check
strip range printed on the back of the
meter. This message will continue to
appear until you perform a check strip
test and get a reading that falls within
the correct check strip range.
To clean and maintain the check strip:
■
17
Make sure both sides of the check
strip are clean. If necessary, wipe the
check strip with a soft cloth or tissue
dampened with water. Dry it
completely.
DCO_06331801A_OTB_OB_US
■
■
■
■
11/25/03
3:27 PM
Page 18
meter and test strips are working
together properly as a system.
Do not get blood, alcohol, control
solution, or any other fluid (except
water) on the check strip.
Do not scratch the check strip.
Do not leave the check strip in
sunlight.
If you lose or damage the check strip,
call LifeScan Customer Services at
1 800 227-8862 for a free replacement.
Before you use the OneTouch® Basic®
Meter to test your blood glucose for the
first time, practice the procedure using
control solution. When you can do three
tests in a row that are within the
expected range, you are ready to test
your blood.
Checking with Control Solution
Normal Control
Solution
®
OneTouch® Normal Control Solution
contains a known amount of glucose
that reacts with OneTouch® Basic®,
Profile®, OneTouch® II Test Strips. Control
solution should be used to practice the
test procedure and to make sure your
18
DCO_06331801A_OTB_OB_US
11/25/03
3:27 PM
Do a control solution test:
■ For practice, before testing your
blood with the OneTouch® Basic®
Meter for the first time
■ When you begin using a new vial of
test strips
■ At least once a week
■ Whenever you suspect that the meter
or test strips are not working
properly
■ When your blood glucose test results
are not consistent with how you feel,
or when you think your results are
not accurate
■ If you drop the meter
■ If you get the meter wet
Page 19
The control solution test procedure is
just like blood glucose testing, except
that you use OneTouch® Normal Control
Solution instead of blood.
Control solution test tips
■ Shake the control solution vial
thoroughly before using.
■ If there are any bubbles on the top of
the vial, wipe them off with a clean
tissue.
■ Apply a full drop of control solution
to the center of the test spot and
cover it completely. Do not dab, wipe,
or smear control solution on the test
spot.
■ Avoid contaminating the control
solution. Do not touch the test
spot with the tip of the vial.
19
DCO_06331801A_OTB_OB_US
11/25/03
3:27 PM
Page 20
IMPORTANT CONTROL SOLUTION TEST INFORMATION
■
Use only OneTouch® Normal Control Solution.
■
Check the expiration date of the control solution. Do not use if expired.
■
Record the discard date on the control solution vial. Discard the vial three
months after first opening.
■
The OneTouch® Normal Control Range printed on the test strip vial is for
OneTouch® Normal Control Solution only. It is not a recommended range for
your blood glucose level.
■
Store the control solution at room temperature below 86°F (30°C).
Do not refrigerate.
■
Control solution should not be used as a cleaning solution for the meter.
Warning
■ For external use only. Do not swallow or inject control solution or put control
solution drops into your eyes.
20
DCO_06331801A_OTB_OB_US
11/25/03
3:27 PM
spot facing up.
Make sure you push
the test strip in all
the way until it stops.
wait appears for
a moment, then
apply sample
appears for five
minutes or until
you apply a drop of
control solution to the test spot on the
test strip.
How to do a control solution test:
Step 1: Press On/Off Button. Insert
Test Strip.
The code number
that appears on
the meter display
should match
the code number
on the test strip vial.
When i n s e r t
code10 (Example)
strip appears,
slide a OneTouch®
(Example)
Basic®, Profile®,
OneTouch® II Test Strip into the test strip
holder, notched end first, with the test
M
Page 21
M
C
21
C
DCO_06331801A_OTB_OB_US
11/25/03
3:27 PM
Step 2: Apply Control Solution.
ol
ntr
Co
Compare the
control solution
test result with
the OneTouch®
Normal Control
Range printed on
the test strip vial.
When you get a
control solution
test result within the
(Example)
control range,
you are ready to test your blood.
R
M
Step 3: Control Solution Result
Appears in 45 Seconds.
se
co
Glu
al
rm on
No oluti
S
Shake the control
solution vial well
before using. Remove
the cap and apply a
drop of control
solution to the middle
of the test spot,
covering
it completely.
Page 22
M
22
C
DCO_06331801A_OTB_OB_US
11/25/03
3:27 PM
Control solution results
Note: The control solution range is
shown in two different units of
measure—mg/dL (used in the United
States) and mmol/L (usedin Canada
and some parts of Europe).
s
D o no
t use after expiration date. u
lac
4 m o nt
hs after first opening. rep
i m m ed
i a t e l y.
D a te v
L ot N
ial first opened __________
o.
Page 23
If test results fall outside the range
printed on the test strip vial, repeat the
test. Results that fall outside the
expected range may indicate:
■
Procedural error
■
Control solution that has not been
shaken enough
■
Expired or contaminated control
solution
■
Improper coding of the meter
■
Dirt on test strip holder or on test
area beneath the test strip holder
■
Test strip deterioration
■
Expired or contaminated test strip
OneTouch® Normal Control Range
4 0 6 8 1 4A
E x p. D
ate
07 - 96
ONE T
n
OUCH Normal Control Ra
d e con
trol de normalidad
8 6 - 1 22
MG/DL
4.8-6.8
MMOL/L
a
35
Milpitas, California 950
©LIFESCAN INC. 1993 AW
(Example)
Control solution test results are
automatically stored with the word
contrl. (If you use a logbook, indicate
control solution tests by writing “C”
after the result.)
23
DCO_06331801A_OTB_OB_US
11/25/03
3:27 PM
■
Meter malfunction
■
Extremes in testing temperatures
CAUTION: If your control solution
test result falls outside the
expected range, the system may
not be working properly. Do not use
the system to test your blood until
you get a test result that falls
within the expected range. If you
are unable to resolve the problem,
call LifeScan Customer Services at
1 800 227-8862.
24
Page 24
DCO_06331801A_OTB_OB_US
11/25/03
3:27 PM
Page 25
TESTING YOUR BLOOD
Abbreviated Test Procedure
You can test your blood by following this 3-step testing procedure.
Step 1: Press on/off button.
Make sure code displayed on
meter matches code on test
strip vial. If correct, insert
strip.
Step 2: Gently apply
sample to test spot. Do
not press finger on test
spot.
Step 3: Accurate results
in 45 seconds.
M
M
C
M
C
C
(Example)
25
Be sure to read the
following section carefully
before testing.
DCO_06331801A_OTB_OB_US
11/25/03
3:27 PM
Page 26
Detailed Test Procedure
Choose a clean, dry work surface. Make
sure you have all the items needed to
test:
■
■
■
OneTouch® Basic® Meter
OneTouch® Basic®, Profile®,
OneTouch® II Test Strips
OneTouch® Penlet® Plus Adjustable
Blood Sampler
Sterile lancet
C
M
25 Test Strips
■
Ejection/Cocking Control
Cap
Release Button
Deep-Puncture Setting (Largest Bump)
Shallow-Puncture Setting (Smallest Bump)
26
D o n o t sto re
T e s t S tri p s
o u t s i d e t h e vial
Code
10
Test for t
tative
measure he quantilucose
in wholement of g
blood.
For use w
TOUC H
Blood Bl ith ONE ters.
ucose Me
Instructi
package ons: Readore
using thiinsert beft.
s produc
For in v
nly.
Store initro diagnostic use o
at temp a cool, dry place
er
F
(30˚C). atures under 86˚
Do not refrigerate.
Vial Ca
more thp: contains not
an 3g silica gel
Protecte
ng
U.S. Pa d under the followi 9,487,
and othtents 4,935,346, 5,04
er patents pending.
Depth
Adjustment
Knob
Depth Indicator
(7 different settings)
OneTouch®
Penlet® Plus
Adjustable
Blood
Sampler
DCO_06331801A_OTB_OB_US
11/25/03
3:27 PM
Page 27
Step 1: Insert a Lancet into
the OneTouch® Penlet ® Plus
Adjustable Blood Sampler.
Getting a Drop of Blood
CAUTION: To reduce the chance
of infection:
■ Never share a lancet with
another person.
■ Always use a new, sterile lancet.
Lancets are for single use only.
■ The OneTouch® Penlet® Plus
Sampler should be used by only
one person.
■ Avoid getting hand lotion,
oils, dirt, or debris in or on
the lancets and the OneTouch®
Penlet® Plus Sampler.
Remove the OneTouch® Penlet® Plus
Cap by twisting it counterclockwise.
Insert a lancet into the lancet holder.
Push down firmly until the lancet is fully
seated in the holder. Do not twist the
lancet. To avoid contamination and to
prevent the cap from rolling away, set
the cap down on a flat surface with its
small hole pointing up.
27
DCO_06331801A_OTB_OB_US
11/25/03
3:27 PM
While the lancet is in the OneTouch®
Penlet® Plus Sampler, twist off the protective disk. Make two full turns to
ensure that the lancet separates from
the protective disk.
Page 28
Replace the OneTouch® Penlet® Plus
Cap. Turn the cap clockwise until it is
snug but not overly tight.
28
DCO_06331801A_OTB_OB_US
11/25/03
3:27 PM
Page 29
Step 2: Cock the OneTouch®
Penlet ® Plus Sampler.
Adjust the puncture depth setting
if necessary. Twist the knob counterclockwise toward the smaller bumps for
a shallower puncture. Twist the knob
clockwise toward the larger bumps for a
deeper puncture.
Slide the ejection/cocking control
backward until it clicks. If it does not
click, the OneTouch® Penlet® Plus
Sampler may have been cocked when
the lancet was inserted.
29
DCO_06331801A_OTB_OB_US
11/25/03
3:27 PM
Step 3: Wash Your Hands.
Page 30
Repeated punctures in the same
spot may cause soreness and calluses.
Hold the OneTouch® Penlet® Plus
Sampler firmly against the side of
your finger. Press the release button.
(Greater pressure of the device against
the finger will also cause a deeper
puncture.)
Use warm, soapy water. Rinse and dry
hands thoroughly. To increase blood
flow to your fingertips, massage the
hand from the wrist to the fingertip two
or three times without touching the
puncture site.
Step 4: Lance Your Finger.
Choose a spot on the side of a
different finger each time you test.
30
DCO_06331801A_OTB_OB_US
11/25/03
3:27 PM
Page 31
Step 5: Remove the Lancet.
Gently massage your finger to obtain the
required blood volume. Proceed with
your blood glucose test.
Remove the cap. Twist it counterclockwise.
31
DCO_06331801A_OTB_OB_US
11/25/03
3:27 PM
Optional: To replace the protective disk
on the lancet, place the disk on a hard
surface and push the exposed tip into
the protective disk.
Page 32
Always use caution when removing the
lancet. Point the lancet down and
away from you. Push forward on the
ejection/cocking control and eject the
lancet directly into a container for
sharp objects.
Return the ejection/cocking control to
the middle position. Replace the cap.
32
DCO_06331801A_OTB_OB_US
11/25/03
3:27 PM
Your current test strip code appears
next, followed by check code and
then
How to Test Your Blood
Step 1: Press On/Off Button. Make
Sure Code Number Displayed on Meter
Matches Code Number on Test Strip
Vial. Insert Test Strip.
Make sure the test strip holder is
properly in place. (See page 77). Turn
your meter on. All display symbols will
appear. The last test result (or, when
you first use the meter, the message
nodata ) will then
automatically appear
on the display for
several seconds.
M
(Example)
Make sure the code number on the
meter display matches the code
number on the vial of OneTouch® Basic®,
Profile®, OneTouch® II Test Strips you are
using. (When you first use the meter,
code-- will appear, indicating that
there is no code stored in the
memory.) If the code numbers do not
match, code the meter. (See page 11).
C
(Example)
Page 33
33
DCO_06331801A_OTB_OB_US
11/25/03
3:27 PM
slide the test strip into the test strip
holder, notched end first, test spot
facing up. Make sure you push the test
strip in all the way until it stops.
PS
STRI
Code
i ve
ntitat
Test for the qua f glucose
measurement o .
in whole blood
UCH
E TO
For use with ONMeters.
Blood Blucose
ad
Instructions: Rebefore
package insert uct.
.
using this prod
only
t
5 Tes
Strip
ore
Do not stps
T e s t S t r i e vi al
o u t si d e th
TEST
s
Remove a test
Test
strip from the vial.
Spot
Replace the vial
cap immediately.
Do not touch the
test spot on the
10
test strip. The test
spot should be
white or ivory-colored, with no tears
or wrinkles.
Page 34
For in vitro diagno
e
st i c u s
l ce
M
With the meter display showing
(Example)
34
C
DCO_06331801A_OTB_OB_US
11/25/03
3:27 PM
Page 35
Obtain a drop of blood from your finger
using the OneTouch® Penlet® Plus
Adjustable Blood Sampler. (See
page 27).
appears for a moment. Then
Step 2: Apply Blood Sample.
With the test strip in the meter and
appears for five minutes or until you
apply blood to the test spot.
on the display, apply a drop of blood to
the test spot.
35
DCO_06331801A_OTB_OB_US
11/25/03
3:27 PM
Be sure that you:
■
M
C
Touch only the tip
of the drop of
blood to the test
spot.
Apply enough
blood to form a
round, shiny drop
that covers the test
spot completely
and stays wet during the entire test.
Page 36
■
Do not move the test strip as you are
applying blood. If the test strip
moves, push it back into its original
position.
■
Do not remove the test strip from the
meter to apply blood.
■
Do not touch or move the test strip
once the count has begun.
■
■
If the Beep option is set to , the
meter will beep when the blood is
applied to the test spot. See page 39,
“Checking the Amount of Blood on the
Test Strip.”
Do not smear blood on the test spot
or apply a second drop after the test
begins.
36
DCO_06331801A_OTB_OB_US
11/25/03
3:27 PM
Step 3: Accurate Results in
45 Seconds.
The meter then
counts down from
45 to 0 seconds,
beeps (if the Beep
option is set to
), and displays
your result. Remove
(Example)
the test strip only
after the result is displayed.
M
Note: The meter records the time
and date of each test even when the
Clock option is set to
. They can
once again be seen by turning the
Clock option to .
C
Blood glucose test results are automatically stored in your meter’s memory
with the time and date they were
performed. If you have chosen to turn
the Clock option to
, your test
results will appear without time and
date. (See page 49).
Page 37
Note: The first time you enter
the set-up mode, the meter will
automatically display the time as
Pacific standard time (PST) when the
Clock option is set to . If you do
not reset the time, the meter will
accurately record each test result
using PST.
37
DCO_06331801A_OTB_OB_US
11/25/03
3:27 PM
Page 38
glucose level is still 60 mg/dL or below,
call your doctor immediately.
Special Messages
The meter displays results from 0 to
600 mg/dL. If your blood glucose test
result is 60 mg/dL or below, your meter
will beep in a low tone (if the Beep
option is set to ) and display a
special message:
Blood glucose results greater than
600 mg/dL are displayed as hi and your
meter will beep in a high tone (if the
Beep option is set to ).
(Example)
(Example)
This message indicates very high blood
sugar (severe hyperglycemia). You
should call your doctor immediately.
The message is warning you of low
blood sugar (hypoglycemia). You may
need food or some source of glucose.
Retest your blood glucose. If your blood
38
DCO_06331801A_OTB_OB_US
11/25/03
3:27 PM
Page 39
Checking the Amount of Blood
on the Test Strip
Test results below 60 mg/dL3
(3.3 mmol/L) mean low blood
glucose (hypoglycemia). Test
results greater than 240 mg/dL4
(13.3 mmol/L) mean high blood
glucose (hyperglycemia). If you get
results below 60 mg/dL or above
240 mg/dL, and do not have
symptoms, first repeat the test. If
you have symptoms and continue
to get results that fall below
60 mg/dL or above 240 mg/dL,
follow the treatment advice of your
healthcare professional.
Although the OneTouch® Basic® Meter
requires only a small drop of blood, it is
very important that the drop be large
enough to cover the test spot
completely.
In many cases, the meter can detect if
the drop of blood was too small to give
an accurate reading. However, it is
important that you also look at the test
strip to make sure that you applied
enough blood.
39
DCO_06331801A_OTB_OB_US
11/25/03
3:27 PM
If the following message
Page 40
■
appears on the display, your drop of
blood was too small, or smeared, or the
test strip was not pushed all the way
into the test strip holder. Repeat the
test with a new test strip and enough
blood to cover the entire test spot.
40
Remove the test
Side
Front
strip from the
meter and look
at the test spot. It
should still have a
wet, shiny drop
that completely
covers the test
(Correct)
spot. If the blood
sample has a dull, dry appearance,
you may not have applied enough
blood, or you may have smeared it.
DCO_06331801A_OTB_OB_US
■
11/25/03
3:27 PM
Look at the back of the test strip. You
should see a full, dark circle. If there
are any white patches or streaks, you
may have smeared the blood or the
drop was too small. In either case,
you may have a false low result.
Repeat the test with a new test strip.
Back
(Correct)
(Incorrect)
41
Page 41
DCO_06331801A_OTB_OB_US
11/25/03
3:27 PM
■
COMPARING METER AND
LABORATORY RESULTS
The blood glucose test result you obtain
from your meter may be different from
your laboratory result due to normal
variation; however, the two results
should be within 20% of each other.5
To make an accurate comparison
between meter and laboratory results,
follow these guidelines.
■
■
Comparisons will be more accurate
if you have not eaten for at least four
hours (and preferably eight hours)
prior to doing the comparative tests.
Take your meter with you to the lab.
While at the lab:
■
■
■
Before you go to the lab:
■
Page 42
Make sure your meter is clean.
Perform check strip and control
solution tests to make sure the meter
is working properly.
42
Make sure that both tests are done
within 15 minutes of each other.
Wash your hands before obtaining a
blood sample.
Never use your meter with blood that
has been placed in a gray-top test
tube.
DCO_06331801A_OTB_OB_US
11/25/03
3:27 PM
Comparing the results:
■
■
■
■
Page 43
Example:
When the lab tests your blood, only
the serum or plasma portion is used.
Your OneTouch® Basic® Meter uses
only whole blood.
Comparing serum or plasma to whole
blood is like comparing a temperature
of 98.6°F with the temperature of
37°C—in order to see if the values are
equal, you have to adjust one of the
results.
Whole blood results are
approximately 12% lower than serum
or plasma results.
To compare lab results with meter
results, divide the lab result by 1.12.
■
■
■
Assume that your lab result (plasma or
serum) is 224 mg/dL.
224 divided by 1.12 = 200 (the lab
value is now approximately equal to a
whole blood result).
Compare this figure to your meter
result. The two should be within 20%
of each other.
You may still have a variation from the
result because blood glucose levels can
change significantly over short periods,
especially if you have recently eaten,
exercised, taken medication, or
experienced stress.6 In addition, if you
have eaten
43
DCO_06331801A_OTB_OB_US
11/25/03
3:27 PM
recently, the blood glucose level from a
fingerstick can be up to 70 mg/dL
higher than blood drawn from a vein
(venous sample) used for a lab test.7
Therefore it is best to fast for four to
eight hours before doing comparison
tests. Factors such as the amount of
red blood cells in the blood (a high or
low hematocrit) or the loss of body
fluid (severe dehydration) may also
give a meter result different from a
laboratory result.
44
Page 44
DCO_06331801A_OTB_OB_US
11/25/03
3:27 PM
Page 45
USING THE METER MEMORY
Your OneTouch® Basic® Meter
automatically stores up to 75 test
records. It stores blood glucose, check
strip, and control solution test results
with time and date. When you have
stored more than 75 records, the oldest
record is dropped from the memory as a
new record is added.
M
Entering the Memory Mode
C
M
C
The word memory with the memory
symbol will appear briefly.
Turn the meter on by pressing the on/off
button. You can access the meter’s
memory and recall test results at any
time before or after performing a test by
pressing the M button.
45
DCO_06331801A_OTB_OB_US
11/25/03
3:27 PM
Page 46
most recent to the oldest, up to the full
75-record capacity of the memory. Test
results will appear on the meter display
as follows:
If you are using the meter for the very
first time and have not used it for
testing, or if you have used a software
program to clear the meter’s memory,
the following message will appear,
indicating that there are no results
stored in the memory:
(Examples)
When the memory returns to the most
recent result, the meter will beep (if the
Beep option is set to ). You can exit
the memory mode at any time by
pressing the on/off button.
Recalling Test Results
Pressing the M button allows you to see
each blood glucose, check strip, and
control solution test stored in memory.
The records will appear in order from the
46
DCO_06331801A_OTB_OB_US
11/25/03
3:27 PM
Page 47
To change the default settings, enter
the set-up mode.
SETTING METER OPTIONS
You do not have to enter the set-up
mode to test. However, you can
customize the various option settings
of your OneTouch® Basic® Meter to best
meet your needs. This is done in the
set-up mode. Option settings (default
settings shown) that you can customize
include:
■ Clock (Time and Date):
■ Beep Prompts:
■ Language:
■ Time Format:
■ Date Format:
■ Unit of Measure:
■ Decimal Separator:
Entering and Using the
Set-Up Mode
To enter the set-up mode, start with your
meter turned off. Press and hold the
on/off button for about three seconds
until all display symbols appear and
begin to flash. Release the on/off
button. The set-up screen will then
appear briefly.
47
DCO_06331801A_OTB_OB_US
11/25/03
3:27 PM
The meter will then automatically
present the first option screen. The
options map will help guide you through
the option screens.
■ Use the M button to scroll through
the options or move within an
option.
■ If you want to change an option
setting, use the C button.
Page 48
†
Note: You can exit the set-up mode
at any time by pressing the on/off
button. If after two minutes you have
not made a selection, the meter will
turn itself off automatically. All
option settings are saved as they
are made.
* Time and Date options appear only if the
Clock option is on.
† The Decimal Separator option appears only
if the unit of measure chosen is mmol/L. The standard
unit of measure in the United States
is mg/dL.
48
DCO_06331801A_OTB_OB_US
11/25/03
3:27 PM
add two (2) hours; eastern standard
time (EST), add three (3) hours. If
you do not reset the time, the meter
will accurately record each test result
using PST.
Clock (Time and Date)
®
Page 49
®
The OneTouch Basic Meter has an
internal clock that will record the time
and date of each test you perform.
Your meter has been set to automatically record tests in Pacific
standard time (PST) both when the
Clock option is set to
and when it
is set to .
You will also need to reset the time
whenever there is a change to or from
daylight saving time.
Note: The accuracy of your test
results will not be affected if you
do not set the Clock option to the
correct time and date or if you
choose not to display the time
and date.
If you are not in Pacific standard time
(PST), you will need to change the time
setting in your meter in order to have
the correct time and date appear with
your test result. If you are in mountain
standard time (MST), add one
(1) hour; central standard time (CST),
49
DCO_06331801A_OTB_OB_US
11/25/03
Once the Clock option is set to
you are ready to set the time.
3:27 PM
Page 50
If you do not want to display the time
and date, press the C button to turn the
Clock option to
.
,
Note: The meter records the time
and date of each test even when the
Clock option is set to
. They
can once again be seen by turning
the Clock option to
.
Note: The first time you enter the
set-up mode, the Clock option will
be preset to
. To set the Clock
option to , see page 47, “Entering
and Using the Set-Up Mode.”
Setting the Time
Enter the set-up mode and set the Clock
option to
(see page 47). Use the
M button to display the current time
setting. Press the C button to change
50
DCO_06331801A_OTB_OB_US
11/25/03
3:27 PM
Page 51
Setting the Date
the time; the hour and am or pm will
flash. Press the C button again to
advance the hour to the correct
setting. Press the M button and the
minutes will flash. Use the C button to
change the minutes. Press the M button
to see the new time setting (the colon
will flash).
Enter the set-up mode and set the
Clock option to
(see page 47).
Use the M button to set the date.
The current date will show. Press
the C button to change the date
setting; the year will flash. Press the
C button again to change the year
to the correct setting. Press the M
button and the month will flash. Use
the C button to change the month.
Press the M button and the day will
flash. Press the C button to change the
day. Pressing the M button again will
display the new date setting.
Press the M button again to move
to the date setting.
51
DCO_06331801A_OTB_OB_US
11/25/03
3:27 PM
Page 52
You may now turn the meter off or
press the M button to move to the next
option.
With the
setting, the meter will
continue to provide beep prompts during
the test procedure.
Beep Prompts
To change the Beep option setting
so that the meter operates silently,
press the C button.
The meter is set to provide you with
audio prompts, or “beeps,” during the
test procedure to tell you that the meter
has performed some function or to alert
you to a special message. To change the
Beep option setting, enter the set-up
mode (see page 47). Use the M button to
choose the Beep option. The current
setting will appear on the display.
will appear on the display.
You may now turn the meter off
or press the M button to move to the
next option.
52
DCO_06331801A_OTB_OB_US
11/25/03
3:27 PM
The meter is set to give prompts in
English. To change the display
language, enter the set-up mode (see
page 47). Use the M button to choose
the Language option. Press the C button
until the language you want appears on
the display. You may now turn the
meter off or press the M button to
move to the next option. Once a
language is selected, all messages will
be displayed in that language.
Language
®
Page 53
®
The OneTouch Basic Meter can
display messages in 17 lan-guages:
English [engl.], Spanish [espan.],
French [franc.], Italian [italia],
Hungarian [magyar], Dutch [neder.],
Norwegian [norsk], Polish [polski],
Portuguese [port.], Russian [pycck.],
Finnish [suomi], Swedish [svens.],
Turkish [turkce], Czech [cesky], Danish
[dansk], German [deuts.], and Greek
[e /ka].
53
DCO_06331801A_OTB_OB_US
11/25/03
3:27 PM
Page 54
Time Format
Date Format
The meter can be set to display the time
in either a 12-hour (AM/PM) format or a
24-hour format.
The meter is set to display the date as
month-day-year (for example: June 1,
1999 reads as 6-01-99 ). You can set
the meter to display day-month-year,
as is common in Europe.
To change the time format, enter
the set-up mode (see page 47). Use the
M button to choose the Time Format
option. Press the C button to change
the time format. You may now turn the
meter off or press the M button to move
to the next option.
To change the date format, enter the
set-up mode (see page 47). Use the
M button to choose the Date Format
option. Press the C button to change
the date format. You may now turn the
meter off or press the M button to move
to the next option.
Note: To change the time and date,
the Clock option must be set to .
54
DCO_06331801A_OTB_OB_US
11/25/03
3:27 PM
Page 55
now press the M button to review or
change any of the options you have
chosen or press the on/off button to
turn the meter off.
Unit of Measure
The meter is set to display test results
in milligrams per deciliter (mg/dL), the
standard unit used in the United States.
You have the option to change to
millimoles per liter (mmol/L), commonly
used in Canada and parts of Europe.
Decimal Separator
Note: The Decimal Separator
option appears only if you have
selected mmol/L as your unit
of measure.
The meter is set to display millimoles
per liter (mmol/L) using a decimal
point. This option allows you to select a
comma instead of a decimal point as a
decimal separator.
To change the unit of measure, enter the
set-up mode (see page 47). Use the
M button to choose the Unit of
Measure option. Press the C button to
change the unit of measure. You may
55
DCO_06331801A_OTB_OB_US
11/25/03
3:27 PM
Page 56
Exiting the Set-Up Mode
All options are automatically saved as
they are made. After you have
completed viewing or changing your
option settings, simply turn the meter
off. The meter will automatically turn
itself off after two minutes of no
activity.
To change the decimal separator, enter
the set-up mode (see page 47) and
select mmol/L as the unit of measure.
Use the M button to choose the Decimal
Separator option. Make your selection
using the C button. You may now press
the M button to review or change any of
the options you have chosen or press
the on/off button to turn the meter off.
56
DCO_06331801A_OTB_OB_US
11/25/03
3:27 PM
Page 57
SOLVING PROBLEMS
The messages that appear on your OneTouch® Basic® Meter display guide you
through the testing procedure, alert you to problems as they occur, and give you
information about test results stored in the meter’s memory. This section provides
you with a complete listing of the display messages, what they mean, and what to
do if there is a problem.
Test Procedure Messages
These messages appear during routine testing. Follow them carefully and they will
guide you through the test.
MESSAGE
APPEARS WHEN
Appears briefly when the meter is turned on. You can see that
all of the display segments are working properly.
57
DCO_06331801A_OTB_OB_US
11/25/03
3:27 PM
Page 58
MESSAGE
APPEARS WHEN
code--
The meter is turned on and you have not previously coded
the meter. This is a reminder that you should verify that the
code displayed on the meter matches the code on the test
strip vial before testing. If it does not, reset by pressing the
C button.
check
code
The meter is turned on. This is a reminder that prior to
testing you should verify that the code displayed on the
meter matches the code on the test strip vial. If it does not,
reset by pressing the C button.
insert
code10
strip
The meter is ready to perform a blood, check strip, or control
solution test.
(Example)
58
DCO_06331801A_OTB_OB_US
11/25/03
3:27 PM
Page 59
MESSAGE
APPEARS WHEN
wait
The meter is performing internal checks.
apply
sample
The meter is ready to receive a blood or control solution
sample. If performing a check strip test, this is your signal to
remove the check strip from the meter.
45 . . . . .0
The meter is counting down from 45 seconds to 0.
108 mg/dL
A blood test has been completed. This indicates a blood
glucose result when the meter is set for mg/dL.
(Example)
6.1 mmol/L
(Example)
A blood test has been completed. This indicates a blood
glucose result when the meter is set for mmol/L, the unit of
measure used in Canada and parts of Europe.
59
DCO_06331801A_OTB_OB_US
11/25/03
3:27 PM
Page 60
MESSAGE
APPEARS WHEN
100 mg/dL
contrl
A control solution test has been completed. (If you have just
performed a blood glucose test, this means that the blood
sample was too small and the meter read it as control solution.
Repeat the test with a new test strip and a larger drop of
blood.)
insert
side 2
You are performing a check strip test. Turn the check strip over
and insert Side 2.
80 mg/dL
The check strip test result falls into the acceptable
range. The check strip range is printed on the back of your
meter.
(Example)
(Example)
A ok
60
DCO_06331801A_OTB_OB_US
11/25/03
3:27 PM
Page 61
MESSAGE
APPEARS WHEN
58 mg/dL
Your blood glucose test result is low, 60 mg/dL or below,
possibly indicating hypoglycemia. You may need food or some
source of glucose. Retest. If the test result is still
60 mg/dL or below, call your doctor.
(Example)
danger
alternating with
58 mg/dL
(Example)
call.dr.
hi mg/dL
(Example)
danger
alternating with
Your blood glucose test result is above 600 mg/dL.
This level is severe hyperglycemia. Contact your
doctor immediately.
hi mg/dL
call.dr.
61
DCO_06331801A_OTB_OB_US
11/25/03
3:27 PM
Page 62
Error Messages
When any of these messages appear, there is a problem with the OneTouch® Basic®
Meter or the way in which you are performing a test. These messages help to identify
certain problems but do not appear in all cases when a problem has occurred. If you
think your meter may not be operating properly, refer to page 13, “Checking the
System.” If you are experiencing symptoms that are not consistent with your
blood glucose test results AND you believe you have followed all of the
instructions in the owner’s booklet, contact your healthcare professional.
In most cases, problems are easy to fix. If you have trouble, help is available from
LifeScan Customer Services 24 hours a day, 7 days a week at 1 800 227-8862.
MESSAGE
PROBLEM
WHAT TO DO
Some parts of the display are not
working. The messages will be
incomplete.
Call LifeScan
Customer Services at
1 800 227-8862.
62
DCO_06331801A_OTB_OB_US
MESSAGE
11/25/03
3:27 PM
Page 63
PROBLEM
WHAT TO DO
When this symbol appears and
stays on the screen, it means the
batteries are getting low. This
symbol will remain on the display
while the meter is on until the
batteries are replaced.
You will still be able to test,
but replace the batteries
as soon as possible. If
batteries get too low, the
meter will not operate.*
When this symbol is flashing, the
batteries are too low.
Replace the batteries
immediately. The meter
will not operate.*
battry
*Neither dead batteries nor battery removal have an effect on information
stored in the memory.
63
DCO_06331801A_OTB_OB_US
11/25/03
3:27 PM
Page 64
MESSAGE
PROBLEM
WHAT TO DO
clean
test
area
1. There is dirt, blood, or lint on
the test area.
1. Clean the test area and
test strip holder according
to instructions.
2. Your hand or an object covered 2. Repeat the test. Keep the
the test area while the meter
meter’s test area clear.
was turned on.
remove
strip
3. The meter was used in very
bright light.
3. Move the meter away from
the light source. Repeat the
test with a new test strip.
The test strip was inserted
before the word insert
appeared on the display.
Repeat the test with a new
test strip. Wait for the word
insert before inserting a
test strip.
64
DCO_06331801A_OTB_OB_US
11/25/03
3:27 PM
Page 65
MESSAGE
PROBLEM
100 mg/dL
If the word contrl appears after Repeat the test with a new
a blood test, your blood sample test strip and a larger drop of
was too small, smeared, or
blood.
another drop was added after
the test began.
(Example)
contrl
WHAT TO DO
error 1
retest
The sample was applied before
the words apply sample
appeared.
Repeat the test with a new
test strip.
error2
retest
1. The test strip moved during
the test.
1. Repeat the test with a
new test strip.
2. The test strip was not inserted
correctly.
2. Repeat the test with a
new test strip.
65
DCO_06331801A_OTB_OB_US
MESSAGE
11/25/03
3:27 PM
Page 66
PROBLEM
WHAT TO DO
3. The test strip was removed
3. Repeat the test with a new
before the test was completed.
test strip.
4. There was not enough blood
on the test strip.
4. Repeat the test with a new
test strip.
5. The meter was used in very
bright light.
5. Move the meter away from
the light source. Repeat
the test with a new test
strip.
6. The check strip procedure
was incorrect.
6. Repeat the check
strip test.
7. The meter may not be
operating correctly.
7. Call LifeScan
Customer Services at
1 800 227-8862.
66
DCO_06331801A_OTB_OB_US
11/25/03
3:27 PM
Page 67
MESSAGE
PROBLEM
WHAT TO DO
error3
retest
The test strip was removed
during a test or the test strip
was inserted with blood or
control solution already
applied.
Repeat the test with a new
test strip. Insert the test
strip into the meter and wait
for the words apply sample
to appear. Apply blood or
control solution with test
strip inserted in meter.
not
enough
blood
retest
1. The blood or control solution
sample was too small or
smeared.
1. Repeat the test with
a new test strip and
a large, shiny drop
of blood or control
solution.
67
DCO_06331801A_OTB_OB_US
MESSAGE
not ok
11/25/03
3:27 PM
Page 68
PROBLEM
WHAT TO DO
2. The test strip was not inserted
far enough into the test strip
holder.
2. Repeat the test with
a new test strip,
pushing the test strip all
the way into the test
strip holder.
3. Your hand or an object covered
the test area while the meter
was turned on.
3. Repeat the test. Keep
the meter test area
clear.
1. If appearing when you turn
your meter on, your meter’s
test area may be dirty.
1. Clean test area.
See page 75.
68
DCO_06331801A_OTB_OB_US
MESSAGE
11/25/03
3:27 PM
Page 69
PROBLEM
WHAT TO DO
2. If appearing when you turn
your meter on, your meter may
have an electronic problem.
2. Call LifeScan
Customer Services at
1 800 227-8862.
3. If appearing at the end of a
test, your meter may have been
moved while applying blood or
during the test process.
3. Repeat the test with a
new test strip; try not to
move the meter.
4. If appearing during the test, the
strip has been removed while
the word wait is on the
display.
4. Repeat the test with a
new test strip.
69
DCO_06331801A_OTB_OB_US
11/25/03
3:27 PM
Page 70
MESSAGE
PROBLEM
WHAT TO DO
58 mg/dL
The check strip test result is
outside the acceptable range
(printed on the back of
the meter).
Clean the meter and check
strip if necessary. Repeat the
check strip test.
redo A
The last check strip test was
outside the acceptable range
and an acceptable repeat
test was not performed.
Repeat the check
strip test.
retest
The last test failed after the
countdown started.
Repeat the test with a
new test strip.
(Example)
Anotok
70
DCO_06331801A_OTB_OB_US
11/25/03
3:27 PM
Page 71
MESSAGE
PROBLEM
WHAT TO DO
code--
The meter requires a test
strip code (found on the test
strip vial) to operate.
(Note: This is not an error
message when the meter
has not yet been coded.)
Use the C button to reset the
meter code to match the test
strip vial code. You should
also check all of your meter
option settings to be sure
they are correct. (If this continues to happen, there may
be a problem with your
meter. Call LifeScan
Customer Services at
1 800 227-8862.)
71
DCO_06331801A_OTB_OB_US
11/25/03
3:27 PM
TAKING CARE OF
YOUR METER
■
Your OneTouch® Basic® Meter is easy to
maintain. These tips will help you keep
it in good operating condition:
CAUTION:
■ Do not get water or other liquids
inside the meter.
■ Never immerse the meter or hold
it under running water or other
liquids.
■
■
Page 72
■
Keep the test strip holder and test
area clean (see page 73).
Keep your meter dry and avoid
exposing it to extremes in tem-
■
72
perature or humidity. For example, do
not leave it in your car.
Do not drop the meter or get it wet,
as this could damage the electronics.
If you drop the meter or get it wet
accidentally, make sure the test strip
holder is still securely in place. If you
drop the meter or get it wet, check
the meter by doing check strip tests
(see page 14) and control solution
tests (see page 18) to be sure it is
operating properly.
Do not take the meter apart.
Sensitive parts could be damaged,
causing inaccurate results. Taking the
meter apart will void the warranty.
Do not clean the meter with alcohol.
Alcohol will damage the meter.
DCO_06331801A_OTB_OB_US
11/25/03
3:27 PM
Page 73
instructions in the next section. Then
do a check strip test (see page 14).
Doing a Daily Check
Cleaning the Meter
Clean the meter and test strip holder:
Look through the small hole in the test
strip holder to make sure there is no lint,
dirt, or blood blocking it.
■
At least once each week
■
Whenever the test area looks dirty
■
Whenever
clean
test
area
appears on the display
If there is anything blocking the hole, or
if the test area has dirt, lint, or blood
on it, remove the test strip holder and
clean the test area by following the
73
DCO_06331801A_OTB_OB_US
11/25/03
3:27 PM
Step 1: Remove the Test Strip Holder
from the Meter.
M
Page 74
M
C
C
Remove the test strip holder to expose
the test area.
Hold the meter and place your thumbs
on the two raised dots on the test strip
holder. Press down on the raised dots
and slide the test strip holder toward
you.
74
DCO_06331801A_OTB_OB_US
11/25/03
3:27 PM
Step 2: Clean the Test Strip Holder.
Page 75
Step 3: Clean the Test Area.
CAUTION: Do not get water inside
the meter. Do not immerse meter
in water.
The following cleaning agents will
damage the meter.
DO NOT USE:
■ Alcohol
■ Cleansers with ammonia or phenol
■ Windex® or other glass cleaners
■ Abrasive cleansers
Wash only the test strip holder with
soap and water.
Clean the underside of the test
strip holder. Using a damp cotton swab,
clean the small hole from both sides to
remove any dirt, blood, or lint. Rinse
well. Dry completely with a soft cloth
or tissue.
Windex is a registered trademark of The Drackett Products Company.
75
DCO_06331801A_OTB_OB_US
M
11/25/03
3:27 PM
C
Page 76
M
C
Rub the test area with a cotton swab or
soft cloth dampened with water to
remove all blood, dirt, or lint from the
test area. If necessary, a mild liquid
dishwashing detergent mixed with water
may also be used. Do not apply fullstrength detergent to the test area. Be
careful not to scratch the test area.
Check the clear, protective coating over
the test area to make sure it is not
scratched or damaged.
76
DCO_06331801A_OTB_OB_US
11/25/03
3:27 PM
Page 77
Dry the test area with a soft, dry tissue
or cloth. Remove any lint.
M
C
Step 4: Replace the Test Strip Holder.
C
Press down on the raised dots of the
test strip holder until it snaps firmly into
place. Press forward on the base of the
test strip holder to be sure it is properly
in place. You are now ready to do a
check strip test. If the check strip will
not slide into the test strip holder,
repeat this step.
M
Hook the bottom of the test strip holder
onto the square notch on the meter.
77
DCO_06331801A_OTB_OB_US
11/25/03
3:27 PM
Page 78
You will still be able to test with low
batteries, but you should replace them
as soon as possible.
Replacing the Batteries
When
The OneTouch® Basic® Meter comes
with batteries already installed. When
the batteries need to be replaced, use
two AAA, 1.5-volt alkaline batteries.
battry
appears flashing on the display, the
meter will no longer give results and you
must replace the batteries before you
can perform another test.
The batteries should last about
18 months when testing up to two (2)
times a day. When the battery symbol
appears on the meter display, the
batteries are getting low.
The meter’s current time and date
settings are saved for a minimum of
30 minutes after the batteries have
78
DCO_06331801A_OTB_OB_US
11/25/03
3:27 PM
Page 79
been removed. After that you may need
to reset the time and date. Dead
batteries and/or battery removal will
not erase or change test results,
default settings, or codes stored in
the meter.
(Back of Meter)
To replace the batteries:
3. With your thumb, press upward on
the opening tab of the battery
compartment door and lift upward
until it releases from the clasp.
1. Make sure the meter is turned off
before you remove the batteries.
2. Turn the meter over so that the front
of the meter is resting in the palm of
your hand.
79
DCO_06331801A_OTB_OB_US
11/25/03
3:27 PM
4. Remove the battery compartment
door.
Page 80
5. Remove the old batteries by gently
slapping the meter against the palm
of your hand. Never tap the meter
against a hard surface.
80
DCO_06331801A_OTB_OB_US
11/25/03
3:27 PM
Page 81
opening tab upward toward the top of
the meter. Lower the battery compartment door until it snaps shut.
Check to see that your meter is working.
If the meter fails to turn on, the batteries
may have been inserted incorrectly.
Remove the batteries and reinsert them
as illustrated.
6. Insert the new AAA batteries into the
battery compartment, being sure to
align the plus (+) and minus (-) signs
correctly.
References
1. LifeScan data on file.
2. LifeScan data on file.
3. Kahn, R., and Weir, G.: Joslin’s Diabetes Mellitus, 13th ed.
Philadelphia: Lea and Febiger (1994), 489.
4. Krall, L.P., and Beaser, R.S.: Joslin Diabetes Manual. Philadelphia:
Lea and Febiger (1989), 261– 263.
5. Clarke, W.L., et al.: Diabetes Care, Vol. 10, No. 5 (1987),
622– 628.
6. Surwit, R.S., and Feinglos, M.N.: Diabetes Forecast (1988), April,
49– 51.
7. Sacks, D.B.: “Carbohydrates.” Burtis, C.A., and Ashwood, E.R. (ed.),
Tietz Textbook of Clinical Chemistry. Philadelphia: W.B. Saunders
Company (1994), 959.
To replace the battery compartment
door, insert the tab on the top of the
door into the slot in the top of the
battery compartment. Press the
81
DCO_06331801A_OTB_OB_US
11/25/03
3:27 PM
Page 82
Hematocrit Range: 30–55%.
SPECIFICATIONS
Dimensions: 4.3" ✕ 2.6" ✕ 1.2".
Power Supply: Two AAA
alkaline batteries.
Weight: 4.1 ounces with batteries.
Battery Life: About 18 months when
testing up to two (2) times a day.
Operating Temperatures: 59–95°F
(15–35°C).
Result Range: 0–600 mg/dL
(0–33.3 mmol/L). Higher values
are displayed as hi.
Operating Humidity Range: 0–90%
relative humidity (noncondensing).
Display Type: Liquid crystal.
Memory: Up to 75 results with time and
date.
Blood Source: Whole blood (capillary or
venous). Do not use samples that
contain fluoride (gray-top tubes).
Data Port: RS-232 serial communications with special LifeScan cable for
interface with a personal computer.
82
DCO_06331801A_OTB_OB_US
11/25/03
3:27 PM
Page 83
Three-Year Warranty
GUARANTEE AND
WARRANTY
If, at any time during the first three years
after purchase, the meter does not work
for any reason (except for obvious
abuse), LifeScan will replace it with a
new meter or equivalent product free of
charge.
30-Day Money-Back Guarantee
If you are not fully satisfied with the
OneTouch® Basic® System, a full refund
may be obtained by calling a LifeScan
Customer Services Representative at
1 800 227-8862 within 30 days of
purchase. You must return the
OneTouch® Basic® Meter and a copy of
your receipt to receive a refund.
The warranty policy applies only to the
original purchaser of this meter and
does not include the batteries supplied
with the meter.
83
DCO_06331801A_OTB_OB_US
11/25/03
3:27 PM
Page 84
The warranty policy does not apply to
the performance of the OneTouch®
Basic® Meter when used with any test
strip other than OneTouch® Basic®,
Profile®, OneTouch® II Test Strips, or
when the OneTouch® Basic® Meter
or OneTouch® Basic®, Profile®,
OneTouch® II Test Strips are changed
or modified in any way.
Before you return your meter, or
any product, call LifeScan Customer
Services at 1 800 227-8862.
Please complete the warranty service
card and mail it to LifeScan.
The OneTouch® Basic® Meter has a full
three-year warranty from the original
date of purchase. Write your date of
purchase here:
This warranty is in lieu of all other
warranties, express or implied,
including any implied warranty of
merchantability or fitness for a
particular purpose.
_________________________________
84
DCO_06331801A_OTB_OB_US
11/25/03
3:27 PM
Page 85
INDEX
Date, Setting the . . . . . . . . . . . . . . . . . . . . . . . . . . . 51
Decimal Separator . . . . . . . . . . . . . . . . . . . . . . . . . 55
Format, Date . . . . . . . . . . . . . . . . . . . . . . . . . . . . . . 54
Format, Time . . . . . . . . . . . . . . . . . . . . . . . . . . . . . . 54
Batteries, Replacing the . . . . . . . . . . . . . . . . . . . . . 78
Beep Prompts . . . . . . . . . . . . . . . . . . . . . . . . . . . . . 52
Blood, Getting a Drop of . . . . . . . . . . . . . . . . . . . . . 27
Blood, How to Test Your . . . . . . . . . . . . . . . . . . . . . 33
Blood on the Test Strip, Checking
the Amount of . . . . . . . . . . . . . . . . . . . . . . . . . . . . 39
C Button . . . . . . . . . . . . . . . . . . . . . . . . . . . . . . . . 6, 7
Check Strip, Checking with the . . . . . . . . . . . . . . . . 14
Check Strip, Test Result Range of . . . . . . . . . . . . . . 17
Cleaning the Meter . . . . . . . . . . . . . . . . . . . . . . . . . 73
Clock . . . . . . . . . . . . . . . . . . . . . . . . . . . . . . . . . . . . 49
Code, Setting Meter . . . . . . . . . . . . . . . . . . . . . . . . 11
Control Solution, Checking with . . . . . . . . . . . . . . . 18
Control Solution, OneTouch® Normal . . . . . . . . . . . 10
Control Solution Results . . . . . . . . . . . . . . . . . . . . . 23
Control Solution Test Information,
Important . . . . . . . . . . . . . . . . . . . . . . . . . . . . . . . 20
Control Solution Test Tips . . . . . . . . . . . . . . . . . . . . 19
Data Port . . . . . . . . . . . . . . . . . . . . . . . . . . . . . . . . . . 8
Guarantee, 30-Day Money-Back . . . . . . . . . . . . . . . 83
Hematocrit . . . . . . . . . . . . . . . . . . . . . . . . . . . . . 3, 82
Laboratory Results, Comparing
Meter Results with . . . . . . . . . . . . . . . . . . . . . . . . 42
Lancet . . . . . . . . . . . . . . . . . . . . . . . . . . . . . . . . . . . 27
Language . . . . . . . . . . . . . . . . . . . . . . . . . . . . . . . . . 53
Limitations, Precautions and . . . . . . . . . . . . . . . . . . 2
M Button . . . . . . . . . . . . . . . . . . . . . . . . . . . . . . . . 6, 7
Measure, Unit of . . . . . . . . . . . . . . . . . . . . . . . . . . . 55
Memory Mode, Entering the . . . . . . . . . . . . . . . . . . 45
Messages, Error . . . . . . . . . . . . . . . . . . . . . . . . . . . 62
Messages, Special . . . . . . . . . . . . . . . . . . . . . . . . . 38
Messages, Test Procedure . . . . . . . . . . . . . . . . . . . 57
Meter, Cleaning . . . . . . . . . . . . . . . . . . . . . . . . . . . . 73
Meter Display . . . . . . . . . . . . . . . . . . . . . . . . . . . . . . 7
85
DCO_06331801A_OTB_OB_US
11/25/03
3:27 PM
Page 86
Options, Setting Meter . . . . . . . . . . . . . . . . . . . . . . 47
OneTouch® Penlet® Plus Adjustable Blood
Meter, Doing a Daily Check of . . . . . . . . . . . . . . . . . 73
Meter On/Off Button . . . . . . . . . . . . . . . . . . . . . . . . . 7
Meter Options, Setting . . . . . . . . . . . . . . . . . . . . . . 47
– Beep Prompts . . . . . . . . . . . . . . . . . . . . . . . . . . . 52
– Date Format . . . . . . . . . . . . . . . . . . . . . . . . . . . . 54
– Decimal Separator . . . . . . . . . . . . . . . . . . . . . . . 55
– Language . . . . . . . . . . . . . . . . . . . . . . . . . . . . . . 53
– Time and Date . . . . . . . . . . . . . . . . . . . . . . . . . . 49
– Time Format . . . . . . . . . . . . . . . . . . . . . . . . . . . . 54
– Unit of Measure . . . . . . . . . . . . . . . . . . . . . . . . . 55
Meter Specifications . . . . . . . . . . . . . . . . . . . . . . . . 82
OneTouch® Basic® Blood
Glucose Meter . . . . . . . . . . . . . . . . . . . . . . . . . . . . . 6
OneTouch® Basic® Blood Glucose
Monitoring System . . . . . . . . . . . . . . . . . . . . . . . . . 5
OneTouch® Normal Control
Solution . . . . . . . . . . . . . . . . . . . . . . . . . . . . . . . . . 10
OneTouch® Basic®, Profile®,
OneTouch® II Test Strips . . . . . . . . . . . . . . . . . . . . . . 8
– Code . . . . . . . . . . . . . . . . . . . . . . . . . . . . . . . . . .11
– Expiration . . . . . . . . . . . . . . . . . . . . . . . . . . . . . . . 9
Sampler . . . . . . . . . . . . . . . . . . . . . . . . . . . . . . . . . 26
OneTouch® Penlet® Plus Adjustable Blood
Sampler, Using the . . . . . . . . . . . . . . . . . . . . . . . . 27
Precautions and Limitations . . . . . . . . . . . . . . . . . . . 2
Problems, Solving . . . . . . . . . . . . . . . . . . . . . . . . . . 57
Set-Up Mode, Entering and Using . . . . . . . . . . . . . 47
Set-Up Mode, Exiting . . . . . . . . . . . . . . . . . . . . . . . 56
System, Checking the . . . . . . . . . . . . . . . . . . . . . . . 13
Test Area . . . . . . . . . . . . . . . . . . . . . . . . . . . . . . . . . . 7
Test Procedure, Abbreviated . . . . . . . . . . . . . . . . . . 25
Test Procedure, Detailed . . . . . . . . . . . . . . . . . . . . . 26
Test Results, Recalling . . . . . . . . . . . . . . . . . . . . . . 46
Test Strip Holder . . . . . . . . . . . . . . . . . . . . . . . . . . . . 7
Test Strip Information, Important . . . . . . . . . . . . . . . 9
Test Strips, OneTouch® Basic®,
Profile®, OneTouch® II . . . . . . . . . . . . . . . . . . . . . . . 8
Time, Setting the . . . . . . . . . . . . . . . . . . . . . . . . . . . 50
Warranty, Three-Year . . . . . . . . . . . . . . . . . . . . . . . . 83
86
DCO_06331801A_OTB_OB_US
11/25/03
3:27 PM
Page 87
NOTES
DCO_06331801A_OTB_OB_US
11/25/03
3:27 PM
Page 88
NOTES
DCO_06331801A_OTB_OB_US
11/25/03
3:27 PM
Page 89
DCO_06331801A_OTB_OB_US
11/25/03
3:27 PM
The system described herein is covered by one or more of the
following U.S. patents: D417,504, D428,150, 5,059,394,
5,187,100, 5,843,692, 5,968,760, 6,045,567, 6,156,051,
6,197,040 and 6,489,133. Use of the monitoring device
described herein is protected under the following U.S. patents:
4,935,346, 5,049,487, 5,179,005, and 6,268,162. Purchase of
the monitoring device described herein does not act to grant a
use license under these patents. Such a license is granted only
when the device is used with OneTouch® Test Strips, or with
test strips manufactured by Diagnostic Solutions, Inc. No test
strip supplier other than LifeScan, Inc. is authorized to grant
such a license. The accuracy of results generated with LifeScan
meters using test strips manufactured by anyone other than
LifeScan has not been evaluated by LifeScan.
OneTouch® is a trademark of LifeScan, Inc.
©2003 LifeScan, Inc. Milpitas, CA 95035. 10/03 AW 063-318-01A
AW 06331801A
Page 90
El folleto para el propietario del OneTouch® Basic® se
encuentra disponible en español. Para recibir su copia
gratuita, favor de llamar al número gratis 1 800 381-7226.
The OneTouch® Basic® instructional materials are available
in Spanish. To receive your free copy, please call toll-free
1 800 381-7226.
LifeScan Customer Services 24-Hour,
Toll-Free Assistance:
USA (English): 1 800 227-8862
USA (Español): 1 800 381-7226
Visit the LifeScan Web site at:
www.LifeScan.com