1
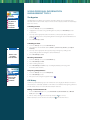
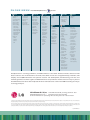
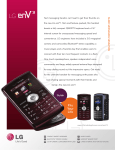
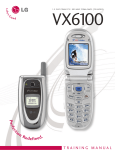
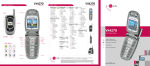
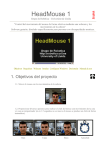
VX6000
1 . 9 G H Z P C S , 8 0 0 M H Z C D M A ( A L L D I G I TA L )
T
R
A
I
N
I
N
G
M
A
N
U
A
L
Ear Piece
VX6000
PRODUCT HIGHLIGHTS
PURE TECHNOLOGY
䡲 Integrated CMOS Digital
䡲 Built-In Web Browser
Camera with Zoom, Multishot,
䡲 E911
Emergency
Location
Resolution
Adjustment,
and
Capable
Self-Portrait Timer
䡲 Long Battery
Life (3.8 hours
䡲 easyedgeSM Service to Access
talk time, 6 days standby)
Email and Download Pictures,
䡲 27
Unique
+ Vibrate
Ringers
andRingers
Games*
Antenna
䡲 Productivity Tools: Calendar
䡲 Multimedia Messaging Service
with Scheduler, Alarm Clock
for Sending Photos with
䡲 Phone
Book
(199 Entries X 5)
Attached
Messages*
Headset Jack
Provides
connection
for an optional
headset
䡲 ESleek
Stylish
R
F R Eand
SH
I N GSilver
STYLE
Clamshell Design
䡲 Ultra Compact and
䡲 Lightweight
Innovative Rolling
External
(only 3.14
oz.)
Left Soft Key
OEL Color Display and
䡲 Two Stylish Colors: Silver
Full-Color Internal LCD
and Black Leather
䡲 Customizable Caller ID,
S IWallpaper,
M P L E Power On/Power
F UOff
N Images
CTIONALITY
䡲
Short
Messaging
䡲 Two-Way
Easy-to-Read
Blue
Service
(SMS)
Backlit Keypad
䡲 Handy 4-Way Navigation Key
䡲 Voice-Activated Dialing
䡲 External
USB Capable
(30 Entries)
䡲 Built-In Games: Mobile Hawk
䡲 Speed Dialing (99 Entries)
and Black Jack
䡲 Large Phone Book capable of
Navigation Key
Scrolls through
menus and
displays the next
or previous
message, entry
or item
My Shortcut
Indicator
Flashes for
incoming calls
or messages
Mobile Web
Right Soft Key
easyedgeSM
Messages
END/PWR Key
Powers the
phone on or off,
ends a call or
returns you to
the main menu
SEND Key
Clear Key
Camera
Voice Dial
(not shown)
storing up to 499 contacts
with up to 5 numbers and 3
email addresses per contact
䡲 31 Caller ID Ringers plus
Vibrate and Silent Alert
Manner/
Silence All
Mode
OEL Display
䡲 Two-Way Short Messaging
Service (SMS)
䡲 And Much, Much More!!!
*US Cellular Service Required
Microphone
Lock
Mode Key
Camera
Lens
Self Portraiture Mirror
/Ringer Speaker
Enter Number
-----------------------------------------------------------
Phone Book
The internal phone book is capable of storing up to 499 contacts with up to 5 numbers and 3
email addresses per contact.
--------------------------------------------------------------------------------------------------------------------------------------------------
Cancel
Pause
Adding a New Phone Book Entry
1. From the Contacts (2) menu, select New Number (2).
2. Enter the telephone number for the entry and press OK .
3. Select a label (Home, Home 2, Office, Office 2, Mobile, Mobile 2, Pager,
Fax, Fax 2 or None) and press OK .
4. Enter a name for the entry and press OK .
5. To exit to the phone book press Left Soft Key for Done.
One-Touch Speed Dialing
Alex
Please select
b
<OK> to start
Christy
recording.
1 OK
2 Cancel
Cancel
Options
Voice Services
1 Voice Dial
2 Answering Mach...
3 Train Words
Key press
One-Touch Speed Dialing: Enables you to dial 9 of your most frequently used numbers using a
single key press. These numbers are stored in your phone book in memory locations 1 through 9.
For locations 1 through 9, you can use one-touch dialing by pressing and holding the
corresponding key to the memory location to be dialed or press a digit, then press
.
Two-Touch Speed Dialing: Enables you to dial numbers in your phone book through two keys
(for locations 10 to 99).
1. From the Contacts (2) menu, select Speed Dials (5).
2. Select or enter a slot number and press OK .
3. Select a name from the list using the Navigation Key and press OK .
4. Select the desired number and press OK .
Voice Dials
Allows you to view the list of numbers that have been programmed with voice dialing or add a
voice dial tag to a number in the phone book.
1. From the Contacts (2) menu, select Voice Dials (6).
2. Press Left Soft Key to select a number to add a voice dial tag to and press OK .
3. Record the voice dial tag by following the phone’s prompts.
Note: Recordings should be made in a quiet place using a clear voice. Hands-free car kits or
headsets should be avoided when recording.
Voice Dial Prompt
Allows you to set the command for voice dialing.
1. From the Settings (9) menu, select Voice Services (7).
2. Select Voice Dial Prompt (1) and press OK .
3. Select desired option (Key press, Flip open, or Disable) and press
OK
.
Tools
1
2
3
4
5
6
7
Schedule
Alarm Clock
Voice Memo
My Shortcut
Notepad
Ez Tip Calc
Calculator
USING PERSONAL INFORMATION
MANAGEMENT TOOLS
The Organizer
The Organizer menu allows you to view the calendar, schedule an event, program your
handset’s alarm clock, view and compose memos on the notepad, as well as record and play
back voice memos.
Scheduling an Event
1. From the Tools (8) menu, select Schedule (1).
2. Highlight the event date using your Navigation Key and press Left Soft Key to add
a new event.
3. You may set the appropriate start and end times, content, repeat (if any), alarm and
ringer by scrolling to the corresponding field and entering the desired information and
pressing OK .
4. Press Left Soft Key to Save.
Scheduling an Alarm
Please start
recording
after the tone.
Recording a Voice Memo
1.
2.
3.
4.
Cancel
Recent Calls
1
2
3
4
5
1. From the Tools (8) menu, select Alarm Clock (2).
2. Select from the list of available alarms, Alarm 1 (1), Alarm 2 (2), Alarm 3 (3) or Quick
Alarm (4).
3. You may set the appropriate time, repeat (if any), and ringer by scrolling to the
corresponding field and entering the desired information.
4. Press Left Soft Key to Save.
Dialed Calls
Received Calls
Missed Calls
Erase Calls
Call Timer
From the Tools (8) menu, select Voice Memo (3).
Press Left Soft Key for New.
Start recording at the tone.
Press Left Soft Key for Done to stop recording. By default, your message will
be listed by date and time.
Composing a Notepad Memo
1. From the Tools (8) menu, select Notepad (5).
2. Press Left Soft Key to add.
3. Enter your memo using the keypad and press
OK
.
Call History
Call History automatically logs up to 30 numbers for each category of dialed, received, and
missed calls. It is continually updated as new numbers are added to the beginning of the list
and the oldest entries are removed from the bottom of the list.
Making a Call from Recent Calls
1. From the Recent Calls (3) menu, select Dialed Calls (1), Received Calls (2) or Missed
Calls (3) and press OK .
2. Place a call by selecting the desired entry and press
to connect.
Note: To quickly access the list of recent calls press
from the main menu.
CAMERA FEATURES
Taking a Photo
Self Timer
Camera
1
2
3
4
5
6
7
Take Photo
0 Gallery
Send Photo Msg
0 Photo Inbox
0 Photo Outbox
0 Photo Saved
Photo Settings
1.
2.
3.
4.
5.
6.
7.
Press Left Soft Key and select Camera (1) menu.
Select Take Photo (1).
Press Right Soft Key for Options.
Select Self Timer (1).
Select 5 sec or 10 sec with the
Navigation Key and press
Press Left Soft Key for Start.
Press Left Soft Key for Save or press Right Soft Key for Reject.
12
OK
.
Setting the Resolution
1.
2.
3.
4.
From the Camera (1) menu, select Take Photo (1).
Press Right Soft Key for Options.
Select Resolution (2).
Use the
Navigation Key to change the resolution (Lo 160x120, Med 320x240, or
Hi 640x480), press OK .
Note: Regardless of camera resolution, the phone will store a maximum of 20 pictures.
12
Changing the Brightness
Med 320x240
1X
1/30
1 Self Timer
2 Resolution
3 Brightness
4 White Balance
5 File Quality
6 Shutter Sound
7 Color Effects
8 Fun Frames
Close
1.
2.
3.
4.
From the Camera (1) menu, select Take Photo (1).
Press Right Soft Key for Options.
Select Brightness (3).
Use the Web
Navigation Key to change the brightness, press Left Soft Key for Done.
Changing the White Balance
1.
2.
3.
4.
From the Camera (1) menu, select Take Photo (1).
Press Right Soft Key for Options.
Select White Balance (4).
Use the Web
Navigation Key to change the white balance (Auto, Sunny, Cloudy,
Tungsten, Fluorescent or Darkness), press Left Soft Key for Done.
Changing the File Quality
Med 320x240
1X
1/30
Shutter Sound
1.
2.
3.
4.
Shutter
Chime
12
Turning On/Off the Shutter Sound
No Sounds
Gallery
From the Camera (1) menu, select Take Photo (1).
Press Right Soft Key for Options.
Select File Quality (5).
Use the
Navigation Key to change the file quality (Economy, Normal or High),
press OK .
Options
1.
2.
3.
4.
From the Camera (1) menu, select Take Photo (1).
Press Right Soft Key for Options.
Select Shutter Sound (6).
Use the
Navigation key to change the shutter sound (Shutter, Chime or No
Sounds), press OK .
12
Changing the Color Effects
1.
2.
3.
4.
Camera
1
2
3
4
5
6
7
Take Photo
0 Gallery
Send Photo Msg
0 Photo Inbox
0 Photo Outbox
0 Photo Saved
Photo Settings
Med 320x240
1X
1/30
Multishot
5 shots
3 shots
Gallery
From the Camera (1) menu, select Take Photo (1).
Press Right Soft Key for Options.
Select Color Effects (7).
Use the Web
Navigation Key to change the color effects (Normal, Antique, Black &
White or Negative), press Left Soft Key for Done.
Fun Frames
1.
2.
3.
4.
5.
6.
From the Camera (1) menu, select Take Photo (1).
Press Right Soft Key for Options.
Select Fun Frames (8).
Use the Web
Navigation Key to change the background options and press
Press OK to take a picture.
Press Left Soft Key for Save or press Right Soft Key for Reject.
OK
.
Taking Multiple Shots
1.
2.
3.
4.
5.
6.
From the Camera (1) menu, select Take Photo (1).
Press Right Soft Key for Options.
Select Multishot (9).
Use the
Navigation Key to change the multishot options*, press OK .
Press Left Soft Key for Start.
Use the Web Navigation Key to scroll through the images, press Left Soft Key for Save
or press Right Soft Key for Reject.
* In low or medium resolution, a series of 5 or 3 shots can be taken. In high resolution,
a series of 2 shots can be taken.
12
Options
Photo Gallery
Setting a Picture Display from Picture Gallery
Picture001
1/1
1 Send
2 Online Album
3 Set As
4 Enlarge
5 Lock
6 Rename
7 Erase
8 Erase All
Close
Allows you to choose the kind of background to be displayed on the phone.
1. From the Camera (1) menu, select Gallery (2).
2. Use the
or Web
Navigation Key to select an image, press OK .
3. Press Right Soft Key for Options.
4. Select Set As (3).
5. Use the
Navigation Key to set picture as Contacts, Wallpaper, Power On or
Power Off, press OK .
12
12
Renaming a Picture
1.
2.
3.
4.
5.
From the Camera (1) menu, select Gallery (2).
Use the
or Web
Navigation Key to select an image.
Press Right Soft Key for Option.
Select Rename (6) to rename the image.
Erase the previous image name, enter the new image name and press
12
OK
to save.
Deleting a Picture Message
1.
2.
3.
4.
From the Camera (1) menu, select Gallery (2).
Use the
or Web
Navigation Key to select an image.
Press the Right Soft Key for Option.
Select Erase (7) to delete the image. A confirmation window will appear stating that
the image will be erased from the gallery. Select either Erase (1) or Cancel (2).
12
Main LCD
Changing the Backlight Timer
Allows you to select the duration the backlight is on for the displays.
1. From the Display (2) menu, select Backlight (2).
2. Select either Main LCD (1), or Front LCD (2).
3. Select Timer (1).
4. Press
Navigation Key to select an option (7 seconds, 15 seconds, 30 seconds,
Always off, or On flip open for Main LCD or 5 seconds, 1 minute or 3 minutes for the
Front LCD) and press OK .
1 Timer
2 Brightness
12
30 Seconds
Changing the Font Size and Color
Allows you to choose the size and color of the number and text input font.
1. From the Display (2) menu, select Fonts (7).
2. Select Calling Digits (1), or Text Editor (2).
3. Select Size (1), or Color (2).
4. Press
Navigation Key to select the size or color of the text and press
12
OK
.
Power Saver
Sets the time duration for keeping LCD turned on.
1. From the Display (2) menu, select Power Saver (9).
2. Press
Navigation Key to select an option (2 min, 10 min, 30 min, Always on) and
press OK .
12
Status Light
–Manner
Mode
Manner Mode–
Thu, July 26 9:54am
Menu
Contacts
Tools
1
2
3
4
5
6
7
Notifies you that your phone is working properly. Indicator lamp blinks every 10 minutes if
phone operates under normal conditions.
1. From the Display (2) menu, select Status Light (0).
2. Press
Navigation Key to select an option (On or Off) and press OK .
12
OTHER NOTABLE SETTINGS
Manner Mode
Schedule
Alarm Clock
Voice Memo
My Shortcut
Notepad
Ez Tip Calc
Calculator
Use Manner Mode in a public place to disable the ringer and activate Vibration Mode.
1. In the standby mode, activate Manner Mode by pressing the
key or the Manner
Mode Key (for 3 seconds) - the phone will vibrate when activated.
2. When set -Manner Mode- will appear on the screen.
3. To release Manner Mode, press the
key again; Silence All is activated.
Press the
key again until -Normal Mode Activated- is displayed.
Silence All Mode: when activated there are no tones from the keys, and the ringer
does not sound but the alert indicator blinks instead.
shift
shift
shift
Jul, 2003
Su Mo Tu We Th Fr Sa
1 2 3 4
5 6
7 8 9 10 11 12 13
14 15 16 17 18 19 20
21 22 23 24 25 26 27
28 29 30 31
Add
Options
Programming the Short Cut Key
1. From the Tools (8) menu, select My Shortcut (4).
2. Select your most frequently used function from the list provided and press OK .
3. Shortcut: Pressing the Navigation Key while in standby mode will quickly access this
function.
12
Photo Outbox
Camera
1
2
3
4
5
6
7
Take Photo
0 Gallery
Send Photo Msg
0 Photo Inbox
0 Photo Outbox
0 Photo Saved
Photo Settings
View a Saved Picture Message from Photo Outbox
1. From the Camera (1) menu, select Photo Outbox (5).
2. To select a picture message, scroll down with the
to view the picture message.
12
Navigation Key, then press
OK
Resending from the Photo Outbox to Other Recipients
1. From the Camera (1) menu, select Photo Outbox (5).
2. Select a picture message from the Outbox list and press Left Soft Key for Send to.
3. Press Left Soft Key for Contact (1), Online Album (2), or Recent Call (3), to select
a recipient.
4. Press Left Soft Key to send.
Deleting from the Outbox
Family
1.
2.
3.
4.
From the Camera (1) menu, select Photo Outbox (5).
Use the
Navigation Key to select the desired picture message, then press
To delete a picture message from the outbox, press Right Soft Key for Options.
Select Erase (3). Select Erase (1) again to confirm.
12
OK
.
Resending from Photo Saved
Send to
Options
1.
2.
3.
4.
From the Camera (1) menu, select Photo Saved (6).
Use the
Navigation Key to select the desired message.
To view the highlighted saved picture message press OK .
If pix is saved from the Inbox, press Left Soft Key for reply, select Photo Msg (1) or
Text Only (2).
5. If pix is saved from the Outbox, press Left Soft Key for Resend.
12
Photo Settings
Setting the Photo Msg Alert
Camera
1
2
3
4
5
6
7
Take Photo
0 Gallery
Send Photo Msg
0 Photo Inbox
0 Photo Outbox
0 Photo Saved
Photo Settings
Set an alert to indicate a photo msg has been delivered to you.
1. From the Camera (1) menu, select Photo Settings (7).
2. Select Photo Msg Alert (4).
3. Use the
Navigation Key to select from Silent, Vibrate Once, Vibrate and Sound,
Custom Ring Tone, Low Beep Once, Low Beeps, Loud Beep Once, or Loud Beeps and
press OK .
12
Text Entry Mode
Allows you to automatically set the text when sending a pix msg.
1. From the Camera (1) menu, select Photo Settings (7).
2. Select Text Entry Mode (5).
3. Use the
Navigation Key to select from T9 Word, Abc, or 123 and press
12
Quick-Text
Allows you to automatically set the text when sending a picture message.
1.
2.
3.
4.
From the Camera (1) menu, select Photo Settings (7).
Select Quick-Text (7).
Select Left Soft Key to Add New.
Enter a custom text message. Press OK to save message.
OK
.
CONNECTIVITY FEATURES
Downloading easyedgeSM Content
The new VX6000 by LG can store up to 1.5 Mb of content from easyedge, a service that
allows you to access your email and download pictures, ringers and games to your phone.
Note: 1.5 Mb of memory is allocated for easyedge content. Camera memory is separate and
will not affect easyedge memory capacity.
easyedge
Downloading New Content from easyedge
(Instant Messaging,Games,Office Applications,etc.)
Apps
1.
2.
3.
4.
5.
Press Soft Key 1.
Select easyedge (5).
Select Apps (1). Main display of easyedge will appear, press OK .
Select
icon and press OK .
Select either Start or Options and press OK .
Start allows you to download selected applications while displaying the easyedge
application list relayed from the easyedge server in connection.
Options allows you to display download log and the current memory capacity of your
mobile phone.
- Information: displays usable capacity for your mobile phone and the memory
capacity in use.
- View Log: displays easyedge version, MSM Chip, and downloading record.
6. Shortcut: Press the
on the navigation key while in standby mode to quickly
start easyedge.
1 Apps
2 Help
Help
1. Press Soft Key 1.
2. Select easyedge (5) .
3. Select Help (2).
This submenu gives you information about the easyedge selection key.
Accessing the Web
Mobile Web
1 Start Browser
2 Web Messages
3 Web Settings
The new VX6000 is enabled by the Openwave UP 4.1 Browser to access the Web.
1. From the Web (6) menu, select Start Browser (1).
2. A reminder of the charge will appear; select Yes (1) to launch MiniBrowser, if required.
After a few seconds, you will see the Home Page.
3. You can end a MiniBrowser session by pressing
.
4. Shortcut: Press the Web on the Navigation Key while in standby mode to quickly launch
the Browser.
Messages
Send New
Allows you to send text messages and emails.
1. From the Messages (4) menu, select New Message (2).
2. Press Left Soft Key for Contacts to select pre-programmed recipient or select Address
and enter an email address or phone number and press OK .
3. Select Message and press OK .
4. Enter a custom text message, up to 160 characters. Press OK to complete the message.
5. Press Right Soft Key and select Send from the menu.
CUSTOMIZABLE FEATURES
Changing the Sound Settings
Selecting a Built-in Ringer
Settings
1
2
3
4
5
6
7
Sounds
Display
System
Security
Call Setup
1x Data
Voice Services
Banner
--------------------------------------------------------------------------------------------------------------------------------------------------
1. From the Settings (9) menu, select Sounds (1).
2. Select Ringers (1).
3. Select Caller ID (1), No Caller ID (2) or Restrict (3).
4. Choose from the list of available default ringers and press OK .
Note: The ringer list includes both downloaded and default ring tones. Downloaded ringers
will be indicated by all lower case names while default ringers will have the first letter of
their name capitalized.
Changing the Display Settings
Changing the Banner
Allows you to enter a string of characters (up to 16) to be displayed on the LCD screen.
1. From the Settings (9) menu, select Display (2).
2. Select Banner (1).
3. For actions, press Right Soft Key: T9Word (1), Abc (2), 123 (3), Symbols (4), or Smiley (5).
4. Enter the desired greeting and press OK .
-----------------------------------------------------------
Cancel
T9Word
Display
1 Banner
2 Backlight
3 Screens
4 Menu Style
5 Clocks
6 Theme Colors
Changing the Screen Display Image
Allows you to choose the kind of background to be displayed on the phone.
1. From the Display (2) menu, select Screens (3).
2. Select Wallpaper (1), Power On (2) or Power Off (3).
3. Select from the list of seven default images, press OK to save.
4. For More images, press Right Soft Key: Default (1), Graphics (2), Gallery (3).
Changing the Menu Style
Allows you to choose whether you want the menu to show as a list or as icons.
1. From the Display (2) menu, select Menu Style (4).
2. Select either Icon or List and press OK .
Changing the Theme Color
Allows you to choose the color of the background screen.
1. From the Display (2) menu, select Theme Colors (6).
2. Press
Navigation Key to select desired option (Default, Green, Violet or Orange)
and press OK .
12
Icon
Changing the External OEL Display Pattern
Allows you to choose different patterns for the external OEL display.
1. From the Display (2) menu, select Backlight (2).
2. From the Front LCD (2) menu select Patterns (2).
3. Select Incoming Calls (1), Missed Calls (2), New SMS Alert (3), Reminders (4)
or Standby (5).
4. Press
Navigation Key to select desired pattern (Pattern0 (1), Pattern1 (2), Pattern2
(3), Pattern3 (4), Pattern4 (5)) and press OK .
12
Sending a Photo
Find Name
Sending a Picture Message from Camera
1. From the Camera (1) menu, select Send Photo Msg (3).
2. Press Left Soft Key for Contact (1), Online Album (2), or Recent Call (3).
3. Use the
Navigation Key to select the recipient, press OK twice.
Up to 10 recipients can be added to each picture message.
4. Use the
Navigation Key, select picture, press OK .
5. Use the
Navigation Key to scroll through the list of pictures, then press OK to view
the picture.
6. Press Left Soft Key to select the image or press the Web Navigation Key to select a
different picture and press
, or press the CLR button to cancel.
Alex
Rob
Christy
12
12
12
Select
Adding Text, Sound, and Voice Memo to a Picture Message
Voice Memo
July 26, 11:57am
After selecting the picture and who to send it to, custom text, sounds and voice memos can
be added to a picture message. On the Send Photo Msg screen:
1. Use the
Navigation Key to scroll to Text, press OK .
2. Enter a custom text message, up to 1000 characters. Press OK to complete the message.
3. Use the
Navigation Key to scroll to Sound, press OK .
4. Use the
Navigation Key to select sound or voice memo, press OK .
5. Press Right Soft Key for Options, select Send (2), or press
.
12
12
12
Photo Inbox
Select
View a Picture Message
1. From the Camera (1) menu, select Photo Inbox (4).
2. To select a picture, scroll down with the
Navigation key, then press
the picture message.
12
OK
to view
Replying to a Picture Message
Picture
Picture001
Picture002
1. From the Camera (1) menu, select Photo Msg Inbox (4).
2. To select a picture message, scroll down with the
Navigation Key, then press OK
to view the picture message.
3. Wait until slide show is over and press Left Soft Key for Reply select Photo Msg (1) or
Text Only (2).
12
Forwarding a Picture Message to Another Handset or E-Mail address
1. From the Camera (1) menu, select Photo Msg Inbox (4).
2. To select a picture message, scroll down with the
Navigation Key, then press OK
to view the picture message.
3. To forward the picture message wait until slide show is over then press Right Soft Key
for Options, select Forward (8).
4. Press Left Soft Key for Contacts (1), Online Album (2), or Recent Calls (3), to select
a recipient.
12
Reply
Options
Inbox
Alex
My Car
Save a Picture Message to Saved Photo Msg
1. From the Camera (1) menu, select Photo Msg Inbox (4).
2. To select a picture message, scroll down with the
Navigation Key, then press OK
to view the picture message.
3. Wait until slide show is over then press Right Soft Key for Options, select Save Photo Msg
(7).
12
Reply
Options
12
PHONE MENU
Camera
1.Take Photo
2. Gallery
3. Send Photo Msg
4. Photo Inbox
5. Photo Outbox
6. Photo Saved
7. Photo Settings
1. Auto Save
2. Auto Delete
3. Auto Download
4.Photo Msg Alert
5.Text Entry Mode
6. Delivery Ack
7. Quick-Text
8. Erase all
1. Inbox
2. Outbox
3. Saved
4. All
Contacts
1. List Contacts
2. List Number
3. New E-mail
4. Groups
5. Speed Dials
6.Voice Dials
7. My Contact Info
Press Left Soft Key Menu. Press
Recent Calls
1. Dialed Calls
2. Received Calls
3. Missed Calls
4. Erase Calls
1. Dialed Calls
2. Received Calls
3. Missed Calls
4. All Calls
5. Call Timer
1. Last Call
2. Home Calls
3. Roam Calls
4. All Calls
Web
Messages
1.Voice Mail
2. New Message
3. Inbox
4. Outbox
5. Saved
6. Msg Settings
1. Auto Save
2. Auto Delete
3. Callback #
4. Msg Alerts
5. Signature
6. Direct View
7. Entry Mode
8. Edit Voice
Mailbox #
9. Quick-Text
7. Erase All
1. Inbox
2. Outbox
3. Saved
4. All
OK
to Scroll
Easyedge
1. Apps
2. Help
Tools
1. Schedule
2. Alarm Clock
1. Alarm 1
2. Alarm 2
3. Alarm 3
4. Quick Alarm
3.Voice Memo
4. My Shortcut
5. Notepad
6. Ez Tip Calc
7. Calculator
8.World Clock
Mobile Web
1. Start Browser
2.Web Messages
3.Web Settings
1. Prompt
2. Alert Beep
Settings
1. Sounds
1. Ringers
2. Key Tone
3.Volume
4. Alerts
5. Power On/Off
Tone
2. Display
1. Banner
2. Backlight
3. Screens
4. Menu Style
5. Clocks
6.Theme Colors
7. Fonts
8. Language
9. Power Saver
0. Status light
3. System
1. Select System
2. Set NAM
3. Auto NAM
4. Serving System
4. Security
1. Lock Phone
2. Restrict
3. Emergency #s
4. Change Code
5. Erase Contacts
6. Reset Default
My Media
1. Graphics
2. Music
Settings
5. Call Setup
1. Auto Retry
2. Answer Call
3. Auto-Answer
4. One-Touch Dial
5.Voice Privacy
6. Auto Volume
7.TTY Mode
6. 1X Data
1. Data/Fax
2. Select Port
3. Port Speed
7.Voice Services
1.Voice Dial
Prompt
2. Answering
Machine
3.Train Words
8. Location
9. Phone Info
1. My Phone
Number
2. S/W Version
3. Icon Glossary
4. Shortcut Help
Headquartered in San Diego, California, LG Mobile Phones is the North American wireless division of LGE
USA, a business unit of LG Electronics of Seoul, Korea. With annual sales of approximately $16 billion, LGE
employs over 55,000 individuals and operates research and development, manufacturing, and sales and
marketing facilities around the globe. LG Mobile Phones has expanded its market share to nearly 19 percent
of CDMA wireless handsets sold and placed third in the United States at the end of 2002 according to analysts
at Strategy Analytics.
LG InfoComm U.S.A.,Inc. 10225 Willow Creek Rd., San Diego, CA 92131-1639
www.LGmobilephones.com | Customer Service: (800) 793-8896
For more information on purchasing LG accessories, please call 1-800-851-6734
Copyright ©2003 LG. All rights reserved. Other products and services are trademarks of their respective owners. Phone features and specifications are subject to change without prior notice. Services and features
may vary depending on network service provider, service plan, network conditions, and personal usage.
The use of non-LG approved accessories will void the warranty and may result in damage to the phone, the phone to explode, or other dangerous conditions. Battery talk and standby times are estimates only.
Use of certain features and other conditions including, but not limited to, battery age and condition, charging habits, temperatures to which the battery is exposed, and use in digital mode will cause actual
standby and talk time to vary. The amount of talk time used will impact the standby time. In the same way, the amount of time that the phone is in standby mode will impact the talk time.
6000TRAINMAN/USC