1
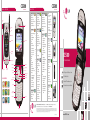
CE500
PHONE OVERVIEW
T R I - BA N D
Headset
Jack
Earpiece
CE500
MENU TREE
T R I - BA N D
recent calls (1)
1.Missed Calls
2.Dialed Calls
3.Received Calls
4.Delete Recent Calls
5.Call Duration
6.Data Information
cingular Mall (4)
1.Shop Tones
2.Shop Games
3.Shop Graphics
4.Shop Multimedia
5.Shop Applications
6.MEdia Home
messaging (2)
1.IM
2.Create New Message
> 1. Text
> 2. Multimedia
> 3. Email
3.Inbox
4.Email Box
> 1. BellSouth
> 2. EarthLink
> 3. SBC Yahoo!
> 4. Account4
> 5. Account5
5.Outbox
6.Drafts
7. Chat
8.Voice Mail
9.Templates
> 1. Text
> 2. Multimedia
> 3. Business Card
0.Settings
> 1. Text Messages
> 2. Multimedia
Messages
> 3. Email
> 4. Download
Messages
Check Memory
MEdia net (5)
1.MEdia Net Home
2.Favorites
3.Go to URL
4.Network Profile
5.Cache Settings
6.Cookie Settings
7. Security Certificates
8.Information
Camera
Flash
Camera Key
External LCD
Internal LCD
External MP3
Controls
Dual Speakers
Volume Up/Down
Charging &
USB Port
Text Message
OK/Web Key
Left Soft Key
Right Soft Key
Camera Key
MP3 Key
My Stuff
Instant Messaging
Address Book
Send Key
MAIN MENU
End/Power Key
Clear & Back Key
Voicemail
Recent Calls
Messaging
*
Games&Apps
TransFlash
Memory Port
Cingular Mall
MEdia Net
IM
My Stuff
Address Book
Settings
Vibrate Mode
Voice Memo
games & Apps (3)
1.Shop Games
2.Games & Apps
3.Favorites
4.Information
IM (6)
1.AIM
2.ICQ
3.Y! Messenger
my stuff (7)
1.Favorites
2.Games & Apps
3.Ringtones/Audio
4.Graphics
5.Photo Gallery
6.Video Gallery
7. Tools
> 1. Camera/Video
> 2. MP3 Player
> 3. Alarm Clock
> 4. Calendar
> 5. Voice Memo
> 6. Calculator
> 7. Notepad
> 8. World Clock
> 9. Unit Converter
> 0. Infrared
> My Menu
8.Check Memory
*
address book (8)
1.Contacts
2.New Contact
3.Speed Dial List
4.Caller Groups
5.Copy All Contacts
6.Delete All Contacts
7. Settings
8.Information
settings (9)
1.Sounds
> 1. Shop Tones
> 2. Ringtones
> 3. Volume
> 4. Ring Alert Type
> 5. Message Alert
Tones
> 6. Key Tones
> 7. Voice Memo
2.Display
> 1. Wallpaper
> 2. Backlight Timer
> 3. Languages
> 4. Menu Style
> 5. Banner
> 6. Theme
> 7. Information Box
3.Date & Time
4.Call
> 1. Call Forwarding
> 2. Answer Mode
> 3. Send My
Number
> 4. Call Waiting
> 5. Minute Minder
> 6. Auto Redial
> 7. Send DTMF
Tones
5.Security
> 1. Request PIN
Code
> 2. Phone Lock
> 3. Fixed Dial
Number
> 4. Change Codes
6.Connection
> 1. Change
Frequency Band
> 2. GPRS Attach
7. Reset Default
MP3 (key)
1.All Songs
2.My Playlist
3.Audio Settings
> 1. Shuffle
> 2. Repeat
> 3. Preset EQ
> 4. Player Skin
4.Check Memory
CAMERA (options)
1.Resolution
2.Quality
3.White Balance
4.Self Timer
5.Flash
6.Color Effect
7. Fun Frames
8.Multishot
9.Shutter Tones
0.Default Settings
video (options)
1.Image Size
2.Quality
3.White Balance
4.Flash
5.Color Effect
6.Default Settings
@
Bluetooth
EVDO
Customizable Faceplates
Sliding Keypad
@metro Enabled
Mini SD
Internal Antenna
Caller-ID
Internal Antenna
CE500
Instant Messaging
Polyphonic Ringers
Get Started Guide
Color Display
Application/Game
Push To Talk/Touch2Talk
Mobile Web
Instant Messaging
Polyphonic Ringers
Voice Recognition
Speakerphone
Bluetooth
Bluetooth
EVDO
EVDO
Sliding Keypad
Mini SD
Mirror
Mini SD
Sliding Keypad
Caller-ID
Compact Design
Caller-ID
15 Second Video Capture
Instant Messaging
MMS
MP3 Player with 3D Stereo Sound
Rotating Camera Lens
Polyphonic Ringers
POP3 E-Mail Client
Bluetooth
Color Display
Color Display
Application/Game
easyedge
Talk Web
Push To Talk/Touch2TalkPush toMobile
Camera/Video
Voice Recognition
Mobile
email client
Speakerphone
QWERTY Keyboard
TransFlash™ External Memory Port
Application/Game
Push To Talk/Touch2Talk
Mobile Web
EVDO
Voice Recognition
Sliding Keypad
Speakerphone
Mini SD
Caller-ID
Instant Messaging
Polyphonic Ringers
VGA Camera/Camcorder with Flash
Mirror
Mirror
Compact Design
Compact Design
15 Second Video Capture
15 Second Video Capture
MMS
Color Display
MMS
Mirror
Rotating Camera Lens
Application/Game
Rotating Camera Lens
Compact Design
Camera/Video
Push To Talk/Touch2Talk
Camera/Video
15 Second Video Capture
Mobile Web
MMS
Voice Recognition
Rotating Camera Lens
Speakerphone
Camera/Video
LG Electronics MobileComm U.S.A., Inc. | 10225 Willow Creek Road, San Diego, CA 92131-1639
Microphone
Customer Service: 800-793-8896 | Accessories: 800-851-6734 | www.LGUSA.com
All materials in this training manual including, without limitation, the design, the text, and any marks are the property of LG Electronics, Inc. ALL RIGHTS RESERVED Copyright © 2005 LG Electronics, Inc.
All product and service marks contained herein that are not LG Electronics, Inc. proprietary marks are the trademarks of their respective owners. LG Electronics, Inc. makes no claim to such properties.
Phone features and specifications are subject to change without prior notice. The use of non-LG approved accessories will void the warranty and may result in damage to the phone, the phone exploding,
or other dangerous conditions. Use of actual songs is for demonstration purposes only; song availability depends on your music service.
CE500TM/Cingular
www.LGUSA.com
CE500
PHONE OVERVIEW
T R I - BA N D
Headset
Jack
Earpiece
CE500
MENU TREE
T R I - BA N D
recent calls (1)
1.Missed Calls
2.Dialed Calls
3.Received Calls
4.Delete Recent Calls
5.Call Duration
6.Data Information
cingular Mall (4)
1.Shop Tones
2.Shop Games
3.Shop Graphics
4.Shop Multimedia
5.Shop Applications
6.MEdia Home
messaging (2)
1.IM
2.Create New Message
> 1. Text
> 2. Multimedia
> 3. Email
3.Inbox
4.Email Box
> 1. BellSouth
> 2. EarthLink
> 3. SBC Yahoo!
> 4. Account4
> 5. Account5
5.Outbox
6.Drafts
7. Chat
8.Voice Mail
9.Templates
> 1. Text
> 2. Multimedia
> 3. Business Card
0.Settings
> 1. Text Messages
> 2. Multimedia
Messages
> 3. Email
> 4. Download
Messages
Check Memory
MEdia net (5)
1.MEdia Net Home
2.Favorites
3.Go to URL
4.Network Profile
5.Cache Settings
6.Cookie Settings
7. Security Certificates
8.Information
Camera
Flash
Camera Key
External LCD
Internal LCD
External MP3
Controls
Dual Speakers
Volume Up/Down
Charging &
USB Port
Text Message
OK/Web Key
Left Soft Key
Right Soft Key
Camera Key
MP3 Key
My Stuff
Instant Messaging
Address Book
Send Key
MAIN MENU
End/Power Key
Clear & Back Key
Voicemail
Recent Calls
Messaging
*
Games&Apps
TransFlash
Memory Port
Cingular Mall
MEdia Net
IM
My Stuff
Address Book
Settings
Vibrate Mode
Voice Memo
games & Apps (3)
1.Shop Games
2.Games & Apps
3.Favorites
4.Information
IM (6)
1.AIM
2.ICQ
3.Y! Messenger
my stuff (7)
1.Favorites
2.Games & Apps
3.Ringtones/Audio
4.Graphics
5.Photo Gallery
6.Video Gallery
7. Tools
> 1. Camera/Video
> 2. MP3 Player
> 3. Alarm Clock
> 4. Calendar
> 5. Voice Memo
> 6. Calculator
> 7. Notepad
> 8. World Clock
> 9. Unit Converter
> 0. Infrared
> My Menu
8.Check Memory
*
address book (8)
1.Contacts
2.New Contact
3.Speed Dial List
4.Caller Groups
5.Copy All Contacts
6.Delete All Contacts
7. Settings
8.Information
settings (9)
1.Sounds
> 1. Shop Tones
> 2. Ringtones
> 3. Volume
> 4. Ring Alert Type
> 5. Message Alert
Tones
> 6. Key Tones
> 7. Voice Memo
2.Display
> 1. Wallpaper
> 2. Backlight Timer
> 3. Languages
> 4. Menu Style
> 5. Banner
> 6. Theme
> 7. Information Box
3.Date & Time
4.Call
> 1. Call Forwarding
> 2. Answer Mode
> 3. Send My
Number
> 4. Call Waiting
> 5. Minute Minder
> 6. Auto Redial
> 7. Send DTMF
Tones
5.Security
> 1. Request PIN
Code
> 2. Phone Lock
> 3. Fixed Dial
Number
> 4. Change Codes
6.Connection
> 1. Change
Frequency Band
> 2. GPRS Attach
7. Reset Default
MP3 (key)
1.All Songs
2.My Playlist
3.Audio Settings
> 1. Shuffle
> 2. Repeat
> 3. Preset EQ
> 4. Player Skin
4.Check Memory
CAMERA (options)
1.Resolution
2.Quality
3.White Balance
4.Self Timer
5.Flash
6.Color Effect
7. Fun Frames
8.Multishot
9.Shutter Tones
0.Default Settings
video (options)
1.Image Size
2.Quality
3.White Balance
4.Flash
5.Color Effect
6.Default Settings
@
Bluetooth
EVDO
Customizable Faceplates
Sliding Keypad
@metro Enabled
Mini SD
Internal Antenna
Caller-ID
Internal Antenna
CE500
Instant Messaging
Polyphonic Ringers
Get Started Guide
Color Display
Application/Game
Push To Talk/Touch2Talk
Mobile Web
Instant Messaging
Polyphonic Ringers
Voice Recognition
Speakerphone
Bluetooth
Bluetooth
EVDO
EVDO
Sliding Keypad
Mini SD
Mirror
Mini SD
Sliding Keypad
Caller-ID
Compact Design
Caller-ID
15 Second Video Capture
Instant Messaging
MMS
MP3 Player with 3D Stereo Sound
Rotating Camera Lens
Polyphonic Ringers
POP3 E-Mail Client
Bluetooth
Color Display
Color Display
Application/Game
easyedge
Talk Web
Push To Talk/Touch2TalkPush toMobile
Camera/Video
Voice Recognition
Mobile
email client
Speakerphone
QWERTY Keyboard
TransFlash™ External Memory Port
Application/Game
Push To Talk/Touch2Talk
Mobile Web
EVDO
Voice Recognition
Sliding Keypad
Speakerphone
Mini SD
Caller-ID
Instant Messaging
Polyphonic Ringers
VGA Camera/Camcorder with Flash
Mirror
Mirror
Compact Design
Compact Design
15 Second Video Capture
15 Second Video Capture
MMS
Color Display
MMS
Mirror
Rotating Camera Lens
Application/Game
Rotating Camera Lens
Compact Design
Camera/Video
Push To Talk/Touch2Talk
Camera/Video
15 Second Video Capture
Mobile Web
MMS
Voice Recognition
Rotating Camera Lens
Speakerphone
Camera/Video
LG Electronics MobileComm U.S.A., Inc. | 10225 Willow Creek Road, San Diego, CA 92131-1639
Microphone
Customer Service: 800-793-8896 | Accessories: 800-851-6734 | www.LGUSA.com
All materials in this training manual including, without limitation, the design, the text, and any marks are the property of LG Electronics, Inc. ALL RIGHTS RESERVED Copyright © 2005 LG Electronics, Inc.
All product and service marks contained herein that are not LG Electronics, Inc. proprietary marks are the trademarks of their respective owners. LG Electronics, Inc. makes no claim to such properties.
Phone features and specifications are subject to change without prior notice. The use of non-LG approved accessories will void the warranty and may result in damage to the phone, the phone exploding,
or other dangerous conditions. Use of actual songs is for demonstration purposes only; song availability depends on your music service.
CE500TM/Cingular
www.LGUSA.com
LG Music Manager and the CE500 phone will only recognize MP3, AAC and AAC+ music formats. If you want
to play music from a CD or other source, you will first have to convert it to one of these formats using the
media player/conversion software of your choice.
>
>
Inserting the TransFlash™ Card
Before starting the software installation process, insert the 64MB TransFlash memory card into your phone.
The small TransFlash card is packaged inside the adapter case.
1.Slide out the card from the bottom of the adapter case using your fingernail.
2.Open the TransFlash memory port on the lower left side of the phone by lifting the lower back lip of the
cover with your fingernail.
3.Insert the TransFlash card with the gold contacts facing up as shown. Push the card in gently until it snaps
firmly into place and close the memory port cover.
Transferring Music to the CE500
You must first install LG Music Manager software from the CD. (LG Music Manager supports Windows only.) Then,
with phone (powered on) and PC connected via USB cable, launch the LG Music Manager program on your desktop.
1.Click on the folder icon
to the right of the Directory field at the top left of the Music Manager screen.
2.Browse your hard drive to find the folder containing your music files and press OK. Your music files will
populate the left side of the screen.
3.Click the Connect button. Then highlight a file in the left window and click the Download button to transfer
the file to the phone. The phone will display a Synchronizing screen during the process.
Setting Up Your Playlist
1. With the phone open, press the MP3 Key, then select My Playlist (2).
2.Press the Left Soft Key for Add.
3.Press OK to select each song you want on the playlist, using the Navigation Key to scroll down the list.
4.Press the Right Soft Key for Done.
Playing Music with the Flip Closed
1.Make sure you set up your playlist first.
2.Press and hold the
Key. Your playlist will appear on the external screen.
3.Press the
Key again to start the music. Use the external keys to control the MP3 player.
4.To exit the music player, press and hold the
Key.
>
CE500
CE500
music player FEATURES
Playing Music with the Flip Open
1.Press the MP3 Key.
2.Select All Songs (1) or My Playlist (2) and press OK.
3.Press the Right Soft Key for Play. To pause, press OK. To go to the previous or next song, press left or
right on the Navigation Key. You can close the flip at this point and the music will continue playing.
CE500
instant messaging
> Recording and Sending a Video
1.From standby mode, press the Camera Key
to activate the viewfinder.
>
3.To change the video resolution, press the Right Soft Key for Options and select Image Size (1).
Signing On to Instant Messaging
1. From standby mode, press the IM icon (right) on the Navigation Key, select an IM provider,
and press OK.
4.Press OK to start recording and press the Right Soft Key for Stop once you are done.
2. Press OK again and enter your Screen Name/ID and Password. Press OK to sign on.
2.Press the Left Soft Key for Video. Press the # Key to activate the video light.
5.To send the video clip, press the Left Soft Key and follow steps 5 through 8 in the previous section.
Sending an Instant Message
A color icon will appear next to the screen names that are currently online.
1. Use the Navigation Key to select the name you’d like to chat with and press OK.
2. Enter your message in the blue area at the bottom of the screen and press OK to send.
Messaging features
3. Your sent message will appear in the main message area with a left caret. Incoming replies will
be marked with a right caret.
e-mail messaging
The POP3 e-mail client enables you to send and receive e-mail like you do on your computer. The CE500 has
3 customizable, preset e-mail accounts, but you can add your own accounts too for a total of 5 e-mail accounts.
other notable features
> Setting Up Your E-Mail Accounts
1.From standby mode, press the Left Soft Key for Menu, select Messaging (2), and scroll up to Settings (0).
>
2.Select Email (3), then Account (1).
Changing the Ringtone
1. From standby mode, press the Left Soft Key for Menu, select Settings (9), then Sounds (1).
3.You can highlight any of the preset e-mail accounts and press OK, then select Edit (2) to enter the
account settings, or you can delete the accounts completely.
2. Select Shop Tones (1) to download new ringtones, or Ringtones (2) to choose from default
or already downloaded ringtones. Press OK to select.
4.To add a completely new e-mail account, select Account4 (4), then select Edit (2).
Adjusting Volume Settings
Ringer Volume: While in standby mode, press the side volume keys to adjust the ringer volume.
5.Select Account Name (1) and enter the name you want to appear on the phone’s account menu.
6.Select Incoming Server Name (2) and enter the incoming POP server on the account you want to add.
(Press the Key to access special characters.)
Earpiece Volume: During a conversation, press the side volume keys to adjust the earpiece volume.
*
Silent Mode: While in standby mode, press the lower volume key until it reads Silent All to mute
all sounds.
7.Select Incoming ID/PW (3) and enter the ID and password for that account.
8.Select Outgoing Server Name (4) and enter the outgoing SMTP server.
9.Select From Address (5) and enter the e-mail address (e.g. [email protected]).
>
10.Select Display Name (6) and enter the name you want recipients to see when they receive your e-mails.
2.Select Wallpaper (1).
11.Press the Clear/Back Key to return to the previous menu and select Set as Default (1) if you want to
use this account to send out e-mails.
3.Select Internal Display (1) or External Display (2), then press OK.
4.Select Graphics (1) or Photo Gallery (2), choose an image, and press OK twice.
Note: Contact your Internet Service Provider if you’re not sure about your e-mail account’s incoming and
outgoing server names.
Adding a New Contact Entry
1.From standby mode, press the Left Soft Key for Menu, select Address Book (8), select
New Contact (2), then select SmartChip (1) or Phone (2).
> Sending an E-Mail Message
1.From standby mode, press the Left Soft Key for Menu and select Messaging (2).
2.Enter information into any of the fields. Scroll to the Picture field and press left or right on the
Navigation Key to set a photo caller ID.
2.Select Create New Message (2), then select Email (3). Enter the subject and press OK.
Camera/video FEATURES
>
3.Enter a message (up to 2,048 characters), then press OK.
Taking and Sending a Photo
1.From standby mode, press the Camera Key
4.Select Send to (1). Press the Left Soft Key for Contacts, or enter the e-mail address of one or more
recipients. (Press the Key to access the @ and . characters.)
to activate the viewfinder.
2.Press up or down on the Navigation Key to zoom (if available*), and left or right to adjust the
brightness. Press the # Key to activate the flash.
3.To take a picture, press OK.
4.To send the photo, press the Left Soft Key.
*
5.Press the Left Soft Key for Send.
> Retrieving E-Mail Messages
1.From standby mode, press the Left Soft Key for Menu and select Messaging (2).
2.Select Email Box (4), then select the Account you want to access.
5.Use the keypad to enter a text message. Press the Right Soft Key to add sounds, symbols or text templates.
3.Select Inbox (1), then press the Left Soft Key for Retrieve. A connecting screen will appear while the
“From/Subject” portions of the e-mails are being downloaded.
6.Once your message is complete, press OK, then select Send to (1).
4. When the sender names appear on the screen, select an e-mail you want to read and press OK twice.
7. Enter the phone number or e-mail address of one or more recipients, or press the Right Soft Key for Contacts.
5.The body of that e-mail will then download and display on screen.
8.Press the Right Soft Key for Send.
6.After reading, press the Left Soft Key for Options to Reply (1), Forward (3), or Delete (4).
Note: To take a self portrait with the flip closed, press and hold the side Camera Key. Press the same key
again to take the photo.
7.Press the Clear/Back Key to return to the inbox to read other e-mails.
* Default phone setting of 640 x 480 pixels does not support zoom function.
8.To clear your e-mail inbox at any point, press the Left Soft Key for Options and choose Delete All (4).
Changing the Wallpaper Image
1.From standby mode, press the Left Soft Key for Menu, select Settings (9), then Display (2).
3.Press Left Soft Key for Save.
>
Setting a Speed Dial
1.From standby mode, press the Right Soft Key for My Menu and select Speed Dial List (1).
2.Select the speed dial number (2-9) and press OK.
3.Highlight a contact and press left or right on the Navigation Key to select the phone number
you’d like to create a speed dial for, and press OK.
Vibrate Mode
1.From standby mode, activate Vibrate Mode by pressing the Vibrate Mode Key ( ) for 3
seconds. The phone will vibrate when activated.
*
2. When set, the vibrate icon
will appear on the idle screen.
3.To turn off Vibrate Mode, press and hold the
* Key again.
LG Music Manager and the CE500 phone will only recognize MP3, AAC and AAC+ music formats. If you want
to play music from a CD or other source, you will first have to convert it to one of these formats using the
media player/conversion software of your choice.
>
>
Inserting the TransFlash™ Card
Before starting the software installation process, insert the 64MB TransFlash memory card into your phone.
The small TransFlash card is packaged inside the adapter case.
1.Slide out the card from the bottom of the adapter case using your fingernail.
2.Open the TransFlash memory port on the lower left side of the phone by lifting the lower back lip of the
cover with your fingernail.
3.Insert the TransFlash card with the gold contacts facing up as shown. Push the card in gently until it snaps
firmly into place and close the memory port cover.
Transferring Music to the CE500
You must first install LG Music Manager software from the CD. (LG Music Manager supports Windows only.)
Then, with phone and PC connected via USB cable, launch the LG Music Manager program on your desktop.
1.Click on the folder icon
to the right of the Directory field at the top left of the Music Manager screen.
2.Browse your hard drive to find the folder containing your music files and press OK. Your music files will
populate the left side of the screen.
3.Click the Connect button. Then highlight a file in the left window and click the Download button to transfer
the file to the phone. The phone will display a Synchronizing screen during the process.
Setting Up Your Playlist
1. With the phone open, press the MP3 Key, then select My Playlist (2).
2.Press the Left Soft Key for Add.
3.Press OK to select each song you want on the playlist, using the Navigation Key to scroll down the list.
4.Press the Right Soft Key for Done.
Playing Music with the Flip Closed
1.Make sure you set up your playlist first.
2.Press and hold the
Key. Your playlist will appear on the external screen.
3.Press the
Key again to start the music. Use the external keys to control the MP3 player.
4.To exit the music player, press and hold the
Key.
>
CE500
CE500
music player FEATURES
Playing Music with the Flip Open
1.Press the MP3 Key.
2.Select All Songs (1) or My Playlist (2) and press OK.
3.Press the Right Soft Key for Play. To pause, press OK. To go to the previous or next song, press left or
right on the Navigation Key. You can close the flip at this point and the music will continue playing.
CE500
instant messaging
> Recording and Sending a Video
1.From standby mode, press the Camera Key
to activate the viewfinder.
>
3.To change the video resolution, press the Right Soft Key for Options and select Image Size (1).
Signing On to Instant Messaging
1. From standby mode, press the IM icon (right) on the Navigation Key, select an IM provider,
and press OK.
4.Press OK to start recording and press the Right Soft Key for Stop once you are done.
2. Press OK again and enter your Screen Name/ID and Password. Press OK to sign on.
2.Press the Left Soft Key for Video. Press the # Key to activate the video light.
5.To send the video clip, press the Left Soft Key and follow steps 5 through 8 in the previous section.
Sending an Instant Message
A color icon will appear next to the screen names that are currently online.
1. Use the Navigation Key to select the name you’d like to chat with and press OK.
2. Enter your message in the blue area at the bottom of the screen and press OK to send.
Messaging features
3. Your sent message will appear in the main message area with a left caret. Incoming replies will
be marked with a right caret.
e-mail messaging
The POP3 e-mail client enables you to send and receive e-mail like you do on your computer. The CE500 has
3 customizable, preset e-mail accounts, but you can add your own accounts too for a total of 5 e-mail accounts.
other notable features
> Setting Up Your E-Mail Accounts
1.From standby mode, press the Left Soft Key for Menu, select Messaging (2), and scroll up to Settings (0).
>
2.Select Email (3), then Account (1).
Changing the Ringtone
1. From standby mode, press the Left Soft Key for Menu, select Settings (9), then Sounds (1).
3.You can highlight any of the preset e-mail accounts and press OK, then select Edit (2) to enter the
account settings, or you can delete the accounts completely.
2. Select Shop Tones (1) to download new ringtones, or Ringtones (2) to choose from default
or already downloaded ringtones. Press OK to select.
4.To add a completely new e-mail account, select Account4 (4), then select Edit (2).
Adjusting Volume Settings
Ringer Volume: While in standby mode, press the side volume keys to adjust the ringer volume.
5.Select Account Name (1) and enter the name you want to appear on the phone’s account menu.
6.Select Incoming Server Name (2) and enter the incoming POP server on the account you want to add.
(Press the Key to access special characters.)
Earpiece Volume: During a conversation, press the side volume keys to adjust the earpiece volume.
*
Silent Mode: While in standby mode, press the lower volume key until it reads Silent All to mute
all sounds.
7.Select Incoming ID/PW (3) and enter the ID and password for that account.
8.Select Outgoing Server Name (4) and enter the outgoing SMTP server.
9.Select From Address (5) and enter the e-mail address (e.g. [email protected]).
>
10.Select Display Name (6) and enter the name you want recipients to see when they receive your e-mails.
2.Select Wallpaper (1).
11.Press the Clear/Back Key to return to the previous menu and select Set as Default (1) if you want to
use this account to send out e-mails.
3.Select Internal Display (1) or External Display (2), then press OK.
4.Select Graphics (1) or Photo Gallery (2), choose an image, and press OK twice.
Note: Contact your Internet Service Provider if you’re not sure about your e-mail account’s incoming and
outgoing server names.
Adding a New Contact Entry
1.From standby mode, press the Left Soft Key for Menu, select Address Book (8), select
New Contact (2), then select SmartChip (1) or Phone (2).
> Sending an E-Mail Message
1.From standby mode, press the Left Soft Key for Menu and select Messaging (2).
2.Enter information into any of the fields. Scroll to the Picture field and press left or right on the
Navigation Key to set a photo caller ID.
2.Select Create New Message (2), then select Email (3). Enter the subject and press OK.
Camera/video FEATURES
>
3.Enter a message (up to 2,048 characters), then press OK.
Taking and Sending a Photo
1.From standby mode, press the Camera Key
4.Select Send to (1). Press the Left Soft Key for Contacts, or enter the e-mail address of one or more
recipients. (Press the Key to access the @ and . characters.)
to activate the viewfinder.
2.Press up or down on the Navigation Key to zoom (if available*), and left or right to adjust the
brightness. Press the # Key to activate the flash.
3.To take a picture, press OK.
4.To send the photo, press the Left Soft Key.
*
5.Press the Left Soft Key for Send.
> Retrieving E-Mail Messages
1.From standby mode, press the Left Soft Key for Menu and select Messaging (2).
2.Select Email Box (4), then select the Account you want to access.
5.Use the keypad to enter a text message. Press the Right Soft Key to add sounds, symbols or text templates.
3.Select Inbox (1), then press the Left Soft Key for Retrieve. A connecting screen will appear while the
“From/Subject” portions of the e-mails are being downloaded.
6.Once your message is complete, press OK, then select Send to (1).
4. When the sender names appear on the screen, select an e-mail you want to read and press OK twice.
7. Enter the phone number or e-mail address of one or more recipients, or press the Right Soft Key for Contacts.
5.The body of that e-mail will then download and display on screen.
8.Press the Right Soft Key for Send.
6.After reading, press the Left Soft Key for Options to Reply (1), Forward (3), or Delete (4).
Note: To take a self portrait with the flip closed, press and hold the side Camera Key. Press the same key
again to take the photo.
7.Press the Clear/Back Key to return to the inbox to read other e-mails.
* Default phone setting of 640 x 480 pixels does not support full zoom function.
8.To clear your e-mail inbox at any point, press the Left Soft Key for Options and choose Delete All (4).
Changing the Wallpaper Image
1.From standby mode, press the Left Soft Key for Menu, select Settings (9), then Display (2).
3.Press Left Soft Key for Save.
>
Setting a Speed Dial
1.From standby mode, press the Right Soft Key for My Menu and select Speed Dial List (1).
2.Select the speed dial number (2-9) and press OK.
3.Highlight a contact and press left or right on the Navigation Key to select the phone number
you’d like to create a speed dial for, and press OK.
Vibrate Mode
1.From standby mode, activate Vibrate Mode by pressing the Vibrate Mode Key ( ) for 3
seconds. The phone will vibrate when activated.
*
2. When set, the vibrate icon
will appear on the idle screen.
3.To turn off Vibrate Mode, press and hold the
* Key again.
CE500
PHONE OVERVIEW
T R I - BA N D
Headset
Jack
Earpiece
CE500
MENU TREE
T R I - BA N D
recent calls (1)
1.Missed Calls
2.Dialed Calls
3.Received Calls
4.Delete Recent Calls
5.Call Duration
6.Data Information
cingular Mall (4)
1.Shop Tones
2.Shop Games
3.Shop Graphics
4.Shop Multimedia
5.Shop Applications
6.MEdia Home
messaging (2)
1.IM
2.Create New Message
> 1. Text
> 2. Multimedia
> 3. Email
3.Inbox
4.Email Box
> 1. BellSouth
> 2. EarthLink
> 3. SBC Yahoo!
> 4. Account4
> 5. Account5
5.Outbox
6.Drafts
7. Chat
8.Voice Mail
9.Templates
> 1. Text
> 2. Multimedia
> 3. Business Card
0.Settings
> 1. Text Messages
> 2. Multimedia
Messages
> 3. Email
> 4. Download
Messages
Check Memory
MEdia net (5)
1.MEdia Net Home
2.Favorites
3.Go to URL
4.Network Profile
5.Cache Settings
6.Cookie Settings
7. Security Certificates
8.Information
Camera
Flash
Camera Key
External LCD
Internal LCD
External MP3
Controls
Dual Speakers
Volume Up/Down
Charging &
USB Port
Text Message
OK/Web Key
Left Soft Key
Right Soft Key
Camera Key
MP3 Key
My Stuff
Instant Messaging
Address Book
Send Key
MAIN MENU
End/Power Key
Clear & Back Key
Voicemail
Recent Calls
Messaging
*
Games&Apps
TransFlash
Memory Port
Cingular Mall
MEdia Net
IM
My Stuff
Address Book
Settings
Vibrate Mode
Voice Memo
games & Apps (3)
1.Shop Games
2.Games & Apps
3.Favorites
4.Information
IM (6)
1.AIM
2.ICQ
3.Y! Messenger
my stuff (7)
1.Favorites
2.Games & Apps
3.Ringtones/Audio
4.Graphics
5.Photo Gallery
6.Video Gallery
7. Tools
> 1. Camera/Video
> 2. MP3 Player
> 3. Alarm Clock
> 4. Calendar
> 5. Voice Memo
> 6. Calculator
> 7. Notepad
> 8. World Clock
> 9. Unit Converter
> 0. Infrared
> My Menu
8.Check Memory
*
address book (8)
1.Contacts
2.New Contact
3.Speed Dial List
4.Caller Groups
5.Copy All Contacts
6.Delete All Contacts
7. Settings
8.Information
settings (9)
1.Sounds
> 1. Shop Tones
> 2. Ringtones
> 3. Volume
> 4. Ring Alert Type
> 5. Message Alert
Tones
> 6. Key Tones
> 7. Voice Memo
2.Display
> 1. Wallpaper
> 2. Backlight Timer
> 3. Languages
> 4. Menu Style
> 5. Banner
> 6. Theme
> 7. Information Box
3.Date & Time
4.Call
> 1. Call Forwarding
> 2. Answer Mode
> 3. Send My
Number
> 4. Call Waiting
> 5. Minute Minder
> 6. Auto Redial
> 7. Send DTMF
Tones
5.Security
> 1. Request PIN
Code
> 2. Phone Lock
> 3. Fixed Dial
Number
> 4. Change Codes
6.Connection
> 1. Change
Frequency Band
> 2. GPRS Attach
7. Reset Default
MP3 (key)
1.All Songs
2.My Playlist
3.Audio Settings
> 1. Shuffle
> 2. Repeat
> 3. Preset EQ
> 4. Player Skin
4.Check Memory
CAMERA (options)
1.Resolution
2.Quality
3.White Balance
4.Self Timer
5.Flash
6.Color Effect
7. Fun Frames
8.Multishot
9.Shutter Tones
0.Default Settings
video (options)
1.Image Size
2.Quality
3.White Balance
4.Flash
5.Color Effect
6.Default Settings
@
Bluetooth
EVDO
Customizable Faceplates
Sliding Keypad
@metro Enabled
Mini SD
Internal Antenna
Caller-ID
Internal Antenna
CE500
Instant Messaging
Polyphonic Ringers
Get Started Guide
Color Display
Application/Game
Push To Talk/Touch2Talk
Mobile Web
Instant Messaging
Polyphonic Ringers
Voice Recognition
Speakerphone
Bluetooth
Bluetooth
EVDO
EVDO
Sliding Keypad
Mini SD
Mirror
Mini SD
Sliding Keypad
Caller-ID
Compact Design
Caller-ID
15 Second Video Capture
Instant Messaging
MMS
MP3 Player with 3D Stereo Sound
Rotating Camera Lens
Polyphonic Ringers
POP3 E-Mail Client
Bluetooth
Color Display
Color Display
Application/Game
easyedge
Talk Web
Push To Talk/Touch2TalkPush toMobile
Camera/Video
Voice Recognition
Mobile
email client
Speakerphone
QWERTY Keyboard
TransFlash™ External Memory Port
Application/Game
Push To Talk/Touch2Talk
Mobile Web
EVDO
Voice Recognition
Sliding Keypad
Speakerphone
Mini SD
Caller-ID
Instant Messaging
Polyphonic Ringers
VGA Camera/Camcorder with Flash
Mirror
Mirror
Compact Design
Compact Design
15 Second Video Capture
15 Second Video Capture
MMS
Color Display
MMS
Mirror
Rotating Camera Lens
Application/Game
Rotating Camera Lens
Compact Design
Camera/Video
Push To Talk/Touch2Talk
Camera/Video
15 Second Video Capture
Mobile Web
MMS
Voice Recognition
Rotating Camera Lens
Speakerphone
Camera/Video
LG Electronics MobileComm U.S.A., Inc. | 10225 Willow Creek Road, San Diego, CA 92131-1639
Microphone
Customer Service: 800-793-8896 | Accessories: 800-851-6734 | www.LGUSA.com
All materials in this training manual including, without limitation, the design, the text, and any marks are the property of LG Electronics, Inc. ALL RIGHTS RESERVED Copyright © 2005 LG Electronics, Inc.
All product and service marks contained herein that are not LG Electronics, Inc. proprietary marks are the trademarks of their respective owners. LG Electronics, Inc. makes no claim to such properties.
Phone features and specifications are subject to change without prior notice. The use of non-LG approved accessories will void the warranty and may result in damage to the phone, the phone exploding,
or other dangerous conditions. Use of actual songs is for demonstration purposes only; song availability depends on your music service.
CE500TM/Cingular
www.LGUSA.com