1
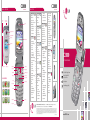
C2000
PHONE OVERVIEW
Headset
Jack
T R I - BA N D
Speakerphone
(on back side)
Earpiece
VGA Digital Camera
Self-Portrait Mirror
Camera Key
Internal LCD
External LCD
Volume Up/Down
Charging Port
Text Message
OK/Web Key
Left Soft Key
Right Soft Key
My MEdia
Gallery Key
MAIN MENU
Send Key
Instant Messaging
Camera Key
Address Book
End/Power Key
Clear & Back
Recent Calls
MEdia Mall
Messaging
MEdia Net
Games&Apps
Voicemail
IM
Vibrate Mode
My MEdia
Address Book
Settings
Microphone
Voice Dial
C2000
MENU TREE
recent calls (1)
1. Missed Calls
2. Dialed Calls
3. Received Calls
4. Delete Recent Calls
5. Call Duration
6. Data Information
> 1. Web Data
> 2. Data Call
> 3. Total Data
messaging (2)
1. IM
2. Text Messages
> 1. New Message
> 2. Inbox
> 3. Sent
> 4. Drafts
> 5. Settings
> 6. Delete All
Messages
3. Multimedia Messages
> 1. New Message
> 2. Inbox
> 3. Outbox
> 4. Sent
> 5. Drafts
> 6. Settings
4. Voice Mail
5. Download Messages
> 1. Inbox
> 2. Receive
6. Chat
7. Templates
> 1. Text
> 2. Multimedia
> 3. Business Card
8. Check Memory
> 1. Text
> 2. Multimedia
T R I - BA N D
games & Apps (3)
1. Shop Games
2. Games & Apps
3. Favorites
4. Information
MEdia Mall (4)
1. Shop Ringtones
2. Shop Games
3. Shop Graphics
4. Shop Multimedia
5. Shop Applications
6. MEdia Net Home
MEdia net (5)
1. MEdia Net Home
2. Favorites
3. Go to URL
4. Network Profile
5. Cache Settings
6. Security Certificates
7. Information
IM (6)
1. AIM
2. ICQ
3. Y! Messenger
4. CW
my media (7)
1. Favorites
2. Games & Apps
3. Ringtones/Audio
4. Graphics
5. Multimedia
6. Tools
> 1. Camera
> 2. Alarm Clock
> 3. Calendar
> 4. Voice Memo
> 5. Calculator
> 6. Notepad
> 7. World Clock
> 8. Unit Converter
> 9. Tip Calculator
address book(8)
1.Contacts
2.New Contact
3.Speed Dial List
4.Voice Dial List
5.Caller Groups
6.Copy All Contacts
7. Delete All Contacts
8.Set Save Location
9.Information
settings (9)
1.Sounds
> 1. Shop Ringtones
> 2. Ringtones
> 3. Volume
> 4. Ring Alert Type
> 5. Message Alert
Tones
> 6. Key Tones
> 7. Voice Memo
2.Display
> 1. Wallpaper
> 2. Backlight Timer
> 3. Contrast
> 4. Languages
> 5. Menu Style
3.Date & Time
4.Call
> 1. Call Forwarding
> 2. Answer Mode
> 3. Send My
Number
> 4. Call Waiting
> 5. Minute Minder
> 6. Voice Dial
> 7. Auto Redial
> 8. Send DTMF
Tones
5.Security
> 1. Request PIN
Code
> 2. Fixed Dial
Number
> 3. Change Codes
6.Connection
> 1. Change
Frequency Band
> 2. GPRS Attach
> 3. Network Profile
> 4. Reset Network
Profile
7. Reset Default
camera (options)
1.Image Size
2.Brightness
3.White Balance
4.Zoom*
5.Color Effect
6.Self Timer
7. Multishot
8.Shutter Sound
9.Default Settings
Gallery (options)
1.View
2.Send Photo
3.Set as Wallpaper
4.Set as Photo ID
5.Delete
6.Slideshow
7. Rename
8.Delete All
9.Information
Bluetooth
EVDO
Color Display
Bluetooth
Customizable Faceplates
Mini SD
Sliding Keypad
Application/Game
Push To Talk/Touch2Talk
Mirror
Instant Messaging
Polyphonic Ringers
Mobile Web
Voice Recognition
Speakerphone
Compact Design
15 Second Video Capture
Mini SD
Sliding Keypad
EVDO
MMS
Caller-ID
Rotating Camera Lens
Instant Messaging
Mini SD
Sliding Keypad
Camera/Video
Polyphonic Ringers
Caller-ID
Application/Game
Push To Talk/Touch2Talk
EVDO
Compact Design
External Caller ID LCD
with Color Filter
Instant Messaging
Polyphonic Ringers
Speakerphone
Color Display
Mirror
Get Started Guide
VGA CMOS Digital Camera
Customizable Faceplates
Bluetooth
Color Display
C2000
Customizable Faceplates
Bluetooth
EVDO
Caller-ID
Sliding Keypad
15 Second Video Capture
Color Display
Mirror
Application/Game
Mobile Web
Application/Game
Voice Recognition
Push To Talk/Touch2Talk
Mini SD
MMS
Caller-ID
Rotating Camera Lens
Speakerphone
Mobile Web
Instant Messaging
Instant Messaging (IM)
Voice Recognition
Speakerphone
Polyphonic Ringers
Camera/Video
Compact
Design
15 Second
Video
MMS
Push To Talk/Touch2Talk
Mobile
WebCapture Voice Recognition
Rotating
Camera Lens
Speakerphone
Camera/Video
*Resolution dependent
LG Electronics MobileComm U.S.A., Inc. | 10225 Willow Creek Road, San Diego, CA 92131-1639
Mirror
Compact Design
15 Second Video Capture
MMS
Rotating Camera Lens
Camera/Video
Customer Service: 800-793-8896 | Accessories: 800-851-6734 | www.LGUSA.com
All materials in this training manual including, without limitation, the design, the text, and any marks are the property of LG Electronics, Inc. ALL RIGHTS RESERVED Copyright © 2005 LG Electronics, Inc. All
product and service marks contained herein that are not LG Electronics, Inc. proprietary marks are the trademarks of their respective owners. LG Electronics, Inc. makes no claim to such properties. Phone
features and specifications are subject to change without prior notice. The use of non-LG approved accessories will void the warranty and may result in damage to the phone, the phone exploding, or other
dangerous conditions. Battery talk and standby times are estimates only. Use of certain features and other conditions including, but not limited to, battery age and condition, charging habits, temperatures
to which the battery is exposed, and use in digital mode will cause actual standby and talk time to vary. The amount of talk time used will impact the standby time. In the same way, the amount of time
that the phone is in standby mode will impact the talk time.
C2000TM/Cingular
www.LGUSA.com
C2000
CAMERA features
>
>
Taking and Sending a Photo
1. From standby mode, press the Camera Key
to activate the viewfinder.
2. Press up or down on the Navigation Key to zoom or right or left to adjust the brightness.
Accessing the Web
1. Press and hold the OK/Web Key
4. To send the photo, press the Left Soft Key.
5. Use the keypad to enter a text message, and scroll down using the Navigation Key to add a sound by
pressing OK.
8. Press the Right Soft Key for Menu and select Send (1).
Signing On to Instant Messaging
1. Press the IM icon
(right) on the Navigation Key, select an IM provider and press OK.
Setting a Photo as Caller ID
1. From standby mode, press the Right Soft Key for Names, then select Contacts (1).
>
>
to activate the viewfinder.
2. Press the Right Soft Key for Options.
Sending a Text Message
1. Press the Text Message icon
(up) on the Navigation Key and enter the message (up to 160
characters) using the keypad, and press Right Soft Key for Options when done.
2. Select Send to Number (1) or Send to Email (2).
3. Select Image Size (1).
4. Add an event by pressing the Left Soft Key for New. You may set the appropriate subject,
event time, recurrence (if any), and alarm by scrolling to the corresponding field.
5. Press the Left Soft Key for Save.
Scheduling an Alarm
1. Press the My MEdia icon
>
2. Press the Right Soft Key for Options.
Adding a New Contact Entry
1. From standby mode, press the Right Soft Key for Names, then select New Contact (2).
Sending a Multimedia Message
1. From standby mode, press the Left Soft Key for Menu, select Messaging (2), then Multimedia Messages (3).
2. Enter information into any of the following fields: Name, Mobile, Home, Office, E-mail,
Group, Notepad and Picture, and press the Left Soft Key for Save.
2. Select New Message (1).
3. Select Shutter Sounds (7) or (8).
Setting a Speed Dial
1. From standby mode, press the Right Soft Key for Names, then select Speed Dial List (3).
3. Select New and press OK.
4. Press left or right on the Navigation Key to select from the available shutter sound options and press OK.
4. Use the keypad to enter a text message, then scroll using the Navigation Key to add an image or a sound by
pressing OK. (You can press the Right Soft Key for Capture to take a new photo for the message.)
2. Select an empty speed dial number (2-9) and press OK to add.
3. Highlight the contact and press left or right on the Navigation Key to select the phone
number you’d like to create a speed dial for, then press OK.
5. Once your message is complete, press the Right Soft Key for Menu, then select Send (1).
6. Press the Left Soft Key for Select to choose phone numbers or e-mail addresses from the Address Book,
or scroll down to enter a phone number or e-mail address.
VOICE features
Activating Speakerphone
1. During a call, press OK until you see
7. Press the Right Soft Key for Menu and select Send (1).
on the middle of the screen for hands-free conversation.
2. Press OK to return to normal conversation.
Warning! Due to higher volume levels, don’t place the phone near your ear while the speakerphone is enabled.
>
Recording a Voice Memo
1. Press the My MEdia
icon (left) on the Navigation Key, and select Tools (6).
2. Select Voice Memo (4).
3. Press OK and start recording immediately. You have 30 seconds to record the memo.
4. Once you’ve finished recording, press OK for Save.
Note: Recorded voice memos are stored in the main menu under My MEdia (7) > Tools (6) > Voice Memo (4).
3. Press left or right on the Navigation Key to select On, then set the appropriate time,
recurrence (if any) and alarm tone by scrolling to the corresponding field.
4. Press the Left Soft Key for Set.
4. Press the Left Soft Key for Send.
>
(left) on the Navigation Key, and select Tools (6).
2. Select Alarm Clock (2).
3. Press the Left Soft Key for Contacts to select a recipient, or use the keypad to enter a phone number or e-mail
address. Up to 5 recipients can be added.
4. Press left or right on the Navigation Key to select 128x160, 160x120 (QQVGA), 320x240 (QVGA), or
640x480 (VGA) and press OK.
(left) on the Navigation Key, and select Tools (6).
3. Highlight the event date using the Navigation Key and press OK. To quickly jump from month
to month, press the * or # keys.
3. Your sent message will appear in the main message area with a left-facing carat/red arrow. Incoming
replies will be marked with a right-facing carat/blue arrow.
>
Scheduling an Event
1. Press the My MEdia icon
2. Select Calendar (3).
Sending an Instant Message
A color icon will appear next to the screen names that are currently online.
2. Enter your message in the blue area at the bottom of the screen and press OK to send.
Setting a Photo as Wallpaper
1. Press the Gallery Key
under the Left Soft Key and highlight the saved photo you’d like to use.
to activate the viewfinder.
PERSONAL INFORMATION TOOLS
1. Use the Navigation Key to select the name you’d like to chat with and press OK.
4. Press the Left Soft Key for Save.
Changing Shutter Sounds
1. From standby mode, press the Camera Key
Note: Downloaded wallpaper graphics are stored in the main menu under My MEdia (7).
2. Enter your Screen Name/ID and password and press OK to sign on.
3. Scroll to the Picture field and press the left or right on the Navigation Key to scroll through the gallery.
Changing the Resolution
1. From standby mode, press the Camera Key
3. Press left or right on the Navigation Key to select a default graphic, or download more
from MEdia Mall, and press OK.
3. Press the End Key to end your browsing session, then press the Left Soft Key for Yes to confirm.
MESSAGING
2. Press the Right Soft Key for Options, select Set as Wallpaper (3) and press OK.
Changing the Wallpaper Image
1. From standby mode, press the Left Soft Key for Menu, select Settings (9), then
Display (2).
2. Select Wallpaper (1).
until you see the “MEdia Net Connecting” screen.
7. Press the Left Soft Key for Select to choose phone numbers or e-mail addresses from Address Book, or
scroll down to enter a phone number or e-mail address.
2. Use the Navigation Key to highlight the desired contact and press the Right Soft Key for Options, then
select Edit (5).
>
2. Once connected, choose a category and press OK.
6. Once your message is complete, press the Right Soft Key for Menu, then select Send (1).
>
Downloading New Content from MEdia Mall
1. From standby mode, press the Left Soft Key for Menu, select MEdia Mall (4), and select a category that
you would like to download content from (ringtones, games, graphics, multimedia, applications), and press OK.
C2000
Note: Downloaded content is stored in the main menu under My MEdia (7).
3. To take a picture, press the Camera Key again, or press OK. Pictures are automatically stored in the
gallery and can be accessed by pressing the Gallery Key
.
>
C2000
CONNECTIVITY FEATURES
Note: To make a call, press and hold the speed dial number on the keypad for that contact.
>
Setting a Voice Dial
1. From standby mode, press the Right Soft Key for Names, then select Voice Dial List (4).
2. Press the Left Soft Key for New.
customizable features
>
Changing the Ringtones
1. From standby mode, press the Left Soft Key for Menu, select Settings (9), then Sounds (1).
2. Select Shop Ringtones (1) to download new ringtones (including MP3 ringtones), or Ringtones (2) to
choose from default or already downloaded ringtones. Press OK to select.
Adjusting Volume Settings
Ringer Volume: While in standby mode, press the side volume keys to adjust the ringtone volume.
Earpiece Volume: During a conversation, press the side volume keys to adjust the earpiece volume.
Silent Mode: While in standby mode, press the lower volume key until it reads Silent All to mute all sounds.
3. Highlight the contact and press left or right on the Navigation Key to select the phone
number you’d like to create a voice dial for, then press OK.
4. You will be prompted twice to say your contact’s name.
Note: To initiate voice-activated dialing, from standby mode, press and hold the # key.
When prompted, say the name of the contact you want to call.
OTHER NOTABLE SETTINGS
Activating Vibrate Mode
1. From standby mode, press and hold the Vibrate Mode Key (*) for 3 seconds. The phone will
vibrate when activated. When set, the vibrate icon
will appear on the idle screen.
2. To turn off Vibrate Mode, press the * key until “Normal Mode” is displayed.
C2000
PHONE OVERVIEW
Headset
Jack
T R I - BA N D
Speakerphone
(on back side)
Earpiece
VGA Digital Camera
Self-Portrait Mirror
Camera Key
Internal LCD
External LCD
Volume Up/Down
Charging Port
Text Message
OK/Web Key
Left Soft Key
Right Soft Key
My MEdia
Gallery Key
MAIN MENU
Send Key
Instant Messaging
Camera Key
Address Book
End/Power Key
Clear & Back
Recent Calls
MEdia Mall
Messaging
MEdia Net
Games&Apps
Voicemail
IM
Vibrate Mode
My MEdia
Address Book
Settings
Microphone
Voice Dial
C2000
MENU TREE
recent calls (1)
1. Missed Calls
2. Dialed Calls
3. Received Calls
4. Delete Recent Calls
5. Call Duration
6. Data Information
> 1. Web Data
> 2. Data Call
> 3. Total Data
messaging (2)
1. IM
2. Text Messages
> 1. New Message
> 2. Inbox
> 3. Sent
> 4. Drafts
> 5. Settings
> 6. Delete All
Messages
3. Multimedia Messages
> 1. New Message
> 2. Inbox
> 3. Outbox
> 4. Sent
> 5. Drafts
> 6. Settings
4. Voice Mail
5. Download Messages
> 1. Inbox
> 2. Receive
6. Chat
7. Templates
> 1. Text
> 2. Multimedia
> 3. Business Card
8. Check Memory
> 1. Text
> 2. Multimedia
T R I - BA N D
games & Apps (3)
1. Shop Games
2. Games & Apps
3. Favorites
4. Information
MEdia Mall (4)
1. Shop Ringtones
2. Shop Games
3. Shop Graphics
4. Shop Multimedia
5. Shop Applications
6. MEdia Net Home
MEdia net (5)
1. MEdia Net Home
2. Favorites
3. Go to URL
4. Network Profile
5. Cache Settings
6. Security Certificates
7. Information
IM (6)
1. AIM
2. ICQ
3. Y! Messenger
4. CW
my media (7)
1. Favorites
2. Games & Apps
3. Ringtones/Audio
4. Graphics
5. Multimedia
6. Tools
> 1. Camera
> 2. Alarm Clock
> 3. Calendar
> 4. Voice Memo
> 5. Calculator
> 6. Notepad
> 7. World Clock
> 8. Unit Converter
> 9. Tip Calculator
address book(8)
1.Contacts
2.New Contact
3.Speed Dial List
4.Voice Dial List
5.Caller Groups
6.Copy All Contacts
7. Delete All Contacts
8.Set Save Location
9.Information
settings (9)
1.Sounds
> 1. Shop Ringtones
> 2. Ringtones
> 3. Volume
> 4. Ring Alert Type
> 5. Message Alert
Tones
> 6. Key Tones
> 7. Voice Memo
2.Display
> 1. Wallpaper
> 2. Backlight Timer
> 3. Contrast
> 4. Languages
> 5. Menu Style
3.Date & Time
4.Call
> 1. Call Forwarding
> 2. Answer Mode
> 3. Send My
Number
> 4. Call Waiting
> 5. Minute Minder
> 6. Voice Dial
> 7. Auto Redial
> 8. Send DTMF
Tones
5.Security
> 1. Request PIN
Code
> 2. Fixed Dial
Number
> 3. Change Codes
6.Connection
> 1. Change
Frequency Band
> 2. GPRS Attach
> 3. Network Profile
> 4. Reset Network
Profile
7. Reset Default
camera (options)
1.Image Size
2.Brightness
3.White Balance
4.Zoom*
5.Color Effect
6.Self Timer
7. Multishot
8.Shutter Sound
9.Default Settings
Gallery (options)
1.View
2.Send Photo
3.Set as Wallpaper
4.Set as Photo ID
5.Delete
6.Slideshow
7. Rename
8.Delete All
9.Information
Bluetooth
EVDO
Color Display
Bluetooth
Customizable Faceplates
Mini SD
Sliding Keypad
Application/Game
Push To Talk/Touch2Talk
Mirror
Instant Messaging
Polyphonic Ringers
Mobile Web
Voice Recognition
Speakerphone
Compact Design
15 Second Video Capture
Mini SD
Sliding Keypad
EVDO
MMS
Caller-ID
Rotating Camera Lens
Instant Messaging
Mini SD
Sliding Keypad
Camera/Video
Polyphonic Ringers
Caller-ID
Application/Game
Push To Talk/Touch2Talk
EVDO
Compact Design
External Caller ID LCD
with Color Filter
Instant Messaging
Polyphonic Ringers
Speakerphone
Color Display
Mirror
Get Started Guide
VGA CMOS Digital Camera
Customizable Faceplates
Bluetooth
Color Display
C2000
Customizable Faceplates
Bluetooth
EVDO
Caller-ID
Sliding Keypad
15 Second Video Capture
Color Display
Mirror
Application/Game
Mobile Web
Application/Game
Voice Recognition
Push To Talk/Touch2Talk
Mini SD
MMS
Caller-ID
Rotating Camera Lens
Speakerphone
Mobile Web
Instant Messaging
Instant Messaging (IM)
Voice Recognition
Speakerphone
Polyphonic Ringers
Camera/Video
Compact
Design
15 Second
Video
MMS
Push To Talk/Touch2Talk
Mobile
WebCapture Voice Recognition
Rotating
Camera Lens
Speakerphone
Camera/Video
*Resolution dependent
LG Electronics MobileComm U.S.A., Inc. | 10225 Willow Creek Road, San Diego, CA 92131-1639
Mirror
Compact Design
15 Second Video Capture
MMS
Rotating Camera Lens
Camera/Video
Customer Service: 800-793-8896 | Accessories: 800-851-6734 | www.LGUSA.com
All materials in this training manual including, without limitation, the design, the text, and any marks are the property of LG Electronics, Inc. ALL RIGHTS RESERVED Copyright © 2005 LG Electronics, Inc. All
product and service marks contained herein that are not LG Electronics, Inc. proprietary marks are the trademarks of their respective owners. LG Electronics, Inc. makes no claim to such properties. Phone
features and specifications are subject to change without prior notice. The use of non-LG approved accessories will void the warranty and may result in damage to the phone, the phone exploding, or other
dangerous conditions. Battery talk and standby times are estimates only. Use of certain features and other conditions including, but not limited to, battery age and condition, charging habits, temperatures
to which the battery is exposed, and use in digital mode will cause actual standby and talk time to vary. The amount of talk time used will impact the standby time. In the same way, the amount of time
that the phone is in standby mode will impact the talk time.
C2000TM/Cingular
www.LGUSA.com