1
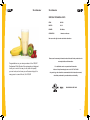
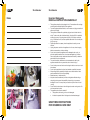
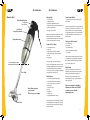
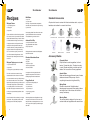
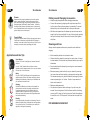
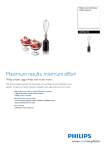
Please Recycle
Stick
Blender
Professional
Owner’s Manual
& User Guide
Stick Blender
180 W 500 N
North Salt Lake, UT 84054
© 2010 All Rights Reserved
Made in China
Stick Blender
Stick Blender
SPECS & TECHNICAL INFO
ITEM306700
MOTOR120 V
POWER550 Watts
OPERATION
1 minute continuous
We reserve the right to make technical alterations.
Please see the warranty information sheet included in the product box for
Congratulations on your wise purchase of the L’EQUIP
Professional Stick Blender. We engineered and designed
it with you in mind. It is easy to use, built with quality
you can trust, and we know you will use and enjoy it for
many years to come. After all, it’s L’EQUIP.
warranty details and information.
For additional service or operational information
visit us at http://www.lequip.com or call 1-877-267-2434
Any servicing, other than that recommended in this instruction manual,
should be performed by an authorized service facility.
HOUSEHOLD USE ONLY
11
Stick Blender
Notes
Stick Blender
Important Safeguards
Read All Instructions Carefully
•
•
•
•
•
•
•
•
•
•
•
•
•
•
This appliance should only be plugged in to AC connections with a voltage
matching the identification plate on the appliance.
To protect against electrical shock, do not immerse cord, plug or machine in
water or other liquid.
This appliance is fitted with a polarized plug (one insert is wider than the
other). To reduce the risk of electrical shock, this plug will fit in a polarized
outlet only one way. If the plug does not fit fully in the outlet, reverse the
plug. If it still does not fit, contact a qualified electrician. Do not modify the
plug in any way.
Close supervision is necessary when the appliance is used by or near
children.
Unplug the power cord when the appliance is not in use, when changing
blades or accessories, or before cleaning.
Do not use or operate the appliance with a damaged cord or plug, or
after the appliance malfunctions, or has been damaged in any manner.
Return the appliance to the nearest authorized service facility or dealer for
examination, repair, or adjustment.
The use of accessory attachments not recommended or sold by the
appliance manufacturer may cause fire, electric shock or injury.
Do not let the power cord hand over the edge of a table or counter, or touch
hot surfaces.
Do not use the appliance for other than intended or specified purposes.
When mixing liquids, especially hot liquids, use a tall container or make
small quantities at a time to reduce spillage.
Blades are sharp. Handle carefully.
Keep hands and utensils away from the cutting blade while blending or
chopping food to prevent the possibility of severe injury to persons or
damage to the unit. A scraper may be used but only when the unit is not
running.
Do not hold the motor base or the whisk gear box under running water. Do
not immerse them in water.
The appliance should not be started if
• The appliance, its housing, or the cord is damaged.
• A defect is suspected after it is dropped or otherwise damaged.
SAVE THESE INSTRUCTIONS
FOR HOUSEHOLD USE ONLY
10
3
Stick Blender
Stick Blender
Spinach Dip
Blender Unit
1 cup sour cream
1 cup Miracle Whip
1 pkg Knorrs Vegetable Soup Mix
1 pkg frozen spinach, thawed, drained and cut
up with chopping blade
1 8oz. pkg cream cheese
Multi Speed Buttons
On Button
Turbo Button
Soft Touch
Easy-Grip Handle
Cream of Corn Soup
1 cup whole kernel corn
2 cups milk
2 Tbsp bread crumbs (mill in grinder)
1 Tbsp chopped onion (chop in grinder)
1 tsp salt
⅛ tsp pepper
Place corn and 1 cup milk in saucepan.
Puree with chopping blade until smooth. Add
remaining ingredients and blend well. Heat to
serving temperature, stirring occasionally.
Tip: You can save time by chopping vegetables
for a soup right in the soup pot.
Do not submerge in water/
liquid higher than this point.
Shaft
Pesto Sauce
Note: Blade removal
tool included
Drive Post
4
1 cup peanuts (bulk nuts tend to be too dry)
Salt to taste
Put peanuts in grinder. Grind on high speed until
smooth (but no longer than 4 minutes). If it is not
quite as smooth as you would like, add a little
oil, after allowing motor to cool. A nice variation
Combine all ingredients together with mixing
blade. Let stand 2 hours in refrigerator.
Optional: Hollow out bread bowl. Cut bread in
chunks. Use bread bowl to serve dip.
Body/Motor Base
Foot
Fresh Peanut Butter
1 ½ cups firmly packed fresh parsley
½ cup firmly packed fresh basil leaves
¼ cup pine nuts, walnuts, or almonds
2 cloves garlic
1 ½ tsp lemon juice
1 tsp salt
¼ tsp pepper
⅓ cup olive oil
½ cup grated Parmesan cheese
is adding a tablespoon of liquid honey to the
peanut butter.
Pastry (no fail pie crust)
½ cup shortening
pinch of salt
¼ cup boiling water
1 Tbsp milk (overflowing slightly)
1 ½ cups flour
Place shortening, salt, boiling water and milk in
mixing bowl. Use chopping blade. Slowly add
flour, mixing until desired consistency. Makes
two 9” crusts. Will not fail!
Baby Foods
Open a can or bottle of any favorite fruit or
vegetable. Pour off liquid, then with chopping
blade, puree until desired consistency is
achieved. Junior foods are made by not
processing quite so long – just gentle taps to
break up the food.
Find more recipes for the Stick
Blender, and other fine L’EQUIP
products on our website:
www.lequip.com
Grind parsley, basil, nuts and garlic in grinder.
Put all ingredients into beaker or any other tall
narrow container and process with chopping
blade until smooth.
9
Stick Blender
Recipes
Whipped Cream
⅓ cup whipping cream
2 Tbsp sugar
Milk Shake
½ cup milk
1 cup ice cream
Flavoring: 1 Tbsp strawberries, raspberries,
chocolate sauce, fresh banana or any flavoring
of your choice.
Stick Blender
Standard Accessories
All parts which come in contact with food are stainless steel, rust proof,
tasteless, and resistant to corrosive food items.
½ tsp vanilla
Cream should be as cold and fresh as possible.
Pour into tall, narrow, dry container. Use aerator
blade. Hold blender accessory in cream. Switch
on. While blender is working, draw it slowly at
an angle towards the rim. Repeat this motion
carefully. Occasionally hold the aerator just
under the surface. By holding the aerator at an
angle, air is beaten into the liquid with every
turn. Do not work too quickly. In a short time
you will have aerated whipped cream, which
will keep its shape. Add sugar and vanilla only
at the end.
Whipped Topping from Non-Fat Milk
⅓ cup ice cold skim milk
½ tsp vanilla
2 Tbsp sugar or sugar substitute (or to taste)
Use chopping blade. Place milk and ice cream
in glass until desired thickness is achieved.
Then add flavoring of choice and mix.
MINCING BLADE
AERATOR BLADE
CHOPPING BLADE
MIXING BLADE
Ambrosia Fruit Dip
1 small jar marshmallow cream
1 pkg spreadable cream cheese
5 Tbsp whip cream
Whip together with aerator blade. Refrigerate.
Serve with fresh fruit.
Flawless Hollandaise Sauce
4 egg yolks
½ tsp salt
1 Tbsp lemon juice
1 dash hot pepper sauce
¼ lb butter, melted
In saucepan with mixing blade, blend all
ingredients except butter. Now heat to a
bubbling stage then add melted butter.
BEAKER
FRENCH WHISK
GRINDER
BRACKET
Accessory Blades
Chopping Blade
Chops raw and cooked vegetables, fruit and
berries. Purees baby food. Crushes ice cubes
or nuts. Blends smoothies, ice drinks and milk
shakes. Can be used for all heavy ingredients.
the contents towards the rim of the container.
Poppy Seed Loaf
Aerator Blade
Beats and blends egg-whites and cream. Aerates
shakes and sauces. Whips soups. Use for
everything that needs to be light and fluffy.
Repeat this process (drawing up and down) until
½ cup instant vanilla pudding mix
1 lemon cake mix
1 cup warm water
½ cup cooking oil
½ cup dry poppy seeds
1 tsp vanilla
Mixing Blade
Stirs and mixes drinks. Emulsifies salad
dressings and mayonnaise. Mixes cakes, batters
and dough. Use for all mixtures with a thick or
creamy consistency.
Pour milk into tall narrow container. Using
aerator blade hold unit on bottom of container
for 3 seconds without moving it. Slowly draw up
milk is stiffly whipped. Do not allow the blade
to completely surface. Turn off the machine,
then add vanilla, sugar or sweetener. Continue
to whip to incorporate these ingredients. Serve
immediately.
Note: To maintain thick consistency for a longer
period, add 1 Tbsp of gelatin powder, vanilla
pudding power or a flavored jello powder.
8
With mixing blade, beat all ingredients in large
mixing bowl until smooth. Pour into two small
loaf pans. Bake at 350 degrees for about 1 hour.
You may top with thin glaze of powdered sugar
and water.
Mincing Blade
The mincing blade is designed to mince raw or
cooked meats and vegetables with coarse fibers.
5
Stick Blender
Grinder
Grates and finely chops ingredients such as herbs, spices,
grains, cereals, chocolate, cheese, coffee beans, onions,
garlic, hard boiled eggs, nuts (including almonds), sugar (for
powdered sugar) and bread (for bread crumbs). It works as
an efficient food processor for salsas, pesto, nut butters and
more. Chocolate should be firm when ground. Do not overfill
grinder. Always use on turbo speed.
Stick Blender
Putting on and Changing Accessories
•
•
•
French Whisk
Designed to beat and aerate. Quickly whips eggs and creams. Can be used in almost any recipe that calls for whipping or
whisking. It can also be used in any bowl or pot, (even on the
stovetop), for stocks, sauces, puddings, and soups.
Always unplug the appliance before changing accessories.
Connect the accessory by aligning with body/motor base. Twist
lock into place. Remove the accessory by untwisting. To connect
blades, line up slot on blade with nub on drive post and push.
With time and repeated use, the blades may become loose and no
longer fit on the drive post tightly. You can fix this by gently pressing
the top of the blade, where it connects to the drive post, together
with pliers.
Cleaning and Care
Always clean the appliance after use to prevent the drive shaft from
clogging.
Application and Use Tips
On
Turbo
Speed Buttons
Use the “On” button for all light, airy foods and for small
amounts.
Use the “Turbo” Speed button for thicker or harder
ingredients and for larger amounts. Do not run your blender
for more than 1 minute at a time.
•
•
•
•
Mixing
Dip your L’EQUIP Stick Blender into the ingredients at an
angle and blend. Switch it off before removing to prevent
splashing. While blending, hold the top of the beaker with
your free hand for better control.
Whipping
Rest the Stick Blender on the bottom of the beaker for
a few seconds, then hold at an angle and slowly draw
it upwards against the side of the beaker. When the
ingredients are no longer drawn with it, go back to the
bottom and repeat the process until the ingredients are at
the desired consistency.
Blending
Use a light swiveling wrist motion in processing. Draw the
blender up slightly and let it fall again onto the ingredients.
Do not press or pound. The fineness of your results will
depend on the length of processing.
6
•
•
Motor base/body should not be placed in water.
Grinder should be cleaned by removing from motor base. Lid must
be hand washed. Grinder bowl and processor blades may be put in
dishwasher.
French whisk should be cleaned by removing from motor base and
hand washed only.
Blender accessory, (shaft and foot), may be cleaned by removing
from motor base and hand washing or placing under running water.
The blender accessory may also be cleaned by submerging in warm
water and pressing the “on” button. Caution – keep water level
below motor base level.
Blades are dishwasher safe.
Your blender will perform better and longer if you oil it every few
months. Use a food grade oil. Hold the blender with the foot facing
you and put 2-3 drops of oil on the drive post. Switch the appliance
on and let it run for 10-20 seconds. Then rinse the drive post in hot
water.
FOR HOUSEHOLD USE ONLY
7