1
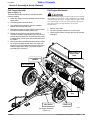
Table of Contents
Primary Seeders
PS2096 Series
20575
313-308M
Operator’s Manual
!
Read the Operator’s manual entirely.
When you see this symbol, the
subsequent instructions and
warnings are serious - follow without
exception. Your life and the lives of
others depend on it!
© Copyright 2008 Printed
4/03/08
Cover photo may show optional
equipment not supplied with
standard unit.
Land Pride
Table of Contents
Table of Contents
Important Safety Information . . . . . . . . . . . . . . . . . . 1
Safety at All Times . . . . . . . . . . . . . . . . . . . . . . . . . 1
Look For The Safety Alert Symbol . . . . . . . . . . . . . 1
Safety Labels . . . . . . . . . . . . . . . . . . . . . . . . . . . . . 4
Introduction . . . . . . . . . . . . . . . . . . . . . . . . . . . . . . . 7
Application . . . . . . . . . . . . . . . . . . . . . . . . . . . . . . . 7
Using This Manual . . . . . . . . . . . . . . . . . . . . . . . . . 7
Terminology . . . . . . . . . . . . . . . . . . . . . . . . . . . 7
Definitions . . . . . . . . . . . . . . . . . . . . . . . . . . . . . 7
Owner Assistance . . . . . . . . . . . . . . . . . . . . . . . . . 7
Serial Number Plate . . . . . . . . . . . . . . . . . . . . . 7
Further Assistance . . . . . . . . . . . . . . . . . . . . . . 7
Section 1: Assembly & Set-Up (Standard) . . . . . . . 8
Pre-Assembly Checklist . . . . . . . . . . . . . . . . . . . . . 8
Sling Bracket . . . . . . . . . . . . . . . . . . . . . . . . . . . . . 8
Tire Track Remover Assembly . . . . . . . . . . . . . . . . 8
Section 2: Assembly & Set-Up (Optional) . . . . . . . . 9
Small Seeds Box (S/N 397503+) . . . . . . . . . . . . . . 9
Small Seeder Box assembly . . . . . . . . . . . . . . . 9
Small Seeds Drive Assembly . . . . . . . . . . . . . 10
Small Seeds Box (S/N 397502-) . . . . . . . . . . . . . 11
Small Seeds Box Assembly . . . . . . . . . . . . . . 11
Small Seeds Drive Assembly . . . . . . . . . . . . . 12
Pull Tongue Hook-Up . . . . . . . . . . . . . . . . . . . 13
Pull Tongue Disconnect . . . . . . . . . . . . . . . . . 13
Section 4: Seeding Adjustments . . . . . . . . . . . . . . 17
Seed Rate Speed Change . . . . . . . . . . . . . . . . . . 17
Main Seed Box . . . . . . . . . . . . . . . . . . . . . . . . 17
Seeding Adjustments . . . . . . . . . . . . . . . . . . . . . . 18
Main Seed Box . . . . . . . . . . . . . . . . . . . . . . . . 18
Small Seeds Box Option . . . . . . . . . . . . . . . . . 19
Seed Rate Charts . . . . . . . . . . . . . . . . . . . . . . . . . 20
Seed Rate Charts (Metric) . . . . . . . . . . . . . . . . . . 22
Seed Rate Charts (Small Seed Box Option) . . . . . 24
Section 5: Maintenance & Lubrication . . . . . . . . . 25
Maintenance . . . . . . . . . . . . . . . . . . . . . . . . . . . . 25
Storage . . . . . . . . . . . . . . . . . . . . . . . . . . . . . . . . 25
Lubrication . . . . . . . . . . . . . . . . . . . . . . . . . . . . . . 25
Feed Cup Drive Shaft . . . . . . . . . . . . . . . . . . . 25
Roller Bearings . . . . . . . . . . . . . . . . . . . . . . . . 25
Roller Bearings . . . . . . . . . . . . . . . . . . . . . . . . 26
Roller Chains . . . . . . . . . . . . . . . . . . . . . . . . . . 26
Drive Sprocket Hanger Bearing (Zerk) . . . . . . 26
Section 6: Specifications and Capacities . . . . . . . 27
Section 7: Features & Benefits . . . . . . . . . . . . . . . 28
Section 8: Troubleshooting . . . . . . . . . . . . . . . . . . 29
Section 9: Appendix . . . . . . . . . . . . . . . . . . . . . . . . 30
Torque Values Chart For Common Bolt Size . . . . 30
Warranty . . . . . . . . . . . . . . . . . . . . . . . . . . . . . . . 31
Section 3: Operating . . . . . . . . . . . . . . . . . . . . . . . 14
General Description . . . . . . . . . . . . . . . . . . . . . . . 14
Operating Check List . . . . . . . . . . . . . . . . . . . . . . 14
Seeder Preparation . . . . . . . . . . . . . . . . . . . . . . . 14
Tractor Requirements . . . . . . . . . . . . . . . . . . . . . 14
Tractor 3-Point Hook-Up . . . . . . . . . . . . . . . . . . . 14
Pull Tongue Hook-Up . . . . . . . . . . . . . . . . . . . . . 15
Seeding . . . . . . . . . . . . . . . . . . . . . . . . . . . . . . . . 15
Transporting . . . . . . . . . . . . . . . . . . . . . . . . . . . . 15
Parking . . . . . . . . . . . . . . . . . . . . . . . . . . . . . . . . 15
Drive System . . . . . . . . . . . . . . . . . . . . . . . . . . . . 15
Roller Packing Wheels . . . . . . . . . . . . . . . . . . . . . 16
© Copyright 2008 All rights Reserved
Land Pride provides this publication “as is” without warranty of any kind, either expressed or implied. While every precaution has been taken in the preparation of this manual, Land
Pride assumes no responsibility for errors or omissions. Neither is any liability assumed for damages resulting from the use of the information contained herein. Land Pride reserves
the right to revise and improve its products as it sees fit. This publication describes the state of this product at the time of its publication, and may not reflect the product in the future.
Land Pride is a registered trademark.
All other brands and product names are trademarks or registered trademarks of their respective holders.
Printed in the United States of America.
PS2096 Series Primary Seeders 313-308M
4/03/08
Land Pride
▲
Table of Contents
Important Safety Information
Important Safety Information
These are common practices that may or may not be applicable to the products described in
this manual.
Safety at All Times
Look For The Safety Alert Symbol
Thoroughly read and understand
the instructions given in this
manual before operation. Refer to
the “Safety Label” section, read
all instructions noted on them.
Do not allow anyone to operate
this equipment who has not fully
read and comprehended this
manual and who has not been
properly trained in the safe
operation of the equipment.
The SAFETY ALERT SYMBOL indicates there is a
potential hazard to personal safety involved and extra
safety precaution must be taken. When you see this
symbol, be alert and carefully read the message that
follows it. In addition to design and configuration of
equipment, hazard control and accident prevention
are dependent upon the awareness, concern,
prudence and proper training of personnel involved in
the operation, transport, maintenance and storage of
equipment.
▲ Operator should be familiar with
all functions of the unit.
▲ Operate implement from the
driver’s seat only.
▲ Make sure all guards and shields
are in place and secured before
operating implement.
▲ Do not leave tractor or implement
unattended with engine running.
▲ Dismounting from a moving
tractor could cause serious injury
or death.
▲ Do not stand between tractor and
implement during hitching.
▲ Keep hands, feet, and clothing
away from power-driven parts.
▲ Wear snug fitting clothing to avoid
entanglement with moving parts.
▲ Watch out for wires, trees, etc.,
when raising implement. Make
sure all persons are clear of
working area.
▲ Turning tractor too tight may
cause implement to ride up on
wheels. This could result in injury
or equipment damage.
!
Be Aware of
Signal Words
! WARNING
A Signal word designates a degree or
level of hazard seriousness. The
signal words are:
! DANGER
Indicates an imminently hazardous
situation which, if not avoided, will
result in death or serious injury. This
signal word is limited to the most
extreme situations, typically for
machine components that, for
functional purposes, cannot be
guarded.
Indicates a potentially hazardous
situation which, if not avoided, could
result in death or serious injury, and
includes hazards that are exposed
when guards are removed. It may also
be used to alert against unsafe
practices.
! CAUTION
Indicates a potentially hazardous
situation which, if not avoided, may
result in minor or moderate injury. It
may also be used to alert against
unsafe practices.
For Your Protection
Shutdown and Storage
▲ Thoroughly read and understand
the “Safety Label” section, read all
instructions noted on them.
▲ Lower machine to ground, put
tractor in park, turn off engine, and
remove the key.
▲ Detach and store implements in a
area where children normally do
not play. Secure implement by
using blocks and supports.
OFF
REMO
VE
4/03/08
PS2096 Series Primary Seeders 313-308M
1
Table of Contents
Land Pride
Important Safety Information
These are common practices that may or may not be applicable to the products described in
this manual.
2
Use Safety
Lights and Devices
Transport
Machinery Safely
▲ Slow moving tractors, selfpropelled equipment, and towed
implements can create a hazard
when driven on public roads. They
are difficult to see, especially at
night.
▲ Flashing warning lights and turn
signals are recommended
whenever driving on public roads.
Use lights and devices provided
with implement.
▲ Comply with state and local laws.
▲ Maximum transport speed for
implement is 20 mph. DO NOT
EXCEED. Never travel at a speed
which does not allow adequate
control of steering and stopping.
Some rough terrain require a
slower speed.
▲ Sudden braking can cause a
towed load to swerve and upset.
Reduce speed if towed load is not
equipped with brakes.
Use A Safety Chain
Practice Safe Maintenance
▲ A safety chain will help control
drawn machinery should it
separate from the tractor
drawbar.
▲ Use a chain with the strength
rating equal to or greater than
the gross weight of the towed
machinery.
▲ Attach the chain to the tractor
drawbar support or other
specified anchor location. Allow
only enough slack in the chain to
permit turning.
▲ Do not use safety chain for
towing.
▲ Understand procedure before
doing work. Use proper tools and
equipment, refer to Operator’s
Manual for additional information.
▲ Work in a clean dry area.
▲ Lower the implement to the
ground, put tractor in park, turn off
engine, and remove key before
performing maintenance.
PS2096 Series Primary Seeders 313-308M
▲ Use the following maximum
speed - tow load weight ratios as
a guideline:
20 mph when weight is less
than or equal to the weight of
tractor.
10 mph when weight is double
the weight of tractor.
▲ IMPORTANT: Do not tow a load
that is more than double the
weight of tractor.
▲ Allow implement to cool
completely.
▲ Do not grease or oil implement
while it is in operation.
▲ Inspect all parts. Make sure parts
are in good condition & installed
properly.
▲ Remove buildup of grease, oil or
debris.
▲ Remove all tools and unused
parts from implement before
operation.
4/03/08
Table of Contents
Land Pride
Important Safety Information
These are common practices that may or may not be applicable to the products described in
this manual.
Prepare for Emergencies
▲ Be prepared if a fire starts.
▲ Keep a first aid kit and fire
extinguisher handy.
▲ Keep emergency numbers for
doctor, ambulance, hospital and
fire department near phone.
Wear
Protective Equipment
Avoid High
Pressure Fluids Hazard
▲ Protective clothing and equipment
should be worn.
▲ Wear clothing and equipment
appropriate for the job. Avoid
loose fitting clothing.
▲ Prolonged exposure to loud noise
can cause hearing impairment or
hearing loss. Wear suitable
hearing protection such as
earmuffs or earplugs.
▲ Operating equipment safely
requires the full attention of the
operator. Avoid wearing radio
headphones while operating
machinery.
▲ Escaping fluid under pressure can
penetrate the skin causing serious
injury.
▲ Avoid the hazard by relieving
pressure before disconnecting
hydraulic lines or performing work
on the system.
▲ Make sure all hydraulic fluid
connections are tight and all
hydraulic hoses and lines are in
good condition before applying
pressure to the system.
▲ Use a piece of paper or
cardboard, NOT BODY PARTS, to
check for suspected leaks.
▲ Wear protective gloves and safety
glasses or goggles when working
with hydraulic systems.
▲ If an accident occurs, see a
doctor immediately. Any fluid
injected into the skin must be
treated within a few hours or
gangrene may result.
911
Keep Riders
Off Machinery
Handle
Chemicals Properly
▲ Riders obstruct the operator’s
view, they could be struck by
foreign objects or thrown from the
machine.
▲ Never allow children to operate
equipment.
▲ Protective clothing should be
worn.
▲ Handle all chemicals with care.
▲ Follow instructions on container
label.
▲ Agricultural chemicals can be
dangerous. Improper use can
seriously injure persons, animals,
plants, soil, and property.
▲ Inhaling smoke from any type of
chemical fire is a serious health
hazard.
▲ Store or dispose of unused
chemicals as specified by the
chemical manufacturer.
4/03/08
PS2096 Series Primary Seeders 313-308M
3
Table of Contents
Land Pride
Important Safety Information
Safety Labels
Your Seeder comes equipped with all safety labels in place.
They were designed to help you safely operate your Seeder.
1. Read and follow label directions.
2. Keep all safety labels clean and legible.
3. Replace all damaged or missing labels.
4. Some new equipment installed during repair require safety
labels to be affixed to the replaced component as specified
by Land Pride. When ordering new components make sure
the correct safety labels are included in the request. To
order new labels go to your Land Pride dealer.
5. Refer to this section for proper label placement. Install new
decals as follows
a. Clean the area on which the decal is to be placed.
b. Spray soapy water on the surface where the decal is to
be placed.
c. Peel backing from decal. Press firmly on surface,
being careful not to cause air bubbles under decal.
d. Squeeze out air bubbles with the edge of a credit card.
818-543C
19635
DANGER: Guard Missing
(Beneath Guard)
838-111C
19635
DANGER: Keep away,
Moving Parts
818-055C
19635
4
PS2096 Series Primary Seeders 313-308M
SMV: Slow Moving Vehicle
4/03/08
Land Pride
Table of Contents
Important Safety Information
20579
818-230C
Red Reflector
20575
818-229C
Amber Reflector
818-543C
Small Grass Seed Option
DANGER: Guard Missing
(Beneath Guard)
20606
838-111C
Small Grass Seed Option
20606
4/03/08
DANGER: Keep away,
Moving Parts
PS2096 Series Primary Seeders 313-308M
5
Table of Contents
Land Pride
Important Safety Information
818-230C
20593
Small Grass Seed Option
Red Reflector
818-055C
20592
Small Grass Seed Option
SMV: Slow Moving Vehicle
6
PS2096 Series Primary Seeders 313-308M
4/03/08
Land Pride
Table of Contents
Introduction
Introduction
Land Pride welcomes you to the growing family of new
product owners.
This Seeder has been designed with care and built by
skilled workers using quality materials. Proper assembly,
maintenance, and safe operating practices will help you
get years of satisfactory use from the machine.
Application
The PS2096 Primary Seeder is perfect for wide open
landscape seeding and turf farms. The main seedbox can
be equipped with our standard fluted seed cups and
agitation to seed most turf type grasses, as well as a
variety of other seeds from peas to alfalfa. It is possible to
seed two different types of seed at different rates by
utilizing the optional Small Seeds Box. The Small Seeds
Box uses a smaller version of our fluted seed cup for
seeds such as alfalfa, clover and many other types of
small seeds. See “Section 7: Features & Benefits” on
page 28 for additional information.
If customer service or repair parts are required contact a
Land Pride dealer. A dealer has trained personnel, repair
parts and equipment needed to service the Seeder.
The parts on your PS2096 Seeder have been specially
designed and should only be replaced with genuine Land
Pride parts. Therefore, should your Seeder require
replacement parts go to your Land Pride Dealer.
Serial Number Plate
For prompt service always use the serial number and
model number when ordering parts from your Land Pride
dealer. Be sure to include your serial and model numbers in
correspondence also. Refer to Figure 1 for the location of
your serial number plate.
Using This Manual
• This Operator’s Manual is designed to help familiarize
•
•
you with safety, assembly, operation, adjustments,
troubleshooting, and maintenance. Read this manual
and follow the recommendations to help ensure safe
and efficient operation.
The information contained within this manual was
current at the time of printing. Some parts may change
slightly to assure you of the best performance.
To order a new Operator’s or Parts Manual contact your
authorized dealer. Manuals can also be downloaded,
free-of-charge from our website at www.landpride.com
or printed from the Land Pride Service & Support Center
by your dealer.
Terminology
“Right” or “Left” as used in this manual is determined by
facing the direction the machine will operate while in use
unless otherwise stated.
Definitions
NOTE: A special point of information that the
operator must be aware of before continuing.
IMPORTANT: A special point of information related
to its preceding topic. Land Pride’s intention is that
this information should be read and noted before
continuing.
Owner Assistance
The Warranty Registration card should be filled out by the
dealer at the time of purchase. This information is
necessary to provide you with quality customer service.
4/03/08
20576
Serial Number Plate Location
Figure 1
Further Assistance
Your dealer wants you to be satisfied with your new
Seeder. If for any reason you do not understand any part
of this manual or are not satisfied with the service
received, the following actions are suggested:
1. Discuss the matter with your dealership service
manager making sure he is aware of any problems
you may have and that he has had the opportunity to
assist you.
2. If you are still not satisfied, seek out the owner or
general manager of the dealership, explain the
problem and request assistance.
3. For further assistance write to:
Land Pride
Service Department
P.O. Box 5060
Salina, KS 67402-5060
E-mail address
[email protected]
PS2096 Series Primary Seeders 313-308M
7
Table of Contents
Land Pride
Section 1: Assembly & Set-Up (Standard)
Section 1: Assembly & Set-Up (Standard)
Pre-Assembly Checklist
Sling Bracket
Check
All major frame components
Reference
Operator’s
Manual
Fasteners and pins that were shipped
with the seeder.
NOTE: All hardware from the factory
has been installed in the location where
it will be used. If a part or fastener is
temporarily removed for assembly
reasons, remember where it goes.Keep
the parts separated.
Operator’s
Manual
All working parts are moving freely,
bolts are tight and cotter pins are
spread.
Operator’s
Manual
If a pin, bolt or other part has been
removed, and you are unsure where it
is used, refer to the parts manual. Be
sure the part gets used in the correct
location. By double checking while you
assemble, you will lessen the chance of
using a bolt incorrectly that may be
needed later.
Operator’s
Manual
All grease fittings are in place and
lubricated.
Section 4
Page 25
Proper tension and alignment on all
drive chains.
Operator’s
Manual
Safety decals are correctly located and
legible. Replace if damaged.
Important
Safety
Information
Refer to Figure 1-1
The sling brackets allow points at each end to hook the
chain for lifting of the unit. When hooking the chain to the
sling brackets, be certain to either use a spreader bar on
the chain or use a long chain to prevent bending the sling
brackets.
Sling Bracket
Figure 1-1
Tire Track Remover Assembly
For shipping purposes the Tire Track Removers are
assembled 180 degrees from their operating position.
Refer to Figure 1-2
1. Remove Track Remover (#1).
2. Flip Track Remover over 180 degrees and reassemble
as shown with 1/2” u-bolt (#4), lockwasher (#3) and
nut (#2).
20589
Tire Track Remover
Figure 1-2
8
PS2096 Series Primary Seeders 313-308M
4/03/08
Table of Contents
Land Pride
Section 2: Assembly & Set-Up (Optional)
Section 2: Assembly & Set-Up (Optional)
Small Seeds Box (S/N 397503+)
Small Seeder Box assembly
1. Remove the eight bolts, lock washers and nuts that
are assembled in the front of the main box. Retain two
bolts, lock washers and nuts and use these to plug the
two holes in the front of the Small Seeds Box.
Refer to Figure 1-6:
2. Assemble the Small Seeds Box (#1) at the ends with
the four 5/16” bolts (#3), flat washers (#7), lock
washers (#6) and nuts (#5). Do not tighten until
spacers (step 3) are installed.
3. Align the four box spacers (#2) to the inner holes of the
Small Seeds Box and the main box and assemble the
four longer 5/16” bolts (#4), flat washers (#7), lock
washers (#6) and nuts (#5).
4. Refer to Figure 1-4. Attach rubber seed tubes to
feeder cups with clamps provided and then into the
small holes in seed drop without clamps. Push rubber
hoses into the seed drop hole to remove any excess
slack.
Plug 2 Holes
Small Seeds Box Assembly
Figure 1-3
20587
Rubber seed hoses
clamped to feeder cups
Insert rubber hoses
into seed drop holes
20596
Small Seeds Tube Assembly
Figure 1-4
4/03/08
PS2096 Series Primary Seeders 313-308M
9
Table of Contents
Land Pride
Section 2: Assembly & Set-Up (Optional)
Small Seeds Drive Assembly
Refer to Figure 1-8:
1. Place decal “Danger Guard Missing” (#18),
“Danger Moving Parts” (#19) and “Seed Rate
Chart” (#20) in locations shown.
2. Assemble chain guard mounts (#5) with the 1/4”
flange bolts (#8) and flange nuts (#11). Do not tighten
until the complete drive has been assembled and the
chain guard (#16) installs properly. The chain guard
mounts are slotted for easier chain guard mounting.
3. Install chain idler with welded on spacer (#2) and
chain idler (#3) with 1/2” nut (#9).
4. Assemble the spacer (#4) and speed change sprocket
assembly (#7) to the 5/8” welded on bolt with the 5/8”
lock washer (#12) and nut (#10).
5. Assemble the front roller sprocket (#13) and key (#1)
to the front roller shaft.
6. Install chain (#14) first and then chain (#15). Tighten
chains with idlers (#2) and (#3).
7. Assemble chain guard (#16). Position chain guard
mounts (#5) where needed and tighten hardware.
Small Seeds Drive Assembly
Figure 1-5
10
PS2096 Series Primary Seeders 313-308M
20588
4/03/08
Land Pride
Table of Contents
Section 2: Assembly & Set-Up (Optional)
Small Seeds Box (S/N 397502-)
Small Seeds Box Assembly
1. Remove the eight bolts, lockwashers and nuts that are
assembled in the back of the main box. Retain two
bolts, lockwashers and nuts and use these to plug the
two holes in the back of the main box where the SMV
sign will be removed.
Refer to Figure 1-6:
1. Remove the SMV (#11) and SMV mounting bracket
from the main box.
2. Assemble the Small Seeds Box (#1) at the ends with
the four 5/16” bolts (#4), flatwashers (#10),
lockwashers (#9) and nuts (#6).
3. Align the four box spacers (#2) to the inner holes of the
small seeds box and the main box and assemble the
four longer 5/16” bolts (#5), flatwashers (#10),
lockwashers (#9) and nuts (#6).
4. Install SMV (#11) with SMV mounting bracket to
Standard Seed Box Assembly (#1).
Refer to Figure 1-7
5. Attach the rubber seed tubes to the seed cups and
then through the small seed holes below.
Remove SMV and plug the 2 Holes
20607
Small Seeds Box Assembly
Figure 1-6
Attach hose to seed cups
and through holes below
Small Seeds Tube Assembly
Figure 1-7
20606
4/03/08
20596
PS2096 Series Primary Seeders 313-308M
11
Table of Contents
Land Pride
Section 2: Assembly & Set-Up (Optional)
Small Seeds Drive Assembly
Refer to Figure 1-8:
1. Place decal “Danger Guard Missing” (#17),
“Danger Moving Parts” (#18) and “Seed Rate
Chart” (#19) in locations shown (beneath lid).
2. Assemble chain guard mounts (#5) with the 1/4”
flange bolts (#7) and flange nuts (#10). Do not tighten
until the complete drive has been assembled and the
chain guard (#15) installs properly. The chain guard
mounts are slotted for easier chain guard mounting.
3. Install chain idler with welded on spacer (#2) and
chain idler (#3) with 1/2” nut (#8).
4. Assemble the spacer (#4) and reduction sprocket
assembly (#6) to the 5/8” welded on bolt with the 5/8”
lockwasher (#11) and nut (#9).
5. Assemble the front roller sprocket (#12) and key (#1)
to the front roller shaft.
6. Install chain (#14) first and then chain (#13).
7. Assemble chain guard (#15) with knobs (#16).
Position chain guard mounts (#5) where needed and
tighten hardware.
Small Seeds Drive Assembly
Figure 1-8
12
PS2096 Series Primary Seeders 313-308M
20608
4/03/08
Table of Contents
Land Pride
Section 2: Assembly & Set-Up (Optional)
Pull Tongue Hook-Up
Pull Tongue Disconnect
Refer to Figure 1-9:
The lower link handles should be in the down position
before preceding.
!
1. Mount Pull Tongue to tractor drawbar and secure with
safety chain.
2. Connect hydraulic hoses to tractor.
3. Fully extend the lift cylinder to rase the transport
wheels and lower the hitch links.
4. Back the pull tongue up to the seeder to align the hitch
links with the seeder’s inside smaller pins.
5. Retract the lift cylinder to rase the hitch links up
around the seeder’s inside smaller pins until the pins
lock into the lower hitch links. Once the pins are locked
in, adjust the lift cylinder up or down as needed to level
the seeder.
6. With the seeder level and the transport wheels resting
on the ground, adjust the top center link of the pull
tongue so that it will install in the bottom holes of the
seeder’s upper center hitch. (Top center link pin is
provided by the customer)
CAUTION
The seeder will have negative tongue weight when it is lifted off
the ground. Lower the seeder to the ground before proceeding
with Pull Tongue disconnect. (Negative tongue weight is when
most of the weight is to the rear of the implement causing the
front of the tongue to be light and may rise up when
disconnected.)
1. Remove top link pin.
2. Flip locking release handles up on pull tongue.
3. Lower tongue until the links are free from the seeders
lower pins.
Bottom Holes of
Upper Center
Hitch
Locking Release
Handles
Top Center Link
Inside Smaller
Pins
Lift Cylinder
Pull Tongue Assembly
Figure 1-9
4/03/08
Hitch Link
20740
PS2096 Series Primary Seeders 313-308M
13
Table of Contents
Land Pride
Section 3: Operating
Section 3: Operating
General Description
Seeder Preparation
The following information is a brief description of how this
Primary Seeder works. It is included to help you
understand the operation of this seeder.
Before proceeding with the first time set-up, or before
making any adjustments mentioned in this section, make
every effort to attach the seeder to a tractor.
The power to drive the seeding function of this seeder
comes from the ground speed of the tractor. The seed
metering is powered by the front roller at a rate
proportional to the distance driven. This ensures that the
rate applied in pounds per acre or pounds per 1000
square feet remains constant as ground speed is varied.
The power is transmitted via drive chains to the seed cups.
This drive can be adjusted to a high or low range to
broadcast more or less seed. The seed rate is adjustable
using the seed rate lever located at the rear of the seeder.
The seed is dropped between cast iron rollers. The front
roller crushes clods, presses down small stones and
forms a firm seedbed. The rear roller firms the soil around
the seeds.
1. This seeder can be transported with a full box of
seeds. It is best not to do this unless necessary
because the increased weight does increase the
chances for problems on the road. Do not exceed 20
miles per hour.
2. Calibrate your seeder for a proper rate based on the
seed you are using. Calibration information is located
on the inside of your box lid or on page 17.
3. Make sure the seed cup door adjustment handle on
each cup is set the same across the seeder.
4. Never allow anyone to ride on the seeder.
5. Maximum seeding speed will vary according to soil
conditions.
6. Check that all plugs and caps have been replaced
properly.
7. Be sure all bolts and nuts are tight.
8. Be certain all guards are in place and secure.
9. Clear the area to be seeded of rocks, branches and
other foreign objects.
10. At first begin seeding at a slow forward speed and shift
up until the desired speed is achieved.
Operating Check List
In addition to design and configuration of equipment,
hazard control and accident prevention are dependent
upon the awareness, concern, prudence and proper
training involved in its operation, transport, maintenance
and storage of equipment. Before beginning to operate
your Primary Seeder, the following inspection should be
performed.
.
14
Check
Reference
Read and follow the “Safety Rules”
carefully.
Important Safety
Information
Read all of the “Tractor Hook Up” and
preparation instructions.
Section 2
page 14
“Basic Operations” in this Manual
Operator’s
Manual
Lubricate the seeder as needed. Refer to
“Lubrication”
Section 4
page 25
Check the seeder initially and periodically for
loose bolts & pins, “Torque Values Chart”.
Section 8
page 30
Make sure all guards and shields are in
place.
Operator’s
Manual
Check initially and periodically for loose bolts,
pins, and chains.
Operator’s
Manual
Inspect the seed cups and seed tubes for
foreign matter.
Section 4
page 29
Set speed change sprocket for drive type
desired.
Section 3
page 17
Set seed rate. See “Seed Rate Charts”.
Section 3
page 20
PS2096 Series Primary Seeders 313-308M
Tractor Requirements
This Primary Seeder is designed for tractors in the
Category 2 or 3 and Cat. 2 Quick Hitch. An optional pull
package is available for smaller tractors.
Check the tractor’s 3-point lifting capacity. Refer to
“Section 6: Specifications and Capacities” on Page 27
for seeder weight.
NOTE: In order to maintain steering control, ballast
may have to be added to your tractor. To determine
whether or not to add ballast, refer to your tractor
operator’s manual.
Tractor 3-Point Hook-Up
1. Back tractor up to seeder until 3-Point links are
aligned with hitch clevises on seeder.
2. Secure the tractor’s 3-Point lower arms to the lower
hitch clevises using hitch pins supplied.
3. Secure tractor’s top center link to the seeder top hitch
using a 1” diameter hitch pin.
4. With the seeder resting on level ground, adjust the
tractor’s top link until the seeder is level.
5. Remove rear roller lock pin from parking position and
place in storage position. See Figure 2-1 on page 15.
4/03/08
Table of Contents
Land Pride
Section 3: Operating
Pull Tongue Hook-Up
1. See “Pull Tongue Hook-Up” on page 13 for a
complete description of connecting a tractor to the pull
tongue and seeder.
IMPORTANT: Always operate the seeder with the
transport wheels on the ground and the seeder level
to prevent dirt build-up and damage to the seeder.
2. At the field site, lower the seeder to the ground by
raising the transport wheels until the seeder is resting
on the ground. Transport wheels must also be resting
on the ground to support some of the seeder’s weight.
3. Set the tractor’s hydraulic lever to return the lift
cylinder to this position each time the seeder is raised
and lowered.
4. With the seeder and transport wheels resting on level
ground, readjust the pull tongue top center link to level
the seeder if needed.
5. Remove rear roller lock pin from parking position and
place in storage position. Refer to Figure 2-1
Transporting
!
CAUTION
When traveling on public roads whether at night or during the
day, use accessory light and devices for adequate warning to
operators of other vehicles. Comply with all federal, state and
local laws.
1. Select a safe ground travel speed when transporting
from one area to another. When traveling on
roadways, transport in such a way that faster moving
vehicles may pass you safely.
2. Reduce tractor ground speed when turning. Leave
enough clearance so the seeder does not contact
obstacles such as buildings, trees or fences.
3. When traveling over rough or hilly terrain, shift tractor
to a lower gear.
Parking
The following steps should be done when preparing to
store the seeder or unhitch it from the tractor. See also
“Section 5: Maintenance & Lubrication” on Page 25 for
additional information on long term storage of your seeder.
1. Park the seeder on a level, solid area.
2. Shut off tractor engine and engage parking brake.
3. To prevent the seeder from tipping backward, remove
rear roller lock pin from storage position and place in
parking position. Refer to Figure 2-2
4. Unhitch from tractor.
.
20578
Rear Roller Pin in Storage Position
Figure 2-1
!
CAUTION
Never back up with the seeder down. This will loosen the drive
chain and possibly damage the seeder.
Seeding
Slowly lower the Primary Seeder to the ground with the
tractor’s hydraulics. Begin in a low gear as the full seeder
can be a heavy load. Ground speed is determined based
on safety, ground conditions and terrain. In most cases do
not exceed 6 MPH. The seeding mechanism is ground
driven. Therefore, seeding can be discontinued by raising
the seeder off the ground with the 3-point lever before
making a turnaround and when transporting from one
area to another.
4/03/08
20579
Rear Roller Pin in Parking Position
Figure 2-2
PS2096 Series Primary Seeders 313-308M
15
Table of Contents
Land Pride
Section 3: Operating
Drive System
Your Primary Seeder uses standard no. 40 roller chain
throughout its drive system. The drive system is simple
and designed for low maintenance.
1. Check the drive idler arms to insure that they are
taking up any excess chain slack.
2. Check each chain to insure that it is not overtightened.
3. Annually clean and lubricate chain with chain oil.
Roller Packing Wheels
The front and rear roller packing wheels should turn freely.
In field position, the rear roller assembly should be free to
float up and down to follow the terrain of your field. See
Figure 2-1 on page 15.
16
PS2096 Series Primary Seeders 313-308M
4/03/08
Table of Contents
Land Pride
Section 4: Seeding Adjustments
Section 4: Seeding Adjustments
Seed Rate Speed Change
change the drive type and chain pitch from High Range to
Low Range, 8 pitches will need to be removed from chain,
refer to Figure 3-1. Remove 5/8” nut, 5/8” lock washer and
5/8” flat washer. Flip speed change sprocket for desired
drive type.
Main Seed Box
The seed rate speed change is designed to give you two
speeds for different types of seeds and rates. The two
drive types are high range (gives you the most pounds per
acre) and low range (least pounds of seed per acre). To
See Figure 3-2 for sprocket alignment.
90 Pitches
90+8=98 Pitches
64+8=72 Pitches
35 Tooth
Sprocket
35 Tooth
Sprocket
64 Pitches
19 Tooth
Sprocket
20580
19 Tooth
Sprocket
High Range
20581
Low Range
Speed Change & Chain Pitches
Figure 3-1
12939
Sprocket Alignment
Figure 3-2
4/03/08
PS2096 Series Primary Seeders 313-308M
17
Table of Contents
Land Pride
Section 4: Seeding Adjustments
Seeding Adjustments
Main Seed Box
1. Using the seed rate charts, beginning on page 20,
determine the seeding rate for the seed you will be
planting and make the following adjustments.
a. Decide whether you need the high range or low
range drive type. Change the speed change
sprocket if necessary, to the desired drive type,
see
Figure 3-1 & Figure 3-2 on page 17.
b. Locate the seed rate adjustment handle at the
rear of the seeder and move it to the indicator
number obtained from the charts, see Figure 3-3.
For best results, first move adjustment handle all
the way to the left. Then move the handle to the
desired setting, moving from a lower to a higher
number.
2. There are many factors which will affect seeding rates:
seed treatment, weight of seed, surface condition of
seed or roller slippage. Minor adjustments may be
needed to compensate for these factors.
3. The seed rate charts are based on average size seed.
This may differ from the seed you are using. Use the
seed rate charts as a guide. For lighter than average
seed, the setting should be increased. For heavier
than average seed, the setting should be decreased.
4. Complete the following procedure to calibrate the rate
for your specific seed.
a. Place several pounds of seed over three of the
seed cups at the outboard end of the seeder.
b. Raise the seeder off the ground and support
safely, leaving front roller to rotate freely.
5. You may want to repeat the calibration procedure if the
results of your calibration vary greatly from the
suggested settings on the chart.
NOTE: To determine seed rates for seeds not listed
on the charts, compare weight and size to those listed
and use a similar setting. Follow steps 4 and 5 to
calibrate the seed rate.
REMEMBER: Field conditions will affect seeding rates.
When seeding check the amount of seed you are using by
noting acres or square feet seeded, amount of seed
added to seeder, and level of seed in the seed box. If you
suspect that you are seeding more or less seed than
desired, and you have accurately calibrated the seeder to
your seed, you may need to adjust the seeding rate
slightly to compensate for field conditions.
NOTE: This seeder is equipped with a four-position
door on each seed cup. The highest handle position
is for small seeds, the second and third positions are
for larger seeds. For application with this seeder, you
will only need to use the highest position. MAKE
SURE all handles are in the same position before
seeding. The wide open position will allow complete
clean out of the seed cup.
IMPORTANT: DO NOT open the cup to the wide open
position with seed in the box unless complete clean
out is desired.
Rotate the front roller to see that the drive system
is working properly and the seed cups are free
from foreign matter.
NOTE: A 1/2” bolt is threaded into the right hand end
of the front roller shaft. Turn the bolt clockwise for
proper seed cup rotation.
Place a drop cloth under the seeder to gather the
seed as it is metered.
d. Rotate the front roller 38 rotations to get 1000
square feet or 1,640 rotations to get one acre. Be
sure to check the three seed cups to make sure
each cup has plenty of seed coming into it.
e. Weigh the seed which has been metered. Divide
by three. This will give you the ounces/pounds
metered by each seed cup. Convert to pounds
and multiply by the number of cups on your
seeder to arrive at the total pounds per 1000
square feet your seeder would meter at that
setting. If this figure is different than desired, set
your seed cup adjustment lever accordingly.
20579
c.
18
PS2096 Series Primary Seeders 313-308M
Seed Rate Adjustment Handle
Figure 3-3
4/03/08
Land Pride
Table of Contents
Section 4: Seeding Adjustments
Small Seeds Box Option
1. Using the seed rate charts, beginning on page 24,
determine the seeding rate for the seed you will be
planting and make the following adjustments.
a. Locate the seed rate adjustment handle at the
rear of the seeder and move it to the indicator
number obtained from the charts, see Figure 3-4.
For best results, first move adjustment handle all
the way to the left. Then move the handle to the
desired setting, moving from a lower to a higher
number.
2. There are many factors which will affect seeding rates:
seed treatment, weight of seed, surface condition of
seed or roller slippage. Minor adjustments may be
needed to compensate for these factors.
3. The seed rate charts are based on average size seed.
This may differ from the seed you are using. Use the
seed rate charts as a guide. For lighter than average
seed, the setting should be increased. For heavier
than average seed, the setting should be decreased.
4. Complete the following procedure to calibrate the rate
for your specific seed.
a. Place several pounds of seed over three of the
seed cups at the outboard end of the seeder.
b. Raise the seeder off the ground and support
safely, leaving front roller to rotate freely.
Rotate the front roller to see that the drive system
is working properly and the seed cups are free
from foreign matter.
5. You may want to repeat the calibration procedure if the
results of your calibration vary greatly from the
suggested settings on the chart.
NOTE: To determine seed rates for seeds not listed
on the charts, compare weight and size to those listed
and use a similar setting. Follow steps 4 and 5 to
calibrate the seed rate.
REMEMBER: Field conditions will affect seeding rates.
When seeding check the amount of seed you are using by
noting acres or square feet seeded, amount of seed
added to seeder, and level of seed in the seed box. If you
suspect that you are seeding more or less seed than
desired, and you have accurately calibrated the seeder to
your seed, you may need to adjust the seeding rate
slightly to compensate for field conditions.
20591
NOTE: A 1/2” bolt is threaded into the right hand end
of the front roller shaft. Turn the bolt clockwise for
proper seed cup rotation.
c.
Place a drop cloth under the seeder to gather the
seed as it is metered.
d. Rotate the front roller 38 rotations to get 1000
square feet or 1,640 rotations to get one acre. Be
sure to check the three seed cups to make sure
each cup has plenty of seed coming into it.
e. Weigh the seed which has been metered. Divide
by three. This will give you the ounces/pounds
metered by each seed cup. Convert to pounds
and multiply by the number of cups on your
seeder to arrive at the total pounds per 1000
square feet your seeder would meter at that
setting. If this figure is different than desired, set
your seed cup adjustment lever accordingly.
4/03/08
Small Seeds Rate Adjustment Handle
Figure 3-4
PS2096 Series Primary Seeders 313-308M
19
Table of Contents
Land Pride
Section 4: Seeding Adjustments
Seed Rate Charts
Cup Setting 0
5
10
Alfalfa (Pounds per Acre)
15
20
25
30
35
40
45
50
55
60
65
70
75
High Range
Low Range
198
63
269
85
341
108
412
131
485
154
555
176
626
198
699
221
769
244
842
267
913
289
985
312
1056 1129 1199 1270 1343 1413
335 358 380 402 425 448
6.2
2
7.8
2.5
9.2
3
11.1
3.5
12.8
4
14.4
4.6
16.1
5.1
17.7
5.6
19.4
6.1
21
6.6
22.6
7.2
24.3
7.7
25.9
8.2
27.6
8.7
29.2
9.2
30.9
9.8
32.5
10.3
152
54
185
66
206
77
239
89
265
99
293
110
326
122
358
131
380
140
413
149
439
159
467
168
499
175
528
184
554
191
586
198
619
205
4.2
1.5
4.7
1.8
5.5
2
6.1
2.3
6.7
2.5
7.5
2.8
8.2
3
8.7
3.2
9.5
3.4
10.1
3.6
11.5
3.9
12.1
4
12.7
4.2
12.7
4.4
13.5
4.5
14.2
4.7
250
79
295
93
341
108
386
122
430
136
475
150
521
165
565
179
610
193
654
207
701
222
745
236
789
250
834
264
880
279
925
293
7.8
2.5
8.9
2.8
9.9
3.1
10.9
3.8
12
3.8
13
4.1
14
4.4
15
4.8
16.1
5.1
17.1
5.4
18.1
5.7
19.2
6.1
20.2
6.4
21.3
6.7
130
46
159
56
185
65
213
73
241
83
259
92
293
99
321
109
352
118
371
127
395
134
417
143
430
147
434
150
9.6
3.3
9.9
3.4
10
3.5
0
0
54
17
125
40
80
85
90
95
100
Alfalfa (Pounds per 1000 Square Feet)
High Range
Low Range
0.0
0.0
1.2
0.4
2.9
0.9
4.5
1.4
Bent Grass (Pounds per Acre)
High Range
Low Range
0
0
37
17
80
29
115
42
Bent Grass (Pounds per 1000 Square Feet)
High Range
Low Range
0.0
0.0
0.8
0.4
1.8
0.7
2.6
1
3.5
1.2
Bermuda - Unhulled (Pounds per Acre)
High Range
Low Range
0
0
61
19
101
32
161
51
206
65
Bermuda - Unhulled (Pounds per 1000 Square Feet)
High Range
Low Range
0.0
0.0
1.4
0.4
2.3
0.7
3.7
1.2
4.7
1.5
5.8
1.8
6.8
2.1
Buffalo Grass Sharps Improved (Pounds per Acre)
High Range
Low Range
0
0
0
0
0
0
22
13
52
21
76
29
106
38
Buffalo Grass Sharps Improved (Pounds per 1000 Square Feet)
High Range
Low Range
0.0
0.0
0
0
0
0
0.5
0.30
1.2
0.5
1.7
0.7
2.4
0.9
3
1.1
3.6
1.3
4.2
1.5
4.9
1.7
5.5
1.9
6.2
2.1
6.7
2.3
7.4
2.5
8.1
2.7
8.5
2.9
9.1
3.1
263
83
321
102
380
120
438
139
499
158
557
177
616
195
676
214
734
233
793
251
852
270
913
289
971
308
1030 1090 1149 1207
326 346 364 383
21
6.6
22.3
7.1
23.7
7.5
Clover - Red (Pounds per Acre)
High Range
Low Range
0
0
77
24
143
45
202
64
Clover - Red (Pounds per 1000 Square Feet)
High Range
Low Range
0.0
0.0
1.8
0.6
3.3
1
4.6
1.5
6
1.9
7.4
2.3
8.7
2.8
1.1
3.2
11.5
3.6
12.8
4.1
14.2
4.5
15.5
4.9
16.9
5.4
18.2
5.8
19.6
6.2
25.1
7.9
26.4
8.4
27.8
8.8
297
94
372
118
444
141
517
164
592
187
664
211
737
234
812
257
884
280
957
303
1032 1104 1177 1252 1324 1397 1472
327 350 373 397 420 443 466
11.9
3.8
13.6
4.3
15.3
4.8
16.9
5.4
18.7
5.9
20.3
6.4
22
7
23.7
7.5
25.4
8
27.1
8.6
28.8
9.1
30.4
9.6
32.1
10.2
33.8
10.7
188
60
216
69
242
77
271
86
299
95
327
104
355
113
384
122
412
131
440
140
468
148
497
157
525
166
553
175
Clover - White (Pounds per Acre)
High Range
Low Range
0
0
77
24
151
48
224
71
Clover - White (Pounds per 1000 Square Feet)
High Range
Low Range
0.0
0.0
1.8
0.6
3.5
1.1
5.2
1.6
6.8
2.2
8.5
2.7
10.2
3.2
Fescue - Fine Blade, Turf Type (Pounds per Acre)
High Range
Low Range
0
0
20
6
46
15
75
24
103
33
131
42
160
51
Fescue - Fine Blade, Turf Type (Pounds per 1000 Square Feet)
High Range
Low Range
0.0
0.0
0.5
0.1
1.1
0.3
1.7
0.5
2.4
0.7
3
1
3.7
1.2
4.3
1.4
5
1.6
5.6
1.8
6.2
2
6.9
2.2
7.5
2.4
8.2
2.6
8.8
2.8
9.5
3
10.1
3.2
10.8
3.4
11.4
3.6
12.1
3.8
12.7
4
83
26
113
35
140
44
165
51
186
58
223
69
243
76
272
84
305
95
328
102
355
110
382
118
408
127
433
134
439
136
450
140
454
141
2.6
0.8
3.2
1
3.8
1.2
4.3
1.3
5.1
1.6
5.6
1.7
6.3
1.9
7
2.2
7.5
2.3
8.2
2.5
8.8
2.7
9.4
2.9
10
3.1
10.1
3.1
10.3
3.2
10.4
3.2
125
41
155
51
178
58
205
67
227
74
250
82
274
90
293
96
322
106
334
109
365
119
387
127
406
133
426
140
442
145
455
149
4.7
1.5
5.2
1.7
5.7
1.9
6.3
2.1
6.7
2.2
7.4
2.4
7.7
2.5
8.4
2.7
8.9
2.9
9.3
3.1
9.8
3.2
10.1
3.3
10.5
3.4
Fescue K-31(Pounds per Acre)
High Range
Low Range
0
0
0
0
21
6
50
15
Fescue K-31 (Pounds per 1000 Square Feet)
High Range
Low Range
0.0
0.0
0.0
0.0
0.5
0.1
1.1
0.4
1.9
0.6
Kentucky Blue Grass (Pounds per Acre)
High Range
Low Range
0
0
23
8
48
16
73
24
103
34
Kentucky Blue Grass (Pounds per 1000 Square Feet)
High Range
Low Range
20
0.0
0.0
0.5
0.2
1.1
0.4
1.7
0.5
2.4
0.8
2.9
0.9
PS2096 Series Primary Seeders 313-308M
3.6
1.2
4.1
1.3
4/03/08
Table of Contents
Land Pride
Section 4: Seeding Adjustments
Cup Setting 0
5
10 15 20
Lovegrass - Sand (Pounds per Acre)
25
30
35
40
45
50
55
60
65
70
75
80
85
90
95
High Range
Low Range
293
93
343
109
394
125
445
141
496
157
547
173
598
189
649
206
700
222
751
238
802
254
852
270
925
286
977
302
1029 1081
319 335
23.7
7.3
0
0
89
28
140
44
191
61
242
77
100
Lovegrass - Sand (Pounds per 1000 Square Feet)
High Range
Low Range
0.0
0.0
2
0.6
3.2
1
4.4
1.4
5.6
1.8
6.7
2.1
7.9
2.5
9.1
2.9
10.2
3.2
11.4
3.6
12.6
4
13.7
4.4
14.9
4.7
16.1
5.1
17.3
5.5
18.4
5.8
19.6
6.2
21.3
6.6
22.5
6.9
24.9
7.7
343
109
396
125
448
142
501
159
553
175
606
192
658
209
711
225
763
242
816
259
868
275
921
292
973
308
1026 1078 1133
325 342 359
Lovegrass - Weeping (Pounds per Acre)
High Range
Low Range
0
0
109
35
176
56
226
72
287
91
Lovegrass - Weeping (Pounds per 1000 Square Feet)
High Range
Low Range
0.0
0.0
2.5
0.8
4
1.3
5.2
1.6
6.6
2.1
7.9
2.5
9.1
2.9
10.3
3.3
11.5
3.6
12.7
4
13.9
4.4
15.1
4.8
16.3
5.2
17.5
5.6
18.7
5.9
20
6.3
21.2
6.7
22.4
7.1
23.6
7.5
24.8
7.8
26
8.2
15
5
20
7
27
9
34
12
41
15
49
18
58
22
66
25
75
29
85
33
94
36
103
40
112
44
121
48
130
51
138
55
146
58
Orchard Grass (Pounds per Acre)
High Range
Low Range
0
0
4
1
6
2
10
3
Orchard Grass (Pounds per 1000 Square Feet)
High Range
Low Range
0.0
0.0
0.1
0.0
0.1
0.0
0.2
0.1
0.3
0.1
0.5
0.2
0.6
0.2
0.8
0.3
0.9
0.3
1.1
0.4
1.3
0.5
1.5
0.6
1.7
0.7
1.9
0.7
2.2
0.8
2.4
0.9
2.6
1.0
2.8
1.1
3.0
1.2
3.2
1.3
3.3
1.3
168
53
204
65
242
77
279
88
315
100
351
111
388
123
426
135
462
147
499
158
535
170
573
182
610
193
646
205
682
216
719
228
Rye Grass - Annual (Pounds per Acre)
High Range
Low Range
0
0
21
7
59
19
95
30
131
42
Rye Grass - Annual (Pounds per 1000 Square Feet)
High Range
Low Range
0.0
0.0
0.5
0.2
1.3
0.4
2.2
0.7
3
1
3.9
1.2
4.7
1.5
5.6
1.8
6.4
2
7.2
2.3
8.1
2.6
8.9
2.8
9.8
3.1
10.6
3.4
11.5
3.6
12.3
3.9
13.2
4.2
14
4.4
14.9
4.7
15.7
5
16.5
5.2
234
74
275
87
315
100
353
112
394
125
434
138
475
150
513
163
553
175
594
188
632
200
672
213
713
226
751
238
791
251
Rye Grass - Perennial (Pounds per Acre)
High Range
Low Range
0
0
36
12
77
24
115
37
156
49
196
62
Rye Grass - Perennial (Pounds per 1000 Square Feet)
High Range
Low Range
0.0
0.0
0.8
0.3
1.8
0.6
2.6
0.8
3.6
1.1
4.5
1.4
5.4
1.7
6.2
2
7.2
2.3
8.1
2.6
9
2.9
10
3.2
10.9
3.5
11.8
3.7
12.7
4
13.6
4.3
14.5
4.6
15.5
4.9
16.4
5.2
17.3
5.5
18.2
5.8
141
55
179
71
220
89
262
107
306
127
352
147
398
168
446
189
495
210
545
231
596
252
648
271
701
290
754
308
808
325
862
339
916
352
19.8
7.8
21.0
8.1
Sudan Grass (Pounds per Acre)
High Range
Low Range
0
0
35
18
68
28
103
41
Sudan Grass (Pounds per 1000 Square Feet)
High Range
Low Range
0.0
0.0
0.8
0.4
1.6
0.6
2.4
0.9
3.2
1.3
4.1
1.6
5.1
2.0
6.0
2.5
7.0
2.9
8.1
3.4
9.1
3.9
10.2
4.3
11.4
4.8
12.5
5.3
13.7
5.8
14.9
6.2
16.1
6.7
17.3
7.1
18.5
7.5
191
56
245
73
302
90
358
108
415
125
471
142
525
159
582
177
638
194
695
211
749
228
805
246
862
263
918
280
973
298
1029 1089 1142
315 333 350
6.9
2.1
8.2
2.5
9.5
2.9
10.8
3.3
12.1
3.7
13.4
4.1
14.7
4.5
16
4.9
17.2
5.2
18.5
5.6
19.8
6
21.1
6.4
22.4
6.9
23.7
7.2
25.1
7.6
26.2
8
95
30
111
35
125
40
139
44
153
49
170
54
184
58
198
63
214
68
228
72
242
77
258
82
273
86
287
91
301
95
Vetch (Pounds per Acre)
High Range
Low Range
0
0
78
21
135
38
Vetch (Pounds per 1000 Square Feet)
High Range
Low Range
0.0
0.0
1.8
0.5
3.1
0.9
4.4
1.3
5.6
1.7
Wheatgrass - Crested (Pounds per Acre)
High Range
Low Range
0
0
22
7
36
12
51
16
67
21
81
26
Wheatgrass - Crested (Pounds per 1000 Square Feet)
High Range
Low Range
0.0
0.0
0.5
0.2
0.8
0.3
1.2
0.4
1.5
0.5
1.9
0.6
2.2
0.7
2.6
0.8
2.9
0.9
3.2
1
3.5
1.1
3.9
1.2
4.2
1.3
4.5
1.4
4.9
1.6
5.2
1.7
5.6
1.8
5.9
1.9
6.3
2
6.6
2.1
6.9
2.2
93
29
110
35
127
4
144
46
161
51
179
57
196
62
213
67
230
73
247
78
265
84
282
89
299
95
316
100
333
106
2.9
0.9
3.3
1
3.7
1.2
4.1
1.3
4.5
1.4
4.9
1.5
5.3
1.7
5.7
1.8
6.1
1.9
6.5
2.1
6.9
2.2
7.3
2.3
7.7
2.4
Wheatgrass - Western (Pounds per Acre)
High Range
Low Range
0
0
7
2
24
8
41
13
58
19
76
24
Wheatgrass - Western (Pounds per 1000 Square Feet)
High Range
Low Range
4/03/08
0.0
0.0
0.2
0
0.5
0.2
0.9
0.3
1.3
0.4
1.7
0.5
2.1
0.7
2.5
0.8
PS2096 Series Primary Seeders 313-308M
21
Table of Contents
Land Pride
Section 4: Seeding Adjustments
Seed Rate Charts (Metric)
Cup Setting 0
5
10 15
Alfalfa (Kilograms per Hectare)
20
25
30
35
40
45
50
55
60
65
High Range
Low Range
301
95
382
121
461
147
543
172
621
197
700
222
782
247
860
273
942
299
1021 1102 1181 1263 1341 1421 1503 1581
323 349 375 410 425 450 475 501
38
12
45
15
54
17
62
20
70
22
79
25
86
27
95
30
103
32
110
35
119
38
126
40
135
42
143
45
151
48
159
50
207
74
230
86
267
100
296
111
328
123
365
136
401
147
425
157
462
167
491
178
522
188
558
196
591
206
620
214
656
222
693
229
0
0
60
19
140
45
222
70
70
75
80
85
90
95
100
Alfalfa (Kilograms per 1000 Square Meters)
High Range
Low Range
0
0
6
2
14
4
22
7
30
10
Bent Grass (Kilograms per Hectare)
High Range
Low Range
0
0
41
19
90
32
129
47
170
60
Bent Grass (Kilograms per 1000 Square Meters)
High Range
Low Range
0
0
4
2
9
3
13
5
17
6
21
7
23
9
27
10
30
11
33
12
37
14
40
15
42
16
46
17
49
18
56
19
59
20
62
21
62
21
66
22
69
23
230
73
280
88
330
104
382
121
432
136
481
152
531
168
583
185
632
200
682
216
732
232
784
248
834
264
883
280
933
295
985
312
1035
328
28
9
33
10
38
12
43
14
48
15
53
19
59
19
63
20
68
21
73
23
79
25
83
26
88
28
94
30
99
31
104
33
85
32
119
43
145
51
178
63
207
73
238
82
270
93
290
103
328
111
359
122
394
132
415
142
442
150
467
160
481
164
486
168
42
14
44
15
47
16
48
17
49
17
Bermuda (Kilograms per Hectare)
High Range
Low Range
0
0
68
21
113
36
180
57
Bermuda (Kilograms per 1000 Square Meters)
High Range
Low Range
0
0
7
2
11
3
18
6
23
7
Buffalo Grass (Kilograms per Hectare)
High Range
Low Range
0
0
0
0
0
0
25
15
58
23
Buffalo Grass (Kilograms per 1000 Square Meters)
High Range
Low Range
0
0
0
0
0
0
2
1
6
2
8
3
12
4
15
5
18
6
21
7
24
8
27
9
30
10
33
11
36
12
40
13
359
114
425
134
490
156
558
177
623
198
689
218
756
239
821
261
887
281
953
302
1021 1086 1152 1219 1286 1350
323 345 365 387 407 429
96
30
103
32
Clover - Red (Kilograms per Hectare)
High Range
Low Range
0
0
86
27
160
50
226
72
294
93
Clover - Red (Kilograms per 1000 Square Meters)
High Range
Low Range
0
0
9
3
16
5
22
7
29
9
36
11
42
14
49
16
56
18
62
20
69
22
76
24
83
26
89
28
109
35
116
37
123
39
129
41
136
43
416
132
497
158
578
183
662
209
743
236
825
262
908
288
989
313
1071 1155 1235 1317 1401 1481 1563 1647
339 366 392 417 444 470 496 521
58
19
66
21
75
23
83
26
91
29
99
31
107
34
116
37
124
39
132
42
141
44
148
47
157
50
165
52
242
77
271
86
303
96
335
106
366
116
397
126
430
136
461
147
492
157
524
166
556
176
587
186
619
196
Clover - White (Kilograms per Hectare)
High Range
Low Range
0
0
86
27
169
54
251
79
332
105
Clover - White (Kilograms per 1000 Square Meters)
High Range
Low Range
0
0
9
3
17
5
25
8
33
11
42
13
50
16
Fescue - Fine Blade, Turf Type (Kilograms per Hectare)
High Range
Low Range
0
0
22
7
51
17
84
27
115
37
147
47
179
57
210
67
Fescue - Fine Blade, Turf Type (Kilograms per 1000 Square Meters)
High Range
Low Range
0
0
2
0
5
1
8
2
12
3
15
5
18
6
21
7
24
8
27
9
30
10
34
11
37
12
40
13
43
14
46
15
49
16
53
17
56
18
59
19
62
20
126
39
157
49
185
57
208
65
249
77
272
85
304
94
341
106
367
114
397
123
427
132
456
142
484
150
491
152
503
157
508
158
19
6
21
6
25
8
27
8
31
9
34
11
37
11
40
12
43
13
46
14
49
15
49
15
50
16
51
16
199
65
229
75
254
83
280
92
307
101
328
107
360
119
374
122
408
133
433
142
454
149
477
157
495
162
509
167
25
8
28
9
31
10
33
11
36
12
38
12
41
13
43
14
45
15
48
16
49
16
51
17
Fescue K-31(Kilograms per Hectare)
High Range
Low Range
0
0
0
0
23
7
56
17
93
29
Fescue K-31 (Kilograms per 1000 Square Meters)
High Range
Low Range
0
0
0
0
2
0
5
5
9
3
13
4
16
5
Kentucky Blue Grass (Kilograms per Hectare)
High Range
Low Range
0
0
26
9
54
18
82
27
115
38
140
46
173
57
Kentucky Blue Grass (Kilograms per 1000 Square Meters)
High Range
Low Range
22
0
0
2
1
5
2
8
2
12
4
14
4
PS2096 Series Primary Seeders 313-308M
18
6
20
6
23
7
4/03/08
Table of Contents
Land Pride
Section 4: Seeding Adjustments
Cup Setting 0
5
10 15 20 25
Lovegrass - Sand (Kilograms per Hectare)
30
35
40
45
50
55
60
65
70
75
80
85
95
100
High Range
Low Range
384
122
441
140
498
158
555
176
612
194
669
211
726
230
783
248
840
266
897
284
953
302
1035 1093 151
320 338 357
1209
375
104
32
122
38
0
0
100
31
157
49
214
68
271
86
328
104
90
Lovegrass - Sand (Kilograms per 1000 Square Meters)
High Range
Low Range
0
0
10
3
16
5
21
7
27
9
33
10
39
12
44
14
50
16
56
18
62
20
67
21
73
23
79
25
84
27
90
28
96
30
110
34
116
36
443
140
501
159
561
178
619
196
678
215
736
234
795
252
854
271
913
290
971
308
1030 1089 1148 1206 1268
327 345 364 383 402
Lovegrass - Weeping (Kilograms per Hectare)
High Range
Low Range
0
0
122
39
197
63
253
81
321
102
384
122
Lovegrass - Weeping (Kilograms per 1000 Square Meters)
High Range
Low Range
0
0
12
4
20
6
25
8
32
10
39
12
44
14
50
16
56
18
62
20
68
21
74
23
80
25
85
27
91
29
98
31
104
33
109
35
15
37
121
38
127
40
23
8
30
10
38
14
46
17
55
20
65
24
74
28
84
32
95
37
105
41
115
45
126
49
136
53
145
57
155
61
164
65
Orchard Grass (Kilograms per Hectare)
High Range
Low Range
0
0
4
1
7
2
11
4
17
5
Orchard Grass (Kilograms per 1000 Square Meters)
High Range
Low Range
0
0
0
0
1
0
1
0
2
1
2
1
3
1
4
1
5
2
6
2
6
2
7
3
8
3
9
4
11
4
12
5
13
5
14
5
15
6
15
6
16
6
228
73
271
86
312
98
352
112
393
124
434
138
477
151
517
164
558
177
599
190
641
204
682
216
723
229
763
242
804
255
27
9
31
10
35
11
40
13
43
14
48
15
52
17
56
18
60
19
64
21
68
21
73
23
77
24
81
25
308
97
352
112
395
125
441
140
486
154
531
168
574
182
619
196
665
210
707
224
752
238
798
253
840
266
885
281
Rye Grass - Annual (Kilograms per Hectare)
High Range
Low Range
0
0
23
8
66
21
106
34
147
47
188
59
Rye Grass - Annual (Kilograms per 1000 Square Meters)
High Range
Low Range
0
0
2
1
6
2
11
3
15
5
19
6
23
7
Rye Grass - Perennial (Kilograms per Hectare)
High Range
Low Range
0
0
40
13
86
27
129
41
175
55
219
69
262
83
Rye Grass - Perennial (Kilograms per 1000 Square Meters)
High Range
Low Range
0
0
4
1
9
3
13
4
18
5
22
7
26
8
30
10
35
11
40
13
44
14
49
16
53
17
58
18
62
20
66
21
71
22
76
24
80
25
84
27
89
28
201
80
247
99
294
120
343
142
394
165
446
188
500
212
555
236
611
259
668
282
726
304
785
325
845
345
905
364
966
380
1027
395
84
35
91
36
97
38
103
39
Sudan Grass (Kilograms per Hectare)
High Range
Low Range
0
0
39
20
77
32
116
46
157
62
Sudan Grass (Kilograms per 1000 Square Meters)
High Range
Low Range
0
0
4
2
8
3
12
5
16
6
20
8
25
10
29
12
34
14
39
16
45
19
50
21
56
24
61
26
67
28
73
30
79
33
274
82
338
101
401
121
464
140
527
159
587
178
651
198
714
217
778
236
838
255
901
275
964
294
1027 1089 1151 1218 1278
313 333 352 373 392
40
12
46
14
53
16
59
18
65
20
72
22
78
24
84
25
90
27
97
29
103
31
109
34
116
35
123
37
128
39
124
39
140
45
156
49
171
55
190
60
206
65
222
70
239
76
255
81
271
86
289
92
305
96
321
102
337
106
Vetch (Kilograms per Hectare)
High Range
Low Range
0
0
87
23
151
43
214
63
Vetch (Kilograms per 1000 Square Meters)
High Range
Low Range
0
0
9
2
15
4
21
6
27
8
34
10
Wheatgrass - Crested (Kilograms per Hectare)
High Range
Low Range
0
0
25
8
40
13
57
18
75
23
91
29
106
34
Wheatgrass - Crested (Kilograms per 1000 Square Meters)
High Range
Low Range
0
0
2
1
4
1
6
2
7
2
9
3
11
3
13
4
14
4
16
5
17
5
19
6
21
6
22
7
24
8
25
8
27
9
29
9
31
10
32
10
34
11
123
39
142
45
161
51
180
57
200
64
219
69
238
75
257
82
276
87
296
94
316
100
335
106
354
112
373
119
16
5
18
6
20
6
22
7
24
7
26
8
28
9
30
9
32
10
34
11
36
11
38
12
Wheatgrass - Western (Kilograms per Hectare)
High Range
Low Range
0
0
8
2
27
9
46
15
65
21
85
27
104
32
Wheatgrass - Western (Kilograms per 1000 Square Meters)
High Range
Low Range
4/03/08
0
0
1
0
2
1
4
1
6
2
8
2
10
3
12
4
14
4
PS2096 Series Primary Seeders 313-308M
23
Table of Contents
Land Pride
Section 4: Seeding Adjustments
Seed Rate Charts (Small Seed Box Option)
Cup Setting 0
5
10
Alfalfa (Pounds per Acre)
15
20
25
30
35
0
4.51
6.20
7.75
9.58
11.27 12.68 14.37 16.21 17.76 19.45 21.14 22.55 24.52 26.07 27.62 29.45 31.00 32.55
.14
.18
.22
.26
4.23
7.89
10.43 13.81 16.35 19.73 22.55 25.36 28.18 31.00 33.82 36.64 39.46 42.56 45.09 47.91 50.73
0
2.82
40
45
50
55
60
65
70
75
80
85
90
95
100
Alfalfa (Pounds per 1000 Square Feet)
0
0
.06
.10
.29
.33
.37
.41
.45
.49
.52
.56
.60
.63
.68
.71
.75
Sudan Grass (Pounds per Acre)
0
0
0
2.82
Sudan Grass (Pounds per 1000 Square Feet)
0
0
0
.06
.10
.18
.24
.32
.38
.45
.52
.58
.65
.71
.78
.84
.91
.98
1.04
1.10
1.16
7.19
9.30
10.71 12.68 14.66 16.63 18.46 20.57 22.55 24.52 26.77 28.75 30.44 32.69 34.95 37.34
Turnips - Purple Top (Pounds per Acre)
0
0
2.11
3.95
5.35
Turnips - Purple Top (Pounds per 1000 Square Feet)
0
0
.05
.09
.12
.16
.21
.25
.29
.34
.38
.42
.47
.52
.56
.61
.66
.70
.75
.80
.86
.85
1.13
.69
.97
.54
.10
3.66
4.23
4.51
5.07
5.64
6.20
6.48
7.05
7.33
7.89
8.17
.05
.06
.07
.08
.10
.10
.12
.13
.14
.15
.16
.17
.18
.19
Orchard Grass (Pounds per Acre)
0
0
0
.28
Orchard Grass (Pounds per 1000 Square Feet)
0
0
0
.01
.02
.03
.04
6.76
9.16
11.55 14.66 17.05 19.73 21.98 24.52 26.77 29.03 31.56 34.10 36.50 38.89 41.43 43.68 45.94
Sweet Clover (Pounds per Acre)
0
0
1.97
4.37
Sweet Clover (Pounds per 1000 Square Feet)
0
0
.05
.10
.16
.21
.27
.34
.39
.45
.50
.56
.61
.67
.72
.78
.84
.89
.95
1.00
1.05
6.06
7.75
10.15 12.54 14.94 16.91 18.88 21.14 23.39 25.08 27.06 29.03 30.86 32.97 35.23 37.77 39.46
Ladino Clover (Pounds per Acre)
0
.85
2.25
4.23
Ladino Clover (Pounds per 1000 Square Feet)
0
.02
.05
.10
.14
.18
.23
.29
.34
.39
.43
.49
.54
.58
.62
.67
.71
.76
.81
.87
.91
7.05
9.30
11.55 14.09 16.35 18.60 20.86 23.11 25.36 27.62 30.16 32.41 34.66 36.92 39.17 41.43 43.97
Red Clover (Pounds per Acre)
0
.28
2.54
4.79
Red Clover (Pounds per 1000 Square Feet)
0
.01
.06
.11
.16
.21
.27
.32
.38
.43
.48
.53
.58
.63
.69
.74
.80
.85
.90
.95
1.01
4.79
6.76
8.74
10.99 13.25 15.50 17.76 20.01 22.26 24.52 26.77 29.31 31.28 33.82 36.07 38.05 40.30
Timothy Grass (Pounds per Acre)
0
0
1.41
3.10
Timothy Grass (Pounds per 1000 Square Feet)
0
0
.03
07
11
.16
.20
.25
.30
.36
.41
.46
.51
.56
.61
.67
.72
.78
.83
.87
.93
5.64
7.61
9.58
11.55 13.53 15.50 17.47 19.73 21.98 23.96 26.49 28.46 30.72 32.83 35.23 37.20 39.46
.17
.22
.27
9.86
12.68 15.22 18.04 20.57 23.39 26.21 29.03 31.85 34.66 37.77 40.58 43.40 45.94 48.76 51.57
Canary Grass (Pounds per Acre)
0
0
1.97
3.80
Canary Grass (Pounds per 1000 Square Feet)
0
0
.05
.09
.13
.31
.36
.40
.45
.50
.55
.61
.65
.71
.75
.81
.85
.91
Birdsfoot Trefoil (Pounds per Acre)
0
0
2.25
4.51
7.05
Birdsfoot Trefoil (Pounds per 1000 Square Feet)
0
0
0.5
.10
.16
.23
.29
.35
.41
.47
.54
.60
.67
.73
.80
.87
.93
1.00
1.05
1.12
1.18
2.54
3.95
5.07
6.20
7.05
8.17
9.30
10.15 10.71 11.55 12.12 12.96 13.81 14.94 15.78 16.91 17.76
Red Top Grass (Pounds per Acre)
0
0
.85
1.69
Red Top Grass (Pounds per 1000 Square Feet)
0
0
.02
.04
.06
.09
.12
.14
.16
.19
.21
.23
.25
.27
.28
.30
.32
.34
.36
.39
.41
3.72
4.37
5.33
6.12
6.90
7.61
8.40
9.02
9.72
10.40 10.99 11.64 12.29 12.82 13.39 13.95
.14
.16
.17
.19
.21
.22
.24
Kentucky Blue Grass (Pounds per Acre)
0
0
.28
1.52
2.17
Kentucky Blue Grass (Pounds per 1000 Square Feet)
0
24
0
.01
.03
.05
.09
PS2096 Series Primary Seeders 313-308M
.10
.12
.25
.27
.28
.29
.31
.32
4/03/08
Table of Contents
Land Pride
Section 5: Maintenance & Lubrication
Section 5: Maintenance & Lubrication
Maintenance
Proper servicing and adjustment is the key to the long life
of any implement. With careful and systematic inspection,
you can avoid costly maintenance, time and repair.
6. After using your seeder for several hours, check all
bolts to be sure they are tight.
7. After transporting your seeder for several hours,
check all bolts and nuts to be sure they are tight.
Storage
1. At the end of the working season or when your
Primary Seeder will not be used for a long period, it is
good practice to clean off any dirt or grease that may
have accumulated on the seeder and any of the
moving parts.
2. Be sure that the seed box is completely cleaned
before storing.
3. The square bore of the seed cup drive sprocket hub
should be oiled to prevent seizing. Squirt oil on to the
square seed cup shaft and move seed cup adjustment
lever back and forth in order to get the oil back into the
square.
4. Lubricate all fittings as indicated.
5. When in storage, lower the seeder with rollers on a
board or hard surface.
6. Repaint parts where paint is worn or scratched to
prevent rust.
7. Replace all damaged or missing decals.
8. Store the seeder inside if possible. Inside storage will
reduce maintenance and make for a longer seeder
life.
9. Inspect the Primary Seeder for loose, damaged or
worn parts and adjust or replace if needed.
Lubrication
Lubrication
Legend
Multi-purpose
spray lube
Multi-purpose
grease lube
Multi-purpose
oil lube
50
hrs
Intervals in hours at which
lubrication is required
50
Hours
Feed Cup Drive Shaft
(Main box)
Type of Lubrication: Oil
Quantity = Coat sprocket bore thoroughly; move seed-rate
handle back and forth to get oil into sprocket bore.
12957
IMPORTANT: DO NOT use petroleum lubricant on
the plastic seed cups. Petroleum will absorb into the
plastic and swell the plastic components.
25
Hours
Roller Bearings
Type of Lubrication: Multi-Purpose
20575
4/03/08
Quantity = Coat Generously
PS2096 Series Primary Seeders 313-308M
25
Table of Contents
Land Pride
Section 5: Maintenance & Lubrication
25
Hours
Roller Bearings
Type of Lubrication: Multi-Purpose
Quantity = Coat Generously
20579
As
Required
Roller Chains
Type of Lubrication: Chain Lubricant
12227
Quantity = Generously
25
Hours
Drive Sprocket Hanger Bearing (Zerk)
(Small Seeds Option)
Type of Lubrication: Multi-Purpose
20610
26
PS2096 Series Primary Seeders 313-308M
Quantity = Generously
4/03/08
Table of Contents
Land Pride
Section 6: Specifications and Capacities
Section 6: Specifications and Capacities
PS20 Series Primary Seeder
Model PS2096 Primary Seeder
Overall Width
9’-4”
Seeding Width (Broadcast)
8’-6”
Weight (Approximate Pounds)
1810 lbs.
Main box construction
Continuous welded construction
Lid construction
Heavy duty precision fit with seed splash guard
Seed Capacity
1 Bushel/Foot (total capacity: 8 bushels)
Seed Cup Drive
Chain Driven from right side of front roller
Seed Cup Agitation
Chain driven paddle type agitators above main box seed cups
Seed Settings
Wide range of calibration
Seed Drop
Wind guarded
Track Removers
Double torsion spring height adjustable and replaceable, Two each
Packer Wheels- Front
12” OD notched, cast iron, 42 each with 1 1/2” sealed greaseable bearings
Packer Wheels- Rear
9 1/2” OD notched, cast iron, 43 each with free floating mounting tube and 1”
greaseable bearing mounted on pivoting spring loaded arms
Hitch
Category 2 & 3; Quick Hitch Adaptable, Optional Pull type hitch (see below)
Small Seed Box
Optional small seeds box with 2 bushel capacity may be added to the PS2096
PS 2096 Pull Type Hitch
Wheel Base
69” Center to Center
Length
95”
Hook-Up
Quick Attach Type Hook-Up
Tires - 2 ea.
9.5” L X 15” 12 Ply Tires
Cylinders
4” X 14” with Transport Lock valve
Tongue Jack
Standard
Weight (Approximate Pounds)
720 lbs.
4/03/08
PS2096 Series Primary Seeders 313-308M
27
Table of Contents
Land Pride
Section 7: Features & Benefits
Section 7: Features & Benefits
PS20 Series Primary Seeder
Features
Benefits
Cat. 2 & 3,
Quick-Hitch adaptable
Optional pull type hitch
Seeding width
Grass seed model
Lift hooks
Grass seed main box
Seedbox construction
Heavy-duty water tight lids
with stay open support
Seed splash guard
Grass seed cups
Grass seed agitator
Powdered metal
in fluted sprockets
Wind guarded seed drop
Seed rate adjustment
Seed rate decal
Allows for easier hook-up to tractor, adaptable to smaller tractors. No negative tongue
weight.
8’ 6” Seeding width is just right for small acreage, roadside native grass work, and small
turf farms.
Turf grass users can use the main box for planting turf type grass seed.
Lift hooks on each side of the seedbox to attach chain or strap to for easy loading and
unloading.
1 bushel per foot (8 1/2 bushel) capacity keeps filling to a minimum, increases productivity.
Continuous welded seedbox construction prevents twisting from uneven ground, offers
years of service.
Lids are precision fit to keep seeds dry and rodents out and they won’t buckle or slam shut
in high winds.
Seedbox lid has a guard to prevent seed from being spilled between lid and box.
Grass seed model uses proven fluted seed cups for accurate seed rates.
Paddle style agitator is used in grass seed main box.
Helps dissipate heat from the fluted area and plastic seed cup housing.
Protects the seed from being blown away by windy conditions. Constant placement of
seed across the whole width of the machine.
Easy adjustment on seed rates. Lever position is located on seed rate chart.
Positioned on lid. Easy access to seed rate information.
High/Low seed settings
Easy adjustment on sprocket arrangement on seed cup drive. This allows for a very broad
range of seed settings.
Small seeds box
A bolt-on small seeds box can be added to plant small seeds in with other types, allowing
them to be seeded at rates that complement each other.
Ground driven metering
Packer wheels are in constant contact with the ground to ensure consistent metering of
seed.
Cast iron packer wheels
12” diameter front rings and 9 1/2” diameter rear rings are used to crush the clods and
pack the seed in to promote seed to soil contact.
Spring mounted rear packers
Adjustable track removers
#40 Roller chain
28
Cat. 2 & 3 offers a wide variety of tractors, QH allows for easy connecting and
disconnecting.
Rear packer wheels are spring loaded for additional down pressure, and to stay in contact
with the ground.
Spring tine track removers effectively scratch out the tracks from the tractor tires.
All drives utilize #40 roller chain for smooth running.
PS2096 Series Primary Seeders 313-308M
4/03/08
Table of Contents
Land Pride
Section 8: Troubleshooting
Section 8: Troubleshooting
Problem
Uneven seed spacing or uneven
stand.
Solution
Check for plugging in seed cup.
Reduce ground speed.
Check for trash or mud build up on rollers.
Actual seeding rate is different than
desired.
Seed treatment will affect seeding rate if the chemicals build up in seed cup.
Unless cleaned regularly, this build up can cause breakage of the seed cup
shaft.
Feed cup sprocket locked up or
twisted feed cup drive shaft.
Check for foreign matter lodged in seed cup sprocket.
Rollers not turning freely.
Check for trash or mud build-up on roller end.
4/03/08
PS2096 Series Primary Seeders 313-308M
29
Table of Contents
Land Pride
Section 9: Appendix
Section 9: Appendix
Torque Values Chart For Common Bolt Size
Bolt Head Identification
Bolt Size
(Inches)
in-tpi1
1/4" - 20
1/4" - 28
5/16" - 18
5/16" - 24
3/8" - 16
3/8" - 24
7/16" - 14
Grade 2
Grade 5
Bolt Head Identification
Grade 8
N · v-lb3 N · m ft-lb N · m ft-lb
7.4
8.5
15
17
27
31
43
5.6
6
11
13
20
22
32
11
13
24
26
42
47
67
8
10
17
19
31
35
49
16
18
33
37
59
67
95
12
14
25
27
44
49
70
Bolt Size
(Metric)
mm x
M 5 X 0.8
M6X1
M 8 X 1.25
M8X1
M10 X 1.5
M10 X 0.75
M12 X 1.75
5.8
8.8
10.9
Class 5.8
Class 8.8
Class 10.9
N · m ft-lb N · m ft-lb N · m ft-lb
4
7
17
18
33
39
58
3
5
12
13
24
29
42
6
11
26
28
52
61
91
5
8
19
21
39
45
67
9
15
36
39
72
85
125
7
11
27
29
53
62
93
7/16" - 20
49
36
75
55
105
78
M12 X 1.5
60
44
95
70
130
97
1/2" - 13
66
49
105
76
145
105
M12 X 1
90
66
105
77
145
105
1/2" - 20
75
55
115
85
165
120
M14 X 2
92
68
145
105
200
150
9/16" - 12
95
70
150
110
210
155
M14 X 1.5
99
73
155
115
l215
160
9/16" - 18
105
79
165
120
235
170
M16 X 2
145
105
225
165
315
230
5/8" - 11
130
97
205
150
285
210
M16 X 1.5
155
115
240
180
335
245
5/8" - 18
150
110
230
170
325
240
M18 X 2.5
195
145
310
230
405
300
3/4" - 10
235
170
360
265
510
375
M18 X 1.5
220
165
350
260
485
355
3/4" - 16
260
190
405
295
570
420
M20 X 2.5
280
205
440
325
610
450
7/8" - 9
225
165
585
430
820
605
M20 X 1.5
310
230
650
480
900
665
7/8" - 14
250
185
640
475
905
670
M24 X 3
480
355
760
560
1050 780
1" - 8
340
250
875
645
1230 910
M24 X 2
525
390
830
610
1150 845
1" - 12
370
275
955
705
1350 995
M30 X 3.5
960
705
1510 1120 2100 1550
1-1/8" - 7
480
355
1080 795
1750 1290
M30 X 2
1060 785
1680 1240 2320 1710
1 1/8" - 12
540
395
1210 890
1960 1440
M36 X 3.5
1730 1270 2650 1950 3660 2700
1 1/4" - 7
680
500
1520 1120 2460 1820
M36 X 2
1880 1380 2960 2190 4100 3220
1 in-tpi = nominal thread diameter in inches-threads per inch
1 1/4" - 12
750
555
1680 1240 2730 2010
2
1 3/8" - 6
890
655
1990 1470 3230 2380
N· m = newton-meters
3
1 3/8" - 12
1010 745
2270 1670 3680 2710
ft-lb= foot pounds
4 mm x pitch = nominal thread diameter in millimeters x thread
1 1/2" - 6
1180 870
2640 1950 4290 3160
pitch
1 1/2" - 12
1330 980
2970 2190 4820 3560
Torque tolerance + 0%, -15% of torquing values. Unless otherwise specified use torque values listed above.
30
PS2096 Series Primary Seeders 313-308M
4/03/08
Table of Contents
Land Pride
Section 9: Appendix
Warranty
Land Pride warrants to the original purchaser that this Land Pride product will
be free from defects in material and workmanship beginning on the date of
purchase by the end user according to the following schedule when used as
intended and under normal service and conditions for personal use.
Overall Unit: One year Parts and Labor
Packer Wheels: Considered wear items
Optional Pull Tongue: One year Parts and Labor
This Warranty is limited to the replacement of any defective part by Land
Pride and the installation by the dealer of any such replacement part, and does
not cover common wear items. Land Pride reserves the right to inspect any
equipment or parts which are claimed to have been defective in material or
workmanship.
This Warranty does not apply to any part or product which in Land Pride’s
judgment shall have been misused or damaged by accident or lack of normal
maintenance or care, or which has been repaired or altered in a way which
adversely affects its performance or reliability, or which has been used for a
purpose for which the product is not designed. Misuse also specifically includes
failure to properly maintain oil levels, grease points, and driveline shafts.
Claims under this Warranty should be made to the dealer which originally sold
the product and all warranty adjustments must be made through an authorized
Land Pride dealer. Land Pride reserves the right to make changes in materials
or design of the product at any time without notice.
This Warranty shall not be interpreted to render Land Pride liable for damages
of any kind, direct, consequential, or contingent to property. Furthermore, Land
Pride shall not be liable for damages resulting from any cause beyond its
reasonable control. This Warranty does not extend to loss of crops, any expense
or loss for labor, supplies, rental machinery or for any other reason.
No other warranty of any kind whatsoever, express or implied, is made
with respect to this sale; and all implied warranties of merchantability and
fitness for a particular purpose which exceed the obligations set forth in
this written warranty are hereby disclaimed and excluded from this sale.
This Warranty is not valid unless registered with Land Pride within 30 days
from the date of purchase by the end user.
4/03/08
PS2096 Series Primary Seeders 313-308M
31
Corporate Office: P.O. Box 5060
Salina, Kansas 67402-5060 USA
www.landpride.com