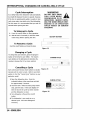
1
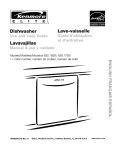
Dishwasher
Use and Care
Manual
HOUSEHOLD
USE ONLY
Congratulations. and
Thank You f ram Kiipperslbusch
for selecting your dishwasher. You have joined the
many consumers who demand quiet anid exceptional
performance from their dishwashers. This manual was
written with your safety and convenience in mind and
the information contained herein is very important. We,
a t Kiippersbusch, highly recommend that you read this
manual prior to using your dishwasher folr the first time.
As an added convenience, a glossary of K ~ ~ P P E R S I P U ~ C H
DISHWASHER FEATURES DESCRIIPTICBNS has been
added to this manual so you can truty ur~lderstandand
appreciate the philosophy put into this exceptional
product.
Enjoy!
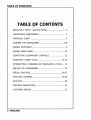
TABLE OF COINTENTS
TABLE OF CONTENTS
IMPORTANT SAFETY INSTRUCTIONS ............................... 3
.
.. . . . 4
DISHWASHER COMPONENTS .....................*..........
................................... 5
MATERIALS CHART ....................
LOADING THE DISHWASHER ..........................................68
.
ADDING DETERGENT .......................
.
.
.
.
................. 9
ADDING RINSE AGENT ............................................
1
0
IDENTIFYING DISHWASHER CONTROLS .......................... 11
SELECTING
A WASH CYCLE ........................................ 12-13
INTERRUPTING. CHANGING OR CANCELLING A CYCLE .... 14
. . . .............. 15
UNLOAD THE DISHWASHER ....................
SPECIAL FEATURES ....................................................
16-17
CARE AND CLEANING .........................
.....
......... 18-19
SELF HELP .......................................................................- 2 0
FEATURES DESCRIPTION .............................................. .2f
CUSTOMER SERVICE ......................................................22
.
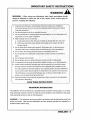
WARNING - When using your dishwasher, basic safety precautions should
always be followed to reduce the risk of fire, electric slhiock, and/or injury to
persons, including the following:
GROUNDING INSTRUCTION!$
Tt- is appliance must be connected to a grounded metal, permanent wiring system, or an equipment grounding conductor must be run with the circuit conductor!; and connected to the equipment grounding terminal or lead on the dishwasher.
WARMING - This dishwasher must be grounded in accordance with theNational Electrical Code
and/or local codes. Make sure this dishwasher has been properly grounded and installed by a
qualified installer before using.
-
ENGLISH 3
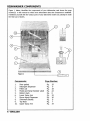
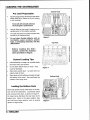
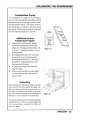
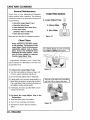
DISHWASHER COMPONENTS
Figure 1, below, identifies the camponen& of your dishwas.her, and shows the page
number(s) in this manual on which more information about tl?~e
component is available.
Familiarize yourself with the various parts of your dishwasher before you attempt to wash
the first load of dishes.
Figure 3L
I
I
_
Campaneg$s
Door gasket
Detergent Dispenser
Filters (3)
Model and Serial N~imberLabel
Bottom Rack
Lower Spray Arm
Rinser Agent Dispenser
Silverware Basket
Top Rack
Upper Spray Arm
-
4 ENGLISH
Paae Nlumber:
Pg.
Pg.
Pg.
Pg.
Pg.
Pg.
Pg.
Pg.
Pg.
Pg.
29
9
18
22
6
19
10
8
7
19
I1?IA%"E
RIALS CHART
Important: Before you wash anything in the dishwasher,,check the materials chart
shown below in Table 1. Some materials are not dishnwsher-safe and shaufd be
hand-washed. Others require special toading cansiderailiotls. Before washing any
dishware or cookware, contact the manufacturerofthe m~raterialto canfirm that it is
dishwasher-safe.
Materials Chart
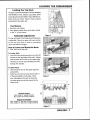
LOADING THE DISHWASHER
-
-
Battom Rack
Pre-Load Preparation
Remove large particles of food from the dishes
before food has a chance to dry, but rinsing
is not necessary.
Food soils will actually enhance
the detergent's performance.
Use the Rinse & Hold cycle if waiting an extended period of time before washing.
Pre-soak and hand-scour pots and pans with
burned-on or blackened food.
Do
not place foreign objects, such as
toothpicks, paper products, piastic
bags, or packaging materials, into the
dishwasher!
Figure 2
Top Rack
%
P
tgsfare loading the dishwasher, revS63,w the material
chart: provided on Page! S.
x
T
w
w
I..
-ww
m
n
cn
General Loading T@ps
m
-
m
za
In
Load dishwasher so water can circulate freely
and reach every part of item.
Do not allow delicate items to touch - they
could be damaged.
Place items upside down - so water does not
collect inside of them.
Place items so that nothing protrudes through
the bottom of the racks - this could block the
rotation of the spray arms.
Loading the Bottom Rack
Place large and/or heavily soiled items in the bottom rack of the dishwasher. Load heavily soiled
1 pots and pans face down, as shown in Figure 4.
For larger items, fold down the rear tines on. the
bottom rack. When in the down position, they
can hold extra large utensils, such as serving
spoons or large knives.
;
1
Figure 4
LOADING "'$"HE
DISHWASHER
Loading the Top Rack
The upper rack of the dishwasher has been designed
with flexibility in mind. Glasses, cups, plates, bowls
and small pots may be loaded in many different positions to fit your needs. Figure 5 shows a typical
mixed load for the upper rack.
Cup Shelives
Fl~pdown cup shelves.
Place glasses upside down with stems resting
in the "V" of the shelves.
1RackmatiEc Adjustmemat
The top rack height of the Kuppersbuschdishwashers
is adjustable. There i s an upper and lower position
for the top rack which is used to accomodate
items with different heights.
Haw to bower and Raise the Rack:
First, pull out the top rack.
To Lower Raek
0
Press the levers simultaneously (one on the left
and one on the right sides of the rack). Always
hold the sides of the rack on the upper edge,
otherwise it will not drop smoothly (and may
damage the utensils).
So Raise Rack
Talte hold of the rack on the upper edge and
pull upwards.
* Before you re-insert the rack, ensure that it is
at the same height on both sides. Other
wise, the appliance door will not close and
the upper spray arm will not connect to the
water circuit.
.
.
---
-r{
I
I
Tap Raek Height:
Max. height 8" (upper position)
Max. height 10" (lower position)
Bottom Rack Hekht:
Max. height12" (top rack in lower position)
Max, height 14" (top rack in upper position)
Figure 8
-
ENGLISH 7
LOADING THE DISHWASHER
Below is an e,~ample
of a silvemare
loading pattt:rn tha$ prevents nesting.
Loading the Silverware Basket(s)
Your Kuppersbusch dishwasher has a large and a
small silverware basket in the bottom rack. For
personal safety and a top quality clean, place the
silverware in the baskets:
so that they do not nest together.
* place silverware with handles-down, but
place knives and other potentially dangerous
utensils handles-up.
7,
f----
i5.Ii_5ii5i
....-..-
14100~0
-1
FlOElLii
[3
f-
m
r---I
[-I
,_-A
r___._l
ELI
it."
'^. --3-J1-t
3
-3
\-_.
,-
---
A
Caution: Always
isad sharp uIt:ens!Bs
with the sharp
point dlwn 1
NESTING
SZlVERViraRE
Figure 10
Figure E l
Large SiCverwware Basket
with Lid
The Kuppersbusch dishwasher model you have
purchased also comes with a large silverware basket
with lid. To use, first fold the basket lids down (snap
in place), then load silverware. The lid will prevent
nesting of silverware (see Figure 9). Refer to Figures
10 and 13 for recommended silverware loading.
-
8 ENGLISH
Figure 12
ADDING DETERGENT
Seleding the Right Detergent
Use only fresh dishwashing detergent (powder is
recommended). Use of other types of detergents
can r e s ~ ~inl texcessive suds. Concentrated detergents usually call for lower usage than standard
detergents.
Filling the
Detergent Dispenser
Detergent
Dispenser
\
Figure Z4
Release Tab
1. Locate the detergent dispenser on the inside
door of the dishwasher (see Figure I).
2. Open the detergent dispenser cover by push-
ing the release tab.
-- ---
3. F~lldispenser. Measure the amount of deter
gent to use based on the cycle setected and
the water hardness (see chart below).
4. Close dispenser. With fingers on arrow, slide
cover over the detergent chamber and press
down on the arrow until it clicks shut.
The detergent will automaticatly be dispensed
during the!wash partian
of the cycle.
--
e - W - k 3 =
-*"&--~.~~,
---I-.-J
Figure 35
Important: Too muek detergent
cambiiapecafl with scft water may
cause @tc$ringsf glassware.
Recommended Drztergent Usage
.
,
Table 2
-
ENGLISH 9
ADDING RINSE AGENT
Rinse Agent
Rinse agent, or a rinse aid, is used to provide aptimum drying results and diminish water spotting.
Always use a rinse agent with the Kuppersbusch
dishwasher to insure proper drying results. It rinses the dishwasher and also rinses the internal
parts of the dishwasher.
TO AD3UST RINSE
AGEMT REGI,,IUTQIR
SmxWG:
%. OPEN THE CQVER
or;: WE RaiNse AGENT
DISPENSER.
2.7-URN THE 5ETfTNG
INDICATOR 1"0THE
DESIRED SETTING
Fa Fir! the Rinse A g e n t Resewair
-
1. Open the dishwasher door fully.
2. Open the cover of the rinse agent dispenser by
pressing the star on the cover with your index
finger
- while pullins
- on the tab with your thumb.
3. Add rinse agent to the reservoir until the level
indicator turns dark, indicating that the reservoir is full (capacity i s approx..3.5 oz.).
#eta: Re$li/$l
rinse agent when
the level indicata~shaws a siflwer
baekgraunld wim black Binas,
4. Close lid until snaps shut.
Rinse Agent
Dispenser Regulator
The Kuppersbusch Rinse Aid Dispenser Regulator
is provided with a regulator calibrated from 4 to 6.
(See Figure 16). This regulator controls the
amount of rinse agent dispensed. The dishwasher
leaves the factory preset to 4. However,
if you see streaks, you should turn
the regulator to a lower number.
if you see water spots, you should
turn the regulator to a higher number.
Figure IT
Rinse agent is avar'8able in liirgaaid or
soiiid farm. ClrpIgs use the !]quid type
of rhse agelrta in the K ~ W ~ F S ~ M S Q ~
dishwashes=
Rinse Agent indicator Light
and Indicator Level
Kuppersbusch models are equipped with an additional rinse aid indicator light on the control
panel. When the rinse agent dispenser is empty,
not only will the indicator level show a silver background with black lines, but the indicator light
will also be illuminated. After filling the rinse
agent dispenser, close the door and wait a few
minutes for the indicator light t o register.
Figure 18
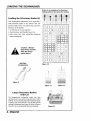
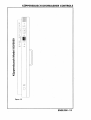
K~PPERSBUSCHDISHW.ASHER CONTROLS
-
ENGLISH 13.
CYCLE SELIECnON CHARTS
Cycle Selection Chart for Kappersk~uschModel
IGVS669
AMOUNTOF
FOODREMAIIUS
cckmmoNOF
HX)OREMMMS
WASH CYCLE
I
Rinse-aid
i
/I
I!
Cycle Duration
in mlnutes
I
Table 3
Shown above are the average values that may be obtained while runn ng the dishwasher under
normal conditions. Actuai valcres may vary. The actual cycle duration, water and energy usage are
dependent upon inlet water temperature.
SELECTING A WASH WCLE
The dishwasher will wash and dry the contents based
on cycle selection made. Refer to Table 3: "Cycle
Selection Chart" to select the most appropriate cycle
for the wash load.
Follow these steps to select a cycle and start the
dishwasher:
Select a Cycle and Start Dishwasher:
1. Open dishwasher door.
2. Press the on/off switch.
3. Push the button once for the program
desired.
4. Close door until it latches and the program will begin.
5. At the end of the cycle the dishwasher
will stop, the LED display will show "Or',
and the dishwasher will beep if the "Cycle
Completion Beeper" is enabled).
Hate: All indlcabr sights will
remairn iDIuminaLed tenti%
the on/
is pressed or the door
3s Q D B O B ~ ~ .
L-----
-
Figure 21
i\c-
I
I
To charpge program, 'push the
desired button ONCE if another
program button is fit up.
END 81F CYCLE INDICATORS
"0" is cilsplayed on the LED.
" Cycle Completion Beeper sounds off
-
ENGLISH 13
INTERRB%PTPNGICHANGING OR CANCELLlrNG A CYCLE
Cycle Interruption
WAFPNIWG
As a safety feature the d~shwasherwlll automatically
turn itself off whenever the door is opened. However,
if the door is opened quickly while in a wash or rinse
cycle some water may splash out of the dishwasher.
For this reason ~t is recommended that you wait 10
seconds before opening the door.
08 Nof BULL
FULLY GtlPEN WHSELE
DISHWA,SNER XS HM
QUICKLY OPENDOOR
BPSHWAS HE^^;^ IS
BPES;.S~ATI~N
CQULD B2ESULT IN SERIOUS
opemTraw.
SCALDING.
I
To Interrupt a Cycle
1. Press the on/off buMon to stop operation.
2. Walt at least 10 seconds (or u n t ~the
l water
BFJIOFF BUPTOM
noises stop) before opening the door,
I
TQ Wesurne ;a cycle
Push the on/off button and close the doar.
--
,
>
(1)
ii
1
-
-
-
hi
Figure 23
1[
I
I
]
Changing a Cycle
To change the cycle selection, press the program
button of the desired cycle ONCE, The chosen
cycle button (or the light above it) becomes illtrrninateri, showing that i t has been selected,
Cancelling a Cycle
Each control panel shows whtch buttons to simultaneously push to cancel a cycle. Refer to your dishwasher to find the "Cancel Drain" buttons on your
particular model.
---Figure 24
1.Open the dishwasher door. Press the
1
I
I
indicated buttons a t the same time and hold
for approximately 3 seconds.
2. Close the door. When the drain pump nolses
stop,
open
the door. I f the LED d~splays
'0"
.
.
.
.
then the end of the cycle has been reached
and the dishwasher is reset.
3. Turn dishwasher off (push the On/Off
button.
4.The dishwasher is now ready t o run a
selected cycle. Add more detergent if
necessary.
14 - ENGLISH
-
CANCEL CYCLE
-i
ill
l i p ,
L ~ A , ~
Figure 25
ID,in-
UNLOADING '11THE DISHWASHER
Condensation Dying
The combination of a high final rinse temperature, the tub's cool stainless steel interior, and the
sheet~ngaction of a Rinse Agent result in effective and efficient drying. The closed condensation drying feature is hygrenic, and saves energy
and money. For best drying results, it is important
that the Rinse Aid Dispenser be kept full.
Additional Drying
f"emperature Option
Open the door, hold down the "Regular"
button and simultaneously turn the dishwasher on. The display will blink with a code
of '0" or 'I". Release the buttons. You are
in program mode.
2. I f the display blinks with a "O", you are programmed for a lower temperature rinse.
If the display blinks with a 'I", you are programmed for a higher temperature rinse,
thus improving dish drying.
3. To change the program code, press the
"Regular" button.
4. When you have the desired code selected,
turn the dishwasher off to take it out of
program mode.
I.
Figure 26,
Unloading
When unloading the dishwasher always unload the
lower rack first and then unload the upper rack.
This will minimize the chance of water drops from
the upper rack Galling on the dishes in the lower
rack. The silverware basket(s1of the Kuppersbusch
dishwasher can be removed for easy unloading.
Figure 27
The dishware tends to get hot immediatelyfollowing
a completed cycle. If the door is opened slightly for
a few minutes before unloading, the dishes will
cool more quickly.
-
ENGLISH 3.5
SPECIAL FEATURES
Delayed Start
On a few Kuppersbusch dishwashers, the start of
the washing cycle can be delayed for up t o 19
hours in I-hour increments. Follow these steps t o
delay the start of a wash cycle:
DEtr4,Y START BUTTON
1. Press the onloff button. The indicator
light for the cycle that was last selected
illuminates.
2. Immediately press the timer button
labeled DELAY-START-HOURSand the
LED display will show "lh".
1-g!
l - g r
HDUrs
1
Rinsealt3
R-a)*tmrg
- nil c in Uin
I I
Pots &
I
, 1'
-
/NO
tntrnslva
PU
IS
i a
,n,
J
~ c y c r u ~ ~ ~n- r r
R
[i -;IA
Iis
i-
L-Cancil
Figure 28
3. Press the DEI-AY-START-HOURSbutton
as many times as necessary until the
LED display shows the desired number of
hours. (Ex: 1h, Zh, 3h.J
The cydk can be changed at
any tinte drasring the delay.
4. Close the door of the dishwasher securely
until the latches snap shut.
Top Rack OnlyTM
I<uppersbusch models have a Top Rack Only that
saves energy and water when you have only a
stnalt load of dishes. Also, you'll use less detergent
for the Top Rack Only. The washing time, however, is not reduced.
The upper rack of the dishwasher has been designed with flexibility in mind. You can load glasses,
cups, plates, bowls and small pots in many different positions to fit your needs. Figure 29 shows a
typical mixed load placed correctly in the upper
rack for the Top Rack Only.
---fi-----
Figure 29
ECQ Saver
ECO SAVER BUTTON
The Kijppersbusch dishwashers come with a time
reduction button called the "ECO Saver". After ,
choosing a wash cycle, push the "ECO Saver" button. The washing time will be reduced by approximately 15 minutes. Refer t o the "Cycle Selection
Chart" for exact cycle time.
-OdY
1,
--
---
oen
1
.-. .
Rinsei d
Renia,ang l me $0Mil,
1
1 I
& g]l3
Pots &
tntem&ve-
R
3-
-
L
,
-ca"ccl
* The ECO Saver button does not work in
conjunction with the "Quick Wash" or
"Rinse & Hold" cycies.
16 - ENGLISH
No
Figure 30
i-
SlPECIAL FEATURES
Cycle Completion Signal
1. Open door, hold down "Delay Start Hours"
button and simultaneously turn dishwasher on.
2. The display will blink with a code of '
0'; '1" or '2".
3. Release the buttons. You are in program mode.
I f the display blinks with a '
0
'
;
you will hear no signal (indicates OFF).
I f the display blinks with a '1';
At the end of a wash cycle, the beeper will
sound off two times, and again every 15 ninuntil the clishwasher isturned
-
you will hear a LOW volume signal.
If the display blinks with a 'Y,
you will hear a HIGHER volume signal.
4. To change program code, press the "Delay Start
Hours" button.
5. When you have the desired code selected, turn
the dishwasher off to take it out of program
mode.
Accomodaling
Extra Tall Items
I f you have extra tall items that cannot fit in the
bottom rack without interfering with the upper spray
arm or without hitting the top rack (max, height 22"),
you can remove the upper rack. A special accessory,
the Extra Tall Item Sprinkler, lets you run the dishwasher with top rack removed: See Figures 31 and
32.
Figure 31
Nate: Bs $$areka semo~e
We
E&ra Tall Xtem Sprinkler bef o e you r 4 3 f m e l i &e tags,rack,
athewise %hed a ~ co~tfd
r
be-
came elantaged and not close
praperliy.
Installing "Extra Pall
Item Sprinkler"
1. With top rack empty, remove it from the dishwasher by pulling the rack toward you to the
point where you can lift it up and out, disengaging the wheels from the side rails.
2. Place the "Extra Tall Item Sprinkler" over the
top rack spray outlet at the back of the dishwasher tub and turn it clockwise to lock the
sprinkler head in place. See Figure 32.
3. Place the extra tall items in the bottom rack
for washing, as shown in Figure 31. To
remove the Extra Tall Item Sprinkler, turn it
counterclockwise and pull it out. Then replace
the top rack.
- - -
-
*
-
--
Figure 32
-
ENGLISH 3.7
CARE AND CLEANING
Genera! Maintenance
Certain areas of your Kuppersbusch Dishwasher
require periodic owner inspection. The following
maintenance tasks can be performed to help assure
top perfomance:
Triple Filter System
*
r Check
the Large O&jectTrap
Check the Wash A m s
e Clean Stainless Steel Inner Door
Clean Door Panel
(Stainless Steel or Colored)
a Clean the Door Gasket
These tasks are described in subsequent sections.
2. Micro Filter
3. Fince Filter
Figure 33
Clean Filters
Under normal use, the filter system
is self-cleaning. t h e purpose of the
Large Object Trap is to help prevent
undesirable objects such as bones,
glass, straws and toothpicks from
damaging the pump system. Items
such as these should be removed
fromthe Large Object Trap.
* Kuppersbusch dishwasher have
a triple filter
system composed of a Microfilter, a Fine Filter and
a Large Object Trap.
To Remove the Large Object Trap:
Figure 34
1. Turn the ring handle (as shown in Figure 34)
1/4 turn counter-clockwise and lift out.
2. Lift out the large object trap for inspection.
3. If large solids, such as bones, large seed(s), or
paper labels are present, remove them by hand.
The Large Object Trap can also be flushed out
by holding it under running water.
4. If necessary, the micro and fine filters can be
removed at this time.
To Re-insert the Large Object Trap in the
Dishwasher:
1. Press the filters firmly into position,
2. Turn 1/4 turn clockwise until locked.
3. Pull gently to ensure that it is locked in
place.
-
38 ENGLISH
Figure 35;
CA,RE AND Ch%AMH9'%6;
Check Wash Arms
The wash arms should be checked periodically to
ensure that the spray orifices are clear and unobstructed. I f the wash arms require cleaning they
are easy to remove and replace:
1. The lower wash arm simply snaps into
place. Pull gently upwards to remove it.
2. The upper wash arm is held in position
by a locking nut. Turn the locking ring
approximately 1/8 turn clockwise to release the arm. See Figure 36.
3. After cleaning, reinstall the wash arms,
Figure 36
Clean Stainless Steel Tank
and Inner Door
Clean the outer edges of the inside door panel
regularly to remove food particles that can gather
there from normaf loading. I f spots begin to appear on the stainless steel tank or inner door, check
to make sure that the rinse agent reservoir is full.
Ciean Door Gasket
Clean the door gasket regularly to remove food
particles that can gather from normal loading. I f
necessary. clean the door gasket using a. damp
cloth.
Clean Outer Doar
Colored Doors
Use only soft cloth that is lightly dampened with
soapy water. Do not use paper towels or an abrasive cloth.
Stainless Steel Doors:
Use a soft cloth with a non-abrasive stainless steel
cleaner. For best results, apply stainless steel
,
I
/ cleaner directly to the cloth, then wipe the sur-
face. Do not use metal scouring pads to clean the
/ stainless steel surfaces as these can scratch the
surface and leave metal fragments that can rust.
I
1
-
ENGLISH 19
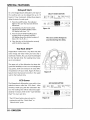
SELF-HELP
Dishwashers may exhibit problems that are unrelated to a malfunction of the dishwasher itself. The
following table may serve to answer your question about a problem you are having without having to
call a repair person.
I 1 Dishwasher does not
I time
f
1 from dishwasher
I
I
t
f
lid will not close
Lower spray arm does
not rotate freely
White deposits left on
dishes
reset circuit breaker at your Fuse box/bteaker box.
Door of dishwasher not properly closed.-close dishwasher making
exceptionally long it is probably due to (coldincoming w a t e ~To avoid
this problem it is recommended that beFore starting the dishwasher:
open the hot water faucet at the sink nearest the dishwasher and
run the water until it runs hot. Then turn off the water and start the
installed at sink) clogged. Check drain hose and fine and coarse
filters (see section titied CARE and CLEANING). Check kitchen sink to
make sure it is draining well. I f problerr~is kitchen sink not draining
f
If
I
I
Too little rinse-aid.
-
-
I
Remove lower spray arm and clean arnn
Unsatisfactory
washing result
20 ENGLISH
1
Incorrect amount of detergent or rinse agent.
Utensils incorrectly arranged or rack cnartoaded.
Wash arm rotation blocked by utensils,
Filters not property fitted into position.
Clogged nozzles in wash arm@)
Unsuitable program selected.
I
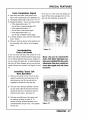
CUSTOMER SERVICE
Your Kuppersbusch dishwasher requires no special care other than that described in the care and
cleaning chapter. If you are having a problem with your dishwasher, before catling for service please
refer to the Self-Help chapter. If service becomes necessary, contact your dealer or installer or an
authorized service center. Do not attempt to repair the appliance yourself. Any work performed by
unauthorized personnel may void the warranty.
If you are having a problem with your Kuppersbuschdishwasher and are not pleased with the service you have received, please take the following steps (in the order listed below) until the problem
is corrected to your satisfaction.
Toll Free: 1-800459-08M
Phone: 813-288-8890
1. Call us at:
Fax: 813-2884604
2. Write to us at the address below:
K~PPERSBUSSHUSA
4920 West Cypress Street
Tampa, Florida 33607
3. E-mail us from the Customer Service section of our web site, ww~~v.kuppersbuschusa.com
I
Please be sure to include (if writing), or have available (if calling),
*
following information:
Model Number
Serial Number
Date of Original Purchase
Date Problem Originated
Explanation of Probiem
Also, if writing, please be sure to include a daytime phone number.
You will find the model number and serial number information etched into the top of the inner door of
the dishwasher. See Figure 1 for an example.
@
MADE IN GERMANY
TYP----GG
60 Hz
I
Please make a copy of your invoice and keep it with your manuai.
I