1
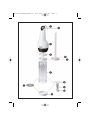
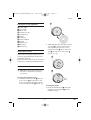
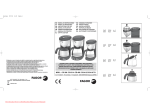
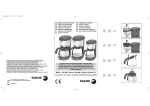
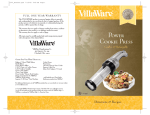
KH1190_Elek_Gebaeckpress_UK
14.06.2006
11:08 Uhr
Seite 1
UK
Kompernaß GmbH · Burgstrasse 21 · D-44867 Bochum
www.kompernass.com
ID Nr.: KH1190-03/06-V3
KH1190_Elek_Gebaeckpress_UK
14.06.2006
11:08 Uhr
Seite 2
Electrical Cookie Gun KH 1190
Operating Instructions
KH1190_Elek_Gebaeckpress_UK
14.06.2006
11:08 Uhr
Seite 3
KH1190_Elek_Gebaeckpress_UK
14.06.2006
11:08 Uhr
Seite 4
KH1190_Elek_Gebaeckpress_UK
14.06.2006
11:08 Uhr
Seite 3
KH1190
Electrical Cookie Gun KH 1190
Page
Safety instructions
4
Proper use
4
Package Contents
4
Technical data
4
Description of the appliance
5
Before the First Use
5
Assemble the Cookie Gun
5
Inserting the transmission disc
Inserting the pusher
Assembling the container
Assembling motif discs
Assembling the nozzles
5
5
6
6
6
Filling the container
6
Shaping biscuits
7
Adding decorations
7
Refilling with pastry or decorative mixture
8
Disassembly of the cookie gun
8
Tips
8
Cleaning and Maintenance
9
Disposal
9
Warranty & Service
9
Recipes
9
Biscuits 1
Biscuits 2
Biscuits 3
9
10
10
Read these operating instructions carefully before using the appliance for the first
time and preserve this booklet for later reference. Hand over the manual to whomsoever you might pass the appliance on to.
-3-
KH1190_Elek_Gebaeckpress_UK
14.06.2006
11:08 Uhr
Seite 4
KH1190
Electrical Cookie Gun KH 1190
Safety instructions
• Always be attentive! Always pay
attention to what you are doing and
act with common sense. Never use the
appliance when you are distracted or
don’t feel well.
• Ensure that the appliance is correctly
and completely assembled before taking it into use.
• Remove the plug from the socket if
the appliance is not being used, when
removing components and for cleaning.
To avoid potentially fatal electric shocks:
• The voltage of the power source must
match the details given on the plate
affixed to the appliance.
• Do not operate the appliance if the
power cable or plug is damaged.
In the event of damage to the power
cable or malfunction with the appliance
arrange for them to be examined and
repaired as soon as possible by Customer
Services.
• Do not expose the appliance to rain
and never use it in a humid or wet environment. Make sure that the cable
never gets damp or wet while the
appliance is in use.
Proper use
The cookie gun KH 1190 is intended for
the shaping of biscuits and for decorating cakes etc. It is intended exclusively
for private, not commercial, purposes.
Package Contents
To avoid risks of fire or injuries:
• Caution! Keep children away from
the power cable and the appliance.
Children frequently underestimate
the dangers from electrical appliances.
• Ensure that the power plug is quickly
accessible in case of danger, and that
there is no danger of tripping over
the cable.
Electrical Cookie Gun KH1190
12 Motif discs
8 Nozzles
Operating instructions
Warranty card
Technical data
Tips for safety:
• In cases of danger, immediately remove
the electrical plug from the socket.
• Never use the appliance for purposes
other than those for which it was designed.
• Do not use the appliance in the open.
.
Mains voltage:
Power rating:
Continuous
operating time:
Protection class:
-4-
230 - 240 V / 50Hz
25 - 30 W
1 minute
II
KH1190_Elek_Gebaeckpress_UK
14.06.2006
11:08 Uhr
Seite 5
KH1190
Description of the appliance
Power cable
Start switch
Motor unit
Transmission disc
Threaded rod
Pusher
Container
Nozzle adapter
Nozzles
Adapter lock
Motif discs
Closing ring
2. With light pressure turn the transmission disc clockwise, until the resistance yields. The arrows on the
transmissiondisc and in the motor
unit must point to each other
(See ill. – ).
Before the First Use
Remove the cookie gun and all accessories from the packaging and remove all
packaging material.
Clean all of the components as described
in the section „Cleaning and Maintenance“.
Assemble the Cookie Gun
Note: Remove the power plug from
the wall socket before inserting
accessories.
Inserting the transmission disc
1. Insert the transmission disc into the
motor unit so that the pins in the
motor unit engage with the recesses
in the transmission disc (See ill. )
Inserting the pusher
3. Place the threaded rod with light
pressure into the pusher until it
audibly engages.
-5-
KH1190_Elek_Gebaeckpress_UK
14.06.2006
11:08 Uhr
Seite 6
KH1190
4. Place the other end of the threaded
rod in the motor unit . Ensure
that the pins in the inside of the
motor unit engage with the guide
rails in the threaded rod .
5. Push the threaded rod with the
pusher into the motor unit to
the stop. The elevations on the transmission disc must engage with the
recesses on the rear of the pusher .
The arrows in the motor unit and
on the pusher must point towards
each other .
Assembling the nozzles
When the pusher and container are assembled:
1. Select a nozzle .
2. Place the nozzle on the nozzle
adapter .
3. Screw the adapter closure over the
nozzle on the nozzle adapter .
4. Place the nozzle adapter in the
closing ring . The nozzle must point outwards.
5. Place the closing ring with the
nozzle adapter on the container .
6. Turn the closing ring in the direction of the arrow until it engages .
Assembling the container
6. Place the container on the motor
unit so that the arrow on the container points at the opened lock
on the motor unit .
Filling the container
Do not place the pastry to be processed in the refrigerator. There it will
become too firm. The pastry must
have a room temperature.
Note: This is only possible if the pusher
is correctly assembled. If the container does not fit onto the motor
unit , repeat steps 1 to 5.
1. Turn the container so that the arrow points to the opened lock
.
7. Turn the container so far until the
arrow points to the closed lock
on
the motor unit and an audible click
is heard.
2. Remove the container from the
motor unit . Leave the pusher and the threaded rod in the motor
unit .
Assembling motif discs
When the pusher and container are assembled:
1. Select the desired motif disc .
2. Place the motif disc in the closing
ring with the inscribed side to
the bottom.
3. Place the closing ring with the motif
disc on the container .
4. Turn the closing ring in the direction of the arrow until it engages .
Tip: If need be, moisten the internal
surfaces of the container with
water before filling it with pastry.
Doing so helps avoid having the pastry
stick to the inner surfaces of the
container .
3. Shape the pastry / decorating mixture
to a roll. This permits easier filling.
Fill the container with this pastry
roll.
-6-
KH1190_Elek_Gebaeckpress_UK
14.06.2006
11:08 Uhr
Seite 7
KH1190
Note: Fill the container to the
MAX marking at the most.
Process the filled pastry straight away.
Notice:
• Should the pastry be too sticky, place
it in the refrigerator for 15 minutes.
4. Place the container on the motor
unit as described in the chapter
„Assembling the container“.
5. Place the power plug in a wall socket.
The Cookie Gun is now ready for use.
Adding decorations
Notice:
• Use the nozzles exclusively for shaping fluid-like substances, such as for
example whipped cream.
• The decoration substance must have
a soft and creamy consistency, otherwise it will block the nozzle .
• Press the start switch first of all only
shortly, to see how the substance responds. It can happen that the substance
may continue to flow out for a short
time.
Shaping biscuits
Note:
• Use exclusively the motif discs for
the shaping of biscuits.
• Line the baking tray with baking paper.
Do not use Teflon, fats or oil paper,
as the biscuits then do not keep their
shape.
• Ensure that the closing ring is firmly
on the container , and the container
correctly placed on the motor unit
, when you switch the appliance on.
1. Hold the cookie gun at a slight angle.
2. Press the start switch .
3. As soon as the decorative substance
starts to flow from the nozzle , move
the cookie gun in accord with the decorative design you wish to create.
1. Place the cookie gun with the motif disc
at the bottom on the baking paper.
2. Hold the cookie gun in the hand
so that you can comfortably reach
the start switch with your thumb.
3. Press on the start switch until the
first biscuit has been formed.
4. Release the start switch and place
the cookie gun in another position.
How long you must press the start
switch is dependant on the desired
size and shape of the biscuit. If you
press the start switch only shortly,
you will form a small biscuit. The longer
you press the start switch , the larger
the biscuit will be.
5. Repeat the steps until you have shaped
a sufficient number of biscuits.
Note: Should the pusher block
during use, it could be that the
substance or the pastry is too firm.
Remove all of the substance resp.
the pastry and, if possible, blend
some fluids into it.
-7-
KH1190_Elek_Gebaeckpress_UK
14.06.2006
11:08 Uhr
Seite 8
KH1190
Refilling with pastry or
decorative mixture
Tips
• If need be, remove the substance
from the cookie gun with a knife, pastry scraper or similar.
• The consistency of the pastry or the
decorative substance should be such
that it easily flows from the motif
discs or nozzles and remains stuck onto
the baking paper or the item being
decorated.
• Should the appliance refuse to switch
on, it could be that the pastry or the
decorative substance is too firm or
that the container is not correctly
affixed to the motor unit .
• If the pastry is too firm to be processed,
knead in some egg yolk or mix in some
fluids.
• Biscuit pastry that has lain in the refrigerator can become too firm for processing.
• Should the pastry to be processed be
too soft, lay it in the refrigerator for
ca. 15 minutes or knead in a little
more flour.
• If the biscuit pastry contains finely
ground constituents (e.g. nuts or
almonds), select a motif disc with
larger openings.
• With some pastries and motif discs it
is better to work quickly, with others,
better to work slowly.
• Simply use trial and error until you
can produce biscuits that match with
your expectations.
• If you want to use various motif discs
and nozzles, first of all use all of the
currently filled pastry or decorative
substance. Change the motif discs
and nozzles when you refill the
cookie gun.
Danger!: Remove the plug from the
wall socket before refilling the container.
1. Remove the container and the pusher
and any pastry that might be remaining. If necessary, also remove any
pastry that may have collected behind
the pusher .
Danger: The motor unit may not
be submerged in fluids. If required,
this can be wiped clean with a moist
cloth.
2. Clean the parts that may be covered
with pastry and dry them well. (see
chapter „Cleaning and maintenance“)
3. Fill the cookie gun with pastry or the
decorative substance, reassemble the
cookie gun as described and continue.
Disassembly of the cookie gun
Danger!: Remove the plug from the
wall socket before disassembling the
appliance.
1. Screw the closing ring off.
2. Turn the container so that the arrow points to the opened lock
.
3. Remove the container from the
motor unit . The pusher and the
threaded rod can now also be removed.
4. To remove the transmission disc ,
turn this anti-clockwise, under light
pressure.
-8-
KH1190_Elek_Gebaeckpress_UK
14.06.2006
11:08 Uhr
Seite 9
KH1190
Cleaning and Maintenance
Warranty & Service
Danger!: Remove the plug from
the wall socket before cleaning the
appliance.
The warranty conditions and the service
address can be found in the warranty
booklet.
As it is difficult to remove dried-on pastry
remains, always clean the cookie gun and
the accessories employed directly
after use.
Kompernaß GmbH
Burgstrasse 21
D-44867 Bochum
www.kompernass.com
Danger!: The motor unit may not
be submerged in water. If required,
this can be wiped clean with a moist
cloth.
Note: The manufacturer is constantly
working on the further development
of all types and models. Therefore
please accept that changes are possible to the actual items supplied
(equipment, shape, technology).
Do not use pointed or abrasive objects
for cleaning. Do not use aggressive or
chemical cleaning agents.
Recipes
Dismantle the cookie gun completely.
Rinse all parts, except the motor unit ,
in a mild detergent.
You can process commercial ready-made
pastry with the cookie gun.
Note: Do not clean any parts in a
dishwasher! They are not suitable
for dishwashers. The material could
be irreparably damaged!
Biscuits 1
150 g butter
100 g powdered sugar
1 Pkt vanilla sugar
1 egg white
200 g plain flour (Type 405)
1 pinch salt
Disposal
Do not dispose of the appliance in
your normal domestic waste.
• Whip the butter until foamy, blend in
the sugar, vanilla sugar, the salt and the
unbeaten egg white, then stir the mixture with a hand mixer for about 8 minutes.
• Blend in the flour, then fill the pastry
into the cookie gun.
• Cover a baking tray with baking paper. Make small biscuits on the tray
with the cookie gun.
Observe the currently applicable regulations. In case of doubt, please contact
your waste disposal centre.
-9-
KH1190_Elek_Gebaeckpress_UK
14.06.2006
11:08 Uhr
Seite 10
KH1190
• Bake in a convection oven for 12-15
minutes at 175-190 ˚C.
• The edges should be golden brown.
Allow the biscuits to cool on the baking tray.
Tip: Melt some plain cooking chocolate
in a bain-marie. Spread a teaspoonful of
chocolate onto the cooled biscuits and
decorate them with a half of a walnut.
Depending on the size of the biscuits,
the baking times can vary.
Biscuits 2
Ingredients:
125 g butter
125 g powdered sugar
1 Pkt vanilla sugar
1 egg
1 egg white
250 g plain flour (Type 405)
1 pinch salt
Biscuits 3
75 g butter
1 Egg, 1 Egg yolk
125 g powdered sugar
Scraped peel of half a lemon
250 g plain flour (Type 405)
• Whip the butter until foamy, slowly
blend in the egg yolk, egg and sugar,
finally the lemon peel and the flour.
• Cover a baking tray with baking paper.
Make small biscuits on the tray with
the cookie gun.
• Brush with egg yolk and sprinkle with
sugar.
• Bake in a convection oven for 12-15
minutes at 175-190 ˚C.
• Whip the butter, sugar, vanilla sugar,
salt, egg and egg white until foamy,
blend in the flour.
• Cover a baking tray with baking paper.
Make small biscuits on the tray with
the cookie gun.
• Bake in a convection oven for 12-15
minutes at 175-190 ˚C.
• Dip the biscuits in molten cooking
chocolate.
Tip: For darker biscuits, substitute 30 gr
of cocoa for the vanilla sugar. Dispense
with the salt and add 1 dessertspoon of
water instead.
Depending on the size of the biscuits,
the baking times can vary.
- 10 -