1
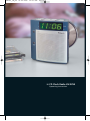
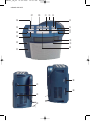
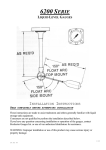
KH2255_IB_UK
13.02.2007
14:57 Uhr
Seite 1
UK
Kompernaß GmbH · Burgstrasse 21 · D-44867 Bochum
www.kompernass.com
ID No.: KH 2255-09/06-V1
KH2255_IB_UK
13.02.2007
14:57 Uhr
Seite 2
CD Clock Radio KH 2255
Operating instructions
KH2255_IB_UK
13.02.2007
14:57 Uhr
Seite 3
KH2255_IB_UK
13.02.2007
14:57 Uhr
Seite 4
e-bench KH 2255
l
k
q w e
j
r
h
t
y
u
g
f
i
o
d
a
s
;
2!
2)
2@
2#
KH2255_IB_UK
13.02.2007
14:57 Uhr
Seite 3
CD Clock Radio
Safety information
4
Delivery Contents
5
Intended Usage
5
Technical Data
5
Operating elements
6
Commissioning
6
Battery Back-up System in Case of Power Failures
6
Setting the Time
7
Radio operation
7
Use of the CD Player
7
Further Functions of the CD Player
8
Setting the Alarm Time and Alarm Type
8
Sleep timer
9
Cleaning
10
Disposal
10
Warranty & customer service
10
Read the operating instructions carefully before using the appliance for the first
time and preserve this booklet for later reference. Pass the manual on to whomsoever might acquire the appliance at a later date.
KH2255_IB_UK
13.02.2007
14:57 Uhr
Seite 4
CD Clock Radio
Danger - Laser Beams!
The appliance is fitted with a
„Class 1 Laser“.
• Never open the device.
• Never attempt to repair the device.
There is invisible laser radiation
inside the device.
• Avoid all direct optical contact
with the laser beam, it could lead
to serious eye injuries.
Safety information
Important!
This clock radio employs a laser
beam. In order to avoid any risk
of injury or accident due to this
laser beam, the appliance may only
be opened by qualified specialists.
The appliances complies with the
international safety regulations
and the Directives of the European
Community. It also complies with
the currently applicable standards
on electrical safety and electromagnetic compatibility (EMC).
Caution:
In order to avoid the risk of electric
shock, the cover of the appliance
must not be removed. There are no
parts that can be serviced inside the
appliance. Always contact qualified
specialists in the event of problems
or faults.
•
•
This symbol warns the user of
hazardous voltages inside the
appliance.
This symbol is intended as a warning
that personal injury can occur if the
information given in the operating
instructions for the device is not
strictly observed.
-4-
Warning:
In order to avoid the risks of fire
and electric shock, the appliance
must not be exposed to rain or
moisture. The ventilation openings
must not be blocked or covered.
Important:
Do not throw batteries into the fire.
Do not immerse the device in water
and avoid splashes and droplets of
water entering the appliance. Do not
place any water/filled vessels (such as
e.g. flower vases) on the appliance.
Electrical Fast Transient (Burst)
Remark:
In case of misfunction due to
electrical fast transient (Burst),
just reset the product (reconnect
of power source may be required)
to resume normal operation.
ESD Remark:
In case of misfunction due to
electrostatic discharge just reset
the product (reconnect of power
source may be required) to resume
normal operation.
KH2255_IB_UK
13.02.2007
14:57 Uhr
Seite 5
Intended Usage
A case of electrostatic discharge
occurs, for example, should someone
wearing shoes with plastic soles
walk over a carpet that also contains
plastic elements. Through the friction
of the shoe soles on the carpet a
charge is created in the body which
discharges itself as soon as one touches
an electricity conducting object, such
as for example a door knob or the
bodywork of a motor vehicle. Direct
contact is not required to effect a
discharge. It is sufficient to approach
the conducting item to within a few
centimetres. The charge can the discharge itself over an electric arc. A
discharge is thus also possible through
plastic housing components.
• This device is suitable for the reception of radio stations and the playing
of audio CDs and is equipped with
individually variable alarm functions.
• Any other use or modification of the
appliance is considered improper use
and may present significant risks of
accidents.
• The manufacturer accepts no liability
for improper use.
Technical Data
Power supply:
Backup battery:
Delivery Contents
CD player:
CD Clock Radio
Operating Instructions
Warranty card
Laser:
Radio:
-5-
230-240 V ~ 50 Hz
2x 1.5 V Type AA battery (not included in
the scope of supply)
Frequency range
(+/- 3dB) 100 Hz to
16 kHz
= 760 nm
Pmax = 0.4 mW
FM 87,5 - 108 MHz
AM (MW)
530 - 1600 kHz
KH2255_IB_UK
14:57 Uhr
Seite 6
Operating elements
Commissioning
q Button STOP/TIME
w CD compartment
e Button Skip/Fast Search
This CD clock radio is operated with
230 - 240 Volt alternating current (AC),
50 Hz. It is additionally equipped with
a back-up system for the event of power
failures, for which two 1,5 V block batteries (not included in the scope of supply)
have to be inserted.
r
t
y
u
i
o
a
s
d
f
g
1%
j
1&
l
1(
2)
2!
2@
2#
13.02.2007
forwards / Hour
Button PLAY MODE
Indicator light Repeat
Buttons ALARM I and ALARM II
Indicator light Sleep
Button SLEEP
Indicator light Random
Button SNOOZE
Tuning display
Volume display
Button ON/OFF
Indicator light ON/OFF
Indicator light Program
Button PROGRAM: Preprogramming
of CD titles
Button Skip/Fast Search backwards
/ Minute
Button PLAY/PAUSE: Start of the CD
playback or brief interruption in the
CD playback
Volume controller
Tuning knob: for selecting the radio
station
Band selector switch: AM (MW) - FM
Function selector switch:
CD - TUNER - BUZZER
FM antenna
➩
➩
Insert the plug of the power lead into
a suitable plug socket (AC voltage).
Place the batteries into the battery
compartment on the underside of
the appliance.
The use of an alkaline battery is
recommended. In order to ensure
optimum functioning, the battery
should be changed every 6 months.
Batteries are not charged in the
battery compartment!
Battery Back-up System in Case of
Power Failures
The batteries ensure that the clock continues to function even in the event of a
power failure. In order to prolong the
battery life, however, the time is not
shown on the display. If no battery has
been inserted, 12:00 appears on the display. This means that you have to carry
out the time and alarm settings again.
-6-
KH2255_IB_UK
13.02.2007
14:57 Uhr
Seite 7
Setting the Time
5. Set the desired volume with the
volume controller 1(.
6. Select the desired radio station
using the TUNING knob 2).
7. To switch off the radio, press the
button ON/OFF 1#. The indicator
light ON/OFF g goes out.
Setting the time when switching on the
first time:
➩ Hold the button TIME q depressed
to switch between the 12 hour and
24 hour modes.
➩ The time flashes. Set the desired time
using the buttons MINUTE 1& and
HOUR e.
➩ As soon as you press the button TIME
q, the setting is saved. The displayed
time no longer flashes.
Use of the CD Player
1. Open the CD compartment w by
hand and insert the CD (with the
label facing to the rear) into the
CD compartment and close the
CD compartment.
Setting the time at some later point:
➩ Hold the button TIME q depressed
to switch between the 12 hour and
24 hour modes.
➩ Press the button TIME q. The time
flashes. Set the desired time using
the buttons MINUTE 1& and HOUR e.
➩ As soon as you press the button
TIME q again, the setting is saved.
The displayed time no longer flashes.
2. Push the function selector switch 2@
to position CD.
3. When the ON/OFF button 1# is pressed, the total number of CD tracks
appears on the display. After a few
seconds, the time is displayed again.
4. Press the button PLAY/PAUSE l to
start the playback of the first track.
01 appears first on the display,
followed shortly thereafter by the
time again.
Radio operation
1. Push the function selector switch 2@
to position TUNER.
2. Push the band selector switch 2! to
position FM (UKW) or AM (MW).
3. In order to achieve optimum reception, extend the FM antenna 2# to
its full length. For the AM waveband,
the appliance needs to be turned to
achieve optimum reception.
4. Switch on the appliance with the
ON/OFF button 1#. The indicator
light g comes on when the appliance
is switched on. The volume display d
and frequency display 1! light up.
Use the button PLAY/PAUSE l also
to briefly interrupt the playing of a
track. The playback can be resumed
by pressing button PLAY/PAUSE l
again.
5. Set the desired volume with the
volume controller 1(.
6. The playback can be stopped by
pressing button STOP q.
-7-
KH2255_IB_UK
13.02.2007
14:57 Uhr
Seite 8
Further Functions of the CD Player
4. Select your track with the buttons
Skip/Fast Search e/k. Then press
the button PROGRAM j to save the
track. Proceed as described above to
program further tracks. A total of
20 tracks can be programmed.
5. Press the button PLAY/PAUSE 1*
to start the playback.
6. Press the button STOP q to stop
the playback.
If you wish to repeat the programming
later:
1. Press the button PROGRAM 1^ again
to activate the programming. The indicator light PROGRAM h lights up.
2. Press the button PLAY/PAUSE 1*
to play the programmed tracks.
➩ To cancel the programming, open
the CD compartment.
SKIP/FAST SEARCH ➩ Press e, to skip to the next track,
or press button e several times to
skip several tracks. Press 1& to jump
to the start of a track, or press button
1& several times to go back several
tracks. If 1& or e are held depressed, certain points of a track can
be found quickly.
REPEAT t – Repeat playback /
RANDOM o – Random playback
➩ Press the button Play Mode r once
to repeat the playback of a particular
track. The REPEAT display t flashes.
➩ Press the button Play Mode r once
again to repeat the playback of the
whole CD. The REPEAT display t
lights up.
➩ Pressing button Play Mode r again
cancels this function. The REPEAT
display t goes out.
➩ The indicator light RANDOM o
lights up. The CD tracks are played
in random order.
➩ Pressing button Play Mode r again
cancels this function. The indicator
light RANDOM o goes out.
Setting the Alarm Time and
Alarm Type
With this appliance you can set two
different wake-up times that can be
used individually or simultaneously:
• AL 1 or AL 2
• or AL 1 and AL 2
Setting the alarm time
• Alarm (AL 1):
Press the button ALARM I y. Press
the buttons Minute 1& and Hour e to
set the desired alarm time. The wakeup time is stored as soon as you press
the button ALARM I y. The indicator
for Alarm I appears on the display.
If you wish to switch off the alarm,
press the button ALARM I y.
PROGRAM 1^: For preprogramming
tracks in any order
1. Insert the CD.
2. Press button ON/OFF 1#. The total
number of tracks appears briefly
on the display.
3. Pressing the button PROGRAM j
again displays p01 . The indicator
light PROGRAM h flashes.
-8-
KH2255_IB_UK
13.02.2007
14:57 Uhr
Seite 9
Switching OFF the alarm
• Alarm (AL 2):
Press the button ALARM II y and
carry out the same steps as described
above. The indicator for Alarm II
appears on the display.
The alarm time is programmed for
60 minutes.
➩ SNOOZE: Press the button SNOOZE a
to switch off the alarm temporarily.
The alarm will then sound again after
roughly 6 minutes.
➩ ON/OFF: Press button ON/OFF 1#.
The alarm is switched off, but will
sound again after 24 hours.
➩ ALARM I/ALARM II: Press the
ALARM I / ALARM II y button to
switch off the alarm permanently.
➩ Now select the wake-up mode using
the function selector switch 2@ (CD,
TUNER or BUZZER).
• Alarm mode BUZZER. Move the function selector switch 2@ to the BUZZER
position.
• Alarm mode Radio
➩ Carry out the steps 1 to 7 described
under "Radio operation" to tune
the radio to your desired station
for the radio alarm.
Sleep timer
➩ Move the function selector switch
2@ to position CD or TUNER.
➩ When you press the button SLEEP i,
• Alarm mode CD player
1. Open the CD compartment w
and insert the CD (with the label
facing to the rear) into the CD
compartment and close the CD
compartment.
2. Push the function selector switch 2@
to position CD.
"90" appears on the display.
➩ Press the button SLEEP i again to
set the desired sleep time (90, 60,
30 or 15 minutes). This starts after
a few seconds.
➩ To stop the playback earlier, press
the button ON/OFF 1#.
The total playing time of the CD
player in Alarm mode is 60 minutes.
If no CD is inserted and alarm mode
CD player is set, the alarm signal of
the setting BUZZER sounds automatically.
-9-
If the playing time of the CD is shorter than the sleep time set by you,
the music ends as soon as all the
tracks on the CD have been played.
KH2255_IB_UK
13.02.2007
14:57 Uhr
Seite 10
Cleaning
Wipe the appliance with a damp cloth.
Do not use aggressive or chemical cleaning agents. These would result in
damage to the appliance.
Disposal
Do not dispose of the device in
normal domestic waste.
Dispose of the device over a registered
waste disposal firm or through your communal waste disposal facility. Observe
the currently valid regulations. In case
of doubt, consult your waste disposal
facility.
Battery disposal!
Batteries may not be disposed of with
normal domestic waste. All consumers
are statutorily obliged to dispose of
batteries at the collection point in their
community/district or with the original
supplier. The purpose of this obligation
is to ensure that batteries can be disposed of in an environmentally-friendly
manner. Only dispose of batteries when
they are fully discharged.
Warranty & customer service
The warranty conditions and the service
address can be found on the warranty
card.
Kompernaß GmbH
Burgstrasse 21
D-44867 Bochum
www.kompernass.com
- 10 -