1
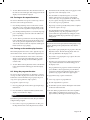
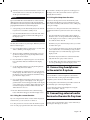
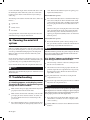
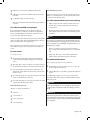
Mini hi-fi system KH 2233 Instructions for use Kompernaß Handelsgesellschaft mbH Burgstraße 21 D–44867 Bochum Deutschland/Germany — www.kompernass.com KH 2233 En v.1.0 11-04-2004 1. Index 2. Safety instructions ............................................................................................................................................................... 5 3. Usage .................................................................................................................................................................................... 6 4. Scope of delivery .................................................................................................................................................................. 6 5. Technical data ...................................................................................................................................................................... 6 5.1. General............................................................................................................................................................................................... 6 5.2. Dimensions (W × D × H) and weight ........................................................................................................................................... 6 5.3. CD player ........................................................................................................................................................................................... 6 5.4. Radio frequency range ..................................................................................................................................................................... 6 6. Components, operating controls and displays of the mini hi-fi system ............................................................................ 7 6.1. Main unit, top ................................................................................................................................................................................... 7 6.2. Main unit, front ................................................................................................................................................................................ 7 6.2.1. Display indicators .......................................................................................................................................................................... 7 6.3. Main unit, back ................................................................................................................................................................................. 8 6.4. Main unit, bottom ............................................................................................................................................................................ 8 6.5. Remote control unit ......................................................................................................................................................................... 8 7. Select a suitable location for the mini hi-fi system ............................................................................................................. 9 8. Preparing the mini hi-fi system for use............................................................................................................................... 9 8.1. Unpacking the components ............................................................................................................................................................ 9 8.2. Preparing the remote control unit for use ..................................................................................................................................... 9 8.3. Activating the power outage memory ........................................................................................................................................... 9 8.4. Connect the loudspeakers to the main unit ................................................................................................................................ 10 9. Turning the mini hi-fi system on and off .......................................................................................................................... 10 10. Using the mini hi-fi system radio .................................................................................................................................... 10 10.1. Using the automatic radio station search .................................................................................................................................. 10 10.2. Manually searching for a radio station ...................................................................................................................................... 11 10.3. Improving reception quality of frequency modulation (FM) radio stations ........................................................................ 11 10.4. Programming a radio station ...................................................................................................................................................... 11 10.5. Selecting a preset radio station ................................................................................................................................................... 11 11. Using the mini hi-fi system CD player ............................................................................................................................ 12 11.1. Playing CDs ................................................................................................................................................................................... 12 11.2. Skipping to the beginning of a song........................................................................................................................................... 12 11.3. Using the fast-forward and rewind functions........................................................................................................................... 12 11.4. Using the intro function .............................................................................................................................................................. 12 11.5. Turning on the repeat functions ................................................................................................................................................. 13 11.6. Turning on the random play function ....................................................................................................................................... 13 11.7. Using the program function ....................................................................................................................................................... 13 12. General functions for radio, CD and AUX operation .................................................................................................... 14 12.1. Adjusting the volume ................................................................................................................................................................... 14 12.2. Muting the loudspeakers ............................................................................................................................................................. 14 English • 3 12.3. Turning on the Equalizer function ............................................................................................................................................ 14 13. Additional functions of the mini hi-fi system................................................................................................................. 14 13.1. Adjusting the clock of the mini hi-fi system ............................................................................................................................. 14 13.2. Using the timer function ............................................................................................................................................................. 14 13.3. Using the snooze function........................................................................................................................................................... 15 13.4. Using the sleep timer function ................................................................................................................................................... 15 14. Connecting headphones to the mini hi-fi system ........................................................................................................... 15 15. Connecting external audio devices to the mini hi-fi system .......................................................................................... 15 16. Cleaning the mini hi-fi system ........................................................................................................................................ 16 17. Troubleshooting .............................................................................................................................................................. 16 17.1. Nothing appears on the display screen/ The mini hi-fi system is not functioning even though it has been turned on. 16 17.2. “No Disc” appears on the display screen even though a CD has been inserted .................................................................. 16 17.3. The inserted CD is not played .................................................................................................................................................... 17 17.4. No sound ....................................................................................................................................................................................... 17 17.5. The remote control unit is not working..................................................................................................................................... 17 17.6. Other malfunctions ...................................................................................................................................................................... 17 18. Disposing of the mini hi-fi system .................................................................................................................................. 18 4 • English 2. Safety instructions † Danger! Do not place the mini hi-fi system ... Ú in areas exposed to direct sunlight. Otherwise, the mini hi-fi system could overheat and be damaged beyond repair. This could cause a fire! Ú in the immediate vicinity of heat sources such as ovens, heaters and similar devices or vent openings of other electrical devices. Otherwise, the mini hi-fi system could be damaged beyond repair. This could cause a fire! Ú in dusty environments. Otherwise dust could collect in the mini hi-fi system. If a large quantity of dust collects in the mini hi-fi system, it could overheat and be damaged beyond repair. This could cause a fire! Ú in damp environments. Otherwise moisture could seep into the mini hi-fi system. This could cause danger of electrical shock and fire! Ú in the immediate vicinity of water, such as bath tubs or swimming pools. Do not place any receptacles containing water (e.g. flower vases) on the mini hi-fi system. If water enters the mini hi-fi system or it falls into water, it could cause danger of electrical shock! Do not place open flames (e.g. burning candles) on the mini hi-fi system. This could cause a fire! Do not cover the vent openings of the mini hi-fi system! Do not place the mini hi-fi system on beds, blankets, etc. Make sure that the vent openings are at least 10cm from the nearest wall or large objects. Otherwise, the mini hi-fi system could overheat and be damaged beyond repair! This could cause a fire! | Warning! Do not place the mini hi-fi system in areas exposed to physical shock or constant vibrations. Physical shock and constant vibrations could lead to malfunctions and long-term damage. The mini hi-fi system and its components contain no userserviceable parts. The warranty is voided if the casings of the mini hi-fi system, remote control unit and/or the loudspeakers are opened! For repairs, please contact our service partner nearest you. You will find the addresses of our service partners in the warranty booklet. This booklet is included in delivery on the mini hi-fi system. Battery acid could leak out, especially if the batteries are old. Therefore you should remove all batteries if you do not plan to use the mini hi-fi system and remote control for long periods of time. This can protect the mini hi-fi systems and remote control unit from damages resulting from leaked battery acid. ™ Caution! The mini hi-fi system should be positioned so that no obstacles can prevent the side CD compartment door from opening properly. If the CD compartment door encounters an obstacle on opening, it will automatically close again. Nonetheless you should not place objects beside the CD compartment door. Light objects could be knocked down by the CD compartment door and damaged. ô Note: No liability will be taken and no guarantee will be made for damages ... Ú resulting from opening the casing of the mini hi-fi system, remote control and/or loudspeakers, Ú resulting from repair attempts not made by qualified experts Ú resulting from other than intended usage of mini hi-fi system or its components! 10 cm 10 cm 10 cm The mini hi-fi system will become warm when turned on. This is not a cause for concern and does not indicate a technical problem. 10 cm In the case of malfunction, never attempt to repair the power supply cable yourself! This could cause danger of electric shock! English • 5 3. Usage The mini hi-fi system is exclusively intended for use ... Ú Ú Ú as an entertainment device as a receiver for medium wave (AM) and frequency modulation (FM) radio stations. 4. Scope of delivery ' ' ' ' Main unit Two loudspeakers Remote control unit (including battery) These instructions for use as a playback device for … • audio CDs of 12 cm (diameter) and 8 cm (diameter) formats, indicated by the logo • the CD audio file format (.cda) on CD-R and CDRW storage medium Main unit Ú stationary in closed spaces Ú for private and not for commercial use. ô Note: No liability will be assumed and no warranty granted for damages caused by use of the mini hi-fi system other than intended! Loudspeakers Remote control unit 5. Technical data 5.1. General Power supply: ............................ 230 V~50 Hz Output: ....................................... 2 × 4 watts 5.2. Dimensions (W × D × H) and weight Mini hi-fi system:...................... 90 × 262 × 192 mm Loudspeakers: ........................... 90 × 225 × 192 mm Net weight: ................................ 4.1 kg 5.3. CD player Laser: .......................................... 3-beam laser pickup Frequency response: ................. 100 Hz – 16 kHz 5.4. Radio frequency range Medium wave (AM): ................ 522 – 1620 kHz Frequency modulation (FM): 87.5 – 108 MHz 6 • English 6. Components, operating controls and displays of the mini hi-fi system 6.1. Main unit, top u q w e r t y u y q t w r e 2% i o a s Snooze button EQ button Open/Close button On/Standby button Mute button Repeat/M-Up button Random button 6.2. Main unit, front i o a s d f g h j k l ; 2) 2! 2@ 2# 2$ 2% AUX button Tuner button CD button Standby indicator CD compartment FM Mode/ST/Mono button Timer/Sleep button Headphones jack Mode/Remain button Memo/C-Adj button Volume+ button Volume– button Stop/Band button Skip/Tun reverse button Skip/Tun forwards button Play/Pause button Display Infrared receiver for remote control unit 2$ k f j h g 6.2.1. Display indicators q During CD operation: Display for the number of the current song. During radio operation: Display for preset number of the current radio station. w During radio operation: Stereo radio station display. e During CD operation: Display for the time that the current song has been playing. During radio operation: Display for frequency of the current radio station. r During radio operation: Display for frequency range of the current radio station. d 2# 2@ 2! 2) ; l q w r e English • 7 6.3. Main unit, back 2^ 2^ 2& 2* 2( 3) 3! 2& Dipole antenna AUX inputs (for cinch cable) Reset button Main switch Power supply cable with plug Loudspeaker connection terminals 3! 2* 2( 6.4. Main unit, bottom 3@ 3) Battery compartment for power outage memory 3@ 6.5. Remote control unit ô Note: The same buttons on the main unit and the remote control unit have the same functions. However, some of the buttons have different names on the main unit than on the remote control unit. The following overview of the remote control buttons indicates the corresponding buttons on the main unit in parentheses. 3# 3$ 3% 3^ 3& 3* 3( 4) 4! 4@ 4# 4$ 4% 4^ 4& 4* On/Standby button Function button (AUX, Tuner, CD – press several times to switch between the various different operating modes) Play/Pause button Skip/Search forwards (Skip/Tun forwards) button Stop/Band button Sleep (Timer/Sleep) button Repeat/M-Up button Intro button (only on the remote control unit) Random button Volume– button Volume+ button Mute button EQ button Timer (Timer/Sleep) button Skip/Search reverse (Skip/Tun reverse) button Snooze button 8 • English 3# 4* 4& 4^ 4% 4$ 3$ 3% 3^ 3& 3* 3( 4) 4! 4@ 4# 7. Select a suitable location for the mini hi-fi system Place the mini hi-fi system and loudspeakers on a level, flat, scratchproof, non-slip surface. Make sure that the surface is made to support the weight of the mini hi-fi system/speakers. † Danger! Do not place the mini hi-fi system ... Ú in areas exposed to direct sunlight. Otherwise, the mini hi-fi system could overheat and be damaged beyond repair. This could cause a fire! Ú in the immediate vicinity of heat sources such as ovens, heaters and similar devices or vent openings of other electrical devices. Otherwise, the mini hi-fi system could be damaged beyond repair. This could cause a fire! Ú in dusty environments. Otherwise dust could collect in the mini hi-fi system. If a large quantity of dust collects in the mini hi-fi system, it could overheat and be damaged irreparably. This could cause a fire! Ú in damp environments. Otherwise moisture could seep into the mini hi-fi system. This could cause danger of electrical shock and fire! Ú in the immediate vicinity of water, such as bath tubs or swimming pools. Do not place any receptacles containing water (e.g. flower vases) on the mini hi-fi system. If water enters the mini hi-fi system or it falls into water, it could cause danger of electrical shock! Do not place open flames (e.g. burning candles) on the mini hi-fi system. This could cause a fire! Do not cover the vent openings of the mini hi-fi system! Do not place the mini hi-fi system on beds, blankets, etc. Make sure that the vent openings are at least 10cm from the nearest wall or large objects. 10 cm 10 cm Otherwise, the mini hi-fi system could overheat and be damaged beyond repair! This could cause a fire! | Warning! Do not place the mini hi-fi system in areas exposed to physical shock or constant vibrations. Physical shock and constant vibrations could lead to malfunctions and long-term damage. ™ Caution! The mini hi-fi system should be positioned so that no obstacles can prevent the side CD compartment from opening properly. If the CD compartment door encounters an obstacle on opening, it will automatically close again. Nonetheless you should not place objects beside the CD compartment door. Light objects could be knocked down by the CD compartment door and damaged. 8. Preparing the mini hi-fi system for use 8.1. Unpacking the components Carefully remove all components from the packaging. Always hold components with both hands. Do not drop the components! Otherwise they could be damaged beyond repair. 8.2. Preparing the remote control unit for use 1 Open the battery compartment of the remote control unit. 2 Remove the protective plastic wrapping from the button battery included in delivery. Insert the button battery in the battery compartment. Please insert the battery as shown in the picture. w q e 10 cm CR 2032 3 Close the battery compartment of the remote control unit. 8.3. Activating the power outage memory 10 cm The mini hi-fi system is equipped with power outage memory. If the power outage memory is activated, then your settings will remain stored in the mini hi-fi system if a power outage occurs. This applies to radio stations, time settings English • 9 and timer function stored in the system. The power outage memory also serves to protect your settings if the power supply cable is unplugged. ô Note: If the power outage memory is not activated, then all of your settings will be deleted in the case of a power outage. Settings will also be deleted if the power cable is unplugged. 9. Turning the mini hi-fi system on and off To turn the mini hi-fi system on: 1 Insert the power cable plug into an electrical outlet. The mini hi-fi system should now be in standby mode. The standby indicator is illuminated when the system is in standby mode. If the indicator is not lit: Switch the main switch on the back of the mini hi-fi system to the On position. To activate the power outage memory: 1 Place the main unit of the mini hi-fi system on its side. The bottom of the mini hi-fi system should now be facing you. 2 Remove the cover of the battery compartment from the 2 Press the On/Standby button on the main unit or on the remote control unit. The mini hi-fi system is now on and the display is illuminated in blue. bottom of the system. 3 Insert three AA/LR6/Mignon type batteries in the bat- tery compartment. These are not included in the delivery. Insert the batteries in the right direction (polarity +/-) as shown on the battery compartment. 4 Place the cover back on the battery compartment. 5 Place the main unit back in the upright position. The power outage memory is now active. | Warning! Battery acid could leak out, especially if the batteries are old. Therefore you should remove all batteries if you do not plan to use the mini hi-fi system and remote control for long periods of time. This can protect the mini hi-fi systems and remote control unit from damages resulting from leaked battery acid. 3 To switch the mini hi-fi system back to standby mode: Press the On/Standby button on the main unit or on the remote control unit. 4 To turn the mini hi-fi system off: Switch the main switch on the back of the main unit to the Off position. If you do not want to use the mini hi-fi system for a long period of time, then unplug the power cable from the power outlet. 10. Using the mini hi-fi system radio 1 Turn the mini hi-fi system on by pressing the On/Standby button. 8.4. Connect the loudspeakers to the main unit 2 Press the Tuner button to switch to radio mode. ”Tuner” 1 Uncoil the loudspeaker connector cable to its full length. 3 Switch between the two frequency ranges (AM medi- appears on the display screen. um wave and FM frequency modulation) by pressing the Stop/Band button. The currently selected frequency range is indicated on the display screen. 2 The loudspeaker connector cables have to be connected to the loudspeaker terminals on the back of the main unit. Place the ends of the black connector cables in the black terminals. Place the ends of the black and white connector cables in the red terminals. You can select a radio station using one of two options: the automatic station search or the manual search. 10.1. Using the automatic radio station search 1 Press and hold for a few seconds ... 10 • English Ú the Skip/Tun button forwards to search forwards for a radio station or Ú the Skip/Tun button reverse to search backwards for a radio station. 2 The next available radio station will be found automati- 2 Press the Memo/C-Adj button on the main unit. 01 will 3 If you would like to search further for a radio station: 3 Press the Repeat/M-Up button on the remote control unit cally. As soon as a radio station is found with a sufficient broadcast signal, the station search will be stopped. Press and hold the Skip/Tun forwards or Skip/Tun reverse button again for a few seconds. The station search will continue until the next radio station with a sufficient broadcast signal is found. 10.2. Manually searching for a radio station The manual search can be used to find radio stations, for which only poor reception quality is available. To do this, press the Skip/Tun forwards or the Skip/Tun reverse button repeatedly. You can use this function to ... Ú search the medium wave (AM) frequency range in steps of 9 kHz Ú search the frequency modulation (FM) frequency range in steps of 0.05 MHz. Repeat this until you have found the required radio station. If you would like to search for a stereo radio station in the FM (frequency modulation) frequency range: First press the FM Mode/ST/Mono button on the main unit. If a stereo radio station is found, then the stereo symbol will appear on the display screen. 10.3. Improving reception quality of frequency modulation (FM) radio stations appear and Memory will blink on the display screen for the first of ten program positions. to select another program position. You can switch to the next program position by pressing the button again. 4 Once the program number, under which you would like to save the radio station, appears on the display screen: Press the Memo/C-Adj button again. The radio station is now preset for the selected program position. Memory appears on the display screen. 5 To preset additional radio stations on other program positions: Repeat steps 1 to 4. To move a preset radio station to another program position: 1 Select the desired radio station. 2 Press the Memo/C-Adj button. Memory blinks on the display screen. 3 Press the Repeat/M-Up button to select another program position. 4 Once the program number, under which you would like to save the radio station, appears on the display screen: Press the Memo/C-Adj button again. The radio station is now preset for the selected program position. Memory appears on the display screen. To improve reception quality of FM radio stations: ô Note: 1 Uncoil the trajectory antenna connector cable to its full If you preset a radio station to correspond to a program position that is already occupied: Then the radio station that was previously preset for the program position will be deleted. length. Slowly move the end of the trajectory antenna connected to the main unit so that it points in different directions. Once you have found a good position for reception of the radio station: Fix the trajectory antenna in this position (e.g. with tape). 2 In the case of poor reception of a frequency modula- tion (FM) radio station in stereo mode, it could also help to switch to mono reception. To do this, press the FM Mode/ST/Mono button once if stereo reception is currently on. The stereo indicator will disappear from the display screen. In the case of power outages: If the power outage memory of the mini hi-fi system has been activated, then all of the radio stations will remain in memory. This is explained in more detail in chapter 8.3. of these instructions. If the power outage memory is not activated, then all of the stored radio stations will be deleted in the case of a power outage. Settings will also be deleted if the power cable is unplugged. 10.4. Programming a radio station 10.5. Selecting a preset radio station You can preset up to ten radio stations in each frequency range. To do this: 1 Press the Stop/Band button to select the frequency range 1 Use the automatic search function or the manual search function to search for the radio station that you would like to preset. of the preset radio station. The selected frequency range (AM medium wave or FM frequency modulation) will appear on the display screen. 2 Press the Repeat/M-Up button to switch to the next stored radio station. The program position of the currently selected radio station appears on the display screen. English • 11 11. Using the mini hi-fi system CD player 6 Press the Play/Pause button to start playing the CD. The number of the current song and the time that has already been played appear on the display screen. 7 To pause playing the CD: Press the Play/Pause button. The time already played of the current song will blink on the display screen. 11.1. Playing CDs 1 Turn the mini hi-fi system on by pressing the On/Stand- 8 To continue playing the CD: Press the Play/Pause button 2 Press the CD button to switch to the CD function. CD 9 To stop playing the CD: Press the Stop/Band button. The by button. appears on the display screen. 3 Press the Open/Close button to open the CD compartment. again. number of songs and the total play time of the CD will appear again on the display screen. 11.2. Skipping to the beginning of a song ô Note: While playing a CD, you can ... The main unit should be positioned so that no obstacles can prevent the side CD compartment from opening properly. If the CD compartment door encounters an obstacle on opening, it will automatically close again. Nonetheless you should not place objects beside the CD compartment door. Light objects could be knocked down by the CD compartment door and damaged. Ú press the Skip/Tun forwards button to: skip to the beginning of the next song or Ú press the Skip/Tun reverse button to: return to the beginning of the song that is currently being played. The first time you open the CD compartment, remove the cardboard protection. 4 Insert the CD in the open CD compartment. The printed/ label side of the CD should be facing the CD compartment door. The bottom edge of the CD should by placed on the two small fitting in the CD compartment door. CD The selected song will be played immediately, without you having to press the Play/Pause button. The number of the current song and the time that has already been played appear on the display screen. 11.3. Using the fast-forward and rewind functions To fast-forward or rewind within the current song in order to select certain parts of the song: 1 To fast-forward: hold the Skip/Tun forwards button pressed while the song is being played. 2 To rewind: hold the Skip/Tun reverse button pressed while the song is being played. 3 Release the button as soon as you have found the desired part of the song. The song will start playing at the selected place. ô Note: 11.4. Using the intro function Do not press the CD down on the spindle in the middle of the CD compartment as with other CD players! Upon closing the CD compartment door, the CD will automatically be placed in the proper position in the CD compartment. You can use the intro function to play the first 10 seconds of every song on a CD. You can use this function to obtain a quick overview of all songs on a CD. To turn on the intro function: 5 Press the Open/Close button to close the CD compart- 1 If a CD is being played, press the Stop/Band button. ment. After a few seconds the number of songs and the total play time of the CD will appear on the display screen. 12 • English 2 Subsequently press the Intro button on the remote control unit once. Intro appears on the display screen. The first ten seconds of each song on the CD will be played one after the other. 3 To turn off the intro function: Press the Intro button on the remote control unit again. Intro disappears from the display screen and the CD is played. 11.5. Turning on the repeat functions The number of the currently selected song appears in the upper left corner of the display screen. 4 Press the Memo/C-Adj button again as soon as the number of the desired song appears on the display screen. This song is now programmed as the first song in your sequence. P-02 appears on the display screen for the second song to be programmed. You can use this function to repeat a certain song or the entire CD. To turn on the repeat function: 1 Press the Repeat/M-Up button on the remote control unit while a song is being played. Repeat blinks on the display screen. The song will now be played repeatedly. 2 Press the Repeat/M-Up button a second time. Repeat ap- 5 Repeat steps 3 and 4 repeatedly until you have compiled the desired sequence of songs. 6 Press the Play/Pause button within ten seconds of pro- gramming the last song. The programmed song sequence will now be played. Memory will appear on the display screen while the programmed song sequence is being played. pears on the display screen. The entire CD will now be played repeatedly. 3 To turn off the repeat function: Press the Repeat/M-Up button until Repeat disappears from the display screen. You can also press the Stop/Band button to achieve the same results. However, this not only turns off the repeat function, but also stops playing. 11.6. Turning on the random play function The random play function can be used to play all songs of a CD in random order. To turn on the random play function: 1 Press the Random button on the remote control unit while a song is being played. Random appears on the display screen. All songs on the CD will be played in random order. ô Note: You can also turn on the repeat function while playing a song sequence. Turning on the repeat functions is described in chapter 11.5. 7 If you want to pause playing the song sequence: Press the Play/Pause button. The time already played of the current song will blink on the display screen. 8 If you want to stop playing the song sequence: Press the Stop/Band button. 9 After the song sequence has been played, the number of songs and the total duration of the CD will appear on the display screen. 2 To turn off the random play function: Press the Random button again. Random will disappear from the display screen. The programmed song sequence remains in memory. If you would like to hear it again: First press the Memo/ C-Adj button and then the Play/Pause button. The programmed song sequence will now be played again. 11.7. Using the program function You can use the program function to determine a sequence of songs on a CD to be played in a certain order. You can determine the order in which the songs are played. Up to 20 songs can be put together in a single sequence. The programmed song sequence is deleted if ... 1 First stop playing the inserted CD by pressing the Stop/ Ú Ú Ú 2 Press the Memo/C-Adj button. Memory blinks on the 10 To turn off the program function: Press the Stop/Band To program a sequence of songs: Band button. display screen and P-01 is display. ô Note: a new song sequence is programmed or the CD compartment is opened or the mini hi-fi system is turned off using the main switch on the back of the main unit. button while a programmed song sequence is being played. Memory will disappear from the display screen. If no button is pressed within 10 seconds, then you will have to begin with step 2 again. 3 Now select a song to be programmed. To do this, press the Skip/Tun forwards or the Skip/Tun reverse button. English • 13 12. General functions for radio, CD and AUX operation 13. Additional functions of the mini hi-fi system 12.1. Adjusting the volume 13.1. Adjusting the clock of the mini hi-fi system While using the radio and CD functions, you can adjust the volume to values between 00 and 80 dB. To increase the volume: Press the Volume+ button. Each time you press the Volume+ button, the volume will be increased by a value of 2 dB. The maximum volume is 80 dB. To decrease the volume: Press the Volume– button. Each time you press the Volume– button, the volume will be decreased by a value of 2 dB. The minimum volume is 0 dB. The mini hi-fi system has to be in standby mode in order to adjust the integrated clock. 1 Press and hold the Memo/C-Adj button until 24 H blinks on the display screen. 2 Press the Skip/Tun forwards button or Skip/Tun reverse to switch between the display formats 24H and 12H. Ú 24 H refers to the 24 hour display format as frequently used in most European/Asian countries. To mute the loudspeakers during use of the radio or CD functions: Ú 12 H refers to the 12 hour AM/PM display format as frequently used in the U.S.A. 1 Press the Mute button on the remote control unit. The 3 Press the Memo/C-Adj button to save the desired display 12.2. Muting the loudspeakers loudspeakers are now muted and Mute appears on the display screen. 2 To turn off the mute function, press the Mute button format. 4 The current time will be displayed on the screen and the hour display will blink. Set up the hour display by pressing the Skip/Tun forwards or Skip/Tun reverse button. again. Mute will disappear from the display screen. 12.3. Turning on the Equalizer function The sound playback equalizer curve can be adjusted for radio, CD and AUX functions. You can choose from the equalizer curves ”Classic”, ”Rock” and ”Pop”. Each equalizer curve has its own characteristic emphasis on the high, mid and bass sounds. You can use this to adjust sound playback to suit different styles of music and your own personal preferences. To turn on the various different equalizer curves: 1 Press the EQ button. The currently selected equalizer curve appears on the display screen. 2 Another equalizer curve is displayed each time you press the EQ button. The equalizer curves are displayed in the following order: ”Classic” ”Rock” ”Pop”. æ æ 3 If you press the EQ button again then the equalizer function will be turned off. The currently selected equalizer curve will disappear from the display screen. 5 Press the Memo/C-Adj button again to save the desired hour. The minute indicator will blink on the display screen. 6 Set up the minute display by pressing the Skip/Tun forwards or Skip/Tun reverse button. 7 Press the Memo/C-Adj button again to save the desired minute display. The time is set and will appear on the display screen. 13.2. Using the timer function The timer function can be used to turn the mini hi-fi system on at a preprogrammed time. This function could be used to implement the mini hi-fi system as an alarm clock for example. This function turns on the most recently used operating mode (radio, CD or AUX). 1 If the mini hi-fi system is turned on: Switch to the operating mode ... 14 • English Ú radio if you want to turn on the radio with the timer function. To do this press the Tuner button. Ú CD if you want to turn on the CD player with the timer function. To do this press the CD button. Ú AUX if you want to use the timer function to turn on an external audio device connected to the AUX inputs. To do this press the AUX button. now switched to standby mode again. Snooze will appear on the display screen. The system will be turned on again automatically after five minutes. ô Note: 13.4. Using the sleep timer function If you select AUX: The external audio device connected to the AUX inputs also has to be turned on at the preprogrammed time. Otherwise the mini hi-fi system will be switched on at the preprogrammed time but no sound will be played. You can use the sleep timer to have the mini hi-fi system turn off automatically after a preprogrammed time period. This could be useful if you like to listen to music while going to sleep for example. 2 Subsequently press the On/Standby button. The mini hi- You can choose a time span between 10 and 90 minutes until which the mini hi-fi system turns off. To turn on the sleep timer: fi system is now switched to standby mode. 3 Press the Mode/Remain button on the main unit. Timer and the most recently saved timer time will appear on the display screen. 1 Press the Timer/Sleep button while a CD is playing or ô Note: while the radio is on. Sleep will blink and 90 will appear on the display screen. 90 refers to a time span of 90 minutes until automatic shut-off. You have five seconds to carry out step 4. Otherwise you will have to return to step 1. Each time you press the Timer/Sleep button, you switch to another time span. 4 Press and hold the Memo/C-Adj for three seconds while 2 As soon as the desired time span is shown on the display Timer is blinking on the display screen. 5 The hour indicator will blink on the display screen. Set up the hour display by pressing the Skip/Tun forwards or Skip/Tun reverse button. 6 Press the Memo/C-Adj button again to save the desired hour. The minute indicator will blink on the display screen. 7 Set up the minute display by pressing the Skip/Tun for- screen: Wait for five seconds without pressing a button. The display returns to normal and Sleep appears in the display as well. The mini hi-fi system will now be turned off automatically after the time span you have selected. 3 To turn off the sleep timer: Press the Timer/Sleep button once. Sleep will disappear from the display screen. 8 Press the Memo/C-Adj button again to save the desired 14. Connecting headphones to the mini hi-fi system 9 Press and hold the Timer/Sleep button for three seconds If you would like to connect headphones to the mini hifi system: Insert the 3.5 mm plug of the headphones in the headphones jack on the front of the main unit. wards or Skip/Tun reverse button. minute display. The Timer time is set and will appear on the display screen. Subsequently wait until Timer disappears from the display screen. until Timer appears on the display screen. The preprogrammed turn-on time will appear briefly on the display screen. After a few seconds the display will return to the normal time display and Timer will be indicated. The Timer function is now on. 10 To turn off the timer function: Press the Timer/Sleep button until Timer disappears from the display screen. 13.3. Using the snooze function If you are using the Timer function of the mini hi-fi system as an alarm clock, you can use the snooze function. To do this press the Snooze button when the mini hi-fi system turns on at the preprogrammed time. The mini hi-fi system is The loudspeakers of the mini hi-fi system will be turned off automatically upon connecting headphones. You can adjust the volume of the headphones using the Volume+ and Volume– buttons. 15. Connecting external audio devices to the mini hi-fi system You can connect external audio devices to the mini hi-fi system using the AUX inputs. To do this: English • 15 Connect the AUX outputs of the external audio device with the AUX inputs of the mini hi-fi system. Use a cinch cable for this. You can obtain a cinch cable from your audio specialist shop. After having connected the external audio device, make sure that it is ... Ú Ú Ú onds. Then turn the mini hi-fi system on again by pressing the On/Standby button. If the malfunction persists: D Press the On/Standby button to switch the mini hi-fi system to the standby mode. Then switch the main switch on the back of the main unit to the Off position. Unplug the power plug from the electrical outlet. Wait for ten seconds. operational, turned on and Then insert the power cable plug into an electrical outlet again. Switch the main switch on the back of the main unit to the On position. Turn the mini hi-fi system on again by pressing the On/Standby button. See if the malfunction persists. not muted. Subsequently turn on the mini hi-fi system. Then select the AUX function by pressing the AUX button. 16. Cleaning the mini hi-fi system If the malfunction persists: Only use a slightly damp cloth to clean the casing of the mini hi-fi system and loudspeakers. To remove persistent dirt, add a few drops of mild dishwashing liquid to the damp cloth. Make sure that no moisture enters the mini hi-fi system while cleaning! ô Note: Clean the inside of the CD compartment (if necessary) only using a clean dry brush. Lens brushes obtainable from a photo specialist shop are especially suitable for this purpose. Never clean the inside of the CD compartment with water! † Danger! E If the Reset button is pressed, all of your settings on the mini hi-fi systems will be deleted. This includes stored radio stations, time and timer functions. 17.2. “No Disc” appears on the display screen even though a CD has been inserted A The CD is dirty, scratched or otherwise damaged. Clean the CD or insert another CD. B The CD has not been inserted properly in the CD com- partment. Open the CD compartment door by pressing the Open/Close button. Remove the CD and insert it again. Make sure that ... If moisture enters the mini hi-fi system, it could cause electric shock and a fire! 17. Troubleshooting 17.1. Nothing appears on the display screen/ The mini hi-fi system is not functioning even though it has been turned on. A Make sure that the power plug of the mini hi-fi system is properly inserted in the electrical outlet. B Make sure that the electrical outlet that you inserted the power plug in carries electrical current. To do this, connect device which is known to be functioning to this power outlet. C Press the On/Standby button to switch the mini hi-fi system to the standby mode. Subsequently wait for ten sec- 16 • English Return the mini hi-fi system to factory settings. To do this, press the Reset button on the back of the main unit with a sharp object while the main unit is on. Ú the printed/label side of the CD is be facing the CD compartment door and Ú the bottom edge of the CD is placed on the two small fitting in the CD compartment door. ô Note: Do not press the CD down on the spindle in the middle of the CD compartment as with other CD players! Upon closing the CD compartment door, the CD will automatically be placed in the proper position in the CD compartment. C If you have inserted a CD-R/CD-RW: Sometimes, individual CD-Rs or CD-RWs can not be read/played. This can be caused by ... Ú Quality differences between various different CD manufacturers Ú Ú Ú Differences between various different CD burners If the malfunction persists: Differences between various different programs used to burn CDs Refer to the instruction for use of the external audio device. Check to see if settings have to be made in the audio device to connect it to hi-fi components. or different settings used to burn CDs. This does not indicate faulty functioning of the mini hifi system. 17.5. The remote control unit is not working A Make sure that the button battery for the remote control unit have been properly inserted in the battery compartment. 17.3. The inserted CD is not played It is possible that a thin layer of condensation water has formed on the laser scanner lens in the CD compartment. This is especially likely if the mini hi-fi system has been exposed to extreme temperature changes. In this case: Place the mini hi-fi system in a dry environment with room temperature and normal humidity levels. Then remove the CD from the CD compartment. Subsequently leave the mini hi-fi system on for at least one hour without using it. The condensation layer should evaporate. B The button battery for the remote control unit could be empty. Replace the battery with a new CR2032 type button battery. ô Note: Do not dispose of used batteries in the household waste! Return the used batteries to an appropriate recycling collection center. Used batteries can usually be returned to the store in which they were bought. C Check to see if there are any obstacles between the re- mote control unit and the infrared receiver on the main unit. 17.4. No sound A Check to see if ... Ú the mini hi-fi system may be muted. If the mini hi-fi system is muted then Mute will appear on the display screen. Ú all loudspeaker connector cable are correctly inserted in the loudspeaker terminals on the back of the main unit. D Please note: The remote control unit only functions within a range of five meters from the main unit. 17.6. Other malfunctions Please contact your nearest service partner if ... Ú the malfunctions described in sections 17.1. to 17.5. can not be rectified as described or AUX inputs of the mini hi-fi system using a cinch cable: Check to see if ... Ú other malfunctions occur while operating the mini hi-fi system. Ú the cinch cable plugs are correctly connected to the AUX inputs on the mini hi-fi system and Ú the cinch cable plugs are correctly connected to the AUX outputs of the external audio device. You will find the addresses of our service partners in the warranty booklet. This booklet is included in delivery of the mini hi-fi system. B If an external audio device has been connected to the If the malfunction persists: Check to see if the external device ... Ú Ú Ú Ú † Danger! In the case of malfunction, never attempt to repair the power supply cable yourself! This could cause danger of electric shock! is muted | Warning! is not turned on The mini hi-fi system and its components contain no userserviceable parts. The warranty is voided if the casings of the mini hi-fi system, remote control unit and/or the loudspeakers are opened! is not operational is not functional. English • 17 ô Note: No liability will be taken and no guarantee will be made for damages ... Ú resulting from opening the casing of the mini hi-fi system, remote control and/or loudspeakers, Ú resulting from repair attempts not made by qualified experts 18. Disposing of the mini hi-fi system Do not dispose of the mini hi-fi system or its components in the household waste. Please contact those responsible for waste management in your city or community and ask how this type of device is to be disposed of properly. ô Note: Remove the batteries before disposing of the mini hi-fi system and/or the remote control unit. Do not dispose of the batteries in the household waste! Return the used batteries to an appropriate recycling collection center. Used batteries can usually be returned to the store in which they were bought. 18 • English