1
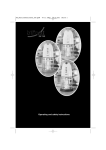
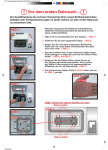
RZ_IB_Sandwichmaker_LB4.qxd
26.09.2003
11:38 Uhr
Seite 1
KH1120
Bedienungsanleitung
gemäß
EN 62079
RZ_IB_Sandwichmaker_LB4.qxd
26.09.2003
11:38 Uhr
Seite 2
RZ_IB_Sandwichmaker_LB4.qxd
26.09.2003
11:38 Uhr
Seite 3
Operating and safety instructions
RZ_IB_Sandwichmaker_LB4.qxd
26.09.2003
11:38 Uhr
Seite 4
Sandwich Maker KH 1120
Congratulations ... ...
... on your purchase of the
Bifinett Sandwich Maker.!
Using the Sandwich Maker, you can conveniently make mouth-watering sandwiches
with fillings of your choice at home.
Technical specifications
Status: September 2003
Dimensions (W x H x D) . . . 23 x 10 x 23 cm
Net weight . . . . . . . . . . . . . . . . . . . . . 1,5 kg
Input voltage . . . . . . . . . . . . . . 230 V / 50 Hz
Power cord length . . . . . . . . . . . . . . 100 cm
Power consumption . . . . . . . . . . . . . . 700 W
For your personal
safety
• Before you start using your Sandwich
Maker, please read the instructions
manual carefully.
• Keep this instructions manual in an
appropriate place close to the appliance.
Pass it on, as the case may be, to the
next owner of the appliance.
• Use the Sandwich Maker only for its
intended purpose in accordance with
the instructions given here.
Prevent electrical shock hazards
by following the measures given
below
• You may use the Sandwich Maker only
indoors in a dry place. Keep the appliance
away from splashing water even when it
is switched off.
• Use the appliance only if the local power
supply voltage corresponds to the voltage
specified for the appliance (230 V AC at
50 Hz).
• Do not connect the appliance to multisocket adapter, from which many other
electrical devices may be simultaneously
drawing power, as this can lead to overloading on the circuit.
• After each use, switch the appliance off
and unplug the unit.
• While cleaning, make sure that water
does not seep into the internal areas of
the appliance. Never attempt to clean the
appliance under running water. Never dip
the appliance into water.
• Protect the power cord from damages
caused by entanglement with other
objects. Keep it away from hot surfaces.
Do not let the power cord hang loosely
from the table or over the hot plate.
• Never open the housing of the appliance.
• Never use the appliance if the power cord
or the plug is damaged or wet. In such a
case, the appliance may need repairs.
• Only service centres authorised by the
manufacturer or experienced technicians
may undertake repairs (see "Repair &
Customer Service").
4
RZ_IB_Sandwichmaker_LB4.qxd
26.09.2003
11:38 Uhr
Prevent fire hazards and injuries
• Place your Sandwich Maker on an even,
non-slippery and heat-resistant base and
never on or near other appliances that
may radiate high levels of heat (e.g.
toaster or cooking-range).
• Do not operate the appliance near
inflammable objects, for example, close
to curtains or near tissue paper roles in
the kitchen.
Seite 5
Before you use the appliance for
the first time
1. Unpack your new Sandwich Maker and
remove all extra fittings such as plastic
wrappers and cable clamps meant for
protection during transportation.
2. Read the instructions manual carefully.
3. Install the appliance as described in the
safety precautions.
• Even during general use, some
components of the appliance may
become very hot (e.g. the top and bottom
housing plates). Do not touch the surface
immediately after switching off the appliance until it cools down completely.
When using the Sandwich Maker for
the first time, you may notice fumes
caused by heating. These fumes are
not injurious to health. However, they
may affect the taste of your first few
sandwiches.
• While operating, you can open or close
the Sandwich Maker safely using the
heatinsulated handle.
Therefore, before making sandwiches
for the first time, we advise you to
switch on the Sandwich Maker once
without any food items and allow it to
heat up for a few minutes.
• Never operate the appliance without
proper supervision. Provide supervision, if
children or frail individuals are allowed to
operate the appliance.
• After use, allow the appliance to cool
down completely before you clean and
keep it away.
Prevent damages to the
appliance
• Use a plastic or wooden spatula or any
other suitable non-metallic utensil to take
the sandwiches out so as not to damage
the non-stick coating of the hot plate of
the Sandwich Maker.
• For the same reason, do not use any
corrosive detergents or pointed instruments while cleaning the appliance.
5
RZ_IB_Sandwichmaker_LB4.qxd
26.09.2003
11:38 Uhr
Toasting Sandwiches
Before switching on the Sandwich
Maker, prepare all required ingredients
for the sandwiches and keep them
ready.
We recommend toast bread for
making sandwiches. Besides wheat
bread, you can also try the wholewheat or mixed grain toast bread.
Seite 6
6. Open the lid up to the stopper and place
the prepared sandwich ingredients in the
correct order:
• Apply some butter or any oil of your
choice on one side of the bread slice.
• Place the buttered slice facing
downwards on another slice of bread.
• Now spread the other ingredients over
the slice of bread.
• Apply some butter or any oil of your
choice on another slice and cover
your sandwich with it. At this time the
buttered side of the slice must face
upwards from the upper surface of the
other bread slice.
a
b
Make sure to spread the filling evenly.
c
1. Open the lid of the Sandwich Maker by
pulling the locking clasp on the handle
(c) towards you and tilting the lid up to
the stopper. If necessary, remove all the
fallen crumbs from the hot plate surface
using a dry cloth.
2. Dab some oil or butter on the hot plate
surface.
3. Close the lid the lid of the Sandwich
Maker. The appliance is fully closed
when the locking clasp on the handle (c)
audibly snaps into position.
4. Insert the plug into a power socket to
switch on the appliance.
Now the Sandwich Maker started getting
hot. The red pilot light "POWER" (a) on
the lid turns on.
5. Wait for about 4 minutes till the green
pilot light "READY" (b) turns on. This
indicates the end of the pre-heating
time: Now the appliance has reached its
operating temperature.
6
7. Close the lid gently until the locking
clasp on the handle audibly snaps into
position.
Now your sandwich is ready for toasting.
During the preparation, the green pilot
light "READY" (b) may turn off from time
to time as the built-in thermostat
continuously regulates the temperature.
8. Open the Sandwich Maker after about 23 minutes and check if your sandwich is
sufficiently browned.
Depending on the quantity and type of
ingredients and your personal taste,
you may try out different cooking times
for your sandwich to obtain different
sandwiches combinations.
9. Remove your sandwiches with a woodenspatula or any other suitable nonmetallic utensil.
RZ_IB_Sandwichmaker_LB4.qxd
26.09.2003
11:38 Uhr
10. To make more sandwiches, close the lid
and repeat steps 5 to 9.
11. You can switch off the Sandwich Maker
by unplugging the appliance from the
socket. Now both the pilot lights are
turned off.
12. Open the lid up to the stopper. Take care
not to touch any hot area on the appliance. Allow the appliance to cool down
completely and then clean the hot plate
surface with a wet cloth.
Cleaning & Maintenance
Before cleaning, unplug the
appliance and wait till it has
completely cooled down.
Never attempt to clean the
appliance under running
water and never dip it in
water.
Do not use any corrosive
detergents or pointed objects
for cleaning.
In order not to damage the non-stick coating of the Sandwich Maker, only use a soft
cloth wetted in hot water to clean the appliance thoroughly. Thereafter, wipe it with a
dry cloth.
Just use a wet cloth to clean the outer surface appliance as well. Before you use your
Sandwich Maker the next time, make sure
that all components are fully dry.
Seite 7
Storage
You can store away the Sandwich Maker in
the horizontal or upright position.
Your Sandwich Maker has an integrated
compartment for storing the power cord at
the bottom of the housing. You can to wind
up the power cord in it when the appliance
is not in use. This way you can prevent the
power cord from getting entangled or soiled
or from becoming a likely cause of
accidents.
Warranty,
Repair & Customer Service
Your Sandwich Maker has a 3-yearswarranty from the date of purchase as per
our standart business conditions and
proper use and maintenance.
To prolong the lifespan of your Sandwich
Maker, follow the directions given under
"Cleaning & Maintenance".
In case your Sandwich Maker fails to
function as expected, it must be given for
repairs to a service centre authorised by the
manufacturer or a qualified technician. For
this purpose, please contact our customer
service. The address is given in the
enclosed warranty certificate.
Disposal
Consult your city or community administrative authorities, if necessary, about procedures for the environmentfriendly and
systematic disposal of the Sandwich Maker.
Before disposal, remove the power
cord from the appliance to make it
unusable. This is a preventive
measure to rule out the risk of an
accident if children use it as a play
object.
7
RZ_IB_Sandwichmaker_LB4.qxd
26.09.2003
11:38 Uhr
www.kompernass.com
IDNr. E4034-250903
Seite 8