1
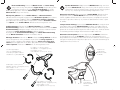
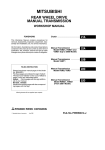
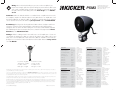
3
Wiring: Attach the included wiring to your source unit or amplifier. If you
require more length, splice the exposed wiring from the insulated cable to your
source unit or amplifier using 18 gauge wire. KICKER recommends protecting
the splice with heat shrink tubing. Attach the Rear Badge over the M5x40
Screw.
PSM3
Weather-proof Mini System
Mini sistema impermeable
Wetterbeständiges Mini-System
Mini système étanche
Cableado: Adhiera el cableado incluido a su unidad fuente o amplificador. Si necesita
más longitud, empalme el cableado expuesto del cable aislado a su amplificador o unidad fuente utilizando un cable de calibre 18. KICKER recomienda proteger el empalme
con un aislante termocontráctil. Adhiera la placa posterior sobre el tornillo M5x40.
Verdrahtung: Befestigen Sie die mitgelieferten Kabel an Ihrem Quellgerät oder Ihrem
Verstärker. Wenn Sie mehr Länge benötigen, verlängern Sie die Leitung zu Ihrem
Quellgerät oder Verstärker mit einer Leitung mit 1 mm² Querschnitt. KICKER empfiehlt,
die Verbindung mit einem Schrumpfschlauch zu schützen. Befestigen Sie die hintere
Plakette über der M5x40-Schraube.
Câblage : Reliez le câblage fourni à votre unité source ou à l’amplificateur. Si vous nécessitez plus de longueur de câble, raccordez les fils exposés des câbles isolés à votre
unité source ou à l’amplificateur à l’aide d’un fil de calibre 18. KICKER recommande de
protéger le raccordement à l’aide d’un tube thermorétractable. Mettez le badge arrière
sur la vis M5x40.
Specifications
Frost Clear: Negative
Transparente: negativo
Frostklar – Minus
Blanc givré - Négatif
Frost Blue - Positive
Celeste: positivo
Frostblau – Plus
Bleu givré - Positif
Our goods come with guarantees that cannot be excluded under the Australian Consumer Law. You are entitled to a replacement or refund for a major failure
and for compensation for any other reasonably foreseeable loss or damage. You are also entitled to have the goods repaired or replaced if the goods fail to be of
acceptable quality and the failure does not amount to a major failure.
Les produits KICKER sont garantis contre les défauts. La durée et les modalités de la garantie dépendent des lois du pays dans lequel le produit a été acheté.
Pour plus d’information veuillez vérifier auprès de votre distributeur local KICKER ou visiter le site : www.kicker.com/warranty.
KICKER-Produkte haben eine Garantie gegen Material- und Verarbeitungsfehler. Dauer und Bedingungen der Garantie hängen von den Gesetzen des Landes
ab, in dem sie erworben wurden. Bzgl. Einzelheiten wenden Sie sich bitte an Ihren örtlichen KICKER-Händler oder besuchen Sie www.kicker.com/warranty
©2014 Stillwater Designs
PSM3+C-20140219
Altavoz de baja frecuencia [pulg., mm]
3, 75
Respuesta de frecuencia [Hz]
100 - 15,000
Potencia [MÁX./RMS]
100/50
Sensibilidad [1W, 1m]
85 dB
Impedancia nominal [Ω]
2ó4
Peso [oz, g]
20, 570
Altura [pulg., mm]
4-3/4, 120
Ancho [pulg., mm]
3-3/8, 86
3, 75
Frequency Response [Hz]
100 - 15,000
Power Handling [PEAK/RMS]
100/50
Sensitivity [1W, 1m]
85 dB
Nominal Impedance [Ω]
2 or 4
Weight [oz, g]
20, 570
Height [in, mm]
4-3/4, 120
Width [in, mm]
3-3/8, 86
Depth [in, mm]
3-7/8, 98
Profundidad [pulg., mm]
3-7/8, 98
Fits Handle Bar Sizes [in,mm]
1-1/4, 32
1, 25
7/8, 22
Se ajusta al tamaño de las palancas
[pulg.,mm
1-1/4, 32
1, 25
7/8, 22
Tieftöner [Zoll, mm]
Frequenzgang [Hz]
Belastbarkeit [MAX/RMS]
Empfindlichkeit [1 W, 1 m]
Nenn-Impedanz [Ω]
Gewicht [Unzen, g]
Höhe [Zoll, mm]
Breite [Zoll, mm]
Los productos KICKER están garantizados contra defectos. La duración y los términos de la garantía dependen de las leyes del país en donde se realizó la
compra. Para más detalles consulte a su distribuidor local de KICKER o visite
www.kicker.com/warranty.
Especificaciones
Woofer [in, mm]
Technische Daten
KICKER products are warranted against defects. Duration and terms of warranty depend on the laws in the country in which it was purchased. For details see
your local KICKER Dealer or www.kicker.com/warranty.
Contains:
(2) PSM Speaker
(2) PSM Enclosure
(2) Upper Clamp
(2) Lower Clamp
(2) Speaker Mount
O-Ring
(2) M5 O-Ring
(2) Washer
(2) M5x40 Screw
(2) M8X20 Screw
(4) M5x16 Screw
(2) Rear Badge
(4) Small Adapter
(4) Large Adapter
Tiefe [Zoll, mm]
Passt zu Handgriffgrößen
[Zoll, mm]
Enthält:
(2) PSM-Lautsprecher
(2) PSM-Gehäuse
(2) Obere Klemmvor100 - 15,000
richtung
(2) Untere Klemmvor100/50
richtung
85 dB
(2) Lautsprecher-Befestigungs-O-Ring
2 oder 4
(2) M5 O-Ring
20, 570
(2) Unterlegscheibe
(2) M5x40 Schraube
4-3/4, 120
(2) M8X20 Schraube
(4) M5x16 Schraube
3-3/8, 86
(2) Hintere Plakette
3-7/8, 98
(4) Kleiner Adapter
(4) Großer Adapter
1-1/4, 32
3, 75
1, 25
7/8, 22
Spécifications
Haut-parleur [pouces ; mm]
3 ; 75
Réponse en fréquence [Hz]
100 à 15 000
Puissance nominale [PIC/RMS]
100/50
Rendement [1W, 1m]
85 dB
Impédance nominale [Ω]
2 ou 4
Poids [g]
570
Hauteur [ pouces ; mm ]
4-3/4 ; 120
Largeur [ pouces ; mm ]
3-3/8 ; 86
Profondeur [ pouces ; mm ]
3-7/8 ; 98
Convient au guidon de taille [
pouces ; mm ]
1-1/4, 32
1, 25
7/8, 22
Contenido:
(2) Altavoz PSM
(2) Gabinete PSM
(2) Abrazadera
superior
(2) Abrazadera inferior
(2) Junta tórica de
montaje para el
altavoz
(2) Junta tórica M5
(2) Arandela
(2) Tornillo M5x40
(2) Tornillo M8X20
(4) Tornillo M5x16
(2) Placa posterior
(4) Adaptador
pequeño
(4) Adaptador grande
Contient :
(2) Module haut-parleur
(2) Boîtier haut-parleur
(2) Étrier de serrage
supérieur
(2) Étrier de serrage
inférieur
(2) Bague de montage
d’enceinte
(2) Joint torique M5
(2) Rondelle
(2) Vis M5x40
(2) Vis M8X20
(4) Vis M5x16
(2) Badge arrière
(4) Petit adaptateur
(4) Grand adaptateur
Enclosure Mounting: Remove the M5x16 Screws and Lower Clamp
using a 4mm hex key, then position the Upper Clamp along the bar you wish
to mount the enclosure to. Use the Large & Small Adapters for smaller
bar-mounting applications. Attach the Lower Clamp to the Upper Clamp with the
M5x16 Screws using a 4mm hex key.
1
Montaje del gabinete: Retire los tornillos M5x16 y la abrazadera inferior
utilizando una llave hexagonal, luego posicione la abrazadera superior junto a la barra
a la que desea montar el gabinete. Utilice los adaptadores grandes y pequeños
para aplicaciones de montaje de barra más pequeñas. Adhiera la abrazadera inferior
a la superior con los tornillos M5x16 utilizando una llave hexagonal de 4 mm.
Gehäusemontage: Entfernen Sie die M5x16-Schrauben und die untere
Klemmvorrichtung mit einem 4-mm-Inbusschlüssel. Positionieren Sie dann die obere
Klemmvorrichtung entlang der Stange, an der Sie das Gehäuse montieren möchten.
Verwenden Sie große und kleine Adapter für kleinere Stangen.
Befestigen Sie die untere Klemmvorrichtung an der oberen Klemmvorrichtung
mit den M5x16-Schrauben und einem 4-mm-Inbusschlüssel.
Montage du boîtier : Retirez les vis M5x16 et l’étrier de serrage inférieur en utilisant
une clé hexagonale de 4 mm, positionnez ensuite l’étrier de serrage supérieur sur
la barre où vous souhaitez monter le boîtier. Utilisez les grands et les petits adaptateurs pour une application sur des barres plus petites. Attachez l’étrier inférieur à
l’étrier supérieur à l’aide des vis M5x16 avec la clé hexagonale de 4 mm.
Use with Large Adapter
Utilice con adaptador grande
Verwendung mit großem Adapter
Utilisation avec le grand adaptateur
2
Speaker Orientation: Slightly loosen the M8X20 Screw using a 6mm hex
key and the M5x40 Screw using a 4mm hex key. Aim the speaker enclosure
at the listener’s head and orient the logo as desired. Do not rotate the speaker
too far (± 45°) and damage the internal wiring. Retighten the screws.
Orientación del altavoz: Afloje suavemente el tornillo M8X20 utilizando una llave
hexagonal de 6 mm y el tornillo M5x40 utilizando una llave hexagonal de 4 mm.
Oriente el gabinete del altavoz hacia la cabeza del oyente y el logotipo en la posición
deseada. No gire tanto el altavoz (± 45°) ni dañe el cableado interno. Vuelva a ajustar
los tornillos.
Lautsprecherausrichtung: Lockern Sie die M8X20-Schraube ein wenig mit einem
6-mm-Inbusschlüssel und die M5x40-Schraube mit einem 4-mm-Inbusschlüssel.
Richten Sie das Lautsprechergehäuse auf den Kopf des Zuhörers und das Logo wie
gewünscht aus. Drehen Sie den Lautsprecher nicht zu weit (± 45 °), damit Sie die innere Verdrahtung nicht beschädigen. Ziehen Sie die Schrauben wieder fest.
Orientation du haut-parleur : Desserrez légèrement la vis M8X20 à l’aide d’une
clé hexagonale de 6 mm et la vis M5x40 à l’aide de la clé hexagonale de 4 mm.
Dirigez le boîtier du haut-parleur en direction de la tête de l’auditeur et orientez le logo à
votre guise. N’orientez pas le haut-parleur à plus de 45°, sous peine d’endommager le
câblage interne. Resserrez les vis.
No Adapter: 1-1/4 inches (32mm)
Sin adaptador: 1-1/4 pulgadas (32 mm)
Kein Adapter: 32 mm
Sans adaptateur: 32 mm (1-1/4 pouce)
M5x40 Screw
tornillo M5x40
M5x40-Schraube
vis M5x40
Small Adapter: 7/8 inch (22mm)
Adaptador pequeño: 7/8 pulgadas (22 mm)
Kleiner Adapter: 22 mm
Petit adaptateur: 22 mm (7/8 pouce)
Large Adapter: 1 inch (25mm)
Adaptador grande: 1 pulgada (25 mm)
Großer Adapter: 25 mm
Large adaptateur: 25 mm (1 pouce)
M8x20 Screw
tornillo M8X20
M8X20-Schraube
vis M8X20