1
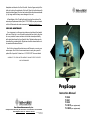
dissipation and shorten the life of the bulb. Use two fingers and pull the
bulb out touching the metal part of the bulb. Clean the bulb surface with
alcohol and lens paper if the user has touched the bulb surface accidentally. Any larger watt bulb may cause damage to the unit.
d. Specification of the 10 watt bulb can be found on the surface of the
microscope. Replacement bulbs (Part # T115V10WB) may be purchased
on Ken-A-Vision web site under accessories at www.ken-a-vision.com
CARE AND MAINTENANCE
Your microscope is a fine precision instrument and should be treated
with care. When not in use it should be protected from dust by the plastic cover provided. Lenses and mirror should be cleaned periodically
with optical lens tissue that is soft and lint free. Painted surfaces can be
cleaned with a moistened cloth. Objectives should be cleaned with a cotton swab and Denatured Alcohol.
Ken-A-Vision has quality technicians on staff to repair or service your
microscopes. Ken-A-Vision recommends service every two years for
optimal life of product. Contact us at 1.816.353.4787 for more details.
WARRANTY: TEN YEAR LIMITED WARRANTY AGAINST DEFECTIVE PARTS
AND WORKMANSHIP.
PrepS c ope
Instruction Manual
KEN-A-VISION MANUFACTURING CO., INC.
5615 Raytown Road, Kansas City, MO 64133 U.S.A Tel. 816-353-4787 Fax. 816-358-5072
Email: [email protected] www.ken-a-vision.com
kav.instcman.prep.pc.v3
Part# INS-SC50
T-1200
T-1201
T-1202
T-1201C
T-1202C
(see supplemental)
(see supplemental)
PREPSCOPE
be very close to the slide, but not touching.
APPLICATION
OPERATION
Thank you for purchasing your Ken-A-Vision microscope. We designed
this compact microscope with optical quality and to withstand student
use. The contoured metal base is covered with high-density plastic to
prevent chipping during normal student use. These and other features,
were designed to enhance the PrepScope to offer you the best value.
Built-In Illuminator (model T-1201 and T-1202)
Turn off the power switch, located on the side of the microscope,
before connecting the power cord. Bulb replacement can be done from
the underneath side. See Bulb Replacement instructions. The built-in 10
watt bayonet incandescent bulb provides all the light needed for illumination. Do not use any other bulb, as it will damage the unit.
Specifications
Catalog#
10x Widefield
Eyepiece w/pointer
Monocular Head
Dual Viewing Head
T-1200 T-1201 T-1202
*
*
*
*
*
*
*
*
Coarse & Fine
Focusing
Mirror
*
*
*
*
*
*
Built-in 10 watt
Illuminator
Vented Cooling
System
Eyepiece
The widefield eyepiece is already locked into place to avoid loss. No
need to tighten. The eyepointer is built-in to the eyepiece.
*
4x, 10x, 40xR
Objective Lens
*
If your microscope has a mirror (model T-1200), it is used to reflect
light from an external light source up through the bottom of the stage.
Never use direct sunlight- as a source for light.
Focus
Place specimen slide under the stage clips into position for viewing.
Use the 4x objective first. Raise the stage until it will go no higher. Then
lower the stage to bring into focus. Once the image is sharp you should
be able to simply turn the nosepiece to the next objective lens and do
minor adjustments with the focus knob.
*
MICROSCOPE PREPARATION
Check the coarse focus tension. The knobs are oversized and are
designed for better gripping. The coarse knob should turn easily to
change the focus, but the stage should not move on its own.
For shipping purposes your Prepscope had been shipped with a
restraining strap around the microscope, please cut the strap off, as
you will not need it again.
Check the stage stop safety feature. Be sure the stage moves
up and down when turning the focusing knob. To check the stop first
place a prepared slide in position for viewing. Move the coarse focus
until the objective and stage are as close together as they can be. Look
at the slide and turn the 40x objective into place. This objective should
kav.instcman.prep.pc.v3
Part# INS-SC50
Disk Diaphragm
The rotating disk is located under the stage. (1=smallest, and
5=largest) The different sized holes are used to control the amount
of light that is projected upward into the slide. Simply bring one of the
different sized holes in line with the stage opening. There is no set rule
regarding which setting to use with a particular lens.
BULB REPLACEMENT (model T-1201 and T-1202)
a. Before changing the bulb, make sure that the power switch is off
and the power cord has been disconnected from the wall outlet.
b. On the bottom of your microscope use a slotted screwdriver to
remove the screw on the lamp door. Pull open the lamp door and carefully remove the old light bulb from the socket by gently pushing in and
turning the bulb one quarter turn counter clockwise. Using lens paper to
hold the bulb, put in new bulb and push and turn clockwise.
c. Avoid touching the glass surface of the bulb with bare hand. Any oil
brought onto the bulb by the bare hand will negatively affect the heat