1
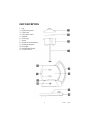
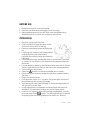
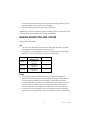
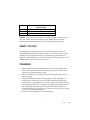
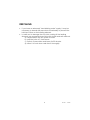
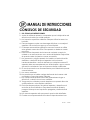
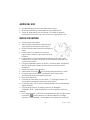
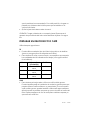
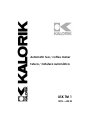
Automatic tea / coffee maker
Tetera / Cafetera automática
USK TM 1
120V ~ 600 W
IMPORTANT SAFEGUARDS
1. READ ALL INSTRUCTIONS
2. Check that your mains voltage corresponds to that stated on the
appliance.
3. Do not touch hot surfaces. Use handles or knobs.
4. To protect against electrical shock do not immerse cord, plugs, or
the appliance in water or other liquid.
5. Close supervision is necessary when any appliance is used by or
near children.
6. Unplug from outlet when not in use and before cleaning. Allow to
cool before putting on or taking off parts.
7. Do not operate any appliance with a damaged cord or plug or
after the appliance malfunctions or has been damaged in any
manner. Return appliance to the nearest authorized service
facility for examination, repair, or adjustment.
8. The use of accessory attachments not recommended by the
appliance manufacturer may cause injuries.
9. Do not use outdoors.
10. Do not let cord hang over edge of table or counter, or touch hot
surfaces.
11. Do not place on or near a hot gas or electric burner, or in a
heated oven.
12. Extreme caution must be used when moving an appliance
containing hot oil or other hot liquids.
13. Always attach plug to appliance first, then plug cord into the wall
outlet. To disconnect, put the switch in off position, then remove
plug from wall outlet.
14. Do not use appliance for other than intended use.
15. Scalding may occur if the lid is removed during use.
16. Make sure the appliance never comes into contact with
inflammable materials such as curtains, textiles, ... when it is in use
as they might catch fire.
17. When removing lime scale, only use special products for the
removal of lime scale. Never use ammonia or any other
substance that might damage your health.
2
USK TM 1 - 070327
18. Never use your appliance without water in it.
19. Ensure that the glass jug is properly located on the power base
before switching on.
20. Remove the glass jug from power base before filling or pouring.
Do not attempt to remove the glass jug from the power base until
it is switched off, manually or automatically.
21. Use the glass jug only with the power base supplied and vice
versa.
22. Use on a hard, flat level surface only.
SAVE THESE INSTRUCTIONS
POLARIZED PLUG INSTRUCTIONS
This appliance has a polarized plug (one blade is wider than the
other). To reduce the risk of electric shock, this plug will fit into the
polarized outlet only one way. If the plug does not properly fit into
the outlet at first, reverse it. If it still does not fit, contact a competent
qualified electrician. Do not attempt to modify the plug in any way.
SHORT CORD INSTRUCTIONS
A short power supply cord is provided to reduce the hazards resulting
from becoming entangled in, or tripping over a longer cord.
Extension cords may be used if care is exercised in their use.
• The electrical rating of the extension cord should be at least
that of the appliance. If the electrical rating of the extension
cord is too low, it could overheat and burn.
• The resulting extended cord should be arranged so that it will
not drape over the counter top or tabletop where it can be
pulled on by children or tripped over.
3
USK TM 1 - 070327
PART DESCRIPTION
1. Lid
2. Distributor plate
3. Filter bowl
4. Percolator tube
5. Handle
6. Glass jug
7. Spout
8. Water level indicators
9. Heating element
10. Pilot light
11. Detachable base
12. On/Off switch
4
USK TM 1 - 070327
BEFORE USE
•
•
•
Read the instruction manual carefully.
Remove the labels and packaging of the tea bags.
Before preparing tea for the first time, rinse the appliance by
operating it once or twice with water but without tea.
OPERATION
•
•
•
•
•
•
•
•
•
•
•
•
•
•
Remove the jug from the base.
Open the lid by putting the arrow of the
lid in front of the arrow of the jug.
Remove the brewing system by lifting the
lid.
Fill the jug with water to the required level,
making sure that the water level is
between the minimum and the maximum
indication.
Fill the filter bowl with the desired amount of loose tea, tea bags
or coffee. Do not fill above the maximum line marked inside the
filter bowl.
Put the distributor plate on the filter bowl and close the lid. Ensure
that the percolator tube fits into the hole in the heating element.
The lid can now be closed.
position on the lid to prepare tea or coffee.
Select the
Place the jug on the base. Make sure the jug is properly fitted to
the base.
Plug in the power supply.
Put the power switch on “I” position. The power light will now be
illuminated and the brewing will begin.
The brewing will take approximately 5-12 minutes depending on
the amount of water used.
Once the brewing is completed, the power light will switch off.
WARNING: This percolator makes very hot tea and coffee.
If you do not intend to drink the beverage immediately, turn the
position. The pilot light will go on and off
lid to the keep warm
everything time the heating element will switch on. With this
5
USK TM 1 - 070327
•
position the water will not go through the brewing system so that
the beverage does not become stronger.
Remove the jug from its base before serving.
WARNING: Protect the glass jug from breaking. Do not refill with cold
water until the percolator has cooled completely.
MAKING PERFECT TEA AND COFFEE
Always use fresh water.
Tea
• You can use all kinds of loose tea or tea bags (but do not leave
the labels and strings inside the percolator).
• As a guide to the strength we would recommend the following
quantity of tea when filled to the Max. water level.
Taste
Weak
Medium
Strong
Loose Tea
leaves (Tsp)
3 Level Tea
spoons
4 Level Tea
spoons
5 Level Tea
spoons
Tea bags.
3
4
5
Coffee
• You will get the best coffee flavour by using coarse ground
coffee. Alternatively your coffee supplier can grind the beans to
a coarse grind suitable for percolators. If percolator coffee is
unavailable "filter machine" or "medium ground" coffee may be
used but some coffee may pass through the filter. We do not
recommend the use of Espresso coffee since it is even thinner.
• As a guide to the strength we would recommend the following
quantity of coarse ground coffee when filled to Max. water level.
6
USK TM 1 - 070327
Taste
Weak
Medium
Strong
Coarse Ground Coffee level tea
spoons (Tsp)
12
14
16
Caution: As the flavour of coffee is usually stronger than the one of
tea, the coffee flavour remaining in the appliance even after
cleaning could influence the taste of tea during the next use.
SAFETY CUT-OUT
This appliance is protected with an automatic safety device if
accidentally switched on without water. In this case, switch off the
appliance by putting the switch in 0 position and wait about 10
minutes for the element to cool. This will reset the safety device. The
appliance may then be used as normal.
CLEANING
•
•
•
•
Always disconnect the appliance from the power supply and
allow it to cool down before cleaning. Take out the filter bowl
and remove the percolator tube.
Wipe the inside with a damp cloth and the plastic parts with a
damp sponge.
Clean the filter bowl with hot water and a mild detergent. To
avoid the risk of electric shocks, NEVER immerse the plug, the
power cord or the appliance in water or any other liquid. Never
use abrasive products. The inside of the glass jug and the top of
the heating element may be cleaned with water and a soft
bristle brush. Be very careful not to scratch the non-stick coating
on top of the heating element.
Never put the appliance in the dishwasher.
7
USK TM 1 - 070327
DESCALING
•
•
If you have an extremely "hard drinking water" supply, it may be
necessary to descale the percolator occasionally to prevent the
build up of lime on the heating element.
In order not to damage the non stick coating of the heating
element, we recommend you follow this simple and safe method:
a) Fill percolator with 0.5 quarts of water.
b) Add the juice of 1 fresh lemon.
c) Switch on percolator and leave for 30 minutes.
d) Allow it to cool down and rinse it thoroughly.
8
USK TM 1 - 070327
e)
CONSEJOS DE SEGURIDAD
1. LEA TODAS LAS INSTRUCCIONES.
2. Antes de utilizar el aparato, compruebe que el voltaje de la red
eléctrica coincide con el del aparato.
3. No toque las superficies calientes. Siempre utilice las asas o los
botones.
4. Para protegerse contra una descarga eléctrica, no sumerja el
aparato o el enchufe en agua o en otros líquidos.
5. Es siempre necesaria la supervisión cercana cuando se utiliza
este aparato cerca de niños. Este aparato no debe ser usado
por niños.
6. Desconecte el aparato de la toma de corriente cuando la
unidad no se encuentra en uso o antes de limpiarla. Deje enfriar
el aparato antes de insertar o sacar accesorios.
7. No opere este y ningún aparato si el cable o el enchufe están
dañados, o después de que el aparato ha funcionado
inadecuadamente o ha sido dañado en cualquier manera. El
aparato debe ser reemplazado por el fabricante o por un centro
de servicio autorizado o por una persona similar cualificada.
8. El uso de accesorios no recomendados por el fabricante puede
causar lesiones.
9. No use en exteriores
10. No permita que el cable cuelgue del borde de la mesa o del
mostrador o toque las partes calientes.
11. No coloque este aparato cerca de quemadores de gas o
eléctricos, o dentro de un horno caliente.
12. Tenga mucho cuidado cuando desplace un aparato lleno de
aceite caliente u otros líquidos calientes.
13. Enchufe siempre primero el cable al aparato y después en el
enchufe de la red eléctrica. Para desconectar el aparato,
ponga el interruptor en la posición apagada y desenchufe el
aparato.
14. No use este aparato más que para lo que ha sido diseñado.
15. Pueden ocurrir quemaduras si se abre la tapa durante el uso.
9
USK TM 1 - 070327
16. Procure que el aparato no entre en contacto con materiales
fácilmente inflamables como cortinas, tejidos, etc., cuando esté
en funcionamiento, ya que podría provocar un incendio.
17. Si quiere eliminar la cal del aparato utilice solamente un
producto especialmente estudiado para este fin. No utilice
amoniaco o cualquier otro producto que pueda perjudicar la
salud.
18. No haga funcionar el aparato sin agua.
19. Asegúrese de que la jarra está correctamente puesta en la base
antes de poner el aparato en marcha.
20. Quite la jarra de la base antes de llenarla o de verter la bebida.
No intente quitar la jarra de la base antes de que esté apagada,
manualmente o automáticamente.
21. Utilice la jarra sólo con la base original y viceversa.
22. Coloque el aparato sólo en una superficie dura, llana y estable.
GUARDE ESTAS INSTRUCCIONES
INFORMACIÓN SOBRE EL ENCHUFE POLARIZADO
Para reducir el riesgo de choque eléctrico, este aparato tiene un
enchufe polarizado (una pata es más ancha que la otra).
Como medida de seguridad, este enchufe calza en el
tomacorriente polarizado de una sola manera. Si el enchufe no
cabe totalmente en el tomacorriente, gire el enchufe. Si aún así no
calza, consulte a un servicio técnico cualificado. No intente anular
esta característica de seguridad.
INSTRUCCIONES DEL CABLE
El cable de alimentación del aparato es un cable corto a fin de
disminuir el riesgo de accidentes (caídas al tropezar con él, etc.)
Puede utilizar un alargador si es necesario.
• Asegúrese de que el nivel eléctrico del cable es igual o mayor
que el indicado. Una extensión con un bajo nivel eléctrico
correría el riesgo de sobrecalentarse y de estropearse.
• Para evitar riesgos colocar de forma tal que los niños no puedan
jalarlo o tropezar con él.. Que no arrastre nunca por el suelo.
10
USK TM 1 - 070327
PARTES
1. Tapa
2. Rejilla de infusión
3. Filtro
4. Tubo percolador
5. Asa
6. Jarra de cristal
7. Pitorro
8. Indicadores del nivel de agua
9. Resistencia
10. Testigo luminoso
11. Base amovible
12. Interruptor encendido/apagado
11
USK TM 1 - 070327
ANTES DEL USO
•
•
•
Lea detenidamente el manual de instrucciones.
Quite las etiquetas y el embalaje de las bolsitas de té.
Antes de preparar té por la primera vez, limpie el aparato
haciéndolo funcionar una o dos veces con agua pero sin té.
MODO DE EMPLEO
Quite la jarra de la base.
Abra la tapa colocando la flecha de la
tapa enfrente de la flecha de la jarra
• Quite el sistema de infusión levantando la
tapa.
• Llene la jarra con agua por lo menos
hasta el nivel mínimo y sin superar el nivel
máximo.
• Llene el filtro con la cantidad deseada de té de hoja suelta,
bolsitas de té o café. No supere el nivel máximo indicado con
una línea en el filtro.
• Ponga la rejilla de infusión en el filtro y cierre la tapa. Asegúrese
de que el tubo percolador se introduce en el hueco de la
resistencia.
• Ahora se puede cerrar la tapa.
en la tapa para preparar té o café.
• Seleccione la posición
• Ponga la jarra en la base. Compruebe que la jarra está
correctamente posicionada en la base.
• Enchufe el aparato.
• Coloque el interruptor en la posición “I”. El testigo luminoso se
encenderá y empezará el proceso de infusión.
• La infusión dura 5 a 12 minutos dependiendo de la cantidad de
agua utilizada.
• Al final de la infusión, el testigo luminoso se apagará.
CUIDADO: El té o café preparado con este aparato está muy
caliente.
• Si no desea beber su infusión inmediatamente, gire la tapa hasta
•
•
para mantener su bebida caliente. El testigo
la posición
luminoso se encenderá y se apagará sucesivamente cada vez
12
USK TM 1 - 070327
•
que la resistencia se encenderá. Con está posición, el agua no
pasará por el sistema de infusión para que la bebida no se
vuelva más fuerte.
Quite la jarra de la base antes de servir.
CUIDADO: Tenga cuidado de no romper la jarra. Espere que el
aparato haya enfriado del todo antes de llenar la jarra con agua
fría
PREPARAR UN DELICIOSO TÉ O CAFÉ
Utilice siempre agua fresca.
Té
• Puede utilizar cualquier tipo de té de hoja suelta o de bolsitas
(pero no ponga nunca las etiquetas en el filtro).
• Para obtener té más o menos fuerte, aconsejamos que respete
las cantidades de té indicadas más abajo (con agua hasta el
nivel máximo).
Sabor
Ligero
Medio
Fuerte
Hojas sueltas
(cucharilla)
3 cucharillas
rasas
4 cucharillas
rasas
5 cucharillas
rasas
Bolsitas
3
4
5
Café
• Para obtener el mejor sabor, utilice un café molido grueso.
Puede también pedir al vendedor de moler los granos para que
pueda utilizar el café molido en su percolador. Si no encuentra
café molido grueso, puede también utilizar café para cafetera
eléctrica pero es posible que pase un poco de café a través del
filtro. Desaconsejamos el uso de café para cafetera express ya
que está aún más fino.
13
USK TM 1 - 070327
•
Para obtener café más o menos fuerte, aconsejamos que
respete las cantidades de café indicadas más abajo (con agua
hasta el nivel máximo).
Sabor
Ligero
Medio
Fuerte
Café molido grueso cucharilla rasa
12
14
16
CUIDADO: En general el sabor del café está más fuerte que el del té
y queda en el aparato aún después de la limpieza. Entonces es
posible que el té sepa a café cuando vuelva a utilizar el aparato
después de preparar café.
PROTECCIÓN CONTRA SOBRECALENTAMIENTO
Este aparato cuenta con un sistema de protección contra
sobrecalentamientos, que para el aparato si es puesto en marcha
accidentalmente sin agua en el depósito. Si le ocurre esto, apague
el aparato con el interruptor y desenchúfelo. Espere 10 minutos
antes de ponerlo de nuevo en marcha. Ello basta para desbloquear
el sistema de protección.
LIMPIEZA
•
•
•
•
Desenchufe siempre el aparato y déjelo enfriar antes de
limpiarlo. Quite el filtro y el tubo percolador.
Pase el interior con un paño húmido y las partes de plástico con
una esponja húmida.
Limpie el filtro con agua caliente y un detergente suave. Para
evitar riesgos de descarga eléctrica, no sumerja NUNCA el
enchufe, el cable de alimentación o el aparato en agua u otro
líquido. No utilice nunca productos abrasivos para la limpieza. El
interior de la jarra de cristal y la resistencia se pueden limpiar con
agua y un cepillo suave. Tenga mucho cuidado de no dañar el
revestimiento antiadherente de la resistencia.
No introduzca nunca el aparato en el lavavajillas.
14
USK TM 1 - 070327
DESCALCIFICACIÓN
Si el agua en su región está muy calcáreo, puede ser necesario
desincrustar el aparato de vez en cuando para evitar la
formación de cal en la resistencia.
• Para no dañar el revestimiento antiadherente de la resistencia,
utilice este método simple y seguro:
f) Llene la jarra con 0,5 cuartos de agua.
g) Añada el sumo de 1 limón fresco.
h) Encienda el aparato y deje 30 minutos.
Deje el aparato enfriar y enjuague bien.
•
15
USK TM 1 - 070327
16
USK TM 1 - 070327
K070327
Back cover page (last page)
Assembly page 17/17