1
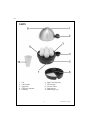
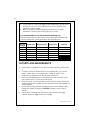
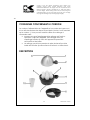
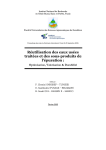
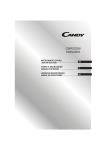
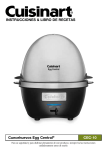
Egg-Boiler
Cuecehuevos
Cuit-Oeufs
USK EK 28441
www.KALORIK.com
120V~ 400W
IMPORTANT SAFEGUARDS
1. READ ALL INSTRUCTIONS
2. Do not use outdoors and always place it in a dry environment.
3. Do not allow to be used as a toy. Close attention is necessary
when used by or near children to avoid possible accidental injury.
4. Use only as described in this manual. Use only manufacturer's
recommended attachments.
5. Do not operate any appliance with a damaged cord or plug or
after the appliance has malfunctioned or has been dropped or
damaged in any way or is not operating properly. Contact the
after-sales service for examination, repair, mechanical or
electrical adjustment.
6. Do not abuse the cord. Never carry the base by the cord or yank
to disconnect from an outlet.
7. Keep cord away from heated surfaces. Do not pull cord around
sharp edges or corners. Do not close door on the charger cord.
8. Do not handle plug or appliance with wet hands.
9. Unplug the appliance from the outlet before any routine
cleaning or maintenance.
10. Never immerse the motor base of your appliance in water or any
other liquid for any reason whatsoever. Never place any piece of
your appliance into the dishwasher.
11. Never use the appliance near hot surfaces.
12. Stand the appliance on a table or flat surface.
13. Unplug the appliance when not in use or immediately after use.
14. Make sure the appliance is unplugged before inserting, removing
or cleaning one of the accessories. It is absolutely necessary to
remove the accessories before cleaning them.
15. Make sure to let the appliance cool down before cleaning it, as
the plate might be very hot and cause scalding.
16. Only cook chicken eggs and nothing else.
17. Make sure the cord never comes into contact with the hot parts
of the appliance. Never touch the hot parts of the appliance,
make use of the plastic handles. Always use gauntlets when
2
USK EK 28441 - 090415
handling the appliance. Make sure nothing comes into contact
with the heating element of the appliance.
18. Before using the appliance always check the water level in the
water tank. This water is vital as it is used for the cooking. Before
filling the water tank, always unplug the appliance. Never spill
water on the resistor and do not exceed the maximum water
level indicated in the water tank.
19.
Be careful not to hurt yourself with the needle (situated on the
main tray) that serves for piercing the egg before cooking it, as it
is very sharp. Make sure it is always clean as it comes into direct
contact with food.
20. Never move the appliance when it is in use.
SAVE THESE INSTRUCTIONS
POLARIZED PLUG INSTRUCTIONS
Some appliances are equipped with a polarized plug (one blade is
wider than the other). To reduce the risk of electric shock, this plug
will fit into the polarized outlet only one way. If the plug does not
properly fit into the outlet at first, reverse it. If it still does not fit,
contact a competent qualified electrician. Do not attempt to modify
the plug in any way.
For appliances equipped with a standard plug, simply insert the plug
into the outlet without paying attention to the way you plug it.
3
USK EK 28441 - 090415
PARTS
1.
2.
3.
4.
5.
Lid
Lid handle
Egg-rack
Egg-rack handle
Housing
6. Egg Poaching tray
7. Power light
8. Steam outlet
9. Egg piercer
10. Measuring cup
4
USK EK 28441 - 090415
IMPORTANT
•
•
The cooking time depends on the number and size of eggs.
With respect to the content of mineral in the water of your region
you may see a slight decolourisation of the egg shell. This does
not affect the taste nor the quality of the egg.
USING YOUR EGG BOILER
HARD or SOFT BOILING
•
•
•
•
•
•
•
•
•
•
•
Take the appliance out of the gift box. Clean the boiling dish with
a damp cloth.
Put the egg boiler on an even surface.
Choose the number of eggs that you want to cook. Use the
measuring cup for filling the boiling dish with cold water,
adapting the quantity of water to the type of cooking you need
(soft- to hard-boiled eggs), using the graduation on the
measuring cup or your own experience.
Put the egg-rack onto the boiling dish.
Pierce the largest rounded end of the eggs, with the egg piercer,
which you will find on the egg rack, and place the eggs onto the
egg rack. Using the egg piercer prevents the eggs from cracking
during boiling.
Please be very careful when using the egg piercer as the needle
is very sharp.
Place the lid on top of the egg boiler and connect the egg
boiler. The pilot light will switch on indicating the appliance is
heating.
In order to avoid burning, keep your hands away from the steam
vent in the lid while the egg boiler is in use. Do not touch the
stainless steel lid as it might be hot too.
When the eggs are ready, a buzzer sound will ring and the
appliance will switch off.
Unplug the appliance as once the unit cools off, it will
automatically turn on again if the unit is still powered.
Remove eggs immediately to prevent overcooking.
5
USK EK 28441 - 090415
•
•
Remove the lid using the handle. Take the egg rack and rinse the
eggs with cold water and let them cool down.
If you use your appliance several times, let it cool down between
each use.
POACHING
Your egg boiler is supplied with a poaching tray. To use it:
• Place egg cooker on a clean, dry surface.
• Remove the lid and cooking tray.
• Fill beaker with cold water to the Medium line. Pour cold water
into heating plate.
• Lightly butter or spray vegetable oil on the poaching tray.
• Break one egg for each poaching section – cooks up to four
poached eggs.
• Place the cooking rack on the base and place the poaching tray
on the top of the cooking rack.
• Place the lid on top of unit
• Plug-in the appliance. The indicator light will be lit.
• When the liquid is sufficiently evaporated, the eggs will be
poached.
• When cooking is complete, a continuous audible buzzing tone
will sound and the appliance will switch off automatically.
• Unplug the appliance as once the unit cools off, it will
automatically turn on again if the unit is still powered.
• Remove the poached eggs immediately to prevent overcooking.
MEASURING THE WATER
•
The measuring cup indicates three different water levels:
SOFT - MEDIUM – HARD
6
USK EK 28441 - 090415
•
•
If you want to cook 2 soft eggs fill the measuring cup up to the
number 2 of the “SOFT“ level and so on. This is valid for soft,
medium and hard eggs.
Below is a table with the approximate amount of water
needed to achieve the cooking level you want:
It is recommended to use the included measuring cup.
Please reference the chart below should the special measuring
cup be misplaced. Water quantities are approximate.
Quantity
of eggs
1
2
3
4
5
6
7
Soft-boiled
Medium-boiled
Hard-boiled
Poached
32ml/1.13Oz
30ml/1.06Oz
28ml/0.99Oz
26ml/0.92Oz
24ml/0.85Oz
22ml/0.78Oz
20ml/0.71Oz
55ml/1.94Oz
50ml/1.76Oz
45ml/1.59Oz
42ml/1.48Oz
39ml/1.38Oz
37ml/1.31Oz
35ml/1.23Oz
100ml/3.53Oz
90ml/3.17Oz
85ml/3.00Oz
78ml/2.75Oz
73ml/2.57Oz
67ml/2.36Oz
62ml/2.19Oz
65ml/2.29Oz
65ml/2.29Oz
65ml/2.29Oz
65ml/2.29Oz
SECURITY AND MAINTENANCE
•
•
•
•
•
•
Please let the appliance cool down before cleaning and rinsing
it.
In order to take off limescale from the boiling dish, you should
add 1 coffee spoon of vinegar and 1 glass of water. Then,
operate the appliance for ten minutes without lid.
Remove the appliance from the supply socket and wait until it
has cooled down. Throw away the liquid.
Rinse the rack, the accessories and the lid with water. Clean the
heating plate with a paper towel moistened with one tablespoon
white vinegar.
Clean the housing and the metallic surface with a damp cloth.
Never use abrasive cleaners. DO NOT immerse main body in
water.
Place clean cooking tray, poaching tray, beaker and egg
holders inside the egg cooker for storage.
7
USK EK 28441 - 090415
8
USK EK 28441 - 090415
WARRANTY
We suggest that you complete and return the enclosed Product
Registration Card promptly to facilitate verification of the date of
original purchase. However, return of the Product Registration Card is
not a condition of these warranties. You can also fill this warranty
card online, at the following address: www.KALORIK.com
This KALORIK product is warranted for 1 year from the date of
purchase against defects in material and workmanship. This warranty
is not transferable. Keep the original sales receipt. Proof of purchase
is required to obtain warranty performance.
During this period, the KALORIK product that, upon inspection by
KALORIK, is proved defective, will be repaired or replaced, at
KALORIK's option, without charge to the customer. If a replacement
product is sent, it will carry the remaining warranty of the original
product.
This warranty does not apply to any defect arising from a buyer's or
user's misuse of the product, negligence, failure to follow KALORIK
instructions noted in the user’s manual, use on current or voltage
other than that stamped on the product, wear and tear, alteration
or repair not authorized by KALORIK, or use for commercial purposes.
There is no warranty for glass parts, glass containers, filter basket,
blades and agitators, and accessories in general. There is also no
warranty for parts lost by the user.
ANY WARRANTY OF MERCHANTABILITY OR FITNESS WITH RESPECT TO
THIS PRODUCT IS ALSO LIMITED TO THE ONE YEAR LIMITED WARRANTY
PERIOD
Some states do not allow limitation on how long an implied warranty
lasts or do not allow the exclusion of incidental or consequential
damages, so the above limitations may not apply to you. This
warranty gives you specific legal rights, and you may also have other
rights which vary from state to state.
9
USK EK 28441 - 090415
If the appliance should become defective within the warranty
period and more than 30 days after date of purchase, do not return
the appliance to the store: often, our Consumer Service
Representatives can help solve the problem without having the
product serviced. If servicing is needed, a Representative can
confirm whether the product is under warranty and direct you to the
nearest service location.
If this is the case, bring the product (or send it, postage prepaid),
along with proof of purchase and indicating a return authorization
number given by our Consumer Service Representatives, to the
nearest authorized KALORIK Service Center (please visit our website
at www.KALORIK.com or call our Customer Service Department for
the address of the nearest authorized KALORIK Service Center).
If you send the product, please include a letter explaining the nature
of the claimed defect.
If you have additional questions, please call our Consumer Service
Department (please see below for complete contact information),
Monday through Friday from 9:00am - 6:00pm (EST). Please note
hours are subject to change.
If you would like to write, please send your letter to:
KALORIK Consumer Service department
Team International Group of America Inc
1400 N.W 159th Street, Suite 102
Miami Gardens, FL 33169 USA
Or call :
Toll Free: +1 888-521-TEAM
Only letters can be accepted at this address above. Shipments and
packages that do not have a return authorization number will be
refused.
10
USK EK 28441 - 090415
CONSEJOS DE SEGURIDAD
1. LEA TODAS LAS INSTRUCCIONES.
2. No use el aparato al aire libre y siempre en un lugar seco.
3. Este aparato no es un juguete. No permita que los niños lo
utilicen, mantengalos apartado para evitar posibles lesiones u
accidentes.
4. Utilicelo únicamente como se describe en este manual. Utilice
sólo los accesorios recomendados por el fabricante.
5. No ponga ningún aparato en funcionamiento que tenga el
cable o enchufe dañados, después de que el aparato muestre
un funcionamiento defectuoso o si se ha caído o dañado de
alguna forma. Póngase en contacto con el servicio post-venta,
para su examen, reparación, o ajuste mecánica o eléctrico.
6. Tenga cuidado con el cable. No tire del cable para mover el
aparato y desconectarlo de la corriente eléctrica.
7. Mantenga el cordón lejos de superficies calientes. No tire del
cordón alrededor de bordes afilados o esquinas. No pille el cable
con ninguna puerta o utro.
8. No agarre el enchufe o aparato con las manos mojadas.
9. Desenchufe el aparato de la toma de corriente antes de
cualquier limpieza o mantenimiento.
10. Nunca sumerja el motor de base de su aparato en agua o en
ningún otro líquido por cualquier motivo. No coloque ninguna
pieza de su aparato en el lavavajillas.
11. Nunca use el aparato cerca de superficies calientes.
12. Coloque el aparato sobre una mesa o superficie plana.
13. Desenchufe el aparato cuando no esté en uso o
inmediatamente después de su uso.
14. Asegúrese de que el aparato esté desenchufado antes de
insertar, eliminar o limpiar cualquier accesorio. Es absolutamente
necesario quitar los accesorios antes de limpiarlos.
15. Deje enfriar su aparato antes de limpiarlo, ya que la placa
puede estar muy caliente y provocar quemaduras.
16. Cocine unicamente huevos de gallina y nada más.
11
USK EK 28441 - 090415
17. Asegúrese de que el cable no entre en contacto con las partes
calientes del aparato. Nunca toque las partes calientes del
aparato, haga uso de las asas de plástico. Use asidores o
guantes de cocina para manipular el aparato. Asegúrese de
que no hay nada en contacto con el elemento de
calentamiento del aparato.
18. Antes de utilizar el aparato siempre comprobe el nivel de agua
en el depósito de agua. Este agua es imprescindible, ya que se
utiliza para la cocción. El aparato debe estar desconectado
antes de llenar el depósito de agua. No derrame agua sobre la
resistencia y no exceda del máximo nivel de agua indicado en el
depósito.
19.
Tenga cuidado de no lastimarse con la aguja (situada en la
bandeja), esta sirve para la perforación de los huevos antes de
cocinarlos, y esta muy afilada. Asegúrese de que esté siempre
limpia, ya que esta en contacto directo con los alimentos.
20. Nunca moeva el aparato cuando este en funcionamiento.
GUARDE ESTAS INSTRUCCIONES
INFORMACIÓN SOBRE EL ENCHUFE POLARIZADO
Algunos aparatos están provistos con un enchufe polarizado (una
pata es más ancha que la otra). Para reducir el riesgo de choque
eléctrico, este enchufe calza en el tomacorriente polarizado de una
sola manera. Si el enchufe no cabe totalmente en el tomacorriente,
gire el enchufe. Si aún así no calza, consulte a un servicio técnico
cualificado. No intente anular esta característica de seguridad.
Para los aparatos provistos con un enchufe clásico, basta con
insertar el enchufe en la toma de corriente.
INSTRUCCIONES DEL CABLE
El cable de alimentación del aparato es un cable corto a fin de
disminuir el riesgo de accidentes (caídas al tropezar con él, etc.)
Puede utilizar un alargador si es necesario.
12
USK EK 28441 - 090415
•
•
Asegúrese de que el nivel eléctrico del cable es igual o
mayor que el indicado. Una extensión con un bajo nivel
eléctrico correría el riesgo de sobrecalentarse y de
estropearse.
Para evitar riesgos colocar de forma tal que los niños no
puedan jalarlo o tropezar con él. Que no arrastre nunca por
el suelo.
PARTES
1.
2.
3.
4.
5.
Tapadera
Asa de la tapadera
Huevera
asa porta huevo
Base del aparato
6. Bandeja huevos escalfados
7. Testigo luminoso
8. Orificio para el vapor
9. Aguja para pinchar los huevos
10. Vaso medidor
13
USK EK 28441 - 090415
Fax +32 2 359 95 50
Copies of the I/B. Please reproduce them without any
changes except under special instruction from Team
International BELGIUM. The pages must be reproduced and
folded in order to obtain a booklet A5 (+/- 148.5 mm width x
210 mm height). When folding, make sure you keep the good
numbering when you turn the pages of the I/B. Don’t change
the page numbering. Keep the language integrity.
IMPORTANTE
•
•
El tiempo de cocción varia según el número y el tamaño de los
huevos.
En función de la dureza del agua de su región, podría notar un
ligero descolorimiento de la parte inferior del huevo. Esto no
afecta al gusto ni a la calidad del mismo.
COMO UTILIZAR SU CUECEHUEVOS
DUROS O PASADOS POR AGUA
•
•
•
•
•
•
•
•
•
•
Saque el aparato fuera de la caja. Limpielo con unpaño un
poco húmedecido.
Coloque el cuecehuevos sobre una superficie uniforme.
Seleccione el número de huevos que desea cocinar. Utilice el
vaso medidor para llenar el recipiente de ebullición con agua
fría, adaptando la cantidad de agua al tipo de coccion que
necesite (huevos duros o pasados por agua), utilizando la
graduación del vaso medidor o su propia experiencia.
Coloque la huevera.
Pinche el extremo extremo redondo mayor de los huevos, con la
uguja situada en la bandeja y coloquelos en la huevera.
Pinchando los huevos se evitan las grietas durante la ebullición.
Por favor, tenga mucho cuidado al utilizar la aguja ya que esta
muy afilada.
Coloque la tapa en la parte superior de la huevera y enchufe su
aparato, el testigo luminoso se enciende indicando que el
dispositivo se está calentando.
Para evitar quemaduras, mantenga sus manos lejos de la salida
de vapor de la tapa, mientras su aparato este en
funcionamiento. No toque la tapa de acero inoxidable, ya que
pode estar muy caliente.
Cuando los huevos estén listos, sonara la alarma sonora y el
aparato se apagará.
Desenchufe el aparato ya que una vez este se enfrie, si el
aparato sigue enchufado, se encenderá automáticamente de
nuevo.
14
USK EK 28441 - 090415
Fax +32 2 359 95 50
Copies of the I/B. Please reproduce them without any
changes except under special instruction from Team
International BELGIUM. The pages must be reproduced and
folded in order to obtain a booklet A5 (+/- 148.5 mm width x
210 mm height). When folding, make sure you keep the good
numbering when you turn the pages of the I/B. Don’t change
the page numbering. Keep the language integrity.
•
•
•
Quite de inmediato los huevos para evitar que se cuezan
demasiado.
Quite la tapadera usando el asa. Saque lo huevera y pase los
huevos por agua fría o déjelos enfriar.
Si utiliza el aparato varias veces, no olvide dejarlo enfriar entre
cada utilización.
HUEVOS ESCALFADOS
Su cuecehuevos viene suministrado con una bandeja para huevos
escalfados. Como usarla:
• Coloque el cuecehuevos en una superficie lisa, limpia y seca.
• Retire la tapadera y la bandeja de cocción.
• Llene el vaso con agua fría hasta la línea del Medio y vierta el
agua fría en recipiente de ebullición.
• Unte ligeramente con mantequilla o aceite vegetal la bandeja
para huevos escalfados.
• Rompa un huevo en cada sección de la bandeja. Hay sitio para
cuatro huevos.
• Coloque la huevera sobre la base y la bandeja para pochar
sobre la huevera.
• Coloque la tapadera
• Enchufe el aparato. El testigo luminoso se encenderá.
• Cuando el líquido se haya evaporado suficientemente, los
huevos estarán listos.
• Cuando se complete la cocción, sonara la alarma sonora y el
testigo luminoso se apagará automáticamente.
• Desenchufe el aparato ya que una vez este se enfrie, si el
aparato sigue enchufado, se encenderá automáticamente de
nuevo.
• Retire el huevos escalfados de inmediato para evitar que se
cuezan demasiado.
MEDIR EL AGUA
•
EI vaso medidor esta marcado con 3 niveles de agua:
SOFT /PASADO POR AGUA - MEDIUM/MEDIO - HARD/DURO.
15
USK EK 28441 - 090415
Fax +32 2 359 95 50
Copies of the I/B. Please reproduce them without any
changes except under special instruction from Team
International BELGIUM. The pages must be reproduced and
folded in order to obtain a booklet A5 (+/- 148.5 mm width x
210 mm height). When folding, make sure you keep the good
numbering when you turn the pages of the I/B. Don’t change
the page numbering. Keep the language integrity.
Para cocer dos huevos pasados por agua, llene el vaso de agua
hasta el número dos del nivel :“SOFT/WEICH/MOLLET” y así
sucesivamente.
Esto sirve para los huevos pasados por agua, medios y duros.
• A continuación se muestra una tabla con la cantidad
aproximada de agua necesaria para alcanzar el nivel de
cocción deseado:
Se recomienda utilizar el vaso medidor suministrado.
En caso de la perdida de este, la tabla de abajo indica las
cantidades de agua aproximadas.
•
Cantidad
de huevos
1
2
3
4
5
6
7
Pasados por agua
Medio
Duros
Escalfados
32ml/1.13Oz
30ml/1.06Oz
28ml/0.99Oz
26ml/0.92Oz
24ml/0.85Oz
22ml/0.78Oz
20ml/0.71Oz
55ml/1.94Oz
50ml/1.76Oz
45ml/1.59Oz
42ml/1.48Oz
39ml/1.38Oz
37ml/1.31Oz
35ml/1.23Oz
100ml/3.53Oz
90ml/3.17Oz
85ml/3.00Oz
78ml/2.75Oz
73ml/2.57Oz
67ml/2.36Oz
62ml/2.19Oz
65ml/2.29Oz
65ml/2.29Oz
65ml/2.29Oz
65ml/2.29Oz
SEGURIDAD Y MANTENIMIENTO
•
•
•
•
•
•
Deje enfriar su aparato antes de su limpieza o enjuagarlo.
Para eliminar los restos de cal del recipiente es necesario poner
una cucharilla de café de vinagre en un vaso de agua. Cueza
10 minutos sin la tapadera.
Desenchufe el aparato y espere hasta que se haya enfriado. Tire
el líquido.
Enjuague la huevera, los accesorios y la tapa con agua. Limpie
la placa de calefacción con una toalla de papel humedecida
con una cucharada de vinagre blanco.
Limpie el cuerpo y la superficie metálica con un paño
húmedecido. Nunca use limpiadores abrasivos. No sumerja el
cuerpo del aparato en el agua.
Una vez limpio, coloque la huevera, la bandeja, y el vaso
medidor cerrando con la tapa.
16
USK EK 28441 - 090415
Fax +32 2 359 95 50
Copies of the I/B. Please reproduce them without any
changes except under special instruction from Team
International BELGIUM. The pages must be reproduced and
folded in order to obtain a booklet A5 (+/- 148.5 mm width x
210 mm height). When folding, make sure you keep the good
numbering when you turn the pages of the I/B. Don’t change
the page numbering. Keep the language integrity.
GARANTÍA
Le sugerimos rellenen y nos envíen rápidamente la Tarjeta adjunta
de Registro de Producto adjunto para facilitar la verificación de la
fecha de compra. Por lo tanto, la devolución de esa Tarjeta de
Registro de Producto no es una condición imprescindible para la
aplicación de esa garantía. Puede también rellenar esa carta de
garantía en línea en la dirección siguiente : www.KALORIK.com
A partir de la fecha de compra, este producto KALORIK está
garantizado un año contra los defectos materiales y de fabricación.
Esta garantía no es transferable. Conserve la prueba de compra
original. Se exige una prueba de compra para obtener la aplicación
de la garantía.
Durante este périodo, si el producto KALORIK que, después de una
inspección por parte de KALORIK, se manifiesta defectuoso, será
reparado o reemplazado, según lo que decida KALORIK, sin gastos
para el consumidor. Si se envía un producto de reemplazamiento, se
aplicará la garantía que queda del producto original.
Esta garantía no se aplica a los defectos causados por una mala
utilización por parte del comprador o del utilizador, a una
negligencia, al no respeto del manual de instrucciones KALORIK, a
una utilización en un circuito eléctrico cuyo voltaje es diferente al
que figura en el producto, a un desgaste normal, a modificaciones
o reparaciones no autorizadas por KALORIK, o por un uso con fines
comerciales. No existe garantía por las partes de cristal, jarras de
cristal, filtros, cestos, hojas y accesorios en general. No existe
tampoco garantía por las piezas perdidas por el utilizador.
Toda garantía de valor comercial o de adaptabilidad a este
producto está limitada a un año también.
Algunos estados no ponen límites a la duración de la garantía tácita
o no autorizan la exclusión de daños y perjuicios accesorios o
indirectos, por lo que puede que las restricciones anteriormente
mencionadas no le sean aplicables a Usted. Esta garantía le otorga
derechos legales particulares, pero usted puede tener también otros
17
USK EK 28441 - 090415
Fax +32 2 359 95 50
Copies of the I/B. Please reproduce them without any
changes except under special instruction from Team
International BELGIUM. The pages must be reproduced and
folded in order to obtain a booklet A5 (+/- 148.5 mm width x
210 mm height). When folding, make sure you keep the good
numbering when you turn the pages of the I/B. Don’t change
the page numbering. Keep the language integrity.
derechos que varían de un estado a otro y algunos derechos
pueden variar de un estado a otro.
Si el aparato tuviera un defecto durante el periodo de garantía y
más de 30 días después de que se compró, no devuelva el aparato
en la tienda donde le compró : a menudo, nuestro Servicio al
Consumidor puede ayudar a resolver el problema sin que el
producto tenga que ser reparado. Si hace falta una reparación, uno
de nuestros representantes puede confirmar si el producto está bajo
garantía y dirigirle al servicio post-venta lo más próximo.
Si fuera el caso, traiga el producto (o envíalo, correctamente
franqueado) con la prueba de compra que mencione el número de
autorización de devolución indicado por nuestro Servicio al
Consumidor, al servicio post-venta KALORIK lo más próximo. (Visite
nuestra web www.KALORIK.com o llame al Servicio al Consumidor
para obtener la dirección del Servicio post-venta KALORIK exclusivo
lo más próximo).
Si envía el producto, le rogamos añadan una carta explicando la
naturaleza del defecto.
Si tiene preguntas adicionales, por favor llame al Servicio al
Consumidor (véase abajo para los datos completos), de lunes a
viernes, de las 9 a las 18 (EST). Note que las horas pueden ser
modificadas.
Si quiere escribirnos, puede hacerlo a la dirección siguiente :
KALORIK Servicio al Consumidor
Team International Group of America Inc
1400 N.W 159th Street, Suite 102
Miami Gardens, FL 33169 USA
O llame gratuitamente al +1 888-521-TEAM
las cartas se aceptan solamente en la dirección anteriormente
mencionada. Los envíos y paquetes que no tengan número de
autorización de devolución serán rechazados.
18
USK EK 28441 - 090415
Fax +32 2 359 95 50
Copies of the I/B. Please reproduce them without any
changes except under special instruction from Team
International BELGIUM. The pages must be reproduced and
folded in order to obtain a booklet A5 (+/- 148.5 mm width x
210 mm height). When folding, make sure you keep the good
numbering when you turn the pages of the I/B. Don’t change
the page numbering. Keep the language integrity.
CONSIGNES DE SECURITE
1. LISEZ L’ENSEMBLE DES INSTRUCTIONS.
2. Veillez à ne pas utiliser l'appareil à l'extérieur et entreposez-le
dans un endroit sec.
3. Faites particulièrement attention lorsque I’appareil est utilisé par
ou en présence d’enfants. Surveillez les enfants afin qu'ils
n'utilisent pas l'appareil comme jouet.
4. N’utilisez l'appareil que pour des usages domestiques et de la
manière indiquée dans la notice. Ne pas utiliser des accessoires
non recommandés par le fabricant.
5. Ne faites pas fonctionner l'appareil si son cordon ou sa fiche est
endommagé ou si l'appareil a présenté un dysfonctionnement
ou est endommagé. Retournez l’appareil au centre de service
autorisé pour le faire vérifier ou réparer.
6. Ne maltraitez pas le cordon d’alimentation. Ne portez jamais la
base par le cordon d’alimentation. Ne tirez pas sur le cordon
d'alimentation ni sur l'appareil pour le débrancher.
7. Ne laissez pas le cordon pendre de la table ou d'un comptoir et
évitez qu’il touche une surface chaude. Faites attention que le
cordon d’alimentation n’est pas coincé dans une porte.
8. Ne touchez pas la fiche ou l'appareil si vous avez les mains
mouillés.
9. Débranchez l’appareil lorsqu’il n’est pas en utilisation.
10. Ne plongez jamais le bloc moteur de votre appareil dans l'eau ou
dans tout autre liquide ni pour son nettoyage ni pour toute autre
raison. Ne placez aucune pièce au lave-vaisselle.
11. N'utilisez pas l'appareil près de sources de chaleur.
12. Posez cet appareil sur une table ou un support suffisamment
stable pour éviter sa chute.
13. Débranchez l’appareil lorsqu’il n’est pas en utilisation.
14. Il est indispensable de débrancher et de laisser refroidir l’appareil
avant de monter, démonter ou nettoyer les différentes parties de
l’appareil. Remarquez qu’il faut impérativement démonter les
différentes parties avant de les nettoyer.
19
USK EK 28441 - 090415
Fax +32 2 359 95 50
Copies of the I/B. Please reproduce them without any
changes except under special instruction from Team
International BELGIUM. The pages must be reproduced and
folded in order to obtain a booklet A5 (+/- 148.5 mm width x
210 mm height). When folding, make sure you keep the good
numbering when you turn the pages of the I/B. Don’t change
the page numbering. Keep the language integrity.
15. Ne faites cuire que des œufs de poule avec cet appareil et rien
d’autre.
16. Veillez à ce que le cordon n’entre pas en contact avec des
surfaces chaudes de l’appareil. Vous-même, veillez à ne pas
toucher les surfaces chaudes de l’appareil, utilisez les poignées
en plastique. Pour toute manipulation, faites usage de maniques.
Prenez également garde que rien ne doit rentrer en contact
avec l’élément chauffant de l’appareil.
17. Ne jamais utiliser l’appareil sans avoir, au préalable, vérifié le
niveau d’eau du bac à eau. Cette eau est indispensable car elle
sert à la cuisson proprement dite. Lors du remplissage de ce bac
à eau, veuillez d’abord toujours débrancher l’appareil. Ne
dépassez pas le niveau Max. indiqué sur le bac à eau.
18.
Prenez garde de ne pas vous blesser avec l’aiguille située au
fond du gobelet doseur et servant à perforer l’œuf avant sa
cuisson car celle-ci est très pointue. Veillez par ailleurs à la garder
propre car elle rentre en contact direct avec la nourriture.
19. Ne déplacez jamais votre appareil lorsqu’il est en
fonctionnement.
CONSERVEZ CES INSTRUCTIONS
INSTRUCTIONS POUR LES FICHES POLARISÉES
Certains appareils ont une prise polarisée (une des deux tiges
métalliques est plus longue que l’autre). Pour réduire le risque de
choc électrique, cette prise ne peut être introduite que d’une seule
façon dans la fiche murale. Si cette prise ne rentre pas correctement
dans la fiche, retournez-la. Si elle ne rentre toujours pas, contactez
un électricien qualifié et reconnu. N’essayez jamais de modifier
vous-même la prise polarisée.
Pour les appareils équipés d’une prise standard, il suffit de brancher
la prise dans la fiche murale.
20
USK EK 28441 - 090415
Fax +32 2 359 95 50
Copies of the I/B. Please reproduce them without any
changes except under special instruction from Team
International BELGIUM. The pages must be reproduced and
folded in order to obtain a booklet A5 (+/- 148.5 mm width x
210 mm height). When folding, make sure you keep the good
numbering when you turn the pages of the I/B. Don’t change
the page numbering. Keep the language integrity.
CONSIGNES CONCERNANT LE CORDON
Le cordon d’alimentation de l’appareil est un cordon de type court,
et ce afin de diminuer les risques d’accidents (chute si vous marchez
sur le cordon...). Vous pouvez toutefois utiliser une rallonge si
nécessaire mais:
• Assurez-vous que l'ampérage de la rallonge est égal ou
supérieur à celui de l'appareil. Une rallonge avec un
ampérage inférieur à celui de l'appareil risquerait de
surchauffer et de brûler.
• La rallonge ne doit pas pendre du plan de travail ou de la
table afin d'éviter que les enfants ne le tirent ou trébuchent.
DESCRIPTION
21
USK EK 28441 - 090415
Fax +32 2 359 95 50
Copies of the I/B. Please reproduce them without any
changes except under special instruction from Team
International BELGIUM. The pages must be reproduced and
folded in order to obtain a booklet A5 (+/- 148.5 mm width x
210 mm height). When folding, make sure you keep the good
numbering when you turn the pages of the I/B. Don’t change
the page numbering. Keep the language integrity.
1.
2.
3.
4.
5.
Couvercle
Poignée du couvercle
Coquetier
Poignée de coquetier
Base de l’appareil
6. Plateau pour pocher les œufs
7. Témoin lumineux
8. Orifice de sortie vapeur
9. Aiguille pour piquer les œufs
10. Gobelet doseur
IMPORTANT
•
•
Le temps de cuisson varie selon le nombre et la taille des œufs.
En fonction du contenu minéral d’eau dans votre région, vous
pourriez remarquer une légère décoloration de la coquille d’œuf.
Cela n’affecte ni le goût ni la qualité de l’œuf.
COMMENT EMPLOYER VOTRE CUIT-ŒUFS
ŒUFS DURS ou A LA COQUE
•
•
•
•
•
•
•
•
•
Retirez votre appareil du carton, lavez-le avec un chiffon humide
et doux.
Placez la base de votre appareil sur une surface horizontale.
Choisissez le nombre d’œufs à cuire. Utilisez le gobelet doseur
pour remplir d’eau froide le poêlon à bouillir, et adaptez la
quantité d’eau selon le type d’œufs que vous désirez (d’œufs à
la coque à œufs durs), faisant attention à la graduation sur le
gobelet doseur ou comptant sur votre expérience.
Placez le coquetier sur l’appareil.
Piquez les œufs avec l’aiguille qui se trouve sur le coquetier. En
utilisant cette aiguille vous évitez que les coquilles ne se cassent
lors de la cuisson.
Faites attention, l’aiguille pour piquer les œufs est aiguisée.
Placez le coquetier sur l’appareil et placez les œufs sur le
coquetier.
Positionnez le couvercle et branchez votre appareil. Le témoin
lumineux s’allumera indiquant que l’appareil chauffe.
Afin d’éviter les brûlures, éloignez vos mains de l’orifice
d’évacuation de la vapeur (qui se trouve sur le couvercle)
pendant la durée de la cuisson. Ne touchez pas le couvercle en
acier inoxydable car il pourrait être chaud aussi.
22
USK EK 28441 - 090415
Fax +32 2 359 95 50
Copies of the I/B. Please reproduce them without any
changes except under special instruction from Team
International BELGIUM. The pages must be reproduced and
folded in order to obtain a booklet A5 (+/- 148.5 mm width x
210 mm height). When folding, make sure you keep the good
numbering when you turn the pages of the I/B. Don’t change
the page numbering. Keep the language integrity.
•
•
•
•
•
Lorsque les œufs seront prêts, une sonnerie retentira et le témoin
lumineux s’éteindra.
Débranchez l’appareil car si vous ne le débranchez pas, il se
mettra de nouveau en marche dès qu’il aura refroidi.
Enlevez les œufs immédiatement afin d’éviter qu’ils seront trop
cuits.
Retirez le couvercle à l’aide de la poignée. Prenez le coquetier et
rincez les œufs à l’eau froide ou laissez-les refroidir lentement.
Si vous utilisez votre appareil plusieurs fois, laissez-le refroidir entre
les cuissons.
ŒUFS POCHÉS
Votre cuit-œufs est équipé d’un plateau pour pocher les œufs. Pour
l’utiliser:
• Mettez le cuit-œufs sur une surface propre et sèche.
• Enlevez le couvercle et le coquetier.
• Remplissez le gobelet d’eau fraîche jusqu’à l’indication Medium.
Versez l’eau fraîche dans le poêlon.
• Mettez un peu de beurre ou pulvérisez de l’huile végétale sur le
plateau pour pocher les œufs.
• Brisez un œuf par section – vous pouvez pocher jusqu’à quatre
œufs.
• Mettez le coquetier sur la base et mettez le plateau pour pocher
les œufs au-dessus du coquetier.
• Mettez le couvercle sur l’appareil.
• Branchez l’appareil. Le témoin lumineux s’allumera.
• Quand le liquide s’est évaporé suffisamment, les œufs seront
pochés.
• Quand la cuisson est finie, un bruit sonore continu retentira et
l’appareil s’éteindra automatiquement.
• Débranchez l’appareil car si vous ne le débranchez pas, il se
mettra de nouveau en marche dès qu’il aura refroidi.
• Enlevez les œufs pochés immédiatement afin d’éviter qu’ils
seront trop cuits.
23
Assembly page 23/29
USK EK 28441 - 090415
Fax +32 2 359 95 50
Copies of the I/B. Please reproduce them without any
changes except under special instruction from Team
International BELGIUM. The pages must be reproduced and
folded in order to obtain a booklet A5 (+/- 148.5 mm width x
210 mm height). When folding, make sure you keep the good
numbering when you turn the pages of the I/B. Don’t change
the page numbering. Keep the language integrity.
MESURER L’EAU
Le gobelet doseur est marqué de 3 niveaux d’eau différents :
SOFT/WEICH/MOLLET - MEDIUM/MITTEL/MEDIUM –
HARD/HART/DUR.
• Pour cuire 2 œufs, remplissez le gobelet d’eau jusqu’à la
graduation 2 et ainsi de suite. Ceci est valable pour les œufs
mollets, medium ou durs.
• Ci-dessous vous trouverez une table avec les quantités d’eau
nécessaire pour obtenir le type de cuisson désiré :
Il est recommandé d’utiliser le gobelet doseur livré.
Si jamais vous ne trouviez plus votre gobelet doseur, veuillez vous
référer au tableau ci-dessous. Les quantités d’eau indiquées sont
approximatives.
•
Nbre d’oeufs
Mollet
Medium
Dur
Poché
1
2
3
4
5
6
7
32ml/1.13Oz
30ml/1.06Oz
28ml/0.99Oz
26ml/0.92Oz
24ml/0.85Oz
22ml/0.78Oz
20ml/0.71Oz
55ml/1.94Oz
50ml/1.76Oz
45ml/1.59Oz
42ml/1.48Oz
39ml/1.38Oz
37ml/1.31Oz
35ml/1.23Oz
100ml/3.53Oz
90ml/3.17Oz
85ml/3.00Oz
78ml/2.75Oz
73ml/2.57Oz
67ml/2.36Oz
62ml/2.19Oz
65ml/2.29Oz
65ml/2.29Oz
65ml/2.29Oz
65ml/2.29Oz
SECURITE ET ENTRETIEN
•
•
•
•
Attendez que l’appareil soit froid avant de le nettoyer et de le
rincer.
Pour enlever les dépôts de calcaire du poêlon, il faut y mettre
une cuillère à café de vinaigre et un gobelet d’eau. Cuisez
pendant 10 minutes sans couvercle.
Débranchez votre appareil et attendez qu’il soit froid. Videz le
mélange de vinaigre et d’eau. Lavez ensuite abondamment
pour rincer.
Rincez le coquetier, les accessoires et le couvercle à l’eau.
Nettoyez le poêlon avec une serviette en papier, mouillée
légèrement avec une cuillerée à soupe de vinaigre blanc.
24
Assembly page 24/29
USK EK 28441 - 090415
Fax +32 2 359 95 50
Copies of the I/B. Please reproduce them without any
changes except under special instruction from Team
International BELGIUM. The pages must be reproduced and
folded in order to obtain a booklet A5 (+/- 148.5 mm width x
210 mm height). When folding, make sure you keep the good
numbering when you turn the pages of the I/B. Don’t change
the page numbering. Keep the language integrity.
•
•
Essuyez le corps de l’appareil et la surface anti-adhérente avec
un chiffon humide et doux. N’utilisez pas de détergents abrasifs et
durs. Ne plongez jamais le corps de l’appareil dans l’eau!
Mettez le coquetier, le plateau pour pocher les œufs, le gobelet
et les porte-œufs propres dans le cuit-œufs afin de le ranger.
25
Assembly page 25/29
USK EK 28441 - 090415
Fax +32 2 359 95 50
Copies of the I/B. Please reproduce them without any
changes except under special instruction from Team
International BELGIUM. The pages must be reproduced and
folded in order to obtain a booklet A5 (+/- 148.5 mm width x
210 mm height). When folding, make sure you keep the good
numbering when you turn the pages of the I/B. Don’t change
the page numbering. Keep the language integrity.
GARANTIE
Nous vous suggérons de remplir et de nous renvoyer rapidement la
Carte d’Enregistrement Produit ci-jointe afin de faciliter la vérification
de la date d’achat. Cependant, le renvoi de la Carte
d’Enregistrement Produit n’est pas une condition indispensable à
l’application de la présente garantie. Vous pouvez aussi remplir
cette carte de garantie en ligne à l’adresse suivante :
www.KALORIK.com
A compter de la date d’achat, ce produit KALORIK est garanti un an
contre les défauts matériels et de fabrication. Cette garantie n’est
pas transférable. Conservez la preuve d’achat originelle. Une preuve
d’achat est exigée pour obtenir l’application de la garantie.
Durant cette période, le produit KALORIK qui, après inspection par
KALORIK, s’avère défectueux, sera réparé ou remplacé, au choix de
KALORIK, sans frais pour le consommateur. Si un produit de
remplacement est envoyé, c’est la garantie restante du produit
originel qui s’appliquera.
La présente garantie ne s’applique pas aux défauts dus à une
mauvaise utilisation de la part de l’acheteur ou de l’utilisateur, à une
négligence, au non-respect des consignes du manuel d’utilisation
KALORIK, à une utilisation sur un circuit électrique au voltage
différent de celui renseigné sur le produit, à une usure normale, à des
modifications ou réparations non autorisées par KALORIK, ou par un
usage à des fins commerciales. Il n’existe pas de garantie pour les
parties en verre, récipients en verre, filtres, paniers, lames et
accessoires en général. Il n’existe également pas de garantie pour
les pièces perdues par l’utilisateur.
Toute garantie de valeur commerciale ou d’adaptabilité à ce
produit est également limitée à la garantie d’un an.
Certains états ne limitent pas la longueur de la garantie tacite ou
n’autorisent pas l’exclusion de dommages-intérêts accessoires ou
indirects, les restrictions ci-dessus peuvent donc ne pas s’appliquer à
vous. Cette garantie vous donne des droits légaux particuliers, et
certains droits peuvent varier d’un état à l’autre.
26
Assembly page 26/29
USK EK 28441 - 090415
Fax +32 2 359 95 50
Copies of the I/B. Please reproduce them without any
changes except under special instruction from Team
International BELGIUM. The pages must be reproduced and
folded in order to obtain a booklet A5 (+/- 148.5 mm width x
210 mm height). When folding, make sure you keep the good
numbering when you turn the pages of the I/B. Don’t change
the page numbering. Keep the language integrity.
Si l’appareil devait présenter un défaut durant la période de
garantie et plus de 30 jours après l’achat, ne ramenez pas l’appareil
au magasin : souvent, notre Service Clientèle peut aider à résoudre
le problème sans que le produit ne doive être réparé. Si une
réparation est nécessaire, un représentant peut confirmer si le
produit est sous garantie et vous rediriger vers le service après-vente
le plus proche.
Le cas échéant, ramenez le produit (ou envoyez-le, dûment
affranchi), ainsi qu’une preuve d’achat, en mentionnant le numéro
d’autorisation de retour, indiqué par notre service clientèle, au
service après-vente KALORIK agrée le plus proche. (visitez notre site
internet www.KALORIK.com ou appelez notre département Service
Clientèle pour obtenir l’adresse du service après-vente KALORIK
agréé le plus proche).
Si vous envoyez le produit, veuillez y joindre une lettre expliquant la
nature du défaut.
Si vous avez des questions complémentaires, veuillez appeler notre
département Service Clientèle (voyez plus bas pour les coordonnées
complètes), du lundi au vendredi de 9h à 18h (EST). Veuillez noter
que les heures sont sujettes à modification.
Si vous souhaitez nous écrire, adressez votre courrier à :
KALORIK Consumer Service Department
Team International Group of America Inc
1400 N.W 159th Street, Suite 102
Miami Gardens, FL 33169 USA
Ou appelez:
Gratuitement: +1 888-521-TEAM
Seules les lettres seront acceptées à l’adresse ci-dessus. Les envois
et colis n’ayant pas de numéro d’autorisation de retour seront
refusés.
27
Assembly page 27/29
USK EK 28441 - 090415
Fax +32 2 359 95 50
Copies of the I/B. Please reproduce them without any
changes except under special instruction from Team
International BELGIUM. The pages must be reproduced and
folded in order to obtain a booklet A5 (+/- 148.5 mm width x
210 mm height). When folding, make sure you keep the good
numbering when you turn the pages of the I/B. Don’t change
the page numbering. Keep the language integrity.
28
Assembly page 28/29
USK EK 28441 - 090415
Fax +32 2 359 95 50
Copies of the I/B. Please reproduce them without any
changes except under special instruction from Team
International BELGIUM. The pages must be reproduced and
folded in order to obtain a booklet A5 (+/- 148.5 mm width x
210 mm height). When folding, make sure you keep the good
numbering when you turn the pages of the I/B. Don’t change
the page numbering. Keep the language integrity.
K090415
www.KALORIK.com
Back cover page (last page)
Assembly page 29/29