1
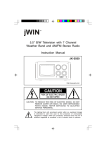
FM SCAN RADIO
V10M10_IM_EN_12272006
2.4” TFT Color LCD Video
MP3 Player with FM Radio, Touch
Pad and Micro SD Card Slot
Instruction Manual
JX-MP331 (332, 334)
Please read this manual carefully before operating and save it
for future reference.
Have a question? Please visit http://www.jWIN.com
Color LCD MP3 w/ FM/Touch Pad
V10M10_IM_EN_01182008
USER SAFETY GUIDE
INSTRUCTIONS ON ENVIRONMENTAL PROTECTION
Do not dispose of this product in the usual
household garbage at the end of its life cycle;
bring it to a collection point for the recycling of
electrical and electronic appliances. This symbol
on the product means the instructions for use or
the packing will inform about the methods for disposal. The
materials are recyclable as mentioned in its marking. By
recycling, material recycling, or other forms of re-utilization of old
appliances, you make an important contribution to protect the
environment. Please inquire at your local community
administration for the authorized disposal location.
Important Safety Instructions
1.
2.
3.
4.
5.
READ INSTRUCTIONS - All the safety and operating
instructions should be read before the appliance is
operated.
RETAIN INSTRUCTIONS - The safety and operating
instructions should be retained in a secure place for future
reference.
HEED WARNINGS - All warnings on the appliance and in
the operating instructions should be observed.
FOLLOW INSTRUCTIONS - All operating and use
instructions should be followed.
WATER AND MOISTURE - The appliance should not be
used near water, such as near a bathtub, kitchen sink,
laundry tub, and/or swimming pool.
-1-
Color LCD MP3 w/ FM/Touch Pad
V10M10_IM_EN_01182008
USER SAFETY GUIDE
Important Safety Instructions – Continued
6.
HEAT - The appliance should be situated away from heat
sources such as radiators, heat registers, stoves, or other
appliances (including amplifiers) that produce heat.
7. POWER SOURCES - The appliance should be connected
to a power supply only of the type described in the
operating instructions or as marked on the appliance.
8. CLEANING - The appliance should be cleaned with a dry
cloth.
9. OBJECT AND LIQUID ENTRY - Care should be taken so
that objects do not fall and liquids are not spilled into the
device’s openings.
10. CARTS AND STANDS - The appliance
should be used only with a cart or stand
that is recommended by the manufacturer.
An appliance and cart combination should
be moved with care. Quick stops,
excessive force, and uneven surfaces may cause the
appliance and cart combination to overturn.
11. SERVICING - The user should not attempt to service the
appliance beyond that described in the user's operating
instructions. All other servicing should be referred to
qualified service professional.
12. DAMAGE REQUIRING SERVICE - The appliance should
be serviced by qualified service professional when:
a. The power-supply cord or plug has been damaged.
b. Objects have fallen into, or liquid has been spilled into
the appliance’s apertures.
c. The appliance has been exposed to rain.
-2-
Color LCD MP3 w/ FM/Touch Pad
V10M10_IM_EN_01182008
USER SAFETY GUIDE
Important Safety Instructions – Continued
d.
The appliance has been dropped and suffered
damage.
e. The appliance does not appear to operate normally, or
exhibits a change in performance.
13. BATTERY USAGE - To prevent battery leakage, which
may result in bodily injury, property damage or damage to
the unit, follow these instructions:
14. LEAD AND MERCURY - This product may contain lead
and/or mercury. Disposal of these materials may be
regulated by your local authorities due to environmental
considerations. For more detailed disposal or recycling
information, please contact your local authorities or the EIA
(Electronic Industries Alliance) – http://www.eiae.org
FCC Notice (USA)
This device complies with part 15 of the FCC Rules. Operation is
subject to the condition that this device does not cause harmful
interference.
-3-
Color LCD MP3 w/ FM/Touch Pad
V10M10_IM_EN_01182008
USER SAFETY GUIDE
Do not change or modify this equipment. Any changes or
modifications not expressly approved by the party
responsible for compliance could void the user’s authority
to operate the equipment.
Important Notes on Hearing
Your hearing is very important to you and to us. Please take care
when operating this equipment. We strongly recommend you to
follow the guidelines below in order to prevent possible damage
to or loss of hearing.
After continuously listening to the loud sounds, hearing will adapt
and will give the impression that the volume has been reduced.
What seems normal may, in fact, be harmful. To guard against
this BEFORE HEARING ADAPTS, set the volume at a low level
and slowly increase the volume level until sound can be heard
comfortably and clearly without distortion. Damage to hearing is
accumulative and is irreversible. Any ringing or discomfort in the
ears indicates that the volume is too loud. Once a comfortable
listening level is established, DO NOT INCREASE THE
VOLUME LEVEL FURTHER.
In the use of headphones, please take more caution. Hearing
experts say that continuous listening to loud music can damage
hearing, especially when using headphones.
-4-
Color LCD MP3 w/ FM/Touch Pad
V10M10_IM_EN_01182008
OPERATING INSTRUCTIONS
Thank you for purchasing the JX-MP331 (332, 334). Unpack the
unit and make sure all accessories are put aside so they will not
be lost.
2.4” TFT Color LCD Video MP3 Player with FM
Radio, Touch Screen, and Micro SD Card Slot
•
•
•
•
•
•
•
•
•
•
•
•
•
•
•
•
•
•
Compact, slim, sleek and stylish design
2.4” TFT color liquid crystal display (LCD)
Built-in flash memory (1GB / 2GB / 4GB)
Attractive touch sensitive controls
File storage
Integrated FM stereo radio (87-108MHz
China/Europe/USA, 76 – 90MHz Japan)
USB 2.0 for fast file transfer
Supports MP3, WMA, AVI, BMP, JPEG, and TXT files
Photo viewer
Portable E-book reader (TXT file support)
Digital voice recorder / FM radio recorder
Built-in speaker
Supports multiple languages
Supports ID3 tag and lyric display
8 preset EQ (Normal, 3D, Rock, Pop, Classic, Bass, Jazz,
User EQ)
7 repeat modes (Once, Repeat one, Folder once, Folder
repeat, All once, All repeat, Intro)
Built-in rechargeable 520mAh battery
Micro SD card slot
What’s Included
•
USB Cable
•
Stereo Earphones
•
Driver / Instruction Manual (ENG/SP) / Video Conversion
Software CD
-5-
Color LCD MP3 w/ FM/Touch Pad
V10M10_IM_EN_01182008
OPERATING INSTRUCTIONS
1 2
Location of Controls
3 4 5
6
7
8
9 10
1. Power/PLAY/PAUSE
2. Microphone
3. FF button
4. Vol + button
5. Micro-SD Card slot
6. Mini USB jack
11
12
7. Color LCD screen
8. Headphone jack
9. ON/OFF switch
10. MENU button
11. FW button
12. Vol- button
-6-
13
Color LCD MP3 w/ FM/Touch Pad
V10M10_IM_EN_01182008
GETTING STARTED
Minimum System Requirements
•
•
•
•
•
Intel Pentium 133M or above
Windows 2000/XP
20M memory or above
CD-ROM Driver
USB interface
USB Connection
•
•
Connect one end of the supplied mini USB cable to the
player.
Connect the other end of the mini USB cable to the
computer.
Charging
•
•
Use USB driver to connect the player PC and charging
automatically.
Or use Adapter to charging (not included).
-7-
Color LCD MP3 w/ FM/Touch Pad
V10M10_IM_EN_01182008
OPERATING INSTRUCTIONS
Power ON / Power OFF
Turn Power ON/OFF switch to ON position, press and hold the
[PLAY] button to power ON.
In any mode, press and hold the [PLAY] button to power OFF.
Set Key Lock
Press and hold the [PLAY] button and the [FF] button for two
(2) seconds at the same time to set Key Lock.
Note: All keys on the player will be locked.
In Lock mode, press and hold the [PLAY] button and the [FF]
button (for 2 seconds) at the same time again to unlock.
Note: All buttons on the player will be unlocked.
Playing Music
In Main menu, press the [FF] or the [FW] buttons to select
Music menu and touch [MENU] button to enter Music mode.
Music playback begins automatically. During Music playback,
touch [MENU] button to enter Music playlist.
1.
Press the [FF] or the
[FW] buttons to select a
Music file. Touch [MENU]
button and Music playback
begins automatically.
2.
During Music playback,
press [PLAY] button to
pause. While in Pause
mode, press [PLAY] button again to resume playback.
-8-
Color LCD MP3 w/ FM/Touch Pad
V10M10_IM_EN_01182008
OPERATING INSTRUCTIONS
Playing Music-continued
Adjusting the Volume
During Music playback, press the [VOL+] or [VOL–] buttons to
adjust volume level.
Note: Pressing and holding the [VOL+] or [VOL–] buttons will
also adjust the volume level (value settings from 00 to 40).
Skipping to Previous / Next Music File
During Music playback, Press the [FF] or [FW] buttons to skip to
Previous or Next track.
Deleting a Music File
During Music playback, press the [MENU] button to enter the
submenu.
1.
Touch the [FF] or the [FW] buttons to select a folder or a
Music file.
2.
When a folder is selected, touch the [MENU] button to
enter folder.
3.
When a Music file is selected, press the [VOL+] button to
delete.
4.
At the “Delete File” prompt “YES / NO”, scroll to “YES”
option and touch the [MENU] button to confirm deletion.
5.
When the file is deleted, the player returns to previous
submenu options.
Note: Press and hold the [MENU] button to return to Main
menu.
-9-
Color LCD MP3 w/ FM/Touch Pad
V10M10_IM_EN_01182008
OPERATING INSTRUCTIONS
Playing Music-continued
A-B Repeat
During Music playback, press and hold the [MENU] button.
1.
The “A-B Repeat” indicator displays “A”.
2.
Press and hold the [MENU] button again and “A-B” is
displayed.
3.
Music will now repeat “A-B” playback in a loop.
To cancel “A-B” repeat playback, press and hold the [MENU]
button to resume.
Synchronous Song Lyrics Display
When a Music file in the player has a song lyrics file with same
file name, song lyrics will be displayed automatically during
Music playback.
Video Playback
In Main menu, select
Video menu and touch the
[MENU] button to enter
Video mode.
•
When Video playlist
is displayed, touch
the [FF] or [FW]
buttons to select a Video file.
•
When a folder is selected, touch the [MENU] button to
enter folder.
When a Video file is selected, touch the [MENU] button and
playback begins automatically.
- 10 -
Color LCD MP3 w/ FM/Touch Pad
V10M10_IM_EN_01182008
OPERATING INSTRUCTIONS
Video Playback-continued
FW / FF a Video file
During Video playback, press and hold the [FF] or [FW] buttons
to FW or FF playback.
Adjusting the Volume
During Video playback, press the [VOL+] or [VOL–] buttons to
adjust volume level.
Note: Pressing and holding the [VOL+] or [VOL–] buttons will
also adjust the volume level (value settings from 00 to 40).
Deleting a Video File
During Video playback, press the [MENU] button to enter the
submenu.
1.
Touch the [FF] or the [FW] buttons to select a folder or a
Video file.
2.
When a folder is selected, touch the [MENU] button to
enter folder.
3.
When a Video file is selected, press the [VOL+] button to
delete.
4.
At the “Delete File” prompt “YES / NO”, scroll to “YES”
option and touch the [MENU] button to confirm deletion.
5.
When the file is deleted, the player returns to previous
submenu options.
Note: Press and hold the [MENU] button to return to Main
menu.
- 11 -
Color LCD MP3 w/ FM/Touch Pad
V10M10_IM_EN_01182008
OPERATING INSTRUCTIONS
Listening to the Radio
The earphones must be
connected to the player when
using FM mode. They act as an
antenna for radio frequency
reception.
•
In Main menu, select FM
menu and press the [MENU] button to enter FM mode.
Manual Frequency Search
In FM mode, touch the [M] button to enter submenu.
1.
Scroll to “Manual” option and touch the [M] button.
2.
Touch the [FF] or the [FW] buttons to manually select a
favorite frequency.
3.
To manually preset the selected frequency, touch the
[MENU] button and scroll to “MEM” option followed by
the [M] button.
4.
When the preset station list is displayed, touch the [FF] or
the [FW] buttons to scroll to a desired station shown in
red color, followed by the [MENU] button to save the
frequency.
5.
At the “Save Channel” prompt, select “YES” option and
press the [MENU] button to confirm changes.
Note: The preset frequency will now be displayed in the preset
station list.
- 12 -
Color LCD MP3 w/ FM/Touch Pad
V10M10_IM_EN_01182008
OPERATING INSTRUCTIONS
Listening to the Radio-continued
Auto Frequency Search
In FM mode, touch the [MENU] button to enter submenu.
1.
Scroll to “Auto” option and touch the [MENU] button.
2.
The player will automatically scan and save any available
frequencies in sequential order.
Playback a Preset Frequency
In FM mode, touch the [MENU] button to enter submenu.
1.
Scroll to “Preset” option and touch the [MENU] button to
enter preset mode.
2.
Touch the [FF] or the [FW] buttons to scroll to the
previous or next preset frequency. (Example: CH:01,
CH02 etc.)
Press and hold the [M] button to return to Main menu.
Deleting a Preset Frequency
In FM mode, touch the [MENU] button to enter submenu.
1.
Scroll to “DEL” option followed by the [MENU] button.
The preset station list will be displayed.
2.
Touch the [FF] or the [FW] buttons to select a preset
frequency to be deleted followed by [MENU] button.
3.
At the “Del Channel” prompt, select “YES” option and
press the [MENU] button to confirm deletion.
4.
Press the [PLAY] button to return
Note: The preset frequency that has just been deleted will now
display “Empty” temporarily.
- 13 -
Color LCD MP3 w/ FM/Touch Pad
V10M10_IM_EN_01182008
OPERATING INSTRUCTIONS
Listening to the Radio-continued
FM Recording
During FM playback, press and hold [PLAY] key to enter FM
recording mode.
1.
Press the [PLAY] button and recording begins
automatically.
2.
During recording, press the [PLAY] button to pause.
3.
Press the [PLAY] button again to resume.
4.
To end and save the recording, press and hold the
[MENU] button.
Notes: The FM recording will be saved as filename
“FM00001.WAV” in the player root directory when connected to
the computer.
FM recording can be played in Music mode.
* In areas where the signal is weak, some channels may be
unavailable, or reception may be poor.
- 14 -
Color LCD MP3 w/ FM/Touch Pad
V10M10_IM_EN_01182008
OPERATING INSTRUCTIONS
Viewing Photos
Displaying a Photo File
In Main menu, select Photo
menu and press the [MENU]
button to enter Photo mode.
1.
When Photo playlist is
displayed, touch the
[FF] or the [FW]
buttons to select a Photo file. When a folder is selected,
touch the [MENU] button to enter folder.
2.
When a Photo file is selected, touch the [MENU] button
and Photo playback begins automatically.
3.
Touch the [FF] or the [FW] buttons to view previous or
next photo file.
During Photo playback, touch the [MENU] button to return to
Photo playlist or press and hold the [MENU] button to return to
Main menu.
Deleting a Photo File
•
In Photo playlist, when a photo file is selected, press
[VOL+] key to delete.
•
At the “Delete File” prompt, select “YES” option and press
the [MENU] button to confirm deletion.
- 15 -
Color LCD MP3 w/ FM/Touch Pad
V10M10_IM_EN_01182008
OPERATING INSTRUCTIONS
Text Mode
Reading Text
In Main menu, select Text
menu and touch the [MENU]
button to enter Text mode.
1.
When Text playlist is
displayed, touch the
[FF] or the [FW]
buttons to select a Text file.
2.
When a folder is selected, touch the [MENU] button to
enter folder.
3.
When a Text file is selected, touch the [MENU] button
and playback begins automatically.
4.
Touch the [FF] or the [FW] buttons to scroll backward or
forward to view text.
During Text playback, press the [MENU] button to return to Text
playlist or press and hold the [MENU] button to return to Main
menu.
Deleting a Text File
1.
In Text playlist, when a Text file is selected, touch
[VOL+] button to delete.
2.
At the “Delete File” prompt, select “YES” option and press
the [MENU] button to confirm deletion.
- 16 -
Color LCD MP3 w/ FM/Touch Pad
V10M10_IM_EN_01182008
OPERATING INSTRUCTIONS
To Bookmark a Page
The Text function supports up to 3 bookmark pages for quick
search purpose.
1.
During Text playback, touch the [FF] or the [FW] buttons
to scroll backward or forward to view Text.
2.
At the desired page to create a bookmark, press the
[Vol+] button and the 3 bookmark will be displayed.
3.
Touch the [FF] or the [FW] buttons to Scroll to any of the
3 following bookmarks and touch the [MENU] button to
confirm settings.
To View a Bookmark Page
During Text playback, press [VOL-] key to view the 3
bookmarks.
•
Touch the [FF] or the [FW] buttons to select a bookmark
followed by the [MENU] button and the bookmarked
page will be displayed automatically.
- 17 -
Color LCD MP3 w/ FM/Touch Pad
V10M10_IM_EN_01182008
OPERATING INSTRUCTIONS
Using the Recorder
Record Mode
In Main menu, select
Record menu and touch
the [MENU] button to
enter Record mode.
1.
In Record mode,
touch the [PLAY]
button and
recording begins
automatically.
2.
During recording, press the [PLAY] button to pause
recording and press the [PLAY] button again to resume.
3.
To end recording, press and hold the [MENU] button to
save the recording and return to Main menu.
Note: Recording files (WAV format) can be played in Music
menu.
- 18 -
Color LCD MP3 w/ FM/Touch Pad
V10M10_IM_EN_01182008
OPERATING INSTRUCTIONS
Explorer Mode
The Explorer mode displays all the folders and files stored in the
player.
1.
In Main menu,
select Explorer
menu and touch the
[MENU] button to
enter.
2.
When Explorer
playlist is displayed,
touch the [FF] or
the [FW] buttons to select a file.
3.
When a folder is selected, touch the [MENU] button to
enter folder.
4.
When a file is selected, touch the [MENU] button and
playback begins automatically.
Note: During playback, press and hold the [MENU] button to
return to Main menu.
Deleting a File
1.
In Explorer playlist, when a file is selected, press the
[VOL+] button to delete.
2.
At the “Delete File” prompt, select “YES” option and touch
the [MENU] button to confirm deletion.
Note: Deletion of folder is NOT supported.
- 19 -
Color LCD MP3 w/ FM/Touch Pad
V10M10_IM_EN_01182008
OPERATING INSTRUCTIONS
Settings Mode
There are 7 settings
available in the Settings
mode.
•
In Main menu,
select Settings
menu and touch
the [MENU]
button to enter
Settings mode.
•
Touch the [FF] or the [FW] buttons to select the desired
settings in each option.
Music Settings
Repeat Mode
•
Once: To play all the files once.
•
Repeat 1: To repeat one file.
•
Folder Once: To play all the files in the folder once.
•
Folder Repeat: To repeat all files in the folder.
•
All Once: To repeat all files once.
•
All Repeat: To repeat all files.
•
Intro: To play the first 10 seconds of each music file.
Play Mode
•
Order: Music playback in sequence.
•
Shuffle: Music playback randomly.
- 20 -
Color LCD MP3 w/ FM/Touch Pad
V10M10_IM_EN_01182008
OPERATING INSTRUCTIONS
Music Settings-continued
EQ Select
•
Normal / 3D / Rock / Pop / Classic/ Bass / Jazz / User EQ
•
User EQ Mode (User can customize their favorite EQ
settings).
In the User EQ settings, press [VOL +] or [VOL –] buttons to
adjust on each individual frequency segment. (60Hz、300 Hz、
1KHz、3KHz、6KHz)
•
Frequency settings are adjusted in -6dB~+6dB intervals.
Touch the [FF] or the [FW] buttons to skip or adjust the next
frequency segment. (active segment will be indicated in red
color)
Touch the [FF] or the [FW] buttons to skip to “YES” option and
press the [MENU] button to save changes and exit.
FM Radio Settings
•
Stereo SW: Set FM stereo mode ON/OFF
•
ON
•
OFF
•
FM Region: Configure FM for your region.
o
China
o
Europe
o
Japan
o
USA
- 21 -
Color LCD MP3 w/ FM/Touch Pad
V10M10_IM_EN_01182008
OPERATING INSTRUCTIONS
Music Settings-continued
Record Settings
•
REC Quality: Recording quality & file size settings
1.
High Quality: Better recording quality with larger file
size.
2.
General Quality: Normal recording quality with
smaller file size.
•
REC Volume: The highest settings +5 will produce the
loudest recording quality. +1 / +2 / +3 / +4 / +5
Display Settings
•
Blight Time: To set the backlight ON timer (unit in
seconds). This function will be disabled when the time is
set to Always On.
•
5s/ 10s / 15s / 20s / 30s / Always On
•
Lum: To set the backlight brightness. 1 / 2 / 3 / 4 / 5
•
Blight Mode: When set to Power Saver, the screen will
turn OFF according to the Blight Time settings (Press any
key to resume).
o
Normal / Power Saver
System Settings
•
About: To display information on firmware version, date
and memory status.
•
Upgrade: For firmware upgrade (if any).
•
Default Set: To restore the player to original default
settings.
- 22 -
Color LCD MP3 w/ FM/Touch Pad
V10M10_IM_EN_01182008
OPERATING INSTRUCTIONS
Music Settings-continued
Power Off Time Settings
OFF/10 Minutes/15 Minutes/30 Minutes/60 Minutes/120 Minutes
Language Settings
To change the desire language settings on the player.
Using the AVI Converter Software
This player supports AVI format video files and can transform
other video formats to the supported AVI format by using the
bundled AVI Converter Software.
The software fully supports fast speed video conversion of multivideo format into high quality AVI format.
System Requirements to Install AVI Converter Software:
•
Intel or AMD processor (Intel Pentium 3 and above,
including Intel Celeron series).
•
Windows 2000 / Windows XP
- 23 -
Color LCD MP3 w/ FM/Touch Pad
V10M10_IM_EN_01182008
OPERATING INSTRUCTIONS
Installation the AVI Converter Software
1.
Connect the player to PC and execute the preloaded AVI
Converter setup program (EXE file) bundled in the player
to begin.
2.
Follow the on-screen instructions to complete the
installation.
3.
Upon a successful installation, an AVI Converter program
icon will be created on the computer desktop
4.
Double click on the AVIConverter icon to begin.
5.
Click on “Add” button to select a video file to convert.
6.
Click on Source File button.
- 24 -
Color LCD MP3 w/ FM/Touch Pad
V10M10_IM_EN_01182008
OPERATING INSTRUCTIONS
Installation the AVI Converter Software-continued
7.
Select the Target File Path button to save the converted
video file. (Keep the rest of the settings as default and
Click on Save button, followed by Close button)
8.
Click on Convert Now button to start video conversion
process
- 25 -
Color LCD MP3 w/ FM/Touch Pad
V10M10_IM_EN_01182008
OPERATING INSTRUCTIONS
Installation the AVI Converter Software-continued
Conversion is complete when the status information shows
100% and OK. Click on Close button to quit.
Finally, transfer (using copy & paste) the converted video file
(AVI format) into the player and you are now ready for video
playback.
Note: Please use only the bundled AVI Converter Software in
this player for video conversion. Video files converted using third
party software might not be able to work properly with this player.
Making Video Files
You can convert AVI, MPG, MPEG, RM, RMBV, WMV and DAT
format to AVI format with fast speed and high quality.
Steps of operation
1.
Run the enclosed CD ROM, and then click and install AVI
Converter
2.
Open the tool, select “add the converter file” after the
appears the following
- 26 -
Color LCD MP3 w/ FM/Touch Pad
V10M10_IM_EN_01182008
OPERATING INSTRUCTIONS
Making Video Files-continued
(02) Appears the convert:
1.
Select the video file that you want to convert: Click the
“source file” button to select the video file or MTV.
2.
Select output file path: click the “output file” path button.
(03) Select the quality and size.(resolution set is320×240)
Click the store button after the parameters are set.
(04) After the parameters set click the start to convert files.
When the converting progress reached 100 percent and prompt
conversion finished, the file is successfully converted. Copy the
converted file to the player and you can watch it now.
- 27 -
Color LCD MP3 w/ FM/Touch Pad
V10M10_IM_EN_01182008
OPERATING INSTRUCTIONS
Firmwear Upgrade
You can upgrade the firmware by using the Firmware Upgrade
Tool.
Note: to upgrade the firmware, need you master certain
computer knowledge, and before you upgrading read the
instruction carefully.
The improper upgrade may cause damage of the player,
maintain the player in the current firmware version unless the
functionality is not appropriate.
(01) When to upgrade for the first time, Connect the player
with PC via USB cable.
Upgrade method:
(02)Execute the next step, and click the view,
The PC finds Rock USB Device and requires installing the driver.
- 28 -
Color LCD MP3 w/ FM/Touch Pad
V10M10_IM_EN_01182008
OPERATING INSTRUCTIONS
(03)Firmware Update: After the installation then can
upgrade: ,choose the upgrade tool.
(04)Open the computer: start=>processing=>Consumer
Update=>Firmware Update),then select the *.rfw file.
(05)Open the MP4, enter the settings=>system
settings=>firmware upgrade=>confirm and via USB to connect
the PC, then click firmware upgrade until upgrade successful
Attention: the firmware upgrade is used to improve the player
function and without using it there is no effect on the normal play.
The fault operating may cause the player can’t operate normally.
This firmware upgrade software is not fit for the other series
player.
- 29 -
Color LCD MP3 w/ FM/Touch Pad
V10M10_IM_EN_01182008
TROUBLESHOOTING
•
•
•
•
•
No power: Please check if it is power ON
No sound from the earphone: 1. Make sure the volume
level is not set to “0”. 2. Check if the earphone is properly
connected to the player. 3. Check if the music file is
corrupted. Try again with other music files.
Error message: “Warning File Format Error”: Please try
the following: Turn the Power ON/OFF safety switch to
OFF. Connect the player to the PC and remove the file
that is corrupted or non-standard audio/video file on the
player. Disconnect the player from the computer and try
again.
What is the common file type that is causing the
“Warning File Format Error” error? When any file type
is not supported by the player is detected, the error
message will occur. If this error occurred on a video file,
try to convert the video file by using the AVI Converter
and try again.
Cannot transfer music: 1. Check if the USB cable is
working properly. 2. Make sure the product drivers has
been installed correctly (if require). 3. Check if the
computer USB port is working properly. Restart the
computer and try again.
- 30 -
Color LCD MP3 w/ FM/Touch Pad
V10M10_IM_EN_01182008
SPECIFICATIONS
•
•
•
•
•
•
•
•
•
•
•
Memory: (1GB / 2GB / 4GB), Flash
Display: 2.4" TFT Color LCD (320 x 240)
Audio frequency: 20 – 20kHz
Headphone Output: 5mW (L) + 5mW (R), 32Ω
Supported file format: MP3, WMA, AVI, BMP, JPEG, TXT
Connectivity
o
3.5mm stereo headphone jack
o
Mini USB port
o
Micro SD card slot
Power Sources
o
Built-in rechargeable 520mAh battery
System Requirements: MS windows 98 / ME / 2000 / XP
(May require driver installation)
Frequency Range:
o
FM: 87-108MHz (China/Europe/USA)
76 – 90MHz (Japan)
Unit Dimensions (W x H x D): 3.3” x 2” x 0.5” (84mm x
50mm x 12mm)
Unit Weight: 1.9 oz (53 g)
* Features and specifications are subject to change without prior
notification. Dimensions and weights are approximate.
- 31 -
FM SCAN RADIO
V10M10_IM_EN_12272006
TEL: 516-626-7188
FAX: 516-626-7105
website: www.jWIN.com
© 2008 jWIN Electronics Corp. All rights reserved. No portion of
this printed material or product enclosed herewith including
design, shape and graphics, may be reproduced or transmitted
in any form without the prior written consent of jWIN Electronics
Corp. by any means, electronic or mechanical, including
photocopying, recording or use of an information storage and
retrieval system. Any unauthorized distribution or reproduction of
this printed material or product, or any portion thereof, will be
prosecuted to the fullest possible extent of the law.