1
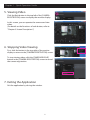
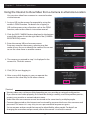
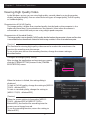
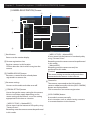
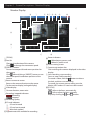
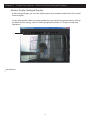
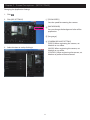
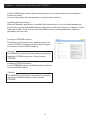
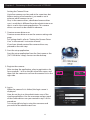
JVC CAM Control (for Windows)
User Guide
English
This is the instruction manual for the software (for Windows) for
Live Streaming Camera GV-LS2/GV-LS1 made by JVC KENWOOD
Corporation.
The operating system compatible with this application is Windows 7.
JVC CAM Control (for Windows) User Guide
Table of Contents
Chapter 1 Quick Operation Guide
1. Have You Completed the Camera Setup? . . . . . . . . . . . . . . . 1
2. Installation . . . . . . . . . . . . . . . . . . . . . . . . . . . . . . . . . . . . . . . . . . . . 1
3. Starting the Application . . . . . . . . . . . . . . . . . . . . . . . . . . . . . . . 1
4. Registering the Camera to Use . . . . . . . . . . . . . . . . . . . . . . . . . 1
5. Viewing Video . . . . . . . . . . . . . . . . . . . . . . . . . . . . . . . . . . . . . . . . . 2
6. Stopping Video Viewing . . . . . . . . . . . . . . . . . . . . . . . . . . . . . . . 2
7. Exiting the Application . . . . . . . . . . . . . . . . . . . . . . . . . . . . . . . . 2
Chapter 2 Advanced Operations
Viewing Video from Multiple Cameras . . . . . . . . . . . . . . . . . . . . 3
Using the Internet to View Video from a Camera in
a Remote Location . . . . . . . . . . . . . . . . . . . . . . . . . . . . . . . . . . . . . 4
Viewing High Quality Video . . . . . . . . . . . . . . . . . . . . . . . . . . . . . . 5
Chapter 3 Screen Descriptions
[CAMERA REGISTRATION] Screen . . . . . . . . . . . . . . . . . . . . . . . . . 7
Monitor Display . . . . . . . . . . . . . . . . . . . . . . . . . . . . . . . . . . . . . . . . . . 8
Monitor Display (Enlarged Display) . . . . . . . . . . . . . . . . . . . . . . . 9
[CAMERA SETTINGS] . . . . . . . . . . . . . . . . . . . . . . . . . . . . . . . . . . . . 10
[APP SETTINGS] . . . . . . . . . . . . . . . . . . . . . . . . . . . . . . . . . . . . . . . . . 11
Chapter 4 Streaming in Real-Time with
USTREAM
Installing the Camera Driver . . . . . . . . . . . . . . . . . . . . . . . . . . . . . 12
Creating a USTREAM Account . . . . . . . . . . . . . . . . . . . . . . . . . . . 12
Installing USTREAM Producer . . . . . . . . . . . . . . . . . . . . . . . . . . . 12
Setting the Camera Driver . . . . . . . . . . . . . . . . . . . . . . . . . . . . . . . 13
Chapter 1
Quick Operation Guide
1. Have You Completed the Camera Setup?
Camera setup must be performed before JVC CAM Control is used.
Be sure to check that the camera video and audio can be played from the Web browser
before proceeding to the next step.
For details on setting up the camera, refer to the instruction manual supplied with the camera.
2. Installation
Install using the CD-ROM supplied with the camera.
Insert the CD-ROM into the computer drive, and run setup.exe
from the drive.
[Caution]
An update may have been released for the application, so
check the support web page before installing.
http://loilo.tv/product/32/
3. Starting the Application
After the application installation is completed, two icons are
displayed on the Windows desktop. Click the JVC CAM Control
icon shown in the illustration.
4. Registering the Camera to Use
The application starts.
On the right side of the display, the cameras in your
network are listed. From the listed cameras, click the
camera you want to use.
A login screen is displayed. Log in to the camera using
the username and password that you set in the camera
setup.
[Caution]
To prevent video from being leaked accidentally to
third parties, be sure to change the username and
password that are set when the camera is shipped.
For details on changing the username and password,
refer to the instruction manual supplied with the
camera.
1
Chapter 1 Quick Operation Guide
5. Viewing Video
Click the Back button in the top left of the [CAMERA
REGISTRATION] screen to display the monitor display.
In this screen, you can operate the camera and view
video.
(For details on the functions of each button, refer to
"Chapter 3 Screen Descriptions".)
6. Stopping Video Viewing
First, click the button in the top right of the monitor
display to return to the [CAMERA REGISTRATION] screen.
To stop viewing video, click the [CAMERA RELEASE]
button in the [CAMERA REGISTRATION] screen to cancel
the camera registration.
7. Exiting the Application
Exit the application by closing the window.
2
Chapter 2 Advanced Operations
Viewing Video from Multiple Cameras
JVC CAM Control (for Windows) enables you to switch
between multiple cameras when viewing video.
[Caution]
To view video from multiple cameras, first you need to
purchase the additional cameras.
1. On the left side of the [CAMERA REGISTRATION] screen,
select the slot in which to register the camera.
2. In the camera list on the right side of the screen, click
the camera to use and log in. For details on logging in,
refer to "4. Registering the Camera to Use" in "Chapter 1
Quick Operation Guide".
3. Click the Back button in the top left of the screen to
display the monitor display.
4. You can now select a camera video by clicking a camera
thumbnail on the right side of the monitor display.
Up to four cameras can be viewed at the same time.
3
2
1
Chapter 2 Advanced Operations
Using the Internet to View Video from a Camera in a Remote Location
You can view video from a camera in a remote location
via the Internet.
1. Assign a URL to the camera, for example by using the
camera's DDNS function. For details on assigning a
URL to the camera using a function such as the DDNS
function, refer to the camera's instruction manual.
2. Click the [ADD CAMERA] button displayed in the bottom
area of the camera list on the right side of the [CAMERA
REGISTRATION] screen.
3. Enter the camera URL and a camera name.
Enter any name for the camera, selecting one that
makes it easy for you to identify the camera. Be sure not
to use the same name as another camera.
4. The camera you entered in step 3 is displayed in the
camera list. Click this camera.
5. Click [OK] to start logging in.
6. After successfully logging in, you can operate the
camera in the same way as the other cameras.
[Caution]
•• Viewing video may not be possible depending on your provider or network configuration.
If you cannot view video properly, first check the settings carefully, and if the problem persists,
contact your provider or network administrator.
•• Video from the same camera cannot be viewed at the same time by multiple people.
•• Camera video posted on the Internet can be viewed by anyone who knows the username and
password. This means it is very risky to use a password that anyone can guess.
Set a username and password that cannot be identified by other people. For details on
changing the username and password, refer to the camera's instruction manual.
4
Chapter 2 Advanced Operations
Viewing High Quality Video
In the Windows version, you can view high quality, smooth video by using the monitor
display (enlarged display). You can select from two types of image quality; Full HD quality
or standard quality.
Characteristics of Full HD Quality
The image quality is higher than standard quality, but the load on the computer is also
higher and more data is transmitted across the network. Select when the camera is
connected in a wired LAN and you are using a high speed computer.
Characteristics of Standard Quality
The image quality is not as good as Full HD quality, but the load on the computer is lower and less data
is transmitted across the network. Select this when using a wireless LAN or a standard computer.
[Caution]
This function for viewing high quality video cannot be used at the same time as the
function for recording onto the camera.
To use at the same time as the recording function, change the stream setting as
described below.
Configure the image quality setting.
After starting the application and registering a camera,
click the [STREAM SETTING] button in the [CAMERA
REGISTRATION] screen.
When the button is clicked, the setting dialog is
displayed.
To view in Full HD quality, change the setting to [MPEG-2
TS(HD) + MotionJPEG].
To view in standard quality, change the setting to
[MPEG-2 TS(SD) + MotionJPEG].
[Caution]
When the stream setting is changed to [MPEG-2
TS(HD) + MotionJPEG] or [MPEG-2 TS(SD) +
MotionJPEG], the function for recording onto the
camera can no longer be used.
To use the recording function, return the setting to
[MotionJPEG].
5
Chapter 2 Advanced Operations
Click the Back button in the top left to return to the
monitor display.
Click the button in the top right of the monitor display
to enlarge the video.
You can view high quality video.
6
Chapter 3 Screen Descriptions - [CAMERA REGISTRATION] Screen
[CAMERA REGISTRATION] Screen
%
&
"
'
#
(
$
•• [MPEG-2 TS(SD) + MotionJPEG]
Use to stream via the Internet in standard quality
using "Camera Driver".
Recording onto the camera cannot be performed
in this mode.
•• [MotionJPEG]
Recording onto the camera can only be
performed in this mode.
[Caution]
The stream setting cannot be configured when
connected to the camera via the Internet.
"Back button
Returns to the monitor display.
#Camera registration slots
Register cameras in this location.
Click to select the slot in which to register the
camera.
$[CAMERA RELEASE] button
Removes a camera that has already been
registered in a camera slot.
'Camera list
The cameras connected to the LAN and the
cameras added manually with the [ADD CAMERA]
button are displayed here.
Click a camera to start camera registration.
%Resource settings
You can set the audio and video on or off.
&[STREAM SETTING] button
Use to change the stream setting for the camera.
Various restrictions apply depending on the
stream setting of the camera, so use the setting
appropriate for the time or situation.
([ADD CAMERA] button
Use to add a camera manually.
Use in situations such as when viewing a camera
in a remote location via the Internet.
•• [MPEG-2 TS(HD) + MotionJPEG]
Use to stream via the Internet in HD quality using
"Camera Driver".
Recording onto the camera cannot be performed
in this mode.
7
Chapter 3
Screen Descriptions - Monitor Display
Monitor Display
'
(
) *+ ,
-
&
.
"
/
#
$
%
0
1
" [ZOOM]
# Pan/tilt
Changes the direction of the camera.
to change the movement speed.
Click
[PRESET]
buttons
$
You can restore pan/tilt and zoom positions for
the camera.
Click
before clicking a [PRESET] button to save
the current pan/tilt and zoom positions of the
camera.
% Return camera to center
Returns the camera direction to the center.
& To the monitor display (enlarged display)
' Video display
( Camera direction, zoom ratio
) Recording/stopped indicators
: Recording
: Stopped
Recording
quality
*
+ SD card indicators
- Power indicators
: When battery power used
: When AC power used
. To the setting screen
/ Camera registration slots
Click to change the camera displayed in the video
display.
0 Start recording, stop recording
Starts or stops video recording.
To record a video, click the button to release
the lock, and then start recording.
To record, the camera stream setting must be
Motion JPEG and an SD card must be inserted.
1 [FOCUS]
: Adjusts the focus automatically.
: Use to adjust the focus manually.
Adjust by clicking the and
buttons.
: SD card inserted
: SD card not inserted
: Write lock applied
, Approximate time available for recording
8
Chapter 3 Screen Descriptions - Monitor Display (Enlarged Display)
Monitor Display (Enlarged Display)
In the enlarged display, you can view higher quality and smoother video than in the normal
monitor display.
To view high-quality video in the enlarged display, you need to change the camera settings.
For details on the settings, refer to "Viewing High Quality Video" in "Chapter 2 Advanced
Operations".
"
"Back button
9
Chapter 3 Screen Descriptions - [CAMERA SETTINGS]
Changing the Camera Settings
1. Click
.
2. Click [CAMERA SETTINGS].
3. Select the item to set by clicking it.
10
Chapter 3 Screen Descriptions - [APP SETTINGS]
Changing the Application Settings
1. Click
.
2. Click [APP SETTINGS].
"[ZOOM SPEED]
Sets the speed for zooming the camera.
#[BACKGROUND]
You can change the background color of the
application.
$[Language]
%[CAMERA RESOURCE SETTING]
[VIDEO]: When registering the camera, set
whether to use video.
[AUDIO]: When registering the camera, set
whether to use audio.
[CONTROL]: When registering the camera, set
whether to perform camera control.
3. Select the item to set by clicking it.
11
Chapter 4 Streaming in Real-Time with USTREAM
Using USTREAM, the Internet video streaming service, you can broadcast live to people all
around the world.
You can stream television-like programs using up to four cameras.
Installing the Camera Driver
When the Windows application is installed, the camera driver is also installed automatically.
If you have not yet installed the Windows application, install it by referring to "Chapter 1 Quick
Operation Guide". Check that you can view video from the viewing application, and then
proceed to the next step.
Creating a USTREAM Account
To perform a live broadcast, you need an account to
use in USTREAM. Create an account by following the
instructions on the USTREAM website.
[Caution]
JVC KENWOOD and LoiLo do not accept any inquiries
regarding USTREAM operations. Please contact
USTREAM.
Installing USTREAM Producer
Install USTREAM Producer by following the instructions
on the USTREAM website.
[Caution]
JVC KENWOOD and LoiLo do not accept any inquiries
regarding USTREAM Producer. Please contact
USTREAM.
12
Chapter 4 Streaming in Real-Time with USTREAM
Setting the Camera Driver
Up to four cameras can be used at the same time, but
before starting a live broadcast, you need to set in
advance which cameras to use.
Also, in the camera driver, a dedicated camera driver
user is used that is different from the administrator user
that is used in the viewing application. This camera
driver user needs to be created in advance.
1. Create a camera driver user.
Create a camera driver user on the camera setting web
page.
For setting details, refer to "Setting the Camera Driver
User" in the camera's instruction manual.
If you have already created the camera driver user,
proceed to the next step.
2. Start the setup application.
Start the setup application from the Start menu or the
[JVC CAM driver setup] shortcut on the desktop.
3. Register the cameras.
After starting the application, select a registration slot
from numbers 1 to 4 on the left side of the screen, and
then click the camera to use from the camera list on the
right side.
4. Log in.
When the camera list is clicked, the login screen is
displayed.
Here, do not log in as the administrator user of the
viewing application. Use the username and password
of the camera driver user you created in step 1 of this
procedure.
It is not possible to log in using the username and
password of the administrator user.
13
1
2
Chapter 4 Streaming in Real-Time with USTREAM
5. Set the image quality.
After successfully logging in, the window for selecting
the image quality to use for streaming is displayed. The
image quality setting can be changed later at any time
using the [IMAGE QUALITY SETTINGS] button.
However, note that USTREAM Producer needs to be
restarted to reflect this setting.
•• [MPEG-2 TS (HD)]
The image quality is high, but the load on the computer
is also high and a large amount of data is transmitted
across the network.
Select when the only one camera is used, the camera
is connected in a wired LAN and you are using a high
speed computer.
•• [MPEG-2 TS (SD)]
The image quality is not as good, but the load on the
computer is lower and less data is transmitted across the
network.
Select this when using a wireless LAN, multiple cameras
or a standard computer.
•• [AAC SOUND ONLY.]
Select this to use the camera audio only.
6. When using multiple cameras, repeat steps 3 to 5.
7. Exit the setup application.
Exit the setup application by closing the window.
14
Chapter 4 Streaming in Real-Time with USTREAM
8. Set the camera stream setting according to the quality
setting.
When using for the camera driver, the stream setting
for the camera needs to be changed according to the
quality setting.
•• If you set the quality setting to [MPEG-2 TS(HD)]
Set the camera stream setting to [MPEG-2 TS(HD) +
MotionJPEG].
•• If you set the quality setting to [MPEG-2 TS(SD)] or [AAC
SOUND ONLY.]
Set the camera stream setting to [MPEG-2
TS(SD)+MotionJPEG].
In addition to the iOS, Android and Windows viewing
applications, the camera stream settings can also be set
from the setting web page.
For details on configuring the stream setting in the
Windows version, refer to "Viewing High Quality Video"
in "Chapter 2 Advanced Operations".
9. Start USTREAM Producer.
In the same way as for normal webcams and other
devices, add a camera from "Add Shot".
The camera names correspond to the numbers set in the
setup application. Four video cameras and four audio
cameras are displayed with names such as those on the
right.
The video and audio are separate, so you can use video
only, or combine the video and audio of different
cameras.
[Caution]
If an error is displayed, correct the cause of the error,
and then restart USTREAM Producer.
Once an error occurs, video and audio will not play
until USTREAM Producer is restarted.
10.Start streaming.
Start streaming using USTREAM Producer.
15
Video
1: JVC CAM Video 1
2: JVC CAM Video 2
3: JVC CAM Video 3
4: JVC CAM Video 4
Audio
1: JVC CAM Audio 1
2: JVC CAM Audio 2
3: JVC CAM Audio 3
4: JVC CAM Audio 4