1
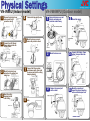
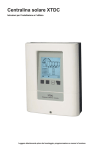
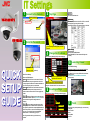
IT Settings
1
Connect to the Camera
3
Top Page
Frame Size
Choose the desired frame size.
Enter http://192.168.0.2/
VN-V686WPU
JPEG Settings
Choose the compression rate from VFS1 – VFS7, or select AFS
and specify the Jpeg average file size in KByte.
Approximate file size for each compression rates are as follows.
Click [Go]
VN-V686U
2
Enter the Password
Click on [Network], followed by [Basic] on the next
submenu.
4
Change the IP address
Click on the menu [Network] – [Basic] to show setting page.
MPEG-4 Settings
Specify the desired MPEG-4 bitrate.
Change CBR/VBR, FPS, I Frame Interval and Priority when
necessary.
6
QUICK
SETUP
GUIDE
User name: admin
Password: vn-v686
Launching Viewer
[Note for MPEG-4 Viewing]
Download the “ffdshow” from the Internet and install before
viewing MPEG-4 image with the built-in MPEG-4 viewer.
(by default)
Basic Trouble Shooting
After selecting [DHCP Disable], enter the
specified value in each fields.
When some ERROR happens…
Solution 1 If DHCP server exists on the network, IP address
other than 192.168.0.2 may be assigned to the camera. Ask
currently assigned IP address for the network administrator or
try to connect again in peer-to-peer environment.
Solution 2 With no DHCP Server, the IP address of the camera
should be 192.168.0.2 by default. Change also the PC IP
address so that the camera and PC are on the logically same
subnet.
Solution 3 Change the IE settings not to use the proxy server
for the camera IP address. Also set http://192.168.0.2/ as an IE
trusted site and change the IE setting to allow Active
Scripting.
Solution 4 If you have already setup another camera which
was originally the same IP address with the camera this time,
PC may still recognize that the corresponding MAC address to
this IP is the previous one. Launch the command prompt and
type “arp –a” to confirm all IP and corresponding MAC
address entries. To delete all entry, type “arp –d”.
Note Ping command could be a good solution in any
situation.
The “ffdshow” is a open source CODEC and found at various
Internet sites like
http://www.free-codecs.com/FFDShow_download.htm
(as of may.2008)
Press OK and wait for 1 minute while rebooting.
Change also IP address of the PC to re-connect the camera.
5
Encoding settings
Click on the menu [Image] – [Encoding] to show setting page.
Frame Size
JPEG Settings
MPEG-4 Settings
7
Finish
According to your system operation policy, set the necessary
settings like
•Preset Position
•Alarm
•Privacy Mask
and so on.
Physical Settings
VN-V686U (Indoor model)
1
2
Remove the terminal cover
and connect the fall
prevention wire.
Connect the LAN / Alarm /
Power cables and tie with
the wire clamp.
5
6
Remove the tape and the cap.
VN-V686WPU (Outdoor model)
1
3
Mount the terminal cover
and pull out the cables from
side or top.
Mount the ceiling
clamping bracket
to the ceiling.
Mount the camera.
Mount the dome cover.
5
Connect LAN / Alarm / Power
cables, then push them into
the hole.
6
Mount the cap and seal
around the cap and mounting
surface with waterproof seal.
Connect the fall prevention
wire between units, then insert
the camera unit into the ceiling
clamping bracket.
3
This figure shows pulling the cable from the top.
4
4
Mount the dome cover and
remove the protective sheet.
2
7
Remove the dome cover and
take the cushioning and
protection material away.
Remove the cap and pull
out the cables.
810 Lock
Remove sheet.