1
ENGLISH
LT-20DA6SK
INTEGRATED DIGITAL WIDE LCD PANEL TV
INSTRUCTIONS
D
Digital
Video
Broadcasting
Trade Mark of the DVB Digital Video Broadcasting
Project (1991 to 1996) Number: 3795
Contents
i
For your safety ........................................ 2
Other Features ...................................... 33
Important Instruction ............................. 4
PC Mode ................................................ 35
Where to install ...................................... 5
Remote Control Buttons ......................... 9
Installation .......................................... 35
Main Menu in PC mode: ..................... 35
PC Picture Position Menu: ................. 35
PC Picture Menu ................................ 36
Sound Menu ....................................... 36
PIP Picture .......................................... 36
Source Menu ...................................... 37
Sound in PC mode ............................ 37
Features ................................................ 10
Analogue Teletext ................................. 37
Getting Started ...................................... 11
To Select Index Page ......................... 38
To Select a Subcode Page ................ 38
Distance Recommendation ................ 5
Important Information ............................ 6
Control Panel Buttons ............................ 7
Using the stand .................................... 8
T-V LINK .............................................. 15
Basic Operations .................................. 16
Operating while watching IDTV ........... 17
Everyday Operation ............................ 17
Digital Teletext .................................... 19
Peripheral Equipment Connections .... 39
Via the RCA jacks ............................... 39
Peripheral Equipment Connections .... 41
Antenna Connections ........................... 42
DTV Menus ............................................ 19
Peripheral Equipment Connections .... 42
Timers (DTV Timer Recording) ......... 19
Configuration ..................................... 22
Edit PR List ........................................ 23
Installation .......................................... 25
Common Interface ............................. 26
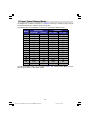
PC Input Typical Display Modes ........ 43
Tips ........................................................ 44
Specifications ....................................... 45
Setting The TV ...................................... 27
Menu System ..................................... 27
Picture Menu ...................................... 27
Sound Menu ....................................... 29
Feature Menu ..................................... 30
Install Menu ........................................ 30
Program Menu ................................... 32
Source Menu ...................................... 33
For users in the UK:
If you have any problems setting up
your new TV, please call the
Helpline on 0870330 5000
For users in the Republic of Ireland:
If you have any problems setting up
your new TV, please call the
Helpline on 1890 - 582500
-1ENG-20710W-17MB16P-1895UK-(LT-20DA6SK)-50076128.p65
1
18.10.2005, 08:39
For your safety
This equipment has been designed and manufactured to meet international safety standards but, like any electrical equipment, care must be taken if you are to obtain the best results and safety is to be assured. So, please read the points below for your own safety. They
are of a general nature, intended to help you with all your electronic consumer products and
some points may not apply to the goods you have just purchased.
Some DOs and DONTs for you
Air Circulation
Leave at least 10cm clearance around the television to allow adequate ventilation. This will
prevent the TV from overheating and consequential possible damage to the TV. Dusty places
should also be avoided.
Heat Damage
Damage may occur if you leave the TV in direct sunlight or near a heater. Avoid places subject to extremely high temperatures or humidity, or locations where the temperature is likely
to fall below 5ºC (41ºF).
Mains Supply
The mains supply required for this equipment is 100 -240 AC, 50 Hz. Never connect to a DC
supply or any other power source. DO ensure that the TV is not standing on the mains lead.
DO NOT cut off the mains plug from this equipment, this incorporates a special Radio Interference Filter, the removal of which will impair its performance.
Hot / Moderate Climate Conditions
This device is suitable for working in hot and moderate climate conditions.
IF IN DOUBT PLEASE CONSULT A COMPETENT ELECTRICIAN.
DO
DO read the operating instructions before you attempt to use the equipment.
DO ensure that all electrical connections (including the mains plug, extension leads and inter-connections between pieces of equipment) are properly made and in accordance with
the manufacturers instructions.
Switch off and withdraw the mains plug before making or changing connections.
DO consult your dealer if you are ever in doubt about the installation, operation or safety of
your equipment.
DO be careful with glass panels or doors on equipment.
DO NOT
DONT remove any fixed cover as this may expose dangerous voltages.
DONT obstruct the ventilation openings of the equipment with items such as newspapers,
-2ENG-20710W-17MB16P-1895UK-(LT-20DA6SK)-50076128.p65
2
18.10.2005, 08:39
table-cloths, curtains etc. Overheating will cause damage and shorten the life of the equipment.
DONT allow electrical equipment to be exposed to dripping or splashing or objects filled
with liquids, such as vases, to be placed on the equipment.
DONT place hot objects or naked flame sources, such as lighted candles or night-lights on,
or close to the equipment. High temperatures can melt plastic and lead to fires.
DONT use makeshift stands and NEVER fix legs with wood screws. To ensure complete
safety, always fit the manufacturers approved stand or legs with the fixings provided according to the instructions.
DONT listen to headphones at high volume, as such use can permanently damage your
hearing.
DONT leave equipment switched on when it is unattended, unless it is specifically stated
that it is designed for unattended operation or has a standby mode. Switch off using the
switch on the equipment and make sure your family know how to do this. Special arrangements may need to be made for infirm or handicapped people.
DONT continue to operate the equipment if you are in any doubt about it working normally, or
it is damaged in any way switch off, withdraw the mains plug and consult your dealer.
DONT put the empty batteries into garbage instead of recycle bin to reduce harmfull effects
to the environment.
ABOVE ALL NEVER let anyone, especially children, push anything into holes, slots or any
other openings in the case this could result in a fatal electric shock.
NEVER guess or take chances with electrical equipment of any kind it is better to be safe
than sorry.
To fully disconnect the TV, switch off the mains socket and remove the Power plug.
Safety Precautions for Power adapter
Be careful! May become hot.
For indoor and dry location use only.
Risk of electric shock.
Shock hazard, do not open.
Keep all power adapters away from any other heat source.
Always use power adapter(s) well-ventilated area.
** Cold cathode fluoresant lamp in LCD PANEL contains a small amount of mercury, please
follow local ordinates or regulations for disposal.
"The LCD panel is very high technology product with about a million thin film transistors,
giving you fine picture details. Occasionally, a few non-active pixels may appear on the
screen as a fixed point of blue, green or red. Please note that this does not affect the
performance of your product." Please note that certain light guns used with games consoles may not work on this product.
Warning:
This is a Class A product. In a domestic environment this product may cause radio interference in which case the user may be required to take adequate measures.
-3ENG-20710W-17MB16P-1895UK-(LT-20DA6SK)-50076128.p65
3
18.10.2005, 08:39
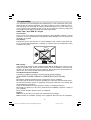
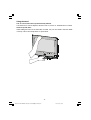
WARNING
Fingers may be trapped under the TV causing injuries. Hold
the TV at the bottom in the middle, and do not allow it to tilt up
or down.
The TV may fall causing injuries. Hold the bottom of the
stand with your hand and tilt the TV up and down.
Do not allow children to hang from the TV, place their elbows
on the TV or lean against the TV. Doing so may cause the TV
to fall over and lead to injuries.
CAUTION:
To avoid electric shock or damage to the unit, first firmly insert the small end of the power cord into the AC Adapter unit it
is no longer wobbly, and then plug the larger end of power
cord into an AC outlet.
Important Instruction
For your own safety read following instruction carefully before attempting to connect this unit
to the mains supply.
MAINS (AC) OPERATION
The wires in this mains lead are coloured in accordance with the following code :
BLUE-NEUTRAL
BROWN-LIVE
As the colours of the wires in the mains lead of this
appliance may not correspond with the coloured
markings identifying the terminals in your plug,
proceed as follows:
The wire which is coloured blue must be connected
to the terminal which is marked with the letter N or
coloured black.
The wire which is coloured brown must be
connected to the terminal which is marked with the
letter L or coloured red.
No connection is to be made to the earth terminal of
the plug.
If a 13 Amp (BS 1363) Plug is used a 5 Amp Fuse
must be fitted, or if any other type of Plug is used a 5
Amp Fuse must be fitted, either in the Plug of
Adaptor, or on the Distribution Board.
CAUTION
TO PREVENT ELECTRIC SHOCK
DISCONNECT FROM THE MAINS
BEFORE REMOVING COVER. NO USER
SERVICEABLE PARTS INSIDE. REFER
SERVICING TO QUALIFIED SERVICE
PERSONNEL.
SAFETY PRECAUTION
THIS EQUIPMENT MUST BE
DISCONNECTED FROM THE MAINS
WHEN NOT IN USE. DO NOT ALLOW
THIS UNIT TO BE EXPOSED TO RAIN OR
MOISTURE.
-4ENG-20710W-17MB16P-1895UK-(LT-20DA6SK)-50076128.p65
4
18.10.2005, 08:39
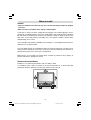
Where to install
WARNING
When you install the TV on the wall, only use a JVC wall mounting unit which is designed
for this TV.
Make sure the TV is installed on the wall by a skilled installer.
Locate the TV away from direct sunlight and strong lights, soft, indirect lighting is recommended for comfortable viewing. Place on a sturdy platform, the mounting surface should be
flat and steady, it should then be secured to the wall with a sturdy tie using the hook on the
back of the TV, this will prevent it from falling over. Use curtains or blinds to prevent direct
sunlight falling on the screen.
A floor and table top stand are available for this television, or and angled bracket which enables the TV to be wall-mounted.
The LCD display panels are manufactured using an extremely high level of precision technology, however sometimes some parts of the screen may be missing picture elements or
have luminous spots. This is not a sign of a malfunction.
Make sure the TV is located in a position where it cannot be pushed or hit by objects, as
pressure will break or damage the screen.
Distance Recommendation
Install the TV on solid horizontal surface such as a table or desk.
For ventilation, leave a space of at least 10 cm free all around the set. To prevent any fault
and unsafe situations, please do not place any objects on top of the set.
-5ENG-20710W-17MB16P-1895UK-(LT-20DA6SK)-50076128.p65
5
18.10.2005, 08:39
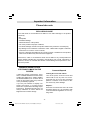
Important Information
Please take note
EXCLUSION CLAUSE
JVC shall under no circumstances be liable for loss and/or damage to the product
caused by:
fire;
earthquake;
accidental damage;
intentional misuse of the product;
use of the product in improper conditions;
loss and/or damage caused to the product whilst in the possession of a third party;
any damage or loss caused as a result of the owner s failure and/or neglect to follow the
instructions set out in the owners manual;
any loss or damage caused directly as a result of misuse or malfunction of the product
when used simultaneously with associated equipment;
Furthermore, under no circumstances shall JVC be liable for any consequential loss
and/or damage including but not limited to the following, loss of profit, interruption of
business, the loss of recorded data whether caused during normal operation or misuse of the product.
WARNING! NEVER LEAVE A
STATIONARY IMAGE ON THE
SCREEN
Care and disposal
Cleaning the screen and cabinet...
If stationary images generated by TELETEXT, CHANNEL IDENTIFICATION LOGOS,
COMPUTER DISPLAYS, VIDEO GAMES,
ON SCREEN MENUS, etc. are left on the TV
screen for any length of time, they could become permanently ingrained.
Turn off the power, clean the screen and
cabinet with a soft, dry cloth. We recommend that you do not use any proprietary
polishes or solvents on the screen or cabinet as this may cause damage.
If you use your television to display completely still images, or moving pictures
which have a permanent still image superimposed e.g. broadcast network logos, it is
always advisable to reduce BOTH the
brightness and contrast settings.
Disposal...
When the set reaches the end of its useful
life please dispose of it in accordance with
Local Government Regulations or at a recycling centre.
-6ENG-20710W-17MB16P-1895UK-(LT-20DA6SK)-50076128.p65
6
18.10.2005, 08:39
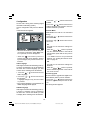
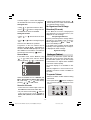
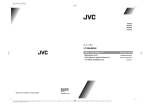
Control Panel Buttons
32:(5/$03
,1)5$5('5(&(,9(5
63($.(5
63($.(5
79$9
79$9
0(182.
0(182.
352*5$0 92/80(
67$1'%<
With certain combinations of connectors and leads the back cover
may not be easily fitted. If the cover is left off, this in no way infringes
safety requirements.
-7ENG-20710W-17MB16P-1895UK-(LT-20DA6SK)-50076128.p65
7
18.10.2005, 08:39
Using the stand
This TV comes with a Table Top Stand already attached.
This stand can be used to adjust the direction of the TV screen 10° backward and 5° forward.
Tilt the TV up and down:
While holding the bottom of the stand with one hand, use your other hand to hold the middle
of the top of the TV and slowly tilt the TV up and down.
-8ENG-20710W-17MB16P-1895UK-(LT-20DA6SK)-50076128.p65
8
18.10.2005, 08:39
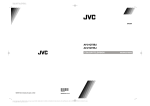
Remote Control Buttons
/ I = (Stand By) button
TV / VCR / DVD Switch
'9
'
Number buttons
79
AV button
(EXT-1, EXT-2, EXT-2S, EXT-3,
EXT-4, EXT-4S, PC, DIGITAL TV)
5&
9
Colour button
MENU = Menu button
= Cursor Up button
OK button
$9
= Cursor Right button
BACK = Back button
= Volume - /+ buttons
GUIDE button
SUBTITLE button
0(18
79'79
ZOOM = Zoom button
buttons
2.
%$&.
IDTV/ VCR/ DVD/ Teletext Control buttons P
PC Control buttons
= Hyper Sound On/Off button
buttons
3
= Cursor Down button
= Teletext button
= Cursor Left button
TV / DTV button
= Information Button / T-V Link in
Program Menu
= Mute button
68%7,7/(
72 30(18
=220
3&
79
-9ENG-20710W-17MB16P-1895UK-(LT-20DA6SK)-50076128.p65
9
*8,'(
18.10.2005, 08:39
Features
It is a remote controlled Integrated Digital colour television and PC monitor.
100 programmes from VHF, UHF bands or cable channels can be preset.
It can tune cable channels.
Controlling the TV is very easy by its menu driven system.
It has 2 pieces of Euroconnector socket for external devices (such as video, video games, audio set, etc.)
S-Video and AV inputs are available.
Optional stereo sound systems (German or German+Nicam) are available.
Multilanguage OSD.
Teletext (Fastext, 7 pages).
It is possible to connect headphone.
A.P.S. (Automatic programming system)
PLL (Frequency Search)
All programmes can be named.
Forward or backward automatic tuning.
Sleep timer.
Child lock.
Auto, Full, Regular, Panoramic, 14:9 Zoom, 16:9 Zoom,16:9 Zoom Subtitle modes.
Automatic sound mute when no transmission.
When no valid signal is detected, after 5 minutes the TV switches itself automatically to standby mode.
NTSC Playback.
TV Picture in PC (if PC input available).
PC input (Support Up to 1360 x 768)
Plug&Play for Windows 9X, ME, 2000, XP
PC Audio input
- 10 ENG-20710W-17MB16P-1895UK-(LT-20DA6SK)-50076128.p65
10
18.10.2005, 08:39
Getting Started
Follow Step 1 to 7 to set up your TV:
Step 1: Checking the accessories supplied
Remote control unit x 1
AA/R6 battery x 2
AC adapter x 1
Power cord x 1
Step 2: Inserting batteries
Remove the battery cover located on the back of the remote control by gently pulling upwards
from the indicated part.
Insert two AA/R6 dry cell or equivalent type of batteries inside.
Replace the battery cover.
NOTE: Remove the batteries from remote control when it is not to be used for a long
period.Otherwise it can be damaged due to any leakage of battery.
Old batteries must be disposed in a designated area. If performance of the remote control
reduces, replace the batteries with the correct type. Do not combine a used, old battery or a
new one or mixed battery types. Remove dead batteries immediately to prevent acid from
leaking into the battery compartment.
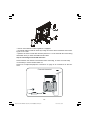
Step 3: Removing the terminal cover
There are connection terminals and a card socket behind the covers of the rear of the TV.
Remove the cover before connecting an antenna, VCR, DVD and other devices.
Remove the covers by removing the hooks. When replacing the covers, place the side or
bottom of the covers against the TV and insert the hooks.
Leave the covers off if they do not fit properly. DO NOT force to replace the covers. Doing so
may cause damages of the connection cables and the covers.
Leave these covers off when mounting the TV on a wall.
- 11 ENG-20710W-17MB16P-1895UK-(LT-20DA6SK)-50076128.p65
11
18.10.2005, 08:39
FDUGVRFNHW
WHUPLQDOV
100 mm mount based on VESA regulation is equipped.
The handle and the stand can be left by loosing the screws with a screwdriver when mounting the TV on a wall.
Spread a soft cloth on a flat table and then place the TV on the cloth with the screen facing
downwards when you leave the handle and the stand.
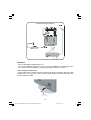
Step 4: Connecting an aerial VCR and mains
Please read the user manual of each device before connecting, to ensure a correct setup.
It is necessary to connect aerial to watch TV.
Please see Peripheral Equipment Connections on page 39 for connections to other devices.
&RQQHFWWKHDHULDO
$(5,$/
$& DG DS WH U
WR'&,1
- 12 ENG-20710W-17MB16P-1895UK-(LT-20DA6SK)-50076128.p65
12
18.10.2005, 08:39
&RQQHFWDYLGHRGHYLFH
$(5,$/
(;7
(;7
$&DGDSWHU
7R'&,1
9&5
IMPORTANT:
Only use the adaptor supplied with this TV.
The TV set is designed to operate on 24 V DC. For this, an adaptor is used which gives 24 V
DC voltage. Connect this adaptor to a system that supplies 100-240 V AC, 50 Hz.
Step 5: Using the cable holder
A cable holder which is used to keep the connection cables tidy is supplied. Attach the cable
holder to the hole on the back of the stand, then gather together the connection cables and
put them inside the holder.
- 13 ENG-20710W-17MB16P-1895UK-(LT-20DA6SK)-50076128.p65
13
18.10.2005, 08:39
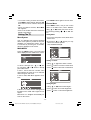
Step 6: Switching the TV ON/OFF
To switch the TV on
35/LVW(PSW\6WDUWDXWRPDWLFVHDUFK Your TV will switch on by two steps:
1- Connect the power supply cord to the system. Then the TV switches itself to standby mode and the power lamp becomes
red located on the front of the TV.
2- To switch on the TV from stand-by mode
either:
Press the , button on the remote control or on the right side of the TV
or.
press a digit button on the remote control so
that a programme number is selected,
or,
or
buttons on the right
Press
side of the TV or on the remote control, so
that last switched off programme is selected.
By either ways the TV will switch on and the
power lamp will become green.
To switch the TV off
Press the , button on the remote control or on the right side of the TV, so the TV
will switch to stand-by mode and the power
lamp will become red.
NOTE: To switch the TV off completely remove the mains plug from the socket.
2.
The IDTV will automatically tune to the UHF
transmission channels 21 to 68 looking for
digital terrestrial TV broadcasts and displaying the names of channels found. This process will take about five minutes. To cancel
searching, you can press MENU button at
any time during the process.
HINT: Depending on the reception conditions in your particular area, you may find that the list of channels found
includes one or more repeated names. This is because the
receiver may detect and store some channels, including
those it cannot receive clearly, from adjacent areas alongside the strong channels from a transmitter nearby. This is
not a problem and the weaker channels can be deleted
from the receiver later, as described in - Edit PR List on
page 23.
2. When the automatic search has finished, the EDIT PR LIST menu appears.
If you want to, you can now edit the
programme numbers (PR) using the EDIT
PR LIST function. For details, see Edit PR
List on page 23.
If you do not want to edit programme numbers (PR), go to the next step.
3. Press the MENU button.
The EDIT PR LIST menu disappears and
the following message appears.
Step 7: Initial settings
'R\RXZDQWWRVHDUFKIRU
DQDORJXHFKDQQHOV"
When the TV is first turned on, it goes into
the initial settings mode. Follow the instructions on the screen display to make the initial settings.
Note: If the TV does not go into the initial settings mode
this is because your TV has already been turned on for
the first time. (Perform the initial settings with INSTALLATION (see page 25) in the DTV menu and AUTO STORE
(Analogue) (see page 32) in the PROGRAM menu.)
Because this is the first time that IDTV has
been used, there are no channels stored in
the memory and below information will be
displayed on the screen.
1. Press the [OK] button to start the automatic search.
<HV
1R
If you select Yes, Analogue terrestrial
broadcasting AUTOMATIC PROGRAMMING
SYSTEM (A.P.S.) window is displayed.
$XWR3URJUDP
3OHDVH&KHFN$QWHQQD&DEOH
$XWR3URJUDPPLQJ6\VWHP
/DQJXDJH
(QJOLVK
&RXQWU\
8.
2.&DQFHO
To cancel APS before starting, press BLUE
button.
- 14 ENG-20710W-17MB16P-1895UK-(LT-20DA6SK)-50076128.p65
14
18.10.2005, 08:39
First of all choose the Language which the
menus of the analogue part of the TV will appear. As soon as you change the language,
the menu items will be displayed in the selected language. By pressing the or
button, come to the Country item and
select the country. This will affect the sort
process in APS. Press RED button to start
A.P.S.
After APS is finalized, a programme list will
appear on the screen. In the programme list
you will see the programme numbers and
names assigned to the programmes.
If you press the BLUE button at any time
while the A.P.S. is running, the A.P.S. will be
ended.
If you do not accept the locations and / or the
programme names of programmes, you
can change them in Program menu. For details see PROGRAM menu on page 32.
If you do not have a T-V LINK compatible
VCR, press MENU button to exit the menu.
If you have a T-V LINK compatible VCR con
nected to the EXT-2 terminal, press
button to display T-V LINK menu. Then follow the operating procedure Downloading
data to VCR in the following T-V LINK section.
Megalogic (A trademark of Grundig Corporation)
SMARTLINK (A trademark of Sony Corporation)
Downloading data to VCR:
The VCR will automatically download the
registered data on the TV channels from the
TV. This means you do not need to set up
the programme channels on your VCR
manually.
The T-V LINK menu will be displayed when
you press the button while PROGRAM
menu is displayed.
If you do not have a T-V LINK compatible VCR,
select Cancel and press or OK button to
exit the menu.
Press or OK button to start downloading data to VCR. TRANSFER is displayed
in the menu.
T-V LINK
When a T-V LINK compatible VCR connected to the EXT-2 terminal on the TV, it is
easier to set up the VCR and to view videos.
T-V LINK uses the following features:
If FEATURE NOT AVAILABLE is displayed,
download was not performed correctly. Before trying to download again, check that:
To use T-V LINK functions
The VCR is T-V LINK compatible.
A T-V LINK compatible VCR means a JVC
video cassette recorder with the T-V LINK
logo, or with one of the following logos. For
details see your VCR instruction manual.
Q-LINK (A trademark of Panasonic Corporation)
Data Logic (A trademark of Metz Corporation)
Easy Link (A trademark of Philips Corporation)
The VCR power is turned on.
The VCR is connected to EXT-2.
The scart cable is fully wired.
Direct REC:
You can easily record to VCR the images
that you are watching on the TV. For details,
read the manual for your VCR. Use your
VCR controls you can not carry out Direct
REC using your TV control.
When the VCR is not ready (For example
when there is no tape inserted), NO RECORDING is displayed.
- 15 ENG-20710W-17MB16P-1895UK-(LT-20DA6SK)-50076128.p65
15
18.10.2005, 08:39
When you press the following buttons (
, TV / DTV, ZOOM,
,
/ I,
, AV, MENU,
, BACK,
/
,
SUBTITLE, GUIDE,
number buttons) during recording, a message appears asking if you want to stop
recording or not. Press OK button to stop
recording or BLUE button to continue recording.
Do not turn the TV off in the following
cases:
When recording images from an external
device connected to TV (For example
camcorder).
When recording a TV channel after it has
been unscrambled on a decoder.
When recording a TV channel by using the
TVs output because the VCRs own tuner
can not properly receive that channel.
When recording Digital terrestrial broadcasting (DVB-T).
TV autopower on/VCR image view:
When the VCR starts playing, the TV automatically turns on and images from EXT-2
appear on the screen.
This function does not happen if your TVs
main power is turned off. Set your TVs main
power to on (StandBy Mode).
Basic Operations
You can operate your TV using both the remote control and TV buttons.
Operation with the buttons on the
TV
Switching input mode
Pressing TV/AV/OK button will change the
input mode.
Entering Main Menu
Press MENU button to enter Main menu. In
the Main menu select submenu using
or
button and enter the sub
menu using
- /
+ or TV/AV or
MENU/OK button. To learn the usage of the
menus, refer to the Menu System sections.
Operation with Remote Control
The remote control of your TV is designed to
control all the functions of the model you selected. The functions will be described in accordance with the menu system of your TV.
Functions of the menu system are described in following sections.
Volume Setting
+ button to increase volume.
Press
Press
- button to decrease volume. A
volume level scale (slider) will be displayed
in the middle at the bottom of the screen.
Programme Selection (Previous or next
programme)
Press
button to select the previous
programme.
button to select the next
Press
programme.
Programme Selection (direct access):
Volume Setting
- button to decrease volume or
Press
+ button to increase volume, so a vol
ume level scale (slider) will be displayed at
the middle of the bottom on the screen.
Programme Selection
button to select the next pro Press
gramme or
button to select the previous programme.
Press digit buttons on the remote control to
select programmes between 0 and 9. TV
will switch to the selected programme. To
select programmes between 10 - 99, press
the digit buttons consecutively which
programme you want to select (eg. for
programme 27, first press 2 and then 7).
When it is late to press second digit button
only the first digit programme will be displayed. The limit of the delay time is 3 seconds.
- 16 ENG-20710W-17MB16P-1895UK-(LT-20DA6SK)-50076128.p65
16
18.10.2005, 08:39
Example: PR6
and 2.
press 6, PR12
press 1
Press directly the programme number to
reselect single digit programmes.
Hint: The channel list numbers are assigned by the
broadcasters. Because not all channels are broadcast
free-to-air and stored by the receiver, the channel list
numbers do not run continuously. The fifteenth channel in
the list, for example, may not be channel number 15 but
channel number 17.
Hint: If you enter a number which does not correspond to
a stored channel, the next valid channel number is selected instead. If you enter a number greater than the
highest numbered channel in the channel list, the IDTV
will select the last channel in the list.
Operating while watching
IDTV
Pressing the TV/DTV button at any time
while watching television programmes will
switch the TV set between displaying the
digital terrestrial television broadcasting and
its normal analogue broadcasting.
It is also used to switch to the last watched
mode (TV or DIGITAL TV) from the EXT
mode. For example; if a DVD player is connected with a SCART cable and powered
on, then the IDTV will automatically switch to
EXT mode. The IDTV will switch to the last
watched mode (TV or DIGITAL TV) if DVD
player is switched off or TV/DTV button is
pressed.
EVERYDAY OPERATION
While using the IDTV to the full, there are
great many buttons to use in different situations. Many of the menu screens displayed
by the IDTV have reminders as to which button do what, at the base of the screen. In addition, many screens have further help available which is displayed when the
button
is pressed, as prompted at the bottom right
of the screen.
OVER AIR DOWNLOAD
Over Air Download (OAD): To ensure that
your IDTV always has the most up-to-date
information. Please ensure that after use it
is set to its standby mode. At 3AM each day,
the IDTV automatically searches for any new
information which may be broadcast and will
download this to your IDTV automatically.
This operation will normally take approximately 30 seconds.
If you want to do this, you need to set Automatic Download to Enabled in Receiver
Upgrade setting. For details see page 23.
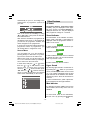
INFORMATION BANNER
Whenever you change channel, using the
/
buttons or the number buttons,
an information banner is displayed at the
bottom of the screen. This will remain on the
screen for approximately three seconds. The
information banner can also be displayed at
any time while watching TV by pressing the
button on the remote control. Pressing
the
button again removes the banner.
Hint: Not all channels broadcast the programme
data. If the name and times of the programme is
not available then No Information is displayed
in the information banner.
The information banner gives a number of
facts on the channel selected and the
programmes on it. The name of the channel
is displayed, along with its channel list number and an indication of the strength of the
signal received on this tuning channel.
The name and the start and finish time of
the programme currently showing on the selected channel are given, and the current
time.
Icons are also displayed in the information
banner and if this channel is a favourite
channel.
favorite channel icon
If the selected channel is locked, you must
enter the correct four digit code to view the
channel.
- 17 ENG-20710W-17MB16P-1895UK-(LT-20DA6SK)-50076128.p65
17
18.10.2005, 08:39
Choosing Channel
1. Press or
the channel.
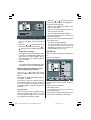
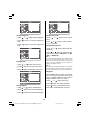
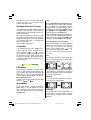
ELECTRONIC PROGRAMME GUIDE (EPG)
Another way of selecting a channel is with
the electronic programme guide, or EPG.
Like the Channel List, the EPG screen displays a list of the stored channels along with
information on what programmes are being
broadcast.
Using the Electronic Programme Guide
EPG can display 7 days programme guide,
but in some areas only current and next
programme guide is displayed.
buttons to choose
2. Press OK button.
The selected channel is displayed.
Programme Reminders
You can easily set the reminder so that you
will not miss the programme you want to
watch.
1. Press or
the channel.
buttons to choose
2. Press the Red and Green buttons to
change the time and Yellow and Blue buttons to change the date.
By using EPG, you can select the channel
and set the reminder for the programme
which you do not want to miss.
3. Press or buttons and then
or buttons to choose the
programme you want to watch.
To display the EPG screen, press the
GUIDE button while watching Digital terrestrial broadcasting.
4. Press the OK button.
You can exit the EPG screen by pressing the
GUIDE button again or the MENU button.
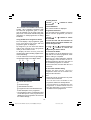
M N
O
P
The reminder icon will be displayed on the
right side of the chosen programme name
and the setting is completed.
When the TV is being watched, it automatically changes to the channel of the reminded programme when the start time of
the scheduled programme is reached.
This function does not work when the TV is
turned off.
To cancel the reminder setting
Display the EPG screen, choose a
programme which has the reminder icon,
and press the OK button.
Q
M Current date and time
N Channel listings
O Selected date and time
P Programme name and broadcast time
Q Brief description of the programme
Note:
Reminder events are ignored if any timer
event is active at that time.
You can not set the reminder for the
programme which has already started.
No Information is displayed for the
programme or channel which does not
have any information. You can not set the
reminder for these programmes.
The programme name, broadcast time and
a brief description of the programme are
displayed for the programme chosen from
the channel listings.
- 18 ENG-20710W-17MB16P-1895UK-(LT-20DA6SK)-50076128.p65
18
18.10.2005, 08:39
DISPLAYING THE SUBTITLES
With Digital terrestrial broadcasting (DVB-T),
some programmes are broadcast with subtitles. Subtitles can be displayed when
watching these programmes.
Press the SUBTITLE button when watching
Digital terrestrial broadcasting (DVB-T).
Subtitle ON appears at the top-left of the
screen and, if programme has subtitles,
the subtitles are displayed.
When the SUBTITLE button is pressed
again, Subtitle OFF appears and the subtitles disappear.
The aspect ratio when watching a channel
with just digital teletext broadcasting is the
same as the aspect ratio of the picture
watched previously.
(Text) button while
When you press the
subtitles are on, the subtitles are turned off.
(Text) button again,
When you press the
the digital teletext screen is displayed.
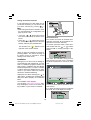
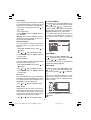
DTV Menus
The DTV menu can only be shown when
watching Digital terrestrial broadcasting. To
display the DTV menu, do the following:
1. Press MENU button.
The menu appears.
6XEWLWOH21
0HQX
6XEWLWOH2))
3LFWXUH
6RXQG
)HDWXUH
DIGITAL TELETEXT
',*,7$/
6RXUFH
With Digital terrestrial broadcasting (DVB-T),
in addition to pictures and sound, you can
also watch digital teletext.
Digital teletext is sometimes broadcast at
the same time as normal broadcasting.
1. Press the
2. Choose DIGITAL and press the OK button.
The DTV menu appears.
'79
button.
7LPHUV
The digital teletext information appears.
&RQILJXUDWLRQ
(GLW35/LVW
2. Operate it with the colour buttons,
/ /
/
,QVWDOODWLRQ
buttons and OK button.
&RPPRQ,QWHUIDFH
The operation method may differ depending
on the contents of the digital teletext.
Follow the instructions displayed on digital
teletext screen.
When Press SELECT or similar message appears on the screen, press the OK
button.
(Text) button is pressed, the
When the
TV returns to television broadcasting.
With Digital terrestrial broadcasting (DVBT), in addition to digital teletext broadcasting
at the same time as normal broadcasting,
there are also channels with just digital teletext broadcasting.
Timers (DTV Timer Recording)
By setting the timer, you can record a Digital
terrestrial broadcasting (DVB-T) programme
with a VCR connected to EXT-2 while you
are out.
Before using DTV timer recording, the VCR
and TV must be connected correctly. For
details, see T-V LINK on page 15.
When you have a T-V LINK compatible VCR
connected to Ext-2, all you need to do is set
the TV timer settings and the programme
will be recorded.
By using Direct Rec of the T-V LINK function, the Direct Rec commands are sent
- 19 ENG-20710W-17MB16P-1895UK-(LT-20DA6SK)-50076128.p65
19
18.10.2005, 08:39
from the TV to the VCR to automatically start
and end the recording. It is not necessary to
set the timer on the VCR.
7+5((
When your VCR is not T-V LINK compatible,
you also need to set the VCR timer settings
to match the TV timer settings.
The recording may not start and stop at exactly the right times for some programmes.
It is recommended that you allow some leeway when setting the recording times.
e
7+5((
f
Provided that the days and times are not the
same, you can set up to ten timer settings.
When subtitles are ON, the subtitles displayed with the broadcast will be recorded.
When you do not want to record the subtitles, you need to turn OFF the subtitles settings beforehand ( See Displaying the subtitles on Page19).
During DTV timer recording, you are unable
to view the DTV menu.
1. Choose Timers and press the OK
button.
3. Use the / buttons, number
buttons and OK button to set the timer.
When setting the start time and end time, input 1200 for 12:00 PM, 1500 for 3:00 PM
and 0000 for 12:00 AM.
Name:
Use the / buttons to choose the
channel for which the timer is to be set.
Press the button.
The TIMER MENU appears.
Start:
Set the timer start time with the number buttons.
7+5((
When the / buttons are pressed, the
input position moves.
Press the button.
End:
Set the timer end time with the number buttons.
When the BACK button is pressed, the previous screen is returned to.
2. Press / buttons to choose
the timer number, and then press the OK
button.
The timer setting window appears.
When the / buttons are pressed, the
input position moves.
Press the button.
Date:
Set the date for the timer to work with the
numbers.
When the / buttons are pressed, the
input position moves.
Press the button.
- 20 ENG-20710W-17MB16P-1895UK-(LT-20DA6SK)-50076128.p65
20
18.10.2005, 08:39
Mode:
cording before you record the programme.
There are some T-V LINK compatible recording device that will not correctly receive
the Direct Rec command from the TV.
Use the / buttons to choose the
timer mode (Once/Daily/Weekly), and then
press the OK button.
If the recording device does not operate
when the recording start time is reached, it
means VCR is not receiving the Direct Rec
command from the TV. In this case, follow
the instructions of When recording on a T-V
LINK incompatible VCR:.
4. Prepare your VCR for recording
When recording on a T-V LINK
compatible VCR:
1. Insert the videotape for recording into the
VCR and set the recording mode.
2. Make sure the VCR is ready to receive Direct Rec commands from the TV.
3. Make sure VCR timer settings do not coincide with the TV timer settings.
For details, see your VCR instruction
manual.
When recording on a T-V LINK
incompatible VCR:
1. Insert the videotape for recording into the
VCR and set the recording mode.
2. Set the VCR recording timer settings.
3. Make sure that the start and end time
match with the TV timer.
While the timer is in operation:
You can turn the TV on or off (Stand by).
WARNING: Do not turn off the main power.
You can watch analogue terrestrial broadcasting channels or the pictures via an Ext
terminal.
Please note that any programme information that appears on the screen, such as
when making changes to the Digital terrestrial broadcasting (DVB-T) channel picture,
will be superimposed over the picture in the
VCR recording.
When you press the following buttons (
4. Set the VCR to record the signal from the external input that the TV is connected to.
For details, see your VCR instruction
manual.
When you have finished the step 4, you have
set the timer.
,
AV, MENU, SUBTITLE, GUIDE,
, BACK,
/
, number buttons) during recording, a message appears asking if you
want to stop recording or not. Press OK
button to stop recording or BLUE button to
continue recording.
Cancelling the timer setting
When you are not watching TV, make sure
the TV is in stand by.
Display the TIMER MENU and press the
/ buttons to choose which timer
WARNING :
setting to cancel. Press the / buttons so that Inactive appears in the Mode
column.
Do not turn off the main power. The timer
function will not work with the main power
switched off.
The TV power lamp begins flashing before
the timer start time. When you are watching
TV at that time, a message appears on the
screen to inform you the timer is about to
start.
Reactivating the cancelled timer
setting
Display the TIMER MENU and press the
/ buttons to choose which timer
setting to reactivate. Press the /
buttons so that Active appears in the
Mode column.
When performing timer recording with a T-V
LINK compatible device, test the timer re- 21 ENG-20710W-17MB16P-1895UK-(LT-20DA6SK)-50076128.p65
21
18.10.2005, 08:39
Configuration
Set the basic setting when watching Digital
terrestrial broadcasting (DVB-T).
1. Press the
Subtitle.
/
buttons and choose
Choose configuration and press the OK button.
2. Press the / buttons and choose a
subtitle language that appears when the
SUBTITLE button is pressed.
CONFIGURATION appears.
Favourite Mode
e
Enable/disable the Edit PR List Favourites
settings.
f
1. Press the /
Favourite Mode.
buttons and choose
/
buttons and choose
2. Press the
ON or OFF.
On:
The Edit PR List Favourites settings are
enabled.
/
button is pressed,
When the
only the channels chosen in the Edit PR
List favourites (those with the icon) can be
chosen.
When the BACK button is pressed, the previous screen is returned to. When MENU button is pressed, the menu disappears.
When the
(Information) button is
pressed, the help screen appears. When it
is pressed again, the previous screen is returned to.
For details on how to set your favourite
channels, see Setting the favourite channels on page 25.
Off:
Audio Language
The Edit PR List Favourites settings are
disabled.
With Digital terrestrial broadcasting (DVB-T),
a number of languages can be broadcast at
the same time. Choose language you want
to listen when watching these broadcasts.
/
button is pressed,
When the
all the channels registered in the Edit PR
List can be chosen.
1. Press the /
Audio Language.
buttons and choose
2. Press the /
the language.
buttons and choose
Set the method to upgrade the Digital terrestrial broadcast (DVB-T) receiver software.
Language changes every time the button
is pressed.
1. Press the / buttons and choose
Receiver Upgrade, and press the OK button.
If the selected language is not broadcast, the
default language will be played.
Receiver Upgrade
The setting window appears.
Subtitle Language
With Digital terrestrial broadcasting (DVB-T),
a number of subtitles can be broadcast at
the same time. Choose the subtitle you want
to display when watching these broadcasts.
- 22 ENG-20710W-17MB16P-1895UK-(LT-20DA6SK)-50076128.p65
22
18.10.2005, 08:39
1. Press the / buttons and choose
Enter PIN code, and press the OK button.
2. Input the current PIN code.
When you are making this setting for the
first time, input 0000.
When a PIN code has already been set,
enter the correct PIN code.
$XWRP DWLF' RZ QOR DG
(QDEOHG
The PIN code setting window appears.
6HDUFKIRU1H Z9HUVLRQ
3. Press the number buttons to input a new
PIN code (password).
The actual version may be different to the
Receiver Upgrade version displayed
above.
2. Press the
/
Pin code is changed appears.
Your newly chosen PIN code is now set.
You will now need to use the PIN code
(password) you choose. Here to lock or to
unlock the Edit PR Lists Lock.
buttons and choose
Automatic Download, and press the
4. Input the new PIN code (password) again
in the Confirm box.
or
buttons to choose Enable and Disable.
Enable (factory settings):
Edit PR List
The Digital terrestrial broadcasting (DVBT) software is automatically updated every
day at 3:00 am. When enabled, the TV
also searches for new software whenever
it goes to standby.
Choose Edit PR List and press the OK button.
EDIT PR LIST appears.
Disable:
The Digital terrestrial broadcasting (DVBT) software is not automatically updated.
Manually updating the Digital terrestrial
broadcasting (DVB-T) information
Press the / buttons and choose
Search for New Version, then press the OK
button.
The Digital terrestrial broadcasting (DVB-T)
information is updated.
In the future, there is a possibility that Receiver Update function may also be able to
be used to update the Digital terrestrial
broadcating (DVB-T) software and add new
functions.
Enter PIN code
Choose Enter PIN code to change the PIN
code for the Edit PR List menus Lock. The
PIN code factory setting (how it is set when
you purchase the television) is 0000.
The Edit PR List can be used to do the following:
delete registered channels
edit channel names.
lock channels so that they can not be
watched by children.
set Favourites so that you can easily choose
from only the channels you often watch.
- 23 ENG-20710W-17MB16P-1895UK-(LT-20DA6SK)-50076128.p65
23
18.10.2005, 08:39
Sometimes you may notice a drop in picture
quality while watching your programme in
the quarter-screen. This is not a fault.
When the BACK button is pressed, the previous screen is returned to. When the TV/DTV
or MENU button is pressed, the menu disappears.
When the
(information) button is
pressed, the help screen appears. When it
is pressed again, the previous screen is returned to.
Here, you can preview any channel stored by
the receiver before viewing it full screen. The
complete list of channels is displayed in
pages of 11 channels at a time, with their
channel list number and a favourite channel
icon if appropriate.
Choosing a channel
The chosen channel is shown on the quarter-screen.
1. Press the / buttons and choose
Select on the bar at the bottom of the screen.
2. Press the / buttons and choose a
channel, and then press the OK button.
Editing a channel name
1. Press the / buttons and choose
Edit Name on the bar at the bottom of the
screen.
2. Press the / buttons and choose
the channel to be edited, and then press the
OK button.
The EDIT window appears.
3. Press the
/
buttons and choose
a character, press the / buttons to
move the cursor and edit the name, and
then press the OK button.
The edited channel appears in the Edit
PR List.
Locking a channel
When there is a channel you do not want
your children to watch, you can lock the
channel.
1. Press the / buttons and choose
Lock on the bar at the bottom of the screen.
2. Press the / buttons and choose
the channel to be locked, and then press
the OK button.
The Enter PIN code input window appears.
The picture of the chosen channel is
shown on the quarter-screen.
Deleting a channel
1. Press the / buttons and choose
Delete on the bar at the bottom of the
screen.
3. Press the number buttons to input to correct PIN code.
2. Press the / buttons and choose
the channel to be deleted, and then press
the OK button.
The channel deletion confirmation window appears.
3. Choose Yes and press the OK button.
The chosen channel is deleted.
If you do not want to delete the chosen
channel, choose NO and press the OK
button.
Perform Installation (see page 25) to
re-register a channel that you have deleted.
If you have not changed the PIN code in
the CONFIGURATION menus Enter PIN
Code (see page 23), input the PIN code
you chose.
The lock icon appears next to the channel
name in the Edit PR List.
When a locked channel is chosen, the Enter PIN code input window will appear. If
the correct PIN code is input, the picture
appears.
When you forget the PIN code for the
Lock, you can unlock locked channels by
performing Automatic Search (see INSTALLATION ).
- 24 ENG-20710W-17MB16P-1895UK-(LT-20DA6SK)-50076128.p65
24
18.10.2005, 08:39
Setting the favourite channels
If only channels that you often watch are set
as favourite channels, you can choose from
/
just those channels by pressing
.
After setting the favourite channels, check
the Favourite Mode in Configuration (see
page 22) is set to ON.
1. Press the / buttons and choose
Favourites on the bar at the bottom of the
screen.
2. Press the / buttons and choose
the channel to be registered as a favourite
channel, and then press the OK button.
The favourite icon (
) appears on the
right side of the chosen channel.
Automatic Search:
The receiver can search for channels automatically (searching all the broadcast frequencies for free-to-air channels).
To perform Automatic search, Select Automatic Search with the or buttons
and press OK. A warning message is displayed.
When you leave the Channel List screen, by
pressing MENU the channel showing on
the quarter screen is selected for normal
viewing on the whole screen.
Installation
Although your TV will not lose its settings or
stored channels when switched off, you may
wish to re-install the programs because you
have moved to a different area with different
broadcast frequencies, you wish to reinstate
a channel previously deleted from the channel list, or you want to watch new channels
which have started broadcasting.
6WDUWDXWRPDWLFVHDUFK"&XUUHQW35OLVW
ZLOOEHUHSODFHG
<HV
1R
This starts the automatic tuning process
and searches through all the available
broadcast frequencies for free-to-air channels.
Display the DTV Menu and using the or
buttons, highlight the Installation line
and press OK to display the Installation
Menu.
The Installation menu appears.
0(18
You can either select Factory Settings, effectively resetting the receiver to its factory setting condition, or just search for channels.
%$&.
Previous channels will be replaced on automatic search.
If no digital terrestrial television broadcasts
are found, the TV will display a message:
1RSURJUDPPHIRXQG
3OHDVHFKHFNDQWHQQDVLJQDO
2.
- 25 ENG-20710W-17MB16P-1895UK-(LT-20DA6SK)-50076128.p65
25
18.10.2005, 08:39
When OK button is pressed, following
message will appear on the right bottom
side of the screen:
warning screen is displayed in case of accidental operation.
$UH\RXVXUH\RXZDQWWRGHOHWHWKH35OLVW
DQGUHVHWDOOVHWWLQJV"
35/LVW(PSW\
Manual Search:
This is for searching for digital channels on
a single broadcast frequency. The frequency
channel number (21-68) is entered in the
box at the top left of the screen and the received signal level and signal quality can be
observed on the two bar graphs at the bottom. When OK is pressed, the TV searches
that frequency and display a list of the channels found.
<HV
1R
Highlight the YES button with the or
key and press OK to erase all the channels
and settings. A message will be displayed
on the screen.
35/LVW(PSW\6WDUWDXWRPDWLFVHDUFK 2.
Press the OK button to start the automatic
search.
When the automatic search has finished, the
EDIT PR LIST menu appears.
Common Interface
It is required to subscribe to a pay channel
company to view the pay channels of the
Digital Terrestrial broadcasting.
Hint
The bar graphs of signal quality and signal
level give a good indication of whether any
channels are likely to be found. If only the
signal level graph shows a high value then
it is likely that an analogue channel occupies that broadcast frequency. If the signal
quality bar is high as well then it is a digital
frequency and digital channels will probably be found.
Again, channels which duplicate those already in the channel list are ignored. However, the manual channel search will find all
channels on the broadcast frequency.
When either search is finished, press the
MENU key to return to normal broadcast
viewing, to watch the new digital terrestrial
television channels found.
Factory Settings:
Obtain the Conditional Access Module
(CAM) and the Viewing card by subscribing
to a pay channel company, then insert those
to the Television using the following procedure.
1. Switch off the TV and unplug from the
mains.
2. Insert the CAM, then Viewing Card to the
slot that is located in the terminal cover at
the left-hand side of the TV (from front
view).
The CAM should be correctly inserted, it is
impossible to insert fully if reversed. The
CAM or the TV terminal may be damaged if
the CAM is forcefully inserted.
3. Connect the TV to the mains supply,
switch on and then wait for few moments until the card is activated.
Some CAMs may require the following set
up. Please set the CAM by entering the DTV
menu, Common Interface then pressing OK
button. (CAM set up menu is not displayed
when it is not required.)
To reset the TV, highlight the Factory Settings line in the menu and press OK. A
- 26 ENG-20710W-17MB16P-1895UK-(LT-20DA6SK)-50076128.p65
26
18.10.2005, 08:39
To see the viewing contract information,
press MENU, Select DIGITAL and Press OK,
then Select Common Interface and press
OK.
Press MENU button again to remove menu.
Picture Menu
When no module is inserted, No CI Module appears.
Press MENU button, now you are in main
menu. In the Main menu, select Picture
using or button, then enter the Pic-
Refer to the module instruction manual for
details of the settings.
ture menu by pressing / or OK button.
Setting The TV
Setting Mode
Menu System
Your TVs analogue part has been designed
with a menu system to provide an easy manipulation of a multi-function system. The TV
is controlled by choosing the commands,
which are displayed on the screen.
As you enter the picture menu, Mode will be
the first item.
By pressing or button you may
choose one of these options:
Soft, Standard and Bright.
MAIN MENU
Press the MENU button. The main menu
will be displayed in the middle of the screen.
Setting Contrast
Using
To select a sub-menu use
or
but-
ton, and press or button or directly
press OK button.
or
button select Contrast.
Press button to increase contrast level.
Press button to decrease contrast level.
In EXT-1, EXT-2 and EXT-4 modes, main
menu appears the same as in TV mode but
without Program sub-menu.
In EXT-3 mode, Main Menu appears as follows:
0HQX
3LFWXUH
6RXQG
)HDWXUH
Setting Bright-1
,QVWDOO
6RXUFH
+ .K] 9+]
In DIGITAL TV mode, DIGITAL will appear on
the Main menu. Install and Program do not
appear.
Using
or
button select Bright-1.
Press
button to increase brightness.
Press
button to decrease brightness.
Menu does not disappear automatically if it
is left on the screen.
- 27 ENG-20710W-17MB16P-1895UK-(LT-20DA6SK)-50076128.p65
27
18.10.2005, 08:39
Setting Sharpness
Setting Colour Temp.
Using
or
button select Sharpness.
Press
level.
button to increase sharpness
Press
level.
button to decrease sharpness
or
Using
Temp.
button select Colour
Press or button to select Warm,
Cool or Normal.
Setting Noise Reduction
Using or
duction.
button select Noise Re-
Press or button to select Noise Reduction level Off or Minimum or Medium or Maximum.
Note 1:
At low signal level, the changings on the Noise Reduction
function are not effective when there is menu on the
screen. If the menu is removed, the effect of this function
is seen. At normal broadcasting, Noise Reduction
changings are effective at once.
Setting Colour
Using
or
Press
button to increase colour level.
Press
button to decrease colour level.
button select Colour.
Note 2:
At moving pictures, while Noise Reduction is at maximum
level, some picture distortions may occur. If Noise Reduction is set to medium or minimum, the picture will improve.
Setting Hue
During Playback NTSC system, this will appear in AV mode only when NTSC video
source is applied. Otherwise, HUE option is
invisible in Picture menu in TV mode :
Using
or
button select Hue.
Press button to increase hue level.
Setting Bright-2
Press button to decrease hue level.
Using
or
button select Bright-2.
Press
button to increase the back light.
Center value is indicated with one arrow.
Press button to decrease the back light.
- 28 ENG-20710W-17MB16P-1895UK-(LT-20DA6SK)-50076128.p65
28
18.10.2005, 08:39
Reset
Setting Balance
Press BLUE button to reset the picture
modes to factory default settings.
It allows adjusting the distribution between
the left and right speakers.
To Store the Settings
Using
or
In the Picture Menu, all settings are stored
automatically.
Press
ward.
button to change balance right-
Sound Menu
Press
ward.
button to change balance left-
As you enter the main menu, sound will be
the second item. In the main menu, select
Sound using or button, then enter
the sound menu by pressing
OK button.
/
or
As you enter the sound menu, Volume will
be the first selected option.
button to increase volume.
Press
button to decrease volume.
Hyper Sound
Using
Sound.
or
button select Hyper
Pressing or button will turn on or off
this feature.
Setting Volume
Press
button select Balance.
Or you can directly change the volume set+ (to increase) or (to
tings using
decrease) button.
Pseudo/spatial effect can be turned on or off
via the Hyper Sound item in the Sound
menu or by remote control. In Mono transmission the left and right channels will be
added at left channel and dummy stereo effect will be introduced to end-user.
In stereo transmission it yields a phase difference between left and right channels.
To Change Audio Out Settings
Audio Out is a sub-menu of Sound menu.
Use this settings to adjust volume for audio
out terminal which is located at the right side
of the TV.
Using
or
button select Audio Out.
Press or button or directly press
OK button on Audio Out, to enter the Audio
Out menu.
Setting Bass Level
Using
Level.
or
button select Bass
Press
button to increase bass level.
Audio Out Volume
Press
button to decrease bass level.
As you enter the Audio Out sound menu,
Volume will be the only option.
Setting Treble Level
Using
or
Press
button to increase treble level.
Press
button to decrease treble level
button select Treble
Press
button to increase volume.
Press
button to decrease volume.
- 29 ENG-20710W-17MB16P-1895UK-(LT-20DA6SK)-50076128.p65
29
18.10.2005, 08:39
Selecting Sound Mode
or
Using
Mode.
Press
Mode.
or
Using
or
button select Child Lock.
button select Sound
Press / button to select Child Lock
On or Off .
button to change Sound
The Child Lock feature can be set On or Off
You can choose Mono, Stereo or Dual
(I-II) mode, only if the selected channel supports that mode.
In case of bilingual broadcast (Dual Sound),
you can select original or dubbed language
using mode option. So when somebody listens to the original language from the loudspeakers, somebody else can listen to the
dubbed language from headphone.
To Store The Settings
In the Sound Menu, all settings are stored
automatically.
Feature Menu
Press MENU button, now you are in
mainmenu. In the main menu, select Feature using or button. Then enter
by / button. When Off is selected,
there will be no difference in the operation of
your TV. When On is selected, the TV can
only be controlled by the remote control. In
this case the control panel buttons except
button on the right side of the TV will not
work.
Selecting Menu Language
Using
or
Press or
language.
button select Language.
button to select menu
EXT-2 Output
From EXT-2 Output; TV, EXT-1, EXT-4 or
DIGITAL can be given. These modes can be
chosen by pressing
EXT-2 OUTPUT.
or
button on
the Feature menu by pressing / or
OK button.
Blue Back (During No Signal)
Sleep Timer
The Sleep Timer is used to turn the TV off
after a defined period of time after selecting
this item. The timer can be programmed between Off and 120 minutes in steps of 10
minutes. (Off, 010, 020, 030, 040, ... , 120)
If sleep timer is activated, at the end of the
selected time, the TV goes automatically to
stand-by mode.
Child Lock
You can use this feature to prevent children
turning the TV on/off or changing
programmes or adjustments etc. without remote control.
The Blue Back Feature can be set by
button to either On or Off.
To Store Settings
In Feature menu all settings are stored automatically.
Install Menu
Press MENU button, now you are in main
menu. In the main menu, select Install using or button. Then enter the Install
menu by pressing / or OK button.
- 30 ENG-20710W-17MB16P-1895UK-(LT-20DA6SK)-50076128.p65
30
or
18.10.2005, 08:39
Selecting Fine Tuning
You can use the Fine Tuning process for
fine adjustment (after coarse adjustment), if
you are not happy about the image on the
screen.
Use or button on Fine Tuning item,
until getting the best image on the screen.
Selecting Search
In EXT mode, Install menu appears like
this:
To start the search process, press button for forward search or button for backward search. If a signal is found or reaches
to end of the band after searching, press
or buttons to continue search process. To stop the search process when you
You can change only Colour system and
VCR.
Selecting Programme
want, press or buttons at any time.
Decoder (EXT-2)
button select
You can use this mode to connect any decoder to your TV.
To select programme number, you can use
Press the or buttons to set it On
or Off.
or
Using
Programme.
/ button or Digit Buttons.
When you select Decoder (EXT-2) On,
EXT-2 output will be chosen as TV mode
only and any scrambled channels will be unscrambled through decoder connected your
TV via EXT-2 output.
Selecting Band
Band, can be chosen either,
C or S by or button.
Selecting Channel
Setting VCR ( Video Cassette Recorder )
Mode
Channel can be changed by or button or by Digit Buttons.
This item can be seen in TV, EXT-1, EXT-2,
EXT-2S, EXT-3, EXT-4 and EXT-4S modes.
Selecting Colour System
If you want to watch a VCR source from one
of these modes, then it will be better to set
VCR mode On. For this, while the cursor is
Using or button on Colour System,
you can change the colour system to PAL,
SECAM or Auto.
Note: In EXT mode, you can choose NTSC
3.58 and NTSC 4.43 as well.
Selecting Sound System
Using or button on Sound System,
you can change the standard to BG, DK, I, L,
Lp.
on this item press the or buttons to
set it On.
If you want to watch a DVD, then you must set
this item off; because DVD is not a source
like a VCR and to see the picture better, you
must set the VCR mode Off.
To Store Settings
Press / or OK button on Store option to store Install menu settings.
- 31 ENG-20710W-17MB16P-1895UK-(LT-20DA6SK)-50076128.p65
31
18.10.2005, 08:39
After stored, T-V LINK menu will appear. If
you do not need to do T-V LINK, select Cancel and press
menu.
or OK button to exit the
Program Menu
If you do not have a T-V LINK compatible VCR,
Press "MENU" button, now you are in main
menu. In the main menu, select Program
using or button. Then enter the
To give a channel name (Name):
select Cancel and press or OK button to
exit the menu.
Programme menu by pressing / or
OK button.
1. Choose the channel you want to give a
channel name.
Note: There is no Program menu in any EXT
modes.
2. Press the RED button to enter the Name
mode.
3. Press or button to choose the
position,and press or button to
choose each character of channel name.
4. Press the RED button to store the channel
name.
To cancel the Name mode, press the BLUE
button.
To delete a channel (Delete):
1. Choose the channel you want to delete.
2. Press the YELLOW button to enter the Delete mode.
Program Menu is used to delete a channel,
to change the programme number of a
channel, to give a channel name to a channel, and to start the A.P.S (Autostore) function.
To choose a channel in the PROGRAM
menu
Press / / / button. The
programme number that you choose is
high-lighted in the Program.
Caution:
Using Delete or Insert function rewrite the current
channel list in the Program menu. Therefore, the
programme numbers of some of channels will change.
When you complete the settings of
Program menu:
If you have a T-V LINK compatible VCR,
3. Press the YELLOW button to delete it.
To cancel the Delete mode, press the BLUE
button.
To change the programme number of a
channel (Insert)
1. Choose the channel you want to change
the programme number.
2. Press the GREEN button to enter the Insert mode.
3. Press / / / button to
choose new programme number.
4. Press the GREEN button to Insert the
channel to the chosen programme number.
Autostore:
To enter Autostore menu, press the BLUE
button. To learn the features of this function
see Autostore below.
press
button to display the T-V LINK
menu. then follow the operating procedure
Autostore, searches and stores all channels
Downloading the data to VCR.
- 32 ENG-20710W-17MB16P-1895UK-(LT-20DA6SK)-50076128.p65
32
18.10.2005, 08:39
automatically on your TV, according to the
transmission of programme systems in
your area.
First of all choose the Country by using
or button. Then press the Red button to start Autostore.
After Autostore is finalized, a programme list
will appear on the screen. In the program list
you will see the programme numbers and
names assigned to the programmes.
If you do not accept the locations and/or the
programme names of programmes, you
can change them in Programme menu.
Source Menu
You can switch your TV to EXT modes by
pressing directly to AV button or by selecting in source menu from the main menu.
While in EXT mode, you can also switch your
TV to TV or other EXT modes by selecting in
source menu from the main menu.
In main menu, firstly use
or
button
then use / or OK button to enter
Source menu. In source menu, move the
cursor by or button and then press
OK button or / buttons when the
cursor is on the required item. The selected
mode comes automatically on the screen.
6RXUFH79
',*,7$/
79
(;7
(;7
(;76
(;7
(;7
(;76
3&
Other Features
TV Status
Programme Number, Programme Name
(or EXT), (they are displayed on the upper
left of the screen). The sound indicator is
displayed with them too. They are displayed
after programme change for 3 seconds.
Sound Indicator
The alternatives of the indicator are Mono,
Stereo, Dual I and Dual II. This indicator is
displayed under the programme number indicator on the screen.
0RQR
In Mono broadcast or in forced-mono (for
stereo broadcast).
6WHUHR
In Stereo broadcast.
'XDO,
If dual broadcast detected. Dual I is selected
in default and also can be selected after
Dual II by Remote Control.
'XDO,,
If Dual II selected by Remote Control.
Hyper Sound
By selecting Hyper Sound in sound menu or
button on your remote
by pressing the
control, Pseudo/Spatial effect can be turned
on or off. In Mono transmission the left and
right channels will be added at left channel
and dummy stereo effect will introduced to
end-user.
In stereo transmission it yields a phase difference between left and right channels.
Mute Indicator
It is placed in the upper middle of the screen
when enabled, and it stays there until it is
disabled.
To cancel mute, there are two alternatives;
the first one is by pressing the button,
- 33 ENG-20710W-17MB16P-1895UK-(LT-20DA6SK)-50076128.p65
33
18.10.2005, 08:39
this volume is set to the preceding value,
and the second one is increasing or decreasing the volume level.
No-Signal Detection (TV mode)
If no valid signal detected, it takes 5 minutes
to switch to the Stand-By mode unless any
signal detected or any Remote Control command is accessed.
After a Remote Control command (if No-Signal Timer is active) the timer stops and if no
signal detected again the timer is initialized
to 5 minutes and starts 3 seconds later
again to count down.
It is not valid in EXT modes.
Volume Bar
It is displayed in the lower middle of the
screen. When a volume command is re+ or
- by Received (pressing
mote Control or Control panel at the top of
the TV) and no menu is active, it stays on the
screen for 3 seconds, after the last volume
command or until another command is received in between.
AUTO:
When a WSS (Wide Screen Signalling) signal, which shows the aspect ratio of the picture, is included in the broadcast signal or
the signal from an external device, the TV
automatically changes the ZOOM mode to
16:9 ZOOM mode PANORAMIC or FULL
mode according to the WSS signal.
When the AUTO mode does not function correctly due to poor WSS signal quality or
when you want to change the ZOOM mode,
change to another ZOOM mode manually.
Using the different screen formats
Press the ZOOM button to select the different
modes: Auto, Full, Regular, Panoramic,14:9
Zoom,16:9 Zoom,16:9 Zoom Subtitle
modes. In some modes, press or
button to move the picture up or down.
Note: You can only choose REGULAR and FULL
in PC mode.
FULL:
This uniformly stretches the left and right
sides of a normal picture (4:3 aspect ratio)
to fill the wide TV screen.
EXT Modes
By pressing the AV button you can switch
your TV to EXT modes (except being in Teletext). Pressing this button consecutively will
switch the TV in one of the optional EXT
modes: EXT-1, EXT-2, EXT-2 S, EXT-3,
EXT-4, EXT-4 S and PC.
In order to quit the EXT mode press any digit
or
buttons or
For 16:9 aspect ratio pictures that have been
squeezed into a normal picture (4:3 aspect
ratio), use the FULL mode to restore the picture to its original shape.
REGULAR:
Use to view a normal picture (4:3 aspect ratio) as this is its original shape.
Zoom Modes
Zoom mode can be changed by pressing
Zoom button. You can change the screen
size according to the picture aspect ratio.
Select the optimum one from the following
ZOOM modes.
PANORAMIC:
This stretches the left and right sides of a
normal picture (4:3 aspect ratio) to fill the
screen, without making the picture appear
unnatural.
- 34 ENG-20710W-17MB16P-1895UK-(LT-20DA6SK)-50076128.p65
34
18.10.2005, 08:39
PC Mode
Installation
The top and bottom of the picture are slightly
cut off.
14:9 ZOOM:
This zooms up the wide picture (14:9 aspect
ratio) to the upper and lower limits of the
screen.
Power off both Computer and the TV before
making any connections.
Set your PCs resolution correctly before
connecting to the TV. See the table in page
43 for supported modes.
Use a D-SUB cable to connect the TVs PC
input to the computers RGB output terminal. If you want to listen to the sound from
the computer, use an audio cable to connect
the PC AUDIO IN to the computers sound
output terminal.
3LQ0LQL'6XE&RQQHFWRU
16:9 ZOOM:
This zooms up the wide picture (16:9 aspect
ratio) to the full screen.
Tighten the screws of the Display cable until
the connectors are fastened securely (finger-tighten only).
16:9 ZOOM SUBTITLE:
This zooms up the wide picture (16:9 aspect
ratio) with subtitles to the full screen.
Main Menu in PC mode:
Enter the main menu by pressing the
MENU button on the remote control.
Note:
For 14:9Zoom, 16:9Zoom, 16:9Zoom Subtitle, top and bottom of DTV menu and OSD
will be cut off.
To enjoy with recommended aspect ratio,
please set Zoom size to Auto.
PC Picture Position Menu:
In the Main menu, select PC Picture Position using or button, then enter the
menu by pressing
tons.
/
- 35 ENG-20710W-17MB16P-1895UK-(LT-20DA6SK)-50076128.p65
35
18.10.2005, 08:39
or OK but-
Auto Position
If you shift the picture horizontally or vertically
to an unwanted position, use this item to put
the picture into correct place automatically.
Select Auto position item by using
buttons.
or
Press OK button.
Press MENU button or BACK button to
store the value.
Warning: Auto position adjustment recommended to be done with the full screen image for the proper adjustment.
PC Picture Menu
In the Main menu, select PC Picture using
or button, then enter the PC Picture
menu by pressing / or OK buttons.
Contrast, Bright-1 and Colour Temperature
adjustments in this menu are identical to
adjustments defined in TV picture menu.
R, G, and B adjust the TV image colour in
PC mode. You can change the TV colour to
your desired colour: R (Red), G (Green), B
(Blue)
Horizontal Position
This item shifts the image horizontally to
right hand side or left hand side of the
screen.
Select Hor. Position item by using
button.
Use
or
or button to adjust the value.
Press MENU button or BACK button to
store the value.
Vertical Position
This item shifts the image vertically towards
the top or bottom of the screen.
Select Ver. Position item by using
button.
Use
or
or button to adjust the value.
Press MENU button or BACK button to
store the value.
Dot Clock
Dot Clock adjustments correct interference
that appear as vertical banding in dot intensive presentations like spreadsheets or
paragraphs or text in smaller fonts.
Use
Sound Menu
In the main menu select Sound using
or button then enter the Sound menu by
pressing / or OK buttons.
The items in this menu are described at
Sound menu starting page 29.
PIP Picture
In the Main menu, select PIP Picture using
or button, then enter the PIP Picture menu by pressing / or OK buttons.
This menu is displayed when PIP is displayed on the screen. Otherwise PIP No
Signal message will be displayed at the
bottom of menu.
3,33LFWXUH
&RQWUDVW
or button to adjust the value.
%ULJKW
Clock Phase
&RORXU
6KDUSQHVV
Depending on the resolution and scan frequency that you input to the TV Set, you may
see a muddy or noisy picture on the screen.
In such a case you can use this item to get a
clear picture by trial and error method.
Use
or button to adjust the value.
3,36L]H
3,33RVLWLRQ
5(6(7
PIP picture is displayed on the screen by
button.
- 36 ENG-20710W-17MB16P-1895UK-(LT-20DA6SK)-50076128.p65
36
18.10.2005, 08:39
Contrast, Bright-1, Colour and Sharpness
are described at Picture menu on page 27.
Setting PIP Size
or
Using
button select PIP Size.
Press or button to change PIP size.
Two different PIP sizes are available.
Setting PIP Position
or
Using
tion.
button select PIP Posi-
Press or button to change PIP position.
There are four different PIP positions.
Programme in the PIP window can be
changed by
/
, digit buttons or
AV button. All EXT modes (Except EXT-3) are
also available in PIP window. PIP window is
removed from the screen by button.
When PIP is displayed on the screen,
button allows you to switch sound between
PC and selected PIP source.
No-Signal and Out Of Range
Detection (PC mode)
In PC Mode,as no menu is displayed,in
case that there is no PC input to the TV, it is
displayed an OSD message:
No input signal detected
then the power lamp turns to orange and PC
will switch to PC standby mode. Press AV
/
butbutton, digit buttons or
tons to exit standby mode.
In PC Mode, if the resolution and the vertical
frequency is not supported by the concept, it
is displayed an OSD message:
Signal out of range
Analogue Teletext
Source Menu
In the Main menu, select Source using
or button, then enter the Source
menu by pressing / or OK buttons.
6RXUFH3&
',*,7$/
Teletext is an information system that displays text on your TV screen. Using the Teletext information system you can view a page
of information on a subject that is available
in the list of contents (index).
On screen display is not available in text
mode.
79
(;7
Contrast, brightness or colour control is not
available, but volume control is available in
text mode.
(;7
(;76
(;7
(;7
To operate Teletext
(;76
3&
Select the available sources of DIGITAL, TV,
EXT-1, EXT-2, EXT-2 S, EXT-3, EXT-4, EXT4S or PC using or button and by
pressing / or OK buttons.
Sound in PC mode
Select a TV station on which Teletext is being
transmitted.
Press (TELETEXT)
button. Usually the
list of contents (index) is displayed on the
screen.
Connect the PCs Audio output to the TVs
PC Audio In socket with an audio cable.
On your remote control,using button to
select sound source from TV, EXT-1,
EXT-2, EXT-3, EXT-4, PC and DIGITAL options.
7230(18
- 37 ENG-20710W-17MB16P-1895UK-(LT-20DA6SK)-50076128.p65
37
18.10.2005, 08:39
To select a page of Teletext
Press the appropriate digit buttons for the
required Teletext page number.
The selected page number is displayed at
the top left corner of the screen. The Teletext
page counter searches until the selected
page number is located, so that the desired
page is displayed on the screen.
button to move the Teletext
Press
screen forward one page at a time.
Pressing button again will conceal the
revealed answers.
To Stop Automatic Page Change
The teletext page you have selected may
contain more information than what is on the
screen; the rest of the information will be
displayed after a period of time.
button to stop the automatic
Press
page change.
Press
button to move the Teletext
screen backward one page at a time.
Press
button again to allow the next
page to be displayed.
To Select Index Page
To Select a Subcode Page
To select the page number of the index (generally page 100), press
button.
Subcode pages are subsections of long
Teletext pages that can only be displayed on
the screen one section at a time.
Searching for a teletext page
while watching TV
Select the required Teletext page.
Press
In the Teletext mode pressing button
will switch the screen to the TV mode. In the
TV mode enter a page number using digit
buttons. As you enter last digit of page num sign will replace the page number
ber,
and flash until the entered page number is
found. Then the page number will replace
sign again. Now you can display this
teletext page pressing button.
To Select Double Height Text
Press button for the top half of the information page to be displayed in double
height text.
Press button again for the bottom half
of the information page to be displayed in
double height text.
Press
button once more for the full
page of normal height text.
To Reveal concealed
Information
Pressing
button once will reveal answers on a quiz or games page.
button.
Select the required subcode page number
by pressing four digit buttons (e.g. 0001).
If the selected subcode page is not displayed
in a short time, press
button. TV
programme will be displayed on the screen.
Teletext page number will be displayed on
the upper left corner of the screen when the
selected page is found.
Press
button to display the selected
Teletext page.
To exit Teletext
Press
button. The screen will switch to
TV mode.
Fastext and Toptext
Your TV supports the 7 page Teletext system.
When the page number of any of the 7 pages
in memory is entered, the system will not
search for the requested page; instead it will
display the page automatically.
button to move the Teletext
Press
screen forward one page at a time.
Press
button to move the Teletext
screen backward one page at a time.
- 38 ENG-20710W-17MB16P-1895UK-(LT-20DA6SK)-50076128.p65
38
18.10.2005, 08:39
nect the decoder to the VCR. If not, the T-V
LINK function may not work properly. And
then set the Decoder (EXT-2) function for the
channel to ON to unscramble a scrambled
channel.
For Fastext and Toptext
The subject-heading for the information may
have a particular colour.
Press an appropriate RED, GREEN, YELLOW
or BLUE button in order to reach the relevant
page quickly.
For TOPTEXT
If Toptext transmission is present, colour
coded buttons will appear in status row.
If Toptext transmission is not present, status
row will not appear.
or
comIn Toptext mode the
mands will request the next or previous
page respectively. If Toptext transmission is
not available, in case of operation of these
commands, wraparound occurs. For example page 100 appears to be one greater
than page 199.
Peripheral Equipment
Connections
There is a wide range of audio and video
equipment that can be connected to your TV.
Connection diagrams at the end of this section show you where the different equipment
should be connected at the back side of the
TV.
Via the Euroconnector
Your TV set has 2 Euroconnector sockets. If
you want to connect peripherals (e.g. video,
decoder, etc.) which have Euroconnectors,
to your TV, use EXT-1 or EXT-2 input.
RGB mode
If an equipment can output the RGB signals,
connect it to the EXT-1 or EXT-2 terminal.
EXT-2 S Mode
If the equipment connected to your TV set
supports S-Video (Y/C) output from Euroconnector, you can have a better picture quality
by selecting EXT-2 S mode and connecting
your equipment to the EXT.2 (EXT-2 S) terminal of TV. See your equipments booklet to
check if your equipment has such feature.
Via the RCA jacks
If you have an equipment (such as a Camcorder) which has the RCA jacks, connect it
to the EXT-4 terminal with the video and audio cables.
If you have a device which outputs component video (Y/Pb/Pr), connect it to the EXT-3
terminal with a component video cable and
an audio cable.
Via the ANT (aerial) socket
If your equipment does not have an Euroconnector or RCA jacks, connect it to the TV
with an aerial cable. For details, see the
manual provided with the equipment.
If an external device is connected via Euroconnector sockets TV is switched to AV
mode automatically. In this case if both
sockets are connected, SCART1 has the
precedence.
To store the test signal that comes from the
equipment, see Install Menu on page 30
and store it to the program number 0. You
can watch images from that equipment to
select the program number which you
stored the test signal.
T-V LINK compatible VCR
Decoder
Be sure to connect the T-V LINK compatible
VCR to the EXT.2 terminal. If not, the T-V
LINK function will not work properly.
Cable TV offers you a wide choice of
programmes. Most of them are free, others
are to be paid for by the viewer. This means
that you will need to subscribe to the broadcasting organisation whose programmes
you wish to receive. This organisation will
When connecting a T-V LINK compatible
VCR to the EXT.2 terminal, be sure to con-
- 39 ENG-20710W-17MB16P-1895UK-(LT-20DA6SK)-50076128.p65
39
18.10.2005, 08:39
supply you a corresponding decoder unit to
allow the programmes to be unscrambled.
For further information ask your dealer. See
also the booklet supplied with your decoder.
Connect a decoder with an aerial socket
to the TV
Connect the decoder to the video
recorder
Some video recorders have a special euroconnector for decoder.
Connect a eurocable to the euroconnector of
your decoder and to the special euroconnector of your video recorder. See also the
handbook of your video recorder.
Connect the aerial cable.
Connect a decoder without an aerial
socket to the TV
Connect the decoder to your TV with a
eurocable (RCA Jack Cable) to EXTERNAL
(RCA Jack). When your decoder has a
Euroconnector / RCA Jack you can obtain
better picture quality if you connect a
eurocable (RCA Jack Cable) to EXTERNAL
(RCA Jack).
TV and Video Recorder (VCR)
Connect the Video Recorder to the ANT (antenna input) socket of the TV with the aerial
cable.
Connect the Video Recorder to the EXT-1 or
EXT-2 terminal with the SCART cable, or
connect it to the EXT-4 terminal with the audio
and video cables.
To connect your video recorder to the TV, see
TV and Video Recorder section.
If you want to connect more equipment to
your TV, consult your dealer.
Connecting Headphones
Use the stereo headphone socket on the
right side of your TV, to connect headphones.
Connecting the PC
Connect PC monitor with 15-pin PC cable to
the 15-pin connector on the rear of the computer. For detail installation procedure see
Installation in PC mode.
To connect to S-Video input
NTSC Playback
Connect your camera or camcorder at the
back side of your TV.
Connect a NTSC video recorder to a terminal. Then press AV button to select the corresponding AV mode.
Connect your equipment to the TV via
S-Video input at the back side by using
S-Video cables.
NTSC 3.58/4.43 system is detected automatically in AV mode.
Camera and Camcorder
To connect to the EXT-4 terminal
Connect your camera or camcorder at the
back side of your TV.
Connect your equipment to the TV via VIDEO
(yellow), AUDIO R (red) and AUDIO L (white)
inputs. You should connect the jacks to the
input in the same colour.
- 40 ENG-20710W-17MB16P-1895UK-(LT-20DA6SK)-50076128.p65
40
18.10.2005, 08:39
Peripheral Equipment Connections
9
$
'&,1
%
3&,1387
&
(;7
'
(;7
(
(;7
9
9
9
9
)
$17(11$
*
3&$8',2,1
+
(;7
,
+($'3+21(
-
$8',2287
7(50,1$/
.
&$5'6/27
<
3E
3U
&RPSRQHQW$XGLR,Q5
&RPSRQHQW$XGLR,Q/
69LGHR,Q
9LGHR,Q
$XGLR5
$XGLR/
$XGLR5
$XGLR/
6XEZRRIHU2XW
- 41 ENG-20710W-17MB16P-1895UK-(LT-20DA6SK)-50076128.p65
41
18.10.2005, 08:39
Antenna Connections
2XWGRRU$QWHQQD&RQQHFWLRQV
9+)DQWHQQD
5RXQGRKPFRD[LDOFDEOH
5HDURI79
)ODWRKPWZLQOHDGFDEOH
9+)8+)DQWHQQD
5HDURI79
5RXQGRKPFRD[LDOFDEOH
Peripheral Equipment Connections
HEADPHONE
AUDIO
$8',2,1
/
9,'(2,1
5
VIDEO
,1
,1
$17,1
&$0&25'(5
FOR SATELLITE RECEIVER
DECODER
- 42 ENG-20710W-17MB16P-1895UK-(LT-20DA6SK)-50076128.p65
42
287
18.10.2005, 08:39
287
PC Input Typical Display Modes
The display has a maximum resolution of 1360x768, vertical sync. frequency range of 50-75
Hz and a horizontal sync. frequency range of 30-69 KHz.
The following table is an illustration of some of the typical video display modes.
0RGH
5HVROXWLRQ
+RUL]RQWDO
9HUWLFDO
)UHTXHQF\
+RUN+] 9HU+]
The native resolution of the TFT-LCD Panel is 1366 x 768. Therefore using Mode 15 is advised to get the best PC input display quality.
- 43 ENG-20710W-17MB16P-1895UK-(LT-20DA6SK)-50076128.p65
43
18.10.2005, 08:39
PC Picture
Tips
Can not turn the TV on?
Check that TV/VCR/DVD switch is set to TV
position.
If no PC picture appears, check that the DSUB cable is connected properly. Check that
your PCs resolution set correctly. See
pages 43 for supported modes.
TV may go to stand-by mode when you turn
the TV on soon after you turn the TV off. If you
can turn the TV on again, it is not a problem.
Sound
Can not turn the TV off?
haps interrupt the sound, pressing button? Are external speakers connected to the
TV?
Check that TV/VCR/DVD switch is set to TV
position.
Care of the Screen
Clean the screen with a slightly damp, soft
cloth. Do not use abrasive solvents as they
may damage the TV screen coating layer.
Colours of image on screen are
abnormal
Have you selected the correct TV system? Is
your TV set or house aerial located too close
to the loudspeakers, non-earthed audio
equipment or neon lights, etc. ?
Mountains or high buildings can cause
double pictures or ghost images. Sometimes you can improve the picture quality by
changing the direction of the aerial.
Is the picture or Teletext unrecognisable?
Check if you have entered the correct frequency.
The picture quality may degrade when two
peripherals are connected to the TV at the
same time. In such a case, disconnect one
of the peripherals.
No Image on Display Screen
Is the aerial connected properly? Are the
plugs connected tightly to the aerial socket?
Is the aerial cable damaged? Are suitable
plugs used to connect the aerial? If you are
in doubt, consult your dealer.
No Image means that your TV is not receiving any transmission. Have you pressed the
correct buttons on the remote control? Try
once more.
You can not hear any sound. Did you per-
Sound is coming from only one of the
speakers. Is the balance set to one direction
extreme? See Sound menu.
Remote Control
If your TV no longer responds to the remote
control, perhaps the batteries are exhausted. Replace the batteries.
Have you selected the wrong menu? Press
MENU button to return to normal screen or
press BACK button to return to the previous
menu.
No solution
If the TV suddenly stops responding, disconnect the power cord of the TV from the AC
outlet. Connect themto the AC outlet again to
turn on the TV. If the TV returns to a normal
state, it is not a failure. If this does not work,
switch off, remove the mains plug and call
the service personnel; never attempt to repair it yourself.
Bad picture (in digital mode)
Although this TV can receive both Digital terrestrial broadcasting (DVB-T) and Analogue
terrestrial broadcasting, you may not be able
to receive DVB-T depending on the area in
which you live.
If the picture freezes a lot, or block effect is
seen frequently on screen, probably there is
a problem with your reception.
Please contact customer services of your
service provider if you are a subscriber.
- 44 ENG-20710W-17MB16P-1895UK-(LT-20DA6SK)-50076128.p65
44
18.10.2005, 08:39
Specifications
Item
Model
LT-20DA6SK
Broadcasting Systems
PAL BG, DK, I, L, Lp
Channels and
Digital : 474 MHz - 858 MHz
Frequencies
Analogue : 46.25 MHz - 862.25 MHz
Cable TV
Input Signal
(S1-S20/ S21-S41)
Video: Analog 0,7 Vp-p 75 ohm positive
Sync: TTL Level positive or negative, Seperate sync.
Horizontal Timing
30 - 69 kHz
Vertical Timing
50 - 75 khz
Dot Rate
78,75 MHz max.
Panel Size
20,04 (509 mm) (measured diagonally)
Visible Picture Size
443,61 mm horizontal x 249,41 mm vertical
Display Resolution
1366 x 768 max. (WXGA)
Number of Preset Channels
Analogue: 100
Channel Indicator
On Screen Display (OSD)
RF Aerial Output
75 Ohm (unbalanced)
Power Requirements
Adaptor: 100-240 V AC, 50 Hz / TV: 24 V DC
Power Consumption (W)
80 W (max) / STAND-BY <3W
Sound Systems
German , Nicam Stereo
Audio Output
2 x 5 WRMS. (%10 THD)
EXT-1 Terminal
Euroconnector (21-pin, SCART) (bottom of the TV)
Video Input, Audio L/R Inputs and RGB inputs are available.
TV broadcast outputs (Video and Audio L/R) are available.
EXT-2 Terminal
Euroconnector (21-pin, SCART) (bottom of the TV)
Video Input, S-VIDEO (Y/C) input, Audio L/R and RGB inputs are available.
Video and Audio L/R outputs are available.
T-V LINK functions are available.
EXT-3 Terminal
RCA connectors x 5 (bottom of the cabinet)
Component video (Pr, Pb, Y) inputs and Audio L-R inputs are available
625p/50Hz and 525p/60Hz signals are available.
EXT-4 Terminal
RCA connectors x 3 (side of the cabinet)
S-VIDEO connector x 1 (side of the cabinet)
Video input, S-VIDEO (Y/C) input and Audio L/R inputs are available.
AUDIO OUT Terminal
RCA connectors x 3
Audio L/R output are available.
Subwoofer out is available.
PC IN terminal
Analog RGB D-SUB 15 x 1
PC AUDIO IN terminal
Stereo mini-jack (3.5 mm diameter)
PC signal is available (refer to page 43 for details of the signals which can be input)
Card Slot
Card Slot for the Conditional Access Module (CAM) x1
Dimensions (W x H x D)
537 mm x 414 mm x 214 mm
537 mm x 377 mm x 97 mm (TV only)
Weight
6,5 kg (with stand) / 5,5 kg (TV only)
Accessories
Remote control unit x 1 (RM-C1895) / AA/R6 dry cell battery x 2
AC adapter x 1 / Power cord x 1
Headphone jack
Stereo mini-jack (3.5 mm diameter)
Wall Mount VESA Compatible
Yes. Wall Mount Hole Pitch:100mm×100mm (4 holes)
- 45 ENG-20710W-17MB16P-1895UK-(LT-20DA6SK)-50076128.p65
45
18.10.2005, 08:39
50076128
©2005 Victor Company of Japan, Limited
0205MKH-VT-VT